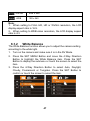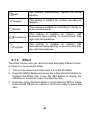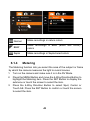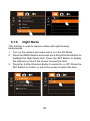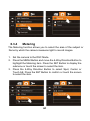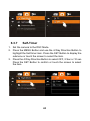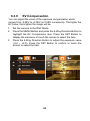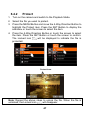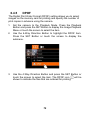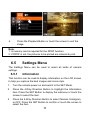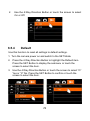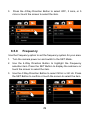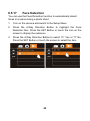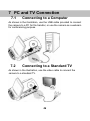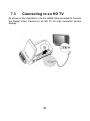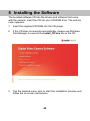
1
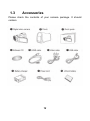
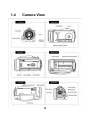
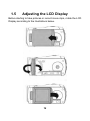
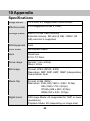
User manual
Microflex 102
Contents
Disclaimer.......................................................................6
Trademark Recognition...............................................6
Federal Communications Commission (FCC)
Compliance ....................................................................6
Declaration of Conformity ..........................................7
Disposal of Waste Equipment by Users in Private
Households in the European Union .........................8
Precautions ....................................................................9
1
General Introduction .............................11
1.1
1.2
1.3
1.4
1.5
2
System Requirements..................................... 11
Features.............................................................. 11
Accessories .......................................................12
Camera View......................................................13
Adjusting the LCD Display.............................14
Getting Started....................................... 15
2.1 Inserting an SD Card .......................................15
2.2 Inserting the Batteries.....................................15
2.3 Charging the Battery .......................................18
2.4 Using the Touchscreen...................................19
2.4.1
Single Touch .............................................19
2.4.2
Scroll..........................................................20
2.4.3
Rotate ........................................................20
1
2.5 Buttons & Functions .......................................21
2.6 About LED Indicators ......................................23
2.7 Initial Settings Before Use .............................23
2.7.1
Setting the Date and Time ......................23
3
LCD Display Information ..................... 25
3.1
3.2
3.3
4
In Movie Clip Mode...........................................25
In Voice Recording Mode ...............................27
In DSC Mode......................................................28
Using the Camera.................................. 30
4.1 Recording Movie Clips....................................30
4.2 Capturing a Still Image from a Movie ..........32
4.3 Capturing a Still Image in Video Mode........33
4.4 Voice Recording ...............................................34
4.5 Movie Clip / Voice Clip Playback ..................35
4.6 Taking / Playing Back Photos .......................37
4.6.1
Taking Photos ...........................................37
4.6.2
Playing Back Photos................................38
5
LCD Display Information ..................... 41
5.1
5.2
5.3
6
Movie Clip Recording Mode...........................41
Voice Recording Mode....................................43
DSC Playback Mode ........................................44
Menu Mode.............................................. 46
6.1
Menu Options in Movie Clip Mode ...............46
2
6.1.1
6.1.2
6.1.3
6.1.4
6.1.5
6.1.6
6.1.7
6.1.8
6.1.9
Video Clip Resolution ..............................46
White Balance ..........................................47
Effect..........................................................48
Metering ....................................................49
Backlight....................................................50
Night Mode................................................51
Motion Detection ......................................52
EV Compensation ....................................53
Multi Shot ..................................................54
6.2 Movie Clip/Voice Playback Menus ...............55
6.2.1
Delete ........................................................55
6.2.2
Protect .......................................................56
6.2.3
Infrared Night Vision ................................57
6.3 Camera Mode Menu Options .........................57
6.3.1
Still Image Resolution..............................57
6.3.2
White Balance ..........................................58
6.3.3
Effect..........................................................59
6.3.4
Metering ....................................................60
6.3.5
Backlight....................................................61
6.3.6
Night Mode................................................61
6.3.7
Self-Timer..................................................62
6.3.8
Continuous Shot.......................................63
6.3.9
EV Compensation ....................................64
6.4 Playback Menus................................................65
6.4.1
Delete ........................................................65
6.4.2
Protect .......................................................67
3
6.4.3
6.4.4
6.4.5
Autoplay ....................................................68
Rotate ........................................................69
DPOF.........................................................70
6.5 Settings Menu ...................................................71
6.5.1
Information ................................................71
6.5.2
Date / Time................................................72
6.5.3
Beep...........................................................72
6.5.4
Default .......................................................73
6.5.5
TV Standard..............................................74
6.5.6
USB............................................................75
6.5.7
Auto Power Off .........................................75
6.5.8
Frequency .................................................76
6.5.9
Language ..................................................77
6.5.10 Format .......................................................78
6.5.11 File Number (Default: Series).................79
6.5.12 LCD Brightness ........................................80
6.5.13 Instant Review..........................................81
6.5.14 Memory .....................................................82
6.5.15 Volume.......................................................83
6.5.16 Start-Up Logo ...........................................84
6.5.17 Face Detection .........................................85
7
PC and TV Connection......................... 86
7.1
7.2
7.3
Connecting to a Computer.............................86
Connecting to a Standard TV ........................86
Connecting to an HD TV .................................87
4
8
Installing the Software ......................... 88
9
Editing Software .................................... 89
10
Appendix ................................................. 90
Specifications ..............................................................90
Troubleshooting..........................................................92
Customer Care.............................................................94
5
This manual is designed to assist you in using your new AgfaPhoto
digital video camera. All information presented is as accurate as
possible but is subject to change without notice.
Disclaimer
This manual contains proprietary information protected by copyright.
All rights are reserved. No part of this manual may be reproduced by
any mechanical, electronic or other means, in any form, without prior
written permission of the manufacturer. © Copyright 2009
Trademark Recognition
Windows 98/2000/ME/XP are registered trademarks of Microsoft
Corporation in the United States and/or other countries. Windows is
an abbreviated term referring to the Microsoft Windows Operating
System. YouTube is a brand of Google, Inc. and YouTube, LLC,
Mountain View, California, US. All other companies or product names
are trademarks or registered trademarks of their respective
companies.
Federal Communications Commission
(FCC) Compliance
This equipment has been tested and found to comply with the limits
for a Class B digital device, pursuant to Part 15 of the FCC Rules.
These limits are designed to provide reasonable protection against
harmful interference in a residential installation. This equipment
generates, uses, and can radiate radio frequency energy and, if not
installed and used in accordance with the instructions, may cause
harmful interference to radio communications. However, there is no
guarantee that interference will not occur in a particular installation.
If this equipment does cause harmful interference to radio or
6
television reception, which can be determined by turning the
equipment off and on, the user is encouraged to try to correct the
interference by one or more of the following measures:
• Reorient or relocate the receiving antenna.
• Increase the distance between the equipment and the receiver.
• Connect the equipment to an outlet on a circuit different from that
to which the receiver is connected.
• Consult the dealer or an experienced radio/TV technician for
help.
Warning: A shielded-type power cord is required in order to meet
FCC emission limits and to prevent interference to radio and
television reception. Use only a shielded cable to connect I/O devices
to this equipment. Any changes or modifications not expressly
approved by the manufacturer may void your warranty and service
agreement.
Declaration of Conformity
This device complies with Part 15 of the FCC rules.
Operation is subject to the following conditions:
• This device may not cause harmful interference.
• This device must accept any interference received, including
interference that may cause undesired operation.
7
Disposal of Waste Equipment by Users in
Private Households in the European
Union
This symbol on the product or on its packaging indicates that this
product must not be disposed of with your other household waste.
Instead, it is your responsibility to dispose of your waste equipment
by handing it in to a designated collection point for the recycling of
waste electrical and electronic equipment.
The separate collection and recycling of your waste equipment at
the time of disposal will help to conserve natural resources and
ensure that it is recycled in a manner that protects human health and
the environment. For more information about where you can drop off
your waste equipment for recycling, please contact your local city
office, your household waste disposal service or the shop where you
purchased the product.
8
Precautions
General precautions
•
•
•
•
•
•
•
•
•
Do not try to disassemble the product yourself, which may
damage the product or cause electric shock.
Keep the camera away from children and animals to prevent
them from swallowing the batteries or small accessories.
Stop using the camera if any kind of liquid or foreign object
enters it. If this happens, power off the camera and contact
your dealer for help.
Do not operate the camera with wet hands: this may cause
electric shock.
The camera may be damaged in a high-temperature
environment. This camera is designed for use in a temperature
range of between 0°C and 40°C (32°F and 104°F).
Do not use or store the product in a dusty, dirty or sandy place
or in an area that is close to air-conditioning or heaters.
It is normal that the temperature of the camera body rises if the
camera is in operation for a long period of time.
Do not open the battery cover whilst an image is being
recorded. Doing so will not only make storage of the current
image impossible, but it may also corrupt other image data
already stored.
Before using this camera for important occasions (such as
weddings or overseas trips), be sure to test it in order to ensure
proper operation.
9
Power Supply
•
•
•
•
•
Be sure to use the type of battery or battery charger that is
suitable for this camera. Using any other type of battery or
battery charger may damage the equipment and render the
guarantee void.
Make sure the batteries are placed in the correct position.
Error in the orientation of batteries may damage this product
and result in fire.
Remove the batteries to avoid leakage of battery fluid when the
camera is not to be used for a long period of time.
Remove a dropped or damaged battery immediately to avoid
leakage of battery fluid or abnormal expansion.
This camera uses either a lithium battery or 2 AA batteries. We
recommend the use of a lithium battery for a longer operating
time.
10
1 General Introduction
Please read this chapter carefully to understand the features and
functions of this AgfaPhoto Microflex 102. This chapter also includes
a description of system requirements, package contents and
hardware components.
1.1
System Requirements
In order to get the most out of your camera, your computer must
meet the following system requirements:
•
Windows® Vista / XP / 2000 operating system or Mac OS 10.3
~10.4
•
Intel® Pentium 4 2.8 GHz CPU or equivalent
•
Memory: at least 512 MB RAM
•
Standard USB 1.1 connection port or higher
•
Display adapter with min. 64MB
Note:
USB 1.1 allows you to transmit files to the host, but using a USB 2.0
connection port will increase transmission speed greatly.
1.2
Features
This AgfaPhoto camera has many features and functions including:
•
5 Megapixel CMOS
•
High-resolution camera (maximum 16 million pixels)
•
3.0-inch touch screen
•
2 SD card slots
•
Slow Motion Playback
•
Still image capture from a movie
•
Still image capture in Video Mode
•
Infrared Night Vision
In addition, this video camera has a USB mass storage hard disk,
and SD card reader.
11
1.3
Accessories
Please check the contents of your camera package. It should
contain:
12
1.4
Camera View
13
1.5
Adjusting the LCD Display
Before starting to take pictures or record movie clips, rotate the LCD
Display according to the illustrations below.
14
2 Getting Started
Expand your camera’s storage by using SD or SDHC memory cards.
2.1
Inserting an SD Card
Insert an SD card with the label facing upwards
.
Note: Do not remove or insert an SD card when the camera is
powered on to avoid damaging files.
2.2
Inserting the Batteries
Use only the batteries provided or recommended by the
manufacturer or dealer.
15
Note: Insert the batteries properly according to the description
below. Inserting the batteries incorrectly could result in
non-repairable damage to the camera.
How to open the battery cover.
Battery Status Indicator:
Battery full
Battery half full
Battery empty
Insert the Lithium-ion battery / 2 AA batteries according to the
illustration.
16
*Important:
Use the supplied lithium-ion battery when using the Infrared Night
Vision function. This function is not supported when using AA
batteries.
1. Close the battery cover.
17
2.3
Charging the Battery
You can use the supplied battery charger to charge the lithium battery.
18
2.4
Using the Touchscreen
2.4.1
Single Touch
The single touch function acts as a hotkey menu to adjust basic
settings directly on the display:
1. Mode change to DV = Digital Video, DSC = Digital Still Camera
and Voice Recording
2. Resolution change to FULL HD, HD, WVGA, WEB or 16M, 8M,
5M, 3M
19
2.4.2
Scroll
Scroll right or left to view the previous file or next file in Playback
Mode.
2.4.3
Rotate
In Playback Mode you can rotate the image in 90° steps as shown
below.
20
2.5
Description
Power
Button
Menu
Button
Buttons & Functions
Button
Function
Press the Power Button to turn the
camera ON/OFF.
Press the Menu Button to display the
main OSD (On Screen Display) menu.
There are three operating Modes for
the camera:
Mode
Button
•
DV Mode
•
DSC Mode and
•
Voice Recording Mode.
Press the Mode Button to change to
the different Modes.
SET (Menu)
Button
Playback
Button
Press to confirm the different function
settings
Press the Playback Button to enter
Playback Mode and play back the last
file
21
4-Way
Direction
Button
The 4-Way Direction Button allows
you to access the various menus
available from the OSD.
•
In DSC Mode:
press the 4-Way Navigation Button UP
to turn the flash light Mode options
on/off: off, auto, fill-in;
•
In DV Mode:
press the 4-Way Navigation Button UP
to turn the Infrared Night Vision on/off
•
In Playback:
press the 4-Way Navigation Button
DOWN to delete a file.
Recording
Button
Press the Recording Button to take
movie clips and for voice recording.
Press the Recording Button again to
stop recording.
Shutter
Button
Press the Shutter Button to take still
images.
Zoom
Button
This camera is equipped with a 4X
digital zoom function. Please note that
the 4x digital zoom is supported in
720P or lower video resolutions. Press
the Zoom Button Right (T) to zoom
into the subject, or Left (W) to zoom
out from the subject
Macro
Button
The Macro function allows you to
shoot very close-up images of an
object. In the Macro Mode, you can
zoom in the focusing distance to 20
cm (normal focus range: 1.2m ~
infinity). The
icon will be displayed
22
on the LCD screen when the Macro
Mode is selected.
2.6
About LED Indicators
The following table describes the meaning of the camera's LED
indicators:
Indicator Color
Power
Definition
Green
Powering on.
Red blinking
Flash charging.
Recording
Red blinking
Recording
Self-timer
Red blinking
Start of Self-timer.
2.7
Initial Settings Before Use
2.7.1
Setting the Date and Time
.
1. When powering on for the first time, set the camera to the SET
Mode. Select the date and time by moving the Up/Down Button
or touching the screen to select.
23
2.
Press the 4-Way Direction Button left/right to highlight each
column. Then press up/down or touch the screen to select the
column.
3.
Press the 4-Way Direction Button up/down to adjust the value.
Press the SET Button to save the value you have changed or
touch the screen to adjust the Year, Date and Time before
pressing the Return Button (
) to save the value and exit the
setting.
24
3 LCD Display Information
The high resolution 3.0” touchscreen display indicates all the
important information on the camera settings as well as the visual
image of your photo or video.
3.1
In Movie Clip Mode
The following illustration shows the LCD display layout and icon
description in the DV Mode (
).
1
Movie Clip recording icon
2
Motion Detection
3
Night Mode
25
4
Exposure compensation
5
Color effect settings
6
Metering settings
7
Current memory for recording
: SD card 1
: SD card 2
: Internal memory (appears when there is
no SD card inserted)
8
Compensation indicator
9
Indicates macro is enabled
10
White balance settings
11
Battery level
12
00:00:00
Remaining recording time
13
Histogram indicator (graphical brightness
distribution)
14
Playback Mode
15
Zoom
16
Indicates a menu button
17
Infrared Button (on, off)
26
18
Current resolution
19
Multi shot function
3.2
In Voice Recording Mode
The following illustration shows the LCD display layout and icon
description in the Voice Recording Mode ( ).
1
Voice Recording Mode
2
Current memory for recording
: SD card 1
: SD card 2
: Internal memory (displayed when there
is no SD card inserted)
3
Battery level
4
00:00:00
Play time
27
5
Playback Button
6
Menu Button
3.3
In DSC Mode
The following illustration shows the LCD display layout and icon
description in the DSC Mode ( ).
1
DSC Mode indicator
2
Night Mode (captures images with night
scenery background).
3
EV compensation
4
Color Effect
5
Metering settings
6
Current memory for recording
: SD card 1 indicator
28
: SD card 2 indicator
: Internal memory (displayed when there
is no SD card inserted)
7
Backlight compensation
8
Indicates macro is enabled
9
White balance settings
10
Battery level
11
0000
Remaining shots available.
12
Histogram (graphical brightness distribution)
13
Playback Button
14
Zoom
15
Menu Button
16
Flash settings (off, auto, fill-in)
17
Resolution settings
18
Continuous Shot Mode
19
Self-timer indicator
29
4 Using the Camera
4.1
Recording Movie Clips
1.
Set the camera to DV Mode: this is the default setting after you
power on the camera.
2.
Press the Recording Button to start and stop recording.
3.
The camera will store the video clip automatically.
DV Mode Indicator
4.
The LCD screen ratio will be different depending on the video
clip resolution setting. Please refer to the table shown below:
30
Video Resolution
Preview
16:9 ratio
FULL HD (1920 x 1080)
HD (1280 x 720)
WVGA (848 x 480)
4:3 ratio
WEB (320 x 240)
31
4.2
Capturing a Still Image from a
Movie
You can save a selected frame from a recorded movie as a still
image. Select the video clip and press the Shutter Button at the
frame you want.
1.
2.
3.
4.
Set the camera to DV Mode
Press the Recording Button to start or stop video recording.
While recording videos, still images can be taken by pressing the
shutter Button.
The camera will store the image automatically.
Image resolution
FULL HD
HD
1920 x 1080
1280 x 720
WVGA
848 x 480
WEB
320 x 240
Note:
The image size is fixed depending on the image quality of the video
clip.
32
1. When setting to FULL HD, HD or WVGA resolution, the LCD
display aspect ratio is 16:9.
2. When setting to WEB video resolution, the LCD display aspect
ratio is 4:3.
4.3
Capturing a Still Image in Video
Mode
You can save a selected frame in Video Mode as a still image. Press
the Shutter Button at the preview image frame you want to save.
You can also do this while recording a video clip.
1.
2.
Press the Shutter Button in the movie clip during playback.
The camera will store the image automatically.
Image resolution
FULL HD
HD
1920 x 1080
1280 x 720
WVGA
848 x 480
WEB
320 x 240
33
Note:
The image size is fixed depending on the image quality of the video
clip.
1. When setting to FULL HD, HD or WVGA resolution, the LCD
display aspect ratio is 16:9.
2. When setting to WEB video resolution, the LCD display aspect
ratio is 4:3.
4.4
Voice Recording
1. Turn the camera on.
2. Press the MODE Button to enter the Voice Recording Mode or
touch the screen hotkey.
3. Press the Recording Button to start or stop Voice Recording.
Voice Recording Mode
34
4.5
1.
Movie Clip / Voice Clip Playback
In Movie/Voice Recording Mode, press the Playback Button to
display recently stored files on the LCD screen.
Playback
Playback Mode indicator
Playback Mode indicator
35
2. Press the 4-Way Direction Button up/down or left/right to view
the stored file. Press the SET Button to play back or touch the
screen to select Playback of the file.
3.
To pause Playback of the file, press the Recording Button or
touch the (
) screen icon.
4.
Press the Playback Button to return to Movie/Voice Recording
Mode.
5.
You can also play back the movie clip at a different speed by
touching the (
) screen icon ON/OFF.
36
Playback speed is as below when
Slow Motion is ϘOFFϙ:
Rewind
Rewind
Rewind
Rewind
2X play
4X play
8X play
16X play
Forward
Forward
Forward
Forward
Playback speed is as below when
Slow Motion is “ON”:
Rewind
Rewind
Rewind
Rewind
1/2X play
1/4X play
1/8X play
1/16X play
Forward
Forward
Forward
Forward
4.6
Taking / Playing Back Photos
4.6.1
Taking Photos
1. Set the camera to the DSC Mode.
2. Press the Shutter Button to capture images.
37
DSC Mode indicator
4.6.2
Playing Back Photos
1. Set the camera to the DSC Mode and press the Playback Button
to display the images on the LCD screen.
38
Playback
Playback Mode Indicator
2. Press the 4-Way Direction Button up/down or left/right to view
the saved files. Press the SET Button to replay or touch the
screen to play back.
3.
Press the SET Button or touch the screen to return to full screen
to view images.
39
4.
or
) panel icon to enlarge or shrink the
Touch the (
image. You can then move the image up/down or left/right.
5.
Press the Playback Button again to return to the DSC Mode.
40
5 LCD Display Information
5.1
Movie Clip Recording Mode
Please refer to the following table showing the description of each
icon and symbol.
Indicates current Mode - Playback Mode
1
2
000-0000
Indicates folder and file number
3
Indicates protected file
4
Memory Status indicator
: SD card 1 indicator;
: SD card 2 indicator
: Internal memory indicator (displayed
when there is no SD card)
5
Indicates battery level
6
00:00:00
Indicates played time
41
7
Sound volume touch icons
8
Return Button
9
Indicates fast forward Playback Button
10
Playback/Pause Button
11
Fast rewind Playback Button
12
Menu Button
13
Resolution indicator
14
Slow motion Playback
42
5.2
Voice Recording Mode
Please refer to the following table showing the description of each
icon and symbol.
1
2
Playback Mode icon
000-0000
Indicates folder and file number
3
Indicates protected file
4
Memory Status indicator
: SD card 1 indicator;
: SD card 2 indicator
: Internal memory indicator (displayed
when there is no SD card)
5
Indicates battery level
6
7
00:00:00
Indicates played time
Sound volume touch icons
8
Return Button
9
Playback/Pause Button
10
Menu Button
43
5.3
DSC Playback Mode
Please refer to the following illustration to familiarize yourself with
icons and symbols of the DSC Playback Mode.
1
Image Playback Mode icon
2
DPOF (Digital Print Order Format)
indicator; the files is marked for printing
3
Exposure compensation indicator
4
Indicates the protected file
5
Memory Status indicator
: SD card 1 indicator;
: SD card 2 indicator
: Internal memory indicator (displayed
when there is no SD card)
44
6
Displays white balance settings
7
Indicates battery level
8
000-0000
Indicates file number
9
Return Button
10
Zoom- In indicator
11
Zoom- Out indicator
12
Menu Button
13
Resolution indicator
45
6 Menu Mode
When a menu screen is displayed, the MENU Button is used to
move through the highlighted items in the submenu or to select a
menu item.
6.1
Menu Options in Movie Clip Mode
Set your camera to Movie Clip Mode and press the MENU Button to
show the Movie options menu.
6.1.1
Video Clip Resolution
1. Set the camera to the DV Mode.
2. Press the MENU Button and press the 4-Way Direction Button to
highlight the Resolution item. Press the SET Button to display
the submenu or touch the screen to select the item.
3. Press the 4-Way Direction Button to select FULL HD, HD,
WVGA or WEB. Press the SET Button to confirm or touch the
screen to select the item.
FULL HD
HD
1920 x 1080
1280 x 720
46
WVGA
848 x 480
WEB
320 x 240
Note:
1. When setting to FULL HD, HD or WVGA resolution, the LCD
display aspect ratio is 16:9.
2. When setting to WEB video resolution, the LCD display aspect
ratio is 4:3.
6.1.2
White Balance
The White Balance function allows you to adjust the camera setting
according to the white light.
1. Turn on the camera and make sure it is in the DV Mode.
2. Press the SET MENU Button and move the 4-Way Direction
Button to highlight the White Balance item. Press the SET
Button to display the submenu or touch the screen to select the
item.
3. Press the 4-Way Direction Button to select Auto, Daylight,
Cloudy, Fluorescent or Tungsten. Press the SET Button to
confirm or touch the screen to select the item.
47
Auto
The camera automatically adjusts the white
balance.
Daylight
This setting is suitable for outdoor recording in
daylight.
Cloudy
This setting is suitable for recording in cloudy or
shady environments.
Fluorescent
This setting is suitable for indoors with
fluorescent lamp lighting, or environments with
high color temperatures.
Tungsten
This setting is suitable for indoors with
incandescent lamp lighting, or environments with
low color temperatures.
6.1.3
Effect
The effect function lets you record movies and apply different colors
or tones for a more artistic effect.
1. Turn on the camera and make sure it is in the DV Mode.
2. Press the MENU Button and press the 4-Way Direction Button to
highlight the Effect item. Press the SET Button to display the
submenu or touch the screen to select the item.
3. Press the 4-Way Direction Button to select Normal, B/W or Sepia.
Press the SET Button to confirm or touch the screen to select the
item.
48
Normal
Make recordings in nature colors
B&W
Make recordings in B&W (Black and White)
colors
Sepia
Make recordings in Sepia-toned colors
6.1.4
Metering
The Metering function lets you select the area of the subject or frame
by which the camera measures the light to record movies.
1.
Turn on the camera and make sure it is in the DV Mode.
2.
Press the MENU Button and move the 4-Way Direction Button to
highlight the Metering item. Press the SET Button to display the
submenu or touch the screen to select the item.
3.
Press the 4-Way Direction Button to select Spot, Center or
Touch AE. Press the SET Button to confirm or touch the screen
to select the item.
49
Spot
This setting is to ensure correct exposure for the
object even if the background is very bright or
very dark.
Center
Use this setting to preserve background details
whilst letting the lighting conditions at the center
of the frame define the exposure.
Touch AE
Tap this item to correct exposure.
6.1.5
Backlight
1.
Turn on the camera and make sure it is in the DV Mode.
2.
Press the MENU Button and move the 4-Way Direction Button to
highlight the Backlight item. Press the SET Button to display the
submenu or touch the screen to select the item.
3.
Press the 4-Way Direction Button to select On or Off. Press the
SET Button to confirm or touch the screen to select the item.
50
6.1.6
Night Mode
This function is used to capture videos with night scenery
backgrounds.
1. Turn on the camera and make sure it is in the DV Mode.
2. Press the MENU Button and press the 4-Way Direction Button to
highlight the Night Mode item. Press the SET Button to display
the submenu or touch the screen to select the item.
3. Press the 4-Way Direction Button to select On or Off. Press the
SET Button to confirm or touch the screen to select the item.
51
6.1.7
Motion Detection
When the Motion Detection function is turned on, the camera will
detect any movement for Movie Clip recording without human
intervention. When the AE variation is detected, recording will start
immediately.
1.
Turn on the camera and make sure it is in the DV Mode.
2.
Press the MENU Button and move the 4-Way Direction Button
to highlight the Motion Detection item. Press the SET Button to
display the submenu or touch the screen to select the item.
3.
Press the 4-Way Direction Button to select On or Off. Press the
SET Button to confirm or touch the screen to select the item.
52
6.1.8
EV Compensation
EV stands for Exposure Value. In difficult lighting condition, the auto
exposure function of your camera may be misled into giving the
wrong readings. You can adjust the value of the exposure
compensation which ranges from -2.0EV to +2.0EV (in 0.5EV
increments). The higher the EV value, the brighter the image will be.
1. Turn on the camera and make sure it is in the DV Mode.
2. Press the MENU Button and move the 4-Way Direction Button to
highlight the EV Compensation item. Press the SET Button to
display the submenu or touch the screen to select the item.
3. Press the 4-Way Direction Button to adjust the Exposure value
(-2.0 ~ + 2.0). Press the SET Button to confirm or touch the
screen to select the item.
53
6.1.9
Multi Shot
1.
Turn on the camera and make sure it is in the DV Mode.
2.
Press the MENU Button and press the 4-Way Direction Button
to highlight the Multi shot item. Press the SET Button to display
the submenu or touch the screen to select the item.
3.
Press the 4-Way Direction Button to select On or Off. Press the
SET Button to confirm or touch the screen to select the item.
Image resolution
FULL HD
HD
1920 x 1080
1280 x 720
WVGA
848 x 480
WEB
320 x 240
Note: The image size is fixed depending on the image quality of the
video clip.
1. When setting to FULL HD, HD or WVGA resolution, the LCD
display aspect ratio is 16:9.
2. When setting to WEB video resolution, the LCD display aspect
ratio is 4:3.
54
6.2
Movie Clip/Voice Playback Menus
6.2.1
.
Delete
The delete function allows you to remove unwanted files.
1. Turn on the camera and make sure it is in the Movie Clip/Voice
Playback Mode.
2. Press the MENU Button and move the 4-Way Direction Button to
highlight the Delete item. Press the SET Button to display the
submenu or touch the screen to select the item.
3. Use the 4-Way Direction Button to select Delete One or Delete
All. Press the SET Button to confirm or touch the screen to select
the item.
4.
Press the 4-Way Direction Button to select “O” Yes or “X” No.
Press the SET Button to confirm or touch the screen to select
the item.
55
Delete One
Delete the current file
Delete All
Delete all files
Note: Files cannot be retrieved once deleted. Therefore please
make sure you have backed up the files before deleting. Protected
files cannot be deleted. To delete these, you must first unlock the
file.
6.2.2
Protect
The Protect function allows you to lock video or audio files.
1.
Turn on the camera and make sure it is in the Movie Clip/Voice
Playback Mode.
2.
Press the MENU Button and move the 4-Way Direction Button
to highlight the protected item. Press the SET Button to display
the submenu or touch the screen to select the item.
3.
Use the 4-Way Direction Button to select Lock One, Lock All,
Unlock One or Unlock All. Press the SET Button to confirm or
touch the screen to select the item.
56
Protect Lock
Note:
To unlock a protected file, repeat the above steps. When the file is
no longer protected, the Locked icon
will disappear.
6.2.3
Infrared Night Vision
This function provides users with incredible vision in total darkness
and the improvement of vision in low light environments.
The function is supported under Video Mode only. Range: < 1.5m
6.3
Camera Mode Menu Options
6.3.1
Still Image Resolution
57
1. Set the camera to the DSC Mode.
2. Press the MENU Button and move the 4-Way Direction Button to
highlight the Resolution item. Press the SET Button to display
the submenu or touch the screen to select the item.
3. Press the 4-Way Direction Button to select 16M, 8M, 5M or 3M.
Press the SET Button to confirm or touch the screen to select
the item.
16M
4608 x 3456 pixels (Interpolation)
8M
3200 x 2400 pixels (Interpolation)
5M
2592 x 1944 pixels
3M
2048 x 1536 pixels
6.3.2
White Balance
The White Balance function allows you to adjust the camera setting
according to the white light when recording still images.
1.
Set the camera to the DSC Mode.
2. Press the MENU Button and move the 4-Way Direction Button to
highlight the White Balance item. Press the SET Button to
display the submenu or touch the screen to select the item.
58
3. Use the 4-Way Direction Button to select Auto, Daylight, Cloudy,
Fluorescent or Tungsten. Press the SET Button to confirm or
touch the screen to select the item.
6.3.3
Effect
The Effect function allows you to take standard color images, Black
& White or Sepia color tone images.
1. Set the camera to the DSC Mode.
2. Press the MENU Button and move the 4-Way Direction Button to
highlight the Effect item. Press SET Button to display the
submenu or touch the screen to select the item.
3. Use the 4-Way Direction Button to select Normal, B/W or Sepia.
Press the SET Button to confirm or touch the screen to select the
item.
59
6.3.4
Metering
The Metering function allows you to select the area of the subject or
frame by which the camera measures light to record images.
1. Set the camera to the DSC Mode.
2. Press the MENU Button and move the 4-Way Direction Button to
highlight the Metering item. Press the SET Button to display the
submenu or touch the screen to select the item.
3. Press the 4-Way Direction Button to select Spot, Center or
Touch AE. Press the SET Button to confirm or touch the screen
to select the item.
60
6.3.5
Backlight
1. Turn on the camera and make sure it is in the DSC Mode.
2. Press the MENU Button and move the 4-Way Direction Button to
highlight the Backlight item. Press the SET Button to display the
submenu or touch the screen to select the item.
3. Press the 4-Way Direction Button to select ON or OFF. Press
the SET Button to confirm or touch the screen to select the item.
6.3.6
Night Mode
1.
Set the camera to the DSC Mode.
2.
Press the MENU Button and move the 4-Way Direction Button
to highlight the Night Mode item. Press the SET Button to
display the submenu or touch the screen to select the item.
3.
Press the 4-Way Direction Button to select On or Off. Press the
SET Button to confirm or touch the screen to select the item.
61
6.3.7
Self-Timer
1. Set the camera to the DSC Mode.
2. Press the MENU Button and use the 4-Way Direction Button to
highlight the Self-timer item. Press the SET Button to display the
submenu or touch the screen to select the item.
3. Press the 4-Way Direction Button to select OFF, 2 Sec or 10 sec.
Press the SET Button to confirm or touch the screen to select
the item.
62
2 sec. Self-timer:
The image will be taken 2 seconds after the shutter is released.
10 sec. Self-timer:
The image will be taken 10 seconds after the shutter is
released.
6.3.8
Continuous Shot
You can continuously record three pictures using this function,
started by pressing and holding the Shutter Button and ending
automatically after taking the third picture.
1.
Set the camera to the DSC Mode.
2.
Press the MENU Button and press the 4-Way Direction Button
to highlight the Continuous Shot item. Press the SET Button to
display the submenu or touch the screen to select the item.
3.
Press the 4-Way Direction Button to select OFF or ON. Press
the SET Button to confirm or touch the screen to select the item.
63
6.3.9
EV Compensation
You can adjust the value of the exposure compensation which
ranges from -2.0EV to +2.0EV (in 0.5EV increments). The higher the
EV value, the brighter the image will be.
1.
Set the camera to the DSC Mode.
2.
Press the MENU Button and press the 4-Way Direction Button to
highlight the EV Compression item. Press the SET Button to
display the submenu or touch the screen to select the item.
3.
Press the 4-Way Direction Button to adjust the exposure value
(-2.0 ~ +2.0). Press the SET Button to confirm or touch the
screen to select the item.
64
6.4
Playback Menus
6.4.1
Delete
Use this function to delete files.
1.
Set the camera to the Playback Mode.
2.
Press the MENU Button and press the 4-Way Direction Button
down or touch the screen to select the file to be deleted or to
delete all files.
3.
Press the 4-Way Direction Button or touch the screen to select
“Delete One” or “Delete All” to display the submenu.
65
4. Press the 4-Way Direction Button or touch the screen to select
“O” Yes or “X” No and press the SET Button to delete file(s).
Note: Files cannot be retrieved once deleted. Therefore please
make sure you have backed up the files before deleting. Protected
files cannot be deleted. To delete these, you must first unlock the
file.
66
6.4.2
Protect
1. Turn on the camera and switch to the Playback Mode.
2. Select the file you want to protect.
3. Press the MENU Button and move the 4-Way Direction Button to
highlight the Protect item. Press the SET Button to display the
submenu or touch the screen to select the item.
4. Press the 4-Way Direction Button or touch the screen to select
the item. Press the SET Button or touch the screen to confirm.
The Locked icon
will be displayed to indicate the file is
protected.
Protect Lock
Note: Repeat the above steps to unlock the file. When the file is
unlocked, the Locked icon
will disappear.
67
6.4.3
Autoplay
You can set the camera to display images in a slide show at a
regular interval.
1. Set the camera to the Playback Mode.
2. Press the MENU Button and move the 4-Way Direction Button to
select Autoplay. Press the SET Button to display the submenu or
touch the screen to select the item.
3. Press the 4-Way Direction Button or touch the screen to select
"Off", "1sec" or "3 sec". The images will be displayed
automatically.
68
6.4.4
Rotate
1.
Set the camera to the Playback Mode.
2.
Use the 4-Way Direction Button to highlight the Rotate item and
press the SET Button or touch the screen to select Left 90º or
Right 90º.
69
6.4.5
DPOF
The Digital Print Order Format (DPOF) setting allows you to select
images on the memory card for printing and specify the number of
print copies in advance using the camera.
1.
Set the camera to the Playback Mode. Press the Playback
Button and press the SET Button to display the Image Playback
Menu or touch the screen to select the item.
2.
Use the 4-Way Direction Button to highlight the DPOF item.
Press the SET Button or touch the screen to display the
submenu.
3.
Use the 4-Way Direction Button and press the SET Button or
touch the screen to select the item. The DPOF icon
will be
shown to indicate the files that are ordered for printing.
70
4.
Press the Playback Button or touch the screen to exit the
image.
Note:
1. A memory card is required for the DPOF function.
2. If DPOF is set, the pictures to be printed are ordered to print.
6.5
Settings Menu
The Settings Menu can be used to select all kinds of camera
settings.
6.5.1
Information
This function can be used to display information on the LCD screen
to help you capture the best images and movie clips.
1.
Turn the camera power on and switch to the SET Mode.
2.
Press the 4-Way Direction Button to highlight the Information
item. Press the SET Button to display the submenu or touch the
screen to select the item.
3.
Press the 4-Way Direction Button to select Normal, Histogram,
or OFF. Press the SET Button to confirm or touch the screen to
select the item.
71
6.5.2
Date / Time
Please refer to 2.7.1, 'Setting the Date and Time' on page 23.
6.5.3
1.
Beep
Turn the camera power on and switch to the SET Mode. Press
the 4-Way Direction Button up or down to highlight the Beep and
press the SET Button to confirm or touch the screen to select.
72
2.
Use the 4-Way Direction Button or touch the screen to select
On or Off.
6.5.4
Default
Use this function to reset all settings to default settings.
1. Turn the camera power on and switch to the SET Mode.
2. Press the 4-Way Direction Button to highlight the Default item.
Press the SET Button to display the submenu or touch the
screen to select the item.
3. Use the 4-Way Direction Button or touch the screen to select “O”
Yes or “X” No. Press the SET Button to confirm or touch the
screen to select the item.
73
6.5.5
TV Standard
Use the TV standard to set the TV system for your area.
1. Turn the camera power on and switch to the SET Mode.
2.
Use the 4-Way Direction Button to highlight the TV standard item.
Press the SET Button to display the submenu or touch the
screen to select the item.
3.
Use the 4-Way Direction Button to select NTSC or PAL. Press
the SET Button to confirm or touch the screen to select the item.
TV out standard setting reference
NTSC
USA, Canada, Japan, Korea, Taiwan, Mexico
PAL
Australia, Austria, Belgium, China, Denmark,
Finland, Germany, UK, Italy, Kuwait, Malaysia,
New Zealand, Singapore, Spain, Sweden,
Switzerland, Thailand, Norway
74
6.5.6
USB
This setting is for the USB output function. You can select an
external device to connect the camera to using the supplied USB
cable.
1.
Turn the camera power on and switch to the SET Mode.
2. Press the 4-Way Direction Button to highlight the USB item.
Press the SET Button to display the submenu or touch the
screen to select the item.
3. Use the 4-Way Direction Button to select PC Camera or Mass
Storage. Press the SET Button to confirm or touch the screen to
select the item.
6.5.7
Auto Power Off
This function can be used to turn the Digital Video Camera off
automatically after not using it for a period of time.
1.
Turn the camera power on and switch to the SET Mode.
2.
Press the 4-Way Direction Button to highlight the Auto Power
Off item. Press the SET Button to display the submenu or touch
the screen to select the item.
75
3.
Press the 4-Way Direction Button to select OFF, 3 mins, or 5
mins or touch the screen to select the item.
6.5.8
Frequency
Use the Frequency option to set the frequency system for your area.
1.
Turn the camera power on and switch to the SET Mode.
2.
Use the 4-Way Direction Button to highlight the Frequency
selection item. Press the SET Button to display the submenu or
touch the screen to select the item.
3.
Use the 4-Way Direction Button to select 50 Hz or 60 Hz. Press
the SET Button to confirm or touch the screen to select the item.
76
Frequency setting reference:
50HZ
UK, Germany, Spain, Italy, France,
Netherlands, Portugal, Russia, China,
Japan
60HZ
USA, Taiwan, Korea, Japan
6.5.9
1.
Language
Turn the camera power on and switch to the SET Mode. Move
the 4-Way Direction Button up/down to highlight the Language
item and press the SET Button to confirm or touch the screen to
select.
2. Press the 4-Way Direction Button or touch the screen to select
the following languages: English, German, French, Italian,
Japanese, Spanish, Portuguese, Traditional Chinese, Simplified
Chinese, Turkish, Russian, Thai, Arabian or Korean.
77
6.5.10
Format
This function allows you to format the memory card or the built-in
memory.
1.
Turn the camera power on and switch to the SET Mode.
2.
Press the 4-Way Direction Button to highlight the Format item.
Press the SET Button or touch the screen to display the
submenu.
3.
Press the 4-Way Direction Button to select “O” Yes or “X” No.
Press the SET Button to confirm or touch the screen to select
the item.
4.
The formatting of the current storage media (memory card or
internal memory) is now completed.
78
Note: All data stored on the memory card or flash memory will be
deleted after formatting.
6.5.11
File Number (Default: Series)
This setting allows you to name the files. If “Series” is selected, the
file number will follow the last stored file consecutively.
If “Reset” is selected, the next file number will start from 0001 even
after formatting, deleting or inserting a new memory card.
1.
Turn the camera power on and switch to the SET Mode.
2.
Press the 4-Way Direction Button to highlight the File Number
item. Press the SET Button to display the submenu or touch the
screen to select the item.
3.
Use the 4-Way Direction Button to select Series or Reset. Press
the SET Button to confirm or touch the screen to select the item.
79
6.5.12
LCD Brightness
This function can be used to adjust the screen brightness.
1.
Turn the camera power on and switch to the SET Mode.
2.
Use the 4-Way Direction Button to highlight the LCD brightness
item. Press the SET Button to display the submenu or touch the
screen to select the item.
3.
Press the 4-Way Direction Button to select High, Medium, or
Low. Press the SET Button to confirm or touch the screen to
select the item.
80
6.5.13
Instant Review
This function can be used to instantly browse files after taking the
picture.
1. Turn the camera power on and switch to the SET Mode.
2. Press the 4-Way Direction Button to highlight the Instant Review
item. Press the SET Button to display the submenu or touch the
screen to select the item.
3. Press the 4-Way Direction Button to select 1 sec, 3 sec, or 5 sec.
Press the SET Button to confirm or touch the screen to select the
item.
81
6.5.14
Memory
This camera supports 2 x 32 GB SD/ SDHC cards. Use this function
to select the data storage location.
1.
Turn the camera power on and switch to the SET Mode.
2.
Press the 4-Way Direction Button to highlight the Memory item.
Press the SET Button to display the submenu or touch the
screen to select the item.
3.
Press the 4-Way Direction Button to select Internal, SD1, or
SD2. Press the SET Button to confirm or touch the screen to
select the item.
Note: The images or movie clips can be stored on the built-in flash
memory or on external SD cards. When SD cards are inserted, the
files will be stored on the external SD cards rather than on the
internal flash memory. On the other hand, the files will be stored on
the built-in flash memory when SD card(s) is/are not inserted.
82
6.5.15
Volume
Use this function to adjust the sound volume.
1.
Turn the camera power on and switch to the SET Mode.
2.
Press the 4-Way Direction Button to highlight the Volume item.
Press the SET Button to display the submenu or touch the
screen to select the item.
3.
Press the 4-Way Direction Button to select High, Medium, or
Low. Press the SET Button to confirm or touch the screen to
select the item.
83
6.5.16
Start-Up Logo
Use this function to select the image that is displayed on the LCD
when the digital camcorder is turned on.
1.
Turn on the camera and switch to the Setup Menu.
2.
Press the 4-Way Direction Button to highlight the Start-up Logo
item. Press the SET Button or touch the icon on the screen to
display the submenu.
3.
Press the 4-Way Direction Button to select Default or User
Setting. Press the SET Button or touch the screen to select the
item.
84
6.5.17
Face Detection
You can use the Face Detection function to automatically detect
faces in a scene during a photo shoot
1.
Turn on the camera and switch to the Setup Menu.
2.
Press the 4-Way Direction Button to highlight the Face
Detection item. Press the SET Button or touch the icon on the
screen to display the submenu.
3.
Press the 4-Way Direction Button to select “O” Yes or “X” No.
Press the SET Button or touch the screen to select the item.
85
7 PC and TV Connection
7.1
Connecting to a Computer
As shown in the illustration, use the USB cable provided to connect
the camera to a PC for file transfer, or use the camera as a webcam
for conferencing purpose.
7.2
Connecting to a Standard TV
As shown in the illustration, use the video cable to connect the
camera to a standard TV.
86
7.3
Connecting to an HD TV
As shown in the illustration, use the HDMI cable provided to connect
the Digital Video Camera to an HD TV for high resolution picture
display.
87
8 Installing the Software
The bundled software CD has the drivers and software that come
with the camera. Insert the CD into your CD-ROM drive. The autorun
menu appears:
1.
Insert the supplied CD ROM into the CD player.
2.
If the CD does not execute automatically, please use Windows
File Manager to execute the Install_CD.exe file on the CD.
The following screen will be displayed.
3.
Tap the desired menu item to start the installation process and
follow the on-screen instructions.
88
9 Editing Software
ArcSoft TotalMedia Extreme® manages your media for you,
and gives you tons of fun and exciting ways to create and share
projects featuring your photo, video, and music files. Edit, enhance
and add creative effects to your photos. You can:
Create your own movies or photo slide shows complete with
soundtrack.
Upload your files easily to YouTube®!
Share them through simple email attachments or popular
photo printing.
Go to http://www.arcsoft.com/ for more information.
89
10 Appendix
Specifications
Image sensor
1/2.5 inch. 5.0 mega pixels CMOS sensor
Effective pixels
5.03 Megapixels (2592 x 1944)
Storage media
Built-in 32 MB Flash memory
External memory: SD card (4 GB) / SDHC (32
GB) card slot is supported
ISO Equipment
Auto
Color effect
Normal/BW/Sepia
Lens
Fixed lens
F/3.2, f=7.5mm
Focus range
Normal: 1.2m~infinity
Macro: 20cm
Still image
Format: JPEG (DPOF, EXIF)
Resolution: 3MP, 5MP, 8MP, 16MP (interpolation)
Scene Mode: Auto
Movie Clip
Format: H.264 (MOV)
Resolution: FULL HD (1920 x 1080 / 30 fps)
HD (1280 x 720 / 30 fps)
WVGA (848 x 480 / 60 fps)
WEB (320 x 240 / 30 fps)
Digital zoom
Still Image Mode: 4X (supported for 720P or lower
resolutions)
Playback Mode: 8X (depending on image size)
90
Audio
Audio for Voice Recording: ADPCM
LCD Display
3.0” Touchscreen display (16:9)
Flash light
Range: < 1.0m
DSC: On/Off
IR Night Vision
Range: < 1.5m
Video Mode: On/Off
White balance
Auto / Daylight / Cloudy / Tungsten / Fluorescent
Exposure
-2.0 EV~+2.0 EV
Self-Timer
Off, 2 seconds, 10 seconds.
Interface
Digital output connector: USB 2.0 high-speed
(480Mbps Max.)
MIC Input, Speaker
HDMI
USB DC IN
TV output
NTSC/PAL
Shutter
Electronic shutter
1~1/8000 second
Auto Power Off
Off, 3 minutes, 5 minutes
Power Source
CNP-40 Lithium battery or 2 AA Alkaline batteries
Dimensions
110 (L) x 58 (H) x 50 (W) mm
Weight
Approx. 250g
91
Troubleshooting
Problem
Cannot power on
camera.
Possible Cause
1. Batteries are not
inserted
correctly.
2. Batteries are
exhausted.
Camera shuts down
suddenly.
Solution
1. Insert batteries
correctly.
2. Replace
batteries.
1. Power on again.
1. Power Saving
Mode is activated.
2. Replace batteries.
2. Battery exhausted.
Pictures are not
stored on the
memory.
Powers off before
storing the images.
Camera shuts
down when using
Self-timer.
Batteries in camera
are exhausted.
Images are out of
focus.
Object exceeds the
range of focus.
Unable to use the
external memory
1. Memory card is
protected.
92
Replace batteries
when the battery
indicator turns red.
Replace batteries.
Take the picture
within the focus
range and select
normal or Macro
Mode.
1. Unlock the
memory card.
card.
protected.
2. Memory card
contains
non-DCF images
taken by other
cameras.
Buttons do not work
or camera hangs.
A short circuit has
occurred when
connecting the
camera to another
device.
93
2. Reformat the
memory card.
Make sure you
backup the files
before
reformatting the
memory card.
Remove batteries
from the camera and
reinsert again.
Customer Care
More information on the complete AgfaPhoto digital camera product
range can be found at www.agfaphoto.com / www.plawa.com
Service & Repair Hotline
(EU):
00800 752 921 00 (from a
landline only)
Service & Support Hotline
(Germany):
0900 1000 042 (1.49 euro / min.
from a German landline only)
Service & Repair Hotline
(UK):
+44 1908 488676
Online Service / International
contact:
[email protected]
Manufactured by
plawa-feinwerktechnik GmbH
& Co. KG
Bleichereistraße 18
73066 Uhingen
Germany
Service & Repair (USA/
Canada):
[email protected]
866-475-2605
Allmonde Group Limited
218 Fairbourne Drive
Atterbury
Milton Keynes
MK10 9RG
United Kingdom
AgfaPhoto is used under license of Agfa-Gevaert NV & Co. KG or
Agfa-Gevaert NV. Neither Agfa-Gevaert NV & Co KG nor
Agfa-Gevaert NV manufacture this product or provide any product
warranty or support. For service, support and warranty information,
contact the distributor or manufacturer. All other brands and product
names are registered trademarks of their respective owners.
Product design and technical features can be changed without
notice. Contact: AgfaPhoto Holding GmbH, www.agfaphoto.com
AgfaPhoto is used under license of Agfa-Gevaert NV & Co. KG or Agfa-Gevaert NV. Neither Agfa-Gevaert NV & Co. KG nor AgfaGevaert NV manufacture this product or provide any product warranty or support. For service, support and warranty information,
contact the distributor or manufacturer. For service, support and warranty information, contact the distributor or manufacturer. All
other brands and product names are registered trademarks of their respective owners. Product design and technical features can
be changed without notice.
AgfaPhoto Holding GmbH, www.agfaphoto.com
Manufactured by plawa-feinwerktechnik GmbH & Co. KG, www.plawa.com