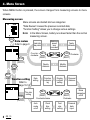
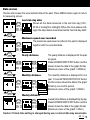
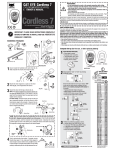
1
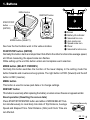
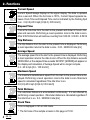
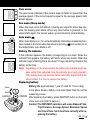
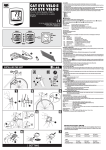
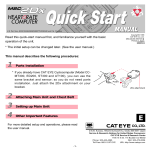
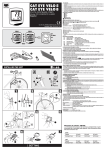
r
e
p
®
l
a
n
o
s
c
l
y
c
o
c
o
m
p
u
t
e
r
R
M
o
EF d
ER el
EN O
C S
E
G 1.
U 0
ID
E
E
Introduction
Thank you very much for purchasing the CAT EYE OS 1.0.
Read "SETUP GUIDE" first, for the installation and the basic operation of the product.
Read this "REFERENCE GUIDE" when you want to know more about the CAT EYE OS 1.0.
Important
Warning!
• Do not give excessive attention to the monitor or the data. Always pay attention to
the road, traffic and your surroundings.
• Keep this product away from children. If children should use this product, they
should have adult supervision.
• Dispose of the used batteries properly. Keep batteries out of children's reach. In
case a battery is swallowed, contact a doctor immediately.
Caution!
• Avoid dropping or severely jarring the main unit.
• Avoid exposing the main unit to direct sun light for extended periods of time.
• Do not disassemble the main unit.
• Do not apply chemicals (thinner or benzene) to the unit.
• Static electricity could cause a function error, resulting in abnormal display of the data.
• Periodically check the positions and mounting conditions of the magnet and the sensor.
1.
2.
3.
4.
5.
6.
•
•
Buttons ----------------------------------------------------------------------------------- 3
Functions -------------------------------------------------------------------------------- 4
Restart/Format/Setup ---------------------------------------------------------------- 6
Menu Screen ------------------------------------------------------------------------ 8-12
Troubleshooting --------------------------------------------------------------------- 13
Specifications ------------------------------------------------------------------------ 14
Optional parts/Limited Warranty ----------------------------------------------- 15
Registration --------------------------------------------------------------------------- 16
2
OS 1.0
1. Buttons
MENU button
RESTART button
START/STOP
button
(ENTER)
REV
FWD
MODE button (SELECT)
See how the four buttons work in the various modes.
1 Screen
2 Battery life indicator
3 Selected tire icon
4 Auto mode icon
5 Speed scale icon
6 Pacer
7 Selected function icon
START/STOP button (ENTER)
Normally this button starts and stops timer that effects the other functions like average speed,
etc. When measuring, the speed scale icon flashes.
While setting up the unit this button enters and completes each selection.
MODE button (SELECT: FWD/REV)
Normally this button switches the function of the lower display. In the setting mode this
button forwards and reverses among options. The right button is FWD (forward) and the left
button is REV (reverse).
MENU button
This button is used to review past data or to change settings.
RESTART button
This button is used only after replacing the battery or when screen freezes or appears erratic.
Reset operation (Resetting the screen data)
Press START/STOP/ENTER button and either of MODE/SELECT button simultaneously to reset daily ride data of Trip Distance, Average
Speed and Elapsed Time. Total Distance (Odo) and Clock Time are
not effected.
Press simultaneously
OS 1.0
3
2. Functions
Current Speed
Current Speed always displays in the upper display. The data is updated
once a second. When the font size is 100%, Current Speed appears between Clock Time and Elapsed Time and is indicated by the flashing Spd
icon. 0.0(3.0)-65.9 mph [0.0(4.0)-105.9 km/h]
Elapsed Time
This is the ride time from the start to the present and shown in hours, minutes and seconds. Performing a reset operation returns the data to zero.
After 9.59.59 the timer will continue counting from 0.00.00. 0.00.00 - 9.59.59
Trip Distance
The trip distance from the start to the present time is displayed. Performing
a reset operation returns the data to zero. 0.00 - 99999.99 mile [km]
Average Speed
The average speed from the start to the present time is displayed. Performing
a reset operation returns the data to zero. When the trip distance exceeds
99999.99km or the elapsed time exceeds 99:59'59", [ERROR] will appear on
the display and calculation of Average Speed will no longer compute.
0.0 - 65.9 mph [0.0 - 105.9 km/h]
Maximum Speed
The maximum instantaneous speed from the start to the present time is displayed. Performing a reset operation returns the data to zero. Maximum
speed is calculated regardless if the ride timer is on.
0.0(3.0)-65.9 mph [0.0(4.0)-105.9 km/h]
Total Distance
The odometer distance is accumulated continuously. It is not effected by
performing a reset operation. Odometer distance is calculated regardless if
the ride timer is on. 0.0 - 999999.9 mile [km]
Clock Time
Time is displayed in 12h or 24h mode.
* The font size of the sample screens in this page is 70:30.
4
OS 1.0
Pace arrow
The pace arrow indicates if the current speed is faster or slower than the
average speed. If the current speed is equal to the average speed, both
arrows appear.
Eco mode (Sleep mode)
When the main unit is left without receiving any signal for about five minutes, the display goes blank. When any main button is pressed, or the
wheel starts again, the screen wakes up and returns to normal display.
Auto mode
When Auto Mode is on, the unit automatically starts/stops measuring functions related to the timer when the wheel is spinning.
icon comes on. In
the default state, Auto Mode is off.
Battery life indicator
If this indicator appears, the battery is beginning to run down. When the
indicator first appears, the battery will last for about one month. When the
indicator begins flashing there are about 10 days remaining. Replace the
battery at this time.
Note: Depending on the environment, the battery life indicator might appear earlier than expected. Use the indicator as a rough standard.
If the display does not become darker even after adjusting the display contrast, it is time to replace the battery.
Replacing battery
Close
Open
RESTART
Battery life: approximately 1 year (if used for 1 hour a day)
In the Menu Screen, battery runs down faster than the normal
measuring screen.
CR2032 After replacing the battery, press RESTART button on the back
of the main unit (refer to page 6.)
Caution! The RESTART operation will erase Elapsed Time,
Trip Distance, Average Speed, Maximum Speed
and Clock Time. Set Clock Time correctly after replacing the battery.
OS 1.0
5
3. Restart/Format/Setup
Restart operation (1.When erratic data appears; 2.After replacing battery)
After replacing the battery, the electric current can be unstable which might
effect the operation of the OS1.0. To avoid this you must press the RESTART
button after replacing the battery.
Note: After restart operation, Elapsed Time, Trip Distance, Average Speed,
Maximum Speed and Clock Time is erased. Set Clock Time again.
Format operation (1.Before first use; 2.When erasing all the stored data)
Caution: Take note that all the data is erased by this operation.
If you want to stop format operation, select "NO" and
the unit returns to measuring screen.
This operation erases all the data and settings.
1. Hold down both MODE/SELECT buttons simultaneously, press and
release RESTART button. The message "FORMAT?" appears.
2. Select "YES" and press ENTER/START/STOP button.
Once format operation is done, the unit need to be set up from the
first step.
Setup
In addition to Quick Setup that is written in the Setup guide, there is Custom
Setup (see the next page). In the Custom Setup, you can select only your favorite functions that you want to use,
and you can also choose your preferred
font size and input your personal data.
Note: By pressing the two SELECT/
MODE buttons simultaneously
you can go back to the next previous screen.
Goes to previous screen
Speed scale setting
Tire size setting
Date setting
Time scale setting
Function customizing
Clock time setting
Font size setting
Custom setup entrance
NO
Setup finished
QUICK SETUP
6
OS 1.0
Setup process
Personal data input
YES
Setup finished
CUSTOM SETUP
Custom setup
To personalize your Cat Eye OS1.0, select YES in e Custom setup prompt.
Function customizing
You can choose to display just the functions you would like. Press ENTER/START/STOP button to select each function you would like to display. You can also simply SELECT ALL to display all seven cyclocomputer
functions. you can choose any of the following 6 functions (current speed
is always displayed): Elapsed Time, Trip Distance, Average Speed, Maximum Speed, Total Distance and Clock. To complete function customization navigate to "FINISHED" and press ENTER/START/STOP button.
(Refer to page12.)
Font size
Choose a display percentage font size.
70:30(%)
50:50(%)
30:70(%)
Personal data input
Input your name. Up
to 16 letters can be
input. (Refer to page
12.)
Setup finished
100(%)
Input your birthday by month
and day (mm/
dd).
Setup finished
You can change the settings later in the MENU screen. Refer to
pages 8-12.
OS 1.0
7
4. Menu Screen
When MENU button is pressed, the screen changes from measuring screens to menu
screens.
Measuring screen
Menu screens are divided into two categories:
"Data Review" reviews the previous recorded data;
"Function Setting" allows you to change various settings.
Note: In the Menu Screen, battery runs down faster than the normal
measuring screen.
MENU
Data review
Refer to page 9
Maximum
speed
ever
recorded
Last ride
day data
Counterclockwise
ENTER
(START/STOP)
FWD Clockwise
REV
(SELECT)
(SELECT)
Weekly
distance
FWD
Yearly
distance
Monthly
distance
(SELECT)
REV
(SELECT) Function setting
Refer to
page 10-12
Date
setting
Tire size
setting
ENTER
Function
customizing
Display
contrast
setting
Personal
distance
REV
FWD
(SELECT)
(SELECT)
Counterclockwise
Clockwise
(START/STOP)
Auto
mode
on/off
8
OS 1.0
Clock
time
setting
Font
size
setting
Personal
data
input
Mode
navigation
on/off
Data review
Checks and reviews the accumulated data of the past. Press MENU button again to return
to measuring screen.
Last ride day data
ENTER
Shows all the data measured in the last ride day (0:00 (START/STOP)
23:59 or midnight to midnight). When the clock passes midnight, the day's data is memorized as the "last ride day data".
SELECT
(MODE)
Maximum speed ever recorded
The maximum speed ever recorded in the past is displayed
together with the recorded date.
(START/STOP)
ENTER
SELECT
(MODE)
Yearly distance
ENTER
ENTER
(START/STOP)
(START/STOP)
SELECT
(MODE)
Monthly distance
ENTER
ENTER
(START/STOP)
(START/STOP)
SELECT
(MODE)
The yearly distance is displayed for the past
six years.
Press ENTER/START/STOP button and the
screen shows the data in the graph format.
(Maximum value of the graph: 12000km)
The monthly distance is displayed for one
year. Press ENTER/START/STOP button
and the screen shows the data in the graph
format by six months period.
(Maximum value of the graph: 1200km)
Weekly distance
ENTER
ENTER
(START/STOP)
(START/STOP)
A week's trip distance is displayed day by day.
Press ENTER/START/STOP button and the
screen shows the data in the graph format.
(Maximum value of the graph: 120km)
Caution! If clock time setting is changed during use, incorrect data may accumulate.
OS 1.0
9
Menu Screen (continued)
Function setting
The function setting screens allow you to change various programmed
functions. At any time press MENU button to return to normal measuring screens.
Note: By pressing the two SELECT/MODE buttons simultaneously you can go back to
Goes to previous screen
the previous on screen.
Auto mode
When Auto mode is on, the unit automatically starts/stops measuring, whenever the computer receives a signal.
icon will be
on when it is activated.
Clock time setting
Changes the clock time setting. When you
have selected 12h mode, take note of the
AM/PM icon.
Font size setting
Select your preferred font size from the four combinations.
Note: When digits exceed the screen size the figures
are automatically reduced. In the default figure it is
70:30.
Personal data input
You can input your name and birthday. Up to 16 letters
can be input for the name. (Refer to page 12.)
10
OS 1.0
Tire size setting
Inputs two different tire sizes A and B.
To input it by inch scale, choose EASY. For more accurate measurement, choose CUSTOM and input it
in millimeters, by measuring the exact wheel circumference.
Date setting
Changes the date setting. It is important to input the
correct date as it affects the accumulated data.
Function customizing
Selects only your favorite functions that you
want to use (refer to page 12).
Display contrast setting
Adjusts the contrast of the screen (right: darker, left: lighter).
Note: The darker the display, the higher the battery consumption.
Personal distance
You can input accumulated distance from a different
cyclocomputer. Then the total distance starts measuring from that figure (refer to page 12).
Mode navigation on/off
Shows what is the previous/next function when
MODE button is pressed to navigate to a new function. In the default setup, mode navigation is on.
OS 1.0
11
Menu Screen (continued)
How to change setting
A or B - Chooses your bike, A or B.
• Press SELECT/MODE button to select A or B.
• Press ENTER/START/STOP to decide.
SIZE --- Changes the figure of the tire sizes A and B.
“EASY” setting:
inputs the figure by the inch size 14
inch - 27 inch;
“CUSTOM” setting: inputs the figure by millimeters 10 9999mm
Function customizing Select your favorite functions with SELECT/MODE button. Press
SELECT/MODE button again to clear the selection. If you don’t
select anything, Total Distance is automatically selected.
If you want to select all the functions, choose "SELECT ALL". To
complete the function customizing, navigate to "FINISHED" and
press ENTER/START/STOP button.
Personal distance
You can keep on accumulating the total distance continuously from your previous cyclocomputer. Up to six digits can be input.
• Input the figure for the first digit using SELECT/MODE button.
• Press ENTER/START/STOP button and the digit moves to the next digit.
• When you reach the last digit (sixth digit), press ENTER/START/STOP button, and personal distance input is completed.
Personal data
Input your name first.
• Navigate the alphabet by pressing SELECT/MODE button. Characters A-Z,
a-z, 0-9, including punctuation marks, a space and .
• Press ENTER/START/STOP button to select a specific character. Then it
moves to the next letter.
• When you have completed selecting all the digits you want, navigate to the
character and press ENTER/START/STOP button. The birthday input
screen now appears.
Input your birthday month and day (mm/dd).
Tire size setting
12
OS 1.0
5. Troubleshooting
If a malfunction occurs, check the following items before contacting a dealer for service.
Trouble
Check items
Remedy
The liquid crystal screen appears dark or there are some dark spots.
Was it left for a long time under direct sunlight?
It will go back to normal after a few hours once it is out of the sunlight. Data will not be
effected.
Display response is slow.
Was the ambient temperature too low [below 0C (32F)]?
It will go back to normal when the temperature rises. Data will not be effected.
No display appears.
Is the battery in the main unit worn out?
Replace it with a new one (CR2032). After the battery is replaced, be sure to press RESTART
button.
Meaningless display appears.
Press RESTART button.
Current Speed is not working properly.
Check if there is any object on the contacts of the main unit or the bracket.
Clean the contacts. Main unit is often stained with sweat. Periodically wash it with mild soap
and wipe dry.
Check the clearance between the speed sensor and the magnet.
Check if the mark line of the speed sensor and the magnet is aligned.
Adjust the positions.
Check if the wire is broken or damaged.
Replace the bracket sensor set with a new one.
Measurement does not stop even though START/STOP button is pressed.
Is the Auto Mode on?
When the Auto Mode is on, START/STOP button does not start or stop measurement. Turn
the Auto Mode off. (Refer to "Auto mode" in page 11.)
The size of the figures on the screen is reduced.
When the bigger font size is selected (100%, 70%, 50%), and if the number of digits for trip
distance and total distance exceed the maximum number of digits, the size is automatically
reduced to fit on the screen.
The last ride day data is not correct.
Is the clock time setting correct?
The last ride day data is saved when the clock time passes the midnight. Therefore, if your
clock is not correctly set, the data shown will be incorrect.
Is the unit measuring?
The last ride day data is not updated unless it newly measures data. (See page 9.)
OS 1.0
13
6. Specifications
CAT EYE OS1.0
Display functions
Current Speed
0.0(3.0) - 65.9 mph [0.0(4.0) - 105.9 km/h]
Elapsed Time
0:00’00” - 9:59’59”
Trip Distance
0.00 - 99999.99 mile [km]
Average Speed
0.0 - 65.9 mph [0.0 - 105.9 km/h]
Maximum Speed
0.0(3.0) - 65.9 mph [0.0(4.0) - 105.9 km/h]
Total Distance
0.0 - 999999.9 mile [km]
Clock Time
0:00 - 23:59 [AM12:00 - PM11:59]
Pace Arrow
Indicates if the current speed is higher or lower than the average speed.
Data review function
Last Ride Day Data
All the data measured in the last ride day (0:00 - 23:59)
Maximum speed ever recorded The maximum speed ever recorded in the past
Yearly distance
The yearly distance for the past six years
Monthly distance
The monthly distance for one year
Weekly distance
A week's trip distance, day by day
Setting function
Tire size:
Two different tires A and B (default figure: A=2096, B=2050)
EASY: 14 inch - 27/700, CUSTOM: 10 - 9999mm
Date
January 1, 2000 - December 31, 2099
Function customizing
Selects only the preferred functions
Display contrast
Changes the contrast in eight levels
Personal distance
Inputs personal total distance and continues to accumulate from
that figure (maximum figure: 6 digits)
Mode navigation
Shows the previous/next function
Personal data
Name and birthday (maximum letters for name: 16 letters)
Font size
Chooses the font size of the lower display (4 sizes)
Clock time
in 12h-mode or 24h-mode
Control system
8-bit one-chip microcomputer, crystal oscillator
Display system
Liquid crystal display (54x31dot plus icon)
Speed signal detection system
Noncontact magnetic sensor
Operating temperature range
32°F - 104°F [0°C - 40°C]
Storage temperature range
–4°F - 122°F [–20°C - 50°C]
Applicable fork diameter
11ø - 36ø
Power supply / battery life
CR2032 x 1 / approx. 1 year (When using 1 hour/day)
Dimension / weight
2-7/18” x 1-27/32” x 23/32” [62 x 47 x 18 mm] / 1.34 oz [38 g]
Designs and specifications are subject to change without notice, due to modifications or improvements.
14
OS 1.0
Optional parts
34
12
5
6
7
1 Bracket sensor kit [169-9650]
2 Bracket sensor kit (Long) [169-9651]
3 Speed sensor kit [169-9670]
4 Speed sensor kit (Long) [169-9671]
5 Bracket [169-9660]
6 Magnet [169-9690]
7 Screw set [169-9680]
8 Lithium battery [166-5150]
8
Limited Warranty
1-Year Warranty for Main Unit Only (Accessories/Attachments and Battery Consumption excluded)
If the computer main unit is operating defectively from normal use, the part of the main unit will be repaired or
replaced free of charge. The service must be performed by Cat Eye Co., Ltd. Please consult our troubleshooting page and then a retailer before returning the product to Cat Eye. Pack the main unit carefully with a
detailed explanation of the problem and instruction for repair. Please include your name and address clearly
on your correspondence. Insurance, handling and transportation charges to our service shall be borne by
person desiring service.
CO.,LTD.
2-8-25 Kuwazu Higashi Sumiyoshi-ku, Osaka 546-0041 Japan
Service & Research Address for United States Consumers:
CAT EYE Service & Research Center
1705 14 th St. 115 Boulder CO 80302
Phone: 303-443-4595
FAX: 303-473-0006
Toll Free: 800-5CAT EYE
URL: http://www.cateye.com
OS 1.0
15
REGISTRATION
CAT EYE Web Site (http://www.cateye.com)
For warranty service you must register your product. Please register your OS1.0 as soon as possible.
CAT EYE provides as much technical support as possible by telephone, e-mail and our web site.
Please register on-line through our web site, or send the registration card below directly to our
Customer Service Department. For registration, please fill in the product's serial number (the 7digits number marked on the back of the main unit).
CO.,LTD.
Copyright© 2000
CAT EYE Co., Ltd.
OS1UE-001124 2
Printed in Japan
066600051
E
2-8-25 Kuwazu Higashi Sumiyoshi-ku, Osaka 546-0041 Japan
Service & Research Address for United States Consumers:
CAT EYE Service & Research Center
1705 14 th St. 115 Boulder CO 80302
Phone: 303-443-4595
FAX: 303-473-0006
Toll Free: 800-5CAT EYE URL: http://www.cateye.com
Serial number
U.S. Pat. Nos. 4642606/5904442/Pat. and Design Pat. Pending
REGISTRATION CARD
Model:
CAT EYE OS1.0
Serial No.
®
Please fill with 7-digits numbers marked on the back of main unit.
Name:
Age:
Street:
City:
State/Providence:
Postal/ZIp code:
Country:
E-mail address: (*We will never share your e-mail address with any other company.)
Dealer or Shop name:
Dealer or Shop address:
The date of purchase:
Comments:
/
/