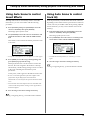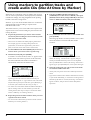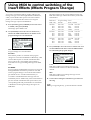
1
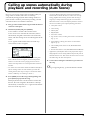
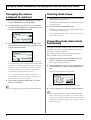
Additional Functions
Additional functions in Version 2
■ Auto Scene
■ Use MIDI to change effects patches
You can call up scenes automatically during playback and
recording by assigning markers to scenes. This provides you
You can now switch Insert Effects patches with Program
Change messages received through MIDI IN. Furthermore,
with automated control of track faders and effects.
when you use the BR-1180’s panel to select Insert Effects
patches, you can transmit these selections as Program Change
messages output from MIDI OUT.
The maximum number of scenes you can create has also been
increased from eight to fifty scenes.
■ Use markers to create audio CDs
(Disc At Once)
This function allows you to use markers to add CD track
numbers to audio tracks within recorded data. This allows
you to create audio CDs complete with the track numbers
even when recording live performances, nonstop DJ mixes,
and other extended recordings.
■ Loading songs from the BR-8
Now you can convert BR-8 song data and load it into the BR1180CD.
(This requires a separate computer with a Zip drive and CDR/RW drive. Additionally, since the BR-1180 (without the
CD-R/RW drive) is unable to read CD-R/RW discs, this
function is not available with the BR-1180.)
■ Normalize function
You can now convert recorded data on audio tracks to
specified amplitude ranges (normalize). This allows you to
achieve the proper volume balance with other tracks, even if
you happen to record a particular track at too low a volume
level.
■ Loop Phrase Time Modify function
This new function allows you to change the tempo of an
existing specified loop phrase and create a new loop phrase
from that data. This also makes it possible to align loop
phrases used in rhythm arrangements.
■ Speaker modeling now DS-30Acompatible
Now included is the speaker modeling algorithm for the
Roland DS-30A Bi-Amp Monitor. In addition, dedicated DS30A patches have been added to preset Patches P23–P33.
■ Rhythm Recording using MIDI
You can now record performance data produced by an
external rhythm machine or other device in real time as a
rhythm pattern, as it arrives at the MIDI IN connector. Such
patterns can then be used as user and song rhythm patterns.
■ Initialize individual partitions
When using multiple drives or partitions, now you can
specify a single partition for initialization.
Other enhancements
■ Now you can change drum kits while Realtime Recording
of rhythm patterns is in standby. You can also use the track
buttons in standby to audition drum sounds. This allows
you to check your drum kits and drum sounds before you
record.
■ You can now edit preset rhythm patterns and write to
User/Song rhythm patterns.
You can easily create your own individualized rhythm
patterns just by selecting and editing the preset rhythm
patterns approximating the sound you want.
■ You can now play whatever drum sound is set at a
particular point by moving the cursor to that point in the
rhythm Step Input or Microscope screen.
■ Now you can use [STOP] and [REC] in saving songs.
This makes saving songs even easier, since it does not
require going into the [UTILITY] menu.
Contents
Calling up scenes automatically during playback and recording
(Auto Scene)............................................................................................3
Changing the scenes assigned to markers .............................................................................................. 4
Clearing Auto Scene................................................................................................................................... 4
Preventing Auto Scene from functioning ............................................................................................... 4
Using Auto Scene to control Insert Effects ............................................................................................. 5
Using Auto Scene to control track EQ ..................................................................................................... 5
Using markers to partition tracks and create audio CDs
(Disc At Once by Marker) .......................................................................6
Converting BR-8 songs and loading them into the BR-1180CD
(Convert BR-8 Songs).............................................................................8
Maximizing the volume levels of data recorded to the tracks
(Normalize) ..............................................................................................9
Altering a loop phrase’s tempo to create a new loop phrase
(Time Modify/Arrange Modify) .............................................................11
Specifying and modifying the source loop phrase (Time Modify) ................................................... 11
Modifying all of the loop phrases in the current rhythm arrangement (Arrange Modify)........... 12
Importing performances from external rhythm machines
as rhythm patterns................................................................................13
Changing drum kits while recording rhythm patterns
with Realtime Recording ......................................................................14
Creating user rhythm patterns based on preset rhythm patterns ...15
Using the DS-30A speaker modeling ..................................................16
Using MIDI to control switching of the Insert Effects
(Effects Program Change)....................................................................17
Rapidly saving songs (Song Store) ....................................................18
Initializing only one of multiple drives (partitions) ............................19
2
Calling up scenes automatically during
playback and recording (Auto Scene)
In Ver. 2, you can now assign scenes to markers. Once you
assign scenes to markers, the scenes are called up
automatically during playback and recording whenever a
point set with a marker is passed, thus providing you with
automated control of track faders and effects.
1. First, go to the location in the song at which the desired
control is to take place.
2. Hold down [STOP] and press [MARK].
A new marker is created at the current location.
A new scene is also created at the same time, and it is
automatically assigned to the marker. The track fader,
effects, and other settings are all recorded together in the
scene.
An “S” appears in the marker name area in the Top
screen when a scene is assigned.
* A scene is called up when the current location matches a
location where a marker has been set. This is true not only
during playback and recording, but also when the song is
stopped, for example when changing the current location.
When Auto Scene is used, not all of the parameters stored in
the scene are called up, but only the following parameters.
• Track fader 1–9/10
• Track muting
• Master fader
• Rhythm fader
• Pan (Track 1–9/10)
• EQ (Track 1–9/10) (→“Using Auto Scene to control track
EQ” (p. 5))
• Insert Effects (→“Using Auto Scene to control Insert
Effects” (p. 5))
• Chorus/Delay Send (Track 1–9/10, RHTYHM/LOOP
PHRASE)
fig.01
• Reverb Send (Track 1–9/10, RHTYHM/LOOP PHRASE)
* You can create up to a total of 100 markers, including both
those to which scenes are assigned, as well as independent
markers. You can also create up to fifty scenes in all. You
cannot create any markers or scenes beyond these maximum
numbers.
* You cannot set a new marker within 100 milliseconds before or
after an existing marker. In such instances, first clear the
existing marker, then carry out Step 3 to set the new marker
(Owner’s Manual p. 61 “Clearing a marker”).
* Application of actual fader values to the performance may be
delayed by about ten to twenty milliseconds from the point at
which the marker is set. This reduces the noise. Be sure to note
this when using the Auto Scene feature.
4. To have these settings be remembered, you must save
the song.
“Saving a song (Song Store)”; p. 80 in the Owner’s Manual
3. Press [ZERO] to reset the song to the beginning, and
press [PLAY] to play back the song.
When playback reaches a location where a marker has
been set, the scene assigned to the marker is called up
automatically. At that time, an “S” appears in the marker
name area of the Top screen.
3
Calling up scenes automatically during playback and recording (Auto Scene)
Changing the scenes
assigned to markers
1. Press [UTILITY], then press [CURSOR] to move the
cursor to “MARKER,” then press [ENTER].
2. Use [CURSOR] to move the cursor to “No.” and then
select the marker number whose assignment you want
to change with the TIME/VALUE dial.
Clearing Auto Scene
1. Press MARK [<<][>>] to move to the location where the
marker you want to clear is set.
The marker field of the display will indicate the marker
you want to clear.
2. Press [CLEAR] in the MARKER section.
The marker is cleared. Any scene assigned to that marker
is also cleared simultaneously.
fig.03
* If a scene is also assigned to another marker, only the marker is
cleared, and not the scene.
3. Use [CURSOR] to move the cursor to “SCENE” and
then select the number for the scene you want to assign
with the TIME/VALUE dial.
fig.04
Preventing Auto Scene from
functioning
Moving the track faders manually while Auto Scene is active
can hinder your work by causing changes in track volume
levels when you don’t want them.
You can prevent such problems by using the procedure
below to disable the Auto Scene functions.
1. Press [UTILITY], then press [CURSOR] to move the
cursor to “SYSTEM,” then press [ENTER].
You can also select from Scene Number 1–50. If you do
not want to assign any scene to the marker, select “OFF.”
* An asterisk (“*”) appears in front of the scene number when
parameters are stored in that scene. Note that if you select a
scene with no asterisk (an open scene), the Auto Scene is
automatically prevented from being carried out.
This brings up the System screen.
2. Use [CURSOR] to move the cursor to “Auto Scene” and
switch the function to “OFF” with the TIME/VALUE
dial.
The Auto Scene function is now disabled.
fig.05
* If “- - -” appears as the scene number, it means that no
corresponding marker has been created yet. In this case, you
will be unable to select the scene number.
4. To have these settings be remembered, you need to
perform a “Song Store.”
* To enable Auto Scene, set “Auto Scene” to “ON” again.
“Saving a song (Song Store)”; p. 80 in the Owner’s Manual
3. Carry out Song Store to store these settings in memory.
“Saving a song (Song Store)”; p. 80 in the Owner’s Manual
* Take care not to forget if “Auto Scene” is set to “OFF” when
saving a song, or Auto Scene will not function afterwards. We
recommend returning this setting to “ON” as often as possible
when saving songs.
4
Calling up scenes automatically during playback and recording (Auto Scene)
Using Auto Scene to control
Insert Effects
Using Auto Scene to control
track EQ
Although Auto Scene is not normally used to control the
Insert Effects, you can control them with the following
procedure.
Track EQ is normally controlled with Auto Scene. However,
depending on the sounds used in a performance recorded on
a track, noise may be audible when the EQ is being adjusted.
In such situations, you may want to disable control of the
track EQ.
1. Press [UTILITY], then press [CURSOR] to move the
cursor to “SYSTEM,” then press [ENTER].
This brings up the System screen.
2. Use [CURSOR] to move the cursor to “Ins.Effects” and
switch the function to “ON” with the TIME/VALUE
dial.
This enables control of the Insert Effects parameters with
Auto Scene.
1. Press [UTILITY], then press [CURSOR] to move the
cursor to “SYSTEM,” then press [ENTER].
This brings up the System screen.
2. Use [CURSOR] to move the cursor to “Track EQ” and
switch this to “OFF” with the TIME/VALUE dial.
fig.07
fig.06
This disables control of the track EQ.
* To stop the control function, set “Ins.Effects” to “OFF” again.
3. Press [ZERO] to reset the song to the beginning, and
press [PLAY] to play back the song.
When playback reaches a location where a marker has
been set, the scene assigned to the marker is called up
automatically, and the settings change to those recorded
in the scene, including the Insert Effects patch
parameters.
* To enable the control function, set “Track EQ” to “ON”
again.
3. Save the song to store these settings in memory.
“Saving a song (Song Store)”; p. 80 in the Owner’s Manual
At this point, “TMP” appears in the Effects Patch screen.
* Be sure to note that application of the Insert Effects in the
performance may be delayed from several hundred
milliseconds to one second from the point at which the marker
is set.
* Also note that noise levels may become more noticeable with
certain sounds and parameter settings used in performances
with Insert Effects.
4. Save the song to store these settings in memory.
“Saving a song (Song Store)”; p. 80 in the Owner’s Manual
5
Using markers to partition tracks and
create audio CDs (Disc At Once by Marker)
When CDs are created from songs recorded in long sessions,
such as with live performances, nonstop DJ mixes, and other
extended recordings, such long-length data ends up being
burned to the CD as a single track.
With Ver. 2, you can use the marker function to set divisions
at desired points in the recording to separate it into
individual audio tracks.
5. Press the CD-R/RW [AUDIO CD] button, use
[CURSOR] to move the cursor to “WRITE,” then press
[ENTER]. Follow this by using [CURSOR] to move the
cursor to “DISK AT ONCE,” then press [ENTER].
fig.22
This function allows you to create audio CDs complete with
separate tracks even when recording live performances and
nonstop DJ mixes.
1. Prepare the performance you want to write an audio
CD from by first recording it to stereo tracks (any tracks
from 1/2 to 9/10 can be used).
* Take care not to switch tracks while preparing audio tracks.
For example, if you are recording a thirty-minute live
performance, record the entire performance, from start to
finish, on the same stereo tracks (such as Tracks 9/10).
6. Use [CURSOR] to move the cursor to “BY MARK” and
press [ENTER].
This brings up the Disc At Once by Marker screen, which
shows the tracks to be written and their marker
locations.
fig.10
2. Use the TIME/VALUE dial and [REW] [FF] to move to a
location where you want to create a separate song.
3. Hold down [TAP] and press [MARK].
A marker is set at that location, and a “T” appears in the
marker name area in the Top screen. At the same time,
the name indicated as the audio track number is
automatically selected as the marker name.
fig.08
* If a CD-R/RW disc that already has data written to it is
loaded, the message “Not Blank Disc!” appears, and you
cannot proceed with the backup. Be sure to use only blank
discs. If a CD-RW disc is inserted, the message “Erase Disc?”
appears. If you press [ENTER] here, erasure of the disc begins.
7. Select the audio tracks you want to write to the audio
CD with the TIME/VALUE dial.
* At this point, only stereo tracks can be selected for the audio
tracks.
* You cannot write in the section on audio CDs from the
beginning of the audio track (zero location) and the first
marker indicated by the “T.” If you want to write to the audio
CD from the very start of an audio track, press [ZERO] to go
to the start of the a audio track, then carry out Step 3.
* You cannot set a new marker within 100 milliseconds before or
after an existing marker. In such instances, first clear the
existing marker, then carry out Step 3 to set the new marker
(Owner’s Manual p. 61 “Clearing markers”).
4. Repeat Step 2 and 3 at all the locations where you want
separate tracks to be created.
* You can clear the marker when you misset a marker (Owner’s
Manual p. 61 “Clearing markers”).
6
* If you select an audio track to which no data has been recorded,
or if no marker indicated by “T” has been set in the segment in
which the performance is recorded, the message “NO DATA”
appears in the list, and you cannot continue with further
operations.
Using markers to partition tracks and create audio CDs (Disc At Once by Marker)
8. Use [CURSOR] to move the cursor up and down and
check the list of the tracks you write.
* Audio CD standards require that a song be at least four
seconds long. Markers that define a song lasting less than four
seconds are disregarded, and do not appear in the list.
9. Use [CURSOR] to move the cursor to “GO” and press
[ENTER].
“Write Speed” is displayed.
10. Rotate the TIME/VALUE dial to set the write speed.
Write Speed:
x2 (352 kbps)
Writes twice as fast.
x4 (704 kbps)
Writes four times as fast.
x8 (1408 kbps)
Writes eight times as fast.
* With some media, the range of write speeds may be limited. In
such cases, the values that can be set with the TIME/VALUE
dial may also be limited.
11. Press [ENTER].
The message “Write Sure?” appears, then press [YES].
“Now Writing...” appears, and writing of the audio CD
begins.
* If the total time of the registered songs exceeds the CD-R/RW
disc’s maximum recording time, the message “CD Full!”
appears, and you cannot continue with writing.
* To quit while writing to the disc is still in progress, press
[EXIT]. When the message “Cancel?” appears, press [YES];
writing is cancelled (it may take some time after you press
[EXIT] for the message to appear). However, no guarantee can
be made for the utility of the content up to the time writing is
cancelled. Particularly with CD-R discs, note that you may be
unable to use the disc a second time.
* You cannot eject the disc while writing is in progress, even by
pressing the EJECT button.
When “Complete!” appears, the writing is finished.
12. By continuously repeating Steps 9–11, you can write
songs to multiple CD-R/RW discs.
“Saving a song (Song Store)”; p. 80 in the Owner’s Manual
* If you want to use the Disc At Once feature from versions
prior to 2 (“Writing multiple songs all at one time (Disc At
Once)” p. 104 in the Owner’s Manual), select “BY SONG” at
Step 6. That way, songs are written to the audio CD song by
song as originally recorded, regardless of the markers used.
7
Converting BR-8 songs and loading them
into the BR-1180CD (Convert BR-8 Songs)
Now, BR-1180CD users who have computers equipped with
a Zip drive and CD-R/RW drive can load songs from BR-8
disks.
1. Copy the entire contents of the BR-8 Zip disk to the
computer’s hard disk.
At this time, confirm that all of the necessary files are
included. The absence of even one required file results in
file names being altered, which prevents the data from
being loaded properly.
Required files:
• DISKINFO.VS3
• SONGLIST.VR8
• SONG????.VS3\
folder and all files under it
2. Write all of the copied files and folders as is to a CD-R
or CD-RW.
Write using only ISO 9660 Level 2 Mode 1. Use of other
formats may not allow the data to be written correctly.
Additionally, complete the writing by finalizing the disc
(Close Session).
3. Place the CD-R/CD-RW with the data written to it in
the BR-1180CD.
4. Press the CD-R/RW [DATA SAVE/LOAD] button, use
[CURSOR] to move the cursor to “CONVERT BR-8
SONGS,” then press [ENTER].
“Now Checking...” is displayed, and a list of the BR-8’s
songs is displayed.
5. Use [CURSOR] to move the cursor to the song you want
to load, then press [ENTER].
“Now Reading...” appears, and loading of the song
begins.
The process is finished when “Complete!” appears.
* Note that the amount of space that a song occupies on disk can
change when the song is converted. This is due to the different
formats and file types used for the song.
* The BR-8 is not able to play back phrases less than one second
in length. In contrast, the BR-1180CD’s specifications are
such that it is able to play phrases as short as 0.5 seconds (but
not shorter). Note that, due to this difference in specifications,
the sound of performances may differ when short phrases that
cannot be played using the BR-8 are played on the BR1180CD.
8
Maximizing the volume levels of data
recorded to the tracks (Normalize)
Ver. 2 includes the Normalize function, which raises the
volume of prerecorded track data to the highest level
possible.
3. Select the track you want to normalize with the TIME/
VALUE dial.
You can select mono or stereo tracks. With stereo tracks
selected, you can increase the volume level while
maintaining the balance between the left and right
tracks.
What Normalize does:
The maximum values for wave data handled in digital
recording are predetermined. Since exceeding these
levels even slightly causes the sound to become
distorted, recording levels are normally set so that the
sound does not distort. However, this lowers the overall
volume of the recorded data.
4. Use [CURSOR] to move the cursor to “LOC,” then
press [ENTER].
The Normalize screen appears again.
fig.14
fig.11
5. Using [CURSOR] and the TIME/VALUE dial, set the
start point and end point for the segment you want to
normalize.
But there is a process that digitally calculates the
recorded data in order to extend the waveforms to the
maximum values for the wave data being treated. This
process is called “normalization.”
After normalization, the waveform looks like this:
fig.12
If you are normalizing the entire track from beginning to
end, press [CURSOR] to move the cursor to “ALL” and
press [ENTER].
* Set a minimum length of 0.5 seconds for the segment to be
normalized. No sound will play back if the segment is shorter
than 0.5 seconds.
* The sound is interrupted for an instant (about twenty
milliseconds) immediately before and after the normalized
segment. For this reason, we recommend setting the start and
end points at locations where this will not be noticed, such as
during breaks in performances.
This allows you to ensure you are getting full volume
within the allowable range of values for the data you are
working with.
Furthermore, even if any other tracks have been
recorded at relatively low volume levels, you can use
this function to increase volume later on.
1. Press [UTILITY], then press [CURSOR] to move the
cursor to “TRACK,” then press [ENTER].
2. Use [CURSOR] to move the cursor to NORMALIZE,
then press [ENTER].
This brings up the Normalize screen.
fig.13
6. Use [CURSOR] to move the cursor to “Normalize To:”
then set the normalization volume with the TIME/
VALUE dial.
1–100%:
When set to 100%, the amplitude of the wave data is
digitally converted to the maximum value that can be
handled. A setting of 50% cuts the amplitude in half.
* If normalization is run with a setting of 100%, note that the
sound during playback may become distorted when the volume
is raised further, such as when effects are used.
* If there is wave data in the normalized segment that
approaches the maximum amplitude, even for an instant, then
you cannot expect to achieve much with the normalize effect.
This tendency is especially pronounced with sounds such as
drums in which the amplitude of their loudest passages differ
greatly from other sections. Be sure to keep this in mind.
9
Maximizing the volume levels of data recorded to the tracks (Normalize)
7. Use [CURSOR] to move the cursor to “GO,” then press
[ENTER].
“Now Reading...” appears in the screen, and
normalization begins. The process is finished when
“Complete!” is displayed.
8. If you don’t like the results of the normalization, you
can undo them.
“Canceling a recording or editing procedure—Undo/Redo”;
p. 75 in the Owner’s Manual
9. Save the song to store the results of the normalization
in memory.
“Saving a song (Song Store)”; p. 80 in the Owner’s Manual
10
Altering a loop phrase’s tempo to create a new
loop phrase (Time Modify/Arrange Modify)
With Ver. 2, you are now able to change the playback tempo
of an existing loop phrase and create a new loop phrase from
that data.
Example 1) The bank only contains loop phrases with a BPM
setting of 100.
100 x 0.75 = 75
100 x 1.5 = 150
Specifying and modifying
the source loop phrase
(Time Modify)
1. Press [LOOP PHRASE IMPORT], then press
[CURSOR] to move the cursor to “TIME MODIFY,”
then press [ENTER].
This brings up the Loop Phrase Time Modify screen.
→ The allowed settings fall in the range from 75 and above and
150 and under (i.e., from 75 to 150).
Example 2) The bank contains loop phrases with varying tempos,
with BPM settings of 100, 120, and 140.
The fastest of these tempos is the BPM setting of 140.
140 x 0.75 = 105
The slowest of these tempos is the BPM setting of 100.
100 x 1.5 = 150
→ The allowed settings fall in the range from 105 and above
and 150 and under (i.e., from 105 to 150).
fig.15
Example 3) The bank contains loop phrases with varying tempos,
with BPM settings of 50, 100, and 200.
The fastest of these tempos is the BPM setting of 200.
200 x 0.75 = 150
2. Select the original loop phrase with the TIME/VALUE
dial. To modify all of the loop phrases in a bank at
once, select the “ALL” indication.
At this point, if you press [CURSOR] to move the cursor
to “PRVW” and then press [ENTER], the loop phrase is
played back. Press [ENTER] to stop the playback.
3. Use [CURSOR] to move the cursor to “To:,” then with
the TIME/VALUE dial select the destination for the
new loop phrase to be created after the tempo is
modified.
4. Use [CURSOR] to move the cursor to “BPM,” then
press [ENTER].
The Tempo Setting screen appears, and the loop phrase’s
original BPM and the BPM after modification are
indicated.
The slowest of these tempos is the BPM setting of 50.
50 x 1.5 = 75
→ The allowed settings fall in ranges of 150 and above, and 75
and under; no tempo settings can be made in these ranges. "---"
is indicated for the "New BPM" setting, and you cannot go on
to make any tempo modifications.
5. Rotate the TIME/VALUE dial to set the modified
tempo you want, use [CURSOR] to move the cursor to
“GO,” then press [ENTER].
“Now Converting...” appears in the screen, and creation
of the new loop phrase with the modified tempo begins.
The process is finished when “Complete!” is displayed.
6. Just as with other loop phrases, you can arrange and
use newly created loop phrases in Rhythm
Arrangements.
* The modified tempo range is 0.75 to 1.5 times that of the
original.
* If you had the “ALL” indicated in Step 2, then the original
BPM is not given.
You can set tempos in a range of 0.75 to 1.5 times the tempos
of the loop phrase in the selected bank. If different loop phrases
in the bank have different tempos, you can make settings
ranging from 0.75 times the fastest of the tempos in the bank to
1.5 times the slowest tempo. If the desired tempo cannot be set
in the given range, “---” is indicated for the “New BPM”
setting, meaning you cannot modify the tempo of any of the
loop phrases in the bank.
“Using loop phrases”; p. 92 in the Owner’s Manual
* You cannot select the original loop phrase as the destination
for the loop phrase created after modification.
* If additional recordings or edits have been made with respect to
the currently selected song, the message “Save Current?” may
appear. If you want to modify the loop phrase’s tempo after the
results of such recording and/or editing have been saved, press
[YES/ENTER]. If you press [NO/EXIT], the recording/editing
is lost.
11
Altering a loop phrase’s tempo to create a new loop phrase (Time Modify/Arrange Modify)
Modifying all of the loop
phrases in the current
rhythm arrangement
(Arrange Modify)
If you have already set up a rhythm arrangement using loop
phrases, you can modify all of the loop phrases used in that
rhythm arrangement at one time.
1. Press [LOOP PHRASE IMPORT], then press
[CURSOR] to move the cursor to “ARRANGE
MODIFY,” then press [ENTER].
This brings up the Loop Phrase Arrange Modify screen.
fig.16
Example 2) The rhythm arrangement contains loop phrases
with varying tempos, with BPM settings of 100, 120, and
140.
The fastest of these tempos is the BPM setting of 140.
140 x 0.75 = 105
The slowest of these tempos is the BPM setting of 100.
100 x 1.5 = 150
→ The allowed settings fall in the range from 105 and
above and 150 and under (i.e., from 105 to 150).
Example 3)The rhythm arrangement contains loop phrases
with varying tempos, with BPM settings of 50, 100, and 200.
The fastest of these tempos is the BPM setting of 200.
200 x 0.75 = 150
The slowest of these tempos is the BPM setting of 50.
50 x 1.5 = 75
2. Use [CURSOR] to move the cursor to “Arrange,” then
rotate the TIME/VALUE dial to select the rhythm
arrangement whose tempo you want to modify.
4. Use [CURSOR] to move the cursor to “GO,” then press
[ENTER].
For more on rhythm arrangement, refer to “Selecting
rhythm arrangements” (p. 83 in the Owner’s Manual).
“Now Converting...” appears in the screen, and creation
of the new loop phrase with the modified tempo begins.
U1–10: User Rhythm Arrangement
The process is finished when “Complete!” is displayed.
S1–10: Song Rhythm Arrangement
* You cannot select a preset rhythm arrangement.
3. Use [CURSOR] to move the cursor to “BPM,” then
rotate the TIME/VALUE dial to select the modified
tempo.
The modified tempo range is 0.75 to 1.5 times that of the
loop phrases contained in the rhythm arrangement. If
different loop phrases have different tempos, you can
make settings ranging from 0.75 times the fastest of the
tempos in the bank to 1.5 times the slowest tempo. If the
desired tempo cannot be set in the given range, “---” is
indicated for the “BPM” setting, meaning you cannot
modify the tempo of any of the loop phrases in the bank.
Example 1) The rhythm arrangement only contains loop
phrases with a BPM setting of 100.
100 x 0.75 = 75
100 x 1.5 = 150
→ The allowed settings fall in the range from 75 and
above and 150 and under (i.e., from 75 to 150).
12
→ The allowed settings fall in ranges of 150 and above,
and 75 and under; no tempo settings can be made in
these ranges. “---” is indicated for the “BPM” setting,
and you cannot go on to make any tempo modifications.
* In this case, the original loop phrases are overwritten by the
modified loop phrases. For example, if the loop phrases A001,
B003, and S005 are used in a rhythm arrangement, the newly
created loop phrases become A001, B003, and S005, and the
original A001, B003, and S005 are deleted. Take care to note
that once loop phrases are overwritten, the procedure cannot be
undone, and there is no way to recover the previous loop
phrases.
* If additional recordings or edits have been made with respect to
the currently selected song, the message “Save Current?” may
appear. If you want to modify the loop phrase’s tempo after the
results of such recording and/or editing have been saved, press
[YES/ENTER]. If you press [NO/EXIT], the recording/editing
is lost.
Importing performances from external
rhythm machines as rhythm patterns
In Ver. 2 you can now load performance data from external
rhythm machines through the MIDI IN connector and use
the data as rhythm patterns.
5. Use [CURSOR] to move the cursor to “Gen.,” then
select the “MIDI CLOCK” with the TIME/VALUE dial.
fig.19
1. Connect the BR-1180/BR-1180CD and the external
rhythm machine with MIDI cables as shown in the
figure.
fig.17_e
6. Carry out Realtime Recording to record the rhythm
pattern.
Rhythm Machine
MIDI OUT
MIDI IN
MIDI IN
“Creating rhythm patterns using Realtime Recording”; p. 86
in the Owner’s Manual
MIDI OUT
When Realtime Recording begins, the external rhythm
machine is simultaneously synchronized, and
automatically starts playing. The performance data
played by the rhythm machine is received through the
BR-1180/BR-1180CD’s MIDI IN and is recorded into the
rhythm pattern.
At this time, set it so that the external rhythm machine is
synchronized to the MIDI Clock from the BR-1180/BR1180CD (for instructions on setting the rhythm machine,
refer to the owner’s manual provided with that device).
2. Press [UTILITY], press [CURSOR] to move the cursor
to “MIDI,” then press [ENTER].
When the number of measures set for Realtime
Recording have passed, the external rhythm machine
automatically stops playing.
7. Press [STOP] to end Realtime Recording.
You’re returned to the Rhythm Pattern screen.
8. If you want to store the recorded rhythm pattern,
continue by writing the rhythm pattern to the disk.
fig.18
Steps 7–8 in the “Creating rhythm patterns using Realtime
Recording”; p. 87 in the Owner’s Manual
3. Use [CURSOR] to move the cursor to “Rhythm Note
Ch.,” then with the TIME/VALUE dial select the same
channel used for the rhythm machine’s MIDI OUT
channel.
Many rhythm machines have this set to Channel 10, so
you can probably set this to 10 as well.
4. Press [EXIT] to return to the immediately preceding
screen, press [CURSOR] to move the cursor to “SYNC,”
and press [ENTER].
* If you don’t set quantization to “OFF” during Realtime
Recording, the performance from the external rhythm machine
will end up being quantized when recorded, and the resulting
performance may sound different than intended. If this occurs,
set Quantize to “OFF.”
* You may be unable to reproduce the performance exactly if the
external rhythm machine’s rhythm sounds differ from the BR1180/BR-1180CD’s.
* Note that the timing of the resulting recorded data could
exhibit inaccuracies if an excessively large number of MIDI
messages have occurred together at one single point in time
during the external rhythm machine’s performance.
13
Changing drum kits while recording
rhythm patterns with Realtime Recording
Ver.2 now allows switching of drum kits during Realtime
Recording of rhythm patterns.
This lets you use Realtime Recording with the drum kits you
want to use in playing back rhythm patterns.
1. Bring up the Realtime Recording Standby screen.
“Creating rhythm patterns using Realtime Recording”; p. 86
in the Owner’s Manual
2. Use [CURSOR] to move the cursor to “DRUMKIT,”
then select the drum kit you want to be used in
Realtime Recording with the TIME/VALUE dial.
* The drum kits set at this time are only used for recording; they
are not stored to the rhythm patterns (you cannot set the
individual drum kits as such to the rhythm patterns
themselves).
* At this time, you can use REC TRACK [1]–[9/10] and [VTRACK] to check the drum tones. For more on the
correspondence between the track buttons and drum tones,
refer to the table of correspondence between the track buttons
and drum sounds on p. 87 in the Owner’s Manual.
3. Begin Realtime Recording.
14
Creating user rhythm patterns based on
preset rhythm patterns
With Ver. 2, you can now select preset rhythm patterns
included with the BR-1180/BR-1180CD and edit them to
create USER/SONG rhythm patterns.
1. Press the RHYTHM [EDIT] button, press [CURSOR] to
move the cursor to “PTN,” then press [ENTER].
This brings up the Rhythm Pattern screen.
fig.20
2. Use [CURSOR] to move the cursor to Pattern, then
select “P001”–”P296” with the TIME/VALUE dial.
6. Press [ENTER].
“Complete!” appears, indicating that the edited results
have been written to the USER or SONG pattern.
* “TMP” appears for the rhythm pattern immediately after its
data is recorded or edited. If you try to select a different
rhythm pattern with the TIME/VALUE dial while the cursor
is positioned above this, the cursor turns white. If you press
[ENTER] at this point, the cursor reverts to black, and the
rhythm pattern number is confirmed. If you do not want to
confirm it, press [EXIT]; “TMP” is indicated again, and the
rhythm pattern reverts to the state it was in immediately after
editing. This allows you to avoid inadvertently erasing data
you have edited.
You can press [PLAY] at this time to hear the selected
preset rhythm pattern. Press [STOP] to stop the
performance.
3. You can record the selected preset rhythm pattern using
Realtime Recording, and use Step Recording and the
Microscope function to add changes.
For instructions on how to use Realtime Recording, Step
Recording, and Microscope, refer to “Creating rhythm
patterns” on p. 86 in the Owner’s Manual.
* In this case, the process does not directly change the preset
rhythm pattern data. The preset rhythm pattern data is copied
to temporary memory, and then any changes are made in that
copied data. Therefore, no matter how much you record and
edit with this data, no changes are made to the original preset
rhythm pattern data.
4. Press [EXIT] to return to the Rhythm Pattern screen,
press [CURSOR] to move the cursor to “WRITE,” then
press [ENTER].
fig.21
5. Use [CURSOR] to move the cursor to the USER or
SONG pattern to which you want to write the edited
pattern.
15
Using the DS-30A speaker modeling
Ver. 2 now adds the Roland DS-30A Bi-Amp Monitor to the
BR-1180’s speaker modeling.
Along with the new DS-30A speaker modeling algorithm,
DS-30A-exclusive patches have been added to preset Patches
P23–P33.
4. Press [CURSOR] to move the cursor to
“OutputSpeaker,” then rotate the TIME/VALUE dial to
select “DS-30A.”
fig.23
Connect the BR-1180 and the DS-30As as shown in the figure.
fig. 22_e
This applies the patch to the DS-30As.
5. To save the changes, proceed by writing the patch.
DIGITAL
IN
Optical cable
DIGITAL OUT
Refer to “Saving speaker modeling settings” on p. 60 in the
Owner’s Manual.
* Due to the DS-30A’s physical structure and acoustic
characteristics, ultimately this modeling can only approximate
the sound of these speakers. Please remember that exact
reproduction of these characteristics cannot be guaranteed.
Use speaker modeling Patches P23–P33 when using this
algorithm.
For more detailed instructions on using speaker modeling,
refer to “Using speaker modeling” on p. 58 in the Owner’s
Manual.
You can use the following procedure to change the speaker
modeling patches already created for the DS-90A/50A and
use them with the DS-30A.
1. Select the speaker modeling patch you want to change.
2. Press [CURSOR] to move the cursor to “EDIT,” then
press [ENTER].
3. Press [CURSOR] to move the cursor to “SP.M” (SP.
Modeling), then press [ENTER].
16
Using MIDI to control switching of the
Insert Effects (Effects Program Change)
The following shows the correspondence between the
Bank Select messages and the Insert Effects patch banks
and numbers.
You can now switch Insert Effects patches with Program
Change messages received through MIDI IN. Furthermore,
when you use the BR-1180’s panel to select Insert Effects
patches, you can transmit these selections as Program
Change messages output from MIDI OUT.
...............................................................................................................
Bank Select
Program Change Patch
MSB / LSB
Number
Bank / Number
...............................................................................................................
00H 00H
00H - 63H
GUITAR P001-100
01H
00H - 31H
MIC
P001-50
02H
00H - 31H
LINE
P001-50
03H
00H - 31H
SIMUL
P001-50
...............................................................................................................
01H 00H
00H - 63H
GUITAR U001-100
01H
00H - 31H
MIC
U001-50
02H
00H - 31H
LINE
U001-50
03H
00H - 31H
SIMUL
U001-50
...............................................................................................................
02H 00H
00H - 63H
GUITAR S001-100
01H
00H - 31H
MIC
S001-50
02H
00H - 31H
LINE
S001-50
03H
00H - 31H
SIMUL
S001-50
...............................................................................................................
1. Press [UTILITY], press [CURSOR] to move the cursor
to “MIDI,” then press [ENTER].
This brings up the MIDI screen.
2. Use [CURSOR] to move the cursor to “Effects P.C.,”
and use the TIME/VALUE dial to set whether or not
program changes are to be transmitted.
fig.24
OFF:
Program changes are not transmitted.
PC ONLY:
Insert Effects patches are switched when program
changes are received from MIDI IN. Additionally, when
an Insert Effects patch is selected with the BR-1180’s
panel controls, the corresponding patch number is
transmitted as a Program Change message from MIDI
OUT.
PC+BANK:
Program Change and Bank Select messages are received
through MIDI IN. Insert Effects patches are switched
when a program change is received. The Insert Effects
patch banks are also switched simultaneously in
accordance with the Bank Select message received
immediately before. Additionally, when an Insert Effects
patch is selected with the BR-1180’s panel controls, the
corresponding bank and patch number are transmitted
as Bank Select and Program Change messages from
MIDI OUT.
3. Use [CURSOR] to move the cursor to “Effects Ch.” and
use the TIME/VALUE dial to select the MIDI channel
for transmitting the program changes.
fig.25
1–16:
Bank Select and Program Change messages are
transmitted and received over the selected MIDI
channel.
OFF:
Bank Select and Program Change messages are not
transmitted and received.
4. To have these settings be remembered, you must save
the song.
“Saving a song (Song Store)”; p. 80 in the Owner’s Manual
17
Rapidly saving songs (Song Store)
Ver. 2 makes saving songs even quicker and easier than
before.
1. After confirming that the recorder is stopped, hold
down [STOP] and press [REC].
“Save Current?” appears in the display.
2. Press [YES/ENTER].
“Storing Current...” appears. The process is finished
when “Complete!” appears.
* You can also save songs using the previous process. The song
content saved is the same in either case.
18
Initializing only one of multiple drives
(partitions)
Now you can specify a single partition for initialization when
using multiple drives (partitions).
* Use of this feature is not required if you are using the default
factory settings without any changes, or if you are using the
hard disk initialized with Format Mode set to NORMAL or
SURFACE SCAN.
1. First, select the drive you want to initialize.
Step 4 in the “Viewing information about the hard disk
(Hard Disk Information)” p. 136 in the Owner’s Manual
2. Press [UTILITY], then press [CURSOR] to move the
cursor to “HDD,” then press [ENTER].
3. Use [CURSOR] to move the cursor to “INITIALIZE,”
then press [ENTER].
This brings up the Hard Disk Initialize screen.
4. Rotate the TIME/VALUE dial to set “Format Mode” to
“ONLY CUR. PARTITION.”
* Take care to note that selecting anything other than “ONLY
CUR. PARTITION” will result in the entire hard disk being
initialized.
5. Use [CURSOR] to move the cursor to “GO,” then press
[ENTER].
When “Sure?” appears in the display, press [YES/
ENTER] once more.
“Now Initializing...” appears, and initialization of the
drive begins. The process is finished when “Complete!”
appears.
19
03128278
‘02-10-C3-11N