1
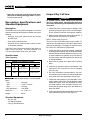
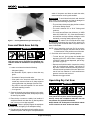
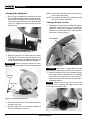
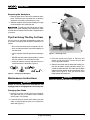
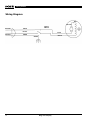
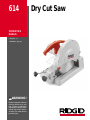
614
OPERATOR’S
MANUAL
• Français – 11
• Castellano – pág. 23
WARNING!
Read this Operator’s Manual
carefully before using this
tool. Failure to understand
and follow the contents of this
manual may result in electrical shock, fire and/or serious
personal injury.
Dry Cut Saw
614 Dry Cut Saw
Table of Contents
Recording Form for Machine Serial Number ..............................................................................................................1
General Safety Information
Work Area Safety........................................................................................................................................................2
Electrical Safety ..........................................................................................................................................................2
Personal Safety...........................................................................................................................................................2
Tool Use and Care......................................................................................................................................................3
Service ........................................................................................................................................................................3
Specific Safety Information
Dry Cutter Safety ........................................................................................................................................................3
Description, Specifications and Standard Equipment
Description ..................................................................................................................................................................4
Specifications..............................................................................................................................................................4
Standard Equipment ...................................................................................................................................................4
Inspect Dry Cut Saw......................................................................................................................................................4
Saw and Work Area Set-Up ..........................................................................................................................................5
Operating Dry Cut Saw
Clamping The Workpiece............................................................................................................................................5
Cutting With Dry Cut Saw ...........................................................................................................................................6
Removing The Workpiece...........................................................................................................................................7
Tips For Using Dry Cut Saw .........................................................................................................................................7
Maintenance Instructions
Changing Saw Blade ..................................................................................................................................................7
Replacing Brushes......................................................................................................................................................8
Saw Storage ...............................................................................................................................................................8
Service and Repair ........................................................................................................................................................9
Wiring Diagram............................................................................................................................................................10
Lifetime Warranty ........................................................................................................................................Back Cover
ii
Ridge Tool Company
614
Dry Cut Saw
614 Dry Cut Saw
Record Serial Number below and retain product serial number which is located on nameplate.
Serial
No.
614 Dry Cut Saw
General Safety Information
WARNING! Read and understand all instructions. Failure
to follow all instructions listed below may
result in electric shock, fire, and/or serious
personal injury.
SAVE THESE INSTRUCTIONS!
Work Area Safety
• Keep your work area clean and well lit. Cluttered
benches and dark areas invite accidents.
• Do not operate tools in explosive atmospheres,
such as in the presence of flammable liquids,
gases, or dust. Tools create sparks which may ignite
the dust or fumes.
• Keep bystanders, children, and visitors away while
operating a tool. Distractions can cause you to lose
control.
• Keep floors dry and free of slippery materials
such as oil. Slippery floors invite accidents.
Electrical Safety
Cover of
grounded
outlet box
• Use proper extension cords. (See chart.) Insufficient conductor size will cause excessive voltage
drop and loss of power.
Minimum Wire Gauge for Extension Cord
Nameplate
Total Length (in feet)
Amps
0 – 25
26 – 50
51 – 100
0–6
18 AWG
16 AWG
16 AWG
6 – 10
18 AWG
16 AWG
14 AWG
10 – 12
16 AWG
16 AWG
14 AWG
12 – 16
14 AWG
12 AWG
NOT RECOMMENDED
• Stay alert, watch what you are doing and use
common sense when operating a power tool. Do
not use tool while tired or under the influence of
drugs, alcohol, or medications. A moment of inattention while operating power tools may result in serious personal injury.
• Dress properly. Do not wear loose clothing or
jewelry. Contain long hair. Keep your hair, clothing,
and gloves away from moving parts. Loose clothes,
jewelry, or long hair can be caught in moving parts.
• Avoid accidental starting. Be sure switch is OFF
before plugging in. Plugging in tools that have the
switch ON invites accidents.
• Remove adjusting keys before turning the tool
ON. A wrench or a key that is left attached to a rotating part of the tool may result in personal injury.
Grounding prong
• Avoid body contact with grounded surfaces. There
is an increased risk of electrical shock if your body is
grounded.
• Do not overreach. Keep proper footing and balance at all times. Proper footing and balance enables
better control of the tool in unexpected situations.
• Do not expose electrical tools to rain or wet conditions. Water entering a tool will increase the risk of
electrical shock.
• Use safety equipment. Always wear eye protection. Dust mask, non-skid safety shoes, hard hat, or
hearing protection must be used for appropriate conditions.
• Do not abuse cord. Never use the cord to pull the
plug from an outlet. Keep cord away from heat,
oil, sharp edges or moving parts. Replace damaged cords immediately. Damaged cords increase the
risk of electrical shock.
2
• Use only three-wire extension cords which have
three-prong grounding plugs and three-pole receptacles which accept the machines plug. Use of
other extension cords will not ground the tool and
increase the risk of electrical shock.
Personal Safety
• Grounded tools must be plugged into an outlet
properly installed and grounded in accordance
with all codes and ordinances. Never remove the
grounding prong or modify the plug in any way. Do
not use any adapter plugs. Check with a qualified electrician if you are in doubt as to whether the
outlet is properly grounded. If the tools should electrically malfunction or break down, grounding provides a low resistance path to carry electricity away
from the user.
Grounding prong
• When operating a power tool outside, use an outdoor extension cord marked “W-A” or “W”. These
cords are rated for outdoor use and reduce the risk of
electrical shock.
WARNING Some dust created by power sanding,
sawing, grinding, drilling and other construction activities
contains chemicals known to the State of California to
Ridge Tool Company
614 Dry Cut Saw
cause cancer, birth defects or other reproductive harm.
Some examples of these chemicals are:
• lead from lead-based paints
• crystalline silica from bricks and cement and other
masonry products
• arsenic and chromium from chemically-treated lumber
Your risk from these exposures varies, depending on
how often you do this type of work. To reduce your exposure to these chemicals: work in a well ventilated area and
work with approved safety equipment such as those dust
masks that are specially designed to filter out microscopic particles.
Service
• Tool service must be performed only by qualified
repair personnel. Service or maintenance performed
by unqualified repair personnel could result in injury.
• When servicing a tool, use only identical replacement parts. Follow instructions in the Maintenance
Section of this manual. Use of unauthorized parts or
failure to follow maintenance instructions may create a
risk of electrical shock or injury.
Specific Safety Information
Tool Use and Care
WARNING
• Use clamps or other practical way to secure and
support the workpiece to a stable platform. Holding
the workpiece by hand or against your body is unstable and may lead to loss of control.
Read this operator’s manual carefully before using
the 614 Dry Cut Saw. Failure to understand and follow the contents of this manual may result in
electrical shock, fire and/or serious personal injury.
• Do not force tool. Use the correct tool for your
application. The correct tool will do the job better
and safer at the rate for which it is designed.
Call the Ridge Tool Company, Technical Service
Department at (800) 519-3456 if you have any questions.
• Do not use tool if switch does not turn it ON or
OFF. Any tool that cannot be controlled with the switch
is dangerous and must be repaired.
• Disconnect the plug from the power source before
making any adjustments, changing accessories,
or storing the tool. Such preventive safety measures reduce the risk of starting the tool accidentally.
• Store idle tools out of the reach of children and
other untrained persons. Tools are dangerous in
the hands of untrained users.
• Maintain tools with care. Keep cutting tools sharp
and clean. Properly maintained tools with sharp cutting
edges are less likely to bind and are easier to control.
• Check for misalignment or binding of moving
parts, breakage of parts, and any other condition
that may affect the tool's operation. If damaged,
have the tool serviced before using. Many accidents
are caused by poorly maintained tools.
• Use only accessories that are recommended by
the manufacturer for your model. Accessories that
may be suitable for one tool may become hazardous
when used on another tool.
• Inspect tool and extension cords periodically and
replace if damaged. Damaged cords increase the
risk of electrical shock.
• Keep handles dry and clean; free from oil and
grease. Allows for better control of the tool.
Dry Cut Saw Safety
• Wear safety glasses and ear protection. Protects
eyes from foreign objects. Prevents loss of hearing.
• Keep all guards in place and in working order.
Never clamp or tie guard in the open position. Exposed
blade increases the risk of injury.
• Set up the dry cutting saw on a flat, level surface. Be sure the saw is stable. Will prevent tipping of
the unit.
• Always clamp the workpiece with vise. Do not
perform any operation freehand. Prevents loss of
control of the workpiece.
• Do not place either hand in the working area when
tool is connected to power source. Never reach
around or in back of the saw blade. Increases the
risk of injury.
• Allow motor to reach full speed before cutting.
Prevents stalling of motor.
• Use only cut-off saw blade with speed rating at
least as high as the RPM specified on the nameplate. Improper blade may be hazardous and result in
injury.
• Workpiece must be cut off against the direction of
the saw only. Prevents workpiece from being thrown.
• Be sure cut-off saw is sharp and free from vibration. Less likely to bind and lose control.
Ridge Tool Company
3
614 Dry Cut Saw
• Raise the cut-off saw from the kerf of the workpiece prior to releasing the trigger switch. Less likely for saw blade to bind.
Description, Specifications and
Standard Equipment
Description
The RIDGID 614 Dry Cut Saw is designed to cut ferrous
and non-ferrous pipe and irregular materials such as the
following:
• Gas pipe, lining tube, electrical pipe and conduit
and PVC pipe.
• Steel angle, channel and bar
• Aluminum frame, curtain rail and a variety of interior decoration material
A two-lever vise clamps the workpiece and allows an
angle cut from 45º to 90º. The motor operates on a
115 volt, single phase, 50-60 Hertz, AC current.
Specifications
Cutting Capacity:
Model 614 Capacity Chart
Cutting
Angle
WARNING
To prevent serious injury, inspect your Dry Cut
Saw on a regular basis. The following inspection
procedures should be performed before each use
of the tool:
1. Inspect the power cord and plug for damage. If the
grounding prong is missing or the cord is damaged,
do not use the tool until the cord has been replaced.
2. Make sure the switches turn the tool ON and OFF. If
broken, do not use until they are replaced.
NOTE! Switch Action (Figure 4)
There is a LOCK-OFF switch button on the handle. To
start the tool, first depress the LOCK-OFF switch button
and then pull the trigger. The trigger will not work before
the LOCK-OFF switch button is depressed.
3. Inspect the saw for any broken, missing, misaligned
or binding parts as well as any conditions which may
affect the safe and normal operation of the tool. If any
of these conditions are present, do not use the tool
until the problem has been repaired. Do not use dull
or damaged blades.
Workpiece Geometry
4. Make sure all guards are in place and in working
order.
5. Clean any oil, grease or dirt from the handles. This
reduces the risk of injury due to the tool slipping
from your grip.
90˚ Cuts
5″
130mm
33/4″ x 7″
95mm x 180mm
41/2″ x 41/2″
115mm x 115mm
45˚ Cuts
4″
100mm
31/2″ x 4″
90mm x 100mm
31/2″ x 31/2″
90mm x 90mm
CAUTION
Inspect Dry Cut Saw
6. Use only accessories recommended for your tool.
Accessories used for other tools may be hazardous
when used on this saw and lead to serious injury.
Cutting of larger shapes not recommended.
Motor:
Type ............................Universal
Volts ............................115AC, 50-60Hz
Amps...........................15 Amps
No Load Speed ...........1300 RPM
Blade Size .....................14″ x .087″ x 1″
Weight ...........................49 lbs.
7. Inspect the cutting edges of your saw blade. If necessary, replace prior to using. Dull or damaged cutting
edges can lead to injury, tool breakage or excessive heat build-up in the workpiece and the tool.
Check that the speed rating of the saw blade is at
least 1300 RPM.
8. Clean metal shavings and other debris from the chip
tray located at the rear of the saw (Figure 1).
Standard Equipment
• Dry Cut Saw
• 14″ Blade (Installed)
• Two (2) Allen Wrenches
4
Ridge Tool Company
614 Dry Cut Saw
earlier. If the power cord does not reach the outlet,
use an extension cord in good condition.
WARNING To avoid electrical shock and electrical
fires, never use an extension cord that is damaged or
does not meet the following requirements:
• The cord has a three-prong plug similar to shown
in Electrical Safety section.
• The cord is rated as “W” or “W-A” if being used
outdoors.
Figure 1 – Cleaning Metal Shavings From Chip Tray
Saw and Work Area Set-Up
• The cord has sufficient wire thickness (14 AWG
below 25′/12 AWG 25′ - 50′). If the wire thickness is
too small, the cord may overheat, melting the cord’s
insulation or causing nearby objects to ignite.
WARNING To reduce risk of electrical shock, keep
all electrical connections dry and off the ground. Do
not touch plug with wet hands. Make sure power cord is
clear of saw blade.
NOTE! Use of extension cords over 50 ft is not recommended. An improper extension cord will result
in deterioration of the performance of the saw.
WARNING
5. Check the unit to insure it is operating properly.
• To start the tool, firmly grasp the handle then
depress LOCK-OFF switch button. Keeping the
LOCK-OFF switch button depressed, pull the trigger switch (Figure 4).
To prevent serious injury, proper set-up of the
saw and work area is required. The following procedures should be followed to set-up the dry cut
saw:
• Depress and hold the switch. Inspect the moving
parts for misalignment, binding, odd noises or
any other unusual conditions that may affect the
safe and normal operation of the saw. Make sure
saw is free from vibration. If such conditions are
present, have the saw serviced.
1. Locate a work area that has the following:
• Adequate lighting
• No flammable liquids, vapors or dust that may
ignite.
• Release the trigger switch.
• Grounded 15 amp electrical outlet
• Clear path to the electrical outlet that does not
contain any sources of heat or oil, sharp edges or
moving parts that may damage electrical cord.
Operating Dry Cut Saw
WARNING
• Dry place for saw and operator. Do not use the
saw while standing in water.
• Level ground
2. Clean up the work area prior to setting up any equipment. To prevent slips and falls, always wipe up any
oil that may be present.
3. Place the dry cut saw on a stable, level surface. If
workpiece extends more than four (4′) feet beyond the
saw, use one or more pipe supports.
WARNING Failure to properly support the workpiece
can result in the unit tipping or the workpiece falling.
Wear safety glasses and ear protection. Make
sure guards are in place and in working order.
Always clamp the workpiece with the vise. Do
not perform any operation freehand.
Keeps hands out of the path of saw blade. Never
reach around or in back of the saw blade.
4. Plug the saw into the electrical outlet making sure to
position the power cord along the clear path selected
Ridge Tool Company
5
614 Dry Cut Saw
Clamping the Workpiece
1. Dry Cut Saw is equipped with a two-lever vise that
can be adjusted to make an angle cut from 45º to 90º,
right and left. To adjust the vise, loosen the two bolts
of the fence guard and move to the desired angle
(Figure 2). Retighten the bolts the lock the fence
guide in place.
NOTE! Always use both hands when using the vise to
prevent saw from tipping.
NOTE! For smoother operation and extended life, keep
the vise mechanism lubricated.
Cutting with Dry Cut Saw
1. To start the tool, firmly grasp the handle, then depress
LOCK-OFF switch button (Figure 4). Keeping the
LOCK-OFF switch button depressed, pull the trigger
switch. Be sure to allow the motor to reach maximum
speed prior to cutting (Figure 5).
Lock Off Switch
Trigger
Figure 2 – Fence Adjustment For Angle Cut
2. Raise the upper lever to release the feed mechanism (Figure 3). Place the workpiece into the vise. If
it extends more than four (4) feet beyond the saw, use
one or more pipe stands to support the workpiece.
WARNING Failure to properly support the workpiece can result in the tipping of the unit or binding of the
saw blade.
Figure 4 – Switch Controls
WARNING Keep hands out of the path of the saw
blade. Never reach around or in back of the saw blade.
2. Hold the workpiece firmly. Cut the workpiece slowly
and evenly. Raise the handle from the workpiece
and release the trigger switch to turn saw OFF.
Leave the handle only when the tip saw blade is
completely stopped.
Horizontal
Lever
CAUTION Raise the cut off saw from the kerf of the
workpiece prior to releasing the trigger switch. Less
likely for the saw blade to bind.
Upper Lever
Figure 3 – Two-Lever Vise Controls
3. Push the horizontal lever until the vise contacts the
workpiece (Figure 3).
4. Bring the upper lever to the horizontal position to
secure the workpiece in the vise.
Figure 5 – Cutting Workpiece
6
Ridge Tool Company
614 Dry Cut Saw
Removing the Workpiece
1. Raise the upper lever of the vise to release the workpiece. Pull back on the horizontal lever to allow the
workpiece to be easily removed from the vise.
Pivot Pin
2. Slide the workpiece out of the saw keeping a firm grip
on the workpiece as it clears the saw.
WARNING To avoid injury from falling parts or equipment tip-overs when handling long workpieces, make
sure that the end farthest from the saw is supported prior
to removal.
Tips For Using The Dry Cut Saw
Life of the dry cut saw blade will depend on proper use
of the saw. Procedures that should be followed are as
follows:
• Do not force the blade into the material to be cut.
• Only cut material within the specified capacity for
the saw blade.
• Let the machine reach full speed before starting to
cut.
• NEVER stop and restart with the blade in contact
with the material. This will break the teeth.
• Clamp the material correctly and ensure that is it
centered relative to the blade (Figure 6).
Figure 6 – Clamping The Workpiece
Figure 7 – Removing Cover
3. Press the spindle lock (Figure 8). Place the hex
wrench on the arbor bolt, unscrew the bolt and
remove the blade carefully.
4. Slide the new blade onto the arbor shaft making certain that the blade marking indicates rotation in a
counter-clockwise direction. Also make sure the blade
rotates the same direction as the arrow shown on the
safety cover (Figure 9). Then, put back the outer
flange washer and arbor bolt.
WARNING
Maintenance Instructions
Make sure the blade hex bolt is securely tightened.
WARNING
Always be sure that the tool is switched OFF and
unplugged before changing blade or servicing saw.
Changing Saw Blade
1. Remove the power cord plug from the receptacle,
then place the plug in a location where someone
will not plug it in by mistake.
2. Loosen the three (3) screws on the safety cover then
rotate it clockwise around pivot pin to expose the
arbor shaft (Figure 7).
Ridge Tool Company
7
614 Dry Cut Saw
Spindle Lock
Figure 10 – Carbon Brush Wear
2. Use the slotted ( – ) screw driver to remove the
brush caps (Figure 11).
Figure 8 – Removing Saw Blade
Figure 11 – Removing Brush Caps
3. Take out the worn brushes inside, put in new ones
and replace the caps.
Saw Storage
Figure 9 – Installing Saw Blade
5. Rotate safety cover back to its position and replace
the three (3) screws.
WARNING
WARNING Motor-driven equipment must be kept
indoors or well covered in rainy weather. Store the
machine in a locked area that is out of reach of children
and people unfamiliar with saws. This saw can cause
serious injury in the hands of untrained users.
Never use this saw with the guard re-
moved.
Replacing Carbon Brushes
1. Replace carbon brushes when they wear down to
about 1/4″ (6mm) or sparking will occur. Both brushes
should be changed at the same time (Figure 10).
8
Ridge Tool Company
614 Dry Cut Saw
Service and Repair
WARNING
The “Maintenance Instructions” will take care of most of
the service needs of this saw. Any problems not
addressed by this section should only be handled by an
authorized RIDGID service technician.
Tool should be taken to a RIDGID Independent
Authorized Service Center or returned to the factory. All
repairs made by Ridge service facilities are warranted
against defects in material and workmanship.
WARNING When servicing this saw, only identical
replacement parts should be used. Failure to follow
these instructions may create a risk of electrical shock or
other serious injury.
If you have any questions regarding the service or repair
of this machine, call or write to:
Ridge Tool Company
Technical Service Department
400 Clark Street
Elyria, Ohio 44035-6001
Tel: (800) 519-3456
E-Mail: [email protected]
For name and address of your nearest Independent
Authorized Service Center, contact the Ridge Tool
Company at (800) 519-3456 or http://www.ridgid.com
Ridge Tool Company
9
614 Dry Cut Saw
Wiring Diagram
RED
YELLOW
NEUTRAL
ON/OFF
SWITCH
WHITE
BLACK
GROUND
BLUE
GREEN
BLACK
GREEN
10
Ridge Tool Company