1
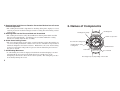
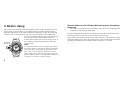
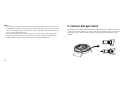
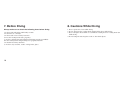
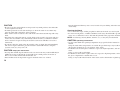
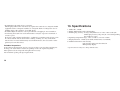
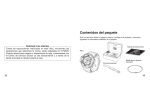
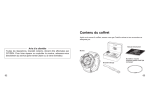
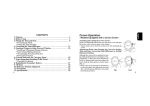
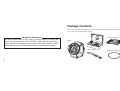
Package Contents
Once you have opened the package, first check whether the following product and
accessories are contained in the package.
Instruction manual
Request to Customers
All repairs performed on this watch, including repairs involving the
band, are to be performed at the CITIZEN. When desiring to have your
watch repaired or inspected, place contact the Citizen Service Center
either directly or through the store where you purchased your watch.
Watch
Extension band
2
Rotating bezel spring (spare)
3
1. Features of the Citizen Promaster 1000 m Professional Diver
Features of the Citizen Promaster 1000 m Professional Diver ........... 5
Names of Components ............................................................................ 7
Before Using ............................................................................................. 8
Setting the Time and Date ..................................................................... 10
1. Setting the Time ................................................................................. 10
2. Setting the Date .................................................................................. 11
5. Helium Escape Valve ............................................................................. 13
6. Using the Rotating Bezel ....................................................................... 14
7. Before Diving .......................................................................................... 16
8. Cautions While Diving ........................................................................... 17
9. Maintenance After Diving ...................................................................... 18
10. Disassembly and Assembly of Rotating Bezel and Rotating Bezel
Clamp ...................................................................................................... 19
11 Handling .................................................................................................. 25
12. Precautions ............................................................................................ 26
13. Specifications ......................................................................................... 31
This watch is a diver’s watch designed to withstand depths down to 1000 m (water
pressure equivalent to 100 atm).
1.
2.
3.
4.
4
1. Titanium Case Offering Outstanding Features
* The watch case employs a titanium base offering superior corrosion resistance,
light weight and high strength, while the surface is specially treated for high
hardness and enhanced scratch resistance.
2. Water Resistant Construction Capable of Withstanding a Depth of 1000 m
* This watch features enhanced water resistance that enables it to withstand
saturation diving by using helium gas.
3. Equipped with an Helium Escape Valve for Discharging Helium Gas
* This watch employs an helium escape valve for enhanced safety that automatically
discharges helium gas that has penetrated inside the watch when ascending from
deep regions to the surface.
5
English
Contents
Rotating bezel
O
FE
SS
AL D I V E R
ION
'S
10
Helium escape valve
0
P
R
Rotating bezel clamp
M
AUTOMATIC
Screw down locking crown
MON 7
T
A
IT
NI
UM
1000M
PROFESSIONAL
DIVER'S
O
P
E
Rotating bezel clamp
locking lever
CL O S E
N
6
2. Names of Components
0
4. Rotating Bezel with Reverse Rotation Prevention Mechanism to Prevent
Incorrect Operation
* The rotating bezel, which is important for checking diving time, employs a reverse
rotation prevention mechanism that prevents the rotating bezel from being rotated
inadvertently.
5. Rotating Bezel can be Disassembled and Assembled
* The rotating bezel can be easily disassembled for cleaning when debris and dirt
have become trapped inside. A locking lever is used that enables the rotating
bezel to be securely fastened after assembly.
6. Screw down locking Crown
* The screw down locking crown can be securely locked in position through the use
of a screw-locking mechanism. What is more, the use of double O-rings results in
enhanced airtightness and water resistance. Furthermore, the screw down locking
crown is located at the 9:00 position to prevent it from obstructing movement of
the wrist or wetsuit.
7. Self-Winding Movement
* A self-winding movement is employed in which the watch mainspring is wound
automatically by movement of the hand when worn, and the force of the
mainspring is then used to drive the movement (watch). The mainspring can also
be wound by turning the crown.
Minute hand
Hour hand
Second hand
The design may vary depending on the model.
7
3. Before Using
FE
SS
ION
AL DI V E R
'S
10
Keep the mainspring adequately wound either by turning the crown by hand or by
wearing the watch on your wrist for at least three hours each day.
If the watch is only worn for short periods of time, turn the crown by hand to keep the
mainspring fully wound. Since this watch employs a slip mechanism that automatically
disengages the mainspring when fully wound, it cannot be over-wound.
0
M
P
O
* After first loosening the screw down locking crown, turn it to the right about 40
revolutions to fully wind the mainspring.
0
R
This watch is a mechanical watch (self-winding). Before using, disengage the screw
down locking crown and turn it to the right by hand to wind the watch mainspring.
When the mainspring is in the fully wound state (sufficiently wound), the watch will
continue to run for about 40 hours. In order to ensure that the watch continuously
provides a stable time display, always wear the watch
on your wrist to keep the mainspring adequately
wound. If the watch is only worn for short periods of
time, wind the mainspring manually by turning the
Disengage
crown by hand.
screw-lock
Note:
A screw down locking crown is employed to enhance
the water resistance of the watch. When operating the
crown, first turn it to the left to disengage the screw
lock. Once you have finished operating the crown,
always make sure to return the crown to the normal
position and then turn it to the right while pushing it in
so that the screw lock is securely engaged.
[General Reference for Winding Mainspring when Completely
Unwound]
AUTOMATIC
CL O S E
MON 7
P
E
N
8
O
T
A
IT
NI
UM
1000M
PROFESSIONAL
DIVER'S
9
UM
NI
A
IT
T
P
E
N
10
O
Time setting
position
R
P
AUTOMATIC
MON 7
NI
UM
1000M
PROFESSIONAL
DIVER'S
A
IT
CL O S E
MON 7
1000M
PROFESSIONAL
DIVER'S
0
CL O S E
AUTOMATIC
10
T
P
M
R
0
AL DI V E R
ION
'S
N
10
SS
E
S
'S
FE
M
FE
AL DI V E R
0
O
N
S IO
O
0
(1) Turn the crown to the left to loosen the screw down lock.
(2) Pull the crown out to the second click.
* The second hand does not stop moving.
(3) Turn the crown to set the hands (time). If the date
changes, the time is around 12:00 AM. The day
changes about 4-5 hours later.
* Pay attention to AM and PM when setting the
time.
(4) Push in the crown to the normal position.
(5) Turn the crown to the right while pushing in until
it stops to securely fasten the screw lock.
(1) Turn the crown to the left to loosen the screw down lock.
(2) Pull the crown out to the first click.
(3) Turn the crown to set the date and day (rapid
correction).
* The date changes if the crown is turned to the
left.
Day rapid
* The day changes if the crown is turned to the
correction
right.
The day is alternately displayed in two
languages. Once the day has been set to the
desired display, the watch automatically
displays the specified display.
Date
(4) Push in the crown to the normal position.
rapid
(5) Turn the crown to the right while pushing in until
correction
it stops to securely fasten the screw lock.
P
1. Setting the Time
2. Setting the Date
O
4. Setting the Time and Date
Date/day setting position
11
Notes:
* Avoid rapid correction of the date when the watch hands are between the hours of
9:00 PM and 4:30 AM. Correcting the date during this time period may prevent the
date from changing on the following day. Set the date and day after the hands have
moved outside this time period.
* This date displayed by this watch is based on a 31-day month. The date must be
changed by operating the crown on the first day of the following month in those
months with less than 31 days (months having 30 days and February).
12
5. Helium Escape Valve
An helium escape valve is provided that automatically discharges helium gas that has
penetrated inside the watch to prevent the watch from rupturing when ascending from
deep regions to the surface during saturation diving by professional divers using
helium.
13
6. Using the Rotating Bezel
The rotating bezel can be used as a reference for elapsed time during diving or for the
amount of time remaining relative to a predetermined amount of time.
Determination of Remaining Time
* The remaining time can be determined by
aligning the ▼ mark on the rotating bezel
with the target time.
[Setting the Rotating Bezel]
* Only turn the rotating bezel to the left. It cannot be rotated in the opposite direction
(to the right) to prevent the risk of incorrect operation.
Determination of Elapsed Time
Turning
direction
Remaining time
* Align the ▼ mark on the rotating bezel
with the minute hand. After a certain
amount of time has elapsed, the elapsed
time can be determined from the scale on
the rotating bezel.
Elapsed time
14
15
7. Before Diving
8. Cautions While Diving
Always make sure to check the following items before diving.
1. Never operate the crown while diving.
2. Do not disengage the rotating bezel clamp locking lever while diving.
3. Never attempt to disassemble or assemble the rotating bezel or rotating bezel clamp
while diving.
4. Do not bump the watch against rocks or other hard objects.
1. Is the watch mainspring sufficiently wound?
2. Is the time set correctly?
3. Is the watch crown securely fastened?
4. Does the rotating bezel rotate properly?
5. Are the rotating bezel and rotating bezel clamp properly assembled?
6. Is the rotating bezel clamp locking lever properly fastened?
7. Is the band securely attached?
8. Are there any scratches, cracks or chips in the glass?
16
17
9. Maintenance After Diving
1. After diving, thoroughly rinse the watch with pure water and carefully wipe off the
moisture with a dry cloth. When rinsing with water, first check to make sure that the
crown is securely locked.
2. If there is any debris or fine sand around the rotating bezel, disassemble the rotating
bezel and rotating bezel clamp and remove any debris and soiling. However, never
attempt to loosen or remove the screws of the back cover.
10. Disassembly and Assembly of Rotating
Bezel and Rotating Bezel Clamp
[Exploded View of Rotating
Bezel and Related Parts]
Rotating bezel clamp
Rotating bezel
Rotating bezel clamp
locking lever
Rotating bezel spring
* Only disassemble the rotating
bezel when necessary. Be
careful not to lose or deform
any of the parts during
disassembly.
Stopper
18
19
[Disassembly Procedure]
1. Open the rotating bezel clamp lever in
the direction of the arrow while
simultaneously lowering the stopper.
20
2. Turn the rotating bezel clamp to the
right and remove (this is opposite
the direction of an ordinary screw).
3. Lift the rotating bezel straight up and
remove.
4. Remove the rotating bezel spring.
Note: Be careful when removing the
rotating bezel clamp since the rotating
bezel and rotating bezel spring may fall
off and become lost.
Note: The rotating bezel spring is
installed beneath the rotating bezel.
Turning the rotating bezel while removing
can cause this spring to be deformed.
Note: Projections at two locations on the
spring are press fit into holes on the top
of the watch to prevent it from falling out
easily. Remove the rotating bezel while
being sufficiently careful not to deform
these projections.
21
[Assembly Procedure]
1. Properly align the projections on the
rotating bezel spring with the two holes
in the top of the watch and then gently
press on the top of the projections to set
in position.
2. Install the rotating bezel and turn to
the left while gently pressing from
above. Confirm that it rotates while
making a clicking sound.
3. Install the rotating bezel clamp and
turn to the left until it is tightly
screwed on (this is opposite the
direction of an ordinary screw).
4. Move the rotating bezel clamp
locking lever in the direction of the
arrow to securely lock the rotating
bezel clamp in position.
Projections
There should be no gap here
Note: Be careful not press on the spring with
excessive force since this can cause it to be
deformed. The side on which the three rising
spring sections are located is the top. Be
careful not to assemble the spring upsidedown.
22
Note: Never turn the rotating bezel to
the right since this can cause
deformation of the rotating bezel
spring.
Notes:
* Make sure that the rotating bezel clamp
is not installed on an angle.
* If debris or other material is adhered to
the threads, it will be difficult to rotate
the rotating bezel clamp. Since this
can also lead to damage of the threads,
make sure there is no debris present.
Note: If the rotating bezel clamp is not
screwed on tightly, a gap will form
between the rotating bezel clamp and
rotating bezel clamp locking lever that
prevents the rotating bezel clamp from
being properly locked in position. Make
sure that the rotating bezel clamp is
screwed on tightly.
23
5. Check the following items after assembling.
* Does the rotating bezel turn smoothly to the left? Does it turn to the right? (do not
use excessive force when turning to confirm this).
* Is the rotating bezel clamp screwed on tightly, and is it installed properly? In
addition, is there a gap between the watch case and the rotating bezel clamp?
(Although the rotating bezel can be rotated slightly even if the rotating bezel clamp
locking lever is closed, the rotating bezel will not come off.)
* Is there a gap between the rotating bezel clamp locking lever and rotating bezel
clamp, and is the rotating bezel clamp tightly screwed on?
11. Handling
* When wearing the watch over a wetsuit and so forth, and the length of the standard
band is not long enough, attach the extension band provided to adjust the length of
the band.
Loop
Are there gaps here?
24
Extension band
Buckle
Note: Securely attach the extension band by
passing the end of the extension band over
the top of the buckle and sliding it through the
loop.
25
12. Precautions
WARNING: Water Resistance Performance
This divers watch is designed to withstand diving to a depth of 1000 m (water pressure
equivalent to 100 atm). It can be used for saturation diving using helium gas.
<Maintaining Water Resistance>
Please have your watch inspected at a Citizen Service Center once every 2-3 years to
maintain water resistance. Have the packing, glass, crown or other parts replaced as
necessary.
WARNING: Water Resistance
Examples of use
Refer to the watch dial and the case back for the indication of
the water resistance of your watch. The following chart
provides examples of use for reference to ensure that your
watch is used properly.
Specifications
Minor exposure
to water
(washing face,
rain, etc.)
Moderate exposure
to water (washing,
kitchen work,
swimming, etc.)
Marine sports
(skin diving)
Scuba diving
(with air tank)
Saturation
diving (helium
enriched
enviroment)
Operation of the
crown with
moisture visible
Water-resistant
to 1000M
OK
OK
OK
OK
OK
NO
Indication
Dial or Case (case back)
DIVER'S WATCH 1000M
26
27
CAUTION
• Be sure to use the watch with the crown pressed in (normal position). Check that the
crown is tightened securely.
• Do NOT operate the crown with wet fingers or when the watch is wet. Water may
enter the watch and compromise water-resistance.
• If the watch is used in seawater, rinse with fresh water afterward and wipe with a dry
cloth.
• If moisture has entered the watch, or if the inside of the crystal is fogged up and does
not become clear within a day, immediately take the watch to your dealer or Citizen
Service Center for repair. Leaving the watch in such a state will allow corrosion to
form inside.
• If seawater enters the watch, place the watch in a box or plastic bag and immediately
take it in for repair. Otherwise, pressure inside the watch will increase, and parts
(crystal, crown, etc.) may come off.
CAUTION: Keep your watch clean.
• Leaving dust and dirt deposited between the case and crown may result in difficulty in
pulling the crown out. Rotate the crown while in its normal position, from time to
time, to loosen dust and dirt and then brush it off.
• Dust and dirt tend to be deposited in gaps in the back of the case or band.
28
Deposited dust and dirt may cause corrosion and soil your clothing. Clean the watch
occasionally.
Cleaning the Watch
• Use a soft cloth to wipe off dirt, perspiration and water from the case and crystal .
• To clean a metal, plastic, or rubber watchband, wash away dirt with mild soap and
water. Use a soft brush to remove dust and dirt jammed in the gaps in the metal band.
NOTE: Avoid using solvents (thinner, benzine, etc.), as they may mar the finish.
CAUTION: Operating environment
• Use the watch within the operating-temperature range specified in the instruction
manual.
Using the watch where temperatures are outside the specified range, may result in
deterioration of functions or even stoppage of the watch.
• Do NOT use the watch in places where it is exposed to high temperature, such as in a
sauna.
Doing so may result in a skin burn.
• Do NOT leave the watch in a place where it is exposed to high temperature, such as
the glove compartment or dash-board of a car.
Doing so may result in deterioration of the watch, such as deformation of plastic parts.
29
• Do NOT place the watch close to a magnet.
Timekeeping will become inaccurate if you place the watch close to magnetic health
equipment such as a magnetic necklace or a magnetic latch of a refrigerator door or
handbag clasp or the earphone of a mobile phone.
• Do NOT subject the watch to a strong shock such as dropping it onto a hard floor.
• Avoid using the watch in an environment where it may be exposed to chemicals or
corrosive gases.
If solvents, such as thinner and benzine, or substances containing such solvents come
in contact with the watch, discoloration, melting, cracking, etc. may result. If the
watch comes in contact with mercury used in thermometers, the case, band or other
parts may become discolored.
Periodical inspections
Your watch needs inspection once in every two or three years for safety and long use.
To keep your watch water-resistant, the packing needs to be replaced regularly.
Other parts need to be inspected and replaced if necessary.
Ask for Citizen geuine parts upon replacement.
30
13. Specifications
1. Caliber No.: 8203B
2. Model: Mechanical watch (self-winding)
3. Timekeeping accuracy: Average daily difference of -10 to +20 seconds (the
timekeeping accuracy range may be exceeded depending on
the conditions of use)
4. Operating temperature range: -10°C to +60°C / -14°F to +140°F
5. Display functions: 3 hands (hour hand, minute hand, second hand)
6. Additional functions: Date and day
Date and day rapid correction function
Bilingual day display
* Specifications are subject to change without notice.
31