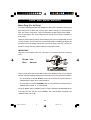
1
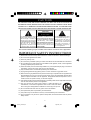
Dual Alarm AM/FM Clock Radio
with
SmartSet
®
Auto Time Setting System
and Sure Alarm
(U.S. Patent No. 6,567,344)
OWNER’S MANUAL
CKS5060B
(Black)
CKS5060S
(Silver)
Visit our web site at www.emersonradio.com
CKS5060_090606.p65
24
6/9/2006, 9:46
CAUT I ON
TO PREVENT FIRE OR SHOCK HAZARD, DO NOT USE THIS PLUG WITH AN
EXTENSION CORD, RECEPTACLE OR OTHER OUTLET UNLESS THE BLADES
CAN BE FULLY INSERTED TO PREVENT BLADE EXPOSURE. TO PREVENT FIRE
OR SHOCK HAZARD, DO NOT EXPOSE THIS APPLIANCE TO RAIN OR MOISTURE.
C AU T I O N
!
RISK OF ELECTRIC SHOCK
DO NOT OPEN
The lightning flash with arrowhead symbol, within an equilateral triangle is intended to
alert the user to the presence
of uninsulated ‘dangerous voltage’
within the product’s enclosure
that may be of sufficient
magnitude to constitute a risk
of electric shock to persons.
WARNING: TO REDUCE THE
RISK OF ELECTRIC SHOCK
DO NOT REMOVE COVER
(OR BACK), NO USER
SERVICEABLE PARTS INSIDE
REFER SERVICING TO
QUALIFIED SERVICE
PERSONNEL.
The exclamation point within
an equilateral triangle is intended to alert the user to
the presence of important
operating and maintenance
(ser vi ci ng) instr ucti ons in
the liter ature accompanying the appl iance.
The Caution Marking maybe located at the bottom enclosure of the apparatus.
IMPORTANT SAFETY INSTRUCTIONS
1.) Read these instructions. Keep these instructions. Follow all instructions. Heed all warnings.
2.) Do not use this apparatus near water.
3.) Clean only with dry cloth.
4.) Do not block any ventilation openings. Install in accordance with the manufacturer’s instructions.
5.) Do not install near any heat sources such as radiators, heat registers, stoves, or other apparatus
(including amplifiers) that produce heat.
6.) Protect the mains power cord from being walked on or pinched particularly at plugs, convenience
receptacles, and the point where they exit from the apparatus.
7.) Only use attachments / accessories specified by the manufacturer.
8.) Unplug this apparatus during lightning storms or when unused for long periods of time.
9.) Refer all servicing to qualified service personnel. Servicing is required when the apparatus has
been damaged in any way, such as mains power-supply cord or plug is damaged, liquid has been
spilled or objects have fallen into the apparatus, the apparatus has been exposed to rain or
moisture, does not operate normally, or has been dropped.
10.) This appliance shall not be exposed to dripping or splashing water and no object filled with liquids
such as vases shall be placed on the apparatus.
11.) Use only with the cart, stand, tripod, bracket, or table specified by the
manufacturer, or sold with the apparatus. When a cart is used, use caution
when moving the cart/apparatus combination to avoid injury from tip-over.
12.) Do not overload wall outlet. Use only power source as indicated.
13.) Use replacement parts as specified by the manufacturer.
14.) The product may be mounted to a wall only if recommended by the manufacturer.
15.) Upon completion of any service or repairs to this product, ask the service technician to perform
safety checks.
1
CKS5060_090606.p65
1
6/9/2006, 9:46
Congratulations!
And thank you for purchasing this SmartSet® Clock Radio from Emerson. SmartSet®
is the world’s first and only LED clock radio that will automatically set itself to the
correct ‘Year’, ‘Month’, ‘Date’, ‘Day’, and ‘Time’as soon as you plug it in and every
time the power is interrupted as well.
We all know how annoying it is to wake up in the morning and see the dreaded
flashing “12:00” display on our clocks or clock radios. This means that your power
was interrupted some time during the night while you were sleeping and your clock
doesn’t know what time it is anymore. Unfortunately it probably also means that
you are late for work, or for school, again. But with your SmartSet® Clock Radio the
dreaded flashing “12:00” display is a thing of the past. The SmartSet® resets itself
as soon as the power is restored and gets you up on time, every time.
And if that isn’t enough, the SmartSet® computer also knows when British Summer
Time begins and ends and it will adjust itself for those changes automatically through
the year 2099! Leap Years too! And best of all, the long life lithium battery backup
battery is already installed in your radio. You don’t have to remember to put a new
9-volt battery in your radio every 6 months. Under normal circumstances the lithium
battery can last for up to 5 years, and when it does need to be changed, a low
battery indicator will ‘flash’to let you know. The CR2430 lithium battery is available
almost anywhere that batteries are sold.
The SmartSet® also gives you dual alarms that can be set to go off on weekdays
only, weekends only, or all 7 days. You can set one alarm to wake you up to buzzer
Monday through Friday when you have to get up early, and use the second alarm
to wake you up to soft music on Saturday and Sunday when you can sleep in.
Someday all clocks and clock radios may be this smart. But today the technology
is only available from Emerson.
We’re sure you’ll be happy and amazed by your SmartSet® Clock Radio, and that it
will give you many years of enjoyment and dependable service.
Once again, all of us at Emerson thank you for your purchase.
2
CKS5060_090606.p65
2
6/9/2006, 9:46
I M P O R TAN T N O T E S
• Avoid installing this unit in places
• Operate controls and switches as
exposed to direct sunlight or close to
described in the manual.
heat radiating appliances such as
• Before turning on the power, make
electric heaters, on top of other stereo
certain that the mains power cord is
equipment that radiates too much
properly installed.
heat, places lacking ventilation or dusty
• When moving the set, be sure to first
areas, places subject to constant
disconnect the mains power cord.
vibration and/or humid or moist areas.
CE Information
This equipment has been tested and found to comply with the EMC directive and
low voltage directive. These limits are designed to provide reasonable protection
against harmful interference in a residential installation. This equipment generates,
uses, and can radiate radio frequency energy and, if not installed and used in
accordance with the instructions, may cause harmful interference to radio
communications. However, there is no guarantee that interference will not occur in
a particular installation. If this equipment does cause harmful interference to radio
or television reception, which can be determined by turning the equipment off and
on, the user is encouraged to try to correct the interference by one or more of the
following measures:
• Reorient or relocate the receiving antenna.
• Increase the separation between the equipment and receiver.
• Connect the equipment into an outlet on a circuit different from that to which
the receiver is connected.
• Consult the dealer or an experienced radio/TV technician for help.
Changes or modifications not expressly approved by the party responsible for
compliance could void the user’s authority to operate the equipment.
3
CKS5060_090606.p65
3
6/9/2006, 9:46
P R E PAR AT I O N F O R U S E
Unpacking And Set Up
• Remove the radio from the carton and remove all packing material from the
radio. We suggest that you save the packing material, if possible, in the unlikely
event that your radio ever needs to be returned for service. The original carton
and packing material is the only safe way to pack your radio to protect it from
damage in transit.
• Remove any descriptive labels or stickers on the front or top of the cabinet. Do
not remove any labels or stickers from the back or bottom of the cabinet.
• Note the serial number on the bottom of your radio and write this number in the
space provided on the Warranty page of this manual.
• Place your radio on a level surface such as a table, desk or shelf, convenient
to a mains outlet, out of direct sunlight, and away from sources of excess heat,
dirt, dust, moisture, humidity, or vibration.
• Unwind the mains power cord and extend it to its full length. The FM antenna
is built in to this cord. It must be fully extended to provide the best FM reception.
Protect Your Furniture
This model is equipped with non-skid rubber ‘feet’to prevent the product
from moving when you operate the controls. These ‘feet’are made from
non-migrating rubber material specially formulated to avoid leaving any
marks or stains on your furniture. However certain types of oil based
furniture polishes, wood preservatives, or cleaning sprays may cause the
rubber ‘feet’to soften, and leave marks or a rubber residue on the furniture.
To prevent any damage to your furniture we strongly recommend that you
purchase small self-adhesive felt pads, available at hardware stores and
home improvement centers everywhere, and apply these pads to the bottom
of the rubber 'feet' before you place the product on fine wooden furniture.
4
CKS5060_090606.p65
4
6/9/2006, 9:46
Power Source
This radio is designed to operate on normal 230V 50Hz Mains power only. Do not
attempt to operate the radio on any other power source. You could cause damage
to the radio that is not covered by your warranty.
This radio should be connected to a Mains outlet that is always ‘live’. If you connect
this radio to a wall outlet that is controlled by a switch, the switch should be left ‘On’
at all times. When the power to the radio is interrupted, the built in lithium battery
takes over to maintain the time and alarm settings. To maximize the life of the
lithium battery keep the radio connected to a ‘live’Mains outlet at all times.
If this plug does not fit into your outlet, you probably have an out-dated Mains
outlet. You should have your outlet changed by a qualified licensed electrician
Mains Outlet
Mains Plug
Sure Alarm battery Back-Up System
This SmartSet® Clock Radio includes a Sure Alarm battery back-up circuit that can
wake you up even if the power is ‘Off’at the selected wake up time. If your power
is ‘Off’at the selected wake up time the clock display will be off and the radio will
not operate, but a separate mini-buzzer will turn ‘On’automatically to wake you up,
even if you had selected the “Wake to Radio” option. The Sure Alarm will sound for
30 seconds and then shut off automatically.
To stop the Sure Alarm buzzer immediately, press the RADIO ON/OFF button.
Pressing the SNOOZE button has no effect during Sure Alarm operation.
NOTE: In order to maximize the life of the built in lithium battery, please be
sure to set the ALARM 1 and ALARM 2 switches to the “OFF” position if the
radio will be disconnected from the Mains outlet for more than a few hours.
This will prevent the Sure Alarm from turning ‘On’unecessarily.
5
CKS5060_090606.p65
5
6/9/2006, 9:46
L O C AT I O N O F C O N T R O L S AN D I N D I C ATO R S
Front Panel
3
4
5
2
6
1
7
8
Top Panel
14
15
13
16
17
18
19
20
12
11
10
9
21
Left Side Panel
Right Side Panel
24
25
23
26
22
27
6
CKS5060_090606.p65
6
6/9/2006, 9:46
1.) AL 1 (Alarm 1 ‘On’) Indicator.
2.) AM Indicator.
3.) Day Of Week (MON, TUE, WED, THU, FRI, SAT, SUN) Indicators.
4.) Time / Date Display.
5.) AL 2 (Alarm 2 ‘On’) Indicator.
6.) LOW
(Battery Low) Indicator.
7.) Back Up Battery Compartment (Bottom Cabinet).
8.) Lighted Dial Pointer.
9.) RADIO ON/OFF Button.
10.) TIME ZONE Button.
11.) DATE/MONTH Setting Button.
12.) TIME Setting Button.
13.) SLEEP Button (Sleep To Music Timer).
14.) Mains Power Cord (Back Cabinet).
15.) Speaker (Top Cabinet).
16.) ALARM MODE (Weekdays / Weekends / Everyday Alarm) Button.
17.) ALARM 1 Setting Button.
18.) ALARM 2 Setting Button.
19.) SET – Button.
20.) SET + Button.
21.) SNOOZE/SLEEP OFF Button.
22.) Display DIMMER (HI / LO) Selector Switch .
23.) ALARM 2 (RADIO / BUZZER / OFF) Selector Switch.
24.) ALARM 1 (RADIO / BUZZER / OFF) Selector Switch.
25.) VOLUME Control.
26.) Radio BAND (AM / FM) Switch.
27.) TUNING Control.
7
CKS5060_090606.p65
7
6/9/2006, 9:46
O P E R AT I I N G I N S T R U C T I O N S
Setting The Time, The First Time
IMPORTANT: The first time you connect your new SmartSet ® clock radio to
the Mains outlet the internal computer will automatically set the time correctly
for “GMT” which is the initial default setting. The display will scan for a few
seconds and then show the correct Day and Time. Your clock is set correctly
and running.
If you do not live in the “GMT” Time zone you must change the default zone display
to your own zone. You only do this one time and the SmartSet® will remember the
new default zone setting and will always return to that setting after a power
interruption.
There are 24 time-zones programmed into your SmartSet® clock radio as follows:
0 : GMT – 0
1 : GMT – 1
2 : GMT – 2
3 : GMT – 3
4 : GMT – 4
5 : GMT – 5
6 : GMT – 6
7 : GMT – 7
8 : GMT – 8
9 : GMT – 9
10 : GMT – 10
11 : GMT – 11
12 : GMT +/– 12
13 : GMT + 11
14 : GMT + 10
15 : GMT + 9
16 : GMT + 8
17 : GMT + 7
18 : GMT + 6
19 : GMT + 5
20 : GMT + 4
21 : GMT + 3
22 : GMT + 2
23 : GMT + 1
To change the default time zone display, depress
the TIME ZONE button. The number “0” will
appear on the display indicating that the default
zone is ZONE 0 (GMT – 0) Time.
Hold the TIME ZONE button and then press either the SET + or – buttons until
your own time zone appears on the display, then release the buttons.
The clock display will change to the correct time in the time zone you selected. The
clock will always return to the correct time in the zone you selected after every
power interruption.
If you move to a different time zone, simply change the default zone display to the
new zone and the SmartSet® will remember that setting for you.
8
CKS5060_090606.p65
8
6/9/2006, 9:46
Date Display
To see the correct date at any time, depress the DATE/MONTH button.
The display changes from time to Date and Month (DD/MM).
For example, 21st May will appear as “21. 5”.
When you release the DATE/MONTH button the display returns to the correct
time.
Year Display
To see the correct year, depress the DATE/MONTH and TIME buttons together.
The display changes from time to year.
When you release the DATE/MONTH and TIME buttons the display returns to the
correct time.
British Summer and Leap Year Adjustments
All British Summer and Leap Year adjustments are made automatically by
the SmartSet® internal computer as follows:
• Start of British Summer Time:
At “2:00 AM” on the Last Sunday in March, the clock will automatically
advance to “3:00 AM”.
• End of British Summer Time:
At “3:00 AM” on the Last Sunday in October, the clock will automatically
reset to “2:00 AM”.
• Leap Year:
At “12:00 Midnight” on February 28th, the calendar display will change
to “29. 2”.
9
CKS5060_090606.p65
9
6/9/2006, 9:46
Manual Time Adjustments
Some people like to set their clocks 5 to 10 minutes fast to make sure that they will
always be on time. Even though the SmartSet® sets the time by itself, you still have
the option of adjusting the time manually if you wish.
To manually adjust the time display depress and hold the TIME button, and press
either the SET + or – buttons to adjust the time display ahead or back as desired.
Each press of the SET + or – buttons will change the display by one minute. If you
hold the SET + or – buttons the display will continue to change. The display will
change slowly at first, one minute at a time. But if you continue holding the SET +
or – buttons the display will change rapidly.
NOTE: If you manually adjust the time, your new setting is entered into the SmartSet®
memory. If the power is interrupted, the display will return to your new setting, not
the original setting, when the power is restored.
Adjusting The Wake Up Times
Your SmartSet ® clock radio has two separate alarms that can be set and used
independently. You may use the alarms to wake two people at different times, or
you may use one alarm for weekdays and the other for weekend wake up times.
The procedure for adjusting the wake up time is the same for both Alarm 1 and
Alarm 2.
1.) Depress and hold either the ALARM 1 or
ALARM 2 setting button. The display will
change from the correct time to the Alarm 1
or Alarm 2 wake up time.
2.) While holding the ALARM 1 or ALARM 2 setting button, depress either the
SET + or – button to move the display ahead or back to your desired wake up
time.
3.) When the desired wake up time appears on the display, release the SET + or –
buttons.
NOTE: Be sure that you have set the wake up time correctly by observing the
AM indicator. If the AM indicator is ‘On’the wake up time is “AM”. If the AM
indicator is ‘Off’, the wake up time is “PM”.
4.) When the desired wake up time (AM or PM) appears on the display, release
the ALARM 1 or ALARM 2 setting buttons.
10
CKS5060_090606.p65
10
6/9/2006, 9:46
Selecting The Alarm Mode
Your SmartSet® clock radio allows you to select from among three different alarm
operation modes for either alarm. The alarm modes are:
• Everyday – the alarm will turn on all 7 days.
• Weekdays only – the alarm will only turn on Monday through Friday;
• Weekends only – the alarm will only turn on Saturday and Sunday;
To check the Alarm Mode setting for Alarm 1, depress the ALARM 1 setting button.
The display will show the Alarm 1 wake up time and the day of the week indicators
will show you the alarm mode which is selected.
• If all 7 indicators are ‘On’, the Everyday mode is
selected.
• If only the Monday through Friday indicators are
‘On’, the Weekdays only mode is selected.
• If only the Saturday and Sunday indicators are ‘On’,
the Weekends only mode is selected.
To change the Alarm Mode setting for Alarm 1, hold the ALARM 1 setting button
and press the ALARM MODE button until the day indicators show the desired
mode setting, Weekdays only, Weekends only, or Everyday operation.
Release the ALARM MODE and ALARM 1 setting buttons and the display will
return to the correct time.
Follow the same procedure to select the desired Alarm Mode for Alarm 2 if
necessary.
Checking The Wake Up Times And Alarm Mode
Whenever you want to check the wake up time or the alarm mode settings, simply
press either the ALARM 1 or ALARM 2 setting buttons. The display will change
from correct time to wake up time and the day indicators will show you the alarm
mode which is currently selected.
Release the ALARM 1 or ALARM 2 setting buttons to return to correct time.
11
CKS5060_090606.p65
11
6/9/2006, 9:46
Listening To The Radio
1.) Set the BAND selector to the desired band, AM or FM.
2.) Set the VOLUME control to a low setting.
3.) Press the RADIO ON/OFF button to turn the radio ‘On’. The radio dial pointer
will light.
4.) Select your desired station with the TUNING control.
5.) Adjust the VOLUME control to the desired setting.
6.) When you are finished listening, press the RADIO ON/OFF button to turn the
radio ‘Off’. The radio dial pointer light goes off.
Antenna Information
AM – The AM bar antenna is inside the cabinet. If AM reception is weak, change
the position of cabinet until the internal antenna picks up the strongest signal.
FM – The FM antenna is built in to the Mains power cord. If FM reception is weak
try varying the position and direction of the power cord until you find the
strongest signal.
12
CKS5060_090606.p65
12
6/9/2006, 9:46
Wake To RADIO
1.) Turn the radio ‘On’and select the band, station, and volume level that you wish
to hear when the alarm comes on, then turn the radio ‘Off’again.
2.) Reconfirm the wake up time and alarm mode settings for the alarm you are
using, Alarm 1, Alarm 2, or both alarms.
3.) Set the ALARM selector switch for one or
both alarms to the “RADIO” position. The
appropriate AL 1 and/or AL 2 indicators will
light up to confirm that the alarms are set.
4.) At the selected wake up time the radio will turn ‘On’. It will play for one hour and
then shut off automatically.
5.) To stop the radio sooner, press either the appropriate ALARM 1 or ALARM 2
button, or press the RADIO ON/OFF button. The radio will stop but the alarm
remains set and will turn the radio on again at the same time on the following
day (depending on the Alarm Mode setting).
6.) If you do not want the alarm to turn the radio on the following day, set the
appropriate ALARM selector to the “OFF” position.
13
CKS5060_090606.p65
13
6/9/2006, 9:46
Wake To Buzzer (Crescendo Alarm)
NOTE: Alarm 1 and Alarm 2 have different buzzer sounds.
• Alarm 1 is a “Single beep” sound.
• Alarm 2 is a “Double beep” sound.
You will be able to tell which alarm is going off by the sound that it makes.
1.) Reconfirm the wake up time and alarm mode settings for the alarm you are
using, Alarm 1, Alarm 2, or both alarms.
2.) Set the ALARM selector switch for one or both alarms to the “BUZZER”position.
The appropriate AL 1 and/or AL 2 indicators will light up to confirm that the
alarms are set.
3.) At the selected wake up time the buzzer will sound. It will begin softly and
gradually increase in volume to wake you up. It will continue for one hour and
then shut off automatically.
4.) To stop the buzzer sooner, press either the appropriate ALARM 1 or
ALARM 2 button. The buzzer will stop but the alarm remains set and will turn
the buzzer on again at the same time on the following day (depending on the
Alarm Mode setting).
To stop the buzzer and turn on the radio immediately, press the RADIO ON/
OFF button instead of the ALARM 1 or ALARM 2 button.
5.) If you do not want the alarm to turn the buzzer on the following day, set the
appropriate ALARM selector to the “OFF” position.
Radio And Buzzer Operation
You may also set one alarm for wake to radio and the other for
wake to buzzer. Just set the ALARM 1 and ALARM 2 selector
switches to the desired positions.
14
CKS5060_090606.p65
14
6/9/2006, 9:46
Snooze Alarm
After the radio or buzzer alarm sounds in the morning you may press the
SNOOZE/SLEEP OFF Bar for a few more minutes sleep. The corresponding AL
indicator will flash.
The alarm will stop for approximately 9 minutes and then turn on again. The Snooze
operation my be repeated several times if desired but after one hour the alarm will
not come on again.
Sleep To Music Timer
You can program the sleep timer to play the radio for up to 90 minutes and then
shut off automatically.
1.) Press the SLEEP button. The display will
briefly show “10” and the radio will begin to
play. After 10 minutes the radio will shut off
automatically.
Each time you press the SLEEP button the sleep timer will start at 10 minutes.
This is the sleep timer default setting.
2.) To increase or decrease the amount of time that the radio will play before
shutting off, hold the SLEEP button and press either the SET + or – button to
change the display to the desired sleep time, up to a maximum of “90” minutes
or a minimum of “02” minutes.
NOTE: When you change the sleep timer from the 10 minute default setting
to a different setting, the new setting becomes the default setting. Whenever
you activate the sleep timer it will begin with your new default setting and
count down to zero from that point.
3.) To cancel the sleep timer before it counts down to “00” and shut the radio ‘Off’
immediately, press the SNOOZE/SLEEP OFF Bar.
IMPORTANT: Remember that the station and volume settings you choose for
the Sleep To Music operation are the same settings you will hear if you set the
alarm for wake to radio the following morning.
Dimmer Control
The DIMMER control was set to the HI (High) position at our factory.
If you find the clock display is too bright in a darkened room, set the DIMMER
control to the LO (Low) position.
15
CKS5060_090606.p65
15
6/9/2006, 9:46
Changing The Lithium Battery
Like all batteries, eventually the built in lithium battery will need to be replaced. A
number of factors, such as, the length of time between the date the radio was
manufactured and the date you plugged it in for the first time determine the amount
of time before replacement. During this initial storage period, the lithium battery is
supplying power to the SmartSet® computer memory. Once you plug the radio in,
your household outlet supplies the power, and the battery is not being used. A
fresh lithium battery can supply power to the SmartSet ® computer for at least 3
years even if it is never connected to a Mains power supply. If your radio was
connected to your Mains supply within a few months after it was manufactured,
and you experience only the normal, nuisance type, short duration power
interruptions, your battery may last for up to 5 years or even longer.
When the battery power drops below a certain level, the LOW
indicator will
‘flash’. When you see this indicator, you should change the battery as soon as it is
convenient for you to do so. To change the battery proceed as follows:
1.) Purchase a replacement 3V lithium battery wherever batteries are sold. The
battery type is CR2430 or equivalent.
2.) Remove the battery from its package so it is ready to install.
IMPORTANT: Leave the radio power cord connected to your Mains outlet.
This will provide power to the SmartSet ® computer memory while the
original lithium battery is removed.
3.) Turn the radio face up and use a small screwdriver to remove the screw securing
the battery holder to the cabinet.
BE CAREFUL NOT TO LOSE THIS SMALL SCREW!
16
CKS5060_090606.p65
16
6/9/2006, 9:46
1
4.) Remove the original battery from the holder and insert the new battery into the
holder the same way, observing the positive (+) direction. Slide the holder with
the new battery back into the slot in the cabinet.
5.) Replace the screw that secures the battery holder in the cabinet.
6.) Turn the radio right side up and confirm that the LOW
indicator is ‘Off’.
7.) Save these instructions. You’ll have to do this again five to eight years from
now!
17
CKS5060_090606.p65
17
6/9/2006, 9:46
Resetting The Clock After A Total Memory Loss
If you do not change the built in lithium battery within a reasonable period of time
after you see the ‘flashing’ LOW
warning indicator, the lithium battery may
become exhausted and will no longer be able to supply back up power to the
SmartSet® internal computer. If the unit is disconnected from the Mains outlet after
the battery is exhausted, or if a power interruption occurs, the SmartSet® memory
will be lost and the clock will need to be reset when the power is restored. Be sure
to install a fresh lithium battery before you reset the clock, otherwise the clock will
need to be reset each time the power is interrupted.
If the lithium battery is exhausted and you experience an interruption in the Mains
power supply, the clock will reset itself to its initial default setting when the power is
restored.
The initial default setting is “12:00 AM, Saturday, 1st January (1. 1), 2005”.
If you notice that the time on your SmartSet ® clock radio is completely incorrect,
and the day of week indicator is also wrong, press the DATE/MONTH button to
see the date.
If the date display is showing “1. 1”, you
probably experienced a total memory loss.
To reset the clock after a total memory loss, proceed as follows:
1.) Follow the instructions on pages 16, 17 and install a new CR2430 lithium battery
in the battery compartment.
2.) Connect the radio to your Mains outlet and let the clock set itself.
3.) Depress the DATE/MONTH and TIME buttons together. The display will change
from ‘Time’to ‘Year’.
While holding the DATE/MONTH and TIME buttons, press the SET + button
to set the display to the correct year, then release the buttons.
18
CKS5060_090606.p65
18
6/9/2006, 9:46
4.) Depress the DATE/MONTH button. The display will change from ‘Time’ to
‘Date/Month’(DD/MM).
While holding the DATE/MONTH button, press the SET + button to set the
display to the correct month and date. The Day indicator will change
automatically as you adjust the Date/Month settings. When the correct Date
and Month appear on the display, release the buttons.
5.) Depress the TIME button and the SET + button to set the display to the correct
time. Be sure to confirm that you have set the time correctly to ‘AM’or ‘PM’by
observing the AM indicator.
6.) After you set the time, reconfirm that the Day, and Date/Month displays are still
correct. Make final adjustments if necessary.
The SmartSet® clock memory is now reset and the new lithium battery will maintain
it for the next 5 to 8 years, depending on the number and duration of the power
outages you experience.
IMPORTANT NOTE:
After resetting the clock, don’t forget to reset your wake up times, and alarm
mode settings, and sleep timer settings as well.
19
CKS5060_090606.p65
19
6/9/2006, 9:46
C AR E AN D M AI N T E N AN C E
Mains Plug (For UK Only)
The Mains lead supplied with this apparatus is fitted with a standard 13-Amp plug
(BS.1363) which is fitted with a 3 Amp fuse. When changing or examining the
fuse, the correct 3 Amp fuse – ASTA or BSI approved (BS.1362) must be fitted.
The 13-Amp plug is the most widely used in the UK and should be suitable for
most users.
However some locations (mainly older buildings) may not be equipped with normal
13-Amp sockets. In such cases it is recommended that a suitable plug adapter be
purchased from you dealer (rather than remove the plug). However, should you
decide to change the plug, please follow the instructions below:
IMPORTANT
The wires in the Mains load are coloured in accordance with the following
code:
Brown : Live.
Blue
: Neutral.
As the colours of the wires in the Mains load of this apparatus may not correspond
with the coloured markings identifying the terminals in your plug, proceed as follows:
• The wire which is colored BLUE must be connected to the terminal which is
marked with the letter “N” or coloured black.
• The wire which is coloured BROWN must be connected to the terminal which is
marked with the letter “L” or coloured red.
DO NOT MAKE ANY CONNECTION TO THE LARGER PIN MARKED WITH
THE LETTER “E” OR BY THE SYMBOL OR COLOURED “GREEN” OR
“GREEN-AND-YELLOW”.
20
CKS5060_090606.p65
20
6/9/2006, 9:46
Care of Cabinets
If the cabinet becomes dusty, wipe it with a soft cloth. If the cabinet becomes
smudged or dirty, clean it with a soft, slightly dampened cloth.
Never allow water or any liquid to get inside the cabinet.
Never use any abrasive cleaners or cleaning pads as these will damage
the finish of your radio.
Lithium Battery Precautions
• Dispose of the old battery properly. Do not leave it lying around
where a young child or pet could play with, or swallow it. If the
battery is swallowed, contact a physician immediately.
• Battery may explode if mistreated. Do not attempt to recharge it or
disassemble it. Do not dispose of the old battery in a fire.
21
CKS5060_090606.p65
21
6/9/2006, 9:46
LIMITED WARRANTY AUDIO PRODUCTS
Emerson Radio International Ltd. warrants that the enclosed Product will be free from
defects in materials and workmanship, under normal use and conditions, for a period of
one (1) year from the date of original purchase in the UK. Warranty extension to three (3)
years available through Access Fulfilment Limited. On production of your dated proof of
purchase, we will repair any defective Product free of charge at an authorized Depot
Repair Facility, or at our discretion replace the Product.
For warranty repair or replacement call the warranty hotline on: 0800 083 3450.
This warranty does not cover:
• Normal wear and tear.
• Damage to the Product caused by your or any third party’s negligence, misuse, abuse,
accident, or failure to follow operating instructions.
• Use of the Product in a commercial application or under rental.
• Changes, modifications or repairs to the Product by anyone other than an authorized
Depot Repair Facility.
• Damage caused because the Product is improperly connected to the equipment of
other manufacturers.
• Products on which the serial number has been defaced, modified or removed.
• Damage to equipment other than the Product.
• Ordinary adjustments which you can perform as outlined in the owner’s manual.
• Signal reception problems caused by external antenna or cable systems.
• Products purchased outside of the United Kingdom.
This warranty is valid and enforceable in the United Kingdom only. This warranty is personal
to you and may not be assigned or transferred to any other party.
THIS WARRANTY DOES NOT AFFECT YOUR STATUTORY RIGHTS AS A CONSUMER.
The Serial Number can be found on the bottom cabinet. We suggest that you
record the Serial Number of your unit in the space below for future reference.
Model Number: CKS5060B/CKS5060S
Serial Number:
22
CKS5060_090606.p65
22
20/9/2006, 12:12
Printed in China
609-01
CKS5060_090606.p65
23
6/9/2006, 9:46