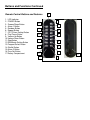
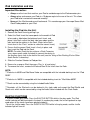
1
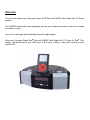
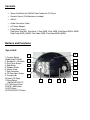
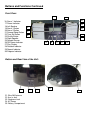
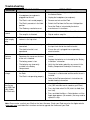
Stereo iPod® Dock with AM/FM Clock Radio
with CD Player
Item Number: 62904198
Installation & User’s Guide
All brand names and trademarks are the property of their respective owners.
READ ALL INSTRUCTIONS BEFORE USE.
Always follow basic safety precautions when using electrical products, especially when
children are present.
•
•
•
•
•
•
•
•
•
•
•
WARNING-- To reduce the risk of fire, electric shock, or serious personal injury:
Keep the product out of the reach of children and pets. This product is not intended for use by
children. Extra caution is necessary when using any electrical product near children.
Always ensure the product is unplugged from the electrical outlet before relocating or cleaning it.
Keep the power cord and product away from heated surfaces.
Do not use the product near water or other liquids.
Do not place or drop the product into water or other liquids. If the product falls into water,
immediately unplug it from the electrical outlet; do not touch or reach into the water.
To disconnect the product, pull directly on the plug; do not pull on the power cord.
Do not put any stress on the power cord where it connects to the product as the power cord could
fray and break.
Do not plug/unplug the product into/from the electrical outlet with a wet hand.
Do not operate the product if it has a damaged or cut power cord or adapter, if wires are
exposed, if it malfunctions, if it is dropped or damaged, or if it is dropped in or exposed to water.
This product has no user-serviceable parts. Do not attempt to examine or repair this product
yourself. Only qualified service personnel should perform any servicing; take the product to the
electronics repair shop of your choice for inspection and repair.
CAUTION-- To reduce the risk of personal injury or product/property damage:
This product is intended for indoor, non-industrial, non-commercial use; do not use the product
outdoors.
Do not mount this product on a wall or on a ceiling.
Overview
Thank you for purchasing a Vuescape Stereo iPod® Dock with AM/FM Clock Radio with CD Player
product!
Your iPod® will now be able to be enjoyed by you and your friends by listening to your music through
our speaker system.
Your music is no longer confined to being heard through earbuds.
Enjoy your Vuescape Stereo iPod® Dock with AM/FM Clock Radio with CD Player for iPod®. Play,
charge, and wake/sleep to your iPod alarm & EQ music functions, along with listening to your
favorite CDs!
Contents
•
Stereo iPod Dock with AM/FM Clock Radio with CD Player
•
Remote Control (2 AAA batteries included)
•
AM Ant
•
Audio Connection Cable
•
AC Power Adapter
•
9 iPod Dock Inserts:
iPod Nano, iPod Mini, iPod Nano 2, iPod 20GB, iPod 40GB, iPod Photo 20GB & 30GB,
iPod Photo 40GB & 60GB, iPod Video 30GB, iPod Video 60GB (80GB)
Buttons and Functions
Top of Unit:
1. Function Switch
(Radio/iPod/CD/AUX)
2. Standby/AL. Off Button
3. Play/Pause Button
4. Stop Button
5. Random Button
6. Volume Knob
7. iPod Connector
8. CD Door Open Button
9. Tuning Knob
10. Open (CD Door)
11. Band Switch
(AM/FM-MO/FM-ST)
12. F.FWD/Hour Button
13. REW / MIN Button
14. REP Button
15. PROG/SELECT Button
10
1
2
11
12
3
13
4
14
5
6
7
8
9
15
Buttons and Functions Continued
Front View:
26
16. Alarm 1 Indicator
17. Power Indicator
18. Left Speaker
19. Alarm 1 Button
20. Alarm 2 Button
21. Snooze/Sleep Button
22. Time Set Button
23. Shuffle Button
24. Right Speaker
25. Remote Sensor
26. FM Stereo Indicator
27. Play Display
28. Random Indicator
29. Repeat Indicator
30. Program Indicator
27
28
29
16
30
17
25
18
24
19
20
21
22
23
Bottom and Rear View of the Unit:
31
31. Wire AM Antenna
32. Aux in Jack
33. Earphone Jack
34. AC Power
35. Battery Compartment
32
33
34
35
Buttons and Functions Continued
Remote Control Buttons and Features
1. LED Indicator
2. POWER Button
3. Snooze/Sleep Button
4. Alarm 1 Button
5. Random Button
6. Repeat Button
7. CD FF/Hour Setting Button
8. Play/Pause Button
9. Volume Up Button
10. Volume Down Button
11. Stop Button
12. RW/Minute Setting Button
13. Program/Select Button
14. Shuffle Button
15. Alarm 2 Button
16. Time Set Button
17. Battery Compartment
1
2
16
3
15
4
14
5
13
6
12
7
8
11
10
17
9
Getting Started
BATTERY BACKUP:
A 9-Volt battery (not included) may be installed as a backup option to maintain the time if
electrical power fails. In the event of a power outage, the time will not appear on the clock LCD
Display, however the clock will continue to operate and the actual time will be maintained. The
Clock LCD Display and other functions will resume once electrical power is restored. If used the
9-Volt battery should be replaced as needed; Remove the battery if the clock is not used or
stored for long periods of time.
SETTING THE CLOCK TIME
Connect the AC power cord to a wall outlet. Press the STANDBY/AL-OFF BUTTON to turn off the
unit first.
1. Press the TIME SET button to enter clock setup mode, the time display will begin to flash.
2. Press the F.FWD/ HOUR button to set desired hour.
3. Press the TIME SET button again to advance to the set MINUTES MODE.
4. Press the REW/ MIN button to set desired minute.
5. Press the TIME SET button to confirm the current clock setting. The time display will stop
flashing.
SETTING THE ALARM FUNCTION
The Radio, iPod, CD or Buzzer will automatically sound at the designated time every day. You can
set two different alarm times, one in AL1 and one in AL2, So that the alarm function operates twice a
day.
Wake Up to Alarm Radio, iPod, CD or Buzzer
FOR RADIO ALARM:
1. Slide the FUNCTION SWITCH to “RADIO” position.
2. Slide the BAND SWITCH to AM, FM-MO or FM-ST and tune in the desired station.
3. Adjust the volume.
4. Press the STANDBY/AL-OFF BUTTON to turn off the unit first.
5. The radio will sound at the set alarm time.
FOR iPod ALARM:
1. Slide the FUNCTION SWITCH to “iPod” position.
2. Insert the iPod into the the iPod Connector.
3. Adjust the volume.
4. Press the STANDBY/AL-OFF BUTTON to turn off the unit first.
5. The radio will sound at the set alarm time.
FOR CD ALARM:
1. Open the CD Door and insert a CD (with the label side facing up) into the CD compartment.
2. Close the CD Door.
3. Slide the FUNCTION SWITCH to “CD” position.
4. Press the STANDBY/AL-OFF BUTTON to turn off the unit first.
5. The CD will sound at the set alarm time playing the first track on the CD.
To deactivate the alarm (CD playing); Press either the STOP BUTTON or Press the STANDBY /ALOFF BUTTON.
FOR BUZZER ALARM:
1. Press the PROG/SELECT Button. A bell symbol will light up.
2. Turn off the unit by pressing the POWER/AL-OFF BUTTON
3. The alarm buzzer will sound at the set alarm time.
Simply press STANDBY/AL-OFF BUTTON to turn off the Alarm.
Note: If the alarm sounds (music or buzzer) and is not stopped manually by pressing the
STANDBY/AL-OFF BUTTON or SNOOZE/SLEEP button, the unit will turn off the alarm sound after
60 minutes.
SNOOZE FUNCTION
If you want to snooze a few more minutes, press the SNOOZE/SLEEP BUTTON and this will
deactivate the alarm sound for 9 minutes. This can be repeated several times.
SLEEP FUNCTON
1. Slide the FUNCTION SWITCH to the desired music source.
2. Tune in the desired radio station, CD or iPod song and adjust the volume control.
3. Press the SLEEP/SNOOZE BUTTON. The “90” will appear on the clock display.
4. Repeatedly press the SLEEP BUTTON for desired sleep time between 10-90 minutes.
5. The unit will automatically switch off when the SLEEP time expires.
6. To cancel the sleep time before it expire, simply press the STANDBY /AL-OFF BUTTON to turn off
or press SLEEP BUTTON repeatedly to set sleep none.
HOW TO SET THE ALARM 1- 2 CLOCK
Press the AL1 or AL2 button to enter alarm setting mode. (When the alarm time display begins to
flash and AL1 or AL2 indicator is lit up).
1. Press F.FWD/ HOUR button to set the desired hour.
2. Press REW/ MIN button to set the desired minute.
3. Press the PROG/SELECT Button 2 times. A musical note1/2 will light up indicating the alarm is set.
NOTE:
To activate the alarm 1- 2 function. Please allow the display to stop flashing in the LCD Display.
To deactivate the alarm 1- 2 function. Press the AL1 or AL2 button again to switch off the alarm and
the AL1 or AL2 indicator will go off.
Radio Operation
1. Slide the FUNCTION SWITCH to “RADIO” position.
2. Slide the BAND SWITCH to the desired position (AM,FM-MO or FM-ST).
3. Turn on the unit by pressing the STANDBY/AL-OFF BUTTON.
4. Rotate the Tuning Control Knob to the desired radio station.
5. Adjust the VOLUME CONTROL KNOB to your preferred Listening Level.
6. After listening, Press the STANDBY/AL-OFF BUTTON to turn off the unit.
Note: Rotate the clock radio for better AM/FM reception.
Note: The STEREO Indicator light will turn on when a program is received in FM Stereo. If the FM
reception is noisy, switch the band selector to the FM position and the program will be received in
Mono radio.
Play a Compact Disc (CD)
1. Open the CD Door by pressing the Open Button. Insert a CD with label side facing up into the CD
compartment. Press the CD Door to close.
2. Slide the FUNCTION SWITCH to “CD” position.
3. Turn on the unit by pressing STANDBY/AL-OFF BUTTON.
4. The disc will rotate for a few seconds, then the disc will stop rotating and the LCD display will
show the total number of tracks on the disc
5. Press the PLAY /PAUSE BUTTON and the first track of the CD will begin to play.
6. To pause the CD while in the play mode. Press the PLAY/PAUSE BUTTON. Press the
PLAY/PAUSE BUTTON again to resume the play mode.
REWIND/FORWARD BUTTON
-
The REW/MIN BUTTON and F.FWD/HOUR BUTTON can be used to jump to a different track
number or to scan disc tracks at high speed.
-
Press the REW/ MIN BUTTON once to hear the beginning of the current track on the disc (in CD
play mode)
-
Press the REW/MIN BUTTON twice continuously to hear the previous track on the disc (in CD
play mode)
-
Press the F.FWD/HOUR BUTTON once to hear the next track on the disc (in CD play mode)
-
For fast forwarding or rewinding the disc, press and hold the F.FWD/HOUR BUTTON or the
REW/MIN BUTTON. Release the BUTTON and normal play will resume
REPEAT FUNCTIONS
-
The REP BUTTON can be used to repeat a single track, repeat all tracks and exit the REPEAT
mode.
-
To repeat a single track. Press the REP BUTTON once while in the play mode .The CD Repeat
LCD Indicator will begin to flash.
-
To repeat all of the tracks on a CD. Press the REP BUTTON a second time while in the play
mode. The CD Repeat LCD Indicator will be illuminated.
-
To exit the REPEAT mode. Press the REP BUTTON a third time while in the play mode, and the
REP indicator light will turn off.
RANDOM FUNCTIONS
- To enter random play mode, Press the RANDOM BUTTON while in the play mode. The CD
Random LCD indicator will be illuminated. (In random play mode, the unit will go back to stop mode
when all the tracks have been played randomly)
-
To exit the RANDOM mode. Press the RANDOM BUTTON while in the play mode, and the RAND
indicator light will turn off.
PROGRAM FUNCTION
To program up to 20 tracks to play in a selected order.
1. While in the Stop mode only (CD is not playing).press the PROGRAM BUTTON and “P 01” will
appear in the CD Track LCD Display and the Program LCD Indicator will begin to flash. .
2. Press the REW/MIN or F.FWD/HOUR BUTTONS to select the desired track.
3. Press the PROGRAM BUTTON to select and store the track into memory. The next memory
location (i.e. P 02.) will show in the CD Track LCD Display.
4. Repeat step 2 and step 3 to program 18 additional tracks.
5. Press the PLAY/PAUSE BUTTON to play the selected tracks in the program mode. The track
number will appear in the CD Track LCD Display. The CD Program indicator will light up.
6. To advance to the next programmed track. Press the F.FWD/HOUR BUTTON. After all
programmed tracks have played. The CD player will return to the stop mode.
7. To clear the program function, press STOP BUTTON to clear the previous programmed tracks.
iPod Installation and Use
Important Precaution:
•
Always use the insert that matches your iPod to avoid damage to the iPod connector pins.
•
Always place and remove your iPod at a 15 degree angle to the rear of the unit. This allows
your iPod to be inserted and removed smoothly.
•
Never pull the iPod forward or push backwards. This can damage your Vuescape Stereo iPod
Clock Radio product or your iPod.
Installing the iPod into the Unit:
1. Remove the Dock Cover by pulling it up.
2. Select the Dock Insert that corresponds to the model of iPod
to be used as labeled on the bottom of each Insert, and
place it into Dock so that the label side faces down and the
tabs lock into the notches in the Dock. (Refer to the Dock
Insert chart in the “Parts” section to select the correct Insert.)
3. Ensure that the correct Dock Insert is firmly in place, and
then insert the iPod into the Dock.
NOTE: For older iPods that do not have a Dock Connector,
use a stereo audio cable (included) to connect the device to
the Auxiliary Input Jack on the back of the unit (see the "Using a Non-Docking iPod or Other
Audio Device" subsection)
4. Slide the Function Selector to iPod position.
5. Browse for a song on iPod, then press Play (
) and enjoy!
6. To remove the Insert, remove the iPod and then lift the Insert from the Dock.
NOTE:
***iPod classic 80GB and iPod Nano Video are compatible with the included docking insert for "iPod
20GB"
***iPod classic 160GB is compatible with the included docking insert for "iPod Video 60GB"
***iTouch can be connected by using the included Audio Cable.
***Reminder...all the iPod units can be docked in this clock radio unit except the iPod Shuffle and
iTouch units which can be connected by using the Audio Cable included with the Clock Radio.
SHUFFLE FUNCTIONS
- To enter random play mode, Press the SHUFFLE BUTTON while in the play mode. The iPod
shuffle indicator will be illuminated in the ipod. (In random play mode, the unit will go back to stop
mode when all the tracks have been played randomly)
- To exit the shuffle mode. Press the SHUFFLE BUTTON while in the play mode, and the shuffle
indicator light will turn off.
Charging the iPod in the Unit
The unit will recharge the iPod while docked. Ensure the correct Dock Insert is used and that the
IPod is properly inserted.
NOTE: The unit will not charge an iPod Shuffle, a non-docking iPod, or any other audio device.
HEADPHONE JACK
Your radio is equipped with a HEADPHONE JACK for private listening. Simply plug any 3.5 mm plug
type stereo headphone into the HEADPHONE JACK. With the headphone connected the speakers
in the radio will be automatically disconnected.
AUX INPUT JACK
1.
2.
3.
4.
Power on the unit.
Connect the AUX connection wire from the output jack of your Personal Player such as a
portable MP3 player to the AUX input jack.
Slide the Function Selector to “AUX”.
Press Start on your Personal Player.
Troubleshooting
PROBABLE CAUSE
PROBLEM
No sound
RESOLUTION
•
The volume is set too low.
•
•
A headphone (or earphone is
plugged into the unit.
Increase the volume by pressing the VOL+ side of
the Volume Button.
•
Unplug the headphone (or earphone).
•
The iPod is not inserted properly.
•
Remove and reinsert the iPod.
•
The iPod is paused or in the Hold
position.
•
Switch the iPod from the Pause or Hold position.
•
Reset the iPod as instructed by the device
manufacturer’s instructions.
•
The IPod may need to be reset.
Distorted
sound
•
The volume level is too high.
•
Decrease the volume of the unit or of the device.
•
The song file is distorted.
•
Skip to another song file.
Unit warm
after lengthy
play.
•
This is acceptable, especially if the •
volume is at a high level.
No power
•
The AC Adapter is not securely
connected.
•
Ensure the Adapter is securely connected to both
the input Jack and to the electrical outlet.
•
The electrical outlet is not
operational.
•
Ensure the unit is plugged into an operating
electrical outlet.
•
The transmitter on the front of the
Remote or the sensor on the front
of the unit is blocked.
•
Remove any material or dirt from the transmitter or
sensor.
•
The battery power is low.
•
Replace the batteries as instructed by the “Battery
Installation” subsection.
•
The batteries are incorrectly
installed in the Battery
Compartment.
•
Verify that the battery polarities are correct in the
Battery Compartment and adjust if necessary.
•
The iPod is not seated properly in
the Dock.
•
•
The iPod is not operating properly.
Remove and replace the iPod, ensuring the
Connector is unobstructed and the correct Insert is
installed.
•
Refer to the iPod manufacturer’s instructions for
troubleshooting information.
•
Reset your iPod (as recommended on Apple web
site.) (Will not effect music stored on your iPod.)
•
Press the Hold switch On/Off (slide it to Hold, then
turn it off).
•
Press and hold the Menu + Select buttons until the
Apple logo appears (10 seconds.) You may need to
repeat this step.
No power Remote
Control
iPod did not
charge
Can’t access
the files on
my 5GB iPod
(with Video)
or iPod nano
Lower the volume or turn off the unit until cool.
Note: Please make sure that your iPod has the latest firmware. Check your iPod manual or the Apple website
(www.apple.com) and follow the instructions on how to upgrade the firmware of your iPod.
IMPORTANT SAFEGUARDS
Signal Word Definitions
DANGER – Indicates an imminently hazardous situation, which, if not avoided, will result in death or
serious injury. Usage of this signal word is limited to the most extreme situations.
WARNING – Indicates a potentially hazardous situation, which, if not avoided, could result in death
or serious injury.
CAUTION – Indicates a potentially hazardous situation, which, if not avoided, may result in
minor/moderate injury or product/property damage. It also alerts against unsafe practices.
LASER SAFETY
THIS SET EMPLOYS AN OPTICAL LASER BEAM SYSTEM IN THE CD MECHANISM
DESIGNED WITH BUILT-IN SAFEGUARDS. DO NOT ATTEMPT TO DISASSEMBLE.
EXPOSURE TO THIS INVISIBLE LASER LIGHT BEAM MAY BE HARMFUL TO THE EYES. THIS
COMPACT DISC PLAYER SHOULD NOT BE ADJUSTED OR REPAIRED BY ANYONE EXCEPT
QUALIFIED SERVICE PERSONNEL. ALTHOUGH THIS PRODUCT USES A LASER PICK-UP
LENS, IT IS COMPLETELY SAFE WHEN OPERATED ACCORDING TO THE
MANUFACTURER’S INSTRUCTIONS CONTAINED HEREIN.
Care and Maintenance
Clean the product with a soft cloth; do not use liquids or abrasive chemicals or pads.
Battery Handling and Usage
WARNING: Only adults should handle batteries. Do not allow a child to use this product unless the
Battery Compartment Cover is securely attached to the Battery Compartment in accordance with all
product usage instructions.
•
•
•
•
•
•
•
•
Follow the battery manufacturer’s safety and usage instructions.
Keep batteries away from children and pets.
Do not mix a new and a used battery or mix batteries of different chemistries or sizes.
Insert the batteries observing the proper polarity (+/−) as indicated inside the battery
compartment. Failure to properly align the battery polarity can cause personal injury and/or
property damage.
Remove spent or discharged batteries from the product.
Remove the batteries when not using the product for an extended period.
Never throw batteries into a fire. Do not expose batteries to fire or other heat sources.
Dispose or recycle spent/discharged batteries in compliance with all applicable laws. For detailed
information, contact your local solid waste authority.
IMPORTANT INFORMATION REQUIRED BY THE FCC
This device complies with Part 15 of the FCC Rules. Operation is subject to the following two
conditions: (1) this device may not cause harmful interference; and (2) this device must accept any
interference received, including interference that may cause undesirable operation.
NOTE: This equipment has been tested and found to comply with the limits for a Class B digital
device, pursuant to Part 15 of the FCC Rules. These limits are designed to provide reasonable
protection against harmful interference in a residential installation. This equipment generates, uses,
and can radiate radio frequency energy and, if not installed and used in accordance with instructions,
may cause harmful interference to radio elevation reception, which can be determined by turning the
equipment off and on. Try to correct the interference by using one or more of the following
measures:
• Reorient or relocate the receiving antenna.
• Increase the separation between the equipment and receiver.
• Connect the equipment into an outlet on a circuit different from that to which the receiver is
connected.
• Consult the dealer or an experienced radio/TV technician for help.
SAVE THESE INSTRUCTIONS FOR FUTURE REFERENCE
Customer Service
For information regarding the return or exchange of this item within 14 days of purchase,
please visit your Inkstop store location or go to www.inkstop.net to read the instructions
regarding customer service returns procedures. Click on the Satisfaction Guaranteed icon on
the website.
For technical support in regards to operation and installation of this item please call the toll free
number below to obtain assistance. A customer service representative will assist you an provide
operating information on the product.
Please have the following information available when you contact technical support:
Your Name and Address
Date of Purchase
Model Number
Serial Number
Store Name and Address
Type of problem with the unit
To contact the technical support facility, please call
508-435-4830 or 800 639-3803.
Email Support: [email protected]
Warranty
90 Days Limited Warranty
This product is warranted to be free from defects in material and workmanship for a period of 90
days. Warranty obligations are limited to replacement or repair of defective parts and components, at
the option of the manufacturer. If the original model is no longer available, we will substitute with a
model of equal or better value that the original item. The warranty of this product is null and void if
the product is subjected to negligence, abuse, modification, misuse, accident or if the customer uses
the product for a function it was not intended for. This warranty is only valid for the original purchaser
of this product and will not be honored if the product is resold. This warranty gives you specific legal
rights, and you may also have other rights which vary from state to state.
The manufacturer will not be liable for incidental or consequential damages caused by the use of this
product. The manufacturer will not be liable for any costs such as lost profits or revenues, cost of
temporary replacements, loss of data, loss of equipment or use of equipment or any claims by third
parties.
After 14 days from purchasing the product, please call the phone number mentioned below to obtain
service. A customer representative will give you a return authorization (RA number) allowing you to
ship the product to the service center. The purchaser must have a copy of the original receipt for
proof of purchase within 90 days. The purchaser of this product is responsible for any shipping
charges to the repair facility. The manufacturer service center will repair or replace the unit in
question and send it back to the purchaser.
In order to contact the service facility, please call 508-435-4830 or 800-639-3803.
The address for this facility is:
Fourstar Group
26840 Fargo Ave.
Unit C
Bedford Heights, OH 44146
E-mail Support: [email protected]