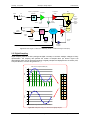
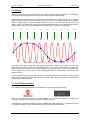
1
MiniProject
Real-Time Microcontroller Based ECG Monitor
Report A: Design Aspects
COURSE:
MODULE:
BY:
DATE:
BEng (HONS) Electronic Systems
EEE512J2 - Electronic Product Design
Colin K McCord
Thursday, 17 July 2003
Thursday, 17 July 2003
MiniProject: Design Aspects
Colin K McCord
TABLE OF CONTENTS
1.0. Introduction
2.0. Fundamentals
2.1. Electrocardiography (ECG, EKG)
2.2. Electrodes
2.3. ECG Amplifier
2.4. The Cathode Ray Tube (CRT)
2.5. Digital Sampling
2.6. Aliasing
2.7. The PIC Microcontroller
3.7.1. Summary of the PICs Built-in Peripherals
2.8. RS232 Serial Interface
3.0. Feasibility / Initial Design Approach
3.1. Market Research and Information Analysis
3.2. Concept Designs
3.3. Initial Product Design Specification
3.4. Applicable Standards
4.0. Project planning and Management
4.1. Planning / Development Costs
4.2. Pareto Concept
4.3. Predicted Product Cost (Ball Park Assessment)
4.4. Line Balancing
5.0. System Architecture
5.1. System Block Diagram
5.2. Partitioning Decisions
6.0. Physical Design
6.1. ABS Plastic (Acrylonitrile butadiene Styrene)
6.2. Manufacture of Plastics
6.3. Shaping of Plastic
6.4. Health and environmental Hazards of Plastics
7.0. Electronic / Software Design
7.1. Design Considerations
7.2. System Powering
7.3. Digital Circuitry
7.4. Analogue Circuitry
7.5. PIC Program
Pages 1
Pages 2 to 10
Pages 2 to 3
Pages 3 to 4
Pages 3 to 5
Pages 5 to 6
Page 6
Page 7
Pages 7 to 8
Page 8
Pages 9 to 10
Pages 11 to 16
Pages 11 to 13
Pages 13 to 14
Pages 14 to 15
Pages 15 to 16
Pages 17 to 25
Pages 17 to 21
Pages 21 to 22
Pages 22 to 23
Pages 23 to 25
Pages 26 to 29
Pages 26 to 27
Pages 27 to 29
Pages 30 to 32
Page 30
Pages 30 to 31
Pages 32 to 33
Page 33
Pages 33 to 37
Page 33
Page 33
Pages 33 to 35
Pages 35 to 36
Pages 36 to 37
8.0. Conclusions
Pages 38 to 39
8.0. References / Bibliography
Pages 40 to 41
EEE512J2 – Electronic Product Design
Contents Page
Thursday, 17 July 2003
A. Appendixes
A1. Project Printouts from Microsoft Project
- Gantt Chart
- PERT Chart
- Top Level Tasks
- Cash Flow
- Budget Report
- Who Does What
- Task Usage
- Resource Usage
EEE512J2 – Electronic Product Design
MiniProject: Design Aspects
Colin K McCord
Pages 42 to 56
Pages 42 to 56
Page 43
Page 44
Page 45
Pages 46 to 48
Pages 49 to 50
Pages 51 to 52
Pages 53 to 54
Pages 55 to 56
Contents Page
Thursday, 17 July 2003
MiniProject: Design Aspects
Colin K McCord
1.0 INTRODUCTION
The heart’s strong pumping action is driven by powerful waves of electrical activity in which the muscle fibres
contract and relax in an orchestrated sequence. These waves cause weak currents to flow in the body,
changing the relative electric potential between different points on the skin. An electrocardiogram is a
biophysical instrumentation device that is used to view/record the electrical activity of the heart for various
diagnostic purposes.
The electrocardiogram (or ECG) has been used extensively in medicine sine its invention in the early 1900’s,
and has since proven to be invaluable in various diagnostic applications, such as the detection of irregular
heartbeat patterns (i.e. fibrillation or arrhythmia), heart murmurs (or other abnormal heart sounds),
tissue/structural damage (such as valve malfunction) and coronary artery blockage. Other applications of the
ECG are very effective in areas of sports medicine, or sports therapy, in tracking the heartbeat through
various levels of physical activity to assist the patient in attaining a desired, optimum heart rate.
Figure 1.0b. ECG for sports therapy
Figure 1.0a. ECG used to diagnostic abnormal heart
Therefore, while the concept of an ECG is not a novel one, the attraction of this project lay in the challenge
to build a simple, compact, operational medical device at a low cost. The basic design theory is as follows: •
The electrical activity of the heart is detected using electrodes placed on the surface of the chest
cavity. These electrodes act as bio-transducers to convert the signal from its existing form in the
body (ionic) into electrical current in the wires.
•
The generated signal is put through an amplifier to allow for observations, measurements, and
recordings to be made. This stage is extremely important, as the cardiac signal is very small, i.e. on
the order of mili-volts, thus a large amplification is necessary for any use to be made of the signal.
•
The amplified signal is then sent to the PIC for Analogue-to-Digital conversion, signal manipulation,
calculation of beats per minute (displayed using 3, 7-segment LED displays), data logging (RS232
communications) and analogue signal output (DAC) for a visual display of the ECG. Note that an
oscilloscope can be used to provide a visual output.
This report will demonstrate how to design and plan the innovation of a new medical device, from the
feasibility study through to physical realisation / manufacture of the product.
EEE512J2 – Electronic Product Design
Page 1
Chapter 1: Introduction
Thursday, 17 July 2003
MiniProject: Design Aspects
Colin K McCord
2.0. FUNDAMENTALS
2.1. Electrocardiography (ECG, EKG)
The heart is a muscular pump made up of four
chambers. The two upper chambers are called
atria, and the two lower chambers are called
ventricles.
The purpose of the atria is to act as ‘filling
chambers’ for the ventricles; the right side of the
heart is the pulmonary pump, i.e. it pumps blood
between the heart and the lungs, and the left side
of the heart is the systemic pump, i.e. it pumps
blood between the heart and the entire body.
The heart beats as a result of ‘commands’
passed in the form of bioelectric impulses and
Figure 2.1a. Heart Anatomy [W1]
action potentials. These action potentials result in
a series of rapid and successive patterns of depolarization and re-polarization across the cardiac muscle,
generating an electric signal. The electrical activity of the heart can be detected through the skin by small
metal discs called electrodes. The electrodes are attached to the skin on the chest, arms, and legs.
Voltages (mV)
The cardiac cycle begins at the Sino-Atria node, located in the right atrium at the superior cava. The
beginning of the cycle corresponds to the contraction of the atria. Following this is a 100ms delay until the
activation of the Atria-ventricular node. This delay is important because it allows time for the ventricles to fill,
increasing the efficiency of the heart. The signal is then propagated down the ventricular septum resulting in
ventricular contraction. The signal generated over one period of the cardiac cycle is depicted in figure 2.1b
(P-Wave: Atria Depolarization, QRS-Complex: Ventricular Depolarization, T-Wave: Ventricular Repolarization).
QRS Complex
P-Wave
T-Wave
Time (ms)
Figure 2.1b. One period of the cardiac cycle
Note that the signal generated from the heart is extremely small (about 2mV’s in amplitude), and at a very
low frequency, having a bandwidth of about 150Hz.
The heart can be considered as an electric dipole, repetitively changing both in magnitude and direction as it
goes through the cardiac cycle. The magnitude of the dipole will be at a maximum during ventricular
contraction. This is important note, as it is quite likely that the smaller P and T waves will be lost in the effects
of noise. Therefore the theory behind detecting the cardiac signal is to place electrodes on the surface of the
body, and simply measure the different differences in potential that arise as the dipole moves through its
cycle.
The measured differences in potential are referred to as ‘leads’. Note that it is always a difference in potential
between at least two electrodes that is being measured, as there is no absolute zero reference voltage in the
EEE512J2 – Electronic Product Design
Page 2
Chapter 2: Fundamentals
Thursday, 17 July 2003
MiniProject: Design Aspects
Colin K McCord
body, only a dipole changing in both space and time. According to cardiac theory, in order to detect the
strongest difference in potential (the peak signal); the optimum electrode placement is to have one on the
right shoulder, and one on the left hip. This is what is usually referred to as “Lead II”, a convention that arises
from the work of Willem Einthoven, a pioneer in ECG development, who observed the differences in signal
strength as he took measurements between two electrodes with placement on the left shoulder, the right
shoulder and the left hip (Einthoven’s Triangle). See reference [W3] for an overview of the different standard
electrode placements.
Figure 2.1c. Limb leads (Bipolar) [W3]
Figure 2.1d. Einthoven's triangle / axial reference system [W3]
Figure 2.1e. Augmented limb leads (Unipolar) [W3]
Figure 2.1f. Chest leads (unipolar) [W3]
The electrocardiogram (ECG) is a simple, non-invasive technique for detecting abnormalities and diagnosing
heart defects, merely by noting the presence of irregularities in the PQRST waveform. For example an
electrocardiogram may show: •
•
•
•
•
•
Signs of insufficient blood flow to the heart.
Signs of a new or previous injury to the heart (heart attack).
Evidence of heart enlargement.
Heart rhythm problems (arrhythmias).
Signs of inflammation of the sac surrounding the heart.
Changes in the electrical activity of the heart caused by a chemical (electrolyte) imbalance in the
body.
Note: Electrocardiography cannot predict whether a person will have a heart attack.
2.2. Electrodes
The role of the electrodes is to act as bio-electric transducers at the interface between the body and the
ECG. Inside the body, electricity exists in the form of ions. Thus, the purpose of the electrodes is to convert
electricity from its ionic form in the body into an electric current in the wires.
EEE512J2 – Electronic Product Design
Page 3
Chapter 2: Fundamentals
Thursday, 17 July 2003
MiniProject: Design Aspects
Colin K McCord
Ag-AgCl electrodes are the current standard for use in medical applications related to biophysical
instrumentation and measurements. The gel provides impedance matching at the interface between the
electrode and the surface of the skin, which means that noise effects are reduced, increasing the signal-tonoise ratio, allowing for a clear signal to be detected. They are non-polarisable, meaning that the differences
in potential that are measured do not depend on current variations in the wires. They are stable, easy to use,
and inexpensive. See reference [W5] for detailed information on the Ag-AgCI electrode.
Figure 2.2b. 3M red dot electrodes cost $14.94 from [W7]
Figure 2.2c. 3M red dot resting electrodes cost $9.94 from [W7]
2.3. ECG Amplifier
The heart’s strong pumping action is driven by powerful waves of electrical activity in which the muscle fibres
contract and relax in an orchestrated sequence. These waves cause weak currents to flow in the body,
changing the relative electric potential between different points on the skin by about 1mV. The signals can
change sharply in as little as one fiftieth of a second. So boosting this signal to an easily measured one-volt
level requires an amplifier with a gain of about 1,000 and a frequency response of at least 50 hertz.
At first it appears that an operational amplifier could be used. But two vexing subtleties make most op-amps
unsuitable. First, when two electrodes are placed at widely separated locations on the skin, the epidermis
acts like a crude battery, generating a continuously shifting potential difference that can exceed 2V. The
cardiac signal is small in comparison. Second, the body and the wires in the device make good radio
antennas, which readily pick up the 50Hz hum that emanates from every power cable connected to the
mains supply. This adds a sinusoidal voltage that further swamps the tiny pulse from the heart and because
these oscillations lie so close to the frequency range needed to rack the heart’s action, this unwanted signal
is difficult to filter out.
Both problems generate equal swells of voltage at the amplifier’s two inputs. Unfortunately, op-amps usually
can’t reject these signals. To ensure that this “common-mode” garbage (whose amplitude, can be over 1,000
time greater than the cardiac signal) adds no more than a 1 percent error, a CMRR (Common-Mode
Rejection Ratio) of at least 100,000 to one (100 decibels) is required. This precision eludes most op-amps.
When an application calls for both high gain and a CMRR of 80 dB or greater special devices known as
“instrumentation amplifiers” are required. The AD624AD from Analog Devices (see [W12]) when set to a gain
of 1,000 has a CMRR exceeding 110 dB. It is available from Farnell (order code 102-076) for £22.50. Clearly
at bit expensive, hence another option is the AD620AN available from Farnell (order code 527-567) for
£6.14.
Figure 2.3a shows a simple ECG amplifier using the AD624AD instrumentation amplifier. A gain of 1,000 is
selected by shorting certain pins together as shown. The two-stage RC filter weeds out frequencies higher
EEE512J2 – Electronic Product Design
Page 4
Chapter 2: Fundamentals
Thursday, 17 July 2003
MiniProject: Design Aspects
Colin K McCord
than about 50 hertz. A 3 lead cable connects the circuit to the electrodes and two wires are required to
connect the output to an ADC for sampling.
+9V
1uF
Electrode 1
1
8
47k
Electrode 2
10k
2
Electrode 3
Simple Low Pass Filter
4
47k
3
5
AD624AD
11
9
6
10M
To ADC
4.7k
13
47k
1uF
1uF
10
12
7
16
1uF
-9V
Figure 2.3a. Simple ECG Amplifier
2.4. The Cathode Ray Tube (CRT)
“The CRT is a glass bulb which has had the air removed and then been sealed with a vacuum inside. At the
front is a flat glass screen which is coated inside with a phosphor material. This phosphor will glow when
struck by the fast moving electronics and produce light, emitted from the front and forming the spot and
hence the trace. The rear of the CRT contains the electron ‘gun’ assembly. A small heater element is
contained within a cylinder of metal called the cathode. When the heater is activated by applying a voltage
across it, the cathode temperature rises and it then emits a stream of electrons.” [B2].
-2000V
Cathode
+100V
+100V
Correction
electrodes, ASTIG
etc.
+100V
+10kV
X and Y deflection plates
PDA
connector
Phosphor coated screen
Heater
-1500V
Focus electrodes
Figure 2.4a. Diagram of a typical Cathode-ray tube (CRT) construction.
A traditional analogue oscilloscope / analogue ECG machine draws its trace with a spot of light (produced by
a deflectable beam of electrons) moving across the screen of its CRT (see Figure 2.4b). Basically an
oscilloscope / ECG consists of the CRT, a ‘time base’ circuit to move the spot steadily from left to right
across the screen at the appropriate time and speed, and some means (usually a ‘Y’ deflection amplifier) of
enabling the signal to deflect the spot in the vertical or Y direction.
EEE512J2 – Electronic Product Design
Page 5
Chapter 2: Fundamentals
Thursday, 17 July 2003
Y Input
MiniProject: Design Aspects
Frequency-compensated
attenuator
AC
Colin K McCord
CRT
Y Deflection
Stage
Y Amplifier
CRT Y
Deflection
plates
DC
CRT X
Deflection
plates
Trigger
pickoff amp
Y Shift
X Deflection
Stage
int
Trigger
Selector
Trigger
Input
Sweep
(time base)
generator
Sweep gate
logic
ext
Trigger
Level
X
Shift
Trigger +/Polarity
X Input
To CRT
Grid 1
Auto Brightline
Circuit
Blanking
Amplifier
Sweep Speed Setting
Figure 2.4b. Block diagram of a basic CRT oscilloscope; similar to a traditional analogue ECG display
2.5. Digital Sampling
Digital sampling requires an ADC (analogue-to-digital converter) to converter analogue voltages to binary
representation. The sampling rate specifies the number of samples taken per second. Figure 2.5a
demonstrates clearly how an analogue waveform is digitally sampled and displayed onto the screen (LCD,
Computer Monitor, or a CRT using a DAC etc…).
50Hz sine-wave, sampled at 500Hz (x10)
10
2
-2
-6
-10
S1
S2
S3
S4
S5
S6
S7
S8
S9
S10
10
Volts
6
2
Array containing ADC readings at each sample point
Volts
6
0
S1
1
S2
2
S3
3
S4
4
S5
5
S6
6
S7
7
S8
8
S9
9
S10
-2
-6
-10
Draw Waveform using Pulse Interpolator (join the dots)
Figure 2.5a. Example showing how a sine-wave is digitally sampled
EEE512J2 – Electronic Product Design
Page 6
Chapter 2: Fundamentals
Thursday, 17 July 2003
MiniProject: Design Aspects
Colin K McCord
2.6. Aliasing
Aliasing is an undesirable effect that can occur when digital sampling analogue voltages. This is the display
of an apparent signal which does not actually exist, usually caused by under-sampling.
Many samples should be taken per cycle (Nyquist theorem states that “to define a sine wave, a sampling
system must take more than two samples per cycle”.) to ensure an accurate representation of an analogue
signal in a digital memory. If only one sample is taken per cycle, or one sample per several cycles, then
aliasing occurs. For example say a waveform is being sampled every three cycles, these samples may form
together, particularly when using pulse interpolation (join the dots), to look like a valid waveform.
S1
S2
S3
S4
S5
S6
S7
S8
S9
S10
Figure 2.6a. Demonstrating aliasing, red is the real waveform, while blue is an alias.
Figure 2.6a clearly demonstrates how false signals (aliasing) are created. The red waveform is the real
waveform, notice that the waveform is under sampled (see green arrows for sample points). The black dots
shows were the real waveform (red) has been sampled, by joining the dots, it is clear that a perfect sinewave is created (blue), which is an alias of the original signal. Note that it is impossible to tell that the blue
signal is an alias.
There is nothing that can be done after sampling to correct aliasing; hence the solution is to filter out high
frequencies by sending the input signal through a low-pass filter. Ideally all frequencies above half the
sample rate should be filtered out.
2.7. The PIC Microcontroller
A PIC (Peripheral Interface Controller) microcontroller is an IC manufactured by Microchip.
These ICs are complete computers in a single package. The only external components necessary are
whatever is required by the I/O devices that are connected to the PIC.
The traditional Von-Neumann Architecture (Used in: 80X86, 8051, 6800, 68000, etc…) is illustrated in Figure
2.7a. Data and program memory share the same memory and must be the same width.
EEE512J2 – Electronic Product Design
Page 7
Chapter 2: Fundamentals
Thursday, 17 July 2003
MiniProject: Design Aspects
Colin K McCord
“All the elements of the von Neumann computer are wired together with the one common data highway or
bus. With the CPU acting as the master controller, all information flow is back and forward along these
shared wires. Although this is efficient, it does mean that only one thing can happen at any time. This
phenomenon is sometimes known as the von Neumann bottleneck.” [B3]
CPU
8-Bit
Memory
(Program
& Data)
Figure 2.7a. Simplified illustration of the von Neumann architecture
PICs use the Harvard architecture. The Harvard architecture (Figure 2.7b) is an adaptation of the standard
von Neumann structure with separate program and data memory: data memory is made up by a small
number of 8-bit registers and program memory is 12 to 16-bits wide EPROM, FLASH or ROM.
Memory
(Data)
8-Bit
CPU
12/14/16 Bit
Memory
(Program)
Figure 2.7b. Simplified illustration of the Harvard architecture
Traditional CISC (Complex Instruction Set Computer) machines (Used in: 80X86, 8051, 6800, 68000, etc…)
have many instructions (usually > 100), many addressing modes and it usually takes more than 1 internal
clock cycle to execute. PIC microcontrollers are RISC (Reduced Instruction Set Computer) machines, which
have 33 (12-bit) to 58 (15-bit) instructions, reduced addressing modes (PICs have only direct and indirect),
each instruction does less, but usually executes in one internal clock.
“The combination of single-word instructions, the simplified instruction decoder implicit with the RISC
paradigm and the Harvard separate program and data buses gives a fast, efficient and cost effective
processor implementation.” [B3]
2.7.1. Summary of the PICs Built-in Peripherals
SPI (Serial Peripheral Interface) uses 3 wires (data in, data out, clock), Master/Slave (can have multiple
masters), very high speed (1.6 Mbps), and full speed simultaneous send and receive (full duplex).
I2C (Inter IC) uses 2 wires (data and clock), Master/Slave. There are lots of cheap I2C chips available;
typically < 100kbps.
UART (Universal Asynchronous Receiver/Transmitter) with baud rates of 300bps to 115kbps, 8 or 9 bits,
parity, start and stop bits, etc. Outputs 5V hence an RS232 level converter (e.g. MAX232) is required.
Timers, both 8 and 16 bits, many have prescalers and some have postscalers. In 14 bit cores they generate
interrupts. External pins (clock in/clock out) can be used for counting events.
Ports have two control registers: TRIS sets whether each pin is an input or an output and PORT sets their
output bit levels. Note: Other peripherals may steal pins, so in this respect peripheral registers control ports
as well. Most pints have 25mA source/sink (LED enabled), but not all pins, it is important to look up the
datasheet. Floating input pints must be tied off (or set to outputs).
ADCs (Analogue to Digital Converter) are currently slow, less than 54 KHz sampling rate (8, 10 or 12 bits),
theoretically higher accuracy when PIC is in sleep mode (less digital noise) once the sample is complete the
ADC sends an interrupt waking the PIC. Note that the PIC must wait until the sampling capacitor is charged;
see datasheets.
EEE512J2 – Electronic Product Design
Page 8
Chapter 2: Fundamentals
Thursday, 17 July 2003
MiniProject: Design Aspects
Colin K McCord
2.8. RS232 Serial Interface
RS232 is simple, universal, well understood and supported, but it has some serious shortcomings as a data
interface. Its origins predate modern computers and it contains many features that are not relevant to the
modern user. It can control very old primitive modems and has many control signals to do this in hardware,
but often it is used without these old control and status lines.
Its major feature is that it does not require the transmission of a clock, the reception of a ‘start bit’ is enough
to cause the receiver to time all its actions from this one edge. This is called asynchronous transmission.
RS232 allows a 5% difference in transmitted timings and receiver chip timings. This is important if using a
PIC as the datasheet specifies the % error of the baud rate generator at certain baud rates (the higher the
baud rate, the higher the % error), as long as this error is less than 5% the RS232 standard is capable of
coping.
Electronic data communications between elements will generally fall into two broad categories: single-ended
and differential. RS232 (single-ended) was introduced in 1962, and despite rumours for its early demise, has
remained widely used.
±3V
±12V
Figure 2.8a. Illustration of RS232, 1 driver and 1 receiver
“Both RS232 and RS423 are unbalanced (or single-ended) standards, where the receiver measures the
potential between signal line and ground reference. Even though the transmitter and receiver grounds are
usually connected though the transmission line return, the impedance over a long distance may support a
significant difference in the two ground potentials, which will degrade noise immunity. Furthermore, any
noise induced from the outside will affect signal lines differently from the ground return due to their dissimilar
electrical characteristics – hence the name unbalanced.” [B3]
RS232 data is bi-polar, e.g. a +3 to +12 volt indicates an SPACE (ON) while a -3 to -12 volt indicates an
MARK (OFF). Modern computer equipment ignores the negative level and accepts a zero voltage level as
the MARK (OFF) state. This means circuits powered by 5 VDC are capable of driving RS232 circuits directly;
however, the overall range that the RS232 signal may be transmitted/received is dramatically reduced.
The output signal level usually swings between +12V and -12V. The ‘dead area’ between +3v and -3v is
designed to absorb line noise. This dead area can vary for various RS232 like definitions, for example the
definition for V.10 has a noise margin from +0.3V to -0.3V. Many receivers designed for RS232 are sensitive
to differentials of 1v or less.
Pin
1
2
3
4
5
Signal
Data Carrier Detect
Receive Data
Transmit Data
Data Terminal Ready
Signal Ground
Pin
6
7
8
9
Signal
Data Set Ready
Request to Send
Clear to Send
Ring Indicator
Figure 2.8b. 9-pin RS232 D-connector, pin signal description
Typical line drivers / receivers chips for RS232 are the Maxim MAX232 or MAX233 chips (see
http://www.maxim-ic.com) the original specification states that RS232 should drive 50 feet, but modern line
driver/receivers can manage much better than this.
EEE512J2 – Electronic Product Design
Page 9
Chapter 2: Fundamentals
Thursday, 17 July 2003
MiniProject: Design Aspects
Baud Rate
110 bps
300 bps
1200 bps
2400 bps
4800 bps
9600 bps
Colin K McCord
Max Distance Shielded Cable
5000 feet
5000 feet
3000 feet
1000 feet
1000 feet
250 feet
Max Distance Unshielded Cable
3000 feet
3000 feet
3000 feet
500 feet
250 feet
250 feet
Figure 2.8c. Typical maximum distance modern line driver/receivers can manage before errors occur.
LSB
MSB
+15V
Space (=0)
0
1
0
0
0
0
0
1
0
1
Indeterminate
Region
+3V
0V
Mark (=1)
-3V
8 Data Bits
-15V
Start Bit
Stop Bit
Figure 2.8d. Illustration of how data is transmitted over RS232
EEE512J2 – Electronic Product Design
Page 10
Chapter 2: Fundamentals
Thursday, 17 July 2003
MiniProject: Design Aspects
Colin K McCord
3.0. FEASIBILITY / INITIAL DESIGN APPROACH
The NHS (National Health Service) is in crisis, mainly due to years of severe under-funding, but partly
because of the extremely high cost of modern medical equipment, drugs and overpaid doctors. Medical
electronic equipment is expensive because they are low volume products that must be guaranteed to work at
all times as peoples lives depend on them. The ECG monitor is one of the most widely used electronic
medical device, if it is possible to produce a simple low cost product that works as well (or better) than the
expensive machines in use today, organisations like the NHS could save a lot of money. Clearly there is a
potential market, for a low-cost solution.
The ECG monitor proposed in this design brief must be low-cost, compact, accurate, reliable and comply
with all of the associated international standards. The product must be designed for use by the medical
community, allows attempts should be made to attract the use of the product by non-medical personnel (e.g.
sports related), hence increasing the potential market.
The low cost of the product should not be the only aspect to attract customers, the shape, form, aesthetics,
styling, tactile qualities / human interaction surfaces, visual interaction should be also considered. As
research shows that most humans buy on impulses (Looks, feel of the product) rather than the technical
aspect of the product because all products are expected to be technically perfect. Note most electronic
engineers don’t care what the product looks like, just the operation, hence they would be happy placing the
product in a standard square box, drilling a couple of holes for switches and knobs. It makes since for the
packaging to be design by a provisional designer and not an engineer.
3.1. Market Research and Information Analysis
Before detailed design, it is important to carry out market research on existing products. The researcher can
than analysis the information discovering if it’s realistic to produce a product that can complete with the
existing products. The following brief list of commercial products should be studied in detail: Biolog 3000i 12 Lead ECG System, [W13]
•
•
•
•
•
Pocket-sized 12 lead ECG machine, [W13]
•
12 Lead ECG
Solution
Biolog is a Small,
lightweight
ECG Software
Accurate, Reliable
and Rugged
Backlit LCD screen
with 2,000
pixels/cm2
•
•
•
•
•
Light weight and
compact
Stores Multiple
ECG's
Infra red print option.
Mains independent
operation
E-mail ECG's.
User selectable
display.
£1,639.13
ECG Machine (i) with LCD Display, [W13]
12 lead ECG Acquisition Patient Cable, [W13]
•
•
•
£2,344.13
ABS Plastic.
Dependant on PC
(supplied by user).
Complies with:
AAMI EC11; IEC
601-1; IEC 601-1-1;
IEC 601-1-2; IEC
601-2-25.
£1,586.25
EEE512J2 – Electronic Product Design
Page 11
•
•
•
•
•
Simple to Use
Single button
operation
Accurate and reliable
Dual Power supply
ECG Interpretation
software.
£3,172.50
Chapter 3: Feasibility / Initial Design Approach
Thursday, 17 July 2003
MiniProject: Design Aspects
ECG-120B, [W6]
Colin K McCord
ECG-310B, [W6]
•
•
•
•
•
•
•
•
•
•
•
•
1 Channel ECG
Thermal array printer
Compact design
Audible alarm sound
LCD message
Digital filter
3 Channel ECG
Thermal array printer
Compact design
Audible alarm sound
LCD message
Digital filter
£798.263
IQMark (Brentwood by Midmark) Digital ECG, [W14]
Cardio Perfect LITE Resting ECG, [W6]
•
•
•
£1,093.27
•
Digital ECG using
PC for display ECG.
Automatic ECG
Storage
5 second Pretrigger
•
•
Digital ECG using
PC for display ECG
12-lead ECG
machine
Digital filters
£971.09
Welch Allyn AT-5, [W14]
£2,255.92
Welch Allyn AT-10, [W14]
•
•
•
•
•
•
•
•
small, notebook size
system
large 10" screen
Built-in battery &
printer
RS-232 port
•
£2,950.05
Eclipse 850 Electrocardiograph, [W14]
Elite II and EK-10 Electrocardiographs, [W14]
•
•
•
•
•
12 lead ECG in a
single or 3-channel
format
Battery operation
simultaneous
acquisition
ECG transmission
and fax option and
storage for 30 ECGs
•
•
•
•
£1,093.23
•
•
•
•
£2,463.86
switch between ECG
and spirometry with
push-button ease
Print full-size reports
store test results for
up to 60 patients
RS-232 interface
Rechargeable
battery
£3,036.08
EEE512J2 – Electronic Product Design
Three-channel
backlit preview
display
Easy-to-use
interface
Automatic ECG
measurements
FAA compatibility
Battery
Eclipse 4 and 400 Electrocardiographs, [W14]
Welch Allyn AT-2 PLUS Combo, [W14]
•
Notebook size
Large 10” screen
Battery & printer
Meets ATS, NIOSH,
OSHA, and Social
Security standards.
RS-232 port
£4,494.40
Page 12
•
•
•
•
•
•
Compact package
Three-channel
preview display
Automatic ECG
measurements
Fax option with
internal modem
FAA compatibility
Long life battery
£2,425.40
Chapter 3: Feasibility / Initial Design Approach
Thursday, 17 July 2003
MiniProject: Design Aspects
Colin K McCord
Clearly there are many compact portable ECG products on the market; most are easy-to-use with pleasing
shape, form, aesthetics, and styling. The key aspect to note is the price (very expensive), if a low-cost
solution is possible, there is a good change of commercial success as long as the product is technically
suitable of medical use (e.g. must comply with all the relative international standards).
3.2. Concept Designs
The first design concept shown in figure 3.2a is very simple, basically the electronic signal of the heart is
detected by electrodes, which is amplified by the differential amplifier and inputted into the micro-board. The
micro-board converts the analogue ECG signal to digital and transmits the data to the PC (via RS232, USB,
etc…) which then visually displays the ECG.
Differential
Amplifier
(ECG Amp)
Microboard
Surface
Electrodes
Figure 3.2a. Concept design 1, using a PC to display ECG.
Design concept 2 shown in figure 3.2b is also simple, basically the electronic signal of the heart is detected
by electrodes, which is amplified by the differential amplifier and inputted into the micro-board. The microboard converts the analogue ECG signal to digital, and generates an analogue signal to control the CRT
(use oscilloscope in XY mode). The amplified ECG signal is also send through an audio amplifier to drive a
speaker.
Oscilloscope
Audio
Amplifier
Speaker
Differential
Amplifier
(ECG Amp)
Microboard
Surface
Electrodes
Figure 3.2b. Concept design 2, using a CRT / oscilloscope to display ECG.
Design concept 3 shown in figure 3.3b is simple, basically the electronic signal of the heart is detected by
electrodes, which is amplified by the differential amplifier and inputted into the micro-board. The micro-board
converts the analogue ECG signal to digital, and generates an analogue signal to control the CRT (use
oscilloscope in XY mode). ECG data is also transmitted to the PC (via RS232, USB, etc…) which then
EEE512J2 – Electronic Product Design
Page 13
Chapter 3: Feasibility / Initial Design Approach
Thursday, 17 July 2003
MiniProject: Design Aspects
Colin K McCord
visually displays the ECG. 7-segment displays display the beats per minute of the ECG, and a buzzer is
used to beep for each heart beat.
Oscilloscope
Differential
Amplifier
(ECG Amp)
Microboard
Surface
Electrodes
Buzzer
Figure 3.2c. Concept design 3, using a CRT and/or a PC to display ECG.
It was decide to developed concept 3, because it offered more features than 1&2, with only a small increase
in product cost. Allow it maybe useful to have a volume control on the beeper, using a buzzer this is difficult
to achieve as buzzers are either ON or OFF (some buzzers may drop in volume, if there input voltage is
decreased, but this is not ideal), hence the idea from concept 2 (audio amplifier with speaker) is still an
option because a volume control is easy to achieved (vary audio amplifier gain).
3.3. Initial Product Design Specification
ECG Display:
Non fade with hold facility. Screen width – 50mm. Moving trace speed – 25 mm/sec
Anti-glare treated screen for high contrast.
Heart Rate Display:
3 digit 7-segment numeric readout LED displays 10 seconds average rate, updated
every 4 seconds. 30-240 bpm.
ECG Signal:
3 lead cable with AAMI standard 6-pin connector. Electrically isolated and fully
protected from overload.
QRS Bleeper:
0-240 bpm with rear panel volume adjustment.
Surgical Diathermy:
A highly effective diathermy filter will be fitted as standard. Permits continuous
monitoring during electro-surgery.
Delayed Output:
Operation of HOLD control stores the 3.3 seconds of ECG waveform on screen for
write-out to recorder from delayed output jack after release of HOLD.
Real-time Output:
Allows real-time recording of ECG from real-time output jack at a fixed gain of
1V/mW. Buffered output for driving long, high capacitance cable.
EEE512J2 – Electronic Product Design
Page 14
Chapter 3: Feasibility / Initial Design Approach
Thursday, 17 July 2003
MiniProject: Design Aspects
Colin K McCord
RS232 Output:
Allows for transmission of ECG to PC via the RS232 serial interface.
Battery Operation:
Four hours monitoring with fully charged battery pack. Four hours of recharge
required for each hour of use.
Power Module:
Compact convenient and independent unit with cable connection to AC outlet and
monitor rear panel. Recharges batteries and permits continuous AC operation.
Monitor automatically reverts to battery operation during AC power failure.
Size: 76mm x 50 mm x 152 mm
Weight: 0.7 kg
Heart Rate Limits:
Upper and lower, heart rate alarms settings. Infinitely variable with audio alarms.
Power Supply:
Separate mains pack to be provided this will have the ability to physically replace
the battery pack.
Separate units available, suitable for either
(a) 110VAC @ 60Hz, or
(b) 220VAC @ 50Hz, or
(c) 100VAX @ 50Hz.
Weight: 3.5kg including battery pack, without separate power/charger module.
Power Switch:
Front panel push-button with ON indicator light.
Low Battery:
ON indicator light flashes when 15 minutes of battery operating time remains.
Lead Selection:
Full lead selection under micro control.
Size:
Push-button selection of 0.5, 1.0, 2.0 c/mv gain and momentary 1 mv calibration
pulse.
Hold:
Momentarily freezes trace on screen. Information on “hold” can be recorded from
delayed output jack.
Volume:
Rear panel slide control varies volume of QRS bleeper. Range includes zero
volume.
Brightness:
Rear panel slide control to optimise sweep displayed brightness according to
ambient lighting conditions.
Bandwidth:
30 Hz or screen.
AC Power Light:
Amber Neon on C power module.
Packaging:
The unit should be ergonomically efficient and packaged in ABC-type plastic. As this
is a low volume product a vacuum mode solution would be the most viable.
3.4. Applicable Standards
The ECG monitor should be designed and manufactured to fulfil the requirements of the Medical Device
Directive 93/42/EEC of the European Community. The following standards are applicable: Standard
Title
EN 60601-1:1988
Amendment 1: 1991
Amendment 2: 1995
Medical Electrical Equipment
Part 1: General requirements for safety.
EEE512J2 – Electronic Product Design
Issued
Page 15
1988
1991
1995
Chapter 3: Feasibility / Initial Design Approach
Thursday, 17 July 2003
MiniProject: Design Aspects
Colin K McCord
Amendment 11: 1995
Amendment 12: 1996
Amendment 13: 1996
1995
1996
1996
EN 60601-1-2:1993
Medical Electrical Equipment
Part 1: General requirements for safety.
Section 2: Collateral standard: Electromagnetic compatibilityrequirements and tests.
1993
EN 60601-2-26:1995
Medical Electrical Equipment
Part 2: Particular requirements for safety of electroencephalographs
1995
EN-ISO 9001: 1994
Quality Systems
Model for quality assurance in design, development, production,
installation and servicing.
1994
NEN-EN 46001: 1996
Quality Systems
Particular requirements for the application of EN-ISO 9001
1996
EN 55011: 1991
Limits and methods of measurement of radio disturbance
characteristics of industrial, scientific and medical (ISM) radiofrequency equipment
1991
EN 61000-4-2
Electromagnetic Compatibility
Part 4: Testing and measuring techniques.
Section 2: Electrostatic discharge requirements.
1995
EN 61000-4-3
Electromagnetic Compatibility
Part 4: Testing and measuring techniques.
Section 3: Radiated, radio-frequency, electromagnetic field immunity
test.
1996
DIN 42802: 1989
Stechverbinder
Berührungsschutz für die Elektromedizin (contact protection for the
electromedicine)
1998
EEE512J2 – Electronic Product Design
Page 16
Chapter 3: Feasibility / Initial Design Approach
Thursday, 17 July 2003
MiniProject: Design Aspects
Colin K McCord
4.0. PROJECT PLANNING AND MANAGEMENT
4.1. Planning / Development Costs
A detailed plan addressing all aspects of the project from initial brief through to manufacture, sales and
distribution was made. The Microsoft Project software application was used: network, Gantt chart, resources,
castings, timescale, financial planning and management planning. A selection of printouts produced by the
Microsoft Project software application is attached to the end of this report (appendixes).
First list all tasks, with duration and predecessors: -
Resource sheet, list each member of the project team along with their wages: -
EEE512J2 – Electronic Product Design
Page 17
Chapter 4: Project Planning and Management
Thursday, 17 July 2003
MiniProject: Design Aspects
Colin K McCord
The resource sheet is important as it allows Microsoft Project to calculate development costs; this is
achieved by selecting who is working on each task and what percentage of their time is spent on the task.
Resource usage (auto generated): -
The resource usage section in MS Project summarises how many hours each employee is working on each
task and the cost for their services. Notice that it is very economical to make wide use of students.
EEE512J2 – Electronic Product Design
Page 18
Chapter 4: Project Planning and Management
Thursday, 17 July 2003
MiniProject: Design Aspects
Colin K McCord
Task usage (auto generated): -
EEE512J2 – Electronic Product Design
Page 19
Chapter 4: Project Planning and Management
Thursday, 17 July 2003
MiniProject: Design Aspects
Colin K McCord
Gantt chart (auto generate): -
PERT chart with fields hidden (red path is the critical path): -
EEE512J2 – Electronic Product Design
Page 20
Chapter 4: Project Planning and Management
Thursday, 17 July 2003
MiniProject: Design Aspects
Colin K McCord
Development costs: -
4.2. Pareto Concept
The Pareto principle states that there are a ‘critical few and trivial many.’ This concept can be applied to
inventory management using ABC analysis and cost estimating (a small number of elements have a large
effect on the total cost of project).
100%
60%
Class C
Class B
Class A
% Product Cost
90%
20%
60%
100%
% No. of Components
Figure 4.2a. Pareto Curve
ABC Analysis divides on-hand inventory into 3 classes, A class, B class and C class. Basis is usually annual
£ volume (£ volume = Annual demand x Unit cost).
Class A (say 20% of items): •
Develop class A suppliers more.
EEE512J2 – Electronic Product Design
Page 21
Chapter 4: Project Planning and Management
Thursday, 17 July 2003
•
•
MiniProject: Design Aspects
Colin K McCord
Give tighter physical control of A items.
Forecast A items more carefully.
Class B (say the next 40% of items): •
A reorder cycle system could control this class.
Class C (Next 40% of items): •
A two-bin or annual demand system could manage the final 40%.
The analysis requires items to be listed with their unit costs and annual volume. Judgment is needed on
critical items or security matter that Pareto analysis in itself does not reveal. Remember in assembly
situations where items from A, B and C are combined in an assembly, a C item out of stock can delay
production just as much as an A or B item.
4.3. Predicted Product Cost (Ball Park Assessment)
COMPONENTS OF COST
COST
OF
COMP
PARETO
MATERIAL
GEN
0.6
0.3
0.1
-
DET
0.2
0.15
0.13
0.12
0.11
0.065
0.05
0.04
0.035
0.03
0.02
0.01
0.01
0.008
0.006
0.005
0.005
0.003
0.003
-
ITEM
ECG Amplifier
Battery pack and charger
Diathermy filter
12VDC power supply
Printed circuit board
ABS plastic outer casing
RS232 null modem cable
3 lead ECG cable
Microcontroller (PIC16F877)
Other PCB components
8k RAM Chip (M6264P)
Dual DAC (ZN508E)
Piezo alarm
7-segment LED Display X3
X38-bit latch (74LS377) X3
RS232 line buffer (max232)
330R Resistor Network X3
AAMI standard 6-pin plug
9-way PCB D-type plug
FINAL ASSEMBLY
FINAL INSPECTION
SUB TOTALS
GROSS TOTALS
LABOUR
RAW
£1
-
S/C
-
PROP
£30
£22
£22
£20
£10
£13
£10
£8
£7
£6
£4
£2
£2
£1.60
£1.20
£1
£1
£0.60
£0.60
-
M/C
£3
-
INSP
£3
£8
£4
£4
£6
£5
ASSY
£3
£6
£5
-
£40.00
£30.00
£26.00
£24.00
£22.00
£13.00
£10.00
£8.00
£7.00
£6.00
£4.00
£2.00
£2.00
£1.60
£1.20
£1.00
£1.00
£0.60
£0.60
£5.00
£5.00
£1
£0
£162
£3
£30
£14
£210
£163
£47
£210
MANUFACTURING CONTINGENCY
£105
MAXIMUM MANUFACTURING COST
£315
EEE512J2 – Electronic Product Design
Page 22
Chapter 4: Project Planning and Management
Thursday, 17 July 2003
MiniProject: Design Aspects
Colin K McCord
Ball Park Assessment Method: 1. List all components/assemblies in the product.
2. Assess most expensive and least expensive items and determine probable cost order.
E.g. ECG Amplifier = 0.2, Batter pack and charger = 0.15, etc…
3. Rearrange components / assemblies in descending order of cost.
E.g. ECG Amplifier (0.2) most expensive, 9-way PCB D-type plug (0.003) least expensive
4. Apply Pareto rating, first general then detailed.
E.g. split items into three groups 60% (class A), 30% (class B) and 10% (class C) of total cost.
5. Estimate or otherwise determine the cost of one component / assembly.
E.g. ECG Amplifier estimated at £40.
6. Divide this cost by its Pareto rating for total component / assembly (product) ball park cost.
E.g. 40/.20 = £200
7. Add a generous contingency for Ball Park manufacturing cost.
E.g. Say 50% of gross cost: £210 + 50% = £315.
8. Determine Individual costs of component.
E.g. Microcontroller (PIC16F877) = 0.035*200= £7.00.
9. Determine the operative components of costs’ areas involved.
10. Assess components of cost.
11. Add final inspection, final assembly, final test etc.
12. Determine manufacturing cost including estimating contingency.
13. Add PISC + sales / admin + profit to get factory selling price.
E.g. Say 20%, hence factory selling price is £378.
14. Allow for retail mark-up (20-25%)
E.g. Say 20%, hence retail selling price is £453.60.
Note: This entire costing exercise is accomplished without any design work, this is a pre-emptive technique.
19 items were included in the costing sheet: • 4 items (21% of items) contributed to 60% of the total component cost.
• 5 items (26% of items) contributed to 30% of the total component cost.
• 10 items (52% of items) contributed to 10% of the total component cost.
4.4. Line Balancing
A balanced line is one where each work station is allocated a package of work which will take an equal
amount of time to complete as every other work station on the line. In practise this is difficult to achieve,
allow there are a couple standard manual methods (largest candidate rule, Kilbridge and Wester’s method,
ranked positional weights method) that managers can use to obtain a good solution (computational software
also exists). All methods provide a good solution approaching the true optimum and focus management
attention on problem areas.
Precedence constraints describe a situation where an operation must be carried out before another
operation can start. Positive zoning means that particular work element should be placed near to each other,
and negative zoning means that particular work elements should not be placed near to each other. Position
constraint (physical size) means that workers come to the product to perform their work. A precedence
EEE512J2 – Electronic Product Design
Page 23
Chapter 4: Project Planning and Management
Thursday, 17 July 2003
MiniProject: Design Aspects
Colin K McCord
diagram is a diagrammatical representation of the sequence of work elements as defined by the precedence
constraints.
The following list of work elements could describe the production of the ECG monitor for a line with a
production rate of 60 units/hr. At a line efficiency of 100%, the value of the cycle rate is 1.0 min (i.e. the ideal
cycle time is 1 min). Note: this is an example of line-balancing, values are crude approximations designed to
demonstrate the method; in the real-world it is important to carry out work measured (timing of each element)
and know exactly how many items need to be produced per hour.
Work
Element
1
2
3
4
5
6
7
8
9
10
11
12
Element Description
Check PCB board (e.g. broken tracks, etc…)
Assemble plug to power cord
Populate PCB board
Test PCB board
Assemble PCB board to ABS plastic case
Wire power cord to transformer (via power switch and mains lamp)
Assemble metal cage for electrostatic protection
Insert rechargeable battery
Assemble the rear panel slide control
Attach cover
Testing
Place in bay for packing.
0.7
0.3
3
9
0.2
0.1
0.3
1
4
5
Te
Predecessors
0.2
0.4
0.7
0.1
0.3
0.11
0.4
0.11
0.3
0.38
0.5
0.12
…
…
1
1,3
4
2,5
…
7
4
6,8,9
10
11
0.4
0.11
0.38
0.5
0.12
2
6
10
11
12
0.4
0.11
7
8
Figure 4.4a. Precedence Diagram
Note:
TC = Ideal cycle time = theoretical cycle time.
Te = time associated with a work element.
n = No of work stations on assembly line.
d = Balancing loss ≅ Balancing delay.
Step 1: Calculate ranked positional weight (RPN) for each work element by summing the elements Te with
all Te’s of elements that follow it in the precedence diagram.
We
1
2
3
4
RPM
2.71
1.51
2.51
1.81
EEE512J2 – Electronic Product Design
Te
0.2
0.4
0.7
0.1
RPM Calculation
0.2 + 0.7 + 0.1 + 0.3 + 0.3 + 0.11 + 0.38 + 0.5 + 0.12
0.4 + 0.11 + 0.38 + 0.5 + 0.12
0.7 + 0.1 + 0.3 + 0.3 + 0.11 + 0.38 + 0.5 + 0.12
0.1 + 0.3 + 0.3 + 0.11 + 0.38 + 0.5 + 0.12
Page 24
Chapter 4: Project Planning and Management
Thursday, 17 July 2003
5
6
7
8
9
10
11
12
MiniProject: Design Aspects
1.41
1.11
1.51
1.11
1.3
1
0.62
0.12
0.3
0.11
0.4
0.11
0.3
0.38
0.5
0.12
Colin K McCord
0.3 + 0.11 + 0.38 + 0.5 + 0.12
0.11 + 0.38 + 0.5 + 0.12
0.4 + 0.11 + 0.38 + 0.5 + 0.12
0.11 + 0.38 + 0.5 + 0.12
0.3 + 0.38 + 0.5 + 0.12
0.38 + 0.5 + 0.12
0.5 + 0.12
0.12
Step 2: Make a table with the largest RPN at the top.
RPM
2.71
2.51
1.81
1.51
1.51
1.41
1.4
1.11
1.11
1
0.62
0.12
We
1
3
4
2
7
5
9
6
8
10
11
12
Te
0.2
0.7
0.1
0.4
0,4
0.3
0.3
0.11
0.11
0.38
0.5
0.12
Step 3: Assign each We to a work station according to precedence’s and time constraint.
Work Station No.
Element (We)
1
3
4
2
7
6
5
9
8
12
10
11
1
2
3
4
Balancing delay d =
nTC − ∑ w e
nTC
EEE512J2 – Electronic Product Design
× 100 =
Te
0.2
0.7
0.1
0.4
0.4
0.11
0.3
0.3
0.11
0.12
0.38
0.5
Sum of Te @ W.Station
1.0
0.91
0.83
0.88
∑w
e
3.64
4(1) − 3.64
0.36
× 100 =
× 100 = 9%
4(1)
4
Page 25
Chapter 4: Project Planning and Management
Thursday, 17 July 2003
MiniProject: Design Aspects
Colin K McCord
5.0. SYSTEM ARCHITECTURE
5.1. System Block Diagram
The proposed design is shown in block diagram form in figure 5.1a, it is clear that there are two main
features: displaying the ECG on a CRT display (e.g. use an oscilloscope) and transmitting the data to a PC
in real-time to display and log ECG data.
PC for data logging /
displaying ECG
Analogue oscilloscope operating in XY mode for
displaying ECG
VA Out
VB Out
ZN508E-8
/A or B
/Enable
(Dual DAC)
RxD
RA4 RA5
MAX232
PIC16F877
TxD
0Æ 5V
ADC
ECG
Amplifer
Port D
Port B
D[7..0]
(Microcontroller)
A[7..0]
(Line Buffer)
ECG
20 MHZ Clock
M6264P-15
(RAM)
RA2
RA3
/WE
/OE
Figure 5.1a. Simplified block diagram of the system
Obviously the design of a Windows based software application is required to log and display ECG signals
directly from the serial port. This application should be user-friendly, i.e. easy-to-use using standard
Windows interface dialog controls (users are familiar with these controls). Clearly since serial communication
is used a simple but effective communication protocol is required.
The heart of the system is the PIC16F877 microcontroller: “The PIC16F877 is a high-performance FLASH
microcontroller that provides engineers with the highest design flexibility possible. In addition to 8192x14
EEE512J2 – Electronic Product Design
Page 26
Chapter 5: System Architecture
Thursday, 17 July 2003
MiniProject: Design Aspects
Colin K McCord
words of FLASH program memory, 256 data memory bytes, and 368 bytes of user RAM, PIC16F877 also
features an integrated 8-channel 10-bit Analogue-to-Digital converter. Peripherals include two 8-bit timers,
one 16-bit timer, a Watchdog timer, Brown-Out-Reset (BOR), In-Circuit-Serial Programming™, RS-485 type
UART for multi-drop data acquisition applications, and I2C™ or SPI™ communications capability for
peripheral expansion. Precision timing interfaces are accommodated through two CCP modules and two
PWM modules.” [W15]
The ECG signal (form electrodes place on the chest, arms and legs) is inputted into the ECG amplifier. The
propose of the amplifier is to amplify the signal to a level that the PICs Analogue-to-Digital Converter (ADC)
can sample (e.g. a common mode gain of 1000, hence the 1mV ECG signal is amplified to 1V).
The design specification specifies that there should be at least 2 seconds of data on the CRT display at any
one time. Since time-compressed memory is used to obtain a flicker free trace, and it is known that the size
of the memory is 256 bytes, the sample rate must be 128 Hz, e.g. the RAM will take 2 seconds to fill.
Notice that the block diagram shows an external RAM chip, this chip is optional because the chosen PIC has
more than enough internal RAM. The external RAM chip is for flexibility, as the time-compressed memory
uses 75% of the PICs internal RAM and if complex software processing (automatic diagnostic) of the signal
is required (sometime in the future after the product is released, e.g. software upgrade) there may not be
enough free internal RAM.
A dual digital-to-analogue converter (DAC) is used to convert digital data into analogue voltage. This chip is
controlled by the PIC to manipulate the CRT trace, e.g. X (DAC A) and Y (DAC B) specifies the position of
the spot, this spot moves faster than 50Hz across the screen hence it appears as a solid waveform to the
human eye.
The MAX232 line buzzer converts PIC TTL logic (0V for logic 0, 5V for logic 1) into RS232 logic (12V for
logic 0, -12V for logic 1).
5.2. Partitioning Decisions
Figure 5.2a splits software development into 3 main areas; simultaneous development of all three areas is
possible. Figure 5.2b splits hardware development into 4 main areas: simultaneous development is possible
for 3 of the 4 areas, as PCB design cannot start until the digital and analogue circuit has been designed.
Communication
Protocol
PCB
Design
Digital
Circuit
Packaging
Analogue
Circuit
PIC
Program
Windows
Application
Figure 5.2b. Hardware Partitioning
Figure 5.2a. Software Partitioning
Each partition could be given to a different engineer, with many partitions being developed simultaneously,
allow there will be some overlap between partitions (e.g. 7-segment displays mounted on the PCB board
must line up with holes in plastic case). Each partition can be split into sub-partitions, for example: -
EEE512J2 – Electronic Product Design
Page 27
Chapter 5: System Architecture
Thursday, 17 July 2003
MiniProject: Design Aspects
Communication Protocol
¾ Concept design.
¾ Design of frame structure.
¾ Error checking, e.g. CRC.
¾ Test Program.
¾ Functional Testing.
PCB Design
¾ Top layer.
¾ Bottom layer.
¾ Ground plane.
¾ Separation of
analogue and
digital circuit to
reduce noise.
Colin K McCord
Windows Application
¾ RS232 object.
¾ ECG Graphical Display.
¾ User Interface.
¾ Internet communications.
¾ Streaming ECG to disk
(data logging).
Digital Circuit
¾ 7-seqment LED
display circuit.
¾ Beeper circuit.
¾ RAM circuit
¾ DAC circuit.
¾ MAX232 circuit.
PIC Program
¾ Time compressed
memory.
¾ RS232 communications.
¾ Calculation of BPM for 7segment displays.
Analogue Circuit
¾ Power supply.
¾ ECG amplifier.
¾ Low pass filter.
¾ Diathermy filter.
¾ Noise reduction.
Packaging
¾ Size and shape
of ABC plastic
case.
¾ Colour, symbols,
position of ports
and controls.
This partitioning technique is extremely useful, as even the most complex of tasks can be split into a number
of small simple tasks. The design of something as large as a plane for example would be impossible without
the use of this partitioning method as the design is far too complex for one person to fully understand all
aspects of design, hence it is split into partitions (e.g. engine, landing gear, etc…) then sub-partitions and
partitions of the sub-partitions etc… until the partitions are small enough to be manageable tasks.
Besides the obvious (simplify design) this partitioning technique has many advantages, the main one is
system flexibility. For example the software program for the PIC can be written in one large block, this will
work, but it is not flexible as changes cannot be easily made, e.g. calculation of ECG bpm may be spread
throughout the code, hence it would be difficult to debug/change, a change to this code could effect other
parts of the program as the whole program is intertwined. It is common practice to partition software into
blocks known as functions, e.g. a function is written to calculate bpm, this function can be tested
independently of other program code, and can easily be modified in the future. Hardware partitioning has the
same benefit, e.g. the 7-segment display circuit can be changed without affecting any other part of the
circuit.
Communication Protocol
Concept
design
Frame
Structure
PIC Software Development
Error
Checking
TCM
Comms.
BPM
PC Software Development
RS232
Communications
ECG
Graphical
Display
User
Interface
TCP/IP Internet
Communications
Data
Logging
Figure 5.2c. Software development architecture
Figure 5.2c clearly shows how the software development could be partitioned. The communication protocol
and PIC software development blocks are small enough for a software engineer to work on each block. But
clearly the PC software development block is large and a group of software engineers could work on various
aspects of this block, for example an engineer on the graphical display, another on the user interface,
another on RS232 & TCP/IP internet and another on data logging.
Figure 5.3d clearly shows how the hardware development could be partitioned. An engineer could work on
the power supply circuit while another works on the ECG amplifier and another on the low-pass / anti-
EEE512J2 – Electronic Product Design
Page 28
Chapter 5: System Architecture
Thursday, 17 July 2003
MiniProject: Design Aspects
Colin K McCord
aliasing filter. One engineer will design the PCB, a design engineer will design the packaging after some
feedback from the electronic engineers, and an engineer will work on the digital circuit.
Analogue Circuit
Power
Supply
Digital Circuit
ECG
Amplifier
Low-pass
Filter
PCB Design
Top
Layer
BPM
Display
Beeper
Circuit
RS232
Comms.
Colour,
symbols
POS of
controls
Packaging
Bottom
Layer
Ground
Plane
Size and
shape
Figure 5.2d. Hardware development architecture
EEE512J2 – Electronic Product Design
Page 29
Chapter 5: System Architecture
Thursday, 17 July 2003
MiniProject: Design Aspects
Colin K McCord
6.0. PHYSICAL DESIGN
The shape, form, aesthetics, styling, tactile qualities / human interaction surfaces and visual interaction of the
ECG monitor could determine if the product is a commercial success or a failure.
Figure 6.0a shows the shape of traditional ECG monitor; clearly it’s a square
box. If engineers had their way everything would simply be put into a square
box, but in terms of attracting customers the dull old square has no chance.
The attraction of the design could be improved by simply rounding the edges.
The controls, display, and sockets should be layouted in a logical and neat
manor. Styling of the product is extremely important, it should have unique
style that sets it apart form any other product on the market, and colour should
be chosen wisely for example bright colours may attract someone’s attention.
Figure 6.0a. ECG Monitor
Human interaction surfaces and tactile qualities, must be right, as certain
textures feel bad (e.g. cheap plastic feel), while others give the impression of
quality.
Plastics are characterised by high strength-to-density ratios, excellent thermal and electrical insulation
properties, and good resistance to acids, alkalis, and solvents. The giant molecules of which they consist
may be linear, branched, or cross-linked, depending on the plastic. Linear and branched molecules are
thermoplastic (soften when heated), whereas cross-linked molecules are thermosetting (harden when
heated).
The ECG monitor should be ergonomically efficient and packaged in ABS-type plastic. As this is a low
volume product a vacuum mode solution would be the most viable. ABS-type plastic was chosen because it
is a tough, heat-resistant thermoplastic making it ideal for this project.
The manufacture of the plastic case will be carried by a plastic specialist company charging an agreed price
for each case. Generally the larger the quality to be manufactured the lower the production cost, but there
are high tooling costs involved with the large production method of manufacture which are no viable for low
volume products (like this ECG monitor).
6.1. ABS Plastic (Acrylonitrile Butadiene Styrene)
ABS is a graft copolymer made by dissolving styrene-butadiene copolymer in a mixture of acrylonitrile and
styrene monomers, then polymerizing the monomers with free-radical initiators in an emulsion process.
Grafting of acrylonitrile and styrene onto the copolymer chains occurs by chain-transfer reactions. ABS was
patented in 1948 and introduced to commercial markets by the Borg-Warner Corporation in 1954.
ABS is a tough, heat-resistant thermoplastic. The three structural units provide a balance of properties, the
butadiene groups (predominantly trans-1,4) imparting good impact strength, the acrylonitrile affording heat
resistance, and the styrene units giving rigidity. ABS is widely used for appliance and telephone housings,
luggage, sporting helmets, pipe fittings, and automotive parts.
6.2. Manufacture of Plastics
The manufacture of plastic and plastic products involves procuring the raw materials, synthesising the basic
polymer, compounding the polymer into a material useful for fabrication, and moulding or shaping the plastic
into its final form.
Most plastics today are derived from petrochemicals. These oil-based raw materials are more widely
available and less expensive than other raw materials. However, because the world supply of oil is limited,
other sources of raw materials, such as coal gasification, are being explored.
EEE512J2 – Electronic Product Design
Page 30
Chapter 6: Physical Design
Thursday, 17 July 2003
MiniProject: Design Aspects
Colin K McCord
The first stage in manufacturing plastic is polymerisation. The two basic polymerisation methods are
condensation and addition reactions. These methods may be carried out in various ways. In bulk
polymerisation, the pure monomer alone is polymerised, generally either in gaseous or liquid phase,
although a few solid-state polymerisation’s are also used. In solution polymerisation, an emulsion is formed
and then coagulated. In interfacial polymerisation, the monomers are dissolved in two immiscible liquids, and
the polymerisation occurs at the interface of the two liquids.
Chemical additives are often used in plastics to produce some desired characteristic. For instance,
antioxidants protect a polymer from chemical degradation by oxygen or ozone; similarly, ultraviolet stabilisers
protect against weathering. Plasticizers make a polymer more flexible, lubricants reduce problems with
friction, and pigments add colour. Among other additives are flame retardant and antistatic.
6.3. Shaping of Plastic
Plastic products are made from plastic resins, which melt into a syrupy liquid when heated. There are several
standard manufacturing techniques for shaping plastics (see figure 6.3a for illustrations), many of which
could be used in manufacture of the ABS plastic case of the ECG monitor.
Figure 6.3a. Illustrations of manufacturing techniques for shaping plastics, source [MS Encarta Encyclopaedia 96]
EEE512J2 – Electronic Product Design
Page 31
Chapter 6: Physical Design
Thursday, 17 July 2003
MiniProject: Design Aspects
Colin K McCord
Compression moulding uses heat and pressure to shape plastics. The process is commonly used to mould
thermosetting plastics.
Injection moulding shoots molten plastic material under pressure into a mould. It is the most widely used
method of moulding thermoplastics.
Blow moulding produces hollow objects. It uses air or steam to expand a tube of molten resin, forcing the
material against a mould’s walls.
Casting does not depend on any external pressure to shape the plastics. In the casting process, melted
resin is simply poured into a mould. Manufacturers use casting to produce thick, solid objects.
Extrusion is used to produce such continuous forms as pipe, rods, fibbers, wire coatings and supermarket
plastic bags. Rotating screw force the plastics through a heated barrel, in which they melt, then force them
out through a specially shaped die.
Calendering produces plastic sheets by pressing molten plastic material between two rollers. Manufacturers
also feed fabric, paper, or other materials through the rollers to produce such items as tablecloths and
playing cards.
Laminating involves coating sheets of such materials as wood, paper, or metal foil with plastics. The sheets
are then stacked and pressed together to make such products as plywood, electronic circuit boards, and
tabletops.
Foaming is any of several methods that produce solid plastics filled with air spaces. To make Styrofoam, for
example, manufacturers use beads of thermoplastic resin containing a chemical that forms a gas when
heated during moulding.
Thermoforming is used to mould items from sheets of plastics. A sheet is clamped over a mould and heated
until it becomes soft. A vacuum pump sucks air out through tiny holes in the mould, drawing the sheet into
the mould.
6.4. Health and Environmental Hazards of Plastics
Because plastics are relatively inert, they do not normally present health hazards to the maker or user.
However, some monomers used in the manufacture of plastics have been shown to cause cancer. Similarly,
benzene, which is an important raw material for the synthesis of nylon, is a carcinogen. The problems
involved in the manufacture of plastics parallel those of the chemical industry in general.
Most synthetic plastics are not environmentally degradable; unlike wood, paper, natural fibres, or even metal
and glass, they do not rot or otherwise break down over time. (Some degradable plastics have been
developed, but none has proven compatible with the conditions required for most sanitary landfills.) Thus,
there is an environmental problem associated with the disposal of plastics.
EEE512J2 – Electronic Product Design
Page 32
Chapter 6: Physical Design
Thursday, 17 July 2003
MiniProject: Design Aspects
Colin K McCord
7.0. ELECTRONIC / SOFTWARE DESIGN
7.1. Design Considerations
Accuracy, dependability, and precision are an absolute must if the device were to be used for diagnostic, or
other medical purposes. Any small fluctuation in the waveform generated could carry critical diagnostic
value, thus it is extremely important that the clinician can confidently and fully rely on the equipment. This
means that the ECG must faithfully display the cardiac signal exactly as it exists in reality, such that any
irregularity detected did in fact arise from an unhealthy cardiac cycle, not from the equipment that was used.
Therefore, there were many special considerations that had to be taken into account when designing the
ECG Monitor.
Noise:
First and foremost in these considerations is the effect of noise. Noise interference in the signal detection
process would be detrimental to the experiment, as the ECG signal is at such small amplitudes it could easily
be masked by noise related fluctuations. Therefore in order to detect the signal accurately, there must be
strict limitations on the acceptable level of noise allowed, and every possible attempt must be made to
minimise this level and reduce the effects of noise on the data acquisition process.
Signal Amplitude:
Another consideration that strongly influenced the design of the ECG is the fact that the cardiac signal
generated has a very small peak amplitude. (As stated above, this is the very signal attribute that makes
noise control so vital). Considerable amplification is necessary if there is any use to be made from the
cardiac signal in terms of analysis and output. Also, the small size of the signal plays a very influential role in
the approach to creating a system of visual output. Caution has to be taken to effectively differentiate
between actual changes in the signal amplitude as opposed to a random variation in noise amplitude.
Low frequency:
Because the signal that is generated from the cardiac muscle has such a low bandwidth, it is very important
that the ECG have a good low frequency response. This is because any shifts in the frequency of the
detected signal, especially the S-T portion of the waveform, carry critical diagnostic value.
7.2. System Powering
Figure 7.2a shows the circuit diagram; clearly a 5V regulator is used to generate a 5 volt DC output to power
the circuit. The 0.1µF capacitors absorb line noise, while the 100µF capacitors are used for storage in the
event of a minor drop in power (milliseconds) the circuit operation will not be affected.
MC7805CT
8 to 20 VDC
Vi
C1
100uF
50V
C2
0.1uF
Vo
Com
5 VDC
C3
0.1uF
C4
100uF
50V
Figure 7.2a. System powering circuit
This means that the circuit has now got a wide operating voltage range as 8 to 20 volts DC will power the
circuit. Note there are higher spec 7805 chips available that can operate up to 30 volts DC, if there is a need
for a higher voltage range.
The system can be powered from a battery source (e.g. PP3 9V), or a DC power supply (e.g. 12V). It has
been decided, not to design a complete power supply unit from scratch, but to use commercially available
units. It is important to remember that voltage regulators are not efficient and as the input voltage increases
the least efficient they become, energy is lost in the form of heat. A heat sink is normally required to keep the
chip within its maximum operational temperature.
EEE512J2 – Electronic Product Design
Page 33
Chapter 7: Electronic / Software Design
Thursday, 17 July 2003
MiniProject: Design Aspects
Colin K McCord
7.3. Digital Circuitry
Figure 7.3a shows the circuit diagram; it is important to note that this is a first draft (prototype) designed to
test the concept of an ECG monitor, this version is not a valid commercial medial product as it does not
comply with all the relative medial standards, for example RS232 communications is not isolated (A isolated
DC to DC converter could be used for this task) and the design has no noise immunity. Allow this design
could be released as a non-medical version (e.g. sports usage) for less than £100 (A lot less than the
predicted retail cost of £453.60 for a fully complied medial product).
g
f
b
f
f
a
b
a
b
a
Buzzer
g
g
Vcc a
C5
c
e
c
c
d
e
f
g
Vcc a
C7
G1
2D
1C2
74LS377
1C2
2D
G1
74LS377
1C2
b
b
c
d
e
f
D5
g
D4
f
D3
e
D2
d
g
330R
c
d
VCC
330R
b
330R
R6
10k
G1
R5
1k
74LS377
C4
Vcc a
d
VCC
D1
d
VCC
T1
BS170
e
e
c
VCC
2D
C8
D6
D0
D6
D5
D4
D3
D2
D1
D0
D6
D5
D4
D3
D2
D1
D0
C6
VCC
5
A5
6
A4
7
A3
8
A2
9
A1
10
A0
11
VCC
12
13
R7
1k
14
WE
A7
CS2
A6
A8
A5
A9
A4
A11
A3
OE
A2
A10
A1
CS1
A0
I/O8
I/O1
I/O7
I/O2
I/O6
I/O3
I/O5
GND
I/O4
Push
Button
X
28
C3
26
25
24
1
23
2
3
22
C2
21
4
20
5
19
6
C1
18
7
17
8
16
9
15
10
AGND
VREF TRIM
VREF OUT
VREF IN (B)
VREF IN (A)
VCC
DGND
WRITE
DAC A/DAB B
ENABLE
DB0 (MSB)
DB7 (LSB)
DB1
DB6
DB2
DB5
DB3
DB4
20
19
VCC
18
17
16
15
C0
14
13
12
11
D3
D4
D5
D6
D7
D7
D6
D5
D4
D3
ZN508E-8
D2
D1
VB OUT
VA OUT
M6264P-15
D0
Y
R1
1.5k
27
D0
4
A6
VCC
A12
VCC
3
A7
NC
D1
2
D2
1
VCC
ECG
3
VCC
4
C0
C1
DIP SW
R2
1k
R3
1k
R4
1k
C2
C3
5
6
7
8
10
VCC
11
12
13
14
15
C4
C5
C6
20MHz
16
17
18
19
A0
C6
33pF
C7
33pF
A1
20
RB7/PGD
RA0/AN0
RB6/PGC
RA1/AN1
RB5
RA2/AN2/VREF-
RB4
RA3/AN3/VREF+
RB3/PGM
RA4/TOCKI
RB2
RA5/AN4/SS
RB1
RE0/RD/AN5
RB0/INT
RE1/WR/AN6
Vdd
RE2/CS/AN7
Vss
Vdd
RD7/PSP7
Vss
RD6/PSP6
OSC1/CLKIN
RD5/PSP5
OSC2/CLKOUT
RD4/PSP4
RC0/T1OSO/T1CKI
RC7/RX/DT
RC1/T1OSI/CCP2
RC6/TX/CK
RC5/SD0
RC2/CCP1
RC3/SCK/SCL
RC4/SDI/SDA
RD0/PSP0
RD3/PSP3
RD1/PSP1
RD2/PSP2
40
D7
39
D6
38
D5
37
C5
1uF
D4
36
C1
1uF
D3
35
1
C1+
3
C1-
4
C2+
5
C2-
D2
34
D1
33
C2
1uF
D0
32
C3
1uF
16
VCC
9
MCLR/VPPTHV
VCC
+5V to +10V
Voltage
Doubler
+10V to -10V
Voltage
Inverter
V+
2
V-
6
C4
1uF
31
1
30
11
14
10
7
12
13
9
8
A7
29
A6
28
2
A5
27
A4
26
8
4
24
22
7
3
25
23
6
DB9
2
D[7..0]
VCC
1
C7
9
5
C8
21
A3
A2
PIC16F877-20/P
MAX232CPE
GND
15
A[7..0]
Figure 7.3a. Digital circuit diagram
EEE512J2 – Electronic Product Design
Page 34
Chapter 7: Electronic / Software Design
Thursday, 17 July 2003
S2
0
0
0
0
1
1
1
1
S1
0
0
1
1
0
0
1
1
S0
0
1
0
1
0
1
0
1
Baud Rate
115,200 bps
57,600 bps
38,400 bps
32,768 bps
19,200 bps
14,400 bps
9,600 bps
4,800 bps
MiniProject: Design Aspects
Colin K McCord
The dip-switches are used to select RS232 baud rate, table shown on
the left. The push button has three functions, if the user holds down the
button during power up, it will put the ECG into test mode, e.g. 7segment, RS232, RAM chip, DAC, ADC, will run through a simple
diagnostics program. If the push button is pressed during normal
operation, this will pause the ECG display, which resumes when the
button is pressed again. The final operation of the push button is to mute
the buzzer when a patient has “flat lined” (e.g. heart beat stopped).
Port D is used for an 8-bit address bus, the only component that requires an address is the RAM chip
(M6264P-15). This RAM has 8k of memory, but because the address bus is only 8-bits wide, hence it is only
possible to access 256 bytes of memory (This is OK). If it is decided that more RAM is required at a later
stage of the design process, it is possible to use all 8k of RAM even though it appears that there are not
enough free ports on the PIC. The trick is to use two 8-bit latches (as used for the 7-seg displays), were one
latch sets the MSB of the address and the other sets the LSB of the address. Since both of these latches
should not be enabled at the same time, the one free pin (RC3) can be used to select between the latches
(e.g. use a not gate to one latch, and connect the pin directly to the other). But these increases chip count,
therefore product cost, hence there would need to be a good reason of the usage of the entire RAM chip.
Port B is used for the shared data bus, the RAM (M6264P-15), the DAC (ZN508E-8), and the 8-bit latches for
the 7-segment displays (74LS377) are all connected to this bus. Note that only one item can be enabled at
any one time, for example if writing to the RAM chip all other devices on the data bus must be disabled. This
is the classic microprocessor method of interfacing with devices, but it was not the only option it is possible to
use a serial RAM chip, serial DAC and serial latches, this would reduce the number of pins required on the
PIC (no need for data bus or address bus) hence a 28-pin device could be used, reducing product cost. But
the disadvantage of this is speed: time compressed memory is used to display the ECG on a CRT; it requires
a refresh rate of at least 50Hz (flicker free), since 256 bytes of data is displayed on the screen, this means
that the DAC must be updated 12,800 (50 x 256) times per second. If a serial DAC was used each bit is
clocked in one at a time, hence a serial baud rate of 102,400kbps (12,800 x 8) would have been required,
the PIC can achieve this, but there may not be enough processor power left to carry out other critical
operations.
The reason why the MAX232CPE (RS232 line buffer) was chosen was because it can be powered from a
single 5V power supply. Recall that RS232 requires +3 to +12 volts for a logic ‘0’ and -3 to -12 volts for a
logic ‘1’, the MAX232CPE has a built-in (external capacitors required) voltage doubler circuit (+10V) and a
voltage inverter circuit (-10V). This reduces product cost as the other option is to using a switch mode DC to
DC converter (cost about £5) to generate required power supply. Allow a +9 and -9 supply (could use -10,
+10) is required for the ECG amplifier circuit, hence a DC to DC converter is required anyway. Allow the
max232 data sheet states that the +10 and -10 voltage pins could be used to drive other circuits, but it is not
recommended, plus its good design practice to keep analogue and digital circuits separate (problems with
noise).
Notice that only the transmit wire is connected to the RS232 cable, the ECG monitor does receive any
feedback from the PC, just transmits ECG data continuously. Perhaps it is a good idea to connect the
receive wire, as this increases the possibilities for future product enhancement. For example the chosen PIC
can protect blocks of program memory, hence a bootstrap program can be written to check the serial
interface before calling the main program. If a certain block of characters are received during boot strap, it
moves into program mode, using a bidirectional communications protocol (RTS, ACK, NAG, etc…) a new
program can be download from the PC directly into program memory, when download is complete the new
program is called. This offers greater product flexible as software updates (bug fixes, new features) can be
downloaded free of charge and download directly into the product using the same serial interface and
software used to display the ECG.
7.4. Analogue Circuitry
Figure 7.4a shows the circuit diagram; it is important to note that this is a first draft (prototype) designed to
test the concept of an ECG amplifier, this version is not a valid commercial medial product as it does not
EEE512J2 – Electronic Product Design
Page 35
Chapter 7: Electronic / Software Design
Thursday, 17 July 2003
MiniProject: Design Aspects
Colin K McCord
comply with all the relative medial standards. This design is extremely simple, but the chosen amplifier is
analogue devices AD624AD, this amplifier is an “Instrumentation amplifier” with a CMRR (Common Mode
Rejection Ration) of 110dB and a gain of 1,000. Note the AD624AD chip is the most expensive chip in the
design, costing £22.50 (retail price); hence perhaps a lower cost solution is possible. The reason why this
expensive chip was chosen was because of its good CMRR (At least 80dB was required) and high precision.
+9V
1uF
Electrode 1
VCC
1
8
47k
Electrode 2
10k
2
Simple Low Pass Filter
4
47k
Electrode 3
3
D1
5
AD624AD
11
9
To ADC
6
10M
4.7k
13
47k
1uF
1uF
D2
10
12
7
16
1uF
-9V
Figure 7.4a. ECG Amplifier circuit
A simple CR second order low pass filter was used to filter high frequencies (anti-aliasing) and the two
diodes ensure that the PIC is not damage in the event of over voltage or negative voltages.
7.5. PIC Program
The philosophy that should be used during the development of the PIC code is to keep it simple,
straightforward, comprehensible, and to a minimum. It was decided to write the program in C, C is a high –
level programming language which allows for programs to be written quickly without any knowledge on how
the CPU works.
The other option is to program at the assembly level, this has the advantage of producing more efficient code
(runs extremely fast), but this code is not transparent to the chosen chip, hence if it was decided to change
the microcontroller, the program may have to be completely rewritten, allow Microchip’s range of
microcontrollers seems to have good backward compatibly, hence maybe only manor chargers are required.
The main draw back for assembly level program is the time it takes to develop the program, writing the
program in a high-level language like C is easier and takes less time, hence reducing development costs.
Start
Timer2_ISR
Setup Ports, Baud
Rate, and ADC
Read ADC
Setup Timer 2 to
cause and
interrupt 128 times
a second
Scan Array of data
and Update DAC
Add ADC reading
to the end of the
array
Return
Figure 7.5b. Simplified Interrupt routine
Figure 7.5a. Simplified Main routine
EEE512J2 – Electronic Product Design
Transmit ADC
Reading through
RS232.
Page 36
Chapter 7: Electronic / Software Design
Thursday, 17 July 2003
MiniProject: Design Aspects
Colin K McCord
Figure 7.5a shows a simplified block diagram of the main routine, this routines first setups the ports
(configure as input / output), sets the baud rate as specified by the DIP switches, and the ADC. Timer 2 is
setup to interrupt the main routine 128-times a second, and then the main routine is stuck in a loop forever
contentiously scanning through the array refreshing the CRT display.
Figure 7.5b shows a simplified block diagram of the interrupt routine, this routine interrupts the main routine
128 times a second and returns back to the main routine after it has been successfully executed. Basically it
reads the ADC, stores the reading at the end of the array, and transmits the reading through RS232 so the
PC can display / log the ECG data.
It was decided to use interrupts, this allows for the CRT display and the sampling of the ECG to be
completely separated and allow the PIC to do two things at once (time slicing). It did not have to be written
this way as it is possible to write the entire program in the main routine, but the code would be intertwined
and difficult to debug.
Obviously calculation of the ECG bpm and sounding of the buzzer has not been included yet as its good
software design practice to build the code up step-by-step (e.g. get part A programmed before moving to part
B, etc…). This code could be placed in the main program or another interrupt routine (using timer 0 or 1 to
cause the interrupt).
EEE512J2 – Electronic Product Design
Page 37
Chapter 7: Electronic / Software Design
Thursday, 17 July 2003
MiniProject: Design Aspects
Colin K McCord
8.0. CONCLUSIONS
Clearly the heart’s strong pumping action is driven by powerful waves of electrical activity, which are
detected by attaching electrodes to the skin. It is clear that these electrical signals are extremely small and
must be amplified considerably (about 1000 times) to be of any use. Evidently an ECG monitor displays
these electrical signals graphically just like an oscilloscope displays voltage variations; expect that the trace
on an ECG monitor scrolls across the screen. The concept of an ECG is not novel one; the attraction of this
project lay in the challenge to build a simple, compact, operational medical device at a low cost.
It is clear that the electrocardiogram (ECG) is a simple, non-invasive technique for detecting abnormalities
and diagnosing heart defects, merely by noting the presence of irregularities in the PQRST waveform.
Clearly other applications are very effective in areas of sports medicine, or sports therapy, in tracking the
heartbeat through various levels of physical activity to assist the patient in attaining a desired, optimum heart
rate.
The CRT display (Cathode Ray Tube) is one of the common display types in use today (TVs, monitors,
oscilloscopes, etc...), clearly this technology is coming to the end of its life as new compact low power
technologies like TFT and LCD are becoming more widely used. The main disadvantage of the CRT
(besides it high power consumption) is the way it draws the image, the spot is moved across the screen at
50 Hz, even at 50 Hz some people will still see the display flickering badly (modern computer monitors have
a refresh rate of over 100Hz), and most people experience problems when an CRT display is within their
peripheral vision, causing headaches, dizziness, and eye strain when exposed for long periods of time. The
use of a TFT or LCD display instead of a CRT display is clearly a better option, as the screen does not
flicker, the reason why it does not flicker is because the screen is split up into pixels, each pixels can
modified independently of each other, hence only the changes made to the display are refreshed.
Undoubtedly it is important for a product designer to first produce a couple of simple concept designs (see
figures 3.3a to 3.3c) before starting detailed design. These design can be completely “of the wall” (not
practical), but aspects of which could have contributed to the design of the finished product. After market
research and the concept design stage, it is time for a designer to make some decisions and come up with a
detailed product design specification that engineers can use to carry out detailed design of the product.
Obviously this product design specification should be flexible, as engineers working on the product may have
thought of a better way of going about a certain problem, new ideas, or certain aspects of the specification
are not practical and have to be changed.
One of the main problems with the design of any product is compliance with international standards, and
because the ECG monitor is designed for medial usage these standards are extremely high. Clearly
international standards are a must, as this ensures the technical operation of the product over varying
conditions and ensures the product is completely safe. Without these standards there would be a lot more
low cost electrical goods on the market, which maybe unsafe, hence the reason why electronic products
without ISO compliance should not be purchased. Allow this does not necessary mean that the product is
unsafe, but with compliance a product is practically guaranteed to operate correctly and safely. The ECG
monitor must fulfil the requirements of the medical device directive 93/42/EEC of the European community in
order to be used as a medial instrument. Note international standards are updated regularly, hence it is
important to keep an eye on them throughout the development of the product.
Powerful software applications like “Microsoft Project” are extremely useful for manning projects. A detailed
plan addressing all aspects of the project from initial brief though to manufacture, sales and distribution was
easily made. The software application automatically calculates development costs by calculating how long
each employee spends of each task and multiplying it by their hourly wage. Gantt charts, PERT charts, and
various forms (e.g. development costs) are easily generated by the system. The total development cost for
the ECG monitor was estimated at £24,646, taking into account only personal wages, never mind overhead
costs (power, telephone, etc…) and prototyping costs.
Clearly commercial ECG monitors are over priced; the main goal of this project is that the cost should be as
low as practically possible, the total manufacturing cost is predicted to be £315 (£450 retail price) and this
figure is being used as guild when selecting hardware components. The predicted retail price of £450 is a
little higher than originally planed (due to compliance with international medial standards), allow the real cost
of the project is likely to be lower (over estimated), clearly it is still much cheaper than existing portable
EEE512J2 – Electronic Product Design
Page 38
Chapter 8: Conclusions
Thursday, 17 July 2003
MiniProject: Design Aspects
Colin K McCord
commercial ECG monitors as the cheapest was £798 and it only had a printer for ECG output, no visual
display, no PC communications, very basic.
Clearly line balancing is very important, as this ensures that the production line is almost optimal, keeping
production costs to a minimum. There are powerful software applications designed specially for this task,
and there are many good manual methods that managers can use. Evidently a balanced production line for
ECG monitor can be achieved using 4 work stations with a balancing delay of only 9%.
The RS232 transport medium was chosen to transmit the ECG to a PC in real-time, the main reasons why it
was chosen is because it is easy to program, reliable and every PC has at least one RS232 port. The main
disadvantage of RS232 is that it is slow (max speed 115kbps) when compared to other mediums (e.g. USB
12Mbps). Because the ECG monitor is only sampling at 128Hz, the speed of the RS232 port is more than
enough.
Unmistakably the partitioning of work is extremely useful, as even the most complex of task can be split into
a number of small simple tasks. The design of a plane for example is clearly too complex for one person to
fully understand all aspects of design and must be partitioned many times over, until the partitions are small
enough to be manageable tasks. Besides the obvious (simplify design) the partitioning technique has many
advantages, the main one being system flexibility, e.g. modules can be modified without the need to
redesign the entire product. But it is important to note that a well designed non-partitioned design (difficult to
achieve) will likely be cheaper and operate more efficiently, clearly this is not commercially viable as the
product would not be flexible (difficult to change) as all aspects of the product are intertwined and rely on
each other, and difficult to service (repair, upgrade).
It is clear that the ECG monitor should not rely totally on the low-cost of the product to attract customers, the
shape, form, aesthetics, styling, tactile qualities / human interaction surfaces, visual interaction should be
designed carefully. Research shows that most humans buy on impulses (Looks fell of the product) rather
than the technical aspects of the product (with the exception of engineers, who are obsessed with technical
details). Note most electronic engineers would be happy to place the product in a standard square box,
drilling a couple of holes for switches and knobs. Clearly a design engineer should design the packaging, but
their must be a close relationship between the design engineer and the electronic engineer as the PCB
board must fit the case with switches and indicators lining up with holes in the case (no point having a cool
case if the electronic circuit does not fit, or does not offer adequate cooling).
Obviously accuracy, dependability, and precision are an absolute must for the ECG monitor as the device is
to be used for diagnostic, and other medical purposes. Clearly any small fluctuation in the waveform
generated could carry critical diagnostic value. It is obvious that noise is the main design consideration, as
the ECG is extremely small and can easily be masked by noise related fluctuations. The ECG amplifier must
amplify the ECG single (1000 times) and not the noise, hence the need for an expensive “instrumentation
amplifier” with a high CMRR. This explains why the ECG amplifier is the single most expensive module
within the ECG amplifier.
Clearly the designed digital circuitry is low cost (under £20), if the same function was designed using
analogue circuitry the cost and chip count would be extremely high. The design shown in 7.3a includes every
that this required to produce a working prototype, but clearly development is required to comply with
international standards, i.e. RS232 communications must be isolated.
This report clearly demonstrated how to design and plan the innovation of a new medical device, from the
feasibility study through to physical realisation / manufacture of the product. Evidently there is a market for a
low cost ECG solution, which is commercially viable to produce.
EEE512J2 – Electronic Product Design
Page 39
Chapter 8: Conclusions
Thursday, 17 July 2003
MiniProject: Design Aspects
Colin K McCord
9.0. REFERENCES / BIBLIOGRAPHY
Text Books
[B1]
The Essences of
Microprocessor Engineering
[B2]
By Barry Ross
Publisher: McGraw – Hill
ISBN: 0-07-707818-7
UUJLIB:621.3815483ROS
1994
By Sid Katzen
Publisher: Prentice Hall
ISBN: 0-13-244708-8
1998
[B3]
The Quintessential PIC
Microcontroller
Hands-On Guide to
Oscilloscopes
[B4]
Microelectronic Circuits –
Fourth Edition.
By S. Sedra and Kenneth
C. Smith
Publisher: Oxford
university press
ISBN: 0-19-511690-9
1998
by Dr Sid Katzen
published by: Springer
ISBN: 1-85233- 309-X.
2001
Websites
[W1]
http://www.laurushealth.com
[W2]
http://baserv.uci.kun.nl/~smientki/Lego_Knex/Lego_electronica/BioSensors/ECG_sensor.htm
(Mindstorms ECG Sensor by Stef Mientki, august 2001)
[W3]
http://www.oucom.ohiou.edu/CVPhysiology/A013.htm (An overview of the different standard
electrode placements is given by Richard E. Klabunde, Ph.D).
[W4]
http://www.oucom.ohiou.edu/CVPhysiology/A009.htm (An overview of electrocardiogram by Richard
E. Klabunde, Ph.D).
[W5]
http://www.consultrsr.com/resources/agcl.htm (The Ag-AgCl reference electrode, © Copyright 2000
research solutions and resources).
[W6]
http://www.harrellmedical.com (Medical equipment and medical supplies)
[W7]
http://www.allheart.com/ (Medical equipment and medical supplies)
[W8]
http://www.healthsci.utas.edu.au/physiol/tute2/rm11.html (The Electrical Conduction System of the
Heart)
[W9]
http://www.praxiom.com/iso-9001.htm (ISO 9001 2000 Translated into Plain English, © Praxiom
research group limited).
[W10] http://www.isas.org.au/main/standards.htm (ISAS Standards)
[W11] http://www.ecglibrary.com/ecghist.html (A not so brief history of electrocardiography).
[W12] http://www.analog.com (Analog Devices official website)
EEE512J2 – Electronic Product Design
Page 40
Chapter 9: References
Thursday, 17 July 2003
MiniProject: Design Aspects
Colin K McCord
[W13] http://www.numed.co.uk/prices.html (Medial Equipment price list by Numed Cardiac Diagnostics ©
Numed 2001)
[W14] http://physicianequipment.com/electrocardiographs.html (Online Medical Supply Store)
[W15] http://www.microchip.com - Microchip Website (PIC datasheets and application notes).
EEE512J2 – Electronic Product Design
Page 41
Chapter 9: References