1
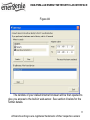
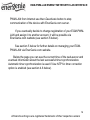
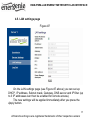
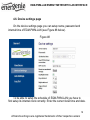
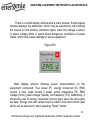
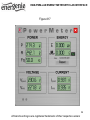
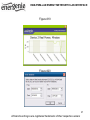
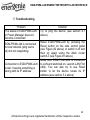
EGM-PWM-LAN
ENERGY METER WITH LAN INTERFACE
USER MANUAL
HANDBUCH
HANDLEIDING
MANUEL DESCRIPTIF
РУКОВОДСТВО ПОЛЬЗОВАТЕЛЯ
КЕРІВНИЦТВО КОРИСТУВАЧА
EGM-PWM-LAN ENERGY METER WITH LAN INTERFACE
Energy meter with LAN interface
Energiemessgerät
Energiemeter met LAN interface
Compteur d'énergie avec interface LAN
Измеритель мощности и энергии с сетевым
интерфейсом
Вимірювач потужності та енергії з мережевим
інтерфейсом
2
All brands and logos are registered trademarks of their respective owners
EGM-PWM-LAN ENERGY METER WITH LAN INTERFACE
1.1. Features
• LAN Energy Meter, accessible from anywhere within your LAN, creates
insight in your energy consumption (voltage/current/power)
• Get your power consumption curves via Internet - no permanent
computer connection required
• No external IP-address at home? No problem. Your own user account
on EnerGenie.com will let you view and analyze the energy costs via
Internet with any PC or even mobile phone.
• Power Meter software provides basic power consumption readings
(home use) and advanced readings (business/scientific use)
1.2. Specifications
• Power rating: 1 socket 250 V AC max,16 A max
• Computer measurements: voltage and current measuring (RMS values),
true power measuring, real energy consumed during a time period (kWh)
• Measurements range: up to 250 V AC, 16 A (RMS), 4000 W, 35 MW a
year
• Measurements accuracy: ± 2% (within 50 W - 4000 W power range)
• Working conditions: (+10 to 40) deg C, below 90% humidity
• Resistance to short-circuits: 1.5 kV
• Dimensions: 135 mm x 92 mm x 78 mm
• Net weight: 0.35 kg
3
All brands and logos are registered trademarks of their respective owners
EGM-PWM-LAN ENERGY METER WITH LAN INTERFACE
1.3. System requirements
•
LAN socket
•
Internet connection is required for uploading the information to
EnerGenie.com server
1.4. Package contents
•
EGM-PWM-LAN
•
Software CD
•
User manual
•
LAN crossover patch cord
•
LAN patch cord
4
All brands and logos are registered trademarks of their respective owners
EGM-PWM-LAN ENERGY METER WITH LAN INTERFACE
2. Indicators and controls of the EGM-PWМ-LAN
Figure #1
Socket 1
Load indicator
Day/Night mode
indicator
Reset button
LAN socket
LAN activity indicators
5
All brands and logos are registered trademarks of their respective owners
EGM-PWM-LAN ENERGY METER WITH LAN INTERFACE
3. Installation of EGM-PWM-LAN
To use EGM-PWM-LAN please follow next steps:
•
Connect EGM-PWM-LAN to the wall socket first and then to the LAN
socket (or your computer LAN card) with the provided patch cord or
vice-versa.
•
It is strongly recommended to avoid damp or wet places for
installation.
•
EGM-PWM-LAN should be connected to the European AC wall
socket of the standard DIN 49 440;
•
It is possible to connect the EGM-PWM-LAN to the power source
via other multi-plugs, surge protectors, voltage regulators or UPS.
3.1. Preparing LAN configuration of EGM-PWM-LAN
Before configuring EGM-PWM-LAN hardware settings, please, let it
obtain its IP address. Follow the steps below:
• Make sure EGM-PWM-LAN is connected to the local network with
the provided RJ-45 cable (option A - recommended)
6
All brands and logos are registered trademarks of their respective owners
EGM-PWM-LAN ENERGY METER WITH LAN INTERFACE
NOTE: by default the factory setting of EGM-PWM-LAN is DHCP
enabled. If your LAN has a router with built-in DHCP server (which is
very common) then EGM-PWM-LAN will automatically get an IP address
from the DHCP server. Proceed to section 3.2 below in this case.
NOTE: you may prefer to connect EGM-PWM-LAN directly to the
managing computer LAN adapter (network card) using the supplied
crossover RJ-45 cable (option B). You might need to use this option if
your LAN does not have DHCP server.
If you choose for option B then the following procedure is required to let
EGM-PWM-LAN obtain a fixed IP address:
•
•
•
Power EGM-PWM-LAN on
Press Reset button on the side control panel (see Figure #2 above)
with the tip of a pen
Holding it pressed for about 3 seconds
The above-mentioned procedure forces EGM-PWM-LAN to reset
itself to the default settings (see below) ...
•
IP: 192.168.0.254
•
Subnet mask: 255.255.255.0
7
All brands and logos are registered trademarks of their respective owners
EGM-PWM-LAN ENERGY METER WITH LAN INTERFACE
•
Gateway: 192.168.0.1
•
DNS:0.0.0.0
•
DHCP: enabled
•
IP filtering: disabled
•
Power Manager client port: 5000
... EGM-PWM-LAN then searches for an IP address from your
eventual DHCP server. If no DHCP server is found within 1 minute, EGMPWM-LAN will then automatically revert to the default settings (see
above, with IP: 192.168.0.254).
8
All brands and logos are registered trademarks of their respective owners
EGM-PWM-LAN ENERGY METER WITH LAN INTERFACE
3.3. Power Manager installation
It is now time to identify which IP address has been obtained by
EGM-PWM-LAN. We need to carry out the following:
• Insert the Power Manager CD into a PC CD-ROM drive. This PC
can be connected either to the same LAN where the device is (if you
chose option A section 3.2) or directly to the device with the
crossover RJ-45 cable (if you chose option B section 3.2)
• If for any reason the automatic setup does not work, then open CDROM drive in the My Computer window and launch SETUP.EXE
from the CD
• Follow instructions of the installation software
NOTE: Antivirus or firewall software may block connection to EGMPWM-LAN. Please, configure antivirus/firewall to permit connection to
the IP address and port of your EGM-PWM-LAN
9
All brands and logos are registered trademarks of their respective owners
EGM-PWM-LAN ENERGY METER WITH LAN INTERFACE
3.4. IP configuration
The utility LAN Find (see Figure #4 below) will run automatically
during the software installation but it can also be started from Start/All
Programs/Gembird/Power Manager. The IP range where you would like
to search for EGM-PWM-LAN will be set automatically according to the IP
settings of your LAN adapter but can be changed manually in the Adapter
subnet fields. Now press the Search button.
NOTE: only EGM-PWM-LAN within a local subnet can be found. If
your computer LAN adapter is not in the (default) subnet of EGM-PWMLAN (as might probably be the case if you chose option B section 3.2)
you will have to change its IP address manually to be able to find EGMPWM-LAN. For example if you wish to find EGM-PWM-LAN (with the
default IP 192.168.0.254), the IP address of your computer should be set
as 192.168.0.XXX (where XXX stands for any digit, for example 1) and
the subnet mask should be 255.255.255.0.
After the searching the IP addresses of the found EGM-PWM-LAN
devices will appear in the list box. Select EGM-PWM-LAN which you
want to access, and press the Open button (see Figure #4 below).
10
All brands and logos are registered trademarks of their respective owners
EGM-PWM-LAN ENERGY METER WITH LAN INTERFACE
Figure #4
The window of your default internet browser will be then opened to
give you access to the built-in web-server. See section 4 below for the
further details.
11
All brands and logos are registered trademarks of their respective owners
EGM-PWM-LAN ENERGY METER WITH LAN INTERFACE
4. The web server
Your EGM-PWM-LAN is equipped with a web-server which allows
managing the device using any web browser such as Internet Explorer
etc.
4.1. Web-server login page
To access the web server of EGM-PWM-LAN, just open Internet
Explorer (or other browser) and input the IP address of EGM-PWM-LAN
(for example http://192.168.1.241). If you have used LAN Find utility to
locate EGM-PWM-LAN then you will be taken to this webpage
automatically. Login page will then be displayed (see Figure #5 below).
NOTE: Java script must be enabled in your Internet Explorer (or
another browser) settings. Otherwise, you get an error message:
WARNING! JAVASCRIPT IS DISABLED!
Figure #5
The default password is 1. It is recommended to change the
password on the Device settings page (see section 4.6 below) after the
first login.
12
All brands and logos are registered trademarks of their respective owners
EGM-PWM-LAN ENERGY METER WITH LAN INTERFACE
After a successful login you will face the Energenie page (see
section 4.2 below).
NOTE: There is a possibility that you might then need to open the
LAN settings page (see section 4.5 below) to complete the IP
configuration.
4.2. EnerGenie page
With the help of EnerGenie page (see Figure #6 below) you will be
able to see the current power consumption of the load connected, Irms,
Vrms and Energy.
The EnerGenie page also allows you to setup access of your
EGM-PWM-LAN from anywhere via Internet even if it does not have an
external IP address. To setup this free service you should follow two
simple steps:
•
Register the device. To restrict access to the device via the Internet
to the rightful owner only, the device should be registered – e.g.
assigned to your account. To register the device, simply push the
button Register on this page (see Figure #6 below). You will then be
redirected to Login page of EnerGenie.com. If you already own an
account at EnerGenie.com then just enter your login and password
on this page and you are done. Otherwise, use the Registration
13
All brands and logos are registered trademarks of their respective owners
EGM-PWM-LAN ENERGY METER WITH LAN INTERFACE
•
button on the Login page to create a new account. After your
successful login (regardless whether you created a new or used an
existing account) your EGM-PWM-LAN is automatically registered.
Return back to the EnerGenie page of your EGM-PWM-LAN (see
Figure #6 below). Push Activate button to let the device initiate
communication with EnerGenie.com server. The EnerGenie page
will then start updating itself until the Status becomes Registered
Activated Connected (see Figure #6 below).
14
All brands and logos are registered trademarks of their respective owners
EGM-PWM-LAN ENERGY METER WITH LAN INTERFACE
Figure # 6
After a successful registration and activation the button Register
will be renamed to Login (and will then open the Login page of
EnerGenie.com) and the button Activate will turn into Deactivate. If by
any reason you would eventually decide to stop managing your EGM15
All brands and logos are registered trademarks of their respective owners
EGM-PWM-LAN ENERGY METER WITH LAN INTERFACE
PWM-LAN from Internet use then Deactivate button to stop
communication of the device with EnerGenie.com server.
If you eventually decide to change registration of your EGM-PWMLAN and assign it to another account, it will be possible via
EnerGenie.com website (see section 5 below).
See section 5 below for further details on managing your EGMPWM-LAN via EnerGenie.com website.
Below the page you can see the current time of the web-server and
eventual information about the last successful timer synchronization.
Automatic timer synchronization is used if Use NTP for timer correction
option is enabled (see section 4.6 below).
16
All brands and logos are registered trademarks of their respective owners
EGM-PWM-LAN ENERGY METER WITH LAN INTERFACE
4.5. LAN settings page
Figure #7
On the LAN settings page (see Figure #7 above) you can set up
DHCP, IP address, Subnet mask, Gateway, DNS server and IP filter (up
to 3 IP addresses can then be enabled for remote access).
The new settings will be applied immediately after you press the
Apply button.
17
All brands and logos are registered trademarks of their respective owners
EGM-PWM-LAN ENERGY METER WITH LAN INTERFACE
IP address, Subnet mask, Gateway, DNS server will be used only if
the DHCP option is disabled.
If you set DHCP option it is recommended for your own convenience
to set up your DHCP server so that it always provides the same IP
address to EGM-PWM-LAN. To do that you will need to know the MAC
address of EGM-PWM-LAN. It can be found on this page or on the
bottom sticker of the device. The MAC address is fixed and cannot be
changed.
DNS server address is important to be properly set up in case you
wish to enable the NTP timer correction option (see section 4.6 below).
IP filter option is needed to prevent unauthorized access to the
server. It restricts the web server access from any computer with IP
address different from IP1, IP2 and IP3. Make sure that you input IP1,
IP2, and IP3 correctly before enabling this option.
Power Manager client port is used for connecting with the Power
Manager software, normally it is not needed to change this setting.
18
All brands and logos are registered trademarks of their respective owners
EGM-PWM-LAN ENERGY METER WITH LAN INTERFACE
4.6. Device settings page
On the device settings page you can setup name, password and
internal time of EGM-PWM-LAN (see Figure #8 below).
Figure #8
To be able to setup the schedule of EGM-PWM-LAN you have to
first setup its internal clock correctly. Enter the current local time and date.
19
All brands and logos are registered trademarks of their respective owners
EGM-PWM-LAN ENERGY METER WITH LAN INTERFACE
Alternatively if the option Use NTP for timer correction is enabled (by
default) then the time will be taken from NTP server. The device will try to
connect with the server every 18 hours. The first synchronization would
take place in 15 seconds after you press the Apply button.
NTP server field should have a valid name of NTP server (by default
“pool.ntp.org”). If for any reason the NTP time correction doesn’t work
you can choose the best NTP server for your country via the website
www.pool.ntp.org.
NOTE: for NTP time correction to work properly the device should
have access to the Internet and have a proper DNS server setting (see
section 4.5 above).
Server name can be convenient to identify the web server if you
have more than one EGM-PWM-LAN. It is “Server 1” by default.
The password is necessary to access EGM-PWM-LAN both from
your web browser and the Power Manager software (see section 6
below). This password is case-sensitive and can be up to 32 characters
long. Alphanumeric characters and spaces are allowed to be entered.
Only the first eight characters of the password are used to access the
device with the Power Manager software. You will need to enter this
password in the Add LAN device window (see section 7 below).
The Power Manager software accesses EGM-PWM-LAN via a
certain client port (by default 5000). You can change this port to any other
except port 80 which is always occupied by the web server.
Don’t forget to push the Apply button to save your settings.
20
All brands and logos are registered trademarks of their respective owners
EGM-PWM-LAN ENERGY METER WITH LAN INTERFACE
4.7. Web-server logout
Having finished working with EGM-PWM-LAN, choose Log Out in
the main menu. If you don’t do this, you will be logged automatically after
10 minutes of inactivity. While you are logged to the web server, it can’t
be accessed from any other computer. If another user tries to access the
web server which is running an active session the error message will be
shown on the login page: Somebody with another IP has already logged
in. Try again later. In the meantime the Power Manager software (see
section 6) can still access the EGM-PWM-LAN.
21
All brands and logos are registered trademarks of their respective owners
EGM-PWM-LAN ENERGY METER WITH LAN INTERFACE
5. EnerGenie.com device interface
With your free personal account at EnerGenie.com website you will
be able to access your EGM-PWM-LAN from anywhere in the world using
any Internet-enabled device (desktop PC, laptop, smartphone etc). See
section 4.2 above on how to register your EGM-PWM-LAN on the server and
setup the connection.
5.1. Logging in
To login into your EnerGenie account just open the webpage
www.energenie.com/user in your Internet browser and enter your login and
password in the login window (see Figure #9 below). If you are a new user –
click “New account” button then fill user profile form.
22
All brands and logos are registered trademarks of their respective owners
EGM-PWM-LAN ENERGY METER WITH LAN INTERFACE
Figure #9
Check Remember me checkbox for automatic login in the future (the website
will then save a cookie on your computer). If you lost your password, click
Forgot password button.
5.2. Device management page
After a successful login you will see the list of your registered devices (see
Figure # 10 below).
23
All brands and logos are registered trademarks of their respective owners
EGM-PWM-LAN ENERGY METER WITH LAN INTERFACE
Figure #10
24
All brands and logos are registered trademarks of their respective owners
EGM-PWM-LAN ENERGY METER WITH LAN INTERFACE
This page will automatically update itself and will keep showing you
the time when your device was last seen online (the latest time when the
device communicated with the server), external IP, MAC address, link to
device web-interface (this link works in case that your computer is in the
same local network with the device).
Values of Real Power (Watts) and Day and Night Energy (WattHours) will be shown. In single-tariff mode the whole energy is shown as
Energy (Day) parameter.
To open real-time chart window click on the Power or Energy value.
To change your account settings click your user name.
Click the device name to change its name and/or transfer it to
another account.
The Last seen online status information lets you check if the device
keeps communicating with the server.
25
All brands and logos are registered trademarks of their respective owners
EGM-PWM-LAN ENERGY METER WITH LAN INTERFACE
Figure #11
26
All brands and logos are registered trademarks of their respective owners
EGM-PWM-LAN ENERGY METER WITH LAN INTERFACE
6. Power Manager software
The Power Manager software is designed to support not only EGMPWM-LAN but also other power management family products (for
additional information visit www.energenie.com) .
6.1. Adding the EGM-PWM-LAN
To be able to manage installed EGM-PWM-LANs, please, do the
following:
• Install Power Manager software on a PC connected to your local
network. A socket icon will then appear in your system tray
• Choose Add device from the right upper coner (see Figure #12
below)
27
All brands and logos are registered trademarks of their respective owners
EGM-PWM-LAN ENERGY METER WITH LAN INTERFACE
Figure #12
28
All brands and logos are registered trademarks of their respective owners
EGM-PWM-LAN ENERGY METER WITH LAN INTERFACE
In the Add LAN device window (see figure #13 below) please, enter
correct IP address, port number (5000 by default) and password (1 by
default) as configured on the Device settings page (see section 4.6 above)
of the web server. To disconnect from the device uncheck the option
Enable, set this option again to regain the access. Click OK button to
return to the LAN devices window.
Figure #13
29
All brands and logos are registered trademarks of their respective owners
EGM-PWM-LAN ENERGY METER WITH LAN INTERFACE
•
•
To edit the LAN device, select it and click the Device settings button,
or just double click on the LAN device
To remove the LAN device, select it and click the Del button in the
keyboard
If the status of EGM-PWM-LAN shows the device is not Connected it could be due to the following reasons:
• Incorrect IP/Port/Password specified in the Add LAN device window
• PC is not connected to the local network
• You are trying to access EGM-PWM-LAN from the PC which is not
allowed to do so. Change PC IP address or change IP filter list in
EGM-PWM-LAN hardware settings (see section 4.5 above)
• EGM-PWM-LAN is not connected to local network. To check if EGMPWM-LAN is on your local network you can do so-called ping test:
• Go to Start->Run
• Type cmd
• Type ping <EGM-PWM-LAN IP Address specified in utility>
in the window which would appear
Suppose EGM-PWM-LAN with IP address 192.168.2.189 is
connected to the local network. Then the cmd window will look as shown
on the Figure #14 below:
30
All brands and logos are registered trademarks of their respective owners
EGM-PWM-LAN ENERGY METER WITH LAN INTERFACE
Figure #14
•
EGM-PWM-LAN is connected to local network (ping test is ok) but
not responding. Reset EGM-PWM-LAN by pressing the Reset button
(A) on the side control panel (see Figure #2 above) or switch it off
and then on again (see Figure #1 above)
NOTE: The Reset button A (see Figure #2 above) can sometimes
help if EGM-PWM-LAN can’t be accessed or works abnormally. The
device will then be restarted. All the IP settings and device settings will
remain the same as before, but the server time will be reset and all
schedules will become outdated.
31
All brands and logos are registered trademarks of their respective owners
EGM-PWM-LAN ENERGY METER WITH LAN INTERFACE
6.2. Managing EGM-PWM-LAN
The software is used for displaying the characteristics of power
consumption and power mains, calculation the consumed energy in
local currency.
When the software is started, a window of power manager appears
with a list of connected devices. Select EGM-PWM-LAN device then
click “Power meter” button to open Power Meter display.
Figure #15
32
All brands and logos are registered trademarks of their respective owners
EGM-PWM-LAN ENERGY METER WITH LAN INTERFACE
There is a small display window and a main window. Small display
window displays the parameter, which may be selected by right-clicking
the mouse on this window. Indicators lights, when the voltage is above
or below voltage limits. It warns about dangerous conditions of power
mains, which may cause damage to some equipment.
Figure #16
Main display window displays power characteristics on the
equipment connected: True power (P), energy consumed (E), RMS
current (I rms), peak current (I peak), active impedance (R), RMS
voltage (Vrms), peak voltage (Vpeak), net frequency (Fq). Additionaly, it
shows the cost of energy consumed (money sign) since the previously
set date. Energy and cost values may be reset to zero and current date
will be set as start point, when pressing “Reset” button.
33
All brands and logos are registered trademarks of their respective owners
EGM-PWM-LAN ENERGY METER WITH LAN INTERFACE
Figure #17
34
All brands and logos are registered trademarks of their respective owners
EGM-PWM-LAN ENERGY METER WITH LAN INTERFACE
The energy rate settings are set in a window, which is popped up
upon pressing “Set” button near the “Cost” indicator. Choose cost rate
(per kWh), currency type and press “OK” for applying the changes. If
rate differs in day and night, check “Use Day/Night modes” and input
rates, day and night start times.
For setting voltage warning limits – press “Set” button nearby and
input it in newly opened window.
Figure #18
35
All brands and logos are registered trademarks of their respective owners
EGM-PWM-LAN ENERGY METER WITH LAN INTERFACE
6.3 Logging parameters and building charts
During online mode parameters P, R, Fq, Irms, Vrms and cost per
time unit are being logged into the database in MDB format. EGMPWM-LAN additionally logs real power (P) into internal memory during
offline mode. This log will be saved into the database manually, by
pressing “Log” sign besides real power indicator, or automatically upon
connection the EGM-PWM-LAN to the computer.
Time charts may be built for P, R, Fq, Irms, Vrms and cost per time
unit from the database. To open chart window left-click on indicator of
corresponding parameter in the main Power meter display, then choose
time scale ( days, hours, minutes or seconds ) from the menu.
Alternatively, you may open Real power P time chart by clicking “Chart”
button in the Power manager window.
To clear a time period from the database select device in the
Power manager window and click “Device settings”, then click “Clear
database”. The window will appear, where you may select a period,
which is to clear.
36
All brands and logos are registered trademarks of their respective owners
EGM-PWM-LAN ENERGY METER WITH LAN INTERFACE
Figure #19
Figure #20
37
All brands and logos are registered trademarks of their respective owners
EGM-PWM-LAN ENERGY METER WITH LAN INTERFACE
6.4 Out-of-range alarms
It is possible to assign alarm and action on the event, when
parameter is out-of-range. Available actions are: Light up indicator, Add
to log, Run application. Typical alarm conditions are: Net voltage is too
high or too low (these conditions might be hazardous for some kind of
equipment), real power is too big ( meaning that load consumes more
power than expected) or too low (is the load switched off or damaged).
Figure #21
38
All brands and logos are registered trademarks of their respective owners
EGM-PWM-LAN ENERGY METER WITH LAN INTERFACE
7. Troubleshooting
Problem
The status of EGM-PWM-LAN
in Power Manager does not
become Connected
EGM-PWM-LAN is connected
to local network (ping test is
ok) but not responding.
Connection to EGM-PWM-LAN
is lost. It seems something is
wrong with its IP address.
Solution
Try to ping the device (see section 6.1
above)
Reset EGM-PWM-LAN by pressing the
Reset button on the side control panel
(see Figure #2 above) or switch it off and
then on again using the Main rocker
switch Z (see Figure #1 above).
Make sure EGM-PWM-LAN is connected
to LAN and switched on. Launch LAN Find
utility. You can also try to use Reset
button to let the device renew its IP
address (see section 3.2 above)
39
All brands and logos are registered trademarks of their respective owners
EGM-PWM-LAN ENERGY METER WITH LAN INTERFACE
40
All brands and logos are registered trademarks of their respective owners
EGM-PWM-LAN ENERGY METER WITH LAN INTERFACE
Waste disposal:
Entsorgungshinweise:
Do not deposit this equipment with the
household waste. Improper disposal can harm
both the environment and human health. For
Information about waste collection facilities for
used electrical and electronic devices, please
contact your city council or an authorized
company for the disposal of electrical and
electronic equipment.
Werfen Sie dieses Gerät nicht in den
Hausmüll. Unsachgemäße Entsorgung kann
sowohl der Umwelt als auch der menschlichen
Gesundheit schaden. Informationen zu
Sammelstellen für Altgeräte erhalten Sie bei
Ihrer Stadtverwaltung oder einer autorisierten
Stelle für die Entsorgung von Elektro-und
Elektronikgeräten.
Richtlijnen m.b.t. afvalverwerking
Traitement des déchets:
Batterijen en accu’s dienen als kleinchemisch afval afgeleverd te worden bij
toegewezen
afvalverzamelpunten
(zie
www.afvalgids.nl). U dient ervoor te zorgen
dat de batterijen/accu’s leeg zijn en dus geen
stroom meer kunnen leveren. Let op, de
batterijen/accu’s
dienen
onbeschadigd
ingeleverd te worden.
Ne jetez pas cet appareil dans les déchets
domestiques. Un traitement inapproprié peut
être dommageable à l'environnement et à la
santé humain.
Gooi dit product niet weg in uw vuilnisbak. Dit
kan zowel het milieu als de menselijke
gezondheid schade toebrengen. Informatie
over het inleveren van dit product kunt u
inwinnen bij uw gemeentelijke vuilnisdienst of
andere geautoriseerde instelling in uw buurt.
chez un centre autorisé pour le traitement des
appareils électriques ou électroniques.
Vous trouvez des informations sur les centres
de rassemblement des appareils vieux chez
l'administration municipale ou
41
All brands and logos are registered trademarks of their respective owners
EGM-PWM-LAN ENERGY METER WITH LAN INTERFACE
WARRANTY CONDITIONS
The warranty period is 36 months and begins with
the sale to the end user. The receipt must clearly list
the date of purchase and the part number, in addition
it should be printed. Keep the receipt for the entire
warranty period since it is required for all warranty
claims. During the warranty period the defective
items will be credited, repaired or replaced at the
manufacturer's expense. Work carried out under the
warranty neither extends the warranty period nor
starts a new warranty period. The manufacturer
reserves the right to void any warranty claim for
damages or defects due to misuse, abuse or
external impact (falling down, impact, ingress of
water, dust, contamination or break). Wearing parts
(e.g. rechargeable batteries) are excluded from the
warranty. Upon receipt of the RMA goods, Gembird
Europe B.V. reserves the right to choose between
replacement of defective goods or issuing a credit
note. The credit note amount will always be
calculated on the basis of the current market value of
the defective products
Gembird Europe B.V.
Wittevrouwen 56, 1358CD Almere
The Netherlands
www.gembird.nl/support
[email protected]
Tel. +31-36-5211588
(0900-4362473 inside The Netherlands, € 0,15 p/m,
mobile costs not included)
GARANTIE BEDINGUNGEN
Die Garantie beträgt 36 Monate ab Verkaufsdatum
an den Endverbraucher. Das Kaufdatum und der
Gerätetyp sind durch eine maschinell erstellte
Kaufquittung zu belegen. Bitte bewahren Sie Ihren
Kaufbeleg daher für die Dauer der Garantie auf, da
er Voraussetzung für eine eventuelle Reklamation
ist. Innerhalb der Garantiezeit werden alle Mängel,
wahlweise durch den Hersteller entweder durch
Instandsetzung, Austausch mangelhafter Teile oder
im Austausch, behoben. Die Ausführung der
Garantieleistung bewirkt weder eine Verlängerung
noch einen Neubeginn der Garantiezeit.
Eine Garantieleistung entfällt für Schäden oder
Mängel die durch unsachgemäße Handhabung oder
durch äußere Einwirkung (Sturz, Schlag, Wasser,
Staub, Verschmutzung oder Bruch) herbeigeführt
wurden. Verschleißteile (z.B. Akkus) sind von der
Garantie ausgenommen.
GEMBIRD Deutschland GmbH
Coesterweg 45, 59494 Soest
Deutschland
www.gembird.de/support
[email protected]
Tel. +49-180 5-436247
0,14 € pro Minute aus dem deutschen Festnetz.
Mobilfunkpreise können abweichen
42
All brands and logos are registered trademarks of their respective owners
EGM-PWM-LAN ENERGY METER WITH LAN INTERFACE
GARANTIE VOORWAARDEN
CONDITIONS DE GARANTIE
De garantietermijn bedraagt 36 maanden en gaat in
op de aankoopdatum van het product door de
eindgebruiker. Op de aankoopbon moeten de
aankoopdatum en productomschrijving duidelijk
vermeld staan. Gelieve de aankoopbon de gehele
garantieperiode te bewaren, deze is ten alle tijden
benodigd voor alle garantie aanspraken. Tijdens de
garantieperiode zullen alle gebreken verholpen of
vervangen worden door de fabrikant d.m.v. reparatie,
omruiling van het defecte onderdeel of het gehele
apparaat. Aanspraken tijdens de garantieperiode
leiden niet tot verlenging hiervan. Garantieaanspraak
vervalt bij schade of gebreken die ontstaan zijn door
oneigenlijk gebruik, misbruik of invloeden van
buitenaf (vallen, stoten, water, stof, vuil of breken).
Slijtagegevoelige onderdelen (b.v. batterijen) zijn
uitgesloten van garantie. Bij ontvangst van de RMA
goederen behoudt Gembird zich het recht om te
kiezen tussen vervanging van de defecte waren of
het uitgeven van een kreditnota. Het bedrag van de
kreditnota zal altijd gecalculeerd zijn op basis van de
huidige marktprijs voor het defecte produkt.
Garantie est de 36 mois a partir de la date d’achat de
l'utilisateur final.
Le talon de garantie doit énumérer clairement la date
d'achat et le type d'appareil.
Conservez le reçu d'achat pendant toute la durée de la
garantie car elle est nécessaire pour toute réclamation.
Au cours de la période de garantie tous les défauts
doivent être remplacé aux frais du fabricant, soit par la
réparation ou la remplacement de la pièce défectueuse
ou l'ensemble du produit.
Les travaux effectués sous garantie ne prolongent pas la
période de garantie ni ne commencent pas une nouvelle
période de garantie.
Le fabricant se réserve le droit d'annuler toute demande
de garantie pour les dommages ou défauts dus à une
mauvaise utilisation, abus ou les effets externes (chute,
choc, pénétration de l'eau, la poussière, etc..).
Les pièces d'usure (par exemple les piles rechargeables)
sont exclus de la garantie.
Dès réception de la marchandise sous garantie, le SAV
de Gembird Europe BV se réserve le droit de choisir
entre le remplacement des produits défectueux ou de
délivrer un avoir.
Le montant d’avoir sera toujours calculée sur la base de
la valeur actuelle du marché des produits défectueux.
Gembird Europe B.V.
Wittevrouwen 56, 1358CD Almere
The Netherlands
www.gembird.nl/support
[email protected]
Tel. 0900-4362473
€ 0,15 p/m binnen Nederland
Exclusief mobiele telefoonkosten
Gembird Europe B.V.
Wittevrouwen 56
1358CD Almere, The Netherlands
www.gembird.nl/support
[email protected]
+33(0) 251 404849
Prix d'appel depuis telephone fixe Pays-Bas : 0.15 euro / min
Prix d'appel depuis telephone mobile / autre pays - selon
operateur
43
All brands and logos are registered trademarks of their respective owners
EGM-PWM-LAN ENERGY METER WITH LAN INTERFACE
ГАРАНТИЙНЫЙ ТАЛОН
1. Гарантийное обслуживание предоставляется в течение
срока гарантии, при наличии правильно и четко заполненного
гарантийного талона, и изделия в полной комплектации.
Серийный номер и модель изделия должны соответствовать
указанным в гарантийном талоне.
2. Гарантийное обслуживание представляет собой бесплатное
устранение всех неполадок (ремонт), или замену изделия на
новое (аналогичное).
3. Гарантия не распространяется на неисправности,
вызванные следующими причинами:
• использование изделия не по назначению.
• нарушение условий эксплуатации, хранения или перевозки
изделия, которые указаны в настоящей инструкции.
• подключение нестандартных или неисправных периферийных
устройств, аксессуаров.
• механические повреждения, попадание внутрь изделия
посторонних предметов, веществ, жидкостей, насекомых.
• ремонт изделия не уполномоченными на то лицами.
4. Комплектность и внешний вид изделия проверяются
Покупателем при получении товара в присутствии персонала
фирмы.
Послепродажные претензии по укомплектованности и
внешнему виду не принимаются.
УМОВИ ГАРАНТІЙНОГО ОБСЛУГОВУВАННЯ
1. Гарантійне обслуговування надається протягом терміну
гарантії, при наявності Гарантійного талону, заповненого
належним чином, та виробу в повній комплектації.
2. Гарантійне обслуговування не підтримується в разі
порушення правил експлуатації, зберігання або перевезення
виробу, що зазначені в інструкції по експлуатації виробу.
3. Гарантійне обслуговування скасовується у випадках:
- наявності механічних пошкоджень або слідів стороннього
втручання;
- пошкодження викликані стихійним лихом або нещасним
випадком, включаючи й блискавку, потраплянням у виріб
сторонніх предметів, рідин, комах, тощо;
- пошкодження викликані застосуванням або підключенням
нестандартних або несправних периферійних пристроїв,
аксесуарів;
4. Гарантія не поширюється на витратні матеріали та додаткові
аксесуари;
З гарантійними умовами згоден.
Підпис покупця: ____________________
ГАРАНТІЙНИЙ ТАЛОН № __________________________
Товар/модель ____________________________________
Наименование изделия: ___________________________
Серійний номер __________________________________
Модель _________________________________________
Термін гаранії ____________________________________
Серийный номер _________________________________
Дата продажу ____________________________________
Срок гарантии ___________________________________
Продавець (назва, телефон)
Дата продажи «____» ___________________ 20____ года
_________________________________________
Фирма-продавец: _________________________________
Адрес и телефон фирмы-продавца:
________________________________________________
М.П. С условиями гарантии ознакомлен и согласен:
Продавец: _____________ Покупатель: _____________
Печатка та підпис продавця
_________________________________________
З гарантійних питань звертайтесь до сервісних центрів
Gembird. Про адреси та контакти Ви можете дізнатись на сайті
www.gembird.ua або по телефону 044-4510213.
44
All brands and logos are registered trademarks of their respective owners