1
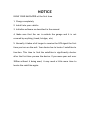
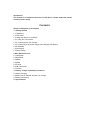
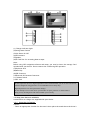
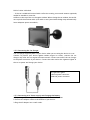
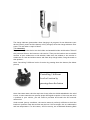
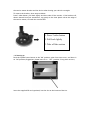
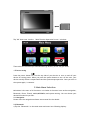
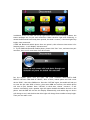
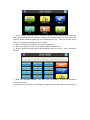
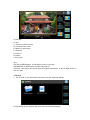
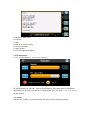
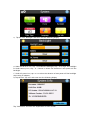
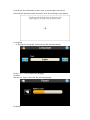
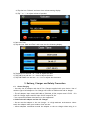
User Manual
WayteQ
N720B
NOTICE
USING YOUR NAVIGATOR at the first time
1. Charge completely
2. Install into your vehicle
3. Initialize software as described in the manual
4. Make sure that the car is outside the garage and it is not
covered by anything (treed, bridges, etc)
5. Normally it takes a bit longer to receive the GPS signal the first
time you turn on the unit. Your device has to locate 3 satellites to
function. This time to find the satellites is significantly shorter
after the first time you use the device. If you move your unit over
300km without it being used, it may need a little more time to
locate the satellites again.
Introduction
This manual is a complete instruction for the device. Please ready this manual
carefully before using.
Contents:
Safety and Regulatory Information
1. Getting Started
1.1 Unpacking
1.2 Over View
1.3 Using Your Device in a Vehicle
1.3.1 Using the Car bracket
1.3.2 Connecting the Car Charger
1.3.3 Connecting to AC Power supply and Charging the Battery
1.3.4 Assembly
1.4 Starting up
1.5 Power saving
2.Main Menu Selection
2.1 Navigation
2.2 Bluetooth
2.3 Media
2.4 Photo
2.5 E-book
2.6 FM transmitter
2.7 System
3. Battery, Charger and Safety Precaution
3.1 About Charging
3.2 About the AC Adapter and the Car Charger
3.3 About the Battery
4. Specifications
Safety and Regulatory Information
Important Safety Notices and Warnings
Global Positioning System
The Global Positioning System (GPS) is a satellite-based system that provides location
and timing information around the Globe.
GPS is operated and controlled under the sole responsibility of the Government of the
United States of America, who are responsible for its availability and accuracy. Any
changes in GPS availability and accuracy, or in environmental conditions, may impact the
operation of your device .We cannot accept any liability for the availability and accuracy
of GPS.
Precautions and Notices
For your own safety, do not operate the controls of the product while driving.
Use this product prudently. The product is intended to be used only as a navigation aid.
It is not for precise measurement of direction, distance, location or topography.
The calculated route is for references only. It is the user's responsibility to follow the
traffic signs and local regulations along the roads When you get off the car, do not leave
your device on the dashboard or the car glass that is subject to direct sunlight. The
overheating of the battery can cause malfunction and /or danger.
GPS is operated by the United States government, which is solely responsible for the
performance of GPS. Any change to the GPS system can affect the accuracy of all GPS
equipments.
GPS satellite signals can not pass through solid materials (except glass).When you are
inside a tunnel or building, GPS positioning is not available.
A minimum of 4 GPS satellite signals is needed to determine current GPS position. Signal
reception can be affected by situations such as bad weather or dense overhead obstacles
(e.g. trees and tall buildings)
The wireless devices might interfere the reception of satellite signals and cause the
reception of the signal to be unstable. For better signal reception, it is recommended
that you use a car antenna (option)
Aircraft and Hospitals
Use of devices with an antenna is prohibited on most aircraft, in many hospitals and in
many other locations. The device must not be used in these environments.
1. Getting Started
1.1Unpacking
Unpack your device box and identify the contents. You should have:
(1) Unit. Its main features are a touch-sensitive LCD screen, 1 SD card slot, 1 volume
control switch. Details see the photo below.
(2) Holder,to hold the device.
(3) Bracket, its main features is to fix the device on a car .
(4) Car Charger. With 12V cigarette lighter adapter. This is the normal way of providing
power to your device when it's in your vehicle.
(5) AC adapter(Option), included for you to charge and work with your device even when
It's not in your vehicle. When you use the adapter, please make sure it is cooled by
placing it in a ventilated area.
(6) USB data cable for connecting your device to a Windows PC
(7) GPS External Antenna (Option) is used when the GPS signal is not so strong and it
should mounted on the top of the car or on the front of the car window .
(8) SD card(Option), containing map data.
(9) User Manual.
(10) Installation CD(Option), containing PC connection software and extra maps.
*Note: please check optional accessories with local retailer/importer/distributor.
1.2 Over View
(1) Charger Indicator Light
(2)Saving Power Switch
(3)Unit Power On/Off
(4)GPS Antenna
(5)Speaker
(6)SD Card Slot: for accessing data as maps.
Note:
Before using GPS navigation software and maps, you need to insert the storage Card
included with your device. Do not remove the card during GPS operation.
(7)Earphone Jack
(8)Reset Key
(9)USB Connector
(10)External GPS Antenna Connector
(11) Volume Switch
(12)DC Jack
Do not expose the device to high temperatures. We recommend that you do not leave the device
in direct sunlight for long periods or in an unattended car on sunny days.
High temperatures can cause permanent damage.
Do not attempt to service the device yourself! Do not open, puncture or disassemble it.
Doing so may be dangerous and will invalidate your warranty.
1.3 Using Your Device in a Vehicle
A stand and a car charger are supplied with your device.
1.3.1 Using the Car Bracket
Caution:
-- Select an appropriate location for the stand. Never place the stand where the driver's
field of vision is blocked.
-- If the car's windshield is tinted with a reflective coating, an external antenna (optional)
maybe be needed to route the.
Antenna to the top of the car through a window. When closing the car window, be careful
not to pinch the antenna cable (Cars with an anti-jam window design may automatically
leave adequate space as needed.).
1.3.2 Connecting the Car Charger
The car charger supplies power to your device when you are using the device in a car.
Caution: To protect your device against sudden surges in current, connect the car
charger only after the car engine has been started. Connect one end of the car charger
to the power connector of your device. Connect the other end to the cigarette lighter in
the car to power and charge your device.
To Cigarette Lighter
1.Device power connector
2.Vehicle power connector
1.3.3 Connecting to AC Power supply and Charging the Battery
1.Fully charge the battery before using your device for the first time
2.Connect the adapter cable to the bottom of your device.
3.Plug the AC adapter into a wall outlet.
The charge indicator glows amber when charging is in progress. Do not disconnect your
device from AC power until the battery is fully charged, when the charge indicator turns
green. This will take a couple of hours.
1.3.4 Assembly
To get started, put the device into the holder and assemble holder with bracket. Take off
the protected film on the bottom or the suction. Then put the bracket onto a suitable
location of your windscreen or side window, make sure the window or the suction or
windscreen is clean and without water and some dirty things inside, fixing the stand on
that position..
Note: Controlling 5 different levels of suction by pressing down the button (See below
picture)
Controlling 5 different
levels of suction by
pressing down the button
Note: that some newer vehicles may have a heat reflective shield embedded in the wind
screen. In some cases this can prevent proper GPS signal reception. If this turns out to be
a problem in your vehicle, you will need to purchase and install the GPS external
antenna kit.
Under normal journey conditions, the suction mount is perfectly sufficient to hold the
bracket in position. Note that suction may be lost if left overnight, due to condensation
and low temperature. For this reason, and for security, we recommend Removing Both
the suction mount bracket and the device when leaving your vehicle overnight.
To remove the bracket, three steps as below:
Press 2 sides button, pull back lightly and then take off the suction. If the bracket still
doesn't detach from your windscreen, tug gently on the clear plastic tab at the edge of
the suction mount, to break the vacuum seal.
1. Press 2 sides button
2. Pull back lightly
3. Take off the suction
1.4 Starting up
Push the System Power button to the "ON" position, when first time to use, and leave it
on "ON" position.(Suggestion: please leave it on "OFF " position if long time not use.)
Insert the supplied SD card (optional) into the slot at the bottom of device.
Tap "OK "then enter into the
"Main Function Operation Screen " as below.
Then select the functions you need and then go directly to the way you need.
1.5 Power saving
Press the power button
on the top side of your device to turn on and off your
device for saving power. When you press the power button to turn off the unit, your
device actually enters a suspend state and the system stops operation. Once you turn on
the system again, it resumes.
2.Main Menu Selection
Main Menu is the start of all functions. It includes six function icons such as navigation,
Bluetooth, Photo, E-book, Media(MP3&MP4) and system setting .You can choose your
desired functions as you like.
2.1 Navigation
Please refer the navigation software user manual for the details.
2.2 Bluetooth
1)Tap the “Bluetooth” on the main menu and enter into following display..
In addition, there is a close icon on top right corner and a status message on down, the
status messages are for pair and connection. When the blue light start flickering, it
means the Bluetooth has already been opened, but didn’t connect, if the blue light keep
bright, then connected.
If PND and Bluetooth mobile phone have not paired ( this reference instruction is for
Samsung series),it will display “disconnected”
2)To pair PND with Bluetooth mobile phone, please click “Pair” icon, and enter into pair
interface, then it will count down form 90 seconds
Put the mobile phone near the PND, and press TOOLING.>>BLUETOOTH>>PAIR
DEVICE>>OPTION>>NEW PAIR OF DEVICE, After a while, mobile phone will find a new
device“XXXX”, that is the PND device. Press the “OPTION” again, the mobile will ask you
to enter the pin code XXXX of device, then enter 8888 and confirm, the mobile phone
will clue on pair finished. Press “OPTION” in third time, choose “connect”, it will
connect successfully, and a speaker sign will appear beside the Mobile devices on the
phone. And the PND will end the fair display automatically, and mobile sign on device
will change to red, and the direction blue light will change from twinkle to keep bright.
Then you can make a call.
3)If ever paired, PND will connect the device which was paired before automatically
when enter into Bluetooth interface. And that the mobile phone has ever paired will
display: Accept connecting XXXX yes or not? Please press “Yes”. Then you do not need to
enter Pin code and searching new device again.
4)After confirmed, PND display connection established.
5)Then you can press “Dial” to use phone keypad to make a call.
6)There are three function key on phone keypad, they are: Cancel , Call Out and Dial
Record .
7)Enter the telephone number (not more than 16 numbers, at most 16 characters
showed on screen.)
8)Press the call out button, it will display: outgoing call and the number you calling out.
9)If the user has not cancelled the call initiative, but cancelled automatically, it will
display “call fail”,that means failed call.
10)If incoming call, it will display “incoming call” and the telephone number.
11)If you accept the incoming call, it will display “active call”. Then you can hear the
voice through the PND, and talk through the Microphone, display the time.
12)Dial Record: 20records of each outgoing call, received call and missed call can be
record in PND. The communication record included phone number, timing, and
communication time.
13)Your can re-dial your last dialed call directly if you ever made a call, otherwise no
reaction.
14)Please check if your device had connected with mobile before making a call. If not,
please press “Talk” icon in Phone keypad interface and it will pair automatically. After
connected, your number will be dialed out.
15)Bluetooth setting
It includes the information of your own device.
The name of your Bluetooth (can’t be changed)
PIN Code: using the little keypad beside, and enter the PIN Code to do interface setting.
If you select “Keep Bluetooth function when Bluetooth interface is closed” frame then
you can receive incoming call even Bluetooth interface closed. Bluetooth function will
closed if the frame is not selected,and all incoming call will not show on device.
16)PIN Code Setting. (not more than 16 numbers, at most 16 characters showed on
screen.)
Please use the New PIN cod for pair with mobile after setting, otherwise it will not be
paired.
17)Pair Record
All mobiles which are paired and connected with device will be shown on this interface.
And you can edit them。
When the PND device connected with one mobile phone, and you want to connect with
other mobile phone, you should disconnect the current connection, please choose the
mobile phone you want to connect, and press “connect”. If you can’t find the mobile
phone on this interface, you should turn back to the Bluetooth main interface, and
press ”Pair” icon, then reconnect with the mobile-phone you want.
2.3 Multimedia
1) Tap the icon " Multimedia " on the main menu and enter into following display.
Select the MP3 or MP4 documents, it will play automatically, and you will see the display
as below :
A: Pause / Play
B: Stop
C: Backwards
D: Forwards
E: Back to previous screen
F: Volume control
G: Back to main menu
When you play MP4, you will enter into the full screen display, wherever you tap the
screen, will enter into MP4 controller display, touch again, will back to full screen.
2.4 Photo
1) Tap " Photo" on the main menu and enter into the following display
2 )Tap the file on the screen and enter into the following picture.
A: previous
B: next
C: return to previous menu
D: current picture name
E: Return to main menu
F: Zoom out
G: Zoom in
H: Rotate
I: full screen
Tips:
Tap FULL SCREEN button, it will display in full screen size
Tap PREVIOUS or NEXT button to view the pictures.
If picture is too big or the device does not support the format, it will be dark screen or
can not read.
2.5E-book
1)Tap "E-book" in the main menu and enter into the following display.
2) Tap the file on the picture and enter into the following display.
A: Return to main menu
B: Previous
C: Next
D: Return to previous menu
E: Current file name
F: Pages choose
G: Current page/total pages
2.6 FM transmitter
A) Tap “System/Volume”, go into next interface
B) Tap the button of “Use FM”, turn on FM transmitter, then the button of FM channel
adjustment can be used, you can tune in FM program after you chose “-” or “+”to set up
FM wave band.
2.7 System
Tap the icon "System" on the main menu and enter into the following setting.
1) Tap the icon "Backlight" and enter into the following display.
A. Under BACKLIGHT icon, tap - to weaken the backlight, tap + to stronger the backlight
B. Under battery icon, tap < or > button to select the duration of auto power off the
backlight.
C. Under AC power icon, tap <or >to select the duration of auto power off the backlight
when using AC adaptor.
2) Tap the icon "Sys Info" and enter into the following display
Tap "Calibration" and enter the adjustment of touch screen
According to the information on the screen, press the right cross centre
Then take the operation under instruction until the following screen display.
3) Language
A) Tap the icon "Language" and enter into the following display.
B) Tap "<"or ">" icon to select the language .
4) Power
Tap the icon "Power" and enter into following display.
5) Volume
A) Tap the icon "Volume" and enter into volume setting display.
B) Tap"-" or "+" to adjust volume of speaker.
6) Date and Time
A) Tap the icon "Date and Time" and enter into the following display.
B) Tap DATE icon and use < or > icon to adjust the date.
C) Tap TIME icon and use < or > icon to adjust the time.
C) Tap TIME ZONE icon and use < or > icon to adjust the time zone.
3. Battery, Charger and Safety Precaution
6.1 About Charging
> Use only the AC adapter and the DC Car Charger supplied with your device. Use of
another type of AC adapter or Car Charger will result in malfunction and/or danger.
> The AC adapter input rated 100~240V AC,50/60Hz, 0.35A, output rated +5V DC / 2.0
A,DC Car Charge input rated DC input 12V DC output 5V, 2A.
> Use a specified Lithium-Lion battery in the equipment.
6.2 About the AC Adapter and the Car Charger
> Do not use the adapter or the car charger in a high moisture environment. Never
touch the adapter when your hands or feet are wet.
> Allow adequate ventilation around the adapter or the car charger when using it to
operate the device or charge the battery. Do not cover the AC adapter or the car
charger with paper or other objects that will reduce cooling. Do not use the AC adapter
while it is inside a carrying case.
> Connect the AC adapter to a proper power source. The voltage requirements are found
on the product case and/or packaging.
> Do not use the adapter or the car charger if the cord becomes damaged.
> Do not attempt to service the unit. There are no serviceable parts inside. Replace the
unit if it is damaged or exposed to excess moisture.
6.3 About the Battery
> Use a specified charger approved by the manufacturer.
CAUTION: This unit contains a non-replaceable internal Lithium Ion battery. The battery
can burst or explode, releasing hazardous chemicals. To reduce the risk of fire or burns,
do not disassemble, crush, puncture, or dispose of in fire or water.
> Important instructions (for service personnel only)
- Replace only with the same or equivalent type recommended by the manufacturer.。
- The battery must be recycled or disposed of properly.
- Use the battery only in the specified equipment.
CAUTION: Risk of explosion if battery is replaced by an incorrect type. Dispose of used
batteries according to the instructions.
4. Specification
CPU: Atlas III 372MHz
SDRAM: 64M Bytes
ROM: 32/64 MB NAND Flash
Display: 4.3" TFT LCD with Touch Panel, resolution 480X272
Map storage: SD/MMC Card
USB Device: USB 1.1
OS: Microsoft Windows CE.NET 5.0
Working temperature: 0~60oC
Storage temperature: -20oC~80oC
Power: 5V, 2A