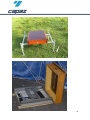
1
Table of Contents
1 Supplies GSM200.................................................................................2
2 Devises.................................................................................................2
3 Fundamentals.......................................................................................3
4 Electronics............................................................................................5
5 Getting started......................................................................................6
6 Scale settings.....................................................................................16
7 Pushbutton and Test-SMS..................................................................17
8 Rain collector......................................................................................19
9 Connecting brood t° Sensor................................................................21
10 3/25/50m cable extension.................................................................22
11 Safety Regulations...........................................................................23
12 Problems and Solutions....................................................................26
1
1 Supplies GSM200
Thank you very much for choosing CAPAZ Bee Scales with
measurement transfer per GSM cell phone. We know that overall, this
scale is not easy, so it is not suitable to weigh products for the sale offer.
The IMEI- Registration for operating the GSM telephone is enclosed in
the documentation of the Siemens cell phone. All of the supplies include:
Scales with electronic measurement lead-accumulator
and lead-accumulator battery charger.
Battery charger 230V-50Hz 17W, SEC 12V 600mA, 7.2 VA max.
GSM cell phone (Siemens S45i) tube and cable
optional: Rain sensor, cell phone cable, Operating parts
Data medium with Windows 9x/2000/XP Software.
serial interface cable 9pole for COMx connection with a PC.
CD with software for scale Configuration
Instructions.
2 Devises
Scale measurements: 420 x 470 x 86 mm (L x W x H)
Scale bridge platform aluminum-high grade steel construction.
Weight range up to 200 Kg decomposition 100 g (unsuitable)
Operating temperature -10° up to +45° C.
Lead-accumulator rechargeable 12V, 7.2 VA max.
Lead-accumulator battery charger 12V 600mA, 7.2 AH.
Accumulator safety 3,15A.
Protection type IP-X5 DIN40050.
Data transfer GSM (Siemens cell phone > S45i)
Registration Telephone, see IMEI Nr. Siemens S45i.
2
3 Fundamentals
The electronic is ready to operate as soon as the power supply is put
into the accumulator cable. To get the scale out of service, just unplug
the ccumulator cable. The scale sends the data as SMS (text message)
or to the Web-Server CAPAZ Direct.
To send an SMS you need a smaller signal than a vocal transmission,
still, at ground level under a crowd the signal is weaker than, for
example, at a height of 1,7 m. The indication of the signal strength from
your own cell phone can be wrong.
Because the cell phone is connected to the scale with a cable, it can
follow the location of the most possible receiver. As an accessory, there
are longer cables. There are cables up to 50 m. With these longer
cables, it is possible to place the cell phone in a nearby tree so that even
with very weak supply commands, the scale probably still works.
To check if scales do work there is a multifunction button to start a TestSMS. The time you keep the button pushed is the function. One second
corresponds to the green LED blinking. Push the button 3 sec. (LED
green blinking 3 times) initializes the Test-SMS.
There are also certain places where the SMS does not always work.
There are often discrepancies or similar bothersome junctions, for
example, on Saturday night, many SMS will be sent. This is difficult
when the network supply in that area is already low. The CAPAZ GSM
200 is designed so that a new SMS will be sent 5 times within 24 hours.
This also means that it consumes a larger amount of power than under
normal conditions.
3
Just in case, take a notebook or operation part with you to recognize any
function errors.
Send the data to the scale as an SMS, receiving the following content:
the scale ID (CAPAZ ID) with data from the over-the-day distributed
measurement data after the time with results!
The order of numbers:
12,6V 04/00R+12,5C45,5Kg65% E01,93
means battery 12,6V, measurement at 4:00, precipitation, outside
temperature 12,5°C, weight 45,5 Kg and 65% relative moisture! Credit
1,93 EUR (incase the network operator assists). Following this is the
next record.
There is a specific setting for work that gives the measurements etc. You
can also see the fixed settings and measurements with a PC software.
With the configuration software you can also define your own times for
the measurements. Especially when the cell phone should be turned on,
and when the SMS should be sent. For safety reasons, there should also
be a certain time for when the cell phone should be turned off. This is
necessary for when there is disturbance with the telephone network, so
that no unnecessary energy is needed. However, experience shows that
up to 10 minutes after being turned on, a safe data transfer is
guaranteed also with very small receiving signals.
There are only 160 marks to order for a SMS, and it makes sense to fill
them completely since the cost stays the same. The amount of
measurements you can have in an SMS depends on whether the SMS is
sent to a cell phone, or to Web-Server CAPAZ Direct. It also depends
on which data you want to transmit. If it’s just the weight, or all the
standing parameter is ordered to be transmitted.
4
4 Electronics
The main screen of the scale shows different connections and operation
elements. Holding down the white pushbutton for a certain amount of
seconds creates different functions. One second corresponds to the
blinking frequency of the green LED.
Multifunction - Pushbutton for Test SMS
Amount of time
Reaction
1 sec *
3 sec ***
More than 10 seconds
Reset
Starts SMS test
Cell phone is turned on
Entering the password into the cell phone is
necessary,
Cell phone’s service is possible
① Pushbutton for Test SMS
② Rain collector
③ Plug in for cell phone
④ Temperature/moisture sensor
⑤ Serial interface or brood temperature sensor or protection
⑥ Plug in for accumulator
Protection
①
②
③
④
⑤
⑥
5
5 Getting started
To begin you need a loaded accumulator, a legal SIM-Card, a telephone
number or e-mail address to receive the data, eventually another
telephone number (owner’s telephone number) to receive a Test-SMS.
After that, settings of the scale must be stored in a Notebook or
operation part.
Recommendation
Charge the battery two times the year, at the beginning and at the end of
season. With beginning season around 3 to 4 days before moving to
location, get the scales started, completely with reading mails for testing.
Later on it will be probably more difficult to work on services…
Take your time to start the CAPAZ GSM 200 scale:
1.
The delivered accumulator takes at least 12 hours and 24 hours
at the most to load.. Please take notice that at 12V and at the
latest 11.8V, the accumulator must be loaded to prevent defects.
Anything under 11.8V but 10.8V for sure brings the accumulator
into defect.
2.
Scales on a desired place on sturdy ground horizontally with the
help of a water scale, which is built onto the scale. So that the
scale doesn’t tip over.
3.
Between the colony and the scale it makes sense to lay a
wooden deck overtop so that the scale stays clean. The main
screen of the electronic with moisture sensors should be
protected against dirt coming through during rainstorms.
4.
When bee colonies and devices are turned on, we recommend
starting a Test-SMS to check the functionality.
6
Cell phone
The Telephone with a SIM-Card is in a waterproof, plastic tube. To work
on the cell phones the following is needed:
Before opening the cell phone tube, you have to unscrew the cable so
that air can enter the tube.
There can be no water inside the cell phone tube
The cable screw on the cell phone tube should be screwed on after
the tube has been closed so that air can escape and no sunlight gets
in. The tube should be fundamentally facing down so that no water
gets in.
Always protect open plugs on the scale, plug caps on the connected
operation pieces incase the cell phone is not turned on.
7
First, unscrew the cable screw
so that air can enter.
(remember to lock it back
afterwards!)
Then, open the plastic tube
between the socket joint
carefully.
By flattening the tube a little,
the cell phone can be easily
taken out of the tube.
8
The cell phone has a SIM
Card holder with two wedges;
place the SIM Card in between
the two wedges and the
holder.
9
Insert the board instead of the cell
phone accumulator, making sure
that the board is touching the cell
phone Contact.
Change SIM card on S45i
With the help of the lever open
the narrow slit and lift up the
board.
Change SIM card on S45i
Change the SIM card
Change SIM card on S45i
Platine replace in the right sense
10
Change SIM card on S45i
With the help of the lever open
the narrow slit and replace the
board back to his place.
Make sure that the brown plug in
on the board is fully clicked into
place.
The cable is provided with a
cable header so that the cable
screw correctly prevents
moisture.
The rubber ring is always slid on
using soft soap after opening.
(Caution: no oil or fat!)
Opening is easier the next time.
11
The black cell phone cable with
the 9 pole plug should be
plugged into the case where it is
labeled „Handy“
CAUTION:
Do not screw them too tight.
The plastic tube with the cell
phone in place should hang so
that the cable and the cable
screw always face down.
Lay the accumulator in the
provided compartment.
Connect the cable of the
accumulator to the scale. Make
sure that the head of the plug
faces down, only then does it
correctly make contact.
12
Plug the cable of the rain
collector into the female plug
called “Regen”. By easily turning
the audio connector, the plug
snaps into place.
13
A Test-SMS is started when the
pushbutton is pushed and held
down for 3 seconds.
> 10 seconds only turns the cell
phone on, and then you must
enter the PIN, for example SIM
Card test.
The LED blinks green during the
Test SMS, and blinks red if
there is an error. See the error
code in the label..
When only the cell phone is
turned on, the LED blinks green
as well.
And when the red LED on the
battery charger lights up, the
accumulator cable fits correctly.
The head of the plug must fit the
counterpart.
After the loading process the red
LED is off, but please keep
accumulator for at least 24h in
charging and please take note
of the data
14
Accumulator exchange
The accumulator must not discharge under 10,8V. The accumulator
stand shows in an announcement, Volt between 12,6V and 10,8V in the
transferred SMS. Under the condition of 10,8V, the lifespan of the
accumulator is threatened. In conditions under 11,8V, begins the risk of
an explosion. The discharged accumulator can be exchanged at its
location using an accumulator without any loss of data or settings. The
accumulator is protected from short-circuiting with a safety device from
3,15A
Accumulator charging
The battery charger fulfills these functions:
Loading after IU-Characteristic curve
electronic protection against overloads and short circuit
automatic reload
maintains loading about. 20 mA
Set the battery charge at 12V, 1 x LED (red light): the lighting up of these
indications shows the loading process of the device. When the loading
light illuminates, the accumulator is loaded and the device switches to
preservation loading. We recommend leaving the battery charger
connected with the accumulator at least 12 and at most 24 hours so that
it is completely loaded.
The battery charger must only be left in closed, dry rooms. Explosive
gases can develop while loading, that’s why sufficient ventilation is
needed to avoid open fires. For fire hazard respectively, to prevent the
danger of electric shock, the device is protected from moisture. A device
that has a damaged case or power plug should not be operated.
15
6 Scale settings
The scale must divide the PIN-Code between which telephone number
the data by SMS or e-mail, to which time the measurement follows and
to which, if necessary, second telephone number the test-SMS should
be sent.
...with a PC
The settings of the scale can be done with Windows
2000/XP/Vista/Win7.
1.
Connect the 9 pole cable of the PC from the COMx port to the
serial interface of the female plug with the symbol of a „PC“.
2.
Install the attached software and follow the instructions on the
screen. Close all of the applications and insert the data medium
into the PC drive. Click the selection labeled “Run” under “start”
on your desktop and start the installation by choosing “setup”.
3.
Follow the instructions on the screen and enter in the personal
data into the shown fields.
4.
After finishing all of the components (accumulator, cell phone
cable, SIM-Card), test all the settings with a Test-SMS.
16
7 Pushbutton and Test-SMS
The main screen of the scale electronic has LED’s and a pushbutton for
carrying out a Test-SMS to make sure that the scale sends correctly.
After the start of the Test-SMS, each LED blinks red and green for each
diagnostic stage. After about 3-5 min. and successful sending of the
SMS, the green LED illuminates durably. During a breakdown, the red
LED blinks the error number for about ½ hour.
A Test-SMS is started by holding down the pushbutton about 3 seconds
(green LED blinks 3 times). Now release the pushbutton, the red LED
blinks shortly and the green LED indicates that the test keeps on going.
green LED
red LED blinks
blinks irregularly
Specification
Diagnose is working, All areas are
being tested.
SMS sent, everything is OK
Permanent light
Short light
2x **
3x
4x
5x
6x
***
****
*****
******
7x *******
8x ********
9x *********
Check Raincollector OK, LED lights
up if push down spoon
No connection with cell phone, No
cell phone connected
SIM-Card error
No network found or false log in.
No reception
Telephone number is wrong or no
money on the SIM-Card
SIM-Card error
Wrong Password
deeply discharged Accumulator,
defect?
17
An example of a Test-SMS can look like the following:
Send 15.Mai 2004 15:34:17
[email protected]
e-mail Address the data should be sent to
13.05.04 15:33
Live time of the data in the scale
ID:8K19
CAPAZ ID Scale number. 8K19
12,2V
loaded!)
Accumulator stand (up to 12,0 respectively 11,8V
No rain collector
Rain measurement check
22/
8:00 p.m. Measurement time (only full hours)
04R
4 Ltr./square meters of rainfall
+22,9C
Outside temperature 22,9 degrees C
056.2Kg
Live weight
36%
Relative air moisture in %
EUR1,74
Credit amount before the SMS was sent
MHD25.12.2005
Credit valid until data
Nr.:+491701611339 Telephone number to be sent to
Home network T-D1 Network provider
SGN:17
reception quality 0-31,
(should be better than 5)
18
8 Rain collector
The rain collector is a self-emptying frost proof electronic rain gauge. It
registers rainfall in mm per sqm. The water runs through a funnel, each
liter/sqm rainfall empties the spoon and is registered from scales.
The box should not be tightened to strong; so plastic box should not be
deformed. Mount the rain gauge in horizontal position and sheltered from
the wind. Plug the cable of the rain collector into the female plug called
“Regen”, the plug snaps into place
Place the rain collector
horizontally on the proper
location. Make sure there
aren’t any trees, branches, or
other things above the funnel.
Also, they must not closed
under openings so that the
measured rainfall can run free.
From time to time the spoon
and funnel should be cleaned.
19
Spoons moving must be free from
dirt; cable shouldn’t bloc spoon
from emptying.
STOP: not this way!
Do not bent collector box by
tighten to strong. Better You use
adhesive tape. The arrangement
should be horizontally well
adjusted
20
9 Connecting brood t° Sensor
The Bee Hive Scale CAPAZ GSM200 regognizes the brood temperature
sensor automaticly if it is connectet to „Computer“ (needs Firmware 9.95
and higher). Insteed of 9 measurements/SMS now it´s reduced to 7
measurements/SMS.
1.) Connect the sensor:
The brood temperature
sensor connect to the
scale CAPAZ GSM200
(Connector „Computer“).
2.) send a Test Message:
The text in the message now shows the additional temperature
3.) Software "Administration Beehive Weight Scales":
Go to Menu „View/Location“ edit and write the text „brood“ and the
symbol „°C“ to row Variant 1
21
10 3/25/50m cable extension
1.) Open the the GSM-Modul:
Open the modul-tube carefully with Your thumbs,
before open the screw on cable to let air into the
tube..
(do not forget to retighten later )
2.) connect brown cable:
Fix the brown cable to the brown connector,
take care that board is fixed nice.
3.) enforce a Test-SMS:
Close tubes (let air escape), than tighten the
screw on cable, now the module is air-tight ,
after fixing check with a Test-SMS
22
11 Safety Regulations
The CE-Marking that is shown on this product states that CAPAZ
follows these guidelines that the EU keeps.
DIN 40050, EMV-Guidelines 89/336/EWG, Low tension –guidelines
73/23/EWG completed in 93/68/EWG
WEEE-Rg.-Nr. DE 13712513
The symbol for the crossed out trash can means that this product can
not be disposed over unsorted household waste.
The company management, CAPAZ GmbH, Hauptstr. 7, DE-77704
Oberkirch
Certifies that this product is manufactured and tested in agreement with
the safety guidelines and emission guidelines Unauthorized changing of
this disables this declaration.
23
Please take notice of the following guidelines. Disregarding of
these rules or rejecting these rules can have dangerous
consequences.
Please inform yourself in relevant research and recommendation over
the impairment of the health from human being or animal by radiation
of the RF-Signals through mobile Telephone.
Do not set the scale in a spray area or in the vicinity of an explosion
threat respectively. There can be sparks, interference with electronic
devices, explosions or fires started. Take notice of these restrictions
and follow the rules and regulations.
Please observe the area of legal regulations, when the insert of a
mobile Telephone is not allowed, or when the telephone creates
interference, or dangerous situations can develop.
For people with medical implant devices, for example, a pacemaker:
pay absolute attention to the regulations of the manufacturer’s relative
interference and fundamental permission from mobile telephone, an
eventually possible minimal interval, etc. Don’t touch the antenna
unnecessarily.
The operation of the mobile telephone with RF-Signals can under
circumstances disrupt the functions from insufficient and protected
electronic systems, vehicles, medical devices, general keyboards and
so on.
The scale should never be loaded over the permitted weight of 200
Kg or over the middle. Make sure that the scale is standing on stable
and safe ground after the water scale is straight, the load can fall over
and cause serious or lethal injuries.
24
The accumulator is only to be loaded with the supplied battery
charger. Take notice of the safety regulations of the accumulator
stand. Never open the accumulator, be careful not to drop it, touch it
with sharp objects, heat or other disturbances. Caution, using or
handling the accumulator improperly can result in death, loss of
eyesight, or other serious injuries. Caution fire hazard, the power
supply cable should not be damaged or short-circuited. If an
operational area is dealing with rodents (marten etc.), the scale must
be sufficiently protected, for example, by wood borders.
Protect the scale from weather conditions such as rainstorms or direct
sunlight, for example, through wood borders.
25
12 Problems and Solutions
Here you will find operations or specific situation advice to bring you to
an understanding.
LED Error message: "no connection with cell phone..."
The microprocessor tries to start the cell phone, but receives no answer.
The cause can be: the cell phone is not connected to the cable, the
cable is severed, contact problems with the cell phone board, and cell
phone won’t turn on.
LED Error message: "SIM-Card error..."
The cell phone informs that the SIM-Card is defective. Test the SIM-Card
on another cell phone.
LED Error message: "no network found or false log in..."
The reception is so bad that the cell phone can’t find the network or the
log in network is false..
Error message: "no reception..."
26
The cell phone has no network reception, see if the cell phone finds
reception on a tree.
LED Error message:
"Wrong telephone number or no credit on SIM-Card..."
The telephone number for sending the SMS is wrong or no longer valid
because, for example, the money credit is spent.
LED Error message:
"Accumulator deep discharge, accumulator defect?..."
When an accumulator is in deep discharge there is always the risk that
the accumulator can receive permanent damage. The SMS also
transmits the loading condition as voltage from 10,8V-12,6V. Please take
notice that from the voltage 12,00V and at the latest 11,8V, the
accumulator will be reloaded.
SMS-Forwarding expenses make an unexpected rise.
Falls die SMS-Versandkosten durch Einflüsse von Fremdnetzen
überhand nehmen, können spezielle Einstellungen am Handy
vorgenommen werden (ggf. Siemens Menü/Einstellungen oder
Dokumentation beachten).
27
No SMS received
Test to see if the LED blinks red (see error messages on the label of the
electronic). Please test the possible error cause.
a.) LED only blinks green, cell phone stays on and stands with the PIN
input. Cause: pushbutton was pushed too long (> 10 sec.), now push the
pushbutton once and hold for only 3 sec.
b.) No LED is blinking: scale is busy and currently finding a
measurement, push the Test-SMS pushbutton after at least 1 minute.
c.) LED still doesn’t light up: test the accumulator connection cable with a
new plug in. Plug in head must be properly inserted.
d.) Test cell phone plug in to see if it is properly inserted, see the
inscription on the main screen.
28
29
30
31
32
33
34
INDEX
Accumulator.........................15, 25
Akku laden.................................15
Battery.......................................15
Charger......................................15
Diagnose....................................17
Error.....................................17, 26
Gidelines....................................24
IMEI Registration.........................2
Ladegerät...................................15
LED..................................5, 17, 26
PIN-Code...................................16
Protection...................................15
Pushbutton.............................3, 17
Safety.........................................23
Settings......................................16
Setup.........................................16
Software.......................................2
Test-SMS.......................3, 5f., 16f.
Akkuladegerät.............................2
35
All from CAPAZ GmbH in this manual documented information are
without any warranty. CAPAZ GmbH takes neither warranty nor any
responsibility or liability for using this product, any economic or operating
efficiency or warranty if male functioning. If legal and allowed CAPAZ
does not take responsibility or liability for any loss or damage or injury in
any kind, including directly or indirectly, the loss of money or breakdown
or business interruption, loss of business information or loss off property.
This also applies if data from this device can not be used. Also CAPAZ
GmbH does not take any liability for injury on human being or animals by
the reason of male functioning on Hard- or Software or misusage of the
product. There is also no responsibility if this product hurts patentprotection .
All rights reserved. No part of this product, neither hardware, hardwaredesign and layout, software nor Interfaces is allowed to be used without
authorization in written form CAPAZ GmbH.
Copyright © 1992-2012, CAPAZ GmbH, Hauptstr. 7, 77704 Oberkirch
Stand Mai 2012
36