1
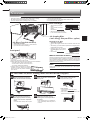
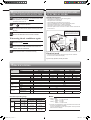
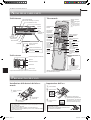
SPLIT-TYPE AIR CONDITIONERS
INDOOR UNIT
MSZ-GC22VA MSZ-GC25VA MSZ-GC35VA
For user
OPERATING INSTRUCTIONS
• To use this unit correctly and safely, be sure to read this operating instructions before use.
English
Per gli utenti
LIBRETTO D’ISTRUZIONI
• Per utilizzare correttamente quest’unità, leggere questo libretto d’istruzioni attentamente e per intero.
Italiano
HM06H341_Cover.indd
1
2006/10/24
8:48:06
● OPERATING INSTRUCTIONS ●
CONTENTS
■
■
■
■
■
■
■
■
■
■
■
■
■
SAFETY PRECAUTIONS
DISPOSAL
NAME OF EACH PART
PREPARATION BEFORE OPERATION
SELECTING OPERATION MODES
FAN SPEED AND AIRFLOW DIRECTION ADJUSTMENT
ECONO COOL OPERATION
TIMER OPERATION (ON/OFF TIMER)
CLEANING
WHEN YOU THINK THAT TROUBLE HAS OCCURRED
WHEN THE AIR CONDITIONER IS NOT GOING TO BE USED FOR A LONG TIME
INSTALLATION PLACE AND ELECTRICAL WORK
SPECIFICATIONS
1
2
3
3
4
5
5
5
6
7
8
8
8
SAFETY PRECAUTIONS
• Since rotating parts and parts which could cause an electric shock are used
in this product, be sure to read these “Safety Precautions” before use.
• Since the cautionary items shown here are important for safety, be sure to
observe them.
• After reading this manual, keep it together with the installation manual in a
handy place for easy reference.
Marks and their meanings
WARNING :
Incorrect handling could cause serious hazard, such as
death, serious injury, etc. with a high probability.
CAUTION :
Incorrect handling could cause serious hazard depending
on the conditions.
Meanings of symbols used in this manual
: Be sure not to do.
: Be sure to follow the instruction.
: Never insert your finger or stick, etc.
: Never step onto the indoor/outdoor unit and do not put anything on them.
: Danger of electric shock. Be careful.
: Be sure to disconnect the power supply plug from the power outlet.
: Be sure to shut off the power.
WARNING
Do not connect the power cord to an intermediate point,
use an extension cord, or connect multiple devices to a
single AC outlet.
• This may cause overheating, fire, or electric shock.
Make sure the power plug is free of dirt and insert it securely into the outlet.
• A dirty plug may cause fire or electric shock.
Do not bundle, pull, or modify the power cord, and do not
apply heat or place heavy objects on it.
• This may cause fire or electric shock.
Do not turn the breaker OFF/ON or disconnect/connect the
power plug during operation.
• This may create sparks, which can cause fire.
• After the indoor unit is switched OFF with the remote controller, make sure to turn the breaker OFF or disconnect the
power plug.
Do not expose your body directly to cool air for a prolonged
length of time.
• This could be detrimental to your health.
The unit should not be installed, relocated, or repaired
by the user.
• An improperly handled air conditioner may cause fire or
electric shock.
Do not insert your finger, a stick, or other objects into the
air inlet or outlet.
• This may cause injury, since the fan inside rotates at high
speeds during operation.
In case of an abnormal condition (such as a burning smell),
stop the air conditioner and disconnect the power plug or
turn the breaker OFF.
• A continued operation in the abnormal state may cause a
malfunction, fire, or electric shock. In this case, consult your
dealer.
When the air conditioner does not cool or heat, there is
a possibility of refrigerant leakage. In this case, consult
your dealer. If a repair involves recharging the unit with
refrigerant, ask the service technician for details.
• The refrigerant used in the air conditioner is safe. Normally,
it does not leak. However, if refrigerant leaks and comes in
contact with a heat source such as a fan heater, kerosene
heater, or cooking stove, it will create a harmful gas.
CAUTION
Do not touch the air inlet or the aluminum fins of the
indoor/outdoor unit.
• This may cause injury.
Do not use insecticides or flammable sprays on the unit.
• This may cause a fire or deformation of the unit.
Do not expose pets or houseplants to direct airflow.
• This may cause injury to the pets or plants.
Do not place other electric appliances or furniture under
the indoor/outdoor unit.
• Water may drip down from the unit, which may cause damage
or malfunction.
Do not leave the unit on a damaged installation stand.
• The unit may fall and cause injury.
En-1
HM06H341_new_en.indd
1
2006/10/24
8:50:08
SAFETY PRECAUTIONS
CAUTION
Do not operate switches with wet hands.
• This may cause electric shock.
Do not step on an unstable bench to operate or clean the
unit.
• This may cause injury if you fall down.
Do not clean the air conditioner with water or place an object
that contains water, such as a flower vase, on it.
• This may cause fire or electric shock.
Do not pull the power cord.
• This may cause a portion of the core wire to break, which may
cause overheating or fire.
Do not step on or place any object on the outdoor unit.
• This may cause injury if you or the object falls down.
Do not charge or disassemble the batteries, and do not
throw them into a fire.
• This may cause the batteries to leak, or cause a fire or explosion.
Do not operate the unit for a long time at high humidity (80%
RH or more), such as with a door or window left open.
• The water condensation in the air conditioner may drip down,
wetting or damaging the furniture.
Do not use the unit for special purposes, such as storing
food, raising animals, growing plants, or preserving precision devices or art objects.
• This may cause deterioration of quality, or harm to animals
and plants.
Do not expose combustion appliances to direct airflow.
• This may cause incomplete combustion.
Before cleaning the unit, switch it OFF and disconnect the
power plug or turn the breaker OFF.
• This may cause injury, since the fan inside rotates at high
speeds during operation.
When the unit will be unused for a long time, disconnect the
power plug or turn the breaker OFF.
• The unit may accumulate dirt, which may cause overheating
or fire.
Replace all batteries of the remote controller with new ones
of the same type.
• Using an old battery together with a new one may cause
overheating, leakage, or explosion.
If the battery fluid comes in contact with your skin or clothes,
wash them thoroughly with clean water.
• If the battery fluid comes in contact with your eyes, wash them
thoroughly with clean water and immediately seek medical
attention.
Ensure that the area is well-ventilated when the unit is operated together with a combustion appliance.
• Inadequate ventilation may cause oxygen starvation.
Turn the breaker OFF when you hear thunder and there is a
possibility of a lightning strike.
• The unit may be damaged if lightning strikes.
For installation
WARNING
Consult your dealer for installing the air conditioner.
• It should not be installed by the user since installation requires
specialized knowledge and skills. An improperly installed air
conditioner may cause water leakage, fire, or electric shock.
Provide a dedicated power supply for the air conditioner.
• A non-dedicated power supply may cause overheating or
fire.
Do not install the unit where flammable gas could leak.
• If gas leaks and accumulates around the outdoor unit, it may
cause an explosion.
CAUTION
Do not install the unit where flammable gas could leak.
• If gas leaks and collects around the unit, it may cause an
explosion.
Earth the unit correctly.
• Do not connect the earth wire to a gas pipe, water pipe, lightning rod, or a telephone ground wire. Improper earthing may
cause electric shock.
Install an earth leakage breaker depending on the installation location of the air conditioner (such as highly humid
areas).
• If an earth leakage breaker is not installed, it may cause electric
shock.
Ensure that the drain water is properly drained.
• If the drain passage is improper, water may drip down from
the indoor/outdoor unit, wetting and damaging the furniture.
In case of an abnormal condition
Immediately stop operating the air conditioner and consult your dealer.
After the air conditioner is used for several seasons, perform inspection and maintenance in addition to normal
cleaning.
• Dirt or dust in the unit may create an unpleasant odor or clog
the drain passage, and cause water to leak from the indoor
unit. Consult your dealer for inspection and maintenance,
which require specialized knowledge and skills.
DISPOSAL
To dispose of this product, consult your dealer.
Note:
This symbol mark is for EU countries only.
This symbol mark is according to the directive 2002/96/
EC Article 10 Information for users and Annex IV.
Your MITSUBISHI ELECTRIC product is designed and manufactured with high
quality materials and components which can be recycled and reused.
This symbol means that electrical and electronic equipment, at their end-of-life,
should be disposed of separately from your household waste.
Please, dispose of this equipment at your local community waste collection/recycling center.
In the European Union there are separate collection systems for used electrical
and electronic product.
Please, help us to conserve the environment we live in!
En-2
HM06H341_new_en.indd
2
2006/10/24
8:50:11
● OPERATING INSTRUCTIONS ●
NAME OF EACH PART
Indoor unit
Remote controller
Air cleaning filter
(Anti-Allergy Enzyme Filter, option)
Signal transmitting
section
Distance of signal :
About 6 m
Heat exchanger
Beep(s) is (are) heard
from the indoor unit when
the signal is received.
Air inlet
Front panel
Air filter
(Catechin
air filter)
Air outlet
Operation display
section
ON/OFF
(operate/stop)
button
Temperature buttons
FAN speed
control button
Fan guard
Page 4
Page 5
Vertical vane
Horizontal vane
Operation
select button
On-timer button Page 5
ECONO
COOL
button Page 5
TIME set buttons Pages 3, 5
Increase time
Decrease time
Page 4
Display section
Remote control
receiving section
Fan
Off-timer button Page 5
Operation indicator
lamp
Emergency
operation switch Page 4
CLOCK button Page 3
VANE
control button
RESET button Page 3
Lid
Slide down to open
Page 5
Remote controller
holder
Outdoor unit
Air inlet (back and side)
Piping
Drainage hose
Air outlet
Drain outlet
Appearance of the outdoor unit may differ from some models.
• Install the remote controller holder to a place where
the signal can be received
by the indoor unit.
Use the remote controller provided with the unit only.
Do not use other remote controllers.
PREPARATION BEFORE OPERATION
Before operation: Insert the power supply plug into the power outlet and/or turn the breaker on.
Installing the remote controller batteries
1.
Remove the front lid
Setting current time
1.
Press RESET
2.
Press CLOCK
SE
RE
RE
T
T
SE
OC
CL
K
K
OC
CL
2.
3.
Insert AAA
alkaline batteries
Install the front lid
• Make sure the polarity of the batteries is correct.
• Do not use manganese batteries. The remote controller could malfunction.
• Do not use rechargeable batteries.
• Replace all batteries with new ones of the same type.
• Batteries can be used for approximately 1 year. However, batteries with
expired shelf lives last shorter.
3.
4.
Press CLOCK again
Press the TIME buttons to set the
time
Each press increases/decreases
the time by 1 minute (10 minutes
when pressed longer)
• Press RESET and CLOCK gently using a thin
stick.
If the RESET button is not pressed, the remote
controller may not operate correctly.
En-3
HM06H341_new_en.indd
3
2006/10/24
8:50:16
SELECTING OPERATION MODES
AUTO mode (Auto changeover)
The unit selects the operation mode according to the difference between the
room temperature and the set temperature. During AUTO mode, the unit
changes mode (COOL↔HEAT) when the room temperature is 2°C away
from the set temperature for more than 15 minutes.
Note:
During multi system operation, the unit may not be able to switch operation mode between COOL and HEAT. In this case, the indoor unit becomes standby mode.
COOL mode
Enjoy cool air at your desired temperature.
Do not operate COOL mode at low outside temperature (less than -10°C).
Water condensed in the unit may drip and wet or damage furniture, etc.
DRY mode
Dehumidify your room. The room may be cooled slightly.
Temperature cannot be set during DRY mode.
HEAT mode
Enjoy warm air at your desired temperature.
1
2
Press
to start the operation.
Emergency operation
When the remote controller cannot be used...
Emergency operation can be activated by pressing the emergency operation
switch (E.O.SW) on the indoor unit.
Press
to select operation mode. Each press
changes mode in the following order:
Each time the E.O.SW is pressed, the operation changes in
the following order:
(AUTO)
Operation indicator lamp
(COOL)
(DRY)
Emergency COOL
(HEAT)
Emergency HEAT
3
Press
or
to set the temperature.
Each press raises or lowers the temperature by 1°C.
Press
• The same setting is selected the next time by simply pressing
Operation indicator lamp
The operation indicator lamp shows the operation state of the unit.
Operation state
Room temperature
About 2°C or more
The unit is operating to reach the set
away from set temtemperature
perature
The room temperature is approach- About 1 to 2°C from
ing the set temperature
set temperature
Standby mode (only during multi
system operation)
Lighted
Blinking
Stop
Note:
to stop the operation.
Indication
Set temperature : 24°C
Fan speed : Medium
Horizontal vane : Auto
Not lighted
—
.
The first 30 minutes of operation is test run. Temperature
control does not work, and fan speed is set to High.
Auto restart function
If a power failure occurs or the main power is turned off during operation, “Auto
restart function” automatically starts operation in the same mode as the one set
with the remote controller just before the shutoff of the main power. When
timer is set, timer setting is cancelled and the unit starts operation when power
is resumed.
If you do not want to use this function, please consult the service representative because the setting of the unit needs to be changed.
Multi system operation
Two or more indoor units can be operated by one outdoor unit. When several
indoor units are operated simultaneously, cooling and heating operations cannot
be done at the same time. When COOL is selected with one unit and HEAT with
another or vice versa, the unit operated later becomes standby mode.
En-4
HM06H341_new_en.indd
4
2006/10/24
8:50:21
● OPERATING INSTRUCTIONS ●
FAN SPEED AND
AIRFLOW DIRECTION ADJUSTMENT
ECONO COOL OPERATION
Press
to select fan speed. Each press changes
fan speed in the following order:
Press
during COOL mode page 4 to start
ECONO COOL operation.
(AUTO)
(Low)
(Med.)
The unit performs swing operation vertically in various cycle according
to the temperature of the unit. Set temperature is set 2°C higher automatically.
(High) (Super High)
• Two short beeps are heard from the indoor unit when set to AUTO.
Press
to select airflow direction. Each press
changes airflow direction in the following order:
(AUTO)
(1)
(2)
(3)
(4)
(SWING)
• Two short beeps are heard from the indoor unit when set to AUTO.
• Press for 2 seconds or more to set to horizontal position.
• Press once to cancel horizontal position.
• When the airflow direction is set to horizontal position, or when horizontal position is cancelled, operation stops for about 3 minutes.
Airflow direction
Press
again to cancel ECONO COOL operation.
• Pressing
also cancels ECONO COOL operation.
What is “ECONO COOL”?
Swing air flow (change of air flow) makes you feel cooler than constant air flow.
So, even though the set temperature is automatically set 2°C higher, it is possible to perform cooling operation with keeping comfort. As a result, energy can
be saved.
TIMER OPERATION (ON/OFF TIMER)
1
Press
(AUTO) .........The vane is set to the most efficient airflow direction. COOL/
DRY:horizontal position. HEAT:position (4).
(OFF timer) : The unit turns OFF at the set
time.
*
or
blinks.
* Make sure that the current time is set correctly. Page 3
(Swing) .........The vane moves up and down intermittently.
■ To change the horizontal airflow direction.
Move the vertical vane manually before starting operation.
during operation to set the timer.
(ON timer) : The unit turns ON at the set
time.
(Manual) .......For efficient air conditioning, select upper position for COOL/
DRY, and lower position for HEAT. During COOL/DRY, vane
automatically moves to position (1) after 0.5 to 1 hour to prevent
water dripping.
Horizontal position
Recommended position during COOL/DRY. Air does not
blow directly to room occupants, providing comfortable airflow
distribution.
or
2
Press
(Increase) and
time of timer.
(Decrease) to set the
Each press increases or decreases the set time by 10 minutes.
3
Press
or
again to cancel timer.
Note:
• ON and OFF timers can be used in combination. mark indicates the order
of timer operations.
• If power failure occurs while ON/OFF timer is set, see page 4 “Auto restart
function”.
En-5
HM06H341_new_en.indd
5
2006/10/24
8:50:28
CLEANING
Instructions:
• Use only diluted mild detergents.
• Do not expose parts to direct sunlight, heat, or flames to dry.
• Do not use water hotter than 50°C.
• Switch off the power supply or turn off the breaker before cleaning.
• Be careful not to touch the metal parts with your hands.
• Do not use benzine, thinner, polishing powder, or insecticide.
Heat exchanger
• Wear gloves to protect your
hands.
• Use the QUICK CLEAN KIT
(option).
Parts Number MAC-093SS-E
• Refer to the instructions described
in the QUICK CLEAN KIT for details.
Air cleaning filter
(Anti-Allergy Enzyme Filter, option)
Back side of air filter
Air filter (Catechin air filter)
• Clean every 3 months.
• Soak the filter together with its frame in lukewarm water and wash
it.
• After washing, dry it well in shade and put it back to its original position.
Install all tabs of the air filter.
• Replace it with a new air cleaning
filter every year for best performance.
• Parts Number MAC-408FT-E
Pull to remove from the air filter
• Clean every 2 weeks
• Remove dirt by a vacuum cleaner, or wash with water.
• Dry it well in shade before installing it.
Front panel
What is “Catechin air filter” ?
Hinge
Hole
1. Lift the front panel until a “click” is heard.
2. Hold the hinges and pull to remove as shown in the above illustration.
• Wipe with a soft dry cloth or wash it with water.
• Do not soak it in water for more than two hours.
• Dry it well in shade before installing it.
3. Install the panel by following the removal
procedure in reverse. Close the front panel
securely and press the positions indicated
by the arrows.
Catechin is a bioflavonoid that is found in green tea that has both antiviral and antioxidant qualities. In addition to these benefits, Catechin also
offers excellent deodorizing characteristics. Catechin air filter uses this
compound to not only improve air quality but also prevent the spread of
bacteria and viruses in the room.
Note:
Clean the filters regularly for best performance and to reduce power
consumption.
Air outlet and Fan (before cleaning, make sure that the fan is stopped)
1
Turn the horizontal vane upward.
Then, remove it as shown in ➀ and ➁.
2
Swing out the two vertical vanes
one by one.
3
Clean the air outlet and fan.
• Wipe with a soft dry cloth.
1
Unlock
Hold the tab
Clean the fan.
• Use the QUICK CLEAN KIT (option).
Parts Number MAC-093SS-E
• Refer to the instructions described in the
QUICK CLEAN KIT for details.
2
4
Put the vertical vanes back to
their original positions correctly
one by one, into their respective
guide.
• Push the vanes until they click into place.
5
Install the horizontal vane by
following the removal procedure
in reverse.
• If the horizontal vane is not installed correctly, all LED lamps blink when power is
turned on.
Guide
En-6
HM06H341_new_en.indd
6
2006/10/24
8:50:31
● OPERATING INSTRUCTIONS ●
WHEN YOU THINK THAT TROUBLE HAS OCCURRED
Even if these items are checked, when the unit does not recover from the
trouble, stop using the air conditioner and consult your dealer.
Symptom
Explanation & Check points
Indoor Unit
The unit cannot be operated.
• Is the breaker turned on?
• Is the power supply plug connected?
• Is the ON timer set? Page 5
All LED lamps on the indoor
unit are blinking.
• Is the horizontal vane installed correctly?
Page 6
The horizontal vane does not
move.
• Are the horizontal vane and the vertical vane
installed correctly? Page 6
• Is the fan guard deformed?
The unit cannot be operated
for about 3 minutes when
restarted.
• This protects the unit according to instructions from the microprocessor. Please
wait.
Mist is discharged from the air • The cool air from the unit rapidly cools moisoutlet of the indoor unit.
ture in the air inside the room, and it turns
into mist.
The swing operation of the
HORIZONTAL VANE is
suspended for a while, then
restarted.
The display on the remote
controller does not appear
or it is dim. The indoor unit
does not respond to the
remote control signal.
The operation is stopped for
about 10 minutes in the heating operation.
• Defrosting of the outdoor unit is being
done.
Since this is completed in max.10 minutes,
please wait. (When the outside temperature
is too low and humidity is too high, frost is
formed.)
The unit starts operation by
itself when the main power
is turned on, though it isn’t
operated with the remote
controller.
• These models are equipped with an auto restart function. When the main power is turned
off without stopping the unit with the remote
controller and is turned on again, the unit
starts operation automatically in the same
mode as the one set with the remote controller just before the shutoff of the main power.
Refer to “Auto restart function” page 4 .
Multi system
The indoor unit which is not
• A small amount of refrigerant continues to
operating becomes warm and
flow into the indoor unit even though it is
a sound, similar to water flownot operating.
ing, is heard from the unit.
• When operation is started during defrosting
of outdoor unit is done, it takes a few minutes
(max. 10 minutes) to blow out warm air.
Outdoor Unit
The fan of the outdoor unit
• When the outside temperature is low durdoes not rotate even though
ing cooling operation, the fan operates
the compressor is running.
intermittently to maintain sufficient cooling
Even if the fan starts to rotate,
capacity.
it stops soon.
Water leaks from the outdoor
unit.
• During COOL and DRY operations, pipe or
pipe connecting sections are cooled and this
causes water to condense.
• In the heating operation, water condensed
on the heat exchanger drips down.
• In the heating operation, the defrosting operation makes water frozen on the outdoor
unit melt and drip down.
White smoke is discharged
from the outdoor unit.
• In the heating operation, vapor generated
by the defrosting operation looks like white
smoke.
Explanation & Check points
• Are the batteries exhausted? Page 3
• Is the polarity (+, -) of the batteries correct?
Page 3
• Are any buttons on the remote controller of
other electric appliances being pressed?
Does not cool or heat
The room cannot be cooled
or heated sufficiently.
• Is the temperature setting appropriate?
Page 4
• Is the fan setting appropriate? Please
change fan speed to higher setting.
• Is the filter clean? Page 6
• Is the fan or heat exchanger of the indoor unit
clean? Page 6
• Are there any obstacles blocking the air inlet
or outlet of the indoor or outdoor unit?
• Is a window or door open?
The room cannot be cooled
sufficiently.
• When a ventilation fan or a gas cooker is
used in a room, the cooling load increases,
resulting in an insufficient cooling effect.
• When the outside temperature is high, the
cooling effect may not be sufficient.
The room cannot be heated
sufficiently.
• When the outside temperature is low, the
heating effect may not be sufficient.
• This is for the swing operation of the HORIZONTAL VANE to be performed normally.
The air flow direction changes • When the unit is operated in COOL or DRY
during operation.
mode, if the operation continues with air
The direction of the horizontal
blowing down for 0.5 to 1 hour, the direction
vane cannot be adjusted with
of the air flow is automatically set to position
the remote controller.
(1) to prevent water from condensing and
dripping.
• In the heating operation, if the air flow temperature is too low or when defrosting is being done, the horizontal vane is automatically
set to horizontal position.
When heating operation is
selected, operation does not
start right away.
Symptom
Remote controller
Air does not blow out soon in • Please wait as the unit is preparing to blow
the heating operation.
out warm air.
Airflow
The air from the indoor unit
smells strange.
• Is the filter clean? Page 6
• Is the fan or heat exchanger of the indoor unit
clean? Page 6
• The unit may suck in an odor adhering to the
wall, carpet, furniture, cloth, etc. and blow it
out with the air.
Sound
Cracking sound is heard.
• This sound is generated by the expansion/
contraction of the front panel, etc. due to
change in temperature.
The sound as burbling is
heard.
• This sound is heard when the outside air is
absorbed from the drain hose by turning on
the range hood or the ventilation fan, making
water flowing in the drain hose to spout out.
This sound is also heard when the outside air
blows into the drain hose in case the outside
wind is strong.
Mechanical sound is heard
from the indoor unit.
• This is the switching sound in turning on/off
the fan or the compressor.
The sound of water flowing
is heard.
• This is the sound of refrigerant or condensed
water flowing in the unit.
Hissing sound is sometimes
heard.
• This is the sound when the flow of refrigerant
inside the unit is switched.
In the following cases, stop using the air conditioner and consult your
dealer.
• When water leaks or drips from the indoor unit.
• When the upper operation indicator lamp blinks.
• When the breaker trips frequently.
• The remote control signal is not received in a room where an electronic ON/OFF
type fluorescent lamp (inverter-type fluorescent lamp, etc.) is used.
• Operation of the air conditioner interferes with radio or TV reception. An amplifier may be required for the affected device.
• When an abnormal sound is heard.
En-7
HM06H341_new_en.indd
7
2006/10/24
8:50:33
WHEN THE AIR CONDITIONER IS NOT
INSTALLATION PLACE AND
GOING TO BE USED FOR A LONG TIME
1
ELECTRICAL WORK
Installation place
Set to the highest temperature in manual COOL mode,
and operate for 3 to 4 hours. Page 4
Avoid installing the air conditioner in the following places.
• Where there is much machine oil.
• Salty places such as the seaside.
• Where sulfide gas is generated such as a hot spring.
• Where oil is splashed or where the area is filled with oily smoke.
• Where there is high-frequency or wireless equipment.
• Where the air from the outdoor unit air outlet is blocked.
• Where the operation sound or air from the outdoor unit does not bother the
house next door.
This dries the inside of the unit.
2
3
4
Press
to stop the operation.
Turn off the breaker and/or disconnect the power supply plug.
The installation location of the outdoor unit should
be at least 3 m away from the antennas for TV sets,
radios, etc. In areas where the reception is weak,
provide greater space between the outdoor unit and
the antenna of the affected device if operation of the
air conditioner interferes with radio or TV reception.
Remove all batteries from the remote controller.
To prevent the effects
of a fluorescent lamp,
keep as far apart as
possible.
When using the air conditioner again:
1
2
3
Inverter-type
fluorescent lamp
wall, etc.
Keep a space to
prevent the picture distortion or
the noise.
Clean the air filter. Page 6
1m
or more
Check that the air inlet and outlet of the indoor and
outdoor units are not blocked.
Cordless
phone or
Portable
phone
Check that the earth is connected correctly.
Wellventilated dry
place
100 mm or
more
100/200 mm
or more
TV
1m
or more
(GC25/GC35)
3 m or
more
Radio
Electrical work
• Provide an exclusive circuit for the power supply of the air conditioner.
• Be sure to observe the breaker capacity.
If you have any questions, consult your dealer.
SPECIFICATIONS
Set name
Model
Indoor
—
MSZ-GC25VA(H)
MSZ-GC22VA
MSZ-GC25VA
MSZ-GC35VA
—
MUZ-GC25VA(H)
MUZ-GC35VA(H)
Outdoor
Function
Cooling
Heating
Cooling
Power supply
MSZ-GC35VA(H)
Heating
Cooling
Heating
~ /N, 230 V, 50 Hz
Capacity
kW
—
—
2.5
3.2
3.5
4.0
Input
kW
—
—
0.665
0.835
1.075
1.055
Weight
Indoor
kg
Outdoor
kg
—
26
31
kg
—
0.75
0.85
Refrigerant filling capacity (R410A)
9
Indoor
IP code
IP 20
Outdoor
Permissible excessive LP ps
operating pressure
HP ps
Noise level
—
MPa
dB(A)
Outdoor
dB(A)
4.15
43/36/29/21
—
Heating
43/36/29/22
46
47
47
48
Note:
Guaranteed operating range
Cooling
1.64
MPa
Indoor (Super High/
High/Med./Low)
Indoor
IP 24
—
Outdoor
MUZ-GC25/35VA MUZ-GC25/35VAH
Upper limit
32°C DB
23°C WB
46°C DB
—
46°C DB
—
Lower limit
21°C DB
15°C WB
-10°C DB
—
-10°C DB
—
Upper limit
27°C DB
—
24°C DB
18°C WB
24°C DB
18°C WB
Lower limit
20°C DB
—
-15°C DB
-16°C WB
-20°C DB
-21°C WB
1. Rating condition
Cooling — Indoor:
Outdoor:
Heating — Indoor:
Outdoor:
27°C DB, 19°C WB
35°C DB
20°C DB
7°C DB, 6°C WB
2. GC22 has no specifications for single combination. This indoor model
is only for multi system air conditioner.
As for the specifications of multi system, please confirm your dealer
and/or refer to the catalogue.
En-8
HM06H341_new_en.indd
8
2006/10/24
8:50:36
● LIBRETTO D’ISTRUZIONI ●
SOMMARIO
■
■
■
■
■
■
■
■
■
■
■
■
■
PRECAUZIONI PER LA SICUREZZA
SMALTIMENTO
NOMI DELLE VARIE PARTI
PREPARATIVI PER L’USO
SELEZIONE DELLE MODALITÀ DI FUNZIONAMENTO
REGOLAZIONE DELLA VELOCITÀ DEL VENTILATORE E DELLA DIREZIONE DEL FLUSSO D’ARIA
FUNZIONAMENTO “ECONO COOL”
FUNZIONAMENTO CON IL TIMER (TIMER ACCENSIONE/SPEGNIMENTO)
PULIZIA
IN CASO DI PROBLEMI
SE SI PREVEDE DI NON UTILIZZARE IL CONDIZIONATORE PER UN LUNGO PERIODO
POSIZIONE DI INSTALLAZIONE E COLLEGAMENTI ELETTRICI
SPECIFICHE
1
2
3
3
4
5
5
5
6
7
8
8
8
PRECAUZIONI PER LA SICUREZZA
• Dato che il prodotto contiene parti in movimento e parti attraversate da
tensione di livello pericoloso, leggere attentamente le seguenti “Precauzioni
per la sicurezza” prima dell’uso.
• Le seguenti norme sono importanti per la vostra sicurezza ed è quindi
imperativo seguirle.
• Dopo aver letto il presente libretto, conservarlo a portata di mano insieme al
manuale di installazione, in modo da poterlo consultare facilmente in caso
di necessità.
Simboli precauzionali e relativi significati
AVVERTENZA:
Esiste un’alta probabilità che un uso scorretto provochi
lesioni gravi o mortali.
ATTENZIONE:
L’uso scorretto può causare lesioni gravi in determinate
circostanze.
AVVERTENZA
Non collegare il cavo di alimentazione ad un punto intermedio, né utilizzare cavi di prolunga o collegare più dispositivi
ad una stessa presa CA.
• Vi è altrimenti un rischio di surriscaldamento, incendio o
scosse elettriche.
La spina del cavo di alimentazione deve essere ben pulita
ed inserita saldamente nella presa.
• Una spina sporca può provocare incendi o scosse elettriche.
Non avvolgere, tirare, modificare o riscaldare il cavo di
alimentazione, né appoggiare oggetti pesanti su di esso.
• Vi è altrimenti un rischio d’incendio o di scosse elettriche.
Non SPEGNERE/ACCENDERE l’interruttore di circuito,
né scollegare/collegare la spina di alimentazione durante
il funzionamento.
• Queste operazioni possono provocare scintille che possono
a loro volta dar luogo ad incendi.
• Dopo aver SPENTO l’unità interna con il telecomando, non
dimenticare di SPEGNERE l’interruttore o di staccare la
spina di alimentazione.
Non esporsi direttamente al flusso d’aria fresca per lungo
tempo.
• Potrebbe non far bene alla salute.
Per l’installazione, lo spostamento o la riparazione dell’unità è richiesto l’intervento di un tecnico.
• Un uso scorretto del condizionatore d’aria può dar luogo a
incendi o scosse elettriche.
Non inserire le dita, matite o altri oggetti nella presa o
nell’uscita d’aria del condizionatore.
• Si rischiano altrimenti lesioni, in quanto il ventilatore interno
gira molto velocemente durante il funzionamento.
Significati dei simboli usati in questo manuale
: Non fare assolutamente.
: Seguire imperativamente le istruzioni.
: Non inserire le dita o oggetti appuntiti.
: Non salire sull’unità interna o esterna, né poggiarvi oggetti.
: Pericolo di scosse elettriche. Fare attenzione.
: Ricordarsi di scollegare la spina d’alimentazione dalla presa di
corrente.
: Ricordarsi di togliere la corrente.
In caso di situazioni anomale (se si avverte per esempio
odore di bruciato), spegnere il condizionatore e staccare la
spina di alimentazione o SPEGNERE l’interruttore.
• La prosecuzione del funzionamento in condizioni anomale
può dar luogo a problemi di funzionamento, incendi o scosse
elettriche. In questo caso, rivolgersi al rivenditore.
Se il condizionatore non raffredda o non riscalda, è possibile che vi sia una perdita di refrigerante. In questo caso,
rivolgersi al rivenditore. Se la riparazione prevede che
l’unità sia ricaricata di refrigerante, chiedere informazioni
al tecnico della manutenzione.
• Il refrigerante utilizzato nel condizionatore è sicuro. Di norma,
non si producono perdite. Tuttavia, qualora il refrigerante dovesse fuoriuscire e venire a contatto con una fonte di calore
come un generatore d’aria calda, una stufa al kerosene o un
fornello da cucina, si formerà un gas nocivo.
ATTENZIONE
Non toccare la presa d’aria o le alette di alluminio dell’unità
interna/esterna.
• Si rischiano altrimenti lesioni.
Non utilizzare insetticidi o spray infiammabili sull’unità.
• Si rischia altrimenti di provocare incendi o deformazioni delle
finiture dell’unità.
Non esporre direttamente animali domestici o piante al
flusso d’aria.
• Gli animali possono ammalarsi e si rischia di danneggiare
le piante.
Non collocare altre apparecchiature elettriche o mobili al
di sotto dell’unità interna/esterna.
• Dall’unità potrebbe scolare acqua, con rischio di danni o
problemi di funzionamento.
Non collocare l’unità su un supporto instabile.
• L’unità rischia di cadere e provocare lesioni.
It-1
HM06H341_It.indd 1
10/23/2006 10:48:46 AM
PRECAUZIONI PER LA SICUREZZA
ATTENZIONE
Non salire su un supporto instabile per attivare o pulire
l’unità.
• Si rischia di cadere e farsi male.
Non tirare il cavo di alimentazione.
• Si rischia altrimenti di spezzare l’anima del cavo, con conseguente rischio di surriscaldamento o incendio.
Non caricare o smontare le batterie e non gettarle nel
fuoco.
• Si rischiano perdite delle batterie, incendi o esplosioni.
Non far funzionare per lunghi periodi l’unità in un ambiente
molto umido (um. rel. pari o superiore all’80%), per esempio
lasciando una porta o una finestra aperte.
• La condensa all’interno del condizionatore può colare, bagnando o danneggiando i mobili.
Non utilizzare l’apparecchio per fini non previsti, quali la
conservazione di cibo, l’allevamento di animali, la coltura
di piante o la protezione di dispositivi di precisione o di
oggetti d’arte.
• Quest’uso improprio può determinare un deterioramento della
qualità degli oggetti o danni ad animali e piante.
Non esporre apparecchi a combustione al flusso d’aria
diretto.
• Si rischia altrimenti una combustione incompleta.
Prima di pulire l’unità, SPEGNERLA e staccare la spina di
alimentazione o SPEGNERE l’interruttore.
• Si rischiano altrimenti lesioni, in quanto il ventilatore interno
gira molto velocemente durante il funzionamento.
Quando si prevede di non utilizzare l’unità per un lungo
periodo, staccare la spina di alimentazione o SPEGNERE
l’interruttore.
• Sull’unità può depositarsi sporcizia, con conseguente rischio
di surriscaldamento o incendio.
Sostituire tutte le batterie del telecomando con batterie
nuove di tipo identico.
• L’uso di una vecchia batteria insieme ad una nuova può provocare surriscaldamento, perdite o esplosioni.
In caso di contatto del liquido delle batterie con la pelle o gli
indumenti, sciacquare abbondantemente con acqua pulita.
• In caso di contatto del liquido delle batterie con gli occhi,
sciacquarli abbondantemente con acqua pulita e rivolgersi
immediatamente al medico.
Quando nella stanza in cui si trova il condizionatore è in uso
un apparecchio a combustione, assicurarsi che la ventilazione della stanza sia sufficiente.
• Una ventilazione insufficiente può provocare una carenza di
ossigeno.
Se si sente tuonare e vi è il rischio che cadano fulmini,
SPEGNERE l’interruttore.
• In caso di caduta di fulmini, l’unità può riportare danni.
Dopo aver utilizzato il condizionatore d’aria per diverse stagioni, eseguire, oltre alla normale pulizia, anche il controllo
e la manutenzione.
• La presenza di sporcizia o polvere all’interno dell’unità può dar
luogo ad un odore sgradevole o ostruire il passaggio di scarico,
con conseguenti perdite d’acqua dall’unità interna. Per il controllo e la manutenzione, operazioni che richiedono specifiche
conoscenze e competenze, rivolgersi al rivenditore.
Non azionare i comandi a mani bagnate.
• Si rischiano altrimenti scosse elettriche.
Non pulire il condizionatore d’aria con acqua, né porre su
di esso oggetti contenenti acqua, come ad esempio vasi
con fiori.
• Vi è altrimenti un rischio d’incendio o di scosse elettriche.
Non salire sull’unità esterna, né porre oggetti su di essa.
• Se si cade, o in caso di caduta di eventuali oggetti, vi è il rischio
di danni.
Per l’installazione
AVVERTENZA
Per l’installazione del condizionatore d’aria, rivolgersi al
rivenditore.
• Non è opportuno che sia l’utente ad installare il condizionatore,
in quanto questa operazione richiede specifiche conoscenze
e competenze. Un’installazione inadeguata del condizionatore d’aria può dar luogo a perdite d’acqua, incendi o scosse
elettriche.
Alimentare il condizionatore d’aria da una sorgente di alimentazione dedicata.
• L’uso di una sorgente di alimentazione non dedicata può
provocare surriscaldamento o incendi.
Non installare il condizionatore in luoghi in cui possono
verificarsi perdite di gas infiammabile.
• In caso di perdite di gas, questo potrebbe accumularsi attorno
all’unità esterna e dar luogo a esplosioni.
ATTENZIONE
Non installare il condizionatore in luoghi in cui possono
verificarsi perdite di gas infiammabile.
• In caso di perdita ed accumulo di gas attorno al condizionatore,
possono verificarsi esplosioni.
Mettere adeguatamente a terra l’unità.
• Non collegare il filo di messa a terra ad una tubazione del gas
o dell’acqua, ad un parafulmine o ad un filo di messa a terra
del telefono. Una messa a terra inadeguata può dar luogo a
scosse elettriche.
Installare un interruttore di messa a terra se la localizzazione
dell’installazione del condizionatore d’aria lo richiede (ad
esempio in zone molto umide).
• La mancata installazione di un interruttore di messa a terra
può dar luogo a scosse elettriche.
Assicurarsi che l’acqua di scarico sia adeguatamente
evacuata.
• Se il passaggio di scarico è inadatto, può gocciolare acqua dall’unità interna/esterna, bagnando e danneggiando i mobili.
In situazioni anomale
Spegnere immediatamente il condizionatore d’aria e rivolgersi al rivenditore.
SMALTIMENTO
Per smaltire il prodotto, rivolgersi al rivenditore.
Nota:
Questo simbolo è destinato solo ai paesi dell’UE.
Questo simbolo è conforme alla direttiva 2002/96/CE, Articolo 10, Informazioni per gli utenti, e all’Allegato IV.
Questo prodotto MITSUBISHI ELECTRIC è stato fabbricato con materiali e
componenti di alta qualità, che possono essere riciclati e riutilizzati.
Questo simbolo significa che i prodotti elettrici ed elettronici devono essere smaltiti
separatamente dai rifiuti casalinghi alla fine della loro vita di servizio.
Per disfarsi di questo prodotto, portarlo al centro di raccolta/riciclaggio dei rifiuti
solidi urbani locale.
Nell’Unione Europea ci sono sistemi di raccolta differenziata per i prodotti elettrici
ed elettronici usati.
Aiutateci a conservare l’ambiente in cui viviamo!
It-2
HM06H341_It.indd 2
10/23/2006 10:48:48 AM
● LIBRETTO D’ISTRUZIONI ●
NOMI DELLE VARIE PARTI
Unità interna
Filtro di pulizia dell’aria
(filtro a enzimi anti-allergie, in opzione)
Telecomando
Sezione emissione
segnale
Distanza del segnale:
Circa 6m
Scambiatore di calore
Alla ricezione del segnale, l’unità interna emette
uno o più segnali sonori
(“bip”).
Presa d’aria
Pannello
anteriore
Filtro
dell’aria
(Filtro aria alla
catechina)
Uscita
d’aria
Protezione
del ventilatore
Alette verticali
Alette orizzontali
Visualizzatore
Sezione di ricezione
telecomando
Ventilatore
Indicatori di funzionamento
Interruttore del funzionamento
d’emergenza Pagina 4
Visualizzatore di
funzione
Tasto ON/OFF
(accensione/
spegnimento)
Tasto di regolazione della velocità
del VENTILATORE Pagina 5
Tasti di regolazione
della temperatura
Pagina 4
Tasto di spegnimento
del timer Pagina 5
Tasto di selezione modalità
di funzionamento Pagina 4
Tasto ECONO COOL
(refrigeramento
economico)
Tasto di accensione del
timer Pagina 5
Tasti di regolazione
dell’ORA Pagina 3, 5
Aumento
Riduzione
Tasto di regolazione
orario CLOCK Pagina 3
Tasto RESET Pagina 3
Coperchio
Far scorrere in giù per
aprire
Pagina 5
Tasto di
controllo delle
ALETTE
Pagina 5
Unità esterna
Supporto del telecomando
Presa d’aria (posteriore e laterale)
Tubazioni
Tubazione di scarico
Uscita d’aria
• Installare il supporto del telecomando in un posto che
consenta all’unità interna
di ricevere il segnale.
Scarico acqua
L’aspetto dell’unità esterna può variare in funzione dei modelli.
Utilizzare esclusivamente il telecomando fornito con l’unità.
Non utilizzare altri telecomandi.
PREPARATIVI PER L’USO
Prima dell’uso: inserire la spina di alimentazione nella presa di corrente e/o accendere l’interruttore.
Installazione delle batterie del telecomando
1.
1.
Premere RESET
2.
Premere CLOCK
RE
T
SE
T
SE
RE
Togliere il coperchio
anteriore
Impostazione dell’ora
OC
CL
K
K
OC
CL
3.
2.
Inserire batterie
alcaline AAA
Rimettere il coperchio anteriore
• Assicurarsi che la polarità delle batterie sia corretta.
• Non utilizzare batterie al manganese. Il telecomando potrebbe non funzionare correttamente.
• Non usare batterie ricaricabili.
• Sostituire tutte le batterie con batterie nuove dello stesso tipo.
• Le batterie possono essere utilizzate per circa 1 anno. Le batterie scadute,
tuttavia, durano di meno.
3.
4.
Premere di nuovo
CLOCK
Regolare l’ora premendo gli
appositi tasti di regolazione ORA
Ad ogni pressione, l’ora aumenta/
diminuisce di 1 minuto (di 10 minuti se la pressione è più lunga)
• Premere delicatamente, con un bastoncino sottile,
i tasti RESET e CLOCK.
Se non si preme il tasto RESET, il telecomando non
può funzionare correttamente.
It-3
HM06H341_It.indd 3
10/23/2006 10:48:50 AM
SELEZIONE DELLE MODALITÀ DI FUNZIONAMENTO
Modo AUTO
(Commutazione automatica)
L’unità seleziona la modalità di funzionamento in base alla differenza tra la
temperatura ambiente e quella impostata. Nel modo AUTO, l’unità cambia
modalità (RAFFREDDAMENTO↔RISCALDAMENTO) quando tra la temperatura ambiente e quella impostata persiste una differenza di 2°C da più
di 15 minuti.
Nota:
Durante il funzionamento di sistemi multipli, l’unità può non essere in grado di operare la commutazione tra RAFFREDDAMENTO (COOL) e RISCALDAMENTO (HEAT). In questo caso, l’unità interna passa in modalità
di attesa (standby).
Modo RAFFREDDAMENTO
(COOL)
Aria fresca alla temperatura desiderata.
Non attivare il modo RAFFREDDAMENTO quando la temperatura esterna
è bassa (inferiore a -10°C). L’acqua condensatasi all’interno dell’unità può
sgocciolare e bagnare o danneggiare mobili, ecc.
Modo DEUMIDIFICAZIONE (DRY)
Consente di deumidificare la stanza. La stanza potrebbe venire leggermente raffreddata.
Nella modalità DEUMIDIFICAZIONE non è possibile impostare la temperatura.
1
2
Modo RISCALDAMENTO (HEAT)
Premere
Aria calda alla temperatura desiderata.
per avviare il funzionamento.
Funzionamento d’emergenza
Premere
per selezionare la modalità di funzionamento. Ad ogni pressione del tasto, la modalità cambia
nell’ordine seguente:
Indicatori di funzionamento
(RAFFREDDAMENTO)
RAFFREDDAMENTO
in emergenza
Temperatura impostata: 24°C
Velocità del ventilatore: Media
RISCALDAMENTO
Alette orizzontali: Auto
di emergenza
(DEUMIDIFICAZIONE)
(RISCALDAMENTO)
Premere
o
per impostare la temperatura.
Ad ogni pressione, la temperatura aumenta o scende
di 1°C.
Premere
per arrestare il funzionamento.
• Per selezionare la stessa impostazione la volta successiva basta premere
.
Questi indicatori segnalano lo stato di funzionamento dell’unità.
Stato di funzionamento
Temperatura ambiente
Differenza uguale o suL’unità funziona per raggiungere la periore a circa 2°C ritemperatura impostata
spetto alla temperatura
impostata
Differenza di circa 1 o 2°C
La temperatura della stanza si avvirispetto alla temperatura
cina a quella impostata
impostata
Modalità di attesa (solo durante il
funzionamento di sistemi multipli)
Spia accesa
Spia lampeggiante
Stop
Nota:
I primi 30 minuti di funzionamento servono da test. Il comando della temperatura non funziona ed è impostata la velocità
ventilatore Alta.
Funzione di riavvio automatico
Indicatori di funzionamento
Indicatore
È possibile attivare il funzionamento d’emergenza premendo l’apposito interruttore
(E.O.SW) sull’unità interna.
Ad ogni pressione del tasto E.O.SW., il funzionamento cambia
nell’ordine seguente:
(AUTO)
3
Quando non è possibile utilizzare il telecomando...
—
Spia spenta
Se si verifica un’interruzione di corrente o se si spegne l’alimentazione principale
durante il funzionamento, la “funzione Riavvio automatico” riavvia automaticamente l’apparecchio nella modalità impostata con il telecomando subito prima
dell’interruzione dell’alimentazione. Quando è impostato il timer, l’impostazione
del timer viene annullata e l’apparecchio si avvia quando viene ripristinata
l’alimentazione.
Se non si desidera usare questa funzione, consultare il servizio tecnico per
far modificare l’impostazione dell’unità.
Funzionamento di sistemi multipli
Con un’unità esterna è possibile far funzionare due o più unità interne. Quando
più unità interne funzionano simultaneamente, non è possibile attivare contemporaneamente le funzioni di raffreddamento e riscaldamento. Se su un’unità è
selezionato il RAFFREDDAMENTO (COOL) e su un’altra il RISCALDAMENTO
(HEAT), l’ultima unità azionata entra in modalità di attesa.
It-4
HM06H341_It.indd 4
10/23/2006 10:48:53 AM
● LIBRETTO D’ISTRUZIONI ●
REGOLAZIONE DELLA VELOCITÀ
DEL VENTILATORE E DELLA DIREZIONE DEL FLUSSO D’ARIA
FUNZIONAMENTO
“ECONO COOL”
Per avviare il funzionamento in modalità ECONO
Premere
per selezionare la velocità del ventilatore. Ad ogni pressione del tasto, la velocità del ventilatore cambia nell’ordine seguente:
(AUTO)
(Bassa)
(Media)
(Alta)
COOL (refrigeramento economico), premere
mentre è attiva la modalità di RAFFREDDAMENTO
pagina 4 .
(Altissima)
L’apparecchio attiverà la funzione di oscillazione verticale in vari cicli, in
funzione della sua temperatura. La temperatura impostata viene aumentata automaticamente di 2°C.
• Quando è impostata la funzione AUTO, l’unità interna emette due brevi segnali “bip”.
Premere nuovamente
ECONO COOL.
Premere
per selezionare la direzione del flusso
d’aria. Ad ogni pressione del tasto, la direzione del
flusso d’aria cambia nell’ordine seguente:
(AUTO)
(1)
(2)
(3)
(4) (OSCILLAZIONE)
• Quando è impostata la funzione AUTO, l’unità interna emette due brevi segnali “bip”.
• Premere per almeno 2 secondi per impostare la posizione orizzontale.
• Premere una volta per annullare la posizione orizzontale.
• Quando viene impostata o annullata la direzione orizzontale del flusso
d’aria, l’apparecchio si arresta per circa 3 minuti.
Direzione del flusso d’aria
(AUTO) .........Le alette vengono posizionate secondo la direzione del flusso
d’aria più efficace. RAFFREDDAMENTO/DEUMIDIFICAZIONE:
posizione orizzontale. RISCALDAMENTO: posizione (4).
• Anche la pressione del tasto
COOL.
Posizione orizzontale
Posizione raccomandata durante il RAFFREDDAMENTO/la
DEUMIDIFICAZIONE. L’aria non soffia direttamente sugli
occupanti della stanza, ma viene distribuita in maniera piacevole.
■ Per cambiare la direzione del flusso d’aria orizzontale.
Spostare manualmente le alette verticali prima di avviare il funzionamento.
annulla la modalità ECONO
Che cos’è la funzione “ECONO COOL”
(RAFFREDDAMENTO ECONOMICO)?
L’oscillazione del flusso d’aria (modifica del flusso d’aria) dà una sensazione di
maggiore freschezza rispetto a quando il flusso d’aria è costante. Così, anche
se la temperatura impostata viene automaticamente aumentata di 2°C, è possibile ottenere un raffreddamento che garantisce lo stesso comfort. Ciò consente
di beneficiare di un risparmio energetico.
FUNZIONAMENTO CON IL TIMER
(TIMER ACCENSIONE/SPEGNIMENTO)
1
(Manuale) .....Per un condizionamento d’aria efficace, selezionare la posizione superiore per il RAFFREDDAMENTO/la DEUMIDIFICAZIONE e la posizione inferiore per il RISCALDAMENTO.
Durante il RAFFREDDAMENTO/la DEUMIDIFICAZIONE, le
alette passano automaticamente alla posizione (1) dopo 0,5
- 1 ora, onde impedire che goccioli acqua.
(Oscillazione)
.....................Le alette si muovono su e giù ad intermittenza.
per annullare la modalità
Premere
o
impostare il timer.
durante il funzionamento per
(Timer ACCENSIONE) : L’apparecchio si
ACCENDERÀ all’ora impostata.
(Timer SPEGNIMENTO) : L’apparecchio si
SPEGNERÀ all’ora impostata.
*
o
lampeggia.
* Assicurarsi che l’ora corrente sia quella esatta. Pagina 3
2
Per impostare l’ora del timer, premere
e
(riduzione).
(aumento)
Ad ogni pressione, l’ora impostata aumenta o diminuisce di 10 minuti.
3
Premere di nuovo
Nota:
o
per annullare il timer.
• I timer di ACCENSIONE e SPEGNIMENTO possono essere utilizzati in abbinamento. L’ordine delle operazioni del timer viene indicato da .
• In caso di interruzione di corrente mentre è impostato il timer ACCENSIONE/
SPEGNIMENTO, vedere pagina 4 “Funzione di riavvio automatico”.
It-5
HM06H341_It.indd 5
10/23/2006 10:48:57 AM
PULIZIA
Istruzioni:
• Prima di procedere alla pulizia, staccare l’alimentazione o spegnere l’interruttore.
• Fare attenzione a non toccare le parti metalliche con le mani.
• Non usare benzina, diluenti, polveri abrasive o insetticidi.
• Utilizzare esclusivamente detergenti delicati diluiti.
• Per l’asciugatura, non esporre i pezzi alla luce solare diretta, a calore diretto
o fiamme.
• Non utilizzare acqua di temperatura superiore a 50°C.
Scambiatore di calore
• Indossare guanti per proteggere
le mani.
• Utilizzare il kit di pulizia rapida
QUICK CLEAN KIT (in opzione).
Numero pezzo MAC-093SS-E
• Per i dettagli, consultare le istruzioni del QUICK CLEAN KIT (kit
di pulizia rapida).
Filtro di pulizia dell’aria (filtro a
enzimi anti-allergie, in opzione)
Filtro aria (Filtro aria alla catechina)
• Pulire ogni 2 settimane
• Eliminare lo sporco con un aspirapolvere o lavare in acqua.
• Prima di procedere al rimontaggio, asciugare bene all’ombra.
Pannello anteriore
Parte posteriore del filtro aria
• Pulire ogni 3 mesi.
• Immergere il filtro con il relativo telaio in acqua tiepida e lavarlo.
• Dopo il lavaggio, farlo asciugare perfettamente all’ombra e rimontarlo
nella posizione originale. Installare tutte le alette del filtro aria.
• Per ottenere sempre prestazioni
ottimali, sostituire il filtro di pulizia
dell’aria con un nuovo filtro ogni
anno.
• Numero pezzo MAC-408FT-E
Tirare per staccare dal filtro aria
Che cosa si intende per
“filtro dell’aria alla catechina”?
Cerniera
Foro
1. Sollevare il pannello anteriore finché non si avverte uno scatto.
2. Impugnare le cerniere e tirare per smontare, come illustrato nella figura in
alto.
• Strofinare con un panno morbido asciutto o procedere al lavaggio con
acqua.
• Non immergere in acqua per più di due ore.
• Prima di procedere al rimontaggio, asciugare bene all’ombra.
3. Per installare il pannello, seguire la procedura di rimozione in ordine inverso. Chiudere
bene il pannello anteriore ed esercitare una
pressione nei punti indicati dalle frecce.
La catechina è un bioflavonoide contenuto nel tè verde che ha proprietà sia antivirali che antiossidanti. Oltre a questi vantaggi, la catechina
presenta anche ottime caratteristiche deodorizzanti. Il filtro aria alla catechina, pertanto, non solo migliora la qualità dell’aria, ma previene il
diffondersi di batteri e virus nella stanza.
Nota:
Per ottimizzare i risultati e ridurre il consumo di corrente, pulire regolarmente i filtri.
Uscita d’aria e ventilatore (prima di procedere alla pulizia, assicurarsi che il ventilatore sia spento)
1
Sollevare le alette orizzontali. Quindi,
rimuoverle come illustrato in ➀ e ➁.
2
Aprire le due alette verticali una
ad una.
3
Pulire l’uscita d’aria e ventilatore.
• Pulire con un panno morbido ed asciutto.
1
Sbloccare
Mantenere la linguetta
Pulire il ventilatore.
• Utilizzare il kit di pulizia rapida QUICK
CLEAN KIT (in opzione).
Numero pezzo MAC-093SS-E
• Per i dettagli, consultare le istruzioni del
QUICK CLEAN KIT.
2
4
Riportare le alette verticali nella
posizione originale, una dopo
l’altra, inserendole nella rispettiva
guida.
• Premere le alette finché non scattano in
sede.
5
Installare le alette orizzontali
seguendo la procedura di rimozione in ordine inverso.
• Se le alette orizzontali non sono installate
correttamente, al momento dell’accensione lampeggeranno tutte le spie LED.
Guida
It-6
HM06H341_It.indd 6
10/23/2006 10:48:58 AM
● LIBRETTO D’ISTRUZIONI ●
IN CASO DI PROBLEMI
Indipendentemente dai controlli di cui sopra, se il climatizzatore dovesse continuare a non funzionare correttamente smettere di utilizzarlo e
rivolgersi al rivenditore.
Sintomo
Spiegazione e punti da controllare
Unità interna
L’unità non funziona.
• L’interruttore è acceso?
• La spina del cavo di alimentazione è inserita?
• È impostato il timer di ACCENSIONE?
Pagina 5
Tutte le spie LED dell’unità
interna lampeggiano.
• Le alette orizzontali sono installate correttamente? Pagina 6
Le alette orizzontali non si
muovono.
• Le alette orizzontali e quelle verticali sono
installate correttamente? Pagina 6
• La protezione del ventilatore è deformata?
Quando si riavvia l’unità, questa non riprende a funzionare
prima che siano trascorsi
circa 3 minuti.
• Ciò è dovuto ad un intervento di protezione
dell’unità da parte del microprocessore.
Attendere.
Dall’uscita d’aria dell’unità
interna fuoriesce foschia.
• L’aria fresca proveniente dall’unità raffredda
rapidamente l’umidità dell’aria nella stanza
trasformandola in foschia.
L’operazione di oscillazione
delle ALETTE ORIZZONTALI
viene sospesa temporaneamente, quindi riavviata.
• Ciò consente la normale esecuzione della
funzione di oscillazione delle ALETTE
ORIZZONTALI.
La direzione del flusso d’aria
non cambia.
La direzione delle alette
orizzontali non può essere
regolata con il telecomando.
• Quando l’unità funziona in modalità RAFFREDDAMENTO o DEUMIDIFICAZIONE
e l’aria soffia verso il basso per un periodo
compreso tra 0,5 - 1 ora, la direzione del
flusso d’aria viene automaticamente regolata
sulla posizione (1) per evitare la formazione
di condensa e lo sgocciolamento di acqua.
• In modalità di riscaldamento, se la temperatura del flusso d’aria è troppo bassa o
durante lo sbrinamento, l’aria viene automaticamente emessa orizzontalmente.
Il funzionamento viene
interrotto per circa 10 minuti
durante il riscaldamento.
• È in corso lo sbrinamento dell’unità esterna.
Attendere: l’operazione richiede massimo
10 minuti. (Quando la temperatura esterna
è troppo bassa e l’umidità troppo elevata, si
forma brina).
Quando torna la corrente,
l’unità riprende a funzionare
senza essere stata accesa
con il telecomando.
• Questi modelli sono dotati della funzione di
riavvio automatico. Se si riavvia l’unità dopo
averla spenta disattivando l’alimentazione
principale (e non attraverso il telecomando),
questa inizia automaticamente a funzionare
nella stessa modalità che era stata impostata con il telecomando subito prima dello
spegnimento dell’alimentazione principale.
Consultare la parte intitolata “Funzione di
riavvio automatico” pagina 4 .
Sintomo
Il display del telecomando
non appare o è oscurato.
L’unità interna non risponde
al segnale del telecomando.
• Una piccola quantità di refrigerante continua
a scorrere nell’unità interna anche quando
non è in funzione.
Quando si seleziona la funzione di riscaldamento, l’unità
non entra subito in funzione.
• Quando si avvia il funzionamento mentre è in
corso lo sbrinamento dell’unità esterna, deve
trascorrere qualche minuto (massimo 10
minuti) prima che inizi a soffiare aria calda.
Unità esterna
Il ventilatore dell’unità esterna • Quando la temperatura esterna è bassa
non gira anche se il compresmentre è attiva la modalità di raffreddamensione è in funzione. Anche
to, il ventilatore funziona in modo intermittense inizia a girare, si arresta
te per mantenere una sufficiente capacità di
subito.
raffreddamento.
L’unità esterna perde acqua.
• Durante il funzionamento in RAFFREDDAMENTO e DEUMIDIFICAZIONE, i tubi o le
sezioni di collegamento si raffreddano, con
conseguente formazione di condensa.
• In modalità riscaldamento, l’acqua condensatasi sullo scambiatore di calore gocciola.
• In modalità di riscaldamento, l’attivazione
della funzione di sbrinamento scioglie il
ghiaccio formatosi sull’unità esterna e lo fa
sgocciolare.
Dall’unità esterna fuoriesce
fumo bianco.
• Durante il funzionamento in modo riscaldamento, il vapore generato dallo sbrinamento
sembra fumo bianco.
• Le batterie sono esaurite? Pagina 3
• La polarità (+, -) delle batterie è corretta?
Pagina 3
• Si stanno premendo i tasti del telecomando
di altre apparecchiature elettriche?
Il condizionatore non raffredda né riscalda
La stanza non viene
raffreddata o riscaldata a
sufficienza.
• L’impostazione della temperatura è adeguata?
Pagina 4
• La regolazione del ventilatore è adeguata?
Regolare la velocità del ventilatore su un
valore più elevato.
• Il filtro è pulito? Pagina 6
• Il ventilatore o lo scambiatore dell’unità interna sono puliti? Pagina 6
• Vi sono elementi che bloccano la presa o
l’uscita d’aria dell’unità interna o di quella
esterna?
• Vi sono finestre o porte aperte?
Non si riesce a raffreddare a
sufficienza la stanza.
• Quando si utilizza un ventilatore o un fornello
a gas nella stanza, il carico di raffreddamento
aumenta, con un effetto di raffreddamento
insufficiente.
• Quando la temperatura esterna è elevata,
l’effetto di raffreddamento può non risultare
sufficiente.
Non si riesce a riscaldare a
sufficienza la stanza.
• Quando la temperatura esterna è bassa,
l’effetto di riscaldamento può non risultare
sufficiente.
L’aria non viene emessa
rapidamente in modalità di
riscaldamento.
• Occorre aspettare che il condizionatore si
prepari ad emettere aria calda.
Flusso d’aria
L’aria proveniente dall’unità
interna ha un odore sgradevole.
• Il filtro è pulito? Pagina 6
• Il ventilatore o lo scambiatore dell’unità interna sono puliti? Pagina 6
• L’unità potrebbe aspirare gli odori sgradevoli
di cui sono impregnati pareti, tappeti, mobili,
stoffa, ecc., e disperderli nell’aria.
Rumore
Si avvertono scricchiolii.
• Questi rumori sono causati dall’espansione
o dalla contrazione del pannello anteriore e
di altre parti a seguito degli sbalzi di temperatura.
Si sente un gorgoglio.
• Questo rumore si produce quando viene assorbita aria esterna dal tubo di scarico quando
si accende l’aspiratore o il ventilatore: l’acqua
contenuta nel tubo di scarico viene espulsa.
Questo rumore si avverte anche quando nel
tubo di scarico penetra violentemente aria
esterna, in caso di forte vento.
L’unità interna emette un
rumore meccanico.
• Si tratta del rumore provocato dall’attivazione
e dalla disattivazione del ventilatore o del
compressore.
Si sente rumore di acqua
che scorre.
• Si tratta del rumore prodotto dallo scorrimento
del refrigerante o di acqua di condensa all’interno dell’unità.
Sistema multiplo
L’unità interna non attiva si
riscalda ed emette un rumore
di acqua che scorre.
Spiegazione e punti da controllare
Telecomando
Talvolta viene udito un sibilo. • Questo rumore viene percepito quando s’inverte il flusso del refrigerante all’interno del
condizionatore.
Nei seguenti casi, smettere di utilizzare il condizionatore d’aria e rivolgersi
al rivenditore.
• Dall’unità interna cola o gocciola acqua.
• La spia dell’indicatore di funzionamento superiore lampeggia.
• L’interruttore del circuito scatta spesso.
• Il segnale del telecomando non viene ricevuto in stanze in cui vi siano lampadine elettroniche fluorescenti di tipo ON/OFF (lampadine fluorescenti del tipo a
inversione, ecc.).
• Il funzionamento del condizionatore d’aria interferisce con la ricezione radio o
TV. È possibile che risulti necessario dotare di un amplificatore l’apparecchio
disturbato.
• Si sentono rumori inconsueti.
It-7
HM06H341_It.indd 7
10/23/2006 10:48:59 AM
SE SI PREVEDE DI NON UTI-
POSIZIONE DI INSTALLAZIO-
LIZZARE IL CONDIZIONATORE
PER UN LUNGO PERIODO
1
NE E COLLEGAMENTI ELETTRICI
Posizione di installazione
Impostare alla temperatura più elevata in modalità
RAFFREDDAMENTO manuale e lasciar funzionare per
3 o 4 ore. Pagina 4
Non installare il condizionatore d’aria nei seguenti luoghi.
• Luoghi in cui vi sono grandi quantità di olio lubrificante.
• In presenza di aria salmastra.
• In presenza di gas solforosi, ad esempio vicino ad una sorgente calda.
• Luoghi in cui si rischiano schizzi d’olio o con presenza di fumi oleosi.
• In presenza di apparecchiature ad alta frequenza o senza fili.
• Laddove l’aria dell’uscita d’aria dell’unità esterna sia bloccata.
• Luoghi in cui il rumore del funzionamento o l’aria dell’unità esterna non disturbino i vicini.
Questa operazione consente di asciugare l’interno dell’unità.
2
3
4
Premere
per arrestare il condizionatore.
L’unità esterna deve essere collocata ad almeno 3
metri di distanza dalle antenne televisive, radiofoniche, ecc. Nelle zone in cui la ricezione è debole, se
il condizionatore d’aria interferisce con la ricezione
radiofonica o televisiva, allontanare ulteriormente l’
unità esterna dall’antenna dell’apparecchio disturbato.
Spegnere l’interruttore e/o staccare la spina del cavo di
alimentazione.
Togliere tutte le batterie dal telecomando.
Per evitare gli effetti
di una lampadina fluorescente, distanziare
quanto più possibile.
Quando si riutilizza il condizionatore
d’aria:
1
2
3
Lampadina
fluorescente a
inversione
Lasciare un
certo spazio
per evitare la
distorsione
dell’immagine o
rumori.
1mo
più
Telefono
cordless
o telefono
portatile
Pulire il filtro dell’aria. Pagina 6
Controllare che la presa e l’uscita d’aria delle unità
interna ed esterna non siano ostruite.
pareti, ecc.
Luogo
asciutto e
ventilato
100 mm o più
100/200 mm
o più
TV
1mo
più
3m
o più
Radio
(GC25/GC35)
Collegamenti elettrici
• Riservare un circuito elettrico esclusivamente per l’alimentazione del condizionatore d’aria.
• Tener conto dell’amperaggio massimo dell’interruttore di circuito, e non superarlo.
Controllare che il filo di messa a terra sia collegato
correttamente.
Per qualsiasi altro problema, rivolgersi al rivenditore.
SPECIFICHE
Modello
Funzione
Alimentazione
Capacità
Ingresso
Nome modello
Interno
Esterno
Interno
Esterno
Capacità fluido refrigerante (R410A)
Interno
Codice IP
Esterno
Eccesso di pressione di LP ps
funzionamento consentito HP ps
Interno (Molto alto/
Alto/Medio/Basso)
Livello di rumore
Esterno
—
MSZ-GC22VA
—
Raffreddamento Riscaldamento
kW
kW
kg
kg
kg
Peso
MPa
MPa
—
—
—
—
—
—
—
—
dB(A)
dB(A)
43/36/29/21
—
Gamma di funzionamento garantita
Interno
Raffreddamento
Riscaldamento
Limite
superiore
Limite
inferiore
Limite
superiore
Limite
inferiore
32°C TS
23°C TB
21°C TS
15°C TB
27°C TS
—
20°C TS
—
MSZ-GC25VA(H)
MSZ-GC35VA(H)
MSZ-GC25VA
MSZ-GC35VA
MUZ-GC25VA(H)
MUZ-GC35VA(H)
Raffreddamento Riscaldamento Raffreddamento Riscaldamento
~ /N, 230 V, 50 Hz
2,5
3,2
3,5
4,0
0,665
0,835
1,075
1,055
9
26
31
0,75
0,85
IP 20
IP 24
1,64
4,15
Esterno
MUZ-GC25/35VA MUZ-GC25/35VAH
46°C TS
46°C TS
—
—
-10°C TS
-10°C TS
—
—
24°C TS
24°C TS
18°C TB
18°C TB
-15°C TS
-20°C TS
-16°C TB
-21°C TB
43/36/29/22
46
47
47
48
Nota:
1. Temperatura di funzionamento
Raffreddamento — interno:
27°C con termometro a secco (TS),
19°C con termometro bagnato (TB)
Esterno: 35°C con termometro a secco (TS)
Riscaldamento — Interno: 20°C con termometro a secco (TS)
Esterno: 7°C con termometro a secco (TS),
6°C con termometro bagnato (TB)
2. Il modello GC22 non dispone di specifiche per la combinazione singola. Questo
modello a unità interna è utilizzabile soltanto con sistemi di condizionamento
multipli.
Per le specifiche relative ai sistemi multipli, chiedere al distributore e/o consultare il catalogo.
It-8
HM06H341_It.indd 8
10/23/2006 10:49:01 AM
This product is designed and intended for use in the residential,
commercial and light-industrial environment.
The product at hand is based on the following EU regulations:
• Low Voltage Directive 73/23/ EEC
• Electromagnetic Compatibility Directive 89/336/ EEC
HEAD OFFICE: TOKYO BLDG., 2-7-3, MARUNOUCHI, CHIYODA-KU, TOKYO 100-8310, JAPAN
SG79Y765H01
HM06H341_Cover.indd
2
2006/10/24
8:48:06