1
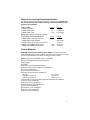
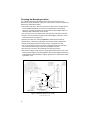
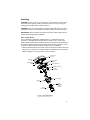
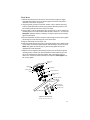
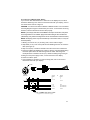
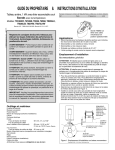
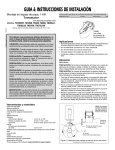
Owner’s Guide & Installation Instructions
GPS Receiver
Model G2183
Record the serial number found on the underside of the sensor.
Serial No._______________ Date of Purchase____________
17-484-01 rev.05
06/12/14
1
Copyright © 2008 - 2014 Airmar Technology Corp. All rights reserved.
All Rights Reserved. Except as expressly provided herein, no part of this manual may be
reproduced, copied, transmitted, disseminated, downloaded, or stored in any storage
medium, for any purpose without prior written consent of Airmar. Airmar hereby grants
permission to download a single copy of this manual and of any revision of this manual onto
a hard drive or other electronic storage medium to be viewed and to print one copy of this
manual or any revision hereto, provided that such electronic or printed copy of this manual
or revision must contain the complete text of this copyright notice and provided further that
any unauthorized commercial distribution of this manual or any revision hereto is strictly
prohibited.
Information in this manual is subject to change without notice. Airmar reserves the right to
change or improve its products and to make changes in the content without obligation to
notify any person or organization of such changes. Visit the Airmar website at
www.airmar.com for current updates and supplemental information concerning the use and
operation of this and other Airmar products.
2
Table of Contents
Introduction............................................................................ 5
Safety Instructions.................................................................. 6
Hardware, Tools & Materials................................................. 7
Choosing the Mounting Location........................................... 8
Installing................................................................................. 9
Pole or Rail Mount................................................................. 9
Flush Mounting on a Horizontal Surface.............................. 11
Cable Routing & Connecting Guidelines............................. 12
Connecting to an NMEA 0183 Display................................ 12
Connecting to an NMEA 2000® Network........................... 14
Maintenance..........................................................................15
Troubleshooting.................................................................... 15
Firmware Revisions.............................................................. 15
NMEA 2000®: Load Equivalency Number......................... 15
Where to Purchase Parts....................................................... 15
Trademarks........................................................................... 15
3
4
IMPORTANT: Please read the Owner’s
Guide completely before proceeding.
Introduction
Thank you for purchasing the Airmar’s GPS Receiver and combined antenna.
This sensor fixes position using Wide Area Augmentation System (WAAS). The
compact housing is waterproof with a single removable cable. Data is output in
digital NMEA 0183 and NMEA 2000® formats.
Functions & Outputs
• GPS using WAAS and EGNOS
• NMEA 0183 interface: RS232 or RS422
Features
•
•
•
•
•
Fast response time
Simultaneously outputs data in digital NMEA 0183 and NMEA 2000® formats
Waterproof housing
Waterproof cable system
Pole, rail, or flush mount
5
WARNING
Navigation Aid Only: The sensor is only an aid to
navigation and should never be solely relied upon. It is
not a replacement for traditional navigation aids and
techniques. Only official government charts contain all
the information needed for safe navigation.
Follow the safety precautions below to reduce the risk of poor product
performance, property damage, personal injury, and/or death.
WARNING: GPS Accuracy
The GPS position and velocity accuracies are controlled by the U.S. Department
of Defence. Therefore the position accuracy described in the specifications cannot
be guaranteed.
WARNING: Correct Installation Important
The sensor must be installed and operated according to the instructions in this
owner’s guide.
WARNING: Installation Safety
Always wear safety goggles and a dust mask when installing.
WARNING: Electrical Safety
The power supply must be OFF before making electrical connections.
WARNING: Voltage
The power supply voltage must be 9 - 40 VDC.
WARNING: Battery
Make power connections to a power source that is isolated from the engine start
battery(s). Voltage drops may cause the sensor to lose information and/or change
operating mode.
WARNING: Fuse or Circuit Breaker
A safe installation requires a 0.5 amp fast-blow fuse or circuit breaker.
6
Cables & Connecting/Converting Hardware
The GPS Receiver (sensor) can be connected in several ways. You must have
the correct cable and any needed converting/connecting hardware before
beginning the installation.
Sensor Cables
• NMEA 0183 Cable
• NMEA 2000® Cable
• NMEA 2000® Cable
NOTE: Additional cable lengths are available.
Connecting/Converting Hardware
•
•
•
•
•
NMEA 0183 to USB, Data Converter
NMEA 0183 to USB Combiner
NMEA 2000® CAN to USB, U200 Gateway
NMEA 0183 & NMEA 2000® Splitter
NMEA 0183 & NMEA 2000® Splitter
Length
10m
6m
10m
Part No.
33-862-02
33-1029-02
33-1029-06
Length
Part No.
33-801-01
NDC-4-AIR
33-727-01
33-641-02
33-641-03
15m
30m
Tools & Materials
CAUTION: Vehicles/boats traveling above 30MPH—Do not use the plastic
Cable Side-exit Adaptor (part D) supplied. Purchase a stainless steel part. At high
speeds, the plastic adaptor may break, causing the sensor to fall off.
NOTE: The sensor has standard marine 1"-14 threads.
Pole/rail mounting hardware (some installations)
Safety goggles
Dust mask
Screwdrivers (Pole/Rail Mount installation)
Teflon pipe thread tape, 1/2" wide (some installations)
Pencil (some installations)
Electric drill (some installations)
Drill bits and hole saws (some installations):
Pilot hole
3mm or 1/8"
Flush mount stud holes
6mm or 1/4"
Flush mount cable hole
38mm or 1-1/2"
Loctite® 242® or other removable thread locker (Flush Mount installation)
Grommets (some installations)
Cutting pliers (some installations)
Heat-shrink tubing (some installations)
Heat gun (some installations)
Wire strippers (some installations)
Multimeter (some installations)
Cable ties (some installations)
7
Choosing the Mounting Location
For a reliable GPS signal, selecting the best location for the sensor is very
important. It can be mounted on a pole, rail, or flat surface. Choose a location that
balances the requirements below.
• The sensor must have a clear view of the sky to the horizon in all directions to
receive satellite signals. Be sure there are no obstructions from buildings,
boats, etc. However, the lower it can be mounted, the more stable it will be. It
will better track satellites low on the horizon.
• Do not mount on top of a sailboat mast. The sway will cause jitter in the data.
• Mount it as far as possible from high-powered transmitting antennas to avoid
mutual interference (see Figure 1).
• Mount it lower than any on-board INMARSAT communications antenna.
• Mount above or below any radar beam. Do not mount within a radar beam.
• Mount reasonably level with the earth’s surface—not tilted to one side.
• Do not mount where the sensor could be a tripping hazard or be tread upon.
Note that frozen water spray on the unit may degrade reception.
• Be sure there is access to the underside of the mounting surface.
• Be sure the cable(s) can be routed to reduce electrical interference from other
electrical wiring and any on-board equipment with a strong magnetic field such as
radar equipment, radio transmitters, engines, generators, etc. Separate the cables
by at least 1 m (3').
G2183
Min. 2m
Min.
1.5m
Min. 2m
metal hull /deck
antenna insulator
Figure 1. Minimum distance from sensor
Courtesy of Northstar, Acton, MA
8
Installing
CAUTION: Be sure to use the correct parts for your installation. Do not use the
flush mount parts (gasket, part B) to mount the receiver on a pole. Using the
wrong parts may allow water to leak into the unit.
CAUTION: If you use a thread locker, use teflon pipe thread tape. Do not use a
liquid thread locker as it may weaken the plastic, causing it to swell and crack.
IMPORTANT: Plan the cable route between the sensor and the display and/or
network before beginning the installation.
Pole or Rail Mount
The nut assembly supplied has standard marine 1"-14 threads that can be
screwed to a standard marine antenna mount, extension pole, or rail-mount
bracket. Before beginning the installation, plan for securing the pole/rail bracket to
the selected mounting surface and purchase all the necessary hardware. It may
be helpful to fasten the pole/rail bracket in place before proceeding.
1. Remove the label from the sensor unit’s socket (see Figure 2). Fasten the mount
base (part C) to the sensor unit (part A) with the two machine screws and lock
washers supplied. The torque for the screws is 1.35Nm.
sensor unit
(part A)
alignment
tab
mount base
(part C)
serial number
lock washer (2)
socket
machine screw (2)
sensor
connector
b.
a.
nut assembly
captive
nut
slot for
cable exit
cable
side-exit
adaptor
(part D)
Figure 2. Pole/Rail mount
Copyright © 2008 Airmar Technology Corp.
9
2. Decide if you want the cable to exit through the center or along the side of the
pole/rail bracket. Slide the nut assembly onto the cable at the sensor
connector. Do not connect the sensor at this time.
a. Center exit—Pass the instrument connector end of the cable through the
center of the pole. Be sure to leave several inches of cable extending beyond
the nut assembly.
b. Side exit—Place the cable side-exit adaptor (part D) over the cable. Being
sure the cable is passing through the slot in the side, screw the nut assembly
onto the adaptor. Hand tighten only. Do not over tighten.
NOTE: Use the adaptor supplied as it has smooth edges that will not chafe the
cable. Do not use a purchased part.
3. Screw the extension pole/rail bracket onto the nut assembly /side-exit adaptor.
Hand tighten only. Do not over tighten.
4. Remove the protective cap from the sensor connector on the cable. (Save the
cap to protect the connector when the receiver is removed.) Plug the cable
firmly into the sensor.
5. With the alignment tab on the sensor facing forward, slide the captive nut
upward and screw it onto the mount base. Hand tighten only. Do not over
tighten.
10
Flush Mount
1. Remove the label from over the sensor unit’s socket (see Figure 3). Apply
removable thread locker to the two studs supplied. Screw the studs into the
underside of the sensor unit (part A).
2. Using the gasket (part B) as a template, position it at the selected mounting
location upside down with the arrow facing forward. Mark the position for the
two mounting holes and the center hole for the cable.
3. Using a 3mm or 1/8" bit, drill the pilot holes. Using a 6mm or 1/4" bit, drill the two
mounting holes for the studs. Drill the cable hole with a 38mm or 1-1/2" hole saw.
Fiberglass—Minimize surface cracking by running the drill in reverse until the
gelcoat is penetrated.
4. Pass the instrument connector-end of the cable through the center of the gasket
and through the center mounting hole in the vehicle/boat.
5. Plug the cable firmly into the sensor unit.
6. Orient the gasket with the arrow facing in the same direction as the alignment tab
on the sensor unit. Push the gasket onto the studs and slide it over the connector.
NOTE: The gasket fits one way only. A groove in the gasket fits over the
alignment tab on the connector.
7. With the sensor’s alignment tab pointing forward, push the studs through the
mounting surface. Check to be sure the gasket is tucked under the lip of the
unit. From underneath the mounting surface, slide a flat washer and lock
washer onto each stud. Fasten them with the thumb nuts. Hand tighten only.
Do not over tighten.
sensor unit
(part A)
alignment
tab
serial number
socket
M5 stud (2)
sensor connector
gasket (part B)
arrow
mounting surface
flat washer (2)
lock washer (2)
thumb nut (2)
Figure 3. Flush mount
Copyright © 2008 Airmar Technology Corp.
11
Cable Routing & Connecting
Depending on the equipment you will be using, route the sensor cable to an
Airmar Data Converter, Combiner, an NMEA 0183 display, an NMEA 2000
network, a laptop, or other device. After reading the cautions below, go to the
appropriate instructions.
CAUTION: Do not remove the waterproof connector(s) to ease cable routing. Buy
a cable without a connector. Instructions for wiring are supplied.
CAUTION: To reduce electrical interference from other electrical wiring and any
on-board equipment with a strong magnetic field such as radar equipment, radio
transmitters, engines, generators, etc., separate the cables by at least 1m (3').
Ensure that all the cables shields are appropriately grounded.
CAUTION: Be careful not to tear the cable jackets when passing them through
compartments, bulkheads, or walls. Use grommets to prevent chaffing.
CAUTION: Use a multimeter to check the polarity and the connections to the
power supply before applying power to the sensor.
CAUTION: Coil any excess cable(s) and secure with cable ties to prevent damage.
Connecting to a Data Converter, Combiner, or Splitter
Follow the installation instructions that are supplied with the unit.
Connecting to an NMEA 0183 Display
Route the sensor cable to the display. Do not fasten the cable in place at this time.
Connector on Display End
If your sensor cable has a connector on the display end, and it can be plugged
into the port on your NMEA 0183 display; do so now. Coil any excess cable and
secure it with cable ties to prevent damage. Fasten the cable in place.
12
No Connector on Display End: Wiring
If your sensor cable does NOT have a connector on the display end, it must be
hard wired. Referring to the owner’s manual that came with your display, connect
the colored wires as show in Figure 4.
CAUTION: Your sensor has either an RS422 or RS232 interface. You must follow
the wiring diagram in Figure 4 that matches your sensor. If it is wired for the wrong
interface, it will not transmit and receive data properly.
NOTE: If your display does NOT have NMEA 0183 output connections, the yellow
and orange wires are not needed. Apply heat-shrink tubing to each unused wire.
(Alternatively, the yellow and orange wires can be connected to an external sensor.)
NOTE: The display power may be wired directly to the sensor cable, or it may be
wired separately.
1. Allowing an extra 25 cm (10") for wiring ease, cut the cable to length.
2. Strip 60mm (2-1/2") of the outer jacket and foil shielding from the cut end of the
cable (see Figure 4).
3. Strip 10 mm (3/8") of conductor insulation from the end of each colored wire.
4. Protect the cable’s foil shielding from causing a short by using heat-shrink tubing
around the jacket where the wires emerge from the cable. The tubing must
overlap the wires a minimum of 6mm (1/4"). Shrink the tubing using a heat gun.
5. Being sure the power supply is OFF, connect the wires to the display.
6. Fasten the cable in place.
7. Your installation is complete. To begin receiving data, refer to the owner’s
manual that came with your display.
locator
10
sensor
connector
optional
RS422
x
10
or
optional
RS232
V+
VA /+ OUT
V+
VTX OUT
A/+ IN
B/- IN
RX IN
NO CONNECTION
B/- OUT
NO CONNECTION
SHIELD
SHIELD
BARE
Figure 4. NMEA 0183 sensor cable
Copyright © 2007 - 2014 Airmar Technology Corp.
13
Connecting to an NMEA 2000® Network
CAUTION: Only two termination resistors are required on an NMEA 2000
network. More than two will degrade the bus performance.
Route the sensor cable to the NMEA 2000 network. Plug the NMEA 2000
connector into the network node (see Figure 5). Coil any excess cable and secure
with cable ties to prevent damage.
locator
10
sensor
connector
NMEA 2000
network
connector
10
Figure 5. NMEA 2000® sensor cable [6m (20') shown]
Copyright © 2008 - 20011 Airmar Technology Corp.
NOTE: Sensor cables longer than 6m (20') have a termination resistor built into
the sensor connector (see Figure 6).
termination resistor in connector
locator
10
120Ω
sensor
connector
NMEA 2000
network
connector
10
Figure 6. NMEA 2000® sensor cable [10m (33') shown]
Copyright © 2009 - 2011 Airmar Technology Corp.
14
Maintenance
CAUTION: Do not disassemble the sensor. Removing the screws from the sensor
unit (part A) will damage the waterproof seal, thus voiding the warranty.
CAUTION: Do not immerse in water or pressure wash. Doing so may allow water
to infiltrate the sensor, voiding the warranty.
Since the sensor has no moving parts, it requires minimal maintenance. Clean
with a soft damp cloth and mild household detergent.
Troubleshooting
•
•
•
•
•
•
•
Is there power to the sensor?
Are all the connections tight?
Is the cable-run free of kinks or damage?
Does the sensor have a clear view of the sky?
Is there interference from other antennas or instruments?
Is there damage to the sensor?
Is there ice on the sensor?
Firmware Revisions
Airmar may release updated versions of the sensor’s firmware. Periodically, check
Airmar’s website at www.airmar.com to down-load the latest revision, or contact
Technical Support for a CD.
NMEA 2000®: Load Equivalency Number
LEN is the amount of current a devise draws from an NMEA 2000 network.
(1 LEN = 50 mA)
LEN........................................3
Where to Purchase Parts
Lost, broken, or worn parts should be replaced immediately. Obtain parts from
your instrument manufacturer or marine dealer.
Gemeco
(USA)
Airmar EMEA
(Europe, Middle East, Africa)
Tel: 803.693.0777
Fax: 803.693.0477
Email: [email protected]
Tel: +33.(0)2.23.52.06.48
Fax: +33.(0)2.23.52.06.49
Email: [email protected]
Trademarks
Airmar® is a trademark of Airmar Technology Corporation.
Loctite® and 242® are trademarks of Henkel Corporation.
NMEA 2000® is a registered trademark of the National Marine Electronics Assoc.
15
35 Meadowbrook Drive, Milford, New Hampshire 03055-4613, USA
www.airmar.com
16