1
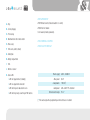
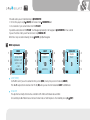
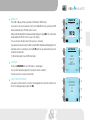
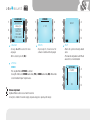
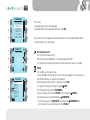
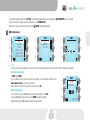
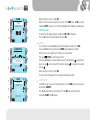
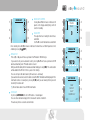
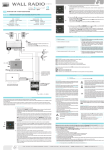
41001
41502
HIGH QUALITY SOUND
es manual de usuario
en user's manual
pt manual de utilizador
de benutzerhandbuch
fr
manuel de l'utilisateur
it
manuale d'uso
41501
B
G
H
F
A
A
E
C
G
D
F
I
A
A
41504
41502
K
J
español
KITS
PRODUCTS
5
english
29
português
53
deutsch
77
français
101
italiano
125
41501 • 41502 • 41503 • 41504 • 41505
41506 • 41507 • 41508 • 41509
PLAY & SOUND is a concept designed
to integrate a high quality, adaptable
and discrete audio system in a uniquely
designed enclosure, which can be
installed in any type of décor.
Requiring minimum work to fit it and
connected directly to the mains, you
will be able to enjoy a highperformance system in one or several
rooms in your home.
You can choose between a wall control
unit (41502) or a two-way remote
control (41501).
Its design imitates an air conditioning
outlet. It can be installed in a normal
ceiling or a false ceiling.
en
es
general
Main components
41001 AIR RADIO KIT
A Keys.
41501 Remote control (includes batteries: 3 x AAA).
B Screen (display).
41504 Flush-fit module.
C Front casing.
D Wall bracket for the remote control.
E Rear casing.
User manual (includes guarantee).
41502 FIXED WALL CONTROL
41504 FLUSH-FIT MODULE
F Trim covers (white / black).
G Sliding tab.
H Battery compartment.
I
Trim.
J Wireless receiver.
K Status LEDs.
• LEDs off: equipment off (standby).
• LEDs on: equipment connected.
• LEDs flashing fast: data transmission.
• LEDs flashing slowly: searching for FM stations.
Technical specifications
Power supply
Max. power
Loudspeakers
Audio power
Remote control range
230 V~; 50-60 Hz
35 W
7W@4Ω
6 W + 6 W @ 1% distortion
15 m.*
(*) The exact range will vary depending on where the base is installed.
30
www.egiaudio.com
performace and quality
41001 - AIR RADIO KIT
INTEGRATED
It integrates in the home adding value to it without taking up any space.
MULTI-LANGUAGE
Menus in different languages.
EASY
Intuitive use.
FM LIST
Scans and memorises up to 36 of the most powerful FM stations. With RDS and
in stereo.
FAVOURITES
Enables you to store and interchange 6 favourite stations with rapid access.
BACKLIGHT
Quick adjustment of screen backlighting.
SOUND QUALITY
Sound quality, 6+6 WRMS power in stereo with base and treble controls.
SLEEP
Incorporates a sleep program that enables automatic disconnection after a
programmed time.
MANUAL TUNING
Enables manual tuning of any station, which can be memorised.
LINK
The system enables you to control all the receivers installed with a single
remote control.
EASY LOCATION OF THE CONTROL
Using the transparent wall bracket supplied.
www.egiaudio.com
DATA TRANSMISSION
Its radiofrequency system enables it to be used even from another room or if it
is in a piece of furniture.
HIGH CLASS MATERIALS
Both the grille and the control are manufactured in anodised aluminium, which
is difficult to scratch and long lasting. The non-slip strips of the control protect
the surfaces on which it is placed
ADAPTABLE TO DÉCOR
With the remote control covers supplied in two colours, it can match any type
of décor.
QUICK CONNECTION
You only need a 230 V~ mains connection.
EASY TO INSTALL
With a 100 mm. ø crown bit, only 3 holes need to be drilled.
41002 - AIR RADIO LUX KIT
Same features as AIR RADIO KIT - 41001 incorporating a double light fitting for
high-power lamps.
41003 - AIR RADIO USB KIT
Same characteristics as AIR RADIO KIT - 41001 incorporating the following features:
AUXILIARY MUSIC INPUT
Through a USB socket for PEN DRIVES (included in the Kit).
FAVOURITES
Enables you to save and exchange 5 FM memories + USB rapid access input.
31
en
performace and quality
41004 - AIR RADIO USB LUX KIT
Same features as AIR RADIO USB KIT - 41003 incorporating a double light fitting
for high power lamps.
41005 - WALL RADIO KIT
Assembly that can be embedded in standard ø60 mm. boxes, comprising a control
module and a loudspeaker module, incorporated with a double trim frame.
EASY INSTALLATION
You only need a 230 V~ mains connection. For desktop installation you will need
to purchase accessory ref. 40160.
MULTI-LANGUAGE
Menu in different languages.
INTUITIVE USE
FM LIST
Scan and memorise up to 36 of the most powerful FM radio stations, RDS
information and stereo sound.
FAVOURITES
Enables you to store and exchange 6 rapid access radio stations.
BACKLIGHT
Adjust the screen backlighting in standby, so as not to disturb your sleep.
INTERNAL AUXILIARY INPUT
Has an internal auxiliary audio input to connect to accessory ref. 41509.
ALARM CLOCK
Enables you to view the time and access the alarm clock function.
PERMANENT CLOCK
Time updated through the radio channels.
SLEEP
Incorporates a sleep program enabling automatic disconnection after a programmed
time has elapsed.
MANUAL TUNING
Enables you to manually tune any radio station that can be received and store
it in the memory.
41006 - AIR BLUETOOTH TOP KIT
Same characteristics as AIR RADIO USB KIT - 41003 incorporating the following
features:
UNIVERSAL BLUETOOTH CONNECTIVITY
Can be paired with Bluetooth devices to reproduce the music they have stored.
WITH A BASE FOR EGi WIRELESS CONTROLS (type 41501)
The built-in base enables remote control charging.
USB INPUT
You can listen to audio material stored in a USB device.
AUXILIARY INPUT
An audio input to connect external audio systems.
FM LIST
Scans and memorises up to 36 of the most powerful FM stations. With RDS and
in stereo.
Available soon
32
www.egiaudio.com
41501 remote control
First connection
Press any key.
The language selection menu will be displayed.
Use keys 4 or 5 to select your language and then press key 3 (OK).
Autoscan
Once you have chosen the language, it will automatically search for the most powerful FM radio stations*.
3
LANGUAGE
DEUTSCH
ENGLISH
E S PA Ñ O L
FRANÇAIS
I TA L I A N O
PORTUGUES
1
RADIO 5
107,9 FM
1
2
4
5
6
(*) Up to 30 stations + 6 in manual mode.
Main screen
Turn the device on/off
Press key 1 to turn the device on/off.
With the audio off, keys 4 and 5 are in screen backlight adjustment mode.
This will enable you to adjust the light intensity of the display when the control is on standby.
FM list
Press key 2 to see all the stations tuned.
Use keys 4 and 5 to select the station. You will see the name displayed. If the station does not
transmit RDS information, its frequency will be displayed.
When the station you wish to listen to is selected, press key 3 (OK).
You can quit the menu at any time by pressing key 6 (QUIT).
Press 1 to add the selected station to FAVOURITES.
If you wish to delete a station from the FM LIST, select it and press 2 (DELETE).
www.egiaudio.com
4
2
5
3
6
1
2
3
FM
RADIO
RADIO
RADIO
RADIO
RADIO
RADIO
LIST
1
2
3
4
5
6
4
5
6
33
en
41501 remote control
If the radio station you wish to delete belongs to FAVOURITES:
• The first time you press key 2 (DELETE) will remove it from FAVOURITES and
• the second time it is pressed will remove it from the FM LIST.
If you delete a radio station from the FM LIST, it will disappear permanently. It will not appear in
If you wish to retrieve it later, you will have to retune it using MANUAL FM.
When there is only one station remaining, the icon DELETE (key 2) will disappear.
FAVOURITES if it was selected.
MENU adjustments
MENU
SLEEP
EQUALIZER
MANUAL FM
AUTOSCAN
LINK
LANGUAGE
1
2
3
4
1
5
2
6
3
SLEEP
NOW
A LW AY S
4
1
10
5
2
MINUTES
6
3
EQUALIZER
TREBLE
BASS
0
4
5
6
SLEEP (TIMER)
Use 1 or 2 to select if you wish to activate the timer just once (NOW) or every time you turn on the device (ALWAYS).
Press 4 or 5 to adjust the disconnection time. Press 3 (OK) when you have finished. To deactivate SLEEP select 0 minutes.
EQUALIZER
This adjustment can modify the level of bass and treble. Use 1 or 2 to switch between base and treble.
Once selected, press 4 or 5 to increase or decrease the level of bass or treble frequencies. Once modified, press key 6
34
(QUIT).
www.egiaudio.com
41501 remote control
MANUAL FM
Pressing 1 or 4, you will move up or down the FM band in 100 kHz steps.
1
If you want to carry out an automatic search, pressing 2 or 5 will scan up or down the FM
bands automatically until FM radio station is found.
2
5
When you find the station (either in manual or automatic mode), press key 3 (OK). This radio station
will be added to the FM list if there is space in the memory.
3
6
You can store up to 36 radio stations (30 in autoscan + 6 manual).
If you wait for a few seconds, once the station is tuned the RDS*information will be displayed. If this
information comes in several parts, press key 3 (OK) when you are viewing the text you wish
to identify the station with.
1
MANUAL FM
RADIO 1
AUTOSCAN
2
You can choose between keeping the list of favourite stations or delete it.
3
4
NEW
FM LIST
KEEP
FAVORITES?
(*) Not all radio stations transmit RDS information.
AUTOSCAN
On pressing AUTOSCAN, the list of FM stations is created again.
4
YES
5
NO
6
The autoscan process can take several minutes.
LINK (See MULTIROOM MODE)
If you have to link the control to a new flush-fit loudspeaker base, bring the control close to
the flush-fit loudspeaker base and press 3 (OK).
1
2
3
www.egiaudio.com
APPROACH
RECEIVER
TO
LINK
4
5
6
35
en
41501 remote control
LANGUAGE
DEUTSCH
ENGLISH
E S PA Ñ O L
FRANÇAIS
I TA L I A N O
PORTUGUES
1
2
3
4
1
VERSION
4
1
RESET
4
V 1.0
5
2
5
2
5
6
3
6
3
6
LANGUAGE
Use keys 4 and 5 to select the menu
language.
When selected, press 3 (OK).
VERSION
On pressing this, the version of the
software installed will be displayed.
RESET
Returns the system to the factory default
status.
Personalised configurations and FM and
favourite lists of will be deleted.
SETTINGS
STEREO:
Press keys 4 or 5 until STEREO is selected.
Use keys 1 or 2 to select STEREO audio mode (YES) or MONO audio mode (NO). Mono mode
is recommended for poor reception areas.
1
SETTINGS
STEREO
2
3
4
5
YES
6
Volume adjustment
Keys 4 and 5 are used to raise or lower the volume.
A short press modifies the volume step by step and a long press speeds up the change.
36
www.egiaudio.com
41501 remote control
Favourites list
You can select up to 6 favourite radio stations. To choose them, press FAVOURITES (1)
from the FM list.
The station selected will be added to the list of favourites in the first free position.
You can also add a station from FAVOURITES, using keys 4-5 to select an empty position and
then press key 2 FM. In this manner, the list of stations available will appear and you can select
the one you wish to add to FAVOURITES.
You can delete a favourite station by selecting it with keys 4-5 and then pressing key 2 (DELETE).
Multiroom mode
The MULTIROOM function is used when the installation has several flush-fit loudspeaker bases and you
wish to use a single remote control to control them.
The remote control will only control one base at a time, therefore it will be necessary to proceed with
the linking process whenever you wish to change the loudspeaker base.
There are 3 modes to begin this linking process:
By menu: MENU adjustments
1
2
3
4
5
6
1
4
2
5
3
6
LINK.
Control without coverage: If the control is not within the coverage distance of the base you wish
to unlink, the possibility of linking a new loudspeaker base by pressing keys 4 and 5 simultaneously
will be displayed on screen.
In the process of linking the remote control, it will be associated to the closest built-in loudspeaker base,
therefore it is necessary to bring the control as close as possible to the base you wish to link to.
1
2
3
www.egiaudio.com
FAV O R I T E S
RADIO 1
RADIO 2
RADIO 3
RADIO 4
RADIO 5
EMPTY
APPROACH
RECEIVER
TO
LINK
4
5
6
37
en
41501 remote control
Loss of coverage
In the communication between the remote or wall control and the flush-fit loudspeaker base, there may
be a loss of coverage that impedes communication.
This may be due to the control being further away from the loudspeaker base than the maximum allowed
range. Control must be carried out at a shorter distance.
If there is a loss of coverage, the control will display on screen the options of either retrying communication
with the linked base, or carrying out a new link with another base (see MULTIROOM MODE).
1
OUT OF
COVERAGE
2
3
TRY
4
Simultaneous control of a base with the remote control
and wall control
5
It is possible to control a single loudspeaker base with a wall control and a remote control without having
to link them alternatively.
6
The remote control will be the priority control, so that when you press any control on the remote, it
will become the active control.
At this moment the wall control will be off.
When 15 seconds have elapsed since the last time you pressed the remote control, it will change to
standby, turning itself off and the wall control will come on and become the active control.
38
www.egiaudio.com
41501 remote control
Fitting the batteries
Before replacing the batteries, make sure you have the new ones ready.
Slide the battery compartment cover open and insert three R6 batteries (AAA size)*.
Make sure the battery poles "+" and "–" coincide with the compartment "+" and "–" signs.
Fitting the wall support
If you wish to use the wall bracket to install the remote
control, you can secure it with the adhesive label
(included) or screws (not included).
Replacing the batteries
If the remote control is not working properly, the batteries may be run down. Replace them with new
batteries when the following sign is displayed on the screen.
en
Attention
• Always replace the batteries at the same time.
• Do not mix old and new batteries or mix different types of batteries.
• If the batteries have leaked, clean the compartment with a cloth and replace the batteries with new
ones. To avoid battery leakage, remove the batteries when the remote control is not going to be used
for a long period of time.
www.egiaudio.com
39
41502 wall control
3
LANGUAGE
DEUTSCH
ENGLISH
E S PA Ñ O L
FRANÇAIS
I TA L I A N O
PORTUGUES
1
RADIO 5
107,9 FM
1
2
4
5
6
5
3
6
2
3
40
FM
RADIO
RADIO
RADIO
RADIO
RADIO
RADIO
LIST
1
2
3
4
5
6
Autoscan
Once you have chosen the language, it will automatically search for the most powerful FM radio stations*.
(*) Up to 30 stations + 6 in manual mode.
Main screen
4
2
1
First connection
Press any key.
The language selection menu will be displayed.
Use keys 4 or 5 to select your language and then press key 3 (OK).
4
5
6
Turn the device on/off
Press key 1 to turn the device on/off.
With the audio off, keys 4 and 5 are in screen backlight adjustment mode.
This will enable you to adjust the light intensity of the display when the control is on standby.
FM list
Press key 2 to see all the stations tuned.
Use keys 4 and 5 to select the station. You will see the name displayed. If the station does not
transmit RDS information, its frequency will be displayed.
When the station you wish to listen to is selected, press key 3 (OK).
You can quit the menu at any time by pressing key 6 (QUIT).
Press 1 to add the selected station to FAVOURITES.
If you wish to delete a station from the FM LIST, select it and press 2 (DELETE).
If the radio station you wish to delete belongs to FAVOURITES:
• The first time you press key 2 (DELETE) will remove it from FAVOURITES and
• the second time it is pressed will remove it from the FM LIST.
www.egiaudio.com
41502 wall control
If you delete a radio station from the FM LIST, it will disappear permanently. It will not appear in
If you wish to retrieve it later, you will have to retune it using MANUAL FM.
When there is only one station remaining, the icon DELETE (key 2) will disappear.
FAVOURITES if it was selected.
MENU adjustments
1
2
3
MENU
TIME
ALARM
SLEEP
BACKLIGHT
EQUALIZAR
MANUAL FM
4
1
5
2
6
3
TIME
AUTO
MANUAL
12/24H
TIME
4
1
4
5
2
5
6
3
6
TIME
You can set the clock automatically (synchronising it with a radio station that transmits the time in RDS information) or manually.
Automatic adjustment:
In TIME select AUTO.
Press key 2 and choose the radio station that supplies time information via RDS (Go to
www.egiaudio.com to see the list of stations).
Wait a moment for the clock to synchronise and then press OK.
Manual adjustment:
To set the clock, use keys 4 and 5 to go to the option, and then press 3 (OK).
Use keys 4 and 5 to increase the hour value (HOUR will appear selected).
When you finish, press key 2 to adjust the minutes in the same manner.
www.egiaudio.com
1
TIME
HOUR
MINUTES
2
3
4
5
12H / 24H
6
41
en
41502 wall control
1
ALARM
HOUR
MINUTES
4
2
5
3
6
1
2
3
1
ALARM TYPE
FM ONCE
00 : 00
SLEEP
NOW
A LW AY S
2
3
42
4
5
6
4
5
MINUTES
6
When everything is OK, press key 3 (OK).
When the clock has been configured, if you return to the TIME menu, the OK key will be
replaced by STOP. If you press this, the time will disappear from the display in standby mode.
12/24 hour mode:
To change the time display mode, press key 5 until 12H / 24H is displayed.
Press key 6 to choose the desired option. Then press OK.
ALARM
To set the alarm, use keys 4 and 5 to go to the desired option, and then press 3 (OK).
Use keys 4 and 5 to increase the time value (HOUR will be displayed as selected).
When you finish, press key 2 to set the minutes in the same manner.
Press key 6
(PLUS) to select the type of alarm.
Using keys 2 and 5 you can choose between an alarm using FM one day , an alarm with a
buzzer one day , alarm using an FM connection every day
or an alarm with a buzzer
every day .
When everything is correct, press 3 (OK).
The home screen will display the hour of activation and the type of alarm.
SLEEP (TIMER)
Use 1 or 2 to select if you wish to activate the timer just once (NOW) or every time you turn
on the device (ALWAYS).
Press 4 or 5 to adjust the disconnection time. Press 3 (OK) when you have finished.
To deactivate SLEEP select 0 minutes.
www.egiaudio.com
41502 wall control
1
BACKLIGHT
2
4
5
BACKLIGHT CONTROL
Use keys 4 and 5 to increase or decrease the
power of the display backlighting, with the
control in standby.
EQUALIZER
This adjustment can modify the level of bass
3
6
and treble.
Use 1 or 2 to switch between base and treble.
Once selected, press 4 or 5 to increase or decrease the level of bass or treble frequencies. Once
modified, press key 6 (QUIT).
MANUAL FM
Pressing 1 or 4, you will move up or down the FM band in 100 kHz steps.
If you want to carry out an automatic search, pressing 2 or 5 will scan up or down the FM
bands automatically until FM radio station is found.
When you find the station (either in manual or automatic mode), press key 3 (OK). This radio station
will be added to the FM list if there is space in the memory.
You can store up to 36 radio stations (30 in autoscan + 6 manual).
If you wait for a few seconds, once the station is tuned the RDS*information will be displayed. If this
information comes in several parts, press key 3 (OK) when you are viewing the text you wish
to identify the station with.
(*) Not all radio stations transmit RDS information.
AUTOSCAN
On pressing AUTOSCAN, the list of FM stations is created again.
You can choose between keeping the list of favourite stations or delete it.
The autoscan process can take several minutes.
www.egiaudio.com
EQUALIZER
TREBLE
BASS
1
2
4
5
0
3
6
MANUAL FM
RADIO 1
1
4
2
5
3
6
AUTOSCAN
1
2
3
4
NEW
FM LIST
KEEP
FAVORITES?
YES
5
NO
6
43
en
41502 wall control
LANGUAGE
DEUTSCH
ENGLISH
E S PA Ñ O L
FRANÇAIS
I TA L I A N O
PORTUGUES
1
2
3
4
1
VERSION
4
1
RESET
4
V 1.0
5
2
5
2
5
6
3
6
3
6
LANGUAGE
Use keys 4 and 5 to select the menu
language.
When selected, press 3 (OK).
VERSION
On pressing this, the version of the
software installed will be displayed.
RESET
Returns the system to the factory default
status.
Personalised configurations and FM and
favourite lists of will be deleted.
Volume adjustment
Keys 4 and 5 are used to raise or lower the volume.
A short press modifies the volume step by step and a long press speeds up the change.
Favourites list
You can select up to 6 favourite radio stations. To choose them, press FAVOURITES (1) from the FM list.
The station selected will be added to the list of favourites in the first free position.
You can also add a station from FAVOURITES, using keys 4-5 to select an empty position and
then press key 2 FM. In this manner, the list of stations available will appear and you can select
the one you wish to add to FAVOURITES.
You can delete a favourite station by selecting it with keys 4-5 and then pressing key 2 (DELETE).
44
1
2
3
FAV O R I T E S
RADIO 1
RADIO 2
RADIO 3
RADIO 4
RADIO 5
EMPTY
4
5
6
www.egiaudio.com
41502 wall control
1
4
2
5
3
6
1
4
APPROACH
RECEIVER
TO
LINK
2
5
3
6
1
4
OUT OF
COVERAGE
2
3
TRY
www.egiaudio.com
Loss of coverage
When communicating between the remote or wall control and the flush-fit loudspeaker base, there may
be a loss of coverage that will impede communication.
This could be due to the loudspeaker base being disconnected from the mains. The loudspeaker
base must be connected to the power supply.
In case of a loss of coverage, the control will display the available options to try to communicate again
with the linked base on screen, or to establish a new link with another base.
Simultaneous control of a base with the remote control
and wall control
It is possible to control a single loudspeaker base with a wall control and a remote control without having
to link them alternatively.
The remote control will be the priority control, so that when you press any control on the remote, it
will become the active control.
At this moment the wall control will be off.
When 15 seconds have elapsed since the last time you pressed the remote control, it will change to
standby, turning itself off and the wall control will come on and become the active control.
5
6
45
en
troubleshooting
Problem
Possible solution
The equipment does not respond to commands. The control screen
displays "OUT OF COVERAGE" and the LEDs are off.
Check the electrical connection of the loudspeaker base.
It is not possible to link the control with the base.
Try to link near to the loudspeaker base. Check the electrical connection.
LEDs on the base lighted, but no audio.
Check that you are tuned into a radio station that is broadcasting
a programme.
Make sure the volume is not set to minimum level.
Poor FM reception.
Check that the FM antenna provided is correctly connected.
Extend the antenna and find the optimum position for it.
Move the unit away from any electronic ballast or other equipment
(fluorescent tubes...).
Loss of coverage at control.
The remote control is further away from the loudspeaker base than
the maximum range allowed. It may be necessary to replace the
batteries.
In the wall control, there may be a problem in the electrical connection
of the base.
46
www.egiaudio.com
information
IMPORTANT
Please read these "Safety instructions" carefully before using any EGi product.
ABOUT THIS MANUAL
We have taken all efforts to make the contents of this manual reliable and
updated. However, EGi does not guarantee the accuracy of the contents which
explanatory reasons only, and in interest of the owner without the intention of
infringing any regulation or rule.
en
Copyright © 2011. All rights reserved.
are subject to change without previous notice.
TECHNICAL SUPPORT
If, while using the system, you encounter a problem that cannot be solved
by consulting the manual, please contact the installer. You can also consult
the website www.egiaudio.com to find the latest information and other
resources to solve your problem.
COPYRIGHT INFORMATION
This manual in whole or in part, and any product or software described herein,
may not be reproduced, transmitted, saved in data recovery systems, or
translated into any language in any form or by any means, except all documents
saved by the user to make security copies; without the previous written consent
of the manufacturer.
All products or corporate names herein may (or not) be registered trademarks
or copyright of their respective companies and are used for identification or
www.egiaudio.com
EMC INFORMATION
PLAY & SOUND series products comply with all current regulations on
electromagnetic compatibility. Operation of the equipment is subject to the
following conditions:
1. This device should not emit problematic interference.
2. This device should withstand any interference received, including any that
could cause undesirable operation.
This equipment has been subject to extensive testing and complies with all
current regulations established for Class B digital devices. The product is
designed to ensure reasonable protection against troublesome interference in
residential installations.
This equipment generates, uses and can transmit radio frequency energy, and
if not correctly installed and used, i.e. in compliance with the instructions,
47
information
it may cause interference in radio communications. However, it cannot be
guaranteed that this interference will not arise in a specific installation. If this
equipment were to produce radio or TV interference, something that can be
proven just by switching it on and off, try to eliminate the problem as follows:
• To avoid damages, this module should be firmly installed according to
manufacturer's instructions.
• Move the antenna or relocate it.
• Only use accessories supplied by EGi.
• Increase the distance between the equipment and the receiver in question.
• EGi will not be held liable for any damage arising from misuse of the product
or usage other than what is was designed for (See Guarantee section).
• Plug the equipment into a mains socket on a different circuit.
• This device shall not be installed where a non qualified user could have
access to dangerous voltages zones.
• Consult your distributor or a radio/TV technician.
SAFETY INSTRUCTIONS
This system has been designed and manufactured in compliance with
the latest safety standards for household electronic equipment. However,
to ensure safe use of this product, it is important to follow the
instructions given in this documentation.
An exclamation mark inside a triangle indicates important
operation and maintenance instructions and the existence
of components that may affect safety if replaced.
Class II device.
• No EGi product should be covered with anything that impedes ventilation.
• Do not place any sources of naked flame such as lighted candles or similar
elements on top of the device.
• Do not expose the device to poured, splashed or sprayed water.
• Disconnect the Mains supply before carrying out any work on the installation.
• Do not expose the equipment to direct sunlight.
• Do not use excessive force when handling the controls.
• Users must not install or try repairing the module. Only qualified personnel
should operate the device.
48
The lightening-shaped arrow warns of the presence of
dangerous voltage. To minimise the risk of electric shock,
do not remove the cover.
The lightening signs near the amplifier output terminals
warn of the danger of electric shock in normal usage
conditions (Terminals dangerous to touch). Do not touch
these terminals while the device is in operation.
www.egiaudio.com
information
This symbol indicates that the battery supplied with the
device must not be treated as normal household waste.
CAUTION
By ensuring that these batteries are correctly disposed
of, you are helping to prevent the negative impact on the
environment and on human health that the incorrect
disposal of batteries causes. Recycling helps preserve
natural resources.
At the end of the battery’s life, to ensure that it is correctly
disposed, hand in the product at a recycling depot for
electrical and electronic devices.
For detailed information on recycling this product or the
battery, please contact the local authorities, the closest
collection point or the establishment where you purchased
the product.
This symbol indicates that the product must not be treated
as normal domestic waste, but must be handed over to the
corresponding collection point for electrical and electronic
equipment.
www.egiaudio.com
RISK OF ELECTRIC SHOCK
DO NOT OPEN
DO NOT EXPOSE TO
RAIN OR MOISTURE!
WARNING: To minimise the risk of electric shock, do not
remove the cover. There are no user-serviceable components
inside the equipment. Repairs must only be carried out by
qualified personnel.
Do not expose the equipment to rain or damp.
en
This symbol indicates that the equipment is designed for
indoor domestic use and therefore must not be installed
outdoors.
Directive 2002/95/EC Restricting the use of certain hazardous
substances in electrical and electronic devices (RoHS Restriction of Hazardous Substances), was adopted in
February 2003 by the European Union. The RoHS directive
came into force on July 1st 2006, restricting the use of six
dangerous substances: Lead, Mercury and Cadmium,
Chromium VI (also known as hexavalent PBB and PBDE
chromium) in the manufacturing of several types of electrical
and electronic equipment.
49
information
The smark means European Conformity and is a European mark for certain groups of services or industrial
products.
The
mark must be displayed by a product if it is within
the scope of the approximately 20 "New Approach" Directives
and can be sold and put into service legally within the
countries of the EU. If the product complies with the
provisions of applicable European Directives and the
is displayed on the product, member states cannot prohibit,
restrict or impede the placement of the product or service
on the market.
LIABILITY
Due to the wide variety of services and devices the system interacts with, the
manufacturer cannot be held liable for failure or faulty operation of devices
not manufactured by EGi and connected or used by any module in the PLAY
& SOUND series.
Thus, the
mark can be considered as a passport for
commercialising a product in EU countries.
50
www.egiaudio.com
information
DECLARATION OF CONFORMITY
Electroacústica General Ibérica, S. A. with registered address in
Av. Almozara, 79 - 50003 Zaragoza (Spain), declares under its sole
responsibility that the equipment described in this manual incorporates
the functions specifies in each case and complies with current regulations:
Directive 2004 / 108 EC, regarding electromagnetic compatibility and Low
Voltage Directive 2006 / 95 / EC, regarding safety in low voltage receivers.
Due to a policy of continuous improvement, EGi reserve the right to
modify their products at any time. Although every effort is made to
present up to date documentation, the documents and illustrations
provided may not coincide with the product purchased.
You can access the latest versions of documentation in:
en
www.egiaudio.com
EGi will not be held liable for any possible errors in the text or references.
All brands mentioned herein are registered with their owners.
www.egiaudio.com
51
guarantee
EGi guarantees its electronic and electroacoustic products against any
manufacturing defect that affects its operation for 36 months from the
production date (indicated in every manufacture), taking the commitment
of repairing or replacing the faulty modules which failure, always to the discretion
of EGi, is caused by a manufacturing defect, without any charge for spare parts.
This guarantee does not include charges for the shipping and handling of the
modules, nor the labour charges for the replacement in the installation of the
aforementioned electronic and electroacoustic modules. The guarantee will not
cover in any case the damages or breakings of the trimming pieces (lattices, trims,
masks, frames...).
This guarantee refers only to the concept of replacement in factory of the
modules produced by EGi, excluding any other cover or responsibility on the
rest of the materials or the whole of the installation that is put at the user disposal,
but that is not supplied nor executed by EGi.
Therefore this guarantee does not cover:
a. The fitting up and the interconnection between the modules.
c. The malfunctions caused by the wrong installation of the modules, or
by an installation with inappropiate cables.
d. The malfunctions caused by the intervention of a person non-authorised
by EGi.
e. The consequences of mixing with equipment from other sources, and also
adaptations, modifications, adjustments and/or adjustment attempts,
irrespectively of those that have been performed in a technically correct
way, provided that there is not an express authorisation by EGi.
f. The consequences of accidents, natural catastrophes or any cause beyond
EGi control, including but not limited to lightning, water and public
disturbances.
In all these cases that are excluded from the guarantee, and every time
that the modules are not considered as faulty by EGi, the sender should
take responsibility of the full amount of the repair, and in the event of a
visit from our technicians, the requesting person will bear the expenses
originated without a cause justified in the guarantee.
b. The results from the abuse or misuse of the product, including but not
limited to:
b.1. Not using the product for usual purposes, or not following the instructions
from EGi for the correct use and maintenance of the product.
b.2. The installation or use of the products in a way that is not concordant
with the technical or security rules now in force.
52
ATTENTION: If you notice any problem in your EGi installation, our
Customer Support Service will attend you from 9h. to 13h (Central
European Time).
www.egiaudio.com
Avda. Almozara, 79
50003 Zaragoza - ESPAÑA
Tel. 976 40 53 53
Fax 976 40 53 54
http//: www.egiaudio.com
e-mail: [email protected]
Av. Almozara, 79
50003 Zaragoza - SPAIN
Tel. +34 976 40 53 56
Fax +34 976 40 53 54
http//: www.egiaudio.com
e-mail: [email protected]
03/2011
export
006740
nacional