1
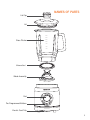
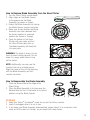
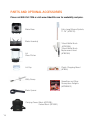
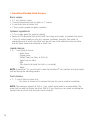
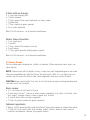
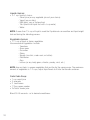
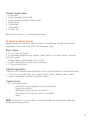
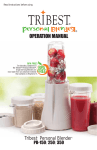
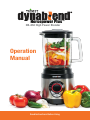
Horsepower Plus™
DB-850 High Power Blender
Operation
Manual
Read Instructions Before Using
2
INTRODUCTION
Thank you for purchasing the Dynablend® Horsepower Plus™ high power blender with a glass
pitcher. You’re minutes away from creating your very own favorite recipes.
Dynablend® Horsepower Plus™ is America’s first high power blender that offers both
Pre-Programmed Buttons and a Variable Speed Dial, with a Glass Pitcher and Stainless
Steel Utility Scoop. Designed for easy cleaning, Dynablend® Horsepower Plus™ comes with
a detachable blade assembly unlike other high power blenders on the market.
The Dynablend® Horsepower Plus™ does almost everything a “super power” blender can
do at a reasonable price with more preferable materials like glass and stainless steel. In
addition to blending just about any fruit or vegetable, the 1.1 horsepower motor easily
blends ice and frozen fruits. It’s also perfect for making sauces, salsa, sorbets, soups,
protein shakes, fruit smoothies, and baby food. And with the stainless steel grinding blade,
included with the Dynablend® Horsepower Plus™, grinding dry ingredients such as coffee
beans, nuts, grains, herbs, and even feisty flax seeds is a snap.
Take a moment to familiarize yourself with your Dynablend® Horsepower Plus™ and make
sure you have received all the parts included with your package. We recommend you wash
all the parts with warm water and a mild detergent before you first use your Dynablend®
Horsepower Plus™. Once you have done so, you are now ready to begin creating scrumptious
delights for you and your family.
Please take the time to read through the entire operation manual for proper use and care
instructions. Following the instructions in this manual will ensure that your Dynablend®
Horsepower Plus™ serves you faithfully for years to come.
We hope you will enjoy your Dynablend® Horsepower Plus™ as it helps you stay in control
of your diet and health.
3
4
TABLE OF CONTENTS
Introduction
Important Safeguards....................................................................................................6
Standard Parts..............................................................................................................8
Names of Parts.............................................................................................................9
Before First Use..........................................................................................................10
Operation Instructions..................................................................................................11
Cleaning and Storage...................................................................................................12
Warranty.....................................................................................................................14
Parts and Optional Accessories....................................................................................16
Recipes......................................................................................................................17
Product Standard........................................................................................................30
5
IMPORTANT SAFEGUARDS
When using electrical appliances, the following basic safety precautions
should always be adhered to:
1. Read all instructions.
2. Avoid electrical shock: do not put cord plug, base, or motor in water or other liquid;
never put a wet plug into an outlet, or handle with wet hands; and never immerse the
Motor Base into water, instead wipe with a damp cloth only and dry promptly.
3. Close supervision is necessary when any appliance is used by or near children.
4. Unplug from the outlet when not in use, before putting on or taking off parts, and
before cleaning.
5. Blades are sharp, handle carefully. Avoid contact with moving parts.
6. Always use on a level, sturdy surface.
7. Do not use outdoors.
8. Do not operate while driving a vehicle.
9. Do not operate any appliance with a damaged cord or plug. If the Dynablend®
malfunctions, is dropped, or damaged in any manner, call the main service center
(888-254-7336) to get a Return Merchandise Authorization (RMA) No. to send your
Dynablend® to the service center. Returns will not be accepted without a RMA No.
clearly written on the box.
10. Only use attachments sold by Tribest® with the Motor Base. The use of attachments,
including canning jars, is not recommended by the manufacturer and may cause injury
to persons or damage to the Dynablend®.
11. Do not let cord hang over edge of a table or counter, or touch the stove or other
hot surfaces.
12. To avoid injury, properly attach the Blade Assembly to the Glass Pitcher base.
13. Do not blend liquids over 104°F. When blending hot liquids, remove center piece of the
two-piece lid.
14. Only use the Dynablend® for its intended purpose. For Household use only. Not for
commercial use.
15. Wash the Glass Pitcher and Blade Assembly immediately after each use.
16. In 30 second Pulse mode, always allow the machine to rest for at least one minute
between consecutive blending cycles of 30 seconds. When blending in the 60 second
cycles, 60 second Blend or Combo mode, do not exceed 3 consecutive cycles.
17. Store the Glass Jar with its Lid. Make sure the parts are thoroughly dry.
18. The Dynablend® has a polarized plug. To reduce the risk of electric shock, this plug
will fit in a polarized outlet in only one way. If the plug does not fit properly in the
outlet, reverse the plug. If it still does not fit, contact a qualified electrician. Do not
modify the plug in any way.
6
19. Keep hands and utensils out of container while blending to reduce the risk of severe
injury to persons or damage to the Dynablend®. A scraper may be used but must be
used only when the Dynablend® is not running.
20. Always operate the Dynablend® with the lid in place.
21. To reduce the risk of injury, never place the Blade Assembly on the Motor Base without
the Glass Pitcher properly attached.
SAVE THESE INSTRUCTIONS
7
STANDARD PARTS
Please check if all parts described below are included.
If not, please call 888-254-7336 for your replacement.
Dynablend® Horsepower Plus™
1)
2)
3)
4)
5)
6)
7)
8)
Motor Base
Glass Pitcher
Stainless Steel Blade Assembly
Lid
Lid Cap
Utility Scoop
Blade Opener
Silicone Seal
6
4
5
2
3
7
ON
MIN
1
OFF
MAX
30 sec
60 sec
Pulse
Blend
60 sec
Combo
8
8
NAMES OF PARTS
Lid Cap
Lid
Glass Pitcher
Silicone Seal
Blade Assembly
Dial
Pre-Programmed Buttons
Electric Cord Tidy
9
BEFORE FIRST USE
1. Clean all parts thoroughly and dry.
2. Take out the required length of cord from the Electric Cord Tidy at the base of the
Dynablend® and plug it into an outlet.
NOTE: The Red Dial Light will flash IF the Dial is at the ‘OFF’ position.
3. Turn on the machine by turning the Dial to the ‘ON’ position. The Red Dial Light
will become solid and the Blue Pre-Programmed Button Lights will be blinking.
Now, your machine is ready to use.
NOTE: 1) For safety reasons, if the electricity goes out while the Dynablend® is in
operation with the Dial positioned at a variable speed, the Red Dial Light will
flash without resuming operation, this prevents the machine from working
without your awareness when the electricity comes back on. If this happens,
turn the Dial to the ‘ON’ position, make sure the Red Dial Light becomes solid
and the Blue Pre-Programmed Button Lights blink, and then resume operation.
2) If the electricity goes out while the machine was in operation with the
Pre-Programmed Buttons, the Red Dial Light will be solid and the Blue
Pre-Programmed Button Lights will blink when the electricity comes back on.
You may then resume operation.
10
OPERATING INSTRUCTIONS
1. Fill the Glass Pitcher with desired ingredients.
- Blending: Add 2-10 oz. of liquid with your solid ingredients depending on the recipe.
- Grinding grains: Fill the pitcher with ¼ - ½ cup of grains.
2. Place the Motor Base on a stable, level surface.
3. Plug the power cord into an outlet.
NOTE: Red Dial Light flashes if Dial is at the ‘OFF’ position and solid if at the ‘ON’ position.
4. Place the Glass Pitcher on the Motor Base.
5. Place the Lid on top of the Glass Pitcher.
6. Place the Lid Cap or the Utility Scoop in the opening of the Lid.
7. Turn the Dial to the ‘ON’ position.
NOTE: The Red Dial Light becomes solid and the Blue Pre-Programmed Button Lights
will be blinking.
8. To activate, press one of the Pre-Programmed Buttons or turn the Variable Speed
Dial clockwise.
9. When you finish blending, turn off the Dynablend® by turning the Dial to the ‘OFF’ position.
10. Remove the Glass Pitcher from the Motor Base.
11. Remove the Lid.
12. Pour your blended food into an appropriate serving cup.
13. Unplug the Dynablend® and clean the parts and accessories immediately after each use.
NOTE: Tribest® Dynablend® Horsepower Plus Blender™ is equipped with a thermoprotection device. It will automatically shut off if the Motor overheats. Should this happen,
unplug the Dynablend® and let it cool down for 20 minutes before resuming operation.
Useful Tips For The Best Results
• To achieve the best results when pureeing solid ingredients, place small portions into
the Glass Pitcher one by one instead of blending a large quantity all at once.
• If you are processing solid ingredients like celery, tomato, or apples, cut them into
small pieces (2-3 cm) first.
• When mixing solid ingredients start off with a small amount of liquid. Gradually add
more liquid through the opening in the Lid.
• Always place your hand on top of the Lid when you are operating the Dynablend®.
• For stirring solid or very thick liquid ingredients we recommend that you use the
blender in pulse mode to prevent the blades from creating an air pocket.
• Overloading the Glass Pitcher with more than 1.5 liters could cause the motor to stall.
Should the motor stall, turn the Dynablend® off, unplug from the outlet, and remove a
portion of the mixture before continuing.
• Do NOT place hands or utensils into the Glass Pitcher during operation or when the
Dynablend® is plugged in.
11
CLEANING AND STORAGE
1. After use, fill the Glass Pitcher 1/3 full with clean water and run one of the Pre-Programmed
Buttons to remove most of food debris remaining in the Glass Pitcher.
NOTE: If necessary you may add a couple of drops of dish soap.
2. Empty the Glass Pitcher.
3. Repeat Step 1 and Step 2 with the Glass Pitcher 2/ 3 full of clean warm water with NO SOAP
to rinse the pitcher thoroughly.
4. Empty the Glass Pitcher.
5. Dry the Glass Pitcher fully for the next use.
NOTE: If any food debris remains at the blade assembly area, remove the Blade Assembly
using the Blade Opener provided to clean out the debris. (Please see “How to Remove
Blade Assembly from the Glass Pitcher” page 13.)
Motor Base
1. Unplug the power cord.
2. Wipe the outside surface with a damp cloth or sponge. Do not use abrasive cleaners
on the Motor Base.
3. Dry with a soft cloth or paper towel.
4. The rubber feet on the bottom of the Motor Base will keep the blender from moving
on most work surfaces. Clean the rubber feet regularly. When the rubber feet are dirty,
the machine may move on the counter.
WARNING: Do not immerse the Motor Base in water.
How to Clean the White Silicone Seal
When you take out the Blade Assembly, you will see a white Silicone Seal placed on the
inside ridge of the Glass Pitcher. Clean it and keep it in a safe place, then replace when
reassembling the Blade Assembly and the Glass Pitcher. (Please see “How to Reassemble
the Blade Assembly” page 13.)
12
How to Remove Blade Assembly from the Glass Pitcher
1. Turn the Glass Pitcher upside down.
2. Align ridges on the Blade Opener
to the grooves on the Blade
Assembly (as shown in Green).
3. Unlock the Blade Assembly by turning
the Blade Opener counter-clockwise.
4. Make sure to see whether the Blade
Assembly has been released from
the locked position to unlocked
position (as shown in Orange).
5. Cover the bottom of the Glass
Pitcher with your palm and turn
the Glass Pitcher right side up.
The Blade Assembly will slowly fall
into your palm.
WARNING: The blade is sharp. Do not
touch to avoid cutting yourself. Do not
leave it in soapy water where it may
not be visible.
NOTE: Additionally, you may use the
inside of the Lid as a blade opener.
Align the inside of the Lid Cap opening
with the Blade Assembly and turn
counter-clockwise.
Locked
Unlocked
How to Reassemble the Blade Assembly
1. Place the Silicone Seal at the ridge of the
Glass Pitcher.
2. Place the Blade Assembly in its place over the
Silicone Seal and turn it clockwise to its locked
position using the Blade Opener.
STORAGE
1. Keep your Tribest® Dynablend® ready for use on the kitchen counter.
2. Keep it unplugged when it is not in use.
3. If you keep your Blade Assembly disassembled, please store it in a convenient, safe
place out of the reach of children, as you would with sharp knives.
13
WARRANTY
1. We warrant to you, the end-user customer who has properly registered after purchasing
a new Tribest® Dynablend®, that the new Tribest® Dynablend® will be free from defects
in materials and workmanship for a period of 10 years from the date of purchase.
2. Upon Tribest’s receipt of a written notice of defects from you during the warranty
period, Tribest®, at its option, will either repair or replace the Tribest® Dynablend®
that proved to be defective. The replacement of the Tribest® Dynablend® may be
either new or like new. The Tribest® Dynablend® may contain re-manufactured or
re-conditioned parts, which is equivalent to new in performance or may have been
subjected to incidental use.
3. This warranty does not apply to defects resulting from:
a) the failure to operate the Tribest® Dynablend® in accordance with the instructions.
b) the use of parts or supplies not provided or authorized by Tribest®.
c) negligent, improper or inadequate maintenance.
d) the service performed or attempted by unauthorized service person(s).
e) tampering, misuse or unauthorized modification of the Tribest® Dynablend®.
4. All warranty and repair services must be performed at a warranty service center which
is located within the country where the Tribest® Dynablend® was originally purchased.
However, in the event that: [I] the machine must be serviced at a service center that is
not located within the country where the machine was purchased; or [II] there is no
service center within the country where the machine is located and must be shipped to
a service center in another country, then those service centers are responsible for the
parts and service only, and any and all costs relating to the shipping, delivery and
handling of the machine to and from those service centers shall be the sole responsibility
of the owner.
5. TRIBEST® MAKES NO OTHER EXPRESS OR IMPLIED WARRANTY OR CONDITION WHETHER
WRITTEN OR ORAL. TO THE EXTENT REQUIRED BY LOCAL LAW, ANY IMPLIED WARRANTY
OF FITNESS FOR A PARTICULAR PURPOSE OR IMPLIED WARRANTY OR CONDITION OF
MERCHANTABILITY OR SATISFACTORY QUALITY IS LIMITED TO ONE (1) YEAR. In the event
that such limitation or exclusion on the duration of an implied warranty is not allowed
in the states or counties wherein you reside, the above limitation or exclusion will not
apply. This warranty gives you specific legal rights and protection, and you might also
have other rights that vary from state to state, or county to county.
6. TO THE EXTENT ALLOWED BY LOCAL LAW, THE REMEDIES IN THIS WARRANTY
STATEMENT ARE YOUR SOLE AND EXCLUSIVE REMEDIES. EXCEPT AS INDICATED
ABOVE, IN NO EVENT WILL TRIBEST BE LIABLE FOR DIRECT, SPECIAL, INCIDENTAL,
14
CONSEQUENTIAL (INCLUDING LOST PROFIT), OR OTHER DAMAGE, WHETHER BASED
IN CONTRACT, TORT, OR OTHERWISE. Some states or counties might not allow the
exclusion or limitation of incidental or consequential damages. If you reside in such a
state or county, the above limitation or exclusion may not be applicable.
In the event that you have any questions concerning the use and care for this product or
concerning service, please call us at 888-254-7336, send an e-mail, or write a letter to
the following address explaining the nature of your concerns.
Tribest Corp.
P.O. Box 4089
Cerritos, CA 90703
Website: www.tribest.com
E-mail: [email protected]
---------------Model #
-----------------Serial #
------------------Date Warranty mailed
15
PARTS AND OPTIONAL ACCESSORIES
Please call 888-254-7336 or visit www.tribestlife.com for availability and price.
Motor Base
Extra Long Silicone Spatula,
11.25” (#PB01S)
Blade Assembly
Lid
Glass Pitcher Lid Cap
Utility Scoop
Tribest Bottle Brush
(#PB038A)
Tribest Bottle Brush
Replacement Head
(#PB038H)
Plastic Chopping Board
(#PB06)
Smoothies and Other
Scrumptious Delights
(#GPBEM03)
Blade Opener
16
Carrying Cases: Black (#PB10BL)
Deluxe Black (PB10BD)
RECIPES
I. Smoothies/Blended Drinks.....................................................................................18
II. Savory Soups........................................................................................................19
III. Sweet or Savory Sauces........................................................................................21
IV. Salsa and Guacamole............................................................................................22
V. Dressing...............................................................................................................23
VI. Tapenade/Pesto....................................................................................................24
VII. Porridge...............................................................................................................25
VIII. Pâté.....................................................................................................................26
IX. Pudding................................................................................................................27
X. Baby Food............................................................................................................28
XI. Possible Nutritional Supplements...........................................................................29
NOTE: The recipes in this booklet are based on suggestion serving size of one, 16 oz. in
volume. Please adjust your portions for the ingredients as per your situation.
17
I. Smoothies/Blended Drink Recipes
Basic recipe:
• ½-1 cup liquid of choice
• 1 banana (maximum) fresh or frozen in 1” pieces
• ¼ cup other fresh or frozen fruit
• 1 Tbsp. protein powder (or green powders)
Optional ingredients:
• 1-2 ice cubes (great for summer cooling).
• Source of EFA (essential fatty acids) from flax, hemp oil or seeds, or soaked chia seeds.
• 1 Tbsp. of soaked seeds or nuts (e.g. sesame, sunflower, pumpkin, flax seeds; or
soaked almonds or brazil nuts) other nuts do not have to be soaked as they are softer
and will blend easier than almonds or brazil nuts.
Liquid choices:
• ½ - 1 cup liquid of choice:
- Apple Juice
- Orange Juice
- Coffee (Teeccino, Pero, or Caf-Lib)
- Yogurt (soy or dairy)
- Milk
- Tofu (blend into liquid first with 1/8 cup water)
- Water
NOTE: If more than 1¼ cup of liquid is used the Dynablend® can overflow and liquid might
leak out during the blending process.
Fruit choices:
• 1/5 -1/3 cup of fresh or frozen fruit
- Any fresh or frozen fruit in season that you like can be used for smoothies.
NOTE: The maximum amount of fruit is 1 cup, adjust liquid levels to accommodate. The
more fruit you add the thicker the drink. With a ¼ cup liquid you can create a pudding like
dessert from any fresh fruit and your choice of liquid.
18
A Date with an Orange:
• ½ cup fresh orange juice
• 1 frozen banana
• 2 Tbsp. soaked chia seeds (optional), or hemp seeds
• 1 pitted date
• 1 Tbsp. protein or green powder
• 2 ice cubes (optional)
Blend 30-45 seconds - or to desired smoothness.
Winter Green Smoothie:
• 1 cup apple juice
• 1 banana
• 1 Tbsp. soaked flax seeds or flax oil
• 2 mint leaves
• 1-2 tsp. green powder (barley green is great)
Blend 30-45 seconds - or to desired smoothness.
II. Savory Soups
Can be made room temperature, chilled, or warmed. When making a warm soup, use
warm liquids.
NOTE: These soups will be slightly chunky, unless very soft vegetables/greens are used.
The more vegetables you add the thicker the drink/soup. With a ¼ cup liquid you can
create a dip or sauce like dishes from most vegetables and your choice of liquid.
CAUTION: Warm works better than hot, as the hot tends to expand during blending and
can leak out of the container.
Basic recipe:
• ½-1 cup warm or hot liquid of choice
• ½ avocado (cut into 1” pieces or other creamy ingredient: e.g. tahini, nut butter, milk,
tofu, yogurt, cottage cheese, cream cheese, oils, or kefir)
• ¼ cup of other fresh or frozen vegetable
• 1 Tbsp. of protein powder (or green powders)
Optional ingredients:
• Source of EFA (essential fatty acids) from flax oil, hemp oil or seeds, or soaked chia seeds.
• 1 Tbsp. of nut or seed butter (e.g. sesame ‘butter’ (tahini), almond, hemp, peanut,
hazelnut, macadamia, cashew, or pumpkin butter.)
19
Liquid choices:
• ½-1 cup liquid of choice:
- Carrot juice (or any vegetable juice of your choice)
- Yogurt (soy or dairy)
- Milk (dairy, soy, or lactose free)
- Tofu (blend into liquid first with 1/8 cup water)
- Water
NOTE: If more than 1¼ cup of liquid is used the Dynablend® can overflow and liquid might
leak out during the blending process.
Vegetable choices:
• 1/5-1/3 cup of fresh or frozen vegetables
Recommended Vegetables Include:
- Tomatoes
- Green peas
- Cucumber
- Celery
- Squash (zucchini, crook neck, or button)
- Cauliflower
- Corn
- Lettuce (or any leafy green, cilantro, parsley, mint, etc.)
NOTE: Use any fresh, in-season vegetables that you like for the savory soups. The maximum
amount of vegetables is 1-2 cups, adjust liquid levels to fit into the blender container.
Cado Cado Soup:
• 1 cup carrot juice
• ½ avocado
• 2 basil leaves
• 1 Tbsp. green powder
• To Taste- lemon juice
Blend 30-45 seconds - or to desired smoothness.
20
Chunky Tomato Soup:
• ¼ cup water
• 4 cherry tomatoes (cut in half)
• 4 dried tomatoes (soaked in warm water)
• 3 basil leaves
• 1 pitted date
• 1 clove garlic
• To Taste- salt Blend 30-45 seconds - or to desired smoothness.
III. Sweet or Savory Sauces
Sauces are lovely to eat like a soup in a bowl, or made thicker by reducing the liquid
ingredients in the recipe. Enjoy both fruit and savory styles.
Basic recipe:
• ¼-½ cup liquid of choice
• ½ cup creamy ingredient (e.g. sesame ‘butter’ (tahini), nut butter, banana, avocado,
milk, tofu, yogurt,
cottage cheese, cream cheese, oils, or kefir)
• ¼ cup of other fresh or frozen fruit or vegetable
• 1-2 tsp. spice of choice
Optional ingredients:
• Source of EFA (essential fatty acids) from flax oil, hemp oil or seeds, or soaked chia seeds
• 1 Tbsp. of nut or seed butter (e.g. sesame ‘butter’ (tahini), almond, hemp, peanut,
hazelnut, macadamia, cashew, or pumpkin butter.)
Liquid choices:
• ½-1 cup liquid of choice:
- Carrot juice (or any vegetable juice of your choice)
- Yogurt (soy or dairy)
- Milk (dairy, lactose free, soy, or potato*)
- Tofu (blend into a liquid first with 1/8 cup water)
- Water
NOTE: If more than 1¼ cup of liquid is used the blender can overflow and might leak
during the blending process.
21
Fruit or Vegetable choices:
• ¼-½ cup of fresh or frozen fruits or vegetables
NOTE: The maximum amount is 1-2 cups, adjust liquid levels to fit into the Glass Pitcher.
Apple Sauce:
• 1 fresh chopped apple (chop into little pieces)
• 1 tsp. soaked chia seeds
• 1 banana
• To Taste- cinnamon and nutmeg
• To Taste- lemon juice
Blend 45-60 seconds - or to desired smoothness.
Sweet and Sour Sauce:
• 1/3 cup fresh orange juice
• ¼ cup maple syrup
• 1 tsp. apple cider vinegar
• 2 Tbsp. olive oil
• 2 Tbsp. lime juice
• 2 Tbsp. soy sauce
• 1 Tbsp. ginger (fresh, finely chopped)
• 2 tsp. mustard
Blend 45-60 seconds - or to desired smoothness.
IV. Salsa and Guacamole
Salsa has a texture that allows chunky and liquid to marinate together to form wonderful
flavors and can be put over any vegetable, grain dish, or used as a dip for fruits or vegetables.
Classic Salsa:
• 1 chopped tomato
• 1 green onion
• ½ cup cilantro
• 1 clove garlic
• ¼ jalepeno (optional)
• To Taste- sea salt
Pulse machine until desired consistency is achieved.
22
Mango Salsa:
• 1 cup mango (chopped)
• ¼ cup fresh pineapple (chopped)
• ¼ cup green onion
• ¼ cup fresh cilantro
• 1 tsp. fresh hot chile (chopped)
• To Taste- lime juice
• To Taste- sea salt
Pulse machine until desired consistency is achieved.
Guacamole:
• 1 avocado
• 2 cherry tomatoes, sliced in half
• 1 Tbsp. onion (red or green, chopped)
• 1 tsp. Mexican seasoning
• To Taste- lime juice • To Taste- sea salt Pulse machine until desired consistency is achieved.
V. Dressing
Dressings can be smooth or chunky depending on the ingredients. Made with a bit less
liquid, or add more solids and they can be turned into dips.
Spicy Papaya - Seed Dressing:
• 1/3 cup brown rice vinegar (or lime juice)
• 1 Tbsp. yellow onion, chopped
• 2 tsp. mustard (Dijon works fine)
• 1 tsp. agave nectar or honey
• 1 tsp. or To Taste- hot sauce
• 2/3 cup olive oil
• 2 Tbsp. papaya seeds
Blend 45-60 seconds - or to desired smoothness.
23
Zesty Papaya Dressing
• 1 papaya (skinned, seeded, and sliced)
• ½ cup orange juice
• 1 Tbsp. soaked chia seed (olive or flax oil can be substituted here)
• 1 tsp. lime juice
• 1 tsp. chile or other hot (cayenne) spice (optional)
• To Taste- sea salt
Blend 45-60 seconds - or to desired smoothness.
VI. Tapenade/Pesto
Tapenade and pesto have a very similar texture - thick with coarsely chopped ingredients.
Olive Tapenade:
• 1 cup olives (pitted, sliced)
• ½ cup olive oil
• 2 Tbsp. capers
• 1 clove garlic (chopped)
• 2 tsp. brown rice vinegar
Blend 45-60 seconds - or to desired smoothness.
Tomato Tapenade:
• 1 cup dried tomatoes (soaked and drained)
• 2 cherry tomatoes (halved)
• ¼ cup olive oil
• 2 cloves garlic (chopped)
• To Taste- sea salt
Blend 45-60 seconds - or to desired smoothness.
24
Presto Pesto:
• ¼ cup olive oil
• 1 Tbsp. lemon juice
• ½ cup fresh basil leaves
• ½ cup parsley (chopped)
• 2 cloves garlic
• 1 tsp. soy sauce
• 3 Tbsp. pine nuts (or walnuts)
Blend 45-60 seconds - or to desired smoothness.
Creamy Walnut Pesto:
• ¼ cup walnuts
• 1 avocado (pitted, and chopped)
• ½ cup basil leaves
• ¼ cup spinach leaves (carefully washed, chopped)
• 2 cloves garlic, chopped
• 2 Tbsp. olive oil
• 1 Tbsp. pepper (freshly ground is best)
• 1 Tbsp. lime juice
• To Taste- sea salt
Blend 45-60 seconds - or to desired smoothness.
VII. Porridge
Blended, cooked, or sprouted grains make a wonderful breakfast meal. Top with your
favorite fresh fruit, nuts or seeds, and milk (dairy or non-dairy).
Rice Porridge:
• 2 cups rice (cooked)
• ¼ cup warmed rice, soy milk, or Vance’s DariFree Milk, or hot water
• 2 Tbs hemp seeds
• ¼ tsp. cinnamon powder
• To Taste- sea salt
• To Taste- maple syrup or sweetener (optional)
Blend 45-60 seconds - or to desired smoothness.
NOTE: This recipe also works with other cooked grains: all the varieties of rice (brown,
basmati, red, white, etc.), millet, buckwheat, barley, or corn meal.
25
Cream of Quinoa (Flakes):
• 1¼ cup hot water
• 2/3 cup quinoa flakes
• ¼ tsp. Chinese 5 Spice (or nutmeg)
• 1 Tbsp. soaked chia seeds
• To Taste- agave nectar or honey
• To Taste- sea salt
Blend 45-60 seconds - or to desired smoothness.
NOTE: This recipe also works with other ‘flaked’ cereals: brown rice, barley, oats, etc.
The water to grain ratio varies slightly (e.g. 1 cup hot water to 1¼ cup brown rice flakes)follow the directions on the packet.
VIII. Pâté
Pâtés are classically made from nuts and vegetables. They can also be made from nuts
and seeds, mixed with various vegetables. Be creative and find your own variations.
These recipes will help you get started.
Pecan Pâté:
• 1 cup pecans (raw)
• 1 red onion (not too large, chopped)
• 2 tsp. poultry spice
• ¼ cup zucchini (chopped)
• 1 Tbsp. soy sauce
Blend 45-60 seconds - or to desired smoothness. To add more texture to this pate, stir in
finely chopped red bell pepper, parsley, and celery (½ cup each).
26
Saucy Pumpkin Pâté:
• ¼ cup soaked pumpkin seeds (soak 30 minutes and drain)
• ¼ cup soaked sunflower seeds (soak 30 minutes and drain)
• ¼ cup fresh orange juice
• ½ avocado, chopped
• 2 sprigs fresh parsley (chopped)
• 2 cherry tomatoes (halved)
• 1 clove garlic (minced)
• 1 Tbsp. fresh ginger (minced)
• 1 Tbsp. curry powder
• To Taste- sea salt
Blend 45-60 seconds - or to desired smoothness. To add a bit of soft/chunky texture, stir
in the other half of the avocado, diced, at the end of blending.
IX. Puddings
Basic Recipe:
• 1-1½ cups of fresh seasonal fruit.
• 2-4 Tbsp. Thickener of choice.
• 1-3 Tbsp. liquid of choice.
Thickener Choices:
• 2-4 Tbsp. thickener of choice:
- Papaya
- Banana (the easiest thickener)
- Dried fruit, soaked
- Nuts: cashews, pecans, or walnuts
- Seeds: sunflower seeds or pumpkin seeds - soak them overnight and rinse and then make the pudding with these ingredients. This process removes
a coating from the seeds that prevents them from sprouting. Soaking and
rinsing also makes it easier to digest. This process is called germinating.
- Soaked chia seeds or hemp seeds (a good source of essential fatty acids)
Liquid Choices:
• 1-3 Tbsp. liquid of choice:
- Fresh juice
- Water
- Yogurt (dairy or non-dairy)
- Milk (dairy, rice, soy, or Vance’s DariFree)
- Kefir (dairy or soy)
27
Orange Cashew Delight
• 1 cup cashew pieces
• 2 Tbsp. fresh orange juice
• 1 Tbsp. hemp seeds
Blend to smooth, serve as a pudding or as a dip.
Apricot Ambrosia
• 1 large apricot or 2 small ones (pitted and sliced)
• 2 dried pineapple slices (soaked in warm water)
• 1 Tbsp. soaking water from the dried pineapple
• 2 Tbsp. sunflower seeds (soaked)
Blend to smooth, serve as a pudding or as a dip.
X. Baby Food
General instructions:
Babies need simple foods:
• Blended fruits (raw)
• Blended vegetables (lightly steamed) - the only exception is potatoes (they get very gluey)
• Pick fruits and vegetables that are in season, blend it with a small amount of water.
NOTE: 2 Tbsp. of liquid/water is enough for most, add more if needed.
Smashed Banana/Grapes
• 1 banana
• 6-10 grapes
Start with the banana and blend to a paste. Then add the grapes and blend until smooth,
then serve.
Pear sauce
• 1 pear (sliced)
• 1 banana
• 1-2 Tbsp. water or apple juice
Start with a small amount of pear and water, add remaining ingredients blend until smooth,
then serve.
28
XI. Possible Nutritional Supplements
EFA sources:
• Hemp seeds - from HempNut
• Chia seeds - from Jaffee Brothers, or Earth Products
• Flax oils - from Barleans
• Flax seeds
Green/Blended Food Powders:
• Green Magma
• Barley Green
• Kamut
• Green Frog
• Pure Synergy
• Ultimate Life/Meal
Milk Choices:
• Lactose free, low fat, or whole milk
• Soy milk
• Rice milk
• Vance’s DariFree Milk - a powdered milk made from potatoes*
• Banana milk - blend fresh or frozen bananas with water
The following three milks can be made in your Dynablend® Horsepower Plus™ by blending
soaked, rinsed almonds, or sunflower seeds, or sesame seeds - with water:
• Almond milk
• Sunflower milk
• Sesame Milk
Juice Companies:
• Juice Evolution
• Trader Joe’s fresh made juices
• Local markets fresh made juices
NOTE: Watch out for flash pasteurized juices - know that they have been heat treated, you
may prefer fresh, non-pasteurized juices.
Enjoy your new Tribest Dynablend® High Power Blender™. The recipes included here are
intended to inspire you to play with the fresh, in season, food you like. Try using Organic
produce which has more nutrition, more flavor, and more food value. Let these recipes
help you create perfect health and vitality.
29
PRODUCT STANDARD
ITEM
MODEL
METHOD
ELECTRICITY
ELECTRIC POWER
GLASS PITCHER SIZE
COLOR BOX SIZE
SHIPPING WEIGHT FOOD PROCESSOR
DB-850
BLENDING/GRINDING
USA: 120V / 60Hz
EUROPE & ASIA: 210~230V / 50~60Hz
850W
1800 ml
270 (L) x 225 (W) x 370 (H) mm
11kg
© 2013 Tribest Corp.
No copies, transmission, or translation into other language of this booklet by any means
without written permission of Tribest Corp. is allowed. All rights are reserved.
30
31
Tribest Corporation
P.O. Box 4089, Cerritos, CA 90703
toll free: 888-254-7336 | fax: 714-879-7140
www.tribest.com | [email protected]
©2013 Tribest Corporation v.20130820