1
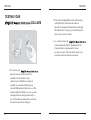
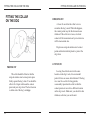
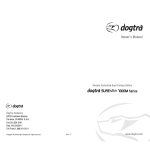
CONTENTS
MAIN FEATURES
2
PRODUCT SAFETY AND HEALTH
STATEMENTS
3
PACKAGE CONTENTS
4
DESCRIPTION OF TRANSMITTER PARTS
5
BUTTON FUNCTIONS
11
DESCRIPTION OF COLLAR / RECEIVER
PARTS
15
BATTERY CHARGER
19
TESTING YOUR
COLLAR
20
FITTING THE COLLAR ON THE DOG
22
CHARGING THE BATTERIES
24
RECEPTION
26
ACCESSORIES
27
BASIC MAINTENANCE
28
TROUBLE SHOOTING GUIDE
29
WARRANTY AND REPAIR INFORMATION 32
EC DECARATION OF CONFORMITY
37
1
MAIN FEATURES
MAIN FEATURES
Easy-to-use, ergonomic transmitter.
Rheostat dial that allows for gradual increases in
stimulation intensity with no jumps between
levels.
The Dogtra Element 300M Series has a 1/2-mile
range.
Two-dog model allows the trainer to control two
different dogs from one transmitter.
Waterproof collar/receiver and handheld
transmitter.
Reduced receiver/collar is ideal for
small/medium size dogs.
No external antenna on the collar receiver.
Rechargeable, user-replaceable Ni-MH
batteries.
One-charger system allows the transmitter and
receiver(s) to be charged at the same time.
Over 8000 different identity codes to prevent
conflicts with other e-collars.
PRODUCT SAFETY AND HEALTH STATEMENTS
PRODUCT SAFETY AND HEALTH STATEMENTS
Proper e-collar use
Dogtra e-collars are intended for the sole purpose
of behavior modification of dogs. They are not
intended for human use or use on other animals.
Dogtra Company does not assume any liability for
improper use of the dogtra e-collar.
Aggressive dogs
Dogtra does not recommend using the e-collar to
correct dogs that are aggressive towards other dogs or
people. In many such cases the dog will associate the
stimulation with the other dog or individual and
become even more aggressive. Dog aggression is best
treated by a dog-training specialist.
Interference with other electronic devices
Dogtra’s industry-leading technology filtering
system ensures minimal interference with other
electronic devices (garage door openers, pacemakers,
etc.). Our digital microprocessor offers thousands of
unique codes to eliminate frequency match-up with
other dogtra e-collars.
Inadvertent activation
If the constant button is held down for 12 seconds
or more the unit will automatically shut down. It
reactivates when the button is released.
2
3
PACKAGE CONTENTS
PACKAGE CONTENTS
DESCRIPTION OF TRANSMITTER PARTS
DESCRIPTION OF
TRANSMITTER PARTS
Transmitter
transmitter (1-dog unit)
Receiver (two collar/receivers for
dogtra two-dog models)
Battery charger and splitter cable
Antenna
Owner’s manual
Rheostat
Intensity Dial
Indicator Light
(LED Window)
“Nick” Button
Pager
Button
“Constant” Button
On/Off Magnetic
Red Dot
4
Battery Charging
Receptacle &
Rubber Plug
5
DESCRIPTION OF TRANSMITTER PARTS
DESCRIPTION OF TRANSMITTER PARTS
DESCRIPTION OF
TRANSMITTER PARTS
transmitter (2-dog unit)
Antenna
Rheostat
Intensity Dial
Transmitter Antenna
Nick/Constant
Toggle Switch
A short 2 antenna is supplied with the
transmitter.
Indicator Light
(LED Window)
1st-dog
Nick &Constant
(Gray Button)
2nd-dog
Nick &Constant
(Orange Button)
1st-dog
Pager
(Gray Button)
2nd-dog
Pager
(Orange Button)
On/Off Magnetic
Red Dot
6
The antenna must be fastened to the
transmitter before using the unit.
Battery Charging
Receptacle &
Rubber Plug
7
DESCRIPTION OF TRANSMITTER PARTS
Rheostat Intensity Dial
The Rheostat Intensity Dial is located on the
top of the transmitter: (0) being the lowest level
and (100) being the highest level.
You will need to adjust the setting (upward or
downward) depending on your dog’s temperament
and threshold for stimulation. Also, as the dog’s
attitude changes, especially during times of
increased excitement or distraction, you may need
to adjust the intensity level.
NOTE : In the constant mode, the
stimulation intensity can be increased or
decreased while the button is depressed.
8
DESCRIPTION OF TRANSMITTER PARTS
Transmitter Indicator Light (LED Window)
The transmitter indicator light (LED) is
located near the Rheostat Intensity Dial. The
LED light will come on when a button is pressed.
The color of the light indicates the status of
battery life. Green Indicates the battery is fully
charged. It turns to amber when the battery is at
medium charge. It is acceptable to charge your
unit even at medium charge without any damage
incurred to your unit. When the transmitter
indicator emits a blinking red light, the battery
needs to be recharged.
(Green = full charge, Amber = medium
charge, Red = needs charge).
9
BUTTON FUNCTIONS
DESCRIPTION OF TRANSMITTER PARTS
BUTTON FUNCTIONS
(1-dog unit)
Nick Button
Pager Button
Transmitter Battery Charging Receptacle &
Rubber Plug
Located on the backside of the transmitter,
the charging receptacle is covered by a rubber
plug. Insert one end of the battery charging cable
into the receptacle to charge the battery (See
Battery Charging Procedure on page 25).
After charging is completed, close the
receptacle with its rubber plug to make sure dirt
or water does not get inside.
10
Constant Button
The transmitter for the
single dog unit has three buttons (one on the
face of the transmitter, two on the left side).
“Nick” Button
The “Nick” button is located on the top left.
It is imprinted with the letter “N” for an easy,
clear selection. When the “Nick” button is
pushed the receiver emits a single rapid pulse of
electrical stimulation.
11
BUTTON FUNCTIONS
BUTTON FUNCTIONS
(2-dog unit)
“Constant” Button
The “Constant” button is located on the
bottom left. Pressing the “Constant” button gives
continuous stimulation as long as the button is
pushed, for up to 12 seconds. If the button is not
released after 12 seconds, the stimulation will
automatically turn off as a safety feature. The
collar will be ready to be reactivated once the
button has been released.
“Pager” Button
The “Pager” button is located on the face of
the transmitter. Pressing it will give a nonstimulating vibration as long as the button is
depressed, for up to 12 seconds.
Nick/ Constant
Toggle Switch
1st-dog
Nick & Constant
(Gray Button)
2nd-dog
Nick & Constant
(Orange Button)
1st-dog
Pager
(Gray Button)
2nd-dog
Pager
(Orange Button)
The
two-dog unit
has four buttons and a toggle switch on the
transmitter. (Two on the face of the transmitter,
two on the left side)
“Nick” & “Constant” Toggle Switch
Located on the face of the transmitter is a
toggle switch. The toggle switch has a setting
for “Nick”and another for “Constant”. The
color-coordinated buttons (orange for the
orange receiver/collar and gray for the black
receiver/collar) will implement the desired
stimulation based on the toggle switch setting.
12
13
BUTTON FUNCTIONS
When either the orange or gray stimulation
button is pressed and the toggle is set on “Nick”,
the receiver emits a single rapid pulse of
electrical stimulation.
DESCRIPTION OF COLLAR / RECEIVER PARTS
DESCRIPTION OF
COLLAR / RECEIVER PARTS
When you press either the orange or gray
stimulation button and the toggle is set on
“Constant”, the receiver emits a continuous
stimulation as long as the button is pushed, for
up to 12 seconds to the corresponding collar. If
the button is not released after 12 seconds, the
stimulation will automatically turn off as a
safety feature. The collar will be ready to be
reactivated once the button has been released.
Collar strap
Contact Points
“Pager” Button
The “Pager” buttons are located on the face
of the transmitter. The orange button
corresponds with the orange receiver/collar and
the gray with the black receiver/collar. Pressing
it will give non-stimulating vibration as long as
the button is depressed, for up to 12 seconds.
On/Off Magnetic Switch
(Red Dot)
Battery Charging
Receptacle and Cover
14
Indicator Light
(LED Window)
15
DESCRIPTION OF COLLAR / RECEIVER PARTS
Receiver On/Off Magnetic Switch (Red Dot)
To activate the receiver/collar, place the red
dot on the back of the transmitter to the red dot
on the collar/receiver. Hold the two red dots
together for a moment until the LED light on the
receiver/collar comes on.
To deactivate the unit, repeat the same
procedure holding the two red dots together
momentarily. The LED light will turn red for a
brief moment indicating that the collar/receiver
is now shut off.
DESCRIPTION OF COLLAR / RECEIVER PARTS
Receiver Indicator Light (LED)
Located on the front of the receiver/collar,
the indicator light comes on and blinks once
every 4 seconds after the collar has been turned
on. The color of the LED indicates the battery
life of the receiver.
(Green = full charge, Amber = medium
charge, Red = needs charge)
When the “Constant” button on the
transmitter is pushed, the collar indicator light
will glow steadily (either green, amber, or red
based on the remaining battery life), as long as
you hold the button down, for up to 12 seconds.
When the “Nick” button is pushed, the light
comes on for a fraction of a second.
16
17
DESCRIPTION OF COLLAR / RECEIVER PARTS
BATTERY CHARGER
BATTERY CHARGER
Charging Cable
120 volt
Charger
Receiver Battery Charging Receptacle &
Rubber Plug
On the inside of the collar receiver, next to
the collar strap, is a battery charging receptacle
with a rubber plug. (See Battery Charging
Procedure on page 25)
If the dog was in salt-water, be sure to
rinse the receiver and charging port with
clean water.
Internal Antenna
All Dogtra E-collars have non-exposed
antennas that are located inside the collar/
receiver.
18
Wall Outlet
Two-dog unit only
The battery charger and charging cables
allow you to charge both the transmitter and
receiver at the same time. The battery charger is
designed for a 120-volt wall outlet. (European
230-volt AC chargers and 12-volt car chargers
are also available.)
To use the battery charger for the two-dog
unit, combine both sets of battery charging
(splitter) cables as shown. This enables you to
charge the transmitter and both receivers at the
same time.
19
TESTING
TESTING
TESTING YOUR
COLLARS
2. The indicator light(LED) on the collar/receiver
will light briefly when the nick button is
pressed. Pressing the Constant button will light
the indicator for as long as you hold the button
down, up to twelve seconds.
3. As a safety feature, the
will automatically shut off stimulation if the
Constant button is depressed for twelve
seconds or longer. The unit will be ready to be
reactivated once the button is released.
1. To activate your
place the red dot on the back of the
transmitter to the red dot on the
collar/receiver. Hold the two red dots
together for a moment until the green
colored LED indicator light comes on. The
indicator light will blink every two seconds
showing the unit is charged and ready to
use. (If the indicator light emits a red color,
the batteries need to be charged.)
20
21
FITTING THE COLLAR ON THE DOG
FITTING THE COLLAR
ON THE DOG
FITTING THE COLLAR ON THE DOG
IMPROPER FIT
A loose fit can allow the collar to move
around on the dog’s neck. When this happens,
the contact points may rub the skin and cause
irritation. If the collar is too loose, electrical
contact will be inconsistent and your corrections
will be inconsistent also.
Dogtra uses surgical stainless steel contact
points and Anti-microbial plastic to protect the
dog’s skin.
ATTENTION!
PROPER FIT
The collar should be fitted so that the
surgical stainless steel contact points press
firmly against the dog’s skin. You should be
able to fit a finger in between the contact
point and your dog’s skin. The best location
is either side of the dog’s windpipe.
22
Leaving the collar/receiver in the same
location on the dog’s neck, for an extended
period of time can cause skin irritation. If the dog
is to wear the e-collar for long periods,
occasionally reposition the collar so that the
contact points are moved to a different location
on the dog’s neck. Make sure you check for skin
irritation, each time you use the unit.
23
CHARGING THE BATTERIES
CHARGING THE BATTERIES
CHARGING THE BATTERIES
The indicator light on the transmitter or
receiver will not ACTIVATE.
The transmitter or receiver does not stay on
when one of the stimulation or pager buttons
is pushed.
Battery Charging Procedure
1. Attach the charging cables to both the
transmitter and receiver(s), as shown on page 24.
uses Ni-MH (NickelMetal-Hydride) batteries.
1. Charge the unit before using the unit for
the first time.
2. Do not charge the batteries near any
flammable substances.
3. Fully charge the batteries for 10 hours if the
unit is to be stored without use for a period
of 3 months or more.
Recharge the unit if :
The LED indicator light on the
collar/receiver is emitting a red color.
24
2. Plug the charger into a 120-volt wall outlet or,
if using the accessory field charger, plug into a
cigarette lighter. (Use a 230-volt European
charger for Europe.) When properly plugged
in, all indicator lights should glow red.
The receiver automatically turns off when you
insert the charging cable into the batterycharging receptacle on the receiver.
3. After charging, cover the battery charging
receptacles with the rubber plugs on the
transmitter and receiver.
4. The battery is fully charged with a 10-hour
charge. The lights will stay red during the
charging process. They DO NOT turn green
when fully charged. Charging the batteries for
more than 10 hours at one time will not extend
the battery life.
25
RECEPTION
ACCESSORIES
RECEPTION
The
collar has
a range of 1/2-mile. Depending on the way you
use your transmitter, the range may vary.
Hold the transmitter away from your body
and avoid touching the antenna, to get the
greatest range.
For maximum signal strength, keep your
unit properly charged.
Maximum Range
ACCESSORIES
The following items may be purchased
separately by calling our customer service at
(888) 811-9111. You may also browse the
selection at www.dogtra.com.
European Charger
Designed for use with 230V AC electrical
outlets in Europe.
Field Auto Charger
Designed for use with the 12-volt cigarette
lighter in your car.
Typical Range
Belt Clip
Minimum Range
26
The metal belt clip accessory is for the
transmitter.
27
BASIC MAINTENANCE
BASIC MAINTENANCE
Be sure that the rubber charging plugs are
always secured when the collar is in use. If your
plugs break or are ripped, please contact
Customer Service at [email protected] or
(888) 811-9111 to obtain replacements.
After each session, carefully inspect your
unit for any missing parts or casing damage.
Broken casings on either the receiver or
transmitter may affect the waterproof guarantee
of the unit. The transmitter antenna should be
secured and tight for optimum performance.
Rinse the unit after each session and clean off
any dirt or debris.
Storage Maintenance
Your unit should be fully charged for 10
hours before extended storage. During storage,
the unit should be charged every 3 months for
10 hours, and once before the first use.
When traveling, try to store your units in
room or slightly warmer temperatures. Do not
transport the unit exposed in extreme climates.
Troubleshooting
If you suspect your unit is malfunctioning
please refer to the “Troubleshooting Guide”
before you send your unit in for service.
If you have any questions or concerns, you
may direct your inquiries to [email protected] or
call (888) 811-9111.
28
TROUBLESHOOTING GUIDE
TROUBLESHOOTING GUIDE
1. My dog is not reacting to the collar.
- Make sure the receiver is turned on. Place
the two red dots together to activate the
receiver.
- Be sure the collar strap is tight enough so
both contact points are touching the dog’s
skin.
- The contact points may be too short for your
dog’s thick or long coat. To place an order
for longer contact points, please call (888)
811-9111. If you are already using longer
contact points, you might need to trim down
the hair on the dog’s neck, so both contact
points are touching the skin.
- The intensity level may be too low for your
dog. Keep increasing the stimulation until
the dog responds usually by neck
movement, head shaking, looking over his
shoulder, etc. (response may be very subtle
so pay attention.)
29
TROUBLESHOOTING GUIDE
2. The LED indicator light comes on, but I do
not feel any stimulation.
- Your tolerance may be higher than your dog’s.
You may need to try the unit on your fingertips
where sensitivity is higher and/or increase the
stimulation level. Be sure both contact points
are touching both of your fingertips.
- The battery may be low, check the LED light
for battery life.
- If you have a full charge, and you have done
all of the above, your unit may need to be
serviced. Please contact Customer Service at
[email protected] or (888) 811-9111.
3. The transmitter has no range, or stimulation is
less when the dog is farther away.
- The antenna(s) may be damaged. To order
parts, please contact Customer Service at
(888) 811-9111.
- The range indicated on the unit’s box is for flat
terrain(line of sight). Heavy brush, trees, hills
or moisture will affect the range of your unit.
For best range, hold the transmitter vertically
above your head, and/or try moving to higher
ground.
- Any electrical conductors will affect the range,
such as cars, chain-link dog runs, metal
buildings, and radio towers. For best results,
operate away from these structures.
30
TROUBLESHOOTING GUIDE
4. My unit is are not holding a charge.
- The batteries might not be charged properly, or
the charger, splitter and the charging port needs
to be inspected. If you suspect your
charger/splitter is not functioning properly
please contact Customer Service at
[email protected] or (888) 811-9111.
- The charging pin may be damaged. Inside the
charging port, there is a metal pin that should be
standing straight up and stiff. If the pin is
wobbling, broken or missing, you will need to
send the unit in to the Repair Dept. The
charging port must be clean prior to charging,
clean the dirt out with a cotton swab and some
rubbing alcohol. If the dog is in salt-water, be
sure to rinse the receiver and charging port with
clean water.
- For Dogtra units over two years old from the
purchase date, the batteries may need to be
replaced. You can replace them yourself by
contacting Dogtra. Damages incurred to the unit
due to improper battery installation are not
covered under any warranty. Battery
replacement is the only time customers should
open the unit, any other unauthorized servicing
or tampering with the unit voids your limited
lifetime warranty. If you are still having
problems after replacing the batteries, Dogtra
strongly recommends sending the unit in for
inspection.
31
WARRANTY AND REPAIR INFORMATION
WARRANTY AND REPAIR INFORMATION
2-Year Limited Lifetime Warranty
Dogtra Company provides the original purchaser with a 2-YEAR
WARRANTY for the 175NCP, 180NCP, 200NCP Gold Series, 210NCP
Series, 280NCP Series, 300M Series, 1400NCP Series, 1500NCP Series,
1600NCP Series, 1700NCP Series, 1800NC Series, 1900NCP Series,
2000T&B Series, 2200NCP Series, 2300NCP Series, 2500T&B Series,
3500NCP Series, and the SureStim Series. The warranty begins from the
date of purchase. For the first two years, coverage is for both Parts and
Labor on warranty repair services.
Accessories such as chargers, splitter cables, antennas, straps, and batteries
are covered for the first year only. After the first two years, the Limited
Lifetime Warranty covers Parts only and does not cover Labor Fees and
Accessories. All Shipping fees incurred, the cost of Accessories after the
first year, and Labor fees associated with out of warranty repair work, are
the customer’s responsibility. Labor fees will be variable depending on the
extent of the work required. The Limited Lifetime Warranty expires 5
years after a model is discontinued from production by Dogtra.
To Qualify for the Dogtra Warranty
All products must be registered and/or a proof of purchase is required to
initiate repair work under warranty. To register your Dogtra product, log
onto our website at www.dogtra.com, click on the warranty registration
link, and fill out the required information. Registration must be completed
within 30 days of purchase. If you do not have access to a computer, you
can call our toll free number at 1-888-811-9111, and one of our customer
service representatives will register the product for you. If you were
unable to register your product within 30 days of purchase, we will accept
all products for repair with a proof of purchase. We strongly recommend
keeping the original receipt. If your product is not registered and a proof of
purchase is not available at the time of service, Dogtra will estimate the
age of the unit by the serial number. Serial number estimates can differ
32
WARRANTY AND REPAIR INFORMATION
from the actual purchase date. A serial number estimate is the only method
of determining an approximate date of purchase without product
registration or a proof of purchase.
Not Covered Under Warranty
Dogtra DOES NOT offer warranty for products that have been bought
secondhand or as a resold product.
Dogtra DOES NOT replace defective units or provide refunds for products
purchased from us after 30 days from the date of purchase.
Dogtra DOES NOT cover the cost of shipping outside of the Continental
United States.
Issues of replacement and refunds on units purchased less than 30 days
from an authorized dealer must be addressed to the dealer directly. If the
products purchased from an authorized dealer are after 30 days from the
date of purchase, please send the units to Dogtra for service and repair.
Dogtra DOES NOT cover the cost of repairs and replacements due to
misuse by the owner or dog, improper maintenance, and/or lost units. Any
water damage on the Water Resistant Transmitters of the 175NCP,
180NCP, 200NCP series, 1400NCP Series, 1500NCP Series, and iQ, and
the Water Resistant Receivers of the RRS, RRD, and RR Deluxe, will not
be covered. All replacement costs for either the transmitter or receiver will
be the owner’s responsibility.
The warranty is void if the unit has been altered or an unauthorized person
has damaged the unit while attempting repair work.
Battery replacement by the customer during the first year of the 2-year
Limited Lifetime Warranty is not recommended. If the customer chooses
to replace the batteries, any damage to the unit during the change-out by
the owner will void the warranty.
The removal of serial numbers from any Dogtra prodcuts will void the
warranty.
Dogtra reserves the right to retain and discard any parts or accessories that
33
EC DECLARATION OF CONFORMITY
WARRANTY AND REPAIR INFORMATION
have been found damaged upon replacement and repair.
Procedure for Repair Work
If the unit is malfunctioning, please refer to the “Trouble Shooting Guide” in
the Owner’s Manual and call customer service at 1-888-811-9111, for
technical support, before sending it to Dogtra for Service.
The cost of shipping products under warranty back to Dogtra is the
customer’s responsibility. Dogtra is not responsible for units damaged or lost
in transition to Dogtra. Dogtra is not responsible for loss of training time or
inconvenience while the unit is in for repair work. Dogtra does not provide
loaner units or any form of compensation during the repair period.
A copy of the sales receipt showing the purchase date may be required before
warranty work is initiated.
Please include a brief explanation outlining the problem and include your
name, address, city/state/zip code, daytime phone number, evening phone
number, and email address. Or you can visit our website at www.dogtra.com
for a service request form. If the repair costs are not covered under warranty,
we will call you for payment information and authorization. For any
questions concerning your Dogtra products, call us toll free at 1-888-8119111, M-F 8:30AM - 4:00PM, Pacific Standard Time, or email us at
[email protected] for specific repair inquiries.
Appendix :
EC Declaration of Conformity
We, Dogtra Company declare under our sole
responsibility that the product
Model Name : Element 300M
to which this declaration relates is in conformity with
R&TTE Directive 1999/5/EC
By application of the following standards
Applied Specification /
Standard
EN 60950-1:2006
Essential Requirements
Description (Field)
Article 3.1(a)
Safety
Article 3.1(b)
EMC
EN 301 489-1 V1.8.1 (2008-04),
EN 301 489-3 V1.4.1 (2002-08)
Article 3.2
Radio
EN 300 220-1 V2.1.1 (2006-04),
EN 300 220-2 V2.1.2 (2007-06)
Send repair units to :
Dogtra Company / Repairs
22912 Lockness Avenue
Torrance, CA 90501
U.S.A.
The diagrams and representations in the manual may differ slightly from
the actual product depending on the model type.
34
35
MEMO
36