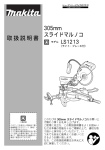
1
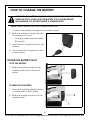
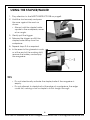
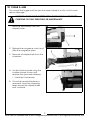
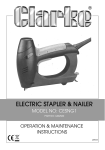
18V CORDLESS STAPLER/NAILER
MODEL NO: CONSN18LI
PART NO: 6487055
OPERATION & MAINTENANCE
INSTRUCTIONS
LS1213
INTRODUCTION
Thank you for purchasing this CLARKE product.
Before attempting to use this product, please read this manual thoroughly and
follow the instructions carefully. In doing so you will ensure the safety of yourself
and that of others around you, and you can look forward to your purchase
giving you long and satisfactory service.
GUARANTEE
This product is guaranteed against faulty manufacture for a period of 12
months from the date of purchase. Please keep your receipt which will be
required as proof of purchase.
This guarantee is invalid if the product is found to have been abused or
tampered with in any way, or not used for the purpose for which it was
intended.
Faulty goods should be returned to their place of purchase, no product can
be returned to us without prior permission.
This guarantee does not effect your statutory rights.
AVAILABLE FASTENERS
The following packs of fasteners are available from your Clarke Dealer.
Nails
Part
Number
Staples
Part
Number
CL NAIL 20mm 18G 1.2
1800415
CL STAPLE TYPE90 16mm
1800429
CL NAIL 30mm 18G 1.2
1800417
CL STAPLE TYPE90 19mm
1800431
CL NAIL 35mm 18G 1.2
1800421
CL STAPLE TYPE90 25mm
1800435
CL NAIL 40mm 18G 1.2
1800423
CL STAPLES TYPE90 32mm
1800436
CL NAIL 50mm 18G 1.2
1800427
CL STAPLES TYPE90 40mm
1800437
2
Parts & Service: 020 8988 7400 / E-mail: [email protected] or [email protected]
SAFETY INSTRUCTIONS
WARNING: WHEN USING ELECTRIC TOOLS, BASIC SAFETY PRECAUTIONS,
INCLUDING THE FOLLOWING, SHOULD ALWAYS BE FOLLOWED TO REDUCE
THE RISK OF FIRE, ELECTRIC SHOCK AND PERSONAL INJURY.
WARNING: READ ALL THESE INSTRUCTIONS BEFORE OPERATING THIS
PRODUCT AND SAVE THESE INSTRUCTIONS FOR FUTURE REFERENCE.
For safe operation:
1. Keep work area clean. - Cluttered areas and benches invite injuries.
2. Consider work area environment. - Do not expose power tools to rain. Do not use
power tools in damp or wet locations. Keep work area well lit. Do not use power
tools where there is risk to cause fire or explosion.
3. Guard against electric shock. - Avoid body contact with earthed or grounded
surfaces (e.g. pipes, radiators, ranges, refrigerators).
4. Keep children away. - Do not let visitors touch the tool. All visitors should be kept
away from area.
5. Store idle tools. - When not in use, tools should be stored in a dry, high or locked up
place, out of reach of children.
6. Do not force the tool. -It will do the job better and safer at the rate for which it was
intended.
7. Use the right tool. - Do not force small tools or attachments to do the job of a heavy
duty tool. Do not use tools for purposes not intended.
8. Dress properly. -Do not wear loose clothing or jewellery, they can be caught in
moving parts. Rubber gloves and non-skid footwear are recommended when
working outdoors. Wear protecting hair covering to contain long hair.
9. Use safety glasses. - Always wear suitable eye protection, manufactured to the
latest European Safety Standards, when firing the stapler/nailer. Eyeglasses are NOT
safety glasses
10. Do not abuse the cable on the charger. - Never carry the charger by the cable or
yank it to disconnect it from the socket. Keep the cable away from heat, oil and
sharp edges.
11. Secure work. - Use clamps or a vice to hold the work. It is safer than using your hand
and it frees both hands to operate the tool.
12. Do not overreach. - Keep proper footing and balance at all times.
13. Maintain tool with care. - Inspect charger cable periodically and if damaged have it
repaired by an authorized service facility. Keep handles dry, clean and free from oil
and grease.
14. Disconnect tools. - When not in use, before servicing and when changing
accessories such as nails or staples.
15. Avoid unintentional starting. - Do not carry a tool with a finger on the trigger.
3
Parts & Service: 020 8988 7400 / E-mail: [email protected] or [email protected]
16. Stay alert. - Watch what you are doing. Use common sense. Do not operate tool
when you are tired.
17. Check damaged parts. - A guard or other part that is damaged should be properly
repaired or replaced by an authorized service centre unless otherwise indicated in
this instruction manual. Have defective parts replaced by an authorised service
facility.
18. Warning. - The use of any accessory or attachment, other than those recommended
in this instruction manual, may present a risk of personal injury.
19. Have your tool repaired by a qualified person. - This electric tool is in accordance
with the relevant safety requirements. Repairs should only be carried out by qualified
persons using original spare parts, otherwise this may result in considerable danger to
the user.
CORDLESS TOOL USE AND CARE
1. Ensure the trigger switch is not being pressed before inserting battery pack.
2. Recharge only with the charger supplied by the manufacturer. A charger that is
suitable for one type of battery pack may create a risk of fire when used with
another.
3. When the battery pack is not in use, keep it away from other metal objects like
paper clips, coins, keys, nails, screws, or other small metal objects that can make a
connection from one terminal to another. Shorting to battery terminals together may
cause burns or a fire.
4. If damaged, corrosive liquid may be ejected from the battery; avoid contact. If
contact accidentally occurs, flush with water. If liquid contacts eyes, additionally
seek medical help. Liquid ejected from the battery may cause irritation or burns.
5. If the cable on the charger is damaged, it must be replaced by a service agent.
MACHINE SPECIFIC
1. Secure the workpiece. A workpiece held with clamping devices or in a vice is held
more securely than by hand.
2. Before any work on the machine itself (e.g. maintenance) as well as during transport
and storage, remove the battery from the power tool. There is danger of injury when
unintentionally actuating the trigger switch.
3. Do not open the battery. Danger of short-circuit.
4. Protect the battery against heat, e.g., also against continuous sun irradiation and
fire. There is danger of explosion.
5. Do not short-circuit the battery. There is danger of explosion.
6. Keep your fingers away from the stapler/nailer head. There is danger of injury when
unintentionally actuating the trigger switch.
7. Never point the machine at persons or animals. Staples or nails shot from a short
distance can cause considerable injuries.
8. Do not use the machine to fasten electrical wiring. Contact with electric wires can
lead to fire and electric shock.
4
Parts & Service: 020 8988 7400 / E-mail: [email protected] or [email protected]
BATTERY CHARGER
1. Observe the mains voltage! The voltage of the power supply must correspond with
the data given on the rating plate of the battery charger.
2. Keep the battery charger away from rain or moisture. Penetration of water into the
battery charger increase the risk of electric shock.
3. Keep the battery charger clean. Contamination can lead to danger of electric
shock.
4. Before each use, check the battery charger, cable and plug. If damage is
detected, do not use. Never open the battery charger yourself. Have repairs
performed only by a qualified technician and only using original spare parts.
Damaged battery chargers, cables and plugs increase the risk of an electric shock.
5. Do not operate the battery charger on easily inflammable surfaces (e.g., paper,
textiles, etc.) or surroundings. The heating of the battery charger during the charging
process can pose a fire hazard.
SAFETY SYMBOLS.
Read
manual
before use
Wear suitable
eye protection
Class II
applience
Indoor Use
Only
Wear Hearing
Protection
Do not
immerse in
liquid
Isolation
transformer
Do not use when on scaffolding or
ladders
SAFETY SYSTEM
FULL SEQUENTIAL ACTUATION
This stapler/nailer has an actuation system in which the trigger and safety yoke
are linked in such a way that it will only operate if the trigger is pulled after the
safety yoke (muzzle) has been applied to the work. Further operations require
the user to release the trigger and lift the safety yoke (muzzle) away from the
workpiece before the next use.
5
Parts & Service: 020 8988 7400 / E-mail: [email protected] or [email protected]
HOW TO CHARGE THE BATTERY
WARNING: THE BATTERY CAN BE WARM TO THE TOUCH WHEN REMOVED
FROM THE TOOL. ALWAYS LET THE BATTERY COOL DOWN BEFORE
RECHARGING. DO NOT RECHARGE A WARM BATTERY.
NOTE: New batteries must be charged before use.
1. Connect the battery charger to the power supply.
2. Slide the battery charger clip into
the battery as shown.
• Charging takes approximately
90 minutes.
3. Remove the charger clip from the
battery.
4. Disconnect the charger from the
power supply.
FITTING THE BATTERY PACK
TO FIT THE BATTERY
1. Slide the battery pack into the
stapler/nailer until it clicks into
place.
TO REMOVE THE BATTERY
1. Press and hold the release buttons
on either side of the battery.
2. Slide the battery pack out of the
stapler/nailer.
6
Parts & Service: 020 8988 7400 / E-mail: [email protected] or [email protected]
PREPARING THE STAPLER/NAILER FOR USE
FILLING THE MAGAZINE:
CAUTION: KEEP YOUR FINGERS WELL AWAY FROM THE TRIGGER,
1. Remove the battery from the
stapler/nailer before filling the
magazine.
2. Press and hold the magazine
catch then pull out the magazine
3. Insert the staple strip or the nail
strip.
• Hold the stapler/nailer slightly
inclined while inserting the nail
strip so that the nails rest
against the side wall.
• Only fasteners specified in the
specification table on page 10
should be used.
4. Close the magazine, making sure it clicks shut.
7
Parts & Service: 020 8988 7400 / E-mail: [email protected] or [email protected]
USING THE STAPLER/NAILER
1. Pay attention to the SAFETY INSTRUCTIONS on page3.
2. Hold the tool securely and press
the nose against the work as
shown.
• Always hold the stapler/nailer
square to the workpiece, never
at an angle.
3. Gently pull the trigger.
4. Release the trigger and lift the
stapler/nailer away from the
workpiece.
5. Repeat steps 2-4 as required.
6. In the event of long breaks in work
or at the end of the working shift,
remove the battery and empty
the magazine.
TIPS
• Do not intentionally activate the stapler/nailer if the magazine is
empty.
• Do not attempt to staple/nail at the edge of a workpiece, the edge
could fail, causing a nail or staple to shoot straight through.
8
Parts & Service: 020 8988 7400 / E-mail: [email protected] or [email protected]
TO CLEAR A JAM
Do not pull the trigger until the jam has been cleared, as this could cause
serious damage:
WARNING: REMOVE THE BATTERY FROM THE STAPLER/NAILER BEFORE
CARRYING OUT ANY SERVICING OR MAINTENANCE
1. Remove the battery from the
stapler/nailer.
2. Release the magazine catch and
slide the magazine open.
3. Remove all staples/nails from the
chamber.
4. Unclip the face plate using the
clamping lever shown and
remove any jammed fasteners.
• Use pliers if necessary.
5. Once the jammed fastener is
removed, close the clamping
lever, reload the stapler/nailer
and continue.
9
Parts & Service: 020 8988 7400 / E-mail: [email protected] or [email protected]
MAINTENANCE
WARNING: REMOVE THE BATTERY FROM THE STAPLER/NAILER BEFORE
CARRYING OUT ANY SERVICING OR MAINTENANCE
• The stapler/nailer does not require any specific maintenance other
than keeping it free from any dirt or debris. This can be done using a
clean dry cloth and/or brush. Do not use solvent or alcohol based
cleaner as it could damage the casing.
• There are no user serviceable parts on the stapler/nailer. If there is a
problem please contact your nearest CLARKE dealer.
• Do not open the casing, the guarantee will be void if the casing has
been opened or if the stapler/nailer has been tampered with.
• The use of parts other than CLARKE replacement parts may result in
safely hazards, decreased tool performance and will invalidate your
warranty.
SPECIFICATION
Input Voltage
18V DC
Max Firing Speed
20 shots/min.
Maximum Magazine Capacity
100 Nails or 100 Staples
Nail Type
18 Gauge (F-Type) 15-50mm
Staple Type
Type90 16-40 mm
Dimensions
300 x 270 x 90 mm
Weight inc battery
3.5 kg
Activation Mode
Full Sequential Actuation
Noise Characteristic Values In Accordance With EN12549.
Sound Pressure:
84.1 dB(A)
Sound Power Measured LwA
95.1 dBLwA
Vibration Characteristic Values In
Accordance With ISO 8662-1 1: 1999
2.879 m/s2
10
Parts & Service: 020 8988 7400 / E-mail: [email protected] or [email protected]
DECLARATION OF CONFORMITY
11
Parts & Service: 020 8988 7400 / E-mail: [email protected] or [email protected]