1
development
version 1.0
User’s Manual
Credits
Typhoon Development team:
Software: Magnus Lidström
Manual and illustrations: Alexander Jean-Claude Bottema
Additional programming and illustrations: Fredrik Lidström
Additional contributions: Jon Allan, Torsten Alm and Björn Hansen
"... a group of rather smart Swedes ... "
Sound On Sound, October 1993
Thanks to:
Michael Kahl (Think C™)
Daniel Karlsson
Zoltan Kelemen
Donald Knuth ( TEX )
Leslie Lamport ( LATEX )
Bob Morrison
Linus Thorvalds (Linux)
Mike Turner
Andreas Wicklund
Copyright ©1993 by Magnus Lidström / NuEdge Development. All Rights Reserved.
The software was developed with Think C™ and various utilities in a Macintosh environment.
This manual was typographically set with LATEX and typeset with TEX running in a Linux environment.
License Agreement
License Agreement
The enclosed software product and this manual are copyrighted and all rights reserved by NuEdge Development. No
part of this manual or any of the accompanying materials may be copied, reproduced, or translated in any form or
medium without the prior written consent of NuEdge Development.
Limited Warranty on Media
NuEdge Development warrants to the original consumer purchaser that the diskette furnished in this product will be free
from defects in materials and workmanship under normal use for a period of ninety (90) days from the date of purchase
(as evidenced by your receipt). Defective media which has not been subjected to misuse, excessive wear or damage due
to carelessness may be returned during the 90-day period without charge.
To obtain a replacement diskette, please return the diskette only, postage prepaid, to NuEdge Development, at the
address below, accompanied by a photocopy of your dated receipt, a statement of the defect, and your name and return
address. To replace defective media after expiration of the warranty period, also enclose $10 U.S. NuEdge Development
will mail a replacement to you.
NOTE: Do not send any other materials which are essential to the use of the program. NuEdge Development assumes
no responsibility for the return of original product packaging or any materials other than the replacement diskette.
THE SOFTWARE, DISKETTE AND DOCUMENTATION ARE PROVIDED "AS IS." EXCEPT THE LIMITED WARRANTY
DESCRIBED ABOVE, THERE ARE NO WARRANTY OF MERCHANTABILITY, NO WARRANTY OF FITNESS FOR A
PARTICULAR USE, AND NO OTHER WARRANTY OF ANY KIND, EITHER EXPRESSED OR IMPLIED REGARDING THE
SOFTWARE, DISKETTE, OR DOCUMENTATION. ACCORDINGLY, THE ENTIRE RISK AS TO THE USE, RESULTS AND
PERFORMANCE OF THE SOFTWARE, DISKETTE AND DOCUMENTATION IS ASSUMED BY YOU. IN NO EVENT WILL
NUEDGE DEVELOPMENT BE LIABLE TO YOU OR ANYONE ELSE FOR ANY CONSEQUENTIAL, SPECIAL, OR INDIRECT
DAMAGES RESULTING FROM POSSESSION, USE, OR MALFUNCTION OF THIS PRODUCT, INCLUDING WITHOUT
LIMITATION, DAMAGE TO PROPERTY AND, TO THE EXTENT PERMITTED BY LAW, DAMAGES FOR PERSONAL
INJURY, EVEN IF NUEDGE DEVELOPMENT HAS BEEN ADVISED OF THE POSSIBILITY OF ANY SUCH DAMAGES OR
LOSS.
All registered trademarks and names are properties of their respective owners.
Notice: NuEdge Development reserves the right to make improvements in the product described in this manual at any
time and without notice.
NuEdge Development
Fredrika Bremers Gata 24
S-129 50 HÄGERSTEN
SWEDEN
Fax:
BBS:
Nat.
08-88 94 27
Int. +46-8-88 94 27
Nat.
08-708 88 35
Int. +46-8-708 88 35
Fidonet:2:201/610
(user: NuEdge, password: NuEdge)
(user: Typhoon)
(Fax, BBS and Fidonet are open for user support to registered users only!)
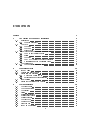
Contents
Preface
1
An Overview of the Sound Architecture
1.1
Basic Items : : : : : : : : : : : : : : : : : : : : :
1.1.1 The Item Hierarchy : : : : : : : : : : : : : :
1.2
The Wave : : : : : : : : : : : : : : : : : : : : : :
1.2.1 The Pitch : : : : : : : : : : : : : : : : : : :
1.2.2 The Loop : : : : : : : : : : : : : : : : : : :
1.2.3 Stereo Waves : : : : : : : : : : : : : : : : :
1.3
The Voice and the Parameters of the Groups : : :
1.3.1 The Key and Velocity Ranges : : : : : : : :
1.3.2 Splits : : : : : : : : : : : : : : : : : : : : : :
1.3.3 The Pitch : : : : : : : : : : : : : : : : : : :
1.3.4 The AEG (Amplitude Envelope Generator)
1.3.5 Modulations and the Modulation Table : : :
1.4
The Performance : : : : : : : : : : : : : : : : : :
1.4.1 The Program Change Table : : : : : : : : :
2
3
2.1
2.2
2.3
The Storage System
Items & Files : : : : : : : : : : : : : :
Loading Items into Memory : : : : : :
Saving Items to Diskettes : : : : : : : :
2.3.1 Which Save Option to Use : : : :
2.3.2 Saving Items on Several Diskettes
2.4
Item Versions : : : : : : : : : : : : : :
2.5
Saving the Condition of the Machine :
3.1
3.2
3.3
3.4
3.5
3.6
3.7
3.8
3.9
3.10
3.11
The User Interface
The Front Panel : : : :
The Menu Buttons : :
The Display : : : : : :
Fields : : : : : : : : : :
Horizontal Hierarchy :
Editing Field Values :
Editing Features : : : :
The List Mode : : : : :
Monitor Mode : : : : :
\Fast Jumps" : : : : :
Item Name Extensions
:
:
:
:
:
:
:
:
:
:
:
:
:
:
:
:
:
:
:
:
:
:
:
:
:
:
:
:
:
:
:
:
:
:
:
:
:
:
:
:
:
:
:
:
:
:
:
:
:
:
:
:
:
:
:
:
:
:
:
:
:
:
:
:
:
:
:
:
:
:
:
:
:
:
:
:
:
:
:
:
:
:
:
:
:
:
:
:
i
:
:
:
:
:
:
:
:
:
:
:
:
:
:
:
:
:
:
:
:
:
:
:
:
:
:
:
:
:
:
:
:
:
:
:
:
:
:
:
:
:
:
:
:
:
:
:
:
:
:
:
:
:
:
:
:
:
:
:
:
:
:
:
:
:
:
:
:
:
:
:
:
:
:
:
:
:
:
:
:
:
:
:
:
:
:
:
:
:
:
:
:
:
:
:
:
:
:
:
:
:
:
:
:
:
:
:
:
:
:
:
:
:
:
:
:
:
:
:
:
:
:
:
:
:
:
:
:
:
:
:
:
:
:
:
:
:
:
:
:
:
:
:
:
:
:
:
:
:
:
:
:
:
:
:
:
:
:
:
:
:
:
:
:
:
:
:
:
:
:
:
:
:
:
:
:
:
:
:
:
:
:
:
:
:
:
:
:
:
:
:
:
:
:
:
:
:
:
:
:
:
:
:
:
:
:
:
:
:
:
:
:
:
:
:
:
:
:
:
:
:
:
:
:
:
:
:
:
:
:
:
:
:
:
:
:
:
:
:
:
:
:
:
:
:
:
:
:
:
:
:
:
:
:
:
:
:
:
:
:
:
:
:
:
:
:
:
:
:
:
:
:
:
:
:
:
:
:
:
:
:
:
:
:
:
:
:
:
:
:
:
:
:
:
:
:
:
:
:
:
:
:
:
:
:
:
:
:
:
:
:
:
:
:
:
:
:
:
:
:
:
:
:
:
:
:
:
:
:
:
:
:
:
:
:
:
:
:
:
:
:
:
:
:
:
:
:
:
:
:
:
:
:
:
:
:
:
:
:
:
:
:
:
:
:
:
:
:
:
:
:
:
:
:
:
:
:
:
:
:
:
:
:
:
:
:
:
:
:
:
:
:
:
:
:
:
:
:
:
:
:
:
:
:
:
:
:
:
:
:
:
:
:
:
:
:
:
:
:
:
:
:
:
:
:
:
:
:
:
:
:
:
:
:
:
:
:
:
:
:
:
:
:
:
:
:
:
:
:
:
:
:
:
:
:
:
:
:
:
:
:
:
:
:
:
:
:
:
:
:
:
:
:
:
:
:
:
:
:
:
:
:
:
:
:
:
:
:
:
:
:
:
:
:
:
:
:
:
:
:
:
:
:
:
:
:
:
:
:
:
:
:
:
:
:
:
:
:
:
:
:
:
:
:
:
:
:
:
:
:
:
:
:
:
:
:
:
:
:
:
:
:
:
:
:
:
:
:
:
:
:
:
:
:
:
:
:
:
:
:
:
:
:
:
:
:
:
:
:
:
:
:
:
:
:
:
:
:
:
:
:
:
:
:
:
:
:
:
:
:
:
:
:
:
:
:
:
:
:
:
:
:
:
:
:
:
:
:
:
:
:
:
:
:
:
:
:
:
:
:
:
:
:
:
:
:
:
:
:
:
:
:
:
:
:
:
:
:
:
:
:
:
:
:
:
:
:
:
:
:
:
:
:
:
:
:
:
:
:
:
:
:
:
1
3
3
3
4
5
5
5
6
6
8
8
9
9
12
12
15
15
16
16
17
17
17
18
19
19
19
19
20
21
21
21
22
22
22
23
CONTENTS
ii
4
4.1
4.2
4.3
4.4
4.5
4.6
4.7
4.8
Reference Manual
Performance Select : : : : : : : : : : : : : :
System Setup : : : : : : : : : : : : : : : : :
4.2.1 Master : : : : : : : : : : : : : : : : : :
4.2.2 X-Cntls (External Controllers) : : : : :
4.2.3 Slider (Data Slider) : : : : : : : : : : :
4.2.4 Remote : : : : : : : : : : : : : : : : : :
4.2.5 RS-422 : : : : : : : : : : : : : : : : : :
System Setup Utilities : : : : : : : : : : : :
4.3.1 Load : : : : : : : : : : : : : : : : : : :
4.3.2 Save : : : : : : : : : : : : : : : : : : :
4.3.3 Memory : : : : : : : : : : : : : : : : :
4.3.4 Items : : : : : : : : : : : : : : : : : : :
4.3.5 Disk : : : : : : : : : : : : : : : : : : :
4.3.6 Files : : : : : : : : : : : : : : : : : : :
Performance Edit : : : : : : : : : : : : : : :
4.4.1 Entries : : : : : : : : : : : : : : : : : :
4.4.2 Pgm chg (Program Change) : : : : : :
4.4.3 Ext trg (External Triggering) : : : : :
Performance Edit Utilities : : : : : : : : : :
4.5.1 Load : : : : : : : : : : : : : : : : : : :
4.5.2 Save : : : : : : : : : : : : : : : : : : :
4.5.3 Delete : : : : : : : : : : : : : : : : : :
4.5.4 Rename : : : : : : : : : : : : : : : : :
4.5.5 Copy : : : : : : : : : : : : : : : : : : :
4.5.6 Swap : : : : : : : : : : : : : : : : : : :
4.5.7 New : : : : : : : : : : : : : : : : : : : :
Voice Edit : : : : : : : : : : : : : : : : : : :
4.6.1 Range : : : : : : : : : : : : : : : : : :
4.6.2 Waves : : : : : : : : : : : : : : : : : :
4.6.3 Pitch : : : : : : : : : : : : : : : : : : :
4.6.4 Volume : : : : : : : : : : : : : : : : : :
4.6.5 Filter : : : : : : : : : : : : : : : : : : :
4.6.6 Output : : : : : : : : : : : : : : : : : :
4.6.7 AEG (Amplitude Envelope Generator)
4.6.8 Mode : : : : : : : : : : : : : : : : : : :
4.6.9 Mod Tbl (Modulation Table) : : : : : :
4.6.10 LFO1 (Low Frequency Oscillator) : : :
4.6.11 LFO2 (Low Frequency Oscillator) : : :
4.6.12 ENV1 (Envelope #1) : : : : : : : : : :
4.6.13 ENV2 (Envelope #2) : : : : : : : : : :
Voice Edit Utilities : : : : : : : : : : : : : :
4.7.1 Load : : : : : : : : : : : : : : : : : : :
4.7.2 Save : : : : : : : : : : : : : : : : : : :
4.7.3 Delete : : : : : : : : : : : : : : : : : :
4.7.4 Rename : : : : : : : : : : : : : : : : :
4.7.5 Copy : : : : : : : : : : : : : : : : : : :
4.7.6 Swap : : : : : : : : : : : : : : : : : : :
4.7.7 New : : : : : : : : : : : : : : : : : : : :
Wave Edit : : : : : : : : : : : : : : : : : : :
4.8.1 Trim : : : : : : : : : : : : : : : : : : :
4.8.2 Loop : : : : : : : : : : : : : : : : : : :
4.8.3 Pitch : : : : : : : : : : : : : : : : : : :
4.8.4 S-rate (Sample Rate Conversion) : : :
:
:
:
:
:
:
:
:
:
:
:
:
:
:
:
:
:
:
:
:
:
:
:
:
:
:
:
:
:
:
:
:
:
:
:
:
:
:
:
:
:
:
:
:
:
:
:
:
:
:
:
:
:
:
:
:
:
:
:
:
:
:
:
:
:
:
:
:
:
:
:
:
:
:
:
:
:
:
:
:
:
:
:
:
:
:
:
:
:
:
:
:
:
:
:
:
:
:
:
:
:
:
:
:
:
:
:
:
:
:
:
:
:
:
:
:
:
:
:
:
:
:
:
:
:
:
:
:
:
:
:
:
:
:
:
:
:
:
:
:
:
:
:
:
:
:
:
:
:
:
:
:
:
:
:
:
:
:
:
:
:
:
:
:
:
:
:
:
:
:
:
:
:
:
:
:
:
:
:
:
:
:
:
:
:
:
:
:
:
:
:
:
:
:
:
:
:
:
:
:
:
:
:
:
:
:
:
:
:
:
:
:
:
:
:
:
:
:
:
:
:
:
:
:
:
:
:
:
:
:
:
:
:
:
:
:
:
:
:
:
:
:
:
:
:
:
:
:
:
:
:
:
:
:
:
:
:
:
:
:
:
:
:
:
:
:
:
:
:
:
:
:
:
:
:
:
:
:
:
:
:
:
:
:
:
:
:
:
:
:
:
:
:
:
:
:
:
:
:
:
:
:
:
:
:
:
:
:
:
:
:
:
:
:
:
:
:
:
:
:
:
:
:
:
:
:
:
:
:
:
:
:
:
:
:
:
:
:
:
:
:
:
:
:
:
:
:
:
:
:
:
:
:
:
:
:
:
:
:
:
:
:
:
:
:
:
:
:
:
:
:
:
:
:
:
:
:
:
:
:
:
:
:
:
:
:
:
:
:
:
:
:
:
:
:
:
:
:
:
:
:
:
:
:
:
:
:
:
:
:
:
:
:
:
:
:
:
:
:
:
:
:
:
:
:
:
:
:
:
:
:
:
:
:
:
:
:
:
:
:
:
:
:
:
:
:
:
:
:
:
:
:
:
:
:
:
:
:
:
:
:
:
:
:
:
:
:
:
:
:
:
:
:
:
:
:
:
:
:
:
:
:
:
:
:
:
:
:
:
:
:
:
:
:
:
:
:
:
:
:
:
:
:
:
:
:
:
:
:
:
:
:
:
:
:
:
:
:
:
:
:
:
:
:
:
:
:
:
:
:
:
:
:
:
:
:
:
:
:
:
:
:
:
:
:
:
:
:
:
:
:
:
:
:
:
:
:
:
:
:
:
:
:
:
:
:
:
:
:
:
:
:
:
:
:
:
:
:
:
:
:
:
:
:
:
:
:
:
:
:
:
:
:
:
:
:
:
:
:
:
:
:
:
:
:
:
:
:
:
:
:
:
:
:
:
:
:
:
:
:
:
:
:
:
:
:
:
:
:
:
:
:
:
:
:
:
:
:
:
:
:
:
:
:
:
:
:
:
:
:
:
:
:
:
:
:
:
:
:
:
:
:
:
:
:
:
:
:
:
:
:
:
:
:
:
:
:
:
:
:
:
:
:
:
:
:
:
:
:
:
:
:
:
:
:
:
:
:
:
:
:
:
:
:
:
:
:
:
:
:
:
:
:
:
:
:
:
:
:
:
:
:
:
:
:
:
:
:
:
:
:
:
:
:
:
:
:
:
:
:
:
:
:
:
:
:
:
:
:
:
:
:
:
:
:
:
:
:
:
:
:
:
:
:
:
:
:
:
:
:
:
:
:
:
:
:
:
:
:
:
:
:
:
:
:
:
:
:
:
:
:
:
:
:
:
:
:
:
:
:
:
:
:
:
:
:
:
:
:
:
:
:
:
:
:
:
:
:
:
:
:
:
:
:
:
:
:
:
:
:
:
:
:
:
:
:
:
:
:
:
:
:
:
:
:
:
:
:
:
:
:
:
:
:
:
:
:
:
:
:
:
:
:
:
:
:
:
:
:
:
:
:
:
:
:
:
:
:
:
:
:
:
:
:
:
:
:
:
:
:
:
:
:
:
:
:
:
:
:
:
:
:
:
:
:
:
:
:
:
:
:
:
:
:
:
:
:
:
:
:
:
:
:
:
:
:
:
:
:
:
:
:
:
:
:
:
:
:
:
:
:
:
:
:
:
:
:
:
:
:
:
:
:
:
:
:
:
:
:
:
:
:
:
:
:
:
:
:
:
:
:
:
:
:
:
:
:
:
:
:
:
:
:
:
:
:
:
:
:
:
:
:
:
:
:
:
:
:
:
:
:
:
:
:
:
:
:
:
:
:
:
:
:
:
:
:
:
:
:
:
:
:
:
:
:
:
:
:
:
:
:
:
:
:
:
:
:
:
:
:
:
:
:
:
:
:
:
:
:
:
:
:
:
:
:
:
:
:
:
:
25
25
26
26
26
26
26
27
28
28
28
29
30
30
30
32
32
35
35
36
36
36
36
36
36
37
37
38
38
39
41
41
42
42
44
44
45
48
50
50
50
51
51
51
51
51
52
52
52
53
53
54
55
55
CONTENTS
4.8.5 XFade (Crossfade) : : : : : : : : : : : : : : : :
4.8.6 Gain : : : : : : : : : : : : : : : : : : : : : : :
4.8.7 Join & Split : : : : : : : : : : : : : : : : : : :
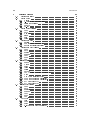
4.9
Wave Edit Utilities : : : : : : : : : : : : : : : : : :
4.9.1 Load : : : : : : : : : : : : : : : : : : : : : : :
4.9.2 Save : : : : : : : : : : : : : : : : : : : : : : :
4.9.3 Delete : : : : : : : : : : : : : : : : : : : : : :
4.9.4 Rename : : : : : : : : : : : : : : : : : : : : :
4.9.5 Copy : : : : : : : : : : : : : : : : : : : : : : :
4.9.6 Swap : : : : : : : : : : : : : : : : : : : : : : :
4.9.7 Dump : : : : : : : : : : : : : : : : : : : : : :
4.10 Sample : : : : : : : : : : : : : : : : : : : : : : : : :
4.10.1 X-trig (Extra Sample Trigger) : : : : : : : : :
4.10.2 Frequency (The Frequency) : : : : : : : : : :
4.10.3 Time (The Time Limit) : : : : : : : : : : : : :
4.10.4 Auto (Automatically Performed Options) : : :
4.10.5 The Sample Monitor & Internal Triggering : :
4.10.6 The Threshold Detection Monitor : : : : : : :
4.10.7 Resample or Keep the Recently Sampled Data
iii
:
:
:
:
:
:
:
:
:
:
:
:
:
:
:
:
:
:
:
:
:
:
:
:
:
:
:
:
:
:
:
:
:
:
:
:
:
:
:
:
:
:
:
:
:
:
:
:
:
:
:
:
:
:
:
:
:
:
:
:
:
:
:
:
:
:
:
:
:
:
:
:
:
:
:
:
:
:
:
:
:
:
:
:
:
:
:
:
:
:
:
:
:
:
:
:
:
:
:
:
:
:
:
:
:
:
:
:
:
:
:
:
:
:
:
:
:
:
:
:
:
:
:
:
:
:
:
:
:
:
:
:
:
:
:
:
:
:
:
:
:
:
:
:
:
:
:
:
:
:
:
:
:
:
:
:
:
:
:
:
:
:
:
:
:
:
:
:
:
:
:
:
:
:
:
:
:
:
:
:
:
:
:
:
:
:
:
:
:
:
:
:
:
:
:
:
:
:
:
:
:
:
:
:
:
:
:
:
:
:
:
:
:
:
:
:
:
:
:
:
:
:
:
:
:
:
:
:
:
:
:
:
:
:
:
:
:
:
:
:
:
:
:
:
:
:
:
:
:
:
:
:
:
:
:
:
:
:
:
:
:
:
:
:
:
:
:
:
:
:
:
:
:
:
:
:
:
:
:
:
:
:
:
:
:
:
:
:
:
:
:
:
:
:
:
:
:
:
:
:
:
:
:
:
56
56
56
58
58
58
58
59
59
59
59
60
60
60
60
61
61
61
62
iv
CONTENTS
List of Figures
1.1
1.2
1.3
1.4
1.5
1.6
1.7
1.8
1.9
1.10
1.11
1.12
1.13
1.14
1.15
1.16
1.17
1.18
Categories of items and their lists : : : : : : : : :
The item hierarchy : : : : : : : : : : : : : : : : :
The sampling process : : : : : : : : : : : : : : : :
The wave : : : : : : : : : : : : : : : : : : : : : : :
The loop of a wave : : : : : : : : : : : : : : : : :
Available parameters of the group : : : : : : : : :
Key-velocity diagram : : : : : : : : : : : : : : : :
Single wave bound to the key range of the group :
Creating a multi-sampled instrument with groups
Splitting the range : : : : : : : : : : : : : : : : :
The pitch shifter : : : : : : : : : : : : : : : : : :
The \pitch" played when using pitchless waves : :
The AEG : : : : : : : : : : : : : : : : : : : : : :
Illustrating modulation : : : : : : : : : : : : : : :
The modulation table : : : : : : : : : : : : : : : :
The LFO : : : : : : : : : : : : : : : : : : : : : : :
The envelope : : : : : : : : : : : : : : : : : : : :
Entries of the performance : : : : : : : : : : : : :
:
:
:
:
:
:
:
:
:
:
:
:
:
:
:
:
:
:
:
:
:
:
:
:
:
:
:
:
:
:
:
:
:
:
:
:
:
:
:
:
:
:
:
:
:
:
:
:
:
:
:
:
:
:
:
:
:
:
:
:
:
:
:
:
:
:
:
:
:
:
:
:
:
:
:
:
:
:
:
:
:
:
:
:
:
:
:
:
:
:
:
:
:
:
:
:
:
:
:
:
:
:
:
:
:
:
:
:
:
:
:
:
:
:
:
:
:
:
:
:
:
:
:
:
:
:
:
:
:
:
:
:
:
:
:
:
:
:
:
:
:
:
:
:
:
:
:
:
:
:
:
:
:
:
:
:
:
:
:
:
:
:
:
:
:
:
:
:
:
:
:
:
:
:
:
:
:
:
:
:
:
:
:
:
:
:
:
:
:
:
:
:
:
:
:
:
:
:
:
:
:
:
:
:
:
:
:
:
:
:
:
:
:
:
:
:
:
:
:
:
:
:
:
:
:
:
:
:
:
:
:
:
:
:
:
:
:
:
:
:
:
:
:
:
:
:
:
:
:
:
:
:
:
:
:
:
:
:
:
:
:
:
:
:
:
:
:
:
:
:
:
:
:
:
:
:
:
:
:
:
:
:
:
:
:
:
:
:
:
:
:
:
:
:
:
:
:
:
:
:
:
:
:
:
:
:
3
4
4
5
5
6
7
7
8
8
9
9
9
10
11
12
12
14
2.1
2.2
2.3
2.4
Items stored as les : : : : : : : : :
Files and their dependencies : : : :
Voice loaded into memory : : : : :
Making a copy of the performance :
:
:
:
:
:
:
:
:
:
:
:
:
:
:
:
:
:
:
:
:
:
:
:
:
:
:
:
:
:
:
:
:
:
:
:
:
:
:
:
:
:
:
:
:
:
:
:
:
:
:
:
:
:
:
:
:
:
:
:
:
:
:
:
:
:
:
:
:
15
16
16
17
3.1
The front panel
: : : : : : : : : : : : : : : : : : : : : : : : : : : : : : : : : : : :
19
4.1
4.2
4.3
4.4
4.5
4.6
4.7
4.8
4.9
4.10
4.11
4.12
4.13
4.14
4.15
4.16
4.17
Entries of the performance : : : : : : : : : : : : : : : : : :
Individual outputs : : : : : : : : : : : : : : : : : : : : : :
Using dierent voices on the same MIDI channel : : : : : :
The eect of using program change codes in performances
The key range : : : : : : : : : : : : : : : : : : : : : : : : :
Velocity range : : : : : : : : : : : : : : : : : : : : : : : : :
Designating splits by using split points : : : : : : : : : : :
Moving split points : : : : : : : : : : : : : : : : : : : : : :
Velocity sensitivity : : : : : : : : : : : : : : : : : : : : : :
The lter table : : : : : : : : : : : : : : : : : : : : : : : :
The AEG (Amplitude Envelope Generator) : : : : : : : :
A modulation table : : : : : : : : : : : : : : : : : : : : : :
Illustrating modulation : : : : : : : : : : : : : : : : : : : :
Using keyboard based velocity as modulation source : : :
Using range based velocity as modulation source : : : : : :
Using keyboard based key modulation : : : : : : : : : : :
Using range based key modulation : : : : : : : : : : : : : :
:
:
:
:
v
:
:
:
:
:
:
:
:
:
:
:
:
:
:
:
:
:
:
:
:
:
:
:
:
:
:
:
:
:
:
:
:
:
:
:
:
:
:
:
:
:
:
:
:
:
:
:
:
:
:
:
:
:
:
:
:
:
:
:
:
:
:
:
:
:
:
:
:
:
:
:
:
:
:
:
:
:
:
:
:
:
:
:
:
:
:
:
:
:
:
:
:
:
:
:
:
:
:
:
:
:
:
:
:
:
:
:
:
:
:
:
:
:
:
:
:
:
:
:
:
:
:
:
:
:
:
:
:
:
:
:
:
:
:
:
:
:
:
:
:
:
:
:
:
:
:
:
:
:
:
:
:
:
:
:
:
:
:
:
:
:
:
:
:
:
:
:
:
:
:
:
:
:
:
:
:
:
:
:
:
:
:
:
:
:
:
:
:
:
:
:
:
:
:
:
:
:
:
:
:
:
:
:
:
:
:
:
:
:
:
:
:
:
:
:
:
:
:
:
:
:
:
:
:
:
:
:
:
:
:
:
:
32
34
34
35
39
39
40
40
42
43
44
45
46
46
46
48
48
LIST OF FIGURES
vi
4.18
4.19
4.20
4.21
4.22
4.23
4.24
Available LFO shapes : : : :
The envelope : : : : : : : :
Trimming the wave : : : : :
Looping the wave : : : : : :
Auto loop nding procedure
Crossfading the wave : : : :
Gaining the wave : : : : : :
:
:
:
:
:
:
:
:
:
:
:
:
:
:
:
:
:
:
:
:
:
:
:
:
:
:
:
:
:
:
:
:
:
:
:
:
:
:
:
:
:
:
:
:
:
:
:
:
:
:
:
:
:
:
:
:
:
:
:
:
:
:
:
:
:
:
:
:
:
:
:
:
:
:
:
:
:
:
:
:
:
:
:
:
:
:
:
:
:
:
:
:
:
:
:
:
:
:
:
:
:
:
:
:
:
:
:
:
:
:
:
:
:
:
:
:
:
:
:
:
:
:
:
:
:
:
:
:
:
:
:
:
:
:
:
:
:
:
:
:
:
:
:
:
:
:
:
:
:
:
:
:
:
:
:
:
:
:
:
:
:
:
:
:
:
:
:
:
:
:
:
:
:
:
:
:
:
:
:
:
:
:
:
:
:
:
:
:
:
:
:
:
:
:
:
:
:
:
:
:
:
:
:
49
50
53
54
55
56
57
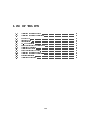
List of Tables
1.1
1.2
Available modulation sources : :
Available modulation destinations
4.1
4.2
4.3
4.4
4.5
4.6
4.7
4.8
4.9
4.10
4.11
4.12
Remote keys : : : : : : : : : : : : :
Transfer modes : : : : : : : : : : :
Transfer rates : : : : : : : : : : : :
MS-DOS extensions : : : : : : : : :
Output settings in the performance
Available key scalings : : : : : : : :
Available lter tables : : : : : : : :
Output settings in the voice : : : :
Available modulation sources : : :
Available modulation destinations :
External triggerings : : : : : : : : :
Available sample rates : : : : : : :
: : : : : : : : : : : : : : : : : : : : : : : : : :
: : : : : : : : : : : : : : : : : : : : : : : : : :
:
:
:
:
:
:
:
:
:
:
:
:
vii
:
:
:
:
:
:
:
:
:
:
:
:
:
:
:
:
:
:
:
:
:
:
:
:
:
:
:
:
:
:
:
:
:
:
:
:
:
:
:
:
:
:
:
:
:
:
:
:
:
:
:
:
:
:
:
:
:
:
:
:
:
:
:
:
:
:
:
:
:
:
:
:
:
:
:
:
:
:
:
:
:
:
:
:
:
:
:
:
:
:
:
:
:
:
:
:
:
:
:
:
:
:
:
:
:
:
:
:
:
:
:
:
:
:
:
:
:
:
:
:
:
:
:
:
:
:
:
:
:
:
:
:
:
:
:
:
:
:
:
:
:
:
:
:
:
:
:
:
:
:
:
:
:
:
:
:
:
:
:
:
:
:
:
:
:
:
:
:
:
:
:
:
:
:
:
:
:
:
:
:
:
:
:
:
:
:
:
:
:
:
:
:
:
:
:
:
:
:
:
:
:
:
:
:
:
:
:
:
:
:
:
:
:
:
:
:
:
:
:
:
:
:
:
:
:
:
:
:
:
:
:
:
:
:
:
:
:
:
:
:
:
:
:
:
:
:
:
:
:
:
:
:
:
:
:
:
:
:
:
:
:
:
:
:
:
:
:
:
:
:
:
:
:
:
:
:
:
:
:
:
:
:
:
:
:
:
:
:
13
13
27
27
27
31
33
41
43
44
47
49
60
60
viii
LIST OF TABLES
Preface
Typhoon is an entirely new system software for the Yamaha TX16W sampler. You will nd few
similarities between the original Yamaha operating system and Typhoon. It is therefore advisable
to read through this manual to get the most out of the new possibilities.
With Typhoon, the TX16W is no longer merely a sampler. Among the many features of
Typhoon there are powerful processing methods that will help you discover new possibilities in
sound creation. In spite of some problems with the TX16W hardware, we have eliminated most
of the frustrating limitations using advanced software techniques.
All modern samplers use dynamic audio channel allocation and with Typhoon the TX16W is
no longer an exception. Our attempt to turn the TX16W into a good modern sampler does not
stop there; to make the TX16W even more competitive with its counterparts we have added other
innovations such as free modulation (including modulation sources such as LFOs and envelopes),
audio le compression (30-50% savings), pretriggered threshold to prevent loss of transients during
sampling, advanced algorithms for pitch tracking, wave trimming and loop nding, good stereo
handling with pan possibilities and advanced storage utilities (which will ease the creation and
exchanging of sound library disks).
With these new features and improvements we hope that the TX16W will live for many years
to come. The development of Typhoon will of course continue, aiming for new goals not achieved
in this version. You can aect this development process by sending us your comments on the
software and this manual. Our primary goal has been to write an easy to use and yet powerful
operating system. Hopefully you will share our opinion that this goal has been achieved.
With this piece of software we hope to demonstrate that it is not only the hardware that determines the nal product. The science of programming is a vital and powerful part in the development
process and it should be treated with the same respect as the hardware.
The Typhoon Development Team (of NuEdge Development)
1
2
PREFACE
Chapter 1
An Overview of the Sound
Architecture
1.1 Basic Items
The sound architecture is built upon three categories of items. These are waves, voices and
performances. Each category is provided with a list wherein the items themselves are stored,
and the lists grow and shrink as necessary. \Empty spaces" are not created when items are
removed and new items are added to the end of the list.
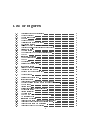
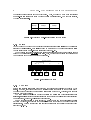
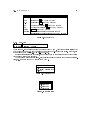
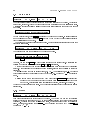
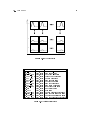
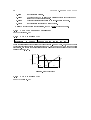
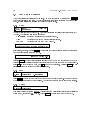
All the items are accessable through their numbers and you can give them names of up to eight
uppercase characters. Two totally dierent items are allowed to have identical names, although it
is not advisable (see Fig. 1.1).
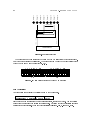
Performances
001:TECHNO
002:JARRE
003:MOZART
004:VANGELIS
Voices
Waves
001:PIANO
002:STRINGS
003:FLUTE
004:PIPEORG
005:CEMBALO
006:DRUMS
001:HIHAT
002:CHOIR
003:PIANOC3
004:PIANOF3
005:BASSDRUM
006:STRING
007:TEST
008:SNARE
009:TEST
Figure 1.1: Categories of items and their lists
The dierent types of items have dierent purposes. The waves represent single pieces of
sound such as a drum or a key of a piano. The voices typically represent instruments, e.g. a
ute. Finally, voices are grouped together in performances so that several voices can be played
simultaneously.
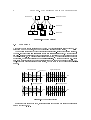
1.1.1 The Item Hierarchy
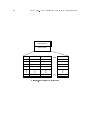
Items may use other items. For example, as we previously said, a performance is built upon
a number of voices. Thus, a performance uses voice items. Similarly, a voice uses waves to
describe the sounds for the various keys of the keyboard. There is no restriction on how many
times an item may be used; an item may be intensively shared. Therefore, the collection of all
the items form a complex item hierarchy (see Fig. 1.2).
3
CHAPTER 1. AN OVERVIEW OF THE SOUND ARCHITECTURE
4
Perf
A
Shared items
Voice
A
Wave
A
Perf
B
Voice
B
Wave
B
Voice
C
Wave
C
Performance items
Voice
D
Voice items
Wave
D
Wave items
Figure 1.2: The item hierarchy
1.2 The Wave
Waves are the most fundamental items in Typhoon. They represent single pieces of sound, e.g. a
snare drum or a key of a piano, and can be created by sampling a sound source.
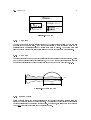
The sampling process can be thought of as taking instant \snap-shots" of the \stream of sound."
The snap-shots are called sample points (or sometimes samples for short). With several such
sampling-points the original sound can be reconstructed by \guessing" what the periods in between
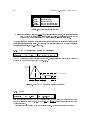
the points contain, e.g. by drawing straight lines between them. (There are several other methods
of \guessing," which is technically known as interpolation.) A higher sample rate (i.e. taking
snap-shots more frequently) makes the reconstruction of the sound more accurate (see Fig. 1.3).
Thus, higher sample rates result in better quality, but the trade o is the consumption of more
memory.
Low sample rate
Higher sample rate
Sample point
Time
Sampling process
Time
Sampling process
Time
Time
Figure 1.3: The sampling process
Besides the (sampled) audio data, other information such as pitch and length are also stored
in the wave (see Fig. 1.4).
1.2. THE WAVE
5
Wave
Length
33 kHz
Sample rate
"Time"
Pitch
Sampled audio data
Figure 1.4: The wave
1.2.1 The Pitch
The pitch of the sound is automatically detected by Typhoon during sampling, but you can also
manually set it to another value. Some sounds are pitchless by their nature and these can be
specially treated as pitchless sounds by setting their pitch to \none." The correct pitch will
always be played provided the pitch information in the wave of the sampled data is correct.
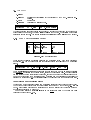
1.2.2 The Loop
The \loop" is an area of the wave that is continuously repeated until the wave stops playing. Unlike
many other popular sampling synthesizers today, the TX16W does not support looping between
two specic points; instead the loop is always an area at the end of the wave (see Fig. 1.5).
Time
Loop
Figure 1.5: The loop of a wave
1.2.3 Stereo Waves
Stereo waves are treated and edited as single waves in Typhoon; there are no separate \left" and
\right" waves for the left and the right speakers. The preference to treat stereo waves as single
waves is well grounded when stereo waves are edited. For example, if a stereo wave is to be looped
you do not have to independently loop two separate waves.
CHAPTER 1. AN OVERVIEW OF THE SOUND ARCHITECTURE
6
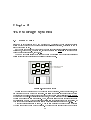
1.3 The Voice and the Parameters of the Groups
In Typhoon voices represent instruments, e.g. a drum kit or a piano, and to provide all the
necessary features an instrument may have, the number of parameters is large.
A voice is partitioned into groups where each group represents a part of the sound that the
voice can produce. There are instruments that can be dened with a single group only, but as
soon as we want to dene more complex instruments the need for several groups is obvious.
The term group is actually short-hand for \group of parameters." By setting the appropriate
parameters you can obtain a large number of instruments. It should be pointed out that setting
the appropriate parameters is a dicult process which requires insight and experience, but once
you have this experience the possibilities are almost endless.
The parameters for each group are divided into 14 categories as shown in Fig. 1.6. First we
shall study two important parameters; the key and velocity ranges.
Vol
Amp
Time
L
R
Vol
Freq
Portamento
Source
Vel
Mode
Dest
AEG
Modulation
table
Filter table
Key range
Vel. range
Velocity
sensitivity
max
min
Volume
Group
LFO
Envelope
Output
Key scaling
Splits
Pitch shift
Inverse
vel
Amp
Time
Figure 1.6: Available parameters of the group
1.3.1 The Key and Velocity Ranges
The key and velocity ranges specify what keys and velocities a group shall respond to. If a received
MIDI note appears to be within these ranges, the group is played.
We can visualize this property in a key-velocity diagram as shown in Fig. 1.7. One axis denotes
the key number and the other axis denotes the key velocity. The group can then be thought of as
an allocated rectangular area representing the total key and velocity range (see Fig. 1.7).
Typically a group plays only one wave and the wave to be played is a single parameter of the
group (see Fig. 1.8).
By the use of several such groups you can create a multi-sampled instrument, where each
group is bound to one wave (see Fig. 1.9). However, there is a hidden disadvantage: Usually the
groups of a multi-sampled instrument are using similar parameter settings and it may become quite
cumbersome to change all the individual parameters whenever changes are made to the complete
instrument. For example, to change the envelope of the instrument you would have to change
1.3. THE VOICE AND THE PARAMETERS OF THE GROUPS
7
Voice
Group
127
Group
Group
Group
Velocity
Key range: C2-F3
Vel. range: 5-70
Key
0
Figure 1.7: Key-velocity diagram
F1 Bottom key
Top key
A5
Total range of group
Bound to...
Wave
Figure 1.8: Single wave bound to the key range of the group
CHAPTER 1. AN OVERVIEW OF THE SOUND ARCHITECTURE
8
the envelope parameters for each and every group. Thus, it would be much more convienient
if a multi-sampled instrument could be dened within one single group. To make this possible,
Typhoon provides splits.
Group
Group
Group
Figure 1.9: Creating a multi-sampled instrument with groups
1.3.2 Splits
The key range of the group can be split into several subranges called splits and the splits are
separated by split points. Each split is bound to a wave and by the use of several such splits
you can easily obtain a multi-sampled instrument (see Fig. 1.10).
The advantage of dening multi-sampled instruments using this method is that all the sounds
dened by the splits share the same parameters. Thus, to change the envelope of the instrument
you would only have to change one group parameter.
Key range of group
Split point
C2
Split 1
Wave 1
F2
D3
Split 2
Split 3
Wave 2
Wave 3
C4
E5
Split 4
Split 5
Wave 4
Wave 5
Split 6
Wave 6
Figure 1.10: Splitting the range
1.3.3 The Pitch
If the wave contains information about its pitch, the correct pitch will always be played by the
group. However, sometimes there can be reasons to shift the pitches of the waves in use by
the group without changing the actual pitch information of the wave. Therefore, each group is
equipped with a pitch shifter.
The pitch shifter expresses the amount of shifting the waves from their original pitches in
octaves, semitones (twelve semitones correspond to one octave) and cents (100 cents correspond
to one semitone). Figure 1.11 illustrates this parameter.
Some waves are pitchless by their nature (e.g. snare drums) and it is meaningless to assign
any pitch but \none." In this case the convention is to let the middle key of a range denote the
original \rate." Keys on the left hand side play lower pitches and the contrary for the right hand
side (see Fig. 1.12).
1.3. THE VOICE AND THE PARAMETERS OF THE GROUPS
9
Pitch shift
0 octaves
+5 semitones
0 cent
Figure 1.11: The pitch shifter
Note: Typhoon will always compute the middle keys of the eective ranges; consideration to
split ranges are taken into account.
Middle key of range
Lower pitch
Higher pitch
Original pitch
Figure 1.12: The \pitch" played when using pitchless waves
1.3.4 The AEG (Amplitude Envelope Generator)
Once the group is playing its volume is determined by the AEG (Amplitude Envelope Generator). The AEG describes the volume distributed over time and its shape is specied by certain
parameters as shown in gure 1.13.
Volume
AEG
Max
Max
Level 1
Level 2
Time
Attack
Decay 1
Decay 2
Release
Figure 1.13: The AEG
1.3.5 Modulations and the Modulation Table
Typhoon provides you with an enormous amount of exibility in changing parameters in real time.
The concept of varying a parameter with a chosen source is called a modulation (see Fig. 1.14).
Varying the pitch with the pitch wheel is no doubt a very familiar modulation. There are other
modulations as well and the types of modulations are programmed in a similar fashion, namely
CHAPTER 1. AN OVERVIEW OF THE SOUND ARCHITECTURE
10
Wave
Volume
Time
Amount
Modulation source
0
Time
Destination
volume
Original
volume
Time
0
Modulated wave
Figure 1.14: Illustrating modulation
1.3. THE VOICE AND THE PARAMETERS OF THE GROUPS
11
by pairwise source and destination entries. Thus, the modulation of varying the pitch with the
pitch wheel is simply obtained by using the pitch wheel as source and the pitch shifter as
destination. Up to 8 such source and destination modulation entries can be stored in the
modulation table of the group (see Fig. 1.15).
Group
Modulation table
The amount denotes the
maximum modulation of
the destination
Entry
Source
Destination
Amount
#1
Pitch wheel
Pitch shifter
+4 semitones
#2
Mod. wheel
Volume
+100
#8
Velocity
AEG/attack
-50
Figure 1.15: The modulation table
Exactly how to set up the modulations to obtain a desired eect is a process which requires
insight and experience. Thus, patience and practice are required, but once you have this experience
the creation of sound becomes much more interesting. For example, the Typhoon drum kit
(available on the Typhoon system diskette) was created by modulating very simple waves such as
pure noise and sine.
The LFO (Low Frequency Oscillator)
Each group is equipped with two user programmable LFO's (Low Frequency Oscillators) which can
only be used as modulation sources. An LFO consists of a wave-form that is innitely repeated in
time. Its characteristic is determined by three important parameters: its shape, its rate (frequency)
and its amplitude (see Fig. 1.16).
LFOs are quite useful. For example, a vibrato eect is easily achieved by modulating the pitch
shifter with the LFO. The rate of the vibrato is then controlled by the rate of the LFO.
The envelope
Also two envelopes are provided for each group. The envelope describes levels distributed over
time. It is similar to the AEG, but it is more general, since envelopes can also have negative levels
(see Fig. 1.17). Like the LFO, the envelope can only be used as a modulation source but unlike
the LFO, the eect of the envelope ceases in a nite amount of time (i.e. when time T1+T2+T3
has expired).
Other Modulation Sources & Destinations
There are many modulation sources and destinations available in Typhoon. The available sources
are shown in table 1.1 and the destinations in table 1.2. Check the reference part of the manual
CHAPTER 1. AN OVERVIEW OF THE SOUND ARCHITECTURE
Amplitude
12
Shape
Rate
Figure 1.16: The LFO
L1
Time
L3
L2
L0
T1
T2
Total amplitude
Envelope
Level
T3
Figure 1.17: The envelope
for further information.
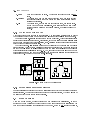
1.4 The Performance
The performance is built upon an amount of entries, where each entry represents a voice allocated on a certain MIDI channel (see Fig. 1.18). The entry is also equipped with a volume
parameter so that individual volume settings can be specied. There are additional parameters
for an entry as well, but check the reference part of the manual for further information.
If a key is received on a MIDI channel, the entries associated with the same MIDI channel will
play their voices. This provides both layering (i.e. using several voices on the same MIDI channel)
and the multiple use of one voice on several MIDI channel.
1.4.1 The Program Change Table
Each performance is also equipped with its own program change table. Once a program change
code is received on a MIDI channel the entries associated with that channel will temporarily change
their voices.
1.4. THE PERFORMANCE
13
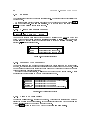
Number Source
#1
#2
#3
#4
#5
#6
#7
#8
#9
#10
#11
#12
#13
#14
#15
Keyboard based velocity
Range based velocity
Keyboard based key number
Range based key number
Modulation wheel
Pitch bend wheel
Pitch bend for held keys
External controller #1
External controller #2
Aftertouch (polyphonic aftertouch is also supported)
External input (on the TX16W front panel)
LFO (Low Frequency Oscillator) #1
LFO #2
Envelope #1
Envelope #2
Table 1.1: Available modulation sources
Number Destination
#1
#2
#3
#4
#5
#6
#7
#8
#9
#10
#11
#12
#13
Pitch shifter
Volume
Filter
Stereo panning
Attack (The attack of the AEG)
AEG/T (The time of the AEG)
Glide (The speed of portamento)
The amplitude parameter of LFO #1
The amplitude parameter of LFO #2
The rate (speed) parameter of LFO #1
The rate (speed) parameter of LFO #2
The amplitude of envelope #1
The amplitude of envelope #2
Table 1.2: Available modulation destinations
CHAPTER 1. AN OVERVIEW OF THE SOUND ARCHITECTURE
14
Performance
Table of entries
Entry
MIDI channel
Voice
Volume
#1
10
PIANO
90
#2
10
STRING
70
#3
9
PIANO
100
#4
11
PERCSSN
95
#n
7
GUITAR
93
Figure 1.18: Entries of the performance
Chapter 2
The Storage System
2.1 Items & Files
Items in memory are lost if the TX16W is turned o. Therefore Typhoon provides a storage
system so that the items can be permanently stored as les on diskettes, which later on can be
loaded back into memory.
In Typhoon you can save any type of item you wish and it is therefore possible to save a single
performance, voice or wave. Furthermore, each item is stored as a single le so it becomes easy
to load or save separate items, see Fig. 2.1.
The name of the le is always the same as the name of the item and to prevent confusion it
is also advisable that dierent items are assigned dierent names.
Wave
Wave
Voice
Perf
Stored item as a file
on the diskette
Voice
Wave
Wave
Perf
Figure 2.1: Items stored as les
Performance and voice items may be dependent upon other items. In the case of voices, they
are dependent upon the waves they are using. Similarly the performances are dependent upon
the voices they are using. It is important that the dependent items are available in main memory
whenever they are used. To consistently provide this, Typhoon stores the dependencies amongst
the items as well as the items themselves. Thus, if a le is loaded and its dependent items are
not available in memory, Typhoon will automatically load the required items that are missing. It
does not matter if the required items are located on several diskettes as shown in Fig. 2.2.
Note that diskettes can also be named. When an item is stored to or loaded from a diskette
Typhoon remembers the name of that diskette. Typhoon can then suggest where to nd it if the
15
CHAPTER 2. THE STORAGE SYSTEM
16
item is required during another session. This is especially recommended for those that would like
to build Typhoon sound library diskettes.
Name: PIANO1
Name: PIANO2
Voice
PNO
Wave
C
Name: PERFTEST
Wave
A
Wave
B
Perf
TEST
Name: PERCSSN
Voice
PERC
Wave
D
Wave
E
Figure 2.2: Files and their dependencies
2.2 Loading Items into Memory
In Typhoon you can at any time load single les from diskettes into memory. Files they are
dependent upon are automatically loaded, and if they are not available on the current diskette a
message is prompted and you are allowed to switch diskettes. Furthermore, Typhoon will only
load the items that are missing in memory. Items that already are in memory become shared
instead of duplicated (see Fig. 2.3).
TX16W memory
Diskette
Name: PIANO
Voice
PNO
Voice
TEST
Wave
A
Wave
C
Voice
PNO
Wave
B
Wave
C
Wave
B
Figure 2.3: Voice loaded into memory
2.3 Saving Items to Diskettes
In Typhoon there are various ways to save an item. The issue is in fact whether to also save the
items it is dependent upon. Typhoon provides you with three dierent alternatives:
2.4. ITEM VERSIONS
1.None
2.Unsaved
3.All
17
Only the chosen item is saved. The items it is dependent upon are not
saved.
The chosen item, and the items it is dependent upon, are saved if these
are presently unsaved (in other words: the items that currently are not
available on diskettes).
The chosen item, and the items it is dependent upon, are always saved.
(Note: Typhoon has some intelligence. If it discovers that an item being
(re)saved already exists on the current diskette, a duplicate will not be
created.)
2.3.1 Which Save Option to Use
Which save option to use depends on your intention. The rst option 1.None could be used if
you would like to save the item on one diskette and the items it is dependent upon on another.
The second option 2.Unsaved is perhaps the most commonly used. This option will guarantee
in only saving currently unsaved items. For instance, if you have loaded an entire performance
and made some changes to the voices it is using, the 2.Unsaved option would guarantee in saving
only the changed voices and nothing else.
The third option 3.All is useful in making a new physical copy of the chosen item and all the
items it is using. Note that the 2.Unsaved option never can provide this. As an example, let us
say that you have loaded an entire performance and the items it is dependent upon are spread
over several diskettes (as illustrated in Fig. 2.4). Now, suppose that you would like to make a copy
of this performance on a new (empty) diskette, so that the items are collected together instead of
being spread out. This can be done with the 3.All option.
Name: PIANO
Name: NEWDISK
Voice
PNO
Perf
TEST
Name: PERFTST
Wave
A
Wave
B
Perf
TEST
Voice
PNO
Name: PERCSSN
Voice
PERC
Wave
A
Wave
B
Voice
PERC
Wave
D
Wave
E
Saved with option 3.All
Wave
D
Wave
E
A copy of the entire performance is made
Figure 2.4: Making a copy of the performance
2.3.2 Saving Items on Several Diskettes
Sometimes all items in question do not t on a single diskette and they must therefore be stored on
several diskettes. Whenever there is a lack of space on the current diskette, Typhoon will prompt
a message so that you are able to switch diskettes.
2.4 Item Versions
When you modify an item, it will be treated as a new version of the original item. If you do
not rename the new version and choose to save it to the same diskette as the original item you
have the option of replacing the orginial with the new one. If you do not choose to replace it,
18
CHAPTER 2. THE STORAGE SYSTEM
the new version will still be saved and the older one will be left as it is. Be warned though that
having many dierent versions with identical names may become quite confusing. It is strongly
recommended that you rename items when signicant changes have been made.
Once an item has been renamed it is no longer treated as newer version but as a completely
dierent item.
If, during loading, the correct version of a required item is missing but another one with the
same name can be found, you have the opportunity of loading that one instead. This can be
practical if you have replaced the version in question with a newer one. In other cases you should
use this feature only as a last resort and try to nd the correct version instead.
2.5 Saving the Condition of the Machine
As we have mentioned previously, Typhoon can save any single item (and the items it is dependent
upon), but it is also possible to save the entire condition of the machine, i.e. all the performances,
voices, waves and other parameters that currently are in memory.
The condition is stored as a setup le among the items it requires. When a setup le is
loaded, Typhoon will clear its memory and reestablish the entire condition.
Chapter 3
The User Interface
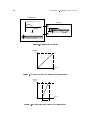
3.1 The Front Panel
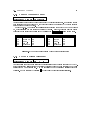
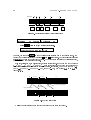
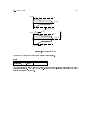
The front panel of the TX16W consists of a display (40 2 characters), a keypad of buttons to
the right, and a row of menu buttons beneath the display.
Menu buttons
Keypad
Figure 3.1: The front panel
3.2 The Menu Buttons
The menu buttons are used to switch the modes of the user interface (e.g. pressing PERFORM EDIT
results in entering the mode of editing performances) and the current mode is indicated by a lit
diode. The FILTER EDIT button is obsolete in Typhoon; lter settings are done in VOICE EDIT ,
but the button may be used in future releases of Typhoon.
The rightmost menu button, namely the UTILITY button is quite dierent from the others.
Pressing the UTILITY button enters the utility menu for the current mode.
\Utility mode" is indicated by two simultaneously lit diodes. The menu typically provides
utilities for storage, but other kinds of utilities are available as well.
3.3 The Display
The display is rather small and consists of 2 rows, each 40 characters wide. A cursor (a ashing
.) is used to show the current position within the display. By pressing < and > you can move
the cursor to the left and right respectively.
19
CHAPTER 3. THE USER INTERFACE
20
Often the information does not t within 40 characters and \scrolling" is used to view dierent
parts. The display can be thought of as a \window" placed upon the displayed information. By
scrolling the window to the left or right, dierent parts of the information become visible. Scrolling
is done by constantly moving the cursor (.) to the left or right. Arrows (, ) are displayed in the
left and the rightmost position indicating that there is additional information in that direction.
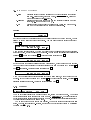
For example,
>Voice
>Grp >Param
001:MAXIPERC 01
1.Range
>Bot .Top C2
C7 According to the above gure, additional information is available to the right due to the
displayed arrows. By moving the cursor (.) further to the right, new information becomes visible:
>Grp >Param
ERC 01
1.Range
>Bot >Top >Min .Max
C2
C7
0 127
At the same time, a part of the left-hand side disappears. By constantly moving the cursor to
the left you will scroll the window again, this time to its previous position. Scrolling is extensively
used in Typhoon due to the tiny display, but with some practice you will nd it to become quite
natural.
3.4 Fields
Generally, elds are places where information is displayed or where functions are selected. Every
eld has a name and a value, and the \>" character indicates it is enterable with the cursor; if
omitted, the eld is only used to show unmodiable information.
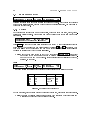
>Util
4.Items
Perfs Voices Waves >Delete >Go
1
2
19 1.Unused
In the gure shown above, >Util, >Delete and >Go are enterable elds, whereas Perfs, Voices
and Waves are elds that only provide the user with information.
The value of a eld is determined by its type. In the above example, the leftmost eld >Util
is actually a menu eld. Menu elds are used to select a particular command or function. To
the right of the menu eld there is some information about performances, voices and waves. The
values of these elds are integer numbers; in this case indicating the number of items available
in memory. Continuing to the right, we nd another menu eld named >Delete. Finally the
rightmost eld >Go does not have a value at all, but its usage is rather to execute a command;
typically the command chosen on the left-hand side.
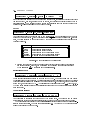
Consider another example,
>Voice
>Grp >Param
001:MAXIPERC 01
1.Range
>Bot >Top >Min >Max
C3
C3
0 127
In this example, >Voice is a value eld denoting the current voice, >Grp is another value
eld denoting the current group (of the voice). >Param is a menu eld denoting the current
parameter. >Bot and >Top are value elds denoting the key range (used by the group). And at
last >Min and >Max are numerical value elds denoting the velocity range.
In Typhoon there exist at least four dierent types of elds. We can classify them as:
1. Value elds (e.g.
>Bot, >Min)
2. Menu/parameter elds (e.g.
>Param)
3. Command elds, i.e. elds without values (e.g.
>Go)
4. Unmodiable elds (i.e. when the \>" character is omitted).
3.5. HORIZONTAL HIERARCHY
21
3.5 Horizontal Hierarchy
It is rather dicult to display all the dierent parameters at the same time, in fact the tiny display
makes it quite impossible. To overcome this dilemma, Typhoon uses a horizontal hierarchy so that
the interface still can become user friendly and easy to use. In plain English, this means that issues
on the right-hand side are typically determined by the issues on the left-hand side. For instance,
>Voice
>Grp >Param
001:MAXIPERC 01
3.Pitch
>O >S >Ct >Key scaling
0 +2 +6 9.normal
the information given on the display should be read as follows: The eld >Grp denotes the
current group of the chosen voice, since it is on the right-hand side of >Voice. Furthermore,
the eld >Param denotes the current parameter of the chosen group, and at last the parameters
themselves are shown to the far right. Note that this structuring is consistent with the rule of
horizontal hierarchy:
Voice
Group
Parameter
of group
The actual
parameters
3.6 Editing Field Values
Almost all types of elds can be edited by using the +1 and -1 buttons. Pressing them typically
results in increasing and decreasing the current value respectively. Note: If these buttons are
continuously held, the rate of change will accelerate until the button is released.
The numeric buttons available on the keypad are commonly used when editing numeric value
elds, but can also be used when editing strings of characters. Editing strings of characters
typically arises when editing names of items. For example,
>Util
>Voice
4.Rename MAXIPERC
>Name
DRUMS
>Go
by pressing ENTER at eld >Name you will obtain another cursor which is shown by a constantly
ashing underline ( ). Pressing a \numeric" button on the keypad results in switching between
the characters given on that button. You can also delete characters and insert blank spaces at the
current position by pressing -1 and +1 respectively. Move the cursor out of the eld range to
exit.
3.7 Editing Features
Typhoon provides a large number of editing features. The data slider on your master keyboard
can be congured to slide between dierent values. This works for all value elds (even for menu
elds).
Fields that denote keys or key velocities, can be set by pressing ENTER once and then press
any key on your master keyboard. The key will be interpreted by Typhoon and the value of the
eld will be set appropriately.
These are the two most prominent editing features. Additional features exist, but we refer you
to the reference part of the manual for further information.
CHAPTER 3. THE USER INTERFACE
22
3.8 The List Mode
All menu elds, and many value elds, have a special list mode. If the eld provides this ability,
it is entered by simply pressing ENTER . The list mode shows a list of all the values that the eld
can provide. Use the cursor to choose between the listed items, and press ENTER to change the
value of the eld to the chosen item, or escape it (without choosing anything) by pressing the
approriate menu button.
Note: By pressing a keypad button, you can jump to items whose names begin with any of
the letters on that button.
The list mode is available almost everywhere in Typhoon. To nd out whenever it is possible
to obtain a list of items, press ENTER and see what happens.
For example,
.Voice
001:MAXIPERC
>Grp >Param
01
1.Range
>Bot >Top >Min >Max
C3
C3
0 127
Pressing ENTER (please note the position of the cursor .) brings you a list of the available voices
in memory:
Voice
Copy [+1]
>MAXIPERC .ZSTRING >PIANO >CHOIR
Typically other convienient utilities are available in list mode. In this case you can make duplicates of the selected voice by pressing +1 .
Note: In list modes, where other utilities are available (such as copying voices), you can
always perform these utilities without entering list mode. The short cut is obtained by
pressing ENTER , keeping it held, and pressing the appropriate button to perform the
function. In the above example, pressing ENTER , keeping it held and then pressing
+1 would make a copy of the selected voice.
3.9 Monitor Mode
Normally Typhoon follows the rule \what you see (on the display) is what you hear." However, if
a menu button is pressed twice, its diode will become constantly ashing; indicating that you have
entered the monitor mode. (Exit the monitor mode by pressing the same menu button again.)
This means that keys are interpreted globally, so that the sound to be played is determined by
the currently selected performance in performance select.
3.10 \Fast Jumps"
Sometimes it is hard to nd the appropriate structure representing the sound produced by a
certain keypress. So called \fast jumps" are provided to ease this procedure. By pressing the
menu button, keeping it held, and then pressing a key on the master keyboard, Typhoon will
automatically \jump" to the structure representing the sound that was produced by that key. If
the key is \ambiguous," i.e. there are several structures allocated on the same key, you can switch
between them by pressing the same key several times.
For example, suppose we have a voice, where two of its groups are layered upon each other.
The key ranges of both the groups are C2 to C4.
3.11. ITEM NAME EXTENSIONS
23
In this example, we then press the VOICE EDIT button, keep it held, and press the key D3 on
the keyboard. Typhoon will jump to one of the two groups that was played by that key.
.Voice
001:STRINGS
>Grp >Param
01
1.Range
>Bot >Top >Min >Max
C2
C4
0 127
If we were to press the same key again. Typhoon would jump to the next of the two groups:
.Voice
001:STRINGS
>Grp >Param
02
1.Range
>Bot >Top >Min >Max
C2
C4
0 127
\Fast jumps" can be performed almost everywhere in Typhoon; consideration to monitor
mode is also taken into account. Generally, the rule is: \What you hear is what you get."
3.11 Item Name Extensions
Names of stereo items are extended with the subscript \2 ". For example,
>Wave
001:BELL2
>Func
1.Trim
>Start >End
>Auto >Go
0
3373
Names of modied items (or items that have not yet been saved) are extended with the superscript \ ". For example,
>Wave
002:KICK
>Func
1.Trim
>Start >End
>Auto >Go
0
1270
24
CHAPTER 3. THE USER INTERFACE
Chapter 4
Reference Manual
4.1 Performance Select
>Perf
>Monitor
001:SUPERPAD 1.MIDI
1234567890123456
Select active performance in the leftmost eld (named >Perf).
Set mode of monitor display. There are three alternatives:
1.MIDI
>Perf
>Monitor
001:SUPERPAD 1.MIDI
1234567890123456
Displays MIDI channel information.
:::
:::
:::
2.Audio
MIDI channel in use by the performance
MIDI channel in use and playing
MIDI note(s) at unused channel
>Perf
>Monitor
001:SUPERPAD 2.Audio
Audio channels
Displays allocated audio channels.
:::
:::
Audio channel occupied and note is o
Audio channel occupied and note is on
>Perf
>Monitor
001:SUPERPAD 2.Audio
12345678 Audio
If any entry is set to use an individual output, the audio channels are split into
two groups (as shown above); the rst group displays the allocated individual
audio outputs (ranging from 1 to 8) and the second group displays the rest
of the allocated audio channels not using individual outputs. (Unfortunately,
hardware limitations prohibit a more dynamic use of individual outputs.)
3.CPU
>Perf
>Monitor
001:SUPERPAD 3.CPU
CPU load
Shows the load of the CPU (Central Processor Unit). When the meter is at
max a slight performance degredation may occur.
Note: An exclamation point (!) appears to the right if the audio channel allocation becomes
overloaded.
25
CHAPTER 4. REFERENCE MANUAL
26
4.2 System Setup
>Set
1.Master
>Left >Right >Tune
>Dev
100
100
440.0 Hz any
These options dene preferences for the entire system. Select option in the leftmost eld. As
usual, parameters related to the selected topic are shown to the right.
4.2.1 Master
>Set
1.Master
>Left >Right >Tune
>Dev
100
100
440.0 Hz any
Set master volume of left and right speakers at eld >Left and >Right respectively. You can also
set master tuning at eld >Tune. >Dev is the device number used for sending and receiving SYSEX
wave dumps (SDS).
4.2.2 X-Cntls (External Controllers)
>Set
>XCtl1 >XCtl2 >Foot Sw
2.X-Cntls 005
006
1.Normal
There are two deniable external controllers for modulations. The controller number for external
controller 1 is set at >XCtl1 and external controller 2 is set at >XCtl2.
The rightmost eld named >Foot Sw has two alternatives 1.Normal and 2.Inverse which
specify the triggering mode of your foot pedal, if and only if it is connected to the foot switch
input on the TX16W.
4.2.3 Slider (Data Slider)
The data slider (defaulted to controller number 006) can be used almost everywhere in the system
for menu scrolling, value editing and much more.
>Set
3.Slider
>Ch >Cntl >When
any 006 1.Never (off)
Specify channel and controller number for your data slider (see above). >When denes when the
controller is activated. There are three alternatives:
Turns it o
1.Never
2.Always
Data slider always active
Data slider is only active after pressing ENTER or when entering numbers.
3.In edit
4.2.4 Remote
>Set
4.Remote
>Ch >+1 >-1 >L >R >Ent >Alpha
any 001 002 C#6 off off C#1-C5
There are some additional special facilities. You can dene keys or controller numbers as aliases
for buttons on the TX16W keypad. However, only the most common buttons are supported. Each
1 D,1 : : : C 7 .
eld (except for >Ch and >Alpha) ranges over of f 000
001 {z
002 : : : 127} | C ,1 C #,{z
|
}
Controllers
Keys
Sometimes it is hard to remember the MIDI controller number of a specic controller source,
but if you press ENTER and touch any controller, Typhoon will automatically call up its number.
4.2. SYSTEM SETUP
Field
>Ch
>+1
>-1
>L
>R
>Ent
>Alpha
27
Description
MIDI channel receive
Increment ( +1 on TX16W keypad)
Decrement ( -1 on TX16W keypad)
Key for \Move left" ( < on TX16W keypad)
Key for \Move right" ( > on TX16W keypad)
ENTER (on TX16W keypad)
The alphabet is mapped to a range of keys
(as aliases for the alpha keys on the TX16W keypad)
Table 4.1: Remote keys
4.2.5 RS-422
>Set
6.RS-422
>Mode
2.Master
>Rate
1.19200
There is an RS-422 high speed port at the rear of your TX16W. All types of transmissions that
can be done via MIDI (e.g. SDS) can also be done via the RS-422 (and vice versa). However, use
at most one port at a time (i.e. MIDI or the RS-422).
Before a transmission can take place, one machine must be the master and the other the slave
(it does not matter which is which).
(The maximum rate is 153600 baud. Higher rates cannot be provided due to hardware limitations, i.e. the speed of the CPU used in the TX16W.)
Transfer modes
1.Disabled
2.Master + transfer rate
3.Slave
Table 4.2: Transfer modes
Transfer rates
1.19200 baud
2.38400 baud
3.76800 baud
4.153600 baud
Table 4.3: Transfer rates
CHAPTER 4. REFERENCE MANUAL
28
4.3 System Setup Utilities
The utility menu of system setup provides miscellaneous utilities for storage and memory. It is
activated by pressing the UTILITY button after system setup has been entered. Two diodes
are lit simultaneously indicating the chosen utility menu for system setup.
4.3.1 Load
>Util
1.Load
>Setup
01:BACH
>Go
This utility loads the chosen setup (i.e. the entire condition of the machine including performances,
voices and waves). Choose a setup at eld >Setup. Note that loading a setup erases all items
currently in memory.
Setup
>BACH >JARRE >MOZART >MYSETUP >SETUP >T
As usual, it is also possible to obtain a directory of the setups on the current diskette by pressing
ENTER at eld >Setup.
Missing perf PERF (from TEMP)
More [ent] Skip [-1]
Stop [-]
A request such as the one shown above is displayed if performances, voices or waves are missing. If
Typhoon can locate the diskette where the particular item may be stored, the name of the diskette
is shown within parenthesis. In any case, the user is allowed to switch diskettes during this request.
Press ENTER to step through the dierent items that are missing. Skip the requested item by
pressing -1 . (Of course, skipping items results in an incorrect reconstruction and should only be
done in an emergency, e.g. when the particular diskette, where the required item is stored, is lost
or damaged.)
Incorrect version of wave ACIDKK
More [ent] Load [+1] Stop [-]
If an incorrect version of the item is found, a query as shown above, will appear. You can choose
to load this item instead of the actually requested one. Note that it is still possible to switch
diskettes, and the query is automatically withdrawn if the correct item is found.
Keep loaded items?
Yes [+1]
No [-1]
Cancelling the operation (by pressing - ) results in the query shown above. You can keep what
has been loaded so far or undo the entire operation by pressing +1 and -1 respectively.
4.3.2 Save
>Util
2.Save
>Voice
SETUPTST
>P/V/W
3.All
>Go
This utility saves the entire condition of the machine as a le to diskette. Three dierent alternatives are provided at eld >P/V/W (performances/voices/waves):
4.3. SYSTEM SETUP UTILITIES
1.None
2.Unsaved
3.All
29
Results in saving the system settings and the dependencies to the required
items (i.e. performances, voices and waves). The performances, voices and
waves themselves are thus not saved.
Results in saving only items that are not currently available on other
diskettes, i.e. the ones marked with \ ".
Results in always saving all the performances, voices and waves in use.
Items may get duplicated if they exist on other diskettes.
Queries
Insert next disk (14 items to save)
Cancel [-]
If Typhoon cannot save additional items to the current diskette due to lack of space, you are
allowed to switch diskettes during this request. You can also cancel the entire procedure by
pressing - .
Erase duplicate of voice MPC60
Yes [+1] No [-1]
Stop [-]
When the item is being resaved, Typhoon may discover that duplicates exist on other diskettes.
If that is the case, a query as shown above appears. You can choose in deleting this duplicate by
pressing +1 , or keep it by pressing -1 . Cancel the entire operation with - .
Erase last version of wave ACIDKK
Yes [+1] No [-1] Stop [-]
If Typhoon nds the previous version of the item being resaved, a query as shown above appears.
You can choose between erasing the previous version of the item or keeping it by pressing +1
and -1 respectively. Cancel the entire operation with - .
Replace identical perf DRUMS
Yes [+1] No [-1]
Stop [-]
When Typhoon discovers an identical version of the item being resaved, a query as shown above
appears. If you choose to replace it by pressing +1 , the older le gets erased. Pressing -1
results in creating another le. Cancel the entire operation with - .
4.3.3 Memory
>Util
Main (Samples)
3.Memory 82% 1707008
System Filter
92%
100%
The memory utility displays the amount of free main, system and lter memory. The actual
waves/voices/performances are stored in main memory. References (e.g. the dependencies) to
waves/voices/performances are stored in system memory. Dierent lter characteristics (in use by
the lter tables) are stored in the lter memory.
The amount of free memory is shown in percent. The number of free sample points are also
shown. (One sample point is a 12-bit value, and the number of \bytes" is obtained by multiplying
the value with 128 = 1:5.)
CHAPTER 4. REFERENCE MANUAL
30
4.3.4 Items
>Util
4.Items
Perfs Voices Waves >Delete >Go
1
2
19 1.Unused
This utility shows the number of performances, voices and waves that are available in memory.
There may exist items that are not currently used by any performance; you can erase them by
using the option 1.Unused at eld >Delete. Another option, to erase all the items from memory,
is also provided as 2.All. Press ENTER at >Go to perform the actual operation.
4.3.5 Disk
>Util
5.Disk
>Name
TYPHOON
Free
124k
>Rename >Format
Finding the appropriate diskettes is made considerably easier if they are given names. You can
do this by typing the name at eld >Name and press ENTER at eld >Rename (which will rename
the diskette to the chosen name).
The number of free bytes on the diskette is shown at eld Free (a \k" sux means kilo-bytes).
By pressing ENTER at eld >Format you can also format diskettes, i.e. initialize them in such
a way that Typhoon can recognize them. (713k is available on a newly formatted diskette. Note
that the TX16W uses double density format even if the diskette is of high density.)
4.3.6 Files
>Util
6.Files
>File
26:MULU
Kind
Wave
Size >Erase
42k
This menu is used to manage les on the current diskette. A le usually corresponds to a stored
item. You choose the le at eld >File. If Typhoon recognizes the type of the le it is shown
immediately to the right of its name. Other types of les are shown with the extension used in
the MS-DOS le system (e.g. .SYS .T01 .XYZ).
File
>909CRASH >ACIDKK >ACIDSNR >AGOGHR16 >B
And, as usual, press ENTER at >File to display the entire contents of the current diskette.
Press ENTER at eld >Erase to erase the chosen le, but be careful; once the le is erased the
data is entirely lost.
Using MS-DOS on a Personal Computer
Those who are familiar with the MS-DOS le system on a personal computer can copy/erase les
whenever necessary. The names of the les are similar to the names presented in Typhoon. An
extension is provided to specify the type of le. (See table 4.4 for the various extensions used in
Typhoon.)
4.3. SYSTEM SETUP UTILITIES
Type
Setup
Performances
Voices
Waves
Filter table
AIFF
Yamaha waves
System les
31
Extension
.X##
.P##
.O##
.C##
.T##
.A##
.W##
.SYS
Where ## is a number used
to distinguish items with equal
names.
Table 4.4: MS-DOS extensions
CHAPTER 4. REFERENCE MANUAL
32
4.4 Performance Edit
>Perf
006:PERFTEST
>Set
># >Prm
1.Entries 4 1.Voice
>Ch >Voice
15 042:PIANO2
>Vol
100
Selection of performances is done in the leftmost eld named >Perf. Each performance consists
of three main settings; entries, program change codes and external triggering. Use eld >Set to
choose one of these topics.
4.4.1 Entries
Each performance is built upon a number of entries, where each entry has voice, output, transposition and priority settings. Choose entry number and desired parameter at eld ># and >Prm
respectively.
Performance entry
Del [-1] Copy [+1]
>MAXIPERC(10) >STRINGS(11) >PIANO(12)
Press ENTER at eld ># to obtain a list containing both voice & MIDI channel information (as
shown above). You can also copy and delete entries by pressing +1 and -1 respectively. Note
that there is no method to generate a new and empty entry; the only way to create one is to
duplicate an existing entry (with the copy function).
Note: Hold down the menu button on the TX16W front panel ( PERFORM
EDIT in this case)
and press a key on your master keyboard to perform \fast jumps" to the entries dened on that key and MIDI channel. Further information is available in chapter 3,
section 3.10 (page 22).
Voice
>Perf
006:PERFTEST
>Set
># >Prm
1.Entries 4 1.Voice
>Ch >Voice
15 042:PIANO2
>Vol
100
In broad outline the entries of the performance are organized in the following manner:
Entry MIDI channel Voice
#1
#2
#3
#4
..
.
10
10
15
13
..
.
PIANO
STRINGS
PERC.
PIANO
..
.
Volume
70
30
90
90
..
.
Figure 4.1: Entries of the performance
Set MIDI channel, voice and volume for the chosen entry at eld >Ch, >Voice and >Vol respectively.
Note: This style of building performances supports both \layering" of several voices and
multiple use of a specic voice on various channels.
4.4. PERFORMANCE EDIT
>Perf
006:PERFTEST
33
>Set
># >Prm
1.Entries 4 1.Voice
>Ch >Voice
15 (BRASS)
>Vol
100
If the voice has been changed due to MIDI program change codes, it is displayed within parentheses
(as shown above). However, as soon you try to edit it, the voice is immediately switched back to
its original value. Thus, received program change codes result in only temporary changes to the
performance. The same applies to MIDI volume changes.
Output
>Perf
006:PERFTEST
>Set
># >Prm
>Out
>Pan
1.Entries 4 2.Output 5.Stereo 100
Use this option to set the output in use by the chosen entry. Output settings are made in the
eld named >Out (see table 4.5 for the settings available). If other output options than 1.Any are
used, the voice is forced to the output given by the entry and the similar output setting in the
voice is overridden.
Field
1.Any
2.Left
3.Right
4.Mono
5.Stereo
6.Individ
Description
Output is determined by the setting in voice (default).
Output is sent to left speaker
Output is sent to right speaker
Output is sent to both speakers in mono
Output is sent to both speakers in stereo *
To specify the use of individual outputs
Table 4.5: Output settings in the performance
* Stereo mode provides you with a panning parameter (to adjust the balance between left
and right speakers). However, the modulation of the panning parameter is determined
by the voice and not by the entry in the performance.
Individual outputs
>Perf
006:PERFTEST
>Set
># >Prm
>Out
>From >To
1.Entries 4 2.Output 6.Individ 2
8
There are eight individual outputs on the rear of the TX16W. The elds >From and >To denote
the inclusive range of outputs used. Additional individual output settings are done in the voices;
these are relatively assigned to the range you have specied here. For example, given the example
shown above, an oset range of +2 : : : +5 will designate the individual outputs 4 : : : 7 (see Fig. 4.2).
Typhoon automatically switches to a special individual output mode once individual outputs are
used in an entry.
Trans (transposition)
>Perf
006:PERFTEST
>Set
># >Prm
1.Entries 4 3.Trans
>O >S >Ct >Bot >Top
+1 +3 -33 C#3 C7
Use this option to transpose the voice in use by the chosen entry. The elds >O and >S denote
note shifting in octaves and semitones respectively, whereas >Ct (cent) is used for ne tuning.
There is a signicant dierence between transposing voices in performances and pitch shifting the voices themselves. The former is a note shift (e.g. C 3 becomes C 4 ) whereas the latter
shifts the actual pitch of the wave(s).
Output 8
Output 7
Output 5
Output 4
Output 3
Output 2
Output 1
Output 6
CHAPTER 4. REFERENCE MANUAL
34
Used outputs
>To = +5
Group
Indiv. (to)
Indiv. (from)
>Ind = +2
Performance
Figure 4.2: Individual outputs
The elds >Bot and >Top designate the bottom and top key respectively of the receive range.
Only keys within this range will respond. This parameter can be used to combine various voices
that act on the same MIDI channel (see Fig. 4.3).
V oice A (MIDI channel 5)
|
{z
Entry #1
V oice B (MIDI channel 5)
}|
{z
Entry #2
}
Figure 4.3: Using dierent voices on the same MIDI channel
Prio (Priorities)
Use this option to set/display the priority in use by the chosen entry.
>Perf
006:PERFTEST
>Set
># >Prm
1.Entries 4 4.Prio
>Priority
3.High
Since only 16 audio channels can be played simultaneously, conicts may occur. Use the priority
parameters to suppress other entries if conicts arise. Entries with higher priorities suppress
entries with lower priorities. There are three priorities available: 1.Low, 2.Mid and 3.High.
4.4. PERFORMANCE EDIT
35
4.4.2 Pgm chg (Program Change)
>Perf
006:PERFTEST
>Set
>PCH >Voice
2.Pgm chg 042 007:BRASS
Use this option to set program change codes in use by the entire performance. If a program change
code is received on MIDI channel #x, the voice for channel #x is replaced by the voice specied
in the program change code table.
Refer to Fig. 4.4. The performance before receives program change code 42 at MIDI channel
10, which results in the new status as described by after. However, these are only temporary
changes; you can \reset" the performance by pressing the PERFORM EDIT menu button twice.
Entry Voice
#1
#2
#3
#4
#5
PIANO
STRINGS
PERC.
PIANO
FAIRLIGH
MIDI channel
10
10
15
13
11
before
Entry Voice
#1
) #2
#3
#4
#5
BRASS
BRASS
PERC.
PIANO
FAIRLIGH
after
MIDI channel
10
10
15
13
11
Figure 4.4: The eect of using program change codes in performances
4.4.3 Ext trg (External Triggering)
>Perf
006:PERFTEST
>Set
>Thres >Ch >Key
3.Ext trg 55%
1
C2
Use this option to set the parameters for the external trigger (on the front panel of the TX16W).
If the trigger input signal exceeds the specied threshold dened at eld >Thres, the key >Key
is triggered on MIDI channel >Ch. The key is released when the signal no longer exceeds the
threshold. Set key to none (by pressing - at eld >Key) to disable external triggering.
CHAPTER 4. REFERENCE MANUAL
36
4.5 Performance Edit Utilities
Performance edit utilities are utilities for performances only. The menu is activated by pressing the
UTILITY button after entering performance edit. Two diodes are lit simultaneously indicating
the chosen utility menu for performances.
4.5.1 Load
>Util
1.Load
>Perf
01:MYPERF
>Test >Go
The load utility loads the chosen performance from the current diskette. The voices and the waves
required by the performance are automatically loaded; missing voices/waves are requested. See
section 4.3.1 (page 28) for further information.
4.5.2 Save
>Util
2.Save
>Perf
001:MYPERF
>V/W
2.Unsaved
>Go
Press ENTER at >Go to save the chosen performance (in memory) as a le to diskette. See
section 4.3.2 (page 28) for further information.
4.5.3 Delete
>Util
>Perf
3.Delete 001:PERF
>Go
This utility deletes performances from memory. (Erasing les from diskettes is possible in the
utilities of system setup, see section 4.3.6, page 30.)
Press ENTER at >Go to remove the chosen performance. Note that the voices/waves in use by
the performance are not removed, since other performances may share them.
4.5.4 Rename
>Util
>Perf
4.Rename 001:MYPERF
>Name
ANTHEM
>Go
This utility renames the chosen performance. Press ENTER at eld >Name to specify the name.
(Move the cursor out of the eld range to exit.) Press ENTER at >Go to perform the actual
operation.
4.5.5 Copy
>Util
5.Copy
>Perf
001:ORGAN
>Name
ORGAN1
>Go
This utility makes a duplicate of the chosen performance and gives it the name specied at eld
>Name. Since it is preferable that duplicates have slightly dierent names, Typhoon will choose a
name for you. If you wish to give the duplicate a name other than the one chosen by Typhoon,
you can do so by pressing ENTER at >Name. Press ENTER at >Go to perform the actual operation.
4.5. PERFORMANCE EDIT UTILITIES
37
4.5.6 Swap
>Util
6.Swap
>Perf
001:MYPERF
>With
002:TEST
>Go
This utility exchanges the two chosen performances. This function is more useful for voices and
waves, since these types of items may be shared by other items. Because performances are not
shared by other items, the eect of the function is merely a way of reorganizing the list of performances.
4.5.7 New
>Util
7.New
>Name
TEST
>Go
This option creates a new performance with the name specied at eld >Name containing a single
entry.
CHAPTER 4. REFERENCE MANUAL
38
4.6 Voice Edit
>Voice
001:PIANO
>Grp >Param
01
1.Range
>Bot >Top >Min >Max
C2
C7
0 127
The eld >Voice species the current voice with voice parameters shown to the right. As described
in chapter 1, section 1.3 (page 6) waves are used as \raw material" upon which groups are built.
A collection of groups is called a voice; thus the parameters considered here aect both groups
and voices.
Voice
Copy [+1]
>MAXIPERC >STRYNG >PIANO >EFFECTS >ORCHE
To view a list of voices, press ENTER (as usual) at the eld named >Voice. It is also possible to
make duplicates of a voice by pressing +1 (on your TX16W keypad) while the list is displayed
(see the illustration shown above).
There are many editable parameters for a group. See the separate sections for each parameter
for further information.
>Voice
001:PIANO
>Grp >Param
01
1.Range
>Bot >Top >Min >Max
C2
C7
0 127
The current group number is displayed at the eld named >Grp.
Voice
Del [-1] Copy [+1]
>C3 >D3 >E3 >F3 >F#3 >G3 A3 >C4 B4 >C5
(Press ENTER at eld >Grp to view the list of groups.)
As usual, you can press ENTER to view the list of groups of the current voice. Duplication and
deletion of a group is possible by pressing +1 and -1 respectively.
Note that there is no method to create new groups; creating a new group is done by duplicating
another. There will always be at least one group available, since it is not possible to delete the
\last" one.
Normally a group that has an ordinary range, e.g C 3 : : : C 4 is displayed as C3 C4, but ranges
that consist of single keys are displayed with that key only, e.g. the range C 3 : : : C 3 is displayed
as C3.
Note: Hold down the menu button on the TX16W front panel ( VOICE
EDIT in this case) and
press a key on your master keyboard to perform \fast jumps" to the group(s) dened
on that key. Further information is available in chapter 3, section 3.10 (page 22).
There are 13 parameters for each group. See the separate sections for each parameter for further
information.
4.6.1 Range
>Voice
001:DRUMS
>Grp >Param
01
1.Range
>Bot >Top >Min >Max
C3
B3
30 100
This parameter species the active range of the group. The bottom key and top key inclusive
specify the active key range (see g 4.5). The group will only respond to keys that appear within
this range. Changing the bottom key moves the range, whereas changing the top key resizes the
range. For example, changing the range C 3 : : : B 3 by changing the bottom key C 3 to C 2 moves
the range to C 2 : : : B 2 .
4.6. VOICE EDIT
39
|
{z
Range C 3 :::B3
}
Figure 4.5: The key range
Similarly, >Min and >Max dene the velocity range (see Fig. 4.6) such that the group only
responds to velocities within this range.
6
,
,
,
,
6
,
, Velocity
,
range 30 : : : 100
,
,
?
,
,
0 ,
127
Figure 4.6: Velocity range
4.6.2 Waves
>Voice
001:DRUMS
>Grp >Param
01
2.Waves
># >Wave
2 042:SNARE
>Bot
D3
This parameter species the wave(s) in use by the current group. If you are using only one wave,
you can specify the wave in the eld named >Wave. Split point parameters can be used for
multi-sampled instruments such as pianos. The elds used in this case are ># (split point number)
and >Bot (the bottom key of a split).
To review the sound architecture, a multi-sampled instrument must be split into several consecutive ranges, where each split is bound to a wave (see chapter 1, section 1.3.2, page 8 for further
information).
Since the ranges are consecutive, the top key of one split is immediately followed by the
bottom key of the next. Thus, instead of specifying the actual ranges, e.g. C 1 : : : B 1 , C 2 : : : B 2
and C 3 : : : B 3 , it is easier (and much more practical) to just designate the split points, i.e. the
keys where the splits are separated. The most logical way to do this is to let the bottom key of a
split specify the split point. Thus, the rst split does not have a split point at all.
Consider Fig. 4.7, note that the rst and the last splits are \innite," but it does not matter
since the group is limited by the key range specied in option 1.Range.
CHAPTER 4. REFERENCE MANUAL
40
Split points
C2
Wave 1
F2
Wave 2
D3
Wave 3
C4
Wave 4
E5
Wave 5
Wave 6
Figure 4.7: Designating splits by using split points
>Voice
001:DRUMS
>Grp >Param
01
2.Waves
+
># >Wave
2 042:SNARE
>Bot
D3
(Press ENTER at eld ># to view the list of split points.)
+
Splitpoint
Del [-1] Copy [+1]
>1st >D3 >E3 >F3 >F#3 >G3 >C4 >B4
As usual, you can press ENTER to view the list of split points in use by the current group. You
can copy and delete split points by pressing +1 and -1 respectively. Copying split points results
in inserting new ones to the right of the cursor. The eld >1st is not itself a physical split point,
denoting instead the beginning of the list.
It is not possible to move a split point out of its current range. If we were to move the ranges
\: : : B 2 ," \C 3 : : : B 3 ," \C 4 : : : B 4 ," and \C 5 : : :" one octave higher, we have to move the rightmost
range rst and then continue with the preceding ranges. In this case, we move the range \C 5 : : :"
to \C 6 : : :," then \C 4 : : : B 4 " to \C 5 : : : B 5 ", then \C 3 : : : B 3 ," and at last \: : : B 2 " to \: : : B 3 "
(see Fig. 4.8).
...B2
C3...B3
C2
C4...B4
C3
C5...
C4
First move this split point
Move this split last
Then this...
C3
...B3
C4
C4...B4
C5
C5...B5
C6...
Figure 4.8: Moving split points
Note: The split points are not aected if the range of the group is changed.
4.6. VOICE EDIT
41
4.6.3 Pitch
>Voice
001:PIANO
>Grp >Param
01
3.Pitch
>O >S >Ct >Key scaling
+1 -1 +42 3.inverse
This parameter enables you to pitch shift the waves in use by the group. The relative pitch is
denoted in octaves >O, semitones >S and cents >Ct. It is also possible to change the key scaling.
Note: This option pitch shifts the actual wave(s) in use by this group and does not \move" the
physical range. You can \move" the range by transposing the voice in performance
edit.
Key scaling
Typhoon also provides various key scalings. A dierent key scaling means that the keys are bound
to other pitches. For example, the inverse key scaling \ips" the keyboard so that ascending keys
become descending. A xed key scaling means that all the keys are \the same" (see table 4.6 for
the various key scalings available).
Key scaling Description
1.inv *4
Inverse key scaling
where semitones are multiplied by 4 in pitch
Inverse key scaling
where semitones are doubled in pitch
Inverse key scaling
Inverse key scaling
where semitones are halved in pitch
Inverse key scaling
where semitones are divided by 4 in pitch
Fixed key scaling;
all keys are given the same pitch
Normal key scaling
where semitones are divided by 4 in pitch
Normal key scaling
where semitones are halved in pitch
Normal key scaling (default)
Normal key scaling
where semitones are doubled in pitch
Normal key scaling
where semitones are multiplied by 4 in pitch
2.inv *2
3.inverse
4.inv 1/2
5.inv 1/4
6.xed
7.1/4
8.1/2
9.normal
10.*2
11.*4
Table 4.6: Available key scalings
Note: Pitchless groups for percussion, such as snare drums, should normally use the xed key
scaling.
4.6.4 Volume
>Voice
001:DRUMS
>Grp >Param
01
4.Volume
>Vol >Vel >Max
100 100%
60
This parameter species the volume and the velocity sensitivity of the group. The volume is set in
the eld named >Vol and denotes the volume for maximum velocity; velocity sensitivity (measured
in percent) is set in the eld named >Vel (zero percent implies no velocity sensitivity at all). The
absolute values for the velocity range from 0 to 127. Since it is almost impossible to strike as hard
CHAPTER 4. REFERENCE MANUAL
42
as 127 (depending on your type of keyboard) it is often convenient to set maximum velocity to a
much lower value. (see Fig. 4.9). It is also possible to achieve inverse velocity by using negative
values on >Vel and naturally the >Max becomes >Min.
Volume
>Vol
0%
>Vel
Velocity
100%
127
0
>max
Figure 4.9: Velocity sensitivity
4.6.5 Filter
>Voice
001:DRUMS
>Grp >Param
01
5.Filter
>FTBL
12:PEAK
>D-Axis >Dyn >Fix
1.freq
99
50
This parameter species the type of lter in use by the current group. The type of lter (i.e. the
lter table to be used) is set in the eld named >FTBL.
The characteristics for each type of lter are described by a matrix where the two axes denote
two characteristics (see Fig. 4.10). Q-lters (e.g. low pass and high pass lters) are typically
described by their level and frequency, but there are lter types with other characteristics as well
(e.g. slope and frequency).
Only one of the axes is allowed to be \dynamic," i.e. possible to modulate (see chapter 1, section 1.3.5, page 9 for further information on modulations). The choice of dynamic axis is set in
the eld named >D-Axis. As mentioned above, what types of axes there are depend on the chosen
lter table.
The choice of >Dyn and >Fix determine the origin of the lter in use, where the former denotes
the origin of the dynamic axis and the latter denotes the origin of the static (xed) axis. Only
values in steps of 10 are allowed on the static (xed) axis.
4.6.6 Output
>Voice
001:DRUMS
>Grp >Param
01
6.Output
>Output
4.Mono
>Ind >To
+2
+5
This parameter species the output in use by the group. There are ve alternatives shown in
table 4.8. Note that the output setting specied here can be overridden by the output setting in
performance edit.
>Voice
001:DRUMS
>Grp >Param
01
6.Output
>Output >Pan >Ind >To
5.Stereo 42 +2
+5
The last option 5.Stereo is provided with a panning parameter (as shown above) to change the
balance between left and right speakers. The balance ranges from 50 to 50.
4.6. VOICE EDIT
Level
43
100
20
10
10
20
100
Frequency
Figure 4.10: The lter table
Filter
1.Q LPF
2.Q HPF
3.WIDE BPF
4.NRRW BPF
5.LOW LPF
6.HIGH LPF
7.LOW HPF
8.HIGH HPF
9.HPF LPF
10.BPF BEF
11.DIP
12.PEAK
13.LOSL LPF
14.HISL LPF
15.LOSL HPF
16.HISL HPF
Axes
freq, level
freq, level
freq, level
freq, level
freq, level
freq, level
freq, level
freq, level
freq, level
freq, level
freq, level
freq, level
freq, slope
freq, slope
freq, slope
freq, slope
Full name
Low pass Q-lter
High pass Q-lter
Wide band pass lter
Narrow band pass lter
Low low pass lter
High low pass lter
Low high pass lter
High high pass lter
High to low pass lter
Band pass to eliminate
DIP (notch) lter
Peak lter
Low low pass lter with slope
High low pass lter with slope
Low high pass lter with slope
High high pass lter with slope
Table 4.7: Available lter tables
CHAPTER 4. REFERENCE MANUAL
44
Output
1.None
2.Left
3.Right
4.Mono
5.Stereo
Description
The group becomes silent
For left speaker
For right speaker
For both speakers (mono)
For both speakers (stereo)
Table 4.8: Output settings in the voice
Note: Stereo groups will occupy two audio channels during their play, and stereo waves will
only be played in stereo if the stereo option is chosen. It will also do if the output
setting of the voice is surpressed by a stereo setting in performance edit.
The elds >Ind and >To are used for individual outputs and are only of interest if the corresponding
option in performance edit is used. Outputs are then relatively assigned to the outputs specied
in performance edit, see g. 4.2 (page 34).
4.6.7 AEG (Amplitude Envelope Generator)
>Voice
001:PIANO
>Grp >Param
01
7.AEG
>At >D1 >L1 >D2 >L2 >Rl
5
5 50
5 35 10
The AEG describes the volume distributed over time. This is a slightly more advanced version of
the common ADSR and is best shown by Fig. 4.11.
Level
(volume)
L1
Key released
L2
At
D1
D2
Rl
Time
Figure 4.11: The AEG (Amplitude Envelope Generator)
4.6.8 Mode
>Voice
001:DRUMS
>Grp >Param
01
8.Mode
>Poly >Mode
on
2.One-shot
This parameter species the mode of the current group. Set the value in the eld named >Poly
to off to disable the polyphony, i.e. at most one and the same audio channel is used each time
the group is played.
>Mode species the playing mode of the current group. There are a total of four modes:
4.6. VOICE EDIT
1.Normal
2.Oneshot
3.Glide
4.Release
>Voice
001:DRUMS
45
Results in never releasing key (as described by the AEG). Useful for percussion.
Portamento
Triggering on release of keys.
>Grp >Param
01
8.Mode
>Poly >Mode
on
3.Glide
>Glide
9999ms
Typhoon provides monophonic portamento, or glide. With glide mode enabled, if you press a key
while holding down another, the pitch will glide between the two keys. The total time of the glide
is specied in eld >Glide. The time is expressed in milliseconds (1000 milliseconds = 1 second).
4.6.9 Mod Tbl (Modulation Table)
Entry Source Destination Amount
#1
#2
#3
..
.
#8
1.Veloc
3.Key
5.Wheel
5.Attack
4.Pan
6.Glide
6.PBend
1.Pitch
..
.
..
.
+7
+50
-500
..
.
>Sm=17, >Ct=22
Figure 4.12: A modulation table
There are eight available modulation entries in the modulation table. Each entry describes a
modulation, i.e. how a chosen parameter (modulation target) is to be varied by a modulation
source.
>Voice
001:STRINGS
>Grp >Param
># >Source >Dest
01
9.Mod tbl 3 5.Wheel 6.Glide
>Amt
-500
>Frz
off
The modulation entry number is chosen in the eld named >#, and the amount, expressing
the maximum modulation of the chosen target, is set in the eld named >Amt. Some modulations
are also equipped with a >Frz (frozen) parameter, such that momentary modulator values on key
down can be taken from the modulation source. Naturally, some modulations are \timeless" (or
\frozen") by their nature (e.g. the velocities given by the keyboard) and the >Frz eld is omitted.
Using Velocity as a Modulation Source
There are two methods of using velocity as a modulation source; keyboard based and range based.
The keyboard based velocity uses the total velocity range given by the keyboard, i.e. from 0
to 127. Zero velocity produces no modulation and maximum velocity (127) produces maximum
modulation as described by gure 4.14.
Range based velocity modulation operates on the local range given by the >Min and >Max
values of the group (see g. 4.15).
CHAPTER 4. REFERENCE MANUAL
46
Modulation
Modulation source (e.g. a LFO)
Amount
Result
Destination = pitch shift
Figure 4.13: Illustrating modulation
Modulation
source
max
Velocity
0
0
max
Figure 4.14: Using keyboard based velocity as modulation source
Modulation
source
max
Velocity
0
0
Vel. range
max
Figure 4.15: Using range based velocity as modulation source
4.6. VOICE EDIT
Source
1.Vel
2.Vel/R
3.Key
4.Key/R
5.Wheel
6.PBend
7.PB/H
8.XCtl1
9.XCtl2
10.Press
11.Extern
12.LFO1
13.LFO2
14.ENV1
15.ENV2
47
Description
Available modulation sources
Velocity given by keys over the total velocity range (i.e. 0 : : : 127). Zero velocity produces no modulation and maximum velocity (127) produces maximum
modulation.
Velocity/range. Velocity is taken from the local key range (of the group).
Minimum velocity (dened by >Min) produces zero modulation and maximum
velocity (dened by >Max) produces maximum modulation.
The middle key of the keyboard produces no modulation, the right hand side
produces positive modulation and the left hand side produces negative modulation.
Key/range. The middle key of the local key range (the range dened by
>Bot and >Top of the group) produces no modulation. The right hand side of
the local key range produces positive modulation, whereas the left hand side
produces negative modulation.
Standard modulation wheel. Modulation ranging from no modulation to maximum modulation.
Pitch bend wheel. Produces modulation ranging from maximum inverse modulation to maximum modulation.
Pitch bend for held keys. Works like 6.PBend but it is only eective on held
keys.
External controller #1 - dened in system setup. Produces modulation
ranging from no modulation to maximum modulation.
External controller #2 - dened in system setup.
Aftertouch. Produces modulation ranging from no modulation to maximum
modulation. (Polyphonic aftertouch is supported.)
The external input on the front panel of the TX16W. Produces modulation
ranging from no modulation to maximum modulation.
Low Frequency Oscillator #1. Produces modulation ranging from maximum
inverse modulation to maximum modulation.
Low Frequency Oscillator #2.
Envelope #1. Produces modulation ranging from maximum inverse modulation to maximum modulation.
Envelope #2.
Table 4.9: Available modulation sources
CHAPTER 4. REFERENCE MANUAL
48
Using the Keyboard as a Modulation Source
As in the case of velocity, there are also two ways you can use the keyboard as a modulation
source. With the keyboard based method, the middle key of the entire keyboard produces no
modulation; the right hand side produces positive modulation and the left hand side produces
negative modulation (see Fig. 4.16).
The range based method operates in a similar fashion on the local range given by the >Bot
and >Top values of the group (see g. 4.17).
Modulation
source
max
0
Middle key
-max
Key
C1
C2
C3
C4
C5
B5
Figure 4.16: Using keyboard based key modulation
Modulation
source
max
max
0
0
Middle key
min
Key
C1
C2
C3
C4
C5
B5
Key range
Figure 4.17: Using range based key modulation
4.6.10 LFO1 (Low Frequency Oscillator)
>Voice
001:STRINGS
>Grp >Param
01 10.LFO1
>Shape >Rate >Amp >Sync >Pos
1.Triang 1000 100 2.Reset 99
The eld named >Shape provides ve dierent shapes (see g. 4.18).
Additional parameters are: >Rate to specify the rate of the oscillator (any value between 1 and
1000) and >Amp to specify the amplitude of the oscillator (any value between 0 and 100).
Since several oscillators may run in parallel, dierent synchronization options are provided.
The type of synchronization is set in the eld named >Sync. There are four alternatives:
4.6. VOICE EDIT
49
Available modulation destinations
Destination Description
1.Pitch
Modulates the pitch of the group. The maximum amount of modulation is
2.Volume
3.Filter
4.Pan
5.Attack
6.AEG/T
7.Glide
8.LFO1/A
9.LFO2/A
10.LFO1/R
11.LFO2/R
12.ENV1
13.ENV2
set by the parameters >Sm (semitones) and >Ct (cents).
Modulates the volume of the group. The maximum amount >Amt of modulation is set to any value between -100 and +100.
Modulates the dynamic axis in use by the lter of the group. Set the maximum
amount >Amt of modulation to any value between -100 and +100.
Stereo panning. Set the maximum amount >Amt of modulation to any value
between -100 and +100. This option is eective only if the group is in stereo
mode (check 6.Output).
Modulates the attack parameter of the AEG. Set the maximum amount >Amt
of modulation to any value between -100 and +100.
Modulates the time of the AEG. Set the maximum amount >Amt of modulation
to any value between -200 and +200.
Modulates the speed of portamento. Set the maximum amount >Amt of modulation to any value between -9999 and +9999.
Modulates the amplitude parameter of LFO #1 (of the group). Set the maximum amount >Amt of modulation to any value between -100 and +100.
Ditto for LFO #2.
Modulates the rate (or frequency) parameter of LFO #1. Set the maximum
amount >Amt of modulation to any value between -1000 and +1000.
Ditto for LFO #2.
Modulates the amplitude parameter of envelope #1. Set the maximum amount
>Amt of modulation to any value between -100 and +100.
Ditto for envelope #2.
Table 4.10: Available modulation destinations
>Amp
1 period
0
>Pos
99
1.Triangle
3.Square
2.Saw
4.Sine
Figure 4.18: Available LFO shapes
5.Noise
CHAPTER 4. REFERENCE MANUAL
50
1.None
2.Reset
3.Group
4.Voice
Synchronization disabled.
The phase of the LFO is reset to the position specied in the eld named
>Pos when the group starts playing.
Phase synchronization is performed on note-on within the group.
Synchronization is performed within the voice.
Note: To obtain complete synchronization, the LFOs must have the same rates.
4.6.11 LFO2 (Low Frequency Oscillator)
See LFO1 (option no. 10)
4.6.12 ENV1 (Envelope #1)
>Voice
001:STRINGS
>Grp >Param
01 12.ENV1
>L0 >T1 >L1 >T2 >L2 >T3 >L3 >Amp
+100 100 -100 100 -100 100 -100 100
is the initial level of the envelope (any value between -100 and +100). >L1, >L2 and >L3 are
the envelope levels in percent of >Amp after time >T1, >T1+>T2 and >T1+>T2+>T3 has expired
respectively. >L3 denes the nal envelope level and >Amp is the actual amplitude of the complete
envelope (see Fig. 4.19).
>L0
L1
+ Level
L3
L0
Time
>Amp
L2
- Level
T1
T2
T3
Figure 4.19: The envelope
4.6.13 ENV2 (Envelope #2)
See ENV1 (option no. 12)
4.7. VOICE EDIT UTILITIES
51
4.7 Voice Edit Utilities
Voice edit utilities are utilities for voices only. The menu is activated by pressing the UTILITY
button after entering voice edit. Two diodes are lit simultaneously indicating the chosen utility
menu for voices.
4.7.1 Load
>Util
1.Load
>Voice
01:PERCUSS
>Test >Go
The load utility loads the chosen voice from the current diskette. The waves required by the voice
are automatically loaded; missing waves are requested.
Loaded voice TR-909 (requires 112632)
Keep [+1] Unload [-1]
Pressing ENTER at eld >Test also results in loading the wave, but with the opportunity to
undo the operation. This is especially useful to test certain sounds and keep them only if you are
satised. Press +1 to keep the loaded voice, and -1 to undo the operation. Pressing ENTER at
>Go results in loading the chosen wave without this dialog. See section 4.3.1 (page 28) for further
information.
4.7.2 Save
>Util
2.Save
>Voice
001:PERC
>Waves
2.Unsaved
>Go
Press ENTER at >Go to save the chosen voice (in memory) as a le to diskette. See section 4.3.2
(page 28) for further information.
4.7.3 Delete
>Util
>Voice
3.Delete 001:PERC
>Go
This utility deletes voices from memory. (Erasing les from diskettes is possible in the utilites of
system setup, see section 4.3.6, page 30.) Press ENTER at >Go to remove the chosen voice. Note
that the waves in use by the voice are not removed, since other voices may share them.
4.7.4 Rename
>Util
>Voice
4.Rename 001:CHURCH
>Name
ORGAN
>Go
This utility renames the chosen voice. Press ENTER at eld >Name to specify the name. (Move
the cursor out of the eld range to exit.) Press ENTER at >Go to perform the actual operation.
CHAPTER 4. REFERENCE MANUAL
52
4.7.5 Copy
>Util
5.Copy
>Voice
001:ORGAN
>Name
ORGAN1
>Go
This utility makes a duplicate of the chosen voice and gives it the name specied at eld >Name.
Since it is preferable that duplicates have slightly dierent names, Typhoon will choose a name
for you. If you wish to give the duplicate a name other than that chosen by Typhoon, you can do
so by pressing ENTER at >Name. (Move the cursor out of the eld range to exit.)
Press ENTER at >Go to perform the actual operation.
4.7.6 Swap
>Util
6.Swap
>Voice
001:ORGAN
>With
007:CHOIR
>Go
This utility exchanges the two chosen voices. At rst glance this seems to be a totally useless
function, but it has been shown to be quite the contrary. Consider a situation where one voice
should be replaced by another. It is quite an eort to replace all the occurrences of the voice
manually. However, using this utility you do the operation in a single step, and more important,
it is equally simple to swap the same items back again if you are not satised with the replacement.
4.7.7 New
>Util
7.New
>Name
TEST
>Go
This option creates a new voice with the name specied at eld >Name. The new voice will contain
a single group with default parameter settings.
4.8. WAVE EDIT
53
4.8 Wave Edit
>Wave
001:MAXIKICK
>Func
1.Trim
>Start >End
>Auto >Go
1024
9327
The eld >Wave designates the current wave whose parameters are shown to the right. There
are several types of functions that can be performed on a wave such as trimming, looping and
crossfading. Some functions are provided with a eld >Auto to let Typhoon perform the function
(based on some intelligence) on the selected wave. Also, most of the functions allow you to listen
to the result before deciding whether to keep the changes or not.
Voice
Copy [+1]
>MAXIKICK >ACIDKK >KICK >SNARE >SNARE2
As usual, pressing ENTER at eld >Wave shows the list of waves that are available in memory.
You can also duplicate waves by pressing +1 .
4.8.1 Trim
>Wave
001:MAXIKICK
>Func
1.Trim
>Start >End
>Auto >Go
1024
9327
Use this function to cut out the range specied with >Start and >End. When you press ENTER
at >Go everything that lies outside this range is deleted (see Fig. 4.20). >Auto will automatically
remove silent parts in the beginning and the end of the selection.
You can also select a range in real time by using the - button on the front panel of your
TX16W panel: Place the cursor on >Start (or >End); play the wave (e.g. by pressing a key on
your master keyboard) and press and hold - to set the start and release the button to set the
end.
>Start
>End
Level
Samples
Figure 4.20: Trimming the wave
CHAPTER 4. REFERENCE MANUAL
54
4.8.2 Loop
>Wave
001:MAXIKICK
>Func
2.Loop
>Loop
off
Loops repeat a specic range at the end of the wave (see Fig. 4.21). Turn loop mode on/off by
pressing - on the front keypad at eld >Loop. Once the loop mode is activated the function is
extended with two additional parameters:
>Wave
001:MAXIKICK
>Func
2.Loop
>Loop >To
>Auto >Go
741
9327
The repeat point of the loop is set at the eld >Loop. You can change the loop manually by simply
entering other values at >Loop and >To; entering new values at eld >To moves the loop. Once
you press ENTER at >Go the loop is set.
Warning: Any sound beyond the end of the new loop is lost!
>Loop
>To
Level
Samples
>Go
>Loop
>To
Level
Samples
Figure 4.21: Looping the wave
Auto loop
Auto loop is a fascinating tool that makes the loop nding procedure quite easy. In practice you
will never need to nd the loop manually, instead you let Typhoon nd it for you. The >Auto
option will try to nd a loop given the range at >Loop : : : >To. Pressing ENTER at >Auto will
extend the loop start to the next position such that a new suitable loop is found. Dierent loops
can also be obtained by simply moving the loop end to dierent positions. Figure 4.22 illustrates
the procedure.
4.8. WAVE EDIT
55
>Loop
>To
Level
Samples
Auto loop search
Level
Samples
>Loop
>To
Figure 4.22: Auto loop nding procedure
4.8.3 Pitch
>Wave
001:PIANOC4
>Func
3.Pitch
>Key >Cent >Auto
C4
+42
Use this option to set the pitch of the wave. Press
the pitch for you (strongly recommended).
>Wave
002:SNARE
>Func
3.Pitch
>Key
none
ENTER
at >Auto if you want Typhoon to track
>Auto
For pitchless waves (e.g. snare drums) you should turn the pitch o. This is done by simply
pressing - (on your TX16W keypad) at >Key.
4.8.4 S-rate (Sample Rate Conversion)
>Wave
004:HIHAT
>Func
4.S-rate
Rate >New
50000 33333
>Go
Use this function for sample rate conversion. Enter the desired rate at >New and press
to perform the operation.
>Go
ENTER
at
CHAPTER 4. REFERENCE MANUAL
56
4.8.5 XFade (Crossfade)
>Wave
002:CHOIR
>Func
5.XFade
>Amount
100%
>Go
Use this function to make harsh loops sound smoother. An amount expressed in percent of the
loop is specied at eld >Amount. Crossfading means that a given amount before the loop is
blended into an equal amount at the end of the loop (see Fig. 4.23).
Loop
Level
+
Amplitude
(Volume)
Crossfades to
Level
Amount
(in %)
100%
0%
Figure 4.23: Crossfading the wave
4.8.6 Gain
>Wave
001:GUITAR
>Func
6.Gain
>Norm >Gain
500%
>Go
Use this function to increase/decrease the gain of the given wave. The gain of the wave is multiplied
with the amount given in >Gain. However, if the gain is increased, sample points may get clipped
and the sound becomes distorted.
You can also normalize the wave (i.e. perform maximal gaining without getting distortion) by
pressing ENTER at >Norm.
4.8.7 Join & Split
Join
>Wave
001:CHOIR
>Func
7.Join
>Right wave
002:CHOIR R
>Go
Use this function to create a stereo wave by joining two non-stereo waves. Choose the waveform
for the right speaker at eld >Right wave and press ENTER at >Go to perform the operation.
4.8. WAVE EDIT
57
Level
max
Samples
Level
Clipped
max
Samples
Amount = 150%
Gaining 150%
Clipped
Figure 4.24: Gaining the wave
Note that the waves must be of the same length before joining.
Split
>Wave
001:CHOIR2
>Func
7.Split
>Go
Use this function to split a stereo wave into two separate non-stereo waves for left and right
speakers respectively. The name of the non-stereo wave that previously represented the right
speaker is extended with an \R."
CHAPTER 4. REFERENCE MANUAL
58
4.9 Wave Edit Utilities
Wave edit utilities are utilities for waves only. The menu is activated by pressing the UTILITY
button after entering wave edit. Two diodes are lit simultaneously indicating the chosen utility
menu. (Similar utilities are provided for voices and performances.)
4.9.1 Load
>Util
1.Load
>Wave
01:909CRASH
>Test >Go
The load utility loads the chosen wave. Automatic translation of foreign formats is performed by
Typhoon. The following formats are supported:
Compressed (Default) Waves stored in compressed format.
Waves stored as AIFF; a widely available standard.
AIFF
Waves stored in Yamaha TX16W format.
Yamaha
Wave
>909CRASH >ACIDKK >ACIDSNR >AGOGHR16 >C
It is possible, as usual, to press ENTER at eld >Wave to obtain a directory of all the waves stored
on the current diskette (as shown above).
Loaded wave 909CRASH (requires 32192)
Keep [+1] Unload [-1]
Pressing ENTER at eld >Test results in loading the wave with the opportunity to undo the
operation. This is especially useful to test certain sounds and keep them only if you are satised.
Press +1 to keep the loaded wave, and -1 to undo the operation. Pressing ENTER at >Go
results in loading the chosen wave without this dialog.
4.9.2 Save
>Util
2.Save
>Wave
001:MAXIKICK
>Format
>Go
1.Compressed
Press ENTER at >Go to save the chosen wave (in memory) as a le to diskette. The format (to save
the wave in) is determined at eld >Format. The supported formats are the same as for loading.
4.9.3 Delete
>Util
>Wave
3.Delete 001:MAXIKICK
>Go
This utility deletes waves from memory. (Erasing les from diskettes is possible in the utilities of
system setup, see section 4.3.6, page 30.) Press ENTER at >Go to remove the chosen wave.
4.9. WAVE EDIT UTILITIES
59
4.9.4 Rename
>Util
>Wave
4.Rename 001:MAXIKICK
>Name
MEGAKICK
>Go
This utility renames the chosen wave. Press ENTER at eld >Name to specify the name. (Move
the cursor out of the eld range to exit.) Press ENTER at >Go to perform the actual operation.
4.9.5 Copy
>Util
5.Copy
>Wave
001:MAXIKICK
>Name
MAXIKIC1
>Go
This utility makes a duplicate of the chosen wave and gives it the name specied at eld >Name.
Since it is preferable that duplicates have slightly dierent names, Typhoon will choose a name
for you. If you wish to give the duplicate another name, you can do so by pressing ENTER at
>Name. Press ENTER at >Go to perform the actual operation.
4.9.6 Swap
>Util
6.Swap
>Wave
001:MAXIKICK
>With
005:909BD
>Go
This utility exchanges the two chosen waves. At rst glance this seems to be a totally useless
function, but it has been shown to be quite the contrary. Consider a percussion where some drum
should be replaced by another. It is quite an eort to replace all the occurrences of the wave
manually. However, using this utility you do the operation in a single step, and more important,
it is equally simple to swap the same items again if you are not satised with the the replacement.
4.9.7 Dump
>Util
7.Dump
>Wave
001:MAXIKICK
>Via
1.MIDI
>Go
This utility dumps the wave via MIDI (1.MIDI) or via RS-422 external port (2.Ext
lectable at eld >Via. Press ENTER at eld >Go to start the transmission.
port)
se-
CHAPTER 4. REFERENCE MANUAL
60
4.10 Sample
The default parameters have been chosen user friendly; i.e. the novice should not necessarily have
to change them.
To start sampling without changing anything: Go to the eld named >Go and press ENTER .
A new menu will appear - the sample monitor. Go to the eld named >Go again and press
ENTER : Typhoon will now sample incoming data.
4.10.1 X-trig (Extra Sample Trigger)
>Set
>X-trig >Freq
1.Sample 1.None 1.Mono 16k
>Time >Go
9000ms
As soon as the specied extra trigger becomes active by pressing down a MIDI key or the foot
pedal, Typhoon automatically enters the threshold detection monitor. However, incoming
audio will not be sampled until the audio level (volume) exceeds a specied threshold. Read
section 4.10.5 for further information.
X-Trig Type Description
1.None
Extra trigger not used at all.
2.MIDI
Extra trigger via MIDI note on.
3.Foot
Extra trigger via MIDI foot pedal.
Table 4.11: External triggerings
4.10.2 Frequency (The Frequency)
The sample frequency is a measure of audio quality; the higher frequency the better quality.
However, the disadvantage of using high frequencies is the consumption of more memory. Using
50 kHz consumes 50000 sample points (of the sample memory) per second whereas 16 kHz only
consumes 16666 sample points per second.
Because of hardware limitations, a sample may not exceed 262144 sample points. This is
approximately 5 seconds using 50 kHz and 8 seconds using 33 kHz.
Frequency
1.Mono 16k
2.Mono 25k
3.Mono 33k
4.Stereo 33k
5.Mono 50k
Description
Sample frequency 16 kHz mono (worst quality).
Sample frequency 25 kHz mono
Sample frequency 33 kHz mono
Sample frequency 33 kHz stereo
Sample frequency 50 kHz mono (best quality).
Table 4.12: Available sample rates
4.10.3 Time (The Time Limit)
Measured in milliseconds; i.e. thousands of a second. This parameter designates the maximum
elapsed time during the sampling session. If you enter larger values than Typhoon actually can
provide, it will default to the maximum value of the system.
Press ENTER at >Go on your TX16W keypad to enter the sample monitor.
4.10. SAMPLE
61
4.10.4 Auto (Automatically Performed Options)
>Set
2.Auto
>Trim >Info >Normalize >Pitch
on
on
off
on
The parameters of this option specify the preferred automatic actions performed after each sampling session. The use of preferences makes the sampling procedure even easier. Work you probably
would do manually such as trimming the wave, tracking the pitch, etc. can now be performed
automatically after each sampling session. Turn the options on/o by pressing +1 / -1 on your
TX16W keypad.
Trim
Info
Normalize
Pitch
Trimming the wave; i.e. cut silent parts at the beginning and the end of
the recently sampled data.
Let Typhoon perform an objective analysis on the recently sampled data
regarding the audio quality.
Perform normalization of the recently sampled data; i.e. maximize the
\volume" without getting distortion.
Let Typhoon track the pitch of the recently sampled data. Sometimes
Typhoon fails to track the pitch, especially on very simple waves such as
pure sine waves. Audio without pitch such as drums should be tracked as
\none."
4.10.5 The Sample Monitor & Internal Triggering
>Auto set >Threshold
Level
I
>Sample
Pressing ENTER at the eld named >Go in the sample option menu brings you to the internal
triggering monitor (as shown above); i.e. setting the threshold level. The incoming signal level is
displayed in the eld named Level. A fat square (to the right) appears if the level exceeds the
maximum limit. Sampling audio above this level causes distortion. Arrows next to the eld Level
appear if the input signal is too low () or too high ().
When the audio level exceeds the specied threshold in the threshold detection monitor,
Typhoon starts to sample incoming audio data. Sound sources in general have a certain level of
noise; it is preferable to set the threshold just above this level. This is done either manually or
automatically; the former is done by pressing +1 / -1 at eld named >Threshold and the latter
is done by pressing ENTER at eld named >Auto set. Set the threshold level to zero to disable
it. Proceed by pressing ENTER in the eld named >Go. Doing this brings you to the threshold
detection monitor.
4.10.6 The Threshold Detection Monitor
Status
THRESHOLD
Freq
Stereo 33k
Time
3000ms
Stop [-1]
Typhoon will start sampling incoming data as soon as the audio level exceeds the specied threshold. Note that Typhoon supports 250 ms (i.e. 41 second) \presampling" to prevent lost of incoming
transients. However, the presampling starts as soon as the user enters the threshold detection
monitor. Thus, audio sampled using external triggering when the threshold is disabled will not be
presampled at all.
The sampling session is ended either by pressing - on your TX16W keypad or when the time
(shown in the eld named Time) has expired. Switched on auto options are then performed on
the recently sampled data.
CHAPTER 4. REFERENCE MANUAL
62
4.10.7 Resample or Keep the Recently Sampled Data
>Name
>Pitch >Cent Dyna
UNTITLED D3
+50
80%
>Retry >Keep
The menu shown above appears after each sampling session. If you are not satised with the
sampling you can either try again by pressing ENTER at the eld named >Retry or abort the
whole session (without saving anything) by simply pressing any menu button on your TX16W
front panel. Pressing ENTER in the eld named >Keep will result in saving the recently sampled
data as a wave. Further editing can be done through the wave edit utilities.
The name of the wave. You can enter a new name by pressing ENTER .
Name
The pitch of the wave. If the >Pitch (pitch tracking) option is disabled
Pitch
you will have to set this manually, e.g. by pressing +1 / -1 .
The current pitch within the note; ranging from -50 to +50. This option is
Cent
used for ne tuning.
Dyna
Dynamics (Dyna) is shown in percent and is only calculated if the >Info
option is enabled. The higher the value - the better quality. Not all of the
12 bits are used if the dynamics is less than 50%; this should be avoided.
Clip
Clipping (Clip) is shown in number of sample points and is only calculated
if the >Info option is enabled. Clipped sample points result in distortion;
thus the higher the value - the poorer the quality. A reasonable amount of
clipping is less than 50 sample points (though this issue is quite subjective).
To avoid clipping/distortion: Sample with lower gain (adjustable on your
TX16W front panel).