1
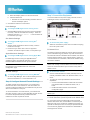
Dominion® KSX II Quick Setup Guide Thank you for your purchase of the KSX II, the industry's most full-featured, enterprise-class, secure, digital KVM (Keyboard, Video, Mouse) and serial console switch. This Quick Setup Guide explains how to install and configure the KSX II. For additional information on any aspect of KSX II, see the accompanying KSX II User Guide, which can be downloaded from the Firmware and Documentation section (http://www.raritan.com/support/firmware-and-documentation/) of Raritan's website. Step 1: Configure the KVM Target Servers For optimal bandwidth efficiency and video performance, KVM target servers running graphical user interfaces such as Windows®, Linux®, X-Windows, Solaris™, and KDE require configuration. The desktop background need not be completely solid but desktop backgrounds featuring photos or complex gradients might degrade performance. Ensure that the server video resolution and refresh rate are supported by KSX II and that the signal is non-interlaced. The KSX II supports these resolutions: Resolutions 800x600 @75Hz 1366x768@60Hz 800x600 @85Hz 1368x768@60Hz 800x600 @90Hz 1400x1050@60Hz 800x600 @100Hz 1440x900@60Hz 832x624 @75.1Hz 1600x1200 @60Hz 1024x768 @60Hz 1680x1050@60Hz Resolutions 640x350 @70Hz 1024x768 @75Hz Mouse Modes 640x350 @85Hz 1024x768 @90Hz The KSX II operates in several mouse modes: 640x400 @56Hz 1024x768 @100Hz 640x400 @84Hz 1152x864 @60Hz 640x400 @85Hz 1152x864 @70Hz 640x480 @60Hz 1152x864 @75Hz 640x480 @66.6Hz 1152x864 @85Hz 640x480 @72Hz 1152x870 @75.1Hz 640x480 @75Hz 1152x900 @66Hz 640x480 @85Hz 1152x900 @76Hz 720x400 @70Hz 1280x720@60Hz 720x400 @84Hz 1280x960 @60Hz 720x400 @85Hz 1280x960 @85Hz 800x600 @56Hz 1280x1024 @60Hz 800x600 @60Hz 1280x1024 @75Hz 800x600 @70Hz 1280x1024 @85Hz 800x600 @72Hz 1360x768@60Hz KSX II Quick Setup Guide QSG-DKSXII-v2.3.0-0D-E 255-62-5001-00-RoHS Absolute Mouse Mode™ (D2CIM-VUSB only) Intelligent Mouse Mode (do not use an animated mouse) Standard Mouse Mode Mouse parameters do not have to be altered for Absolute Mouse Synchronization but D2CIM-VUSB or D2CIM-DVUSB is required for this mode. For both the Standard and Intelligent mouse modes, mouse parameters must be set to specific values, which are described here. Mouse configurations will vary on different target operating systems. Consult your OS documentation for additional detail. Windows XP, Windows 2003 and Windows 2008 Settings To configure KVM target servers running Windows XP®, Windows 2003® and Windows 2008®: 1. Configure the mouse settings: a. Choose Start > Control Panel > Mouse. b. Click the Pointer Options tab. c. In the Motion group: Set the mouse motion speed setting to exactly the middle speed. 1 Disable the "Enhance pointer precision" option. Disable the Snap To option. Click OK. 2. Disable transition effects: a. Select the Display option from the Control Panel. b. Click the Appearance tab. Click the Effects button. Deselect the "Use the following transition effect for menus and tooltips" option. 3. Click OK and close the Control Panel. Animation options: Animate controls and elements inside windows Animate windows when minimizing and maximizing Fade options: Fade or slide menus into view Fade or slide ToolTips into view Fade out menu items after clicking 3. Click OK and Close the Control Panel. Note: For KVM target servers running Windows XP, Windows 2000 or Windows 2008, you may wish to create a user name that will be used only for remote connections through the KSX II. This will enable you to keep the target server's slow mouse pointer motion/acceleration settings exclusive to the KSX II connection. 1. Configure the mouse settings: a. Choose Start > Control Panel > Hardware and Sound > Mouse. b. Click the Pointer Options tab. c. In the Motion group: Set the mouse motion speed setting to exactly the middle speed. Disable the "Enhanced pointer precision" option. Click OK. 2. Disable animation and fade effects: a. Select Control Panel > System and Security. b. Select System and then select "Advanced system settings" from the left navigation panel. The System Properties dialog appears. c. Click the Advanced tab. d. Click the Settings button in the Performance group to open the Performance Options dialog. e. Under Custom options, deselect the following checkboxes: Animation options: Animate controls and elements inside windows Animate windows when minimizing and maximizing Fade options: Fade or slide menus into view Fade or slide ToolTips into view Fade out menu items after clicking 3. Click OK and Close the Control Panel. Windows XP, 2000, and 2008 login pages revert to preset mouse parameters that differ from those suggested for optimal KSX II performance. As a result, mouse synchronization may not be optimal for these screens. WARNING! Proceed only if you are comfortable adjusting the registry on Windows KVM target servers. You can obtain better KSX II mouse synchronization at the login pages by using the Windows registry editor to change the following settings: HKey_USERS\.DEFAULT\Control Panel\Mouse: > MouseSpeed = 0;MouseThreshold 1=0;MouseThreshold 2=0. Microsoft Windows 7 and Windows Vista Settings To configure KVM target servers running Windows Vista® operating system: 1. Configure the mouse settings: a. Choose Start > Settings > Control Panel > Mouse. b. Select "Advanced system settings" from the left navigation panel. The System Properties dialog opens. c. Click the Pointer Options tab. d. In the Motion group: Set the mouse motion speed setting to exactly the middle speed. Disable the "Enhanced pointer precision" option. Click OK. 2. Disable animation and fade effects: a. Select the System option from the Control Panel. b. Select Performance Information then Tools > Advanced Tools > Adjust to adjust the appearance and performance of Windows. c. Click the Advanced tab. d. Click the Settings button in the Performance group to open the Performance Options dialog. e. Under Custom options, deselect the following checkboxes: KSX II Quick Setup Guide QSG-DKSXII-v2.3.0-0D-E 255-62-5001-00-RoHS To configure KVM target servers running Windows 7® operating system: Windows 2000 Settings To configure KVM target servers running Microsoft Windows 2000® operating system: 1. Configure the mouse settings: a. Choose Start > Control Panel > Mouse. b. Click the Motion tab. Set the acceleration to None. Set the mouse motion speed setting to exactly the middle speed. Click OK. 2. Disable transition effects: 2 a. Select the Display option from the Control Panel. b. Click the Effects tab. Deselect the "Use the following transition effect for menus and tooltips" option. 3. Click OK and close the Control Panel. Step 3: Connect the Equipment Connect the KSX II to the power supply, network, local PC, KVM target servers, and serial targets. Linux Settings To configure KVM target servers running Linux®: (Standard Mouse Mode only) Set the mouse acceleration to exactly 1 and set the threshold to exactly 1. Enter the following command: xset mouse 1 1. This should be set for execution upon login. Sun Solaris Settings To configure KVM target servers running Sun® Solaris™: 1. Set the mouse acceleration value to exactly 1 and the threshold to exactly 1. 2. Ensure that your video card is set to a supported resolution and that its output is VGA, not composite sync. Apple Macintosh Settings To configure KVM target servers running Apple Mac: For KVM target servers running an Apple Macintosh® operating system, the preferred method is to use the D2CIM-VUSB and Absolute Mouse Synchronization. Note: 'USB Profile 'Mac OS-X, version 10.4.9 and later' must be selected from the USB Profile menu or the Port Configuration page. IBM AIX Settings To configure KVM target servers running IBM AIX®: Go to the Style Manager, click on Mouse Settings and set Mouse Acceleration to 1.0 and Threshold to 3.0. QS Rule Step 2: Configure Network Firewall Settings To enable remote access to the KSX II, your network and firewall must allow communication on TCP Port 5000. You can also configure the KSX II to use a different TCP port, then allow communication on that port. To access the KSX II via a web browser, your firewall must also allow access to TCP Port 443 (Standard HTTPS). Access to TCP Port 80 (Standard HTTP) enables automatic redirection of HTTP requests to HTTPS. A. AC Power To connect the power supply: 1. Attach the included AC power cord to the KSX II and plug into an AC power outlet. B. Network Port The KSX II provides two Ethernet ports for failover purposes (not for load-balancing). By default, only LAN1 is active and the automatic failover is disabled. When enabled, if the KSX II internal network interface or the network switch to which it is connected becomes unavailable, LAN2 will be enabled using the same IP address. Note: Because a failover port is not activated until after a failover has actually occurred, Raritan recommends that you either not monitor the failover port or monitor it only after a failover occurs. To connect the network: 1. Connect a standard Ethernet cable (included) from the network port labeled LAN1 to an Ethernet switch, hub, or router. 2. To make use of the optional KSX II Ethernet failover capabilities: Connect a standard Ethernet cable from the network port labeled LAN2 to an Ethernet switch, hub, or router. Enable Automatic Failover on the Network Configuration page. Note: Use both network ports only if you want to use one as a failover port. C. Local User Port (Local PC) and Local Admin Port QS Rule For convenient access to KVM target servers and serial devices while at the rack, use the KSX II Local Access port. While the local port is required for installation and setup, it is optional for subsequent use. The local port provides the KSX II Local Console graphical user interface for administration and target server access. KSX II Quick Setup Guide QSG-DKSXII-v2.3.0-0D-E 255-62-5001-00-RoHS 3 To connect the Local User port: Attach a multi-sync VGA monitor, keyboard, and mouse to the respective Local User ports (using either a PS/2 or USB keyboard and mouse). Connection Description Monitor Attach a standard multi-sync VGA monitor to the HD15 (female) video port. Keyboard Attach either a standard PS/2 keyboard to the Mini-DIN6 (female) keyboard port, or a standard USB keyboard to one of the USB Type A (female) ports. Mouse Attach either a standard PS/2 mouse to the Mini-DIN6 (female) mouse port or a standard USB mouse to one of the USB Type A (female) ports. E. Power Strip To connect the Dominion PX to the KSX II: 1. Plug one end of a Cat5 cable into the Serial port on the front of the Dominion PX. 2. Connect the other end of the Cat5 cable to either the Power Ctrl. 1 or Power Ctrl. 2 ports on the back of the KSX II. 3. Attach an AC power cord to the target server and an available rack PDU outlet. 4. Connect the rack PDU to an AC power source. 5. Power on the KSX II device. Important: When using CC-SG, the power ports should be inactive before attaching rack PDUs that were swapped between the power ports. If this is not done, there is a possibility that the number of power outlets will not be correctly detected, especially after swapping 8 and 20 outlet rack PDU models. You can use the Local Admin port to connect the KSX II directly to a workstation to manage your serial targets and configure the system with a terminal emulation program such as HyperTerminal. The Local Admin port requires the use of a standard null modem cable. Note: When local Authorization and Authentication is set to None, logging in to serial admin console requires username input. D. KVM Target Server Ports The KSX II uses standard UTP cabling (Cat5/5e/6) to connect to each target server. To connect a KVM target server to the KSX II: 1. Use the appropriate Computer Interface Module (CIM). 2. Attach the HD15 video connector of your CIM to the video port of your KVM target server. Ensure that your target server's video has already been configured to a supported resolution and refresh rate. For Sun servers, also ensure that your target server's video card has been set to output standard VGA (H-and-V sync) and not composite sync. 3. Attach the keyboard/mouse connector of your CIM to the corresponding ports on your target server. Using a standard straight-through UTP (Cat5/5e/6) cable, connect the CIM to an available server port on the back of your KSX II device. Note: The DCIM-USB G2 provides a small slide switch on the back of the CIM. Move the switch to P for PC-based USB target servers. Move the switch to S for Sun USB target servers. A new switch position takes effect only after the CIM is power-cycled. To power-cycle the CIM, remove the USB connector from the target server and plug it back in a few seconds later. KSX II Quick Setup Guide QSG-DKSXII-v2.3.0-0D-E 255-62-5001-00-RoHS Diagram key KSX II PX serial port KSX II Power Ctrl. 1 Port or Power Ctrl. 2 Port Cat5 cable PX F. Serial Target Ports To connect a serial target to the KSX II, use a Cat5 cable with an appropriate serial adapter. 4 The following table lists the necessary KSX II hardware (adapters and/or cables) for connecting the KSX II to common vendor/model combinations. Vendor Device Console connector Serial connection Checkpoint Firewall DB9M Cisco PIX Firewall ASCSDB9F adapter and a CAT 5 cable Cisco Catalyst RJ-45 CRLVR-15 rollover cable; or CRLVR-1 adapter cable and a CAT5 cable CRLVR-1 cable for connecting a terminal port (RJ-45 Connector type) of KSX II-48 models that have this connector to another KSX II. Cisco Router DB25F Hewlett Packard® UNIX® Server Silicon Graphics Origin Sun™ ASCSDB25M adapter and a CAT 5 cable DB9M ASCSDB9F adapter and a CAT 5 cable SPARCStation DB25F ASCSDB25M adapter and a CAT 5 cable Sun Netra T1 RJ-45 CRLVR-15 cable; or CRLVR-1 adapter and a CAT5 cable Sun Cobalt DB9M ASCSDB9F adapter and a CAT 5 cable Various Windows NT ® Go to the Support page on Raritan's website (www.raritan.com) to obtain a list of commonly used cables and adapters. QS Rule Step 4: Configure the KSX II Change the Default Password The KSX II ships with a default password. The first time you start the KSX II you are required to change that password. To change the default password: 1. Power ON the KSX II using the power switch at the back of the device. Wait for the KSX II device to boot. (A beep signals completion of the boot.) 2. Once the device has booted, the KSX II Local Console is visible on the monitor attached to the KSX II local port. Type the default username (admin) and password (raritan) and click Login. The Change Password screen is displayed. 3. Type your old password (raritan) in the Old Password field. 4. Type a new password in the New Password field; retype the new password in the Confirm New Password field. Passwords can be up to 64 characters long and can consist of English alphanumeric and printable special characters. 5. Click Apply. 6. You will receive confirmation that the password was successfully changed. Click OK. The Port Access page opens. Assigning an IP Address To assign an IP address: 1. Choose Device Settings > Network. The Network Settings page opens. 2. Specify a meaningful Device Name for your KSX II device. Up to 32 alphanumeric characters using valid special characters and no spaces. 3. In the IPv4 section, enter or select the appropriate IPv4-specific network settings: a. Enter the IP Address if needed. The default IP address is 192.168.0.192. b. Enter the Subnet Mask. The default subnet mask is 255.255.255.0. c. Enter the Default Gateway if None is selected from the IP Auto Configuration drop-down. d. Enter the Preferred DHCP Host Name if DHCP is selected from the IP Auto Configuration drop-down. e. Select the IP Auto Configuration. The following options are available: None (Static IP) - This option requires that you manually specify the network parameters. This is the recommended option because the KSX II is an infrastructure device and its IP address should not change. DHCP - Dynamic Host Configuration Protocol is used by networked computers (clients) to obtain unique IP addresses and other parameters from a DHCP server. With this option, network parameters are assigned by the DHCP server. If DHCP is used, enter the Preferred host name (DHCP only). Up to 63 characters. 4. If IPv6 is to be used, enter or select the appropriate IPv6-specific network settings in the IPv6 section: KSX II Quick Setup Guide QSG-DKSXII-v2.3.0-0D-E 255-62-5001-00-RoHS 5 a. Select the IPv6 checkbox to activate the fields in the section. b. Enter a Global/Unique IP Address. This is the IP address assigned to the KSX II. c. Enter the Prefix Length. This is the number of bits used in the IPv6 address. d. Enter the Gateway IP Address. e. Link-Local IP Address. This address is automatically assigned to the device. It is used for neighbor discovery or when no routers are present. Read-Only f. Zone ID. This identifies the device with which the address is associated. Read-Only g. Select the IP Auto Configuration. The following options are available: None - Use this option if you do not want an auto IP configuration and prefer to set the IP address yourself (static IP). This is the default and recommended option. If None is selected for the IP auto configuration, the following Network Basic Settings fields are enabled: Global/Unique IP Address, Prefix Length, and Gateway IP Address allowing you to manually set the IP configuration. Router Discovery - Use this option to automatically assign IPv6 addresses that have Global or Unique Local significance beyond that of the Link Local, which only applies to a directly connected subnet. 5. Select Obtain DNS Server Address Automatically if DHCP is selected and Obtain DNS Server Address is enabled. When Obtain DNS Server Address Automatically, the DNS information provided by the DHCP server will be used. 6. If Use the Following DNS Server Addresses is selected, regardless of whether DHCP is selected or not, the addresses entered in this section will be used to connect to the DNS server. Enter the following information if the Following DNS Server Addresses option is selected. These addresses are the primary and secondary DNS addresses that will be used if the primary DNS server connection is lost due to an outage. a. Primary DNS Server IP Address b. Secondary DNS Server IP Address 7. When finished, click OK. Your KSX II device is now network accessible. Note: In some environments, the default LAN Interface Speed & Duplex setting Autodetect (autonegotiator) does not properly set the network parameters, which results in network issues. In these instances, setting the KSX II LAN Interface Speed & Duplex field to 100 Mbps/Full Duplex (or whatever option is appropriate to your network) addresses the issue. Naming Target Servers Note that the KVM and serial target names are defined on different Port pages (either a KVM or serial Port page) but the KSX II Quick Setup Guide QSG-DKSXII-v2.3.0-0D-E 255-62-5001-00-RoHS steps involved are the same for both. The only variation is selecting a KVM target or serial target from the Port Configuration page to connect to the appropriate page. To name KVM target servers and serial targets: 1. Connect all of the KVM target servers and serial targets if you have not already done so (as described in Step 1: Connect the Equipment). 2. Using the KSX II Local Console, select Device Settings > Port Configuration. The Port Configuration page opens. 3. Click the name of the KVM target server or serial target you want to name. The Port page opens. The fields on the Port page will vary for KVM and serial targets. 4. Assign a name to identify the server or serial target connected to that port. The name can be up to 32 characters; alphanumeric and special characters are allowed. 5. Click OK. Creating User Groups and Users To add a new user group: 1. Open the Group page by selecting User Management > Add New User Group or clicking the Add button from the User Group List page. The Group page is organized into the following categories: Group, Permissions, Port Permissions, and IP ACL. 2. Type a descriptive name for the new user group into the Group Name field (up to 64 characters). 3. Set the permissions for the group. Select the checkboxes before the permissions you want to assign to all of the users belonging to this group. 4. Set the port permissions. Specify the server ports that can be accessed by users belonging to this group (and the type of access). 5. Set the IP ACL. This feature limits access to the KSX II device by specifying IP addresses. It applies only to users belonging to a specific group, unlike the IP Access Control list feature that applies to all access attempts to the device (and takes priority).Optional 6. Click OK. To add a new user: 1. Open the User page by choosing User Management > Add New User or clicking the Add button on the User List page. 2. Type a unique name in the Username field (up to 16 characters). 3. Type the person's full name in the Full Name field (up to 64 characters). 4. Type a password in the Password field and retype the password in the Confirm Password field (up to 64 characters). 5. Choose the group from the User Group drop-down list. The list contains all groups you have created in addition to 6 the system-supplied default groups. <Unknown>, which is the default setting, Admin, Individual Group. 6. To activate the new user, select the Active checkbox. The default is activated (enabled). 7. Click OK. QS Rule Step 5: Launch the KSX II Remote Console Additional Information For more information about the KSX II and the entire Raritan product line, see Raritan's website (www.raritan.com). For technical issues, contact Raritan Technical Support. See the Contact Support page in the Support section on Raritan's website for technical support contact information worldwide. Raritan's products use code licensed under the GPL and LGPL. You can request a copy of the source code. For details, see the Open Source Software Statement at (http://www.raritan.com/about/legal-statements/open-source-software-statement/) on Raritan's website. To launch the KSX II Remote Console: 1. Log in to any workstation with network connectivity to your KSX II and Java Runtime Environment® installed (JRE® is available on the Java website http://java.sun.com/). 2. Launch a supported web browser such as Internet Explorer® or Firefox®. 3. Type the following URL: http://IP-ADDRESS, where IP-ADDRESS is the IP address assigned to your KSX II. You can also use https, the DNS name of the KSX II assigned by the administrator (provided that a DNS server has been configured), or just simply type the IP address in the browser (KSX II always redirects the IP address from HTTP to HTTPS.) The Login page opens. 4. Type your Username and Password. Click Login. Access and Control Target Servers Remotely The KSX II Port Access page provides a list of all KSX II ports, the connected target servers, their status, and availability. Accessing a Target Server To access a target server: 1. Click the Port Name of the target you want to access. The Port Action Menu is displayed. 2. Choose Connect from the Port Action menu. A KVM window opens with a connection to the target. Switching between Target Servers To switch between KVM target servers: 1. While already using a target server, access the KSX II Port Access page. 2. Click the port name of the target you want to access. The Port Action menu appears. 3. Choose Switch From in the Port Action menu. The Virtual KVM Client window switches to the new target server you selected. Disconnecting a Target Server To disconnect a target server: 1. Click the port name of the target you want to disconnect. The Port Action menu appears. 2. Choose Disconnect. QS Rule KSX II Quick Setup Guide QSG-DKSXII-v2.3.0-0D-E 255-62-5001-00-RoHS 7