1
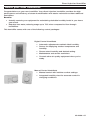
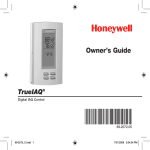
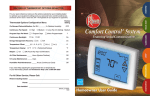
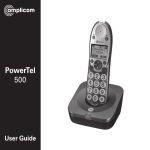
Steam Humidifier
Homeowner’s Operating Manual
Must be installed by a trained, experienced technician
Read these instructions carefully. Failure to follow these instructions
can damage the product or cause a hazardous condition.
69-2306-01
Table of contents
About your new humidifier
Controls....................................................................................................................1
Maintaining ideal humidity.......................................................................................2
Function and operation............................................................................................3
Setting the controls..................................................................................................4
Maintenance and operation
LED light indicators..................................................................................................5
Cleaning and maintenance......................................................................................6
Seasonal or vacation maintenance.........................................................................8
Troubleshooting and repair
Homeowner troubleshooting...................................................................................9
Limited warranty.....................................................................................................10
Need Help?
For assistance with this product please visit Rheem.com or Ruud.com
or call 479-648-4900.
Read and save these instructions.
Direct-Injection Humidifier
About your new humidifier
thermostat
Congratulations on your new humidifier. Your direct-injection humidifier provides the high
performance and efficiency of steam humidification with easier maintenance than traditional
humidifiers.
Benefits
• Actually controls your equipment for maintaining desirable humidity levels in your home
year-round.
• Requires less water, reducing usage up to 70% when compared to flow-through
humidifiers.
This humidifier comes with one of the following control packages:
Digital Control Humidistat
• Automatic adjustments maintain ideal humidity.
• Sensor for displaying outdoor temperature and
humidity.
• Shows actual humidity and desired setting.
• Maintenance and service reminders.
• Controls other air quality equipment when you’re
ready.
Manual Control Humidistat
• Manual control with intuitive comfort settings.
• Integrated humidity chart for accurate control in
changing conditions.
1
69-2306—01
Operating Manual
Maintaining ideal humidity
Optimal Relative Humidity (RH) is defined by industry experts* as between 40-60% RH on an
average annual basis, and 35% during the heating season in dry climates. An environment with
too little humidity leaves the body vulnerable to viruses and bacteria, and can cause woodwork
in the house to shrink and crack. On the other hand, too much humidity creates ideal conditions
for mold and mildew growth.
Proper indoor humidity can also help you save money on energy bills. When maintained properly, your equipment won’t have to run as much because humidified air feels warmer in the winter.
OPTIMUM
ZONE
ASHRAE RECOMMENDED WINTER DESIGN LEVEL
BACTERIA
VIRUSES
FUNGI
MITES
RESPIRATORY
INFECTIONS
ALLERGIC RHINITIS
AND ASTHMA
CHEMICAL
INTERACTIONS
OZONE
PRODUCTION
0
10
20
30
40
50
60
70
80
90
100
M24780
* American Society of Heating, Refrigerating, and Air Conditioning Engineers (ASHRAE)
69-2306—01
2
Direct-Injection Humidifier
Function and operation
Your humidifier provides the highest capacity and most efficient steam humidification for wholehouse residential applications.
LED light feedback allows you to
monitor performance, giving you
total control and peace of mind.
The humidifier provides your home with highcapacity true humidity, while using up to 70%
less water than flow-through humidifiers.
Snap-lock latch allows
for quick, easy maintenance.
The patented Condensate
Collect Dome and beveled nozzle
keep water in the tank, delivering
only true steam into your duct’s
airflow.
Sediment screen
keeps the tank clean
for a longer period of
time, reducing maintenance and ensuring
optimum performance.
M24784
Wiring to your HVAC equipment
allows the humidifier to supply
humidity when you need it by turning
on your equipment automatically.
Automatically fills with
water and drains when
needed, so you don’t have
to remember to do it.
3
69-2306—01
Operating Manual
Setting the controls
The colder it is outside, the less humidity can be retained by the air. Initially setting your humidistat to ideal comfort levels will help your humidifier deliver optimal humidification. The table
below provides suggested control settings based on outdoor conditions.
You may experience that your home needs
humidity levels to be slightly higher or lower
than the suggested levels given in the table, in
order to prevent window condensation or dryness. This is because your home is unique in
size, shape, building tightness, and age. These
variables play an active role in how your indoor
humidity fluctuates. Use the table as a starting point, but adjust according to your comfort
and observations of condensation.
Outdoor
Temperature
Recommended RH %
Setting
-20°F (-29°C)
15%
-10°F (-23°C)
20%
0°F (-18°C)
25%
10°F (-12°C)
30%
20°F (-7°C)
35%
>20°F (-1°C)
40%
With automatic controls like Digital Control Humidistat, you need only calibrate this setting once. The automatic feature will adjust by itself as outdoor conditions change, based on your initial settings. After setting your
auto control to the desired RH% level, check for condensation or frost
forming on windows on the first cold day. If present, adjust your frost settings on the control (see control owner’s manual if needed).
The Window Frost Protection feature protects your home by limiting
humidity output based on outdoor conditions (for example, on colder days,
your home can hold less humidity).
MORE HUMIDITY
LESS HUMIDITY
TIGHT HOME/TRIPLE-PANE WINDOWS
LOOSE HOME/SINGLE-PANE WINDOWS
1
2
3
4
5
6
7
8
9
M24830
Frost Settings should be lowered by one value each morning that you see frost or condensation on windows. Allow 24 hours for the adjustment to take affect. Once you have this set to a
comfortable level without condensation forming, you will not need to adjust this again. You can
adjust your humidity settings without worrying about condensation.
With Manual Humidity Controls, you will need to adjust your RH% settings each time the outdoor conditions change (more humidity with warmer outdoor
conditions, lower humidity with colder conditions). These
controls provide accurate operation, but require more hands
on adjustment. These controls are a good choice for homeowners who desire continuous interaction with humidity
settings.
69-2306—01
4
Direct-Injection Humidifier
About
LED
light
your
indicators
new thermostat
The LED light panel on the humidifier lets you know that the humidifier is operating correctly,
when maintenance is needed, and when it is safe to remove the tank for cleaning. The push buttons allow the tank to be drained for cleaning, and quickly return to operation when the tank is
reattached to the humidifier.
Power indicates the humidifier is plugged in and ready for operation.
Humidifying indicates that steam is being delivered to the home.
Clean Tank: This LED blinks to indicate the humidifier tank is draining
when you press the EMPTY button. When the light is on solid (not blinking),
the tank is empty and safe to remove for cleaning.
POWER
HUMIDIFYING
Call Service is a fault indicator. Call your HVAC technician to service the
humidifier. HVAC technicians: Refer to page 12 for fault identification and
troubleshooting.
Press Reset will blink when power is applied or reapplied (upon initial
installation or after cleaning). This is a stand-by mode to ensure water
lines are hooked up properly before unit resumes operation. This will blink
for 5 minutes before going to system ready. The 5-minute default can be
overriden by the installer by pressing the RESET button.
CLEAN TANK
SEE LABEL BELOW !
CALL SERVICE
PRESS RESET
Press Empty will blink to indicate that the water tank needs cleaning. Push
the Empty button to drain the tank for safe removal and cleaning.
Reset Button If the Press Reset light is blinking, press the RESET button to
override the 5-minute delay at startup. If the Call Service LED is on (fault is
present), press/release the RESET button to blink a diagnostic code on the
Call Service LED. Press/Hold the button for 5 seconds to clear all faults and
reset “Clean Tank” timers. If the Press Empty LED is blinking, press/hold the
RESET button for 5 seconds to turn off the Press Empty LED and restart the
Clean tank timer.
Empty Button Press and hold for 3 seconds to drain the tank of water for
service. Do this before servicing the tank and internal parts.
5
PRESS EMPTY
RESET
EMPTY
M24763
69-2306—01
Operating Manual
Cleaning and maintenance
Maintenance is made simple with the humidifier—just remove the water tank for cleaning.
Warning: Scalding hazard.
Do not attempt to remove the humidifier from the mounting bracket during operation, or
the humidifier’s water tank when full of water. The heating element could be hot when
tank is removed. Failure to comply could result in severe scalding or death.
CAUTION
Hot water temperature above 140°F (60°C) can cause burns from scalding.
Drain Operation
• Auto flushing is configurable to 10, 20 or 30 hours of operational time (heating element
active).
• During auto flushing, cold water will enter the tank to lower water temperature below 140°F
(60°C) before draining.
• During manual flush (performed by pressing the EMPTY button) initial water temperature
may be above 140°F (60°C). Ensure drain outlet is not exposed and use caution when
pressing the EMPTY button, and do NOT attempt to remove the tank with water in it.
• Manual flush takes approximately 15 minutes to empty the tank completely.
To clean:
1. Press the EMPTY button. Wait for the CLEAN TANK light to be on solid (not blinking).
Wait
(approximately 15 minutes)
CLEAN TANK
(BLINKING LIGHT)
Go to Step 2
CLEAN TANK
(ON SOLID)
EMPTY
M24775
M24774
69-2306—01
M24776
6
Direct-Injection Humidifier
Cleaning and maintenance
2. Turn the manual shutoff valve at the bottom
of the tank to the
“Unlock” position.
3.Grip the white water
valve arm and slide it
back within the bracket
to disengage from the
tank.
4.Firmly grip the tank
bottom. Push down the
cover's safety button and
pull the latch forward to
release the tank.
Note: Latch does not come
off humidifier with tank.
M24777
M24779
5.Use tap water to flush loose minerals
from the tank. Sediment screen at
tank's bottom is removable. For a more
thorough cleaning, soak tank in warm,
soapy water, then rinse clean. Tank is
also dishwasher-safe.
M24778
6. Carefully rub minerals off of the heating
element and reservoir walls. Scouring
pads suitable for non-stick pots or pans
are suitable for cleaning the humidifier
reservoir walls and components within the
tank.
Sediment screen
M24857
M24856
Once clean, reattach tank by securing the latch. Engage the water valve to the cam shaft, and
“Lock” the shut-off valve. The “Press Reset” light will blink at start-up. Push the RESET button
to ready the humidifier.
7
69-2306—01
Operating Manual
Seasonal or vacation maintenance
The humidifier has the built-in intelligence to shut down when humidity is not needed for an
extended period. After 48 hours of inactivity, the humidifier will drain its tank and remain empty
until it is needed again. This prevents water from stagnating within the tank. There are a few
house-cleaning steps to follow to keep your the humidifier at peak efficiency:
1. Follow steps 1–6 in the Cleaning section on pages 7–8 at least once per year, or when the
Press Empty light is blinking.
2. Clear ventilation holes in the humidifier’s cover.
3. Clear the water drain tube.
4. Make sure the water tank gasket seal is not cracked or split before reattaching the
humidifier water tank.
5. Check that the humidifier is still level.
Extended Vacation
When you leave on extended vacations, it is recommended you turn off the humidifier’s water
supply and turn off the humidity control. When you return, turn on the humidifier water supply and
reset your humidity control to a comfortable position.
69-2306—01
8
Direct-Injection Humidifier
Homeowner troubleshooting
If you have difficulty with the humidifier, please try the following suggestions.
Most problems can be corrected quickly and easily.
Problem
Look For
Low humidity Humidifier heater is
not operating
Rapid air changes.
Drafts (cold air
is dry and is an
added load for the
humidifier)
High Humidity Condensation on
walls
Call for
Service LED
is blinking
What to Do
•
•
•
•
•
Confirm that power light is on.
Set the humidistat higher.
Check that the furnace power is on.
Reset your circuit breaker or check for blown fuse.
If fault persists, turn humidistat off, unplug unit,
reset circuit breaker and call a professional HVAC
contractor.
•
•
•
•
Keep doors and windows closed.
Close fireplace damper when not in use.
Keep exhaust fan running time to a minimum.
Seal around doors and windows.
• Turn off the humidity control until condensation is
completely evaporated. Lower humidistat setting to
prevent reoccurance of condensation (see pages 2–4
for controlling humidity levels).
Heavy
condensation on
windows
• Turn humidity control down low enough to eliminate
condensation caused by moisture from bathing,
mopping, cooking, etc. If moisture persists, more
ventilation is needed.
The humidifier has
detected one of 15
system faults.
• Press Reset button.
• If fault persists, turn off power supply to the
humidifier, and turn back on.
• If fault persists, call a professional HVAC contractor.
9
69-2306—01
Warranty Information
5 years from date of purchase (contact the Rheem Parts Distribution Center for
more information).
Before proceeding with installation,
refer to installation instructions
packaged with each model, as well
as complying with all Federal, State,
Provincial, and Local codes.
RHEEM
AIR CONDITIONING
DIVISION
5600 Old Greenwood Road, Fort Smith, Arkansas 72908
“In keeping with its policy of continuous progress and product improvements, Rheem reserves the right to make changes without notice.”
Patents pending.
69-2306—01 M.S. 12-08
Printed in U.S.A. on recycled
paper containing at least 10%
post-consumer paper fibers.