1
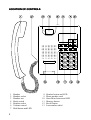
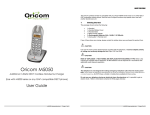
Telephone with headset socket
LOCATION OF CONTROLS
1
2
3
4
5
6
7
2
Handset
Handset socket
Handset rest
Hook switch
Headset socket
Volume control
Hold button and LED
8
9
10
11
12
13
Headset button and LED
Phone number card
Store/Mute button and LED
Memory button
Recall button
Last number redial
INSTALLATION
# Connect the line cord to the telephone socket.
# Lift the handset and check for a dial tone.
CONNECTING THE HEADSET
Australian version includes a Headset.
New Zealand version, Headset is optional (see page 8 for contact details)
The headset must be connected to the socket at the rear of the telephone (item 5 on
page 2).
NOTE: Australian users - The headset supplied should only be used with this
telephone.
WALL MOUNTING
The Audioline Casino can be wall mounted onto the standard wall plate by using the
wall bracket included or alternatively, by using the two screw holes located on the
rear of the unit.
Wall mounting without using supplied bracket
# Mark the position of the two holes 83 mm apart, one above the other.
# Ensure there are no hidden cables, water pipes, etc., before drilling holes. Check
that the intended mounting point is within reach of a telephone socket.
# Drill the holes.
# Fit the screws (not supplied) to the wall, leaving 5 mm protruding (use wall plugs
if necessary, not supplied).
# Place the telephone in position and locate the two holes on the base of the
telephone over the screws, then slide into place.
TO MAKE A CALL
USING THE HANDSET
P Lift the handset and wait for dial tone.
P Dial the phone number.
P Replace the handset to terminate the call.
USING THE HEADSET
P Press and release the [HEADSET] button.
The headset indicator
above the headset button will illuminate.
P Dial the number you wish to call.
P Press the [HEADSET] button again to terminate the call.
You can change between headset or handset use during a call, by pressing the
[HEADSET] button and replacing the handset or by lifting the handset.
3
LAST NUMBER REDIAL
To redial the number called, lift the handset and press the [REDIAL] button. The
number will be dialled automatically. The number will be retained in memory until
another number is dialled.
MUTE
To speak privately to a third party while on a call, press the [MUTE] button (the small
red LED will flash). When you wish to resume your telephone conversation, press
the [MUTE] button again.
VOLUME CONTROL
The volume level in the handset earpiece and headset can be increased or decreased
using the
volume buttons during a call.
HOLD
You can place a call on temporary hold during a conversation using the [HOLD]
button.
P When a call is connected.
P Press the [HOLD] button and replace the handset. The Hold indicator
above
the button will illuminate.
P To release the hold:
Lift the handset or
Take the call from another telephone connected to the same line
The hold
indicator will turn off
NOTE: The hold function may disconnect a call when connected to a PBX
system.
PAUSE FUNCTION
When memory programming, some network services or use on a PBX system you
may require a pause to be inserted between digits.
To insert a Pause (2 to 3 seconds), press the [REDIAL] button, to insert a longer
pause, press the [REDIAL] button twice.
4
INDIRECT MEMORY
The telephone has 10 indirect memories (keypad 0-9). When a phone number is
stored in a memory location, you need to press two buttons only to make the call.
STORE INDIRECT MEMORY
P Lift the handset or press the [HEADSET] button.
P Press [STORE] button (ignore any sound through the earpiece/headset).
P Press [MEMORY] button.
P Select the desired indirect memory location (0-9) by pressing on the
corresponding button.
P Enter the phone number (max 21 digits).
P Press [STORE] button again.
P Replace the handset or press the [HEADSET] button. The number is now stored.
DIALLING INDIRECT MEMORIES
P Lift the handset or press the [HEADSET] button and wait for a dial tone.
P Press [MEMORY] button.
P Select the required memory location (0-9) by pressing on the corresponding
button. The telephone will automatically dial the stored number.
ADDITIONAL NETWORK SERVICES
Network services such as call waiting, reminder calls, charge advice, etc., can be
accessed via the [RECALL], [#] and [*] buttons. For further information, contact your
Network Operator.
HEARING AID COMPATIBLE
The Casino telephone is hearing aid compatible, when used with a suitable hearing
aid set to the T mode.
5
ADJUSTABLE RINGER
There are three different ringing tones available and three different volume settings
for each ringer:
P
P
P
P
P
Lift the handset or press the [HEADSET] button and press the [STORE] button.
Press the [#] button.
Select a ring signal by pressing (0-9) according to the table below.
Press the [STORE] button again.
Replace the handset or turn off the headset. The ringer type is now selected.
Keypad digit
Ringer type
Setting
1
Melody A
Low
2
Melody A
Normal
3
Melody A
High
4
Melody B
Low
5
Melody B
Normal
6 (factory setting)
Melody B
High
7
Melody C
Low
8
Melody C
Normal
9
Melody C
High
0
Off * (see below)
-
* If setting 0 is selected, the ringer type will be turned off until the handset is lifted
again. After that, the ringer type reverts to the previous setting.
6
TROUBLESHOOTING
In the unlikely event of a fault occurring, proceed as follows:
# Check that the telephone is plugged into a telephone socket.
# Check telephone operation in master telephone socket. There may be a fault with
the line in which case contact your Network Operator.
# If the telephone does not ring:
Lift and replace the handset (the ringer may be programmed off).
Does the total REN (RN) of equipment connected to your line exceed 3 (5)?
If it does, disconnect other equipment until 3 (5) is achieved.
# If the Headset is not operating:
Check headset is connected correctly.
Does the green headset indicator turn on when pressing the headset button?
Is the Mute indicator flashing? Yes, press mute button to release mute.
Are you using a compatible headset? Disconnect handset cord from telephone
and connect the headset to the handset socket to confirm operation.
WARNING
It is recommended that you disconnect your telephone during a thunderstorm as you
can get a shock from your telephone (and other electrical appliances). We
recommend you follow these simple precautions during a thunderstorm:
# Do not use your telephone unless the call is urgent.
# If you must use your telephone, make the call as brief as possible and keep clear
of electrical equipment and metal fixtures.
# Do not stand in bare feet on uncovered concrete floors.
# Do not touch brick or concrete walls.
NOTE: Do not install your telephone in damp or high humidity locations, such as
a laundry or bathroom. If any damage is caused by such elements it is not covered
by the manufacturers warranty.
CLEANING
The casing should be cleaned by wiping with a damp cloth.
# Do not use abrasives, solvents or spray polish that may enter through holes in the
earpiece and mouthpiece and cause damage.
# Do not place the telephone in direct sunlight or use in extreme humidity.
7
REN (RN
for New Zealand)
The REN (Ringer Equivalance Number) or RN is of significance only if you wish to
connect more than 1 telephone to your telephone line. Your telephone line has a
maximum REN capacity of 3 (RN of 5). Your Audioline Casino has a REN of 0.5
(RN of 0.5), thus it is feasible to connect 2 (4) more telephones of a value of 1 to
your system. You should not exceed a value of 3 (5) on the complete system,
otherwise the volume of the ringer in any phone will decrease and one telephone
may not ring at all.
GUARANTEE
If you believe your Audioline Casino is malfunctioning, please refer to the relevant
section and/or consult the troubleshooting guide in this manual to ensure that you
have followed the instructions carefully.
The Audioline Casino is guaranteed for a period of 12 months from the date of
purchase. In the unlikely event of a fault during this period, please contact us for
assistance. If the product is then found to be faulty you will be asked to return it
directly to us with a copy of the purchase receipt.
AUSTRALIA
DORO Australia Pty Ltd
PO Box 6760
Baulkham Hills BC NSW 2153 Australia
NEW ZEALAND
Atlas Gentech (NZ) Limited
Private Bag 14927, Panmure
Auckland
Helpline
Ph: (02) 8853 8444
Fax: (02) 8853-8489
Email:
Consumer Support
Ph: 0900 50-025 (Toll Call)
Fax: (09) 574-2722
Email: [email protected]
NOTE: The guarantee does not extend to damage caused by misuse, negligence, excessive voltage, faults on the telephone line or
lightning. This guarantee in no way affects your statutory rights. DORO is the trademark of DORO AB.
Notes For Operation In New Zealand
The grant of a Telepermit for any item of terminal equipment indicates only that Telecom has accepted that the item complies with
the minimum conditions for connection to its network. It indicates no endorsement of the product by Telecom, nor does it provide
any sort of warranty. Above all, it provides no assurance that any item will work correctly in all respects with another item of
Telepermitted equipment o f a different make or model, nor does it imply that any product is compatible with all of Telecom’s
network services.
This equipment shall not be set to make automatic calls to the Telecom “111" Emergency Service.
This Equipment may not provide for the effective hand-over of a call to another device connected to the same line .
8