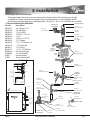
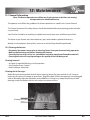
1
Northwest Manufacturing, Inc
600 Polk Ave SW
Red Lake Falls, MN 56750
www.woodmaster.com
Retain this manual
Manual PN: 7994-300
Rev: 13.4
Owners Manual
Congratulations on your decision to purchase the
WoodMaster Flex fuel. You will be extremely pleased with this product, which stands out from the
competition in terms of ease of use, furnace efficiency and low emissions.
Burning Wood
Burning Pellets
2
Flex Fuel Owner’s Manual
2012
1: Table of Contents
1. Contents����������������������������������������������������������������������������������������������������������������������� 3
2. Terms���������������������������������������������������������������������������������������������������������������������������� 5
3. Safety ............................................................................................................................ 7
4. Features ........................................................................................................................ 9
5. Installation ................................................................................................................. 10
5.1 Location ........................................................................................................................................... 10
5.2 Display .............................................................................................................................................. 11
5.3 Chimney .......................................................................................................................................... 11
5.4 Water Connections....................................................................................................................... 11
5.5 Electrical Connections ................................................................................................................ 17
5.6 I/O Board ......................................................................................................................................... 18
5.7 Connecting to Heating System ............................................................................................... 20
6. Fuels............................................................................................................................. 21
6.1 Pellets ............................................................................................................................................... 21
6.2 Bulk Materials ................................................................................................................................ 21
7. Switching the Furnace On/Off ................................................................................... 22
7.1 Switching the Furnace On.......................................................................................................... 22
7.2 Switching the Furnace Off ........................................................................................................ 23
8. Display ........................................................................................................................ 24
8.1 The Start Screen ............................................................................................................................ 25
8.2 Menu Navigation .......................................................................................................................... 26
9. Basic Furnace Settings ............................................................................................... 28
9.1 Set Required Furnace Values .................................................................................................... 28
9.2 Select Furnace Operating Mode ............................................................................................. 28
9.3 Boiler Cleaning............................................................................................................................... 28
9.4 Vacuum Output/Heat Exchanger............................................................................................ 28
9.5 Setting the Clock/Date ............................................................................................................... 29
9.6 Service Menu ................................................................................................................................. 29
9.7 Alarm Protocol ............................................................................................................................... 29
9.8 Output Test - Heating Cycle ...................................................................................................... 30
9.9 Output Test - Boiler ...................................................................................................................... 30
9.10 Language Selection/Temperature Scale Selection ........................................................ 31
9.11 Hour Meter ................................................................................................................................... 32
10. Operating Modes ..................................................................................................... 33
10.1 View of the Selected Operating Mode ............................................................................... 33
10.2 Setting the Furnace Operating Mode ................................................................................ 33
10.3 Changing the Furnace Operating Mode ........................................................................... 34
2012
Flex Fuel Owner’s Manual
3
1: Table of Contents
11. Bulk Materials Mode ................................................................................................ 37
11.1 General Information ................................................................................................................. 37
11.2 Pre-Firing Checks........................................................................................................................ 37
11.3 Firing .............................................................................................................................................. 38
11.4 Smoldering Gas Extraction and Adding Fuel ................................................................... 41
11.5 Combustion Completed .......................................................................................................... 41
11.6 Status Lines During Furnace Operating Mode “Bulk Materials” ................................ 43
11.7 Indications..................................................................................................................................... 43
12. Bulk Materials Auto Mode ....................................................................................... 45
12.1 General Information ................................................................................................................. 45
12.2 Pre-Firing Checks ....................................................................................................................... 45
12.3 Filling the Furnace...................................................................................................................... 46
12.4 Setting the Release Period ..................................................................................................... 48
12.5 Activating “Bulk materials auto control”............................................................................. 51
12.6 Status Lines for Operating mode “Bulk materials auto control”................................. 51
12.7 Automatic Change-Over of Furnace Operating Mode.................................................. 51
13. Pellets Auto Control ................................................................................................. 52
13.1 General Information ................................................................................................................. 52
13.2 Pre-Firing Checks ....................................................................................................................... 52
13.3 Adjusting the Pellet Slide ........................................................................................................ 53
13.4 Starting the Furnace in Operating Mode “Pellets Auto Control”............................... 55
13.5 Opening the Firebox Door During “Pellets Auto Control”............................................ 55
13.6 Status Lines for Operating Mode “Pellets Auto Control”............................................... 56
14. Buffer/Thermal Storage ........................................................................................... 61
14.1 Buffer Settings ........................................................................................................................... 61
15. Maintenance............................................................................................................ 63
15.1 General Information ................................................................................................................. 63
15.2 Cleaning the Furnace ............................................................................................................... 63
16. Error Messages......................................................................................................... 66
17. Troubleshooting ...................................................................................................... 69
18. Specifications ........................................................................................................... 70
19. Warranty ................................................................................................................... 71
4
Flex Fuel Owner’s Manual
2012
2: Terms
Flex fuel - Hydronic heater designed to burn multiple wood fuel types
Furnace/Boiler AKA appliance, stove - An apparatus in which heat may be generated, as for heating
homes, buildings, pools and radiant heat via water
Seasoned Wood - Wood that has dried to an internal moisture content of 25% or less
Cord Wood - Lengths of wood that are typically 8’ long
Chunk Wood - Pieces cut from cord wood that have not been split or seasoned
Bulk Materials - Split, seasoned wood cut less that 26” long
Kindling - Small, easily combustible material for starting a fire
Green Wood - Wood that is recently cut and has a high moisture content
Pellets - Wood sawdust compressed into small cylinders to be used as fuel
Flue - AKA Chimney - Any duct or passage for air, gas, or exhaust
Air Factor - Indicator of oxygen level of the flue gas
Display - AKA Eco manager - screen for user to change settings and parameters
I/O Board - Input/output board that controls the furnace functions
Firebox - Chamber where fuel is loaded or conveyed
Water Jacket - Steel casing that surrounds the firebox and holds the water/antifreeze
Funnel - Casting located on the bottom of the firebox
Insert - Replaceable part designed for particular fuels located in the funnel grate
Refractory - Bricks of various shapes lining the ash chamber causing gasification
Turbulator - Cleaning mechanism located in heat exchangers that also increase efficiency
Draft Inducer - Fan that manages the combustion process
Igniter - Hot air blower for igniting fuel
Gasification - Extracting gas from the wood to be burnt to heat water
Buffer - AKA Thermal Storage - Tanks used to store hot water
2012
Flex Fuel Owner’s Manual
5
2: Terms
Air Ratio - See air factor
ESC - Function on display controlled by the operator to move back
Fire Irons - Metal pokers and scrapers used for ash/wood cleaning & maintenance
Fault - An error that causes an alarm
Hopper - Storage container used to hold pellets
Fuel Shut Off - Metal gate used to isolate fuel storage from high temperatures and/or fire
Call for Heat - Heat demands from circuits utilized in heating system designs
Release - A demand set by the operator for the furnace to carry out a function
Blow Down - The process of removing sediment deposits from the furnace/buffer tank(s) by draining water
from the bottom of the unit(s) until the water runs clean
Lambda - AKA Oxygen Sensor - A sensor that measures the amount of oxygen in the flue gas
6
Flex Fuel Owner’s Manual
2012
3: Safety
• All installation and operations must follow STATE and LOCAL CODES for wiring, plumbing, and firing of this
unit. These CODES may differ from this manual. Installation must be performed by a qualified installer.
• All Flex fuel models operate at atmospheric pressure. DO NOT obstruct, block, or plug the overflow tank.
• Never open the ash door during operation!
• Anyone who is not familiar with and/or has not been trained to operate the Flex fuel may not
operate the system. Only responsible adults should operate your furnace. If the furnace is not fired
properly damage could result and the warranty may be voided.
• Never allow children to play near or tamper with the furnace, fuels, tanks or any other part of the system.
• Always keep the area around, and in front of fuel door clean and free from combustible materials.
• Keep animals away from the furnace.
• The operation may not be continued or restarted in the event of visible damages (for example, water leaks,
thermal distortion, traces of smoke or fire, mechanical damages, etc.). Any damages must be repaired. In
the event of any doubts, please contact your authorized WoodMaster Flex fuel Dealer.
• Freeze protection must be guaranteed in all water-bearing parts in the event of extensive idle
periods of the system. Note: Your Flex fuel is not intended to be your only heat source. In the event that
your existing heat source will not back up your Flex fuel antifreeze must be used.
• The Flex fuel system must not be exposed to external mechanical stress (for example, as storage, climbing
support, brace, or similar). This also applies for single parts (doors, covers, etc.).
• Only touch the handles during the operation. Temperatures at other points (for example, chimney, ash
door, buffer tank, lines…) can be very high.
• Remember to recycle the packaging your Flex fuel was shipped in. In the long term properly recycle the
furnace if you replace your Flex fuel.
•
The Flex fuel must be operated exclusively according to the guidelines for planning, assembly,
regulations, statutes and product related instructions. The manufacturer is not liable for damages and
their results, if they occurred due to improper assembly, operation, application and also inadequate
maintenance and cleaning.
• Do not connect this unit to a chimney flue serving another appliance. Follow all state/local codes.
• Load wood carefully to avoid injury to hands and fingers that may come into contact with furnace
opening.
• Read and follow these directions carefully. Retain this manual for as long as you own your Flex fuel.
2012
Flex Fuel Owner’s Manual
7
3: Safety
UL Certification
8
Flex Fuel Owner’s Manual
2012
4: Features
1. Ash Door - A large opening to make cleaning the ash chamber simple and easy.
2. Firebox door - A large opening to make filling and cleaning the firebox simple and easy
3. Display for Controller - Designed for easy operation.
4. I/O Board - An input output board that controls the furnace as well as where optional accessories plug in.
5. Ash Chamber - A large compartment to reduce the amount of times the ash needs to be removed.
6. Firebox - Large volume to hold enough wood for up to a four hour burn at max burn rate.
7. Inserts for Pellets or Bulk Materials - Easily changed when switching operating mode. No tools required.
8. Heat Exchanger - Efficient transfer of heat and are self cleaning.
9. Flange for Automatic Loading (Both Sides) - Allows the optional pellet arm to be installed on either side.
10. Exhaust Pipe - Allows easy installation to both new and existing chimneys.
11. Smoldering Gas Duct - Prevents any exhaust from exiting the furnace when the firebox door is open.
12. STL (Safety Temp Limiter) - Safety switch that shuts down the furnace in the even of it overheating.
All photos in this manual represent the Flex fuel 30 kW unless otherwise noted
2012
Flex Fuel Owner’s Manual
9
5: Installation
Your Flex fuel must be installed by a professional and should follow all local, state and federal laws
and regulations. Any use of an unapproved installation may result in a voided warranty.
It is recommended to have your installation approved by WoodMaster.
5.1 Location
Your Flex fuel can only be installed indoors. The furnace may be installed inside the building that it
serves or in an out building. Your Flex fuel must have protection against freezing. Your Flex fuel does not
need to be installed in the same structure that it serves.
Ensure that the floor that the furnace is placed on is level and able to support the weight of the furnace
plus the additional weight of the water and fuel.
There should be ample room around your Flex fuel to make loading and cleaning your furnace easier.
This area should also be clear of any easily combustible materials. Minimum clearances requirements is
11 inches for the top, 14 inches for the sides, 19.5 inches for the back and open to the front.
The room where the furnace is placed should allow ample venting to ensure proper air flow to the
furnace. The vent size requirements are 31 square inches for the Flex fuel 30 kW and 62 square inches for
the Flex fuel 60 kW.
Ensure the feet are in the bottom of the furnace. adjust the feet so the furnace sits level and the feet are
loaded evenly.
Below are the dimensions for both the Flex fuel 30 kW and Flex fuel 60 kW including all optional
accessories and chimney.
15.50
15.00
R5.00
19.00
R4.00
Chimney Mount
17.00
Chimney Mount
72.00
57.00
Pellet Tank
Pellet Auger
53.00
51.00
Igniter
Igniter
30 kW
28.25
Pellet Auger
38.00
40.00
R14.00
60 kW
4.25
R14.00
30.00
6.25
4.25
6.25
11.25
Pellet Tank
13.00
24.00
58.25
32.50
62.50
66.75
71.00
10
Flex Fuel Owner’s Manual
2012
5: Installation
5.2 Display
Remove the hood of the furnace by lifting it to access the displays mounting position.
Plug the display into the intended connector on the I/O board.
Screw the display to the furnace using the supplied hardware.
5.3 Chimney
The flue pipe is to be installed is a rising chimney, and must be 6 inches for the 30 kW and 8 inches for
the 60 kW.
Elbows should not be used, T’s are recommended to allow for the cleaning of the flue pipe.
For every one foot of horizontal pipe three feet of vertical pipe is required.
A barometric damper must be used to allow proper flow. The damper must be installed as close to the
furnace as possible.
The chimney draw must be 0.1 mbars.
Chimneys must follow all state and local codes.
Your Flex fuel can be vented into an existing chimney as long as the chimney fits the necessary criteria.
5.4 Water Connections
The following layouts are basic configuration for the furnace water connections. Contact your
WoodMaster Flex fuel Dealer for additional layouts. Insulate the lines if desired to prevent heat loss.
1” line is recommended for the Flex fuel 30 kW and 1.25” line is recommended for the Flex fuel 60 kW.
Furnace and Buffer in
the same building.
Vent Cap
Expansion Tank
Clear
1” Pex
Sight
Gauge
Expansion Tank
Heat Zone Supply
Supply to
Storage Tank
Temp
Probe
Storage
Tank
Furnace
Supply
Furnace Supply
Pump
Pump
Temp
Probe
Diverting Valve
Temp Head
Heat Zone Return
Supply to
Storage Tank
Diverting Valve
1” Copper Line
Return from
Storage Tank
Return from
Storage Tank
Diverting
Valve
Temp
Probe
Diverting
Valve
Temp
Probe
Return to
Furnace
Furnace
Drain
Back View
2012
Return to
Furnace
Side View
Flex Fuel Owner’s Manual
This document contains information that is property of
Northwest Mfg. No reproductions or duplications of this
document in whole or part shall be made without written
authorization from Northwest Mfg.
This is a SUGGESTED layout only. user must determine if
system layout will work for their particular application.
User should check and follow all state and local codes.
11
5: Installation
Furnace and Buffer in
separate buildings
running with a plate
pump.
Vent Cap
20 Gal
Expansion
Tank
Vent Cap
Heat Zone Supply
Heat Zone Return
10 Gal
Expansion
Tank
Temp
Probe
Pump
Furnace
Plate
Storage
Tank
Temp
Probe
Plate
Pump
The Furnace must be antifreezed to prevent
the outside lines from freezing. Temperature
probe wires should run from the furnace to
the tank so that the tank temperatures can
be read at the furnace. Doing so aides in
determining load size.
Plate zone pump must run continuously or
wired to run simultaneously with the
furnace pump to take heat off the furnace
plate when furnace is heating.
Furnace Supply
Pump
Supply to
Storage Tank
Diverting Valve
Temp Head
1” Copper Line
This document contains information that is property of
Northwest Mfg. No reproductions or duplications of this
Document in whole or part shall be made without written
Authorization from Northwest Mfg.
This is a SUGGESTED layout only. User must determine if
system layout will work for their particular application.
User should check and follow all state and local codes.
Return
from
Storage
Tank
Diverting
Valve Temp
Probe
Return to
Furnace
Furnace
Drain
Furnace and Buffer in
separate buildings
running without a
plate pump.
Vent Cap
20 Gal
Expansion
Tank
Vent Cap
Heat Zone Supply
Heat Zone Return
Temp
Probe
Pump
10 Gal
Expansion
Tank
Storage
Tank
Furnace
Plate
Temp
Probe
The Furnace must be antifreezed to prevent
the outside lines from freezing. Temperature
probe wires should run from the furnace to
the tank so that the tank temperatures can
be read at the furnace. Doing so aides in
determining load size.
Heat zone pump must run continuously to
take heat off the furnace plate when
furnace is heating.
Furnace Supply
Pump
Supply to
Storage Tank
Diverting Valve
Temp Head
1” Copper Line
This document contains information that is property of
Northwest Mfg. No reproductions or duplications of this
Document in whole or part shall be made without written
Authorization from Northwest Mfg.
This is a SUGGESTED layout only. User must determine if
system layout will work for their particular application.
User should check and follow all state and local codes.
12
Flex Fuel Owner’s Manual
Return
from
Storage
Tank
Diverting
Valve Temp
Probe
Return to
Furnace
Furnace
Drain
2012
5: Installation
Plumbing the Rear of the Furnace
The images below show how to connect the pump to the back of your Flex fuel furnace using the
installation kit. Please note that the circulation pump and copper lines are not included in the kit.
All plumbing should be done by a qualified plumber. This kit is a 1” kit, a 1.25” kit (020-0010) is available.
To expansion tank
1” Furnace Plumbing Kit (020-0006)
To furnace hot
Part No.
Description
0020-258
water supply
1 1/2 “ x 1” Reducer
0030-195
3/4” F Hose x 1/2”
0020-270
0020-271
0020-198
1/2” Ball Valve
1 1/2” Street 90
1 1/2” Tee
0020-224
1” Sw St 90 (3)
0020-227
1” MPT x 1” F Sw (2)
0020-258
1 1/2 “ x 1” Reducer
0020-230
1” Sw T
0020-250
0020-233
1” M Sw x 1” FPT (2)
1”x 2” Nipple
0020-250
1”x 2” Nipple
0020-258
1 1/2 “ x 1” Reducer (3)
0020-270
1 1/2” Street 90
0020-271
1 1/2” Tee (2)
Circulation
0020-272
1 1/2” x 1/2” Reducer
Pump
(Not Included)
0020-366
ISO Pump Flanges
0020-366
ISO Pump Flanges
Water
0109-003
1/2” Thermowell
Flow
63025
Diverting Valve
57094
Thermostatic Head
To Expansion Tank
0020-227
1” MPT x 1” F Sw
Pump
Supply to
Storage Tank
Return from
Storage Tank
Copper Pipe
Furnace Supply
57094
Thermostatic Head
Temp Head
Supply to
buffer tank
0020-233
1” M Sw x 1” FPT
63025
Diverting Valve
1” Copper Line
0020-224
1” Sw St 90
Diverting
Valve
Temp
Probe
Return to
Furnace
Furnace
Drain
0020-230
1” Sw T
Back View
To Expansion Tank
Copper Pipe
0109-003
1/2” Thermowell
0020-233
1” M Sw x 1” FPT
Return from
buffer tank
Supply to
Storage Tank
Diverting Valve
0020-272
1 1/2” x 1/2”
Reducer
Copper Pipe
Furnace Supply
Pump
0020-224
1” Sw St 90
0020-224
1” Sw St 90
0020-198
1/2” Ball Valve
To furnace drain
Return from
Storage Tank
0020-227
1” MPT x 1” F Sw
Diverting
Valve
Temp
Probe
Return to
Furnace
Side View
2012
To furnace cold
water return
0020-271
1 1/2” Tee
Flex Fuel Owner’s Manual
0020-195
3/4” F Hose x 1/2”
0020-258
1 1/2 “ x 1” Reducer
13
5: Installation
Expansion Tank
Since the Flex fuel is a non pressurized system, an expansion tank is needed to allow the water to
expand when heated.
The Expansion tank should be connected to the furnace through 1” line and should be placed higher
than the top of the furnace. (See Diagram On Page 11)
Your expansion tank should be sized according to the total amount of water in your system. for every 150
gallons of water in the system, there should be room for 5 gallons in the expansion tank. Do not over fill
your expansion tank as it may overflow when the water in the system heats up and expands.
Note: The expansion tank must be vented so that the system will not become pressurized.
There MUST NOT be a valve between the expansion tank and furnace. Failure to vent the furnace
may result to damage to the furnace and/or severe injury or death.
Expansion Tank Kit
The following images shows the basic layout for attaching the site tube and vent cap to your expansion
tank. Installation is the same for both the 10 and 20 gallon tanks. Ensure that the vent is properly used
and that the system is not allowed to become pressurized.
The Expansion tank must be placed higher than the top of the furnace. Ensure that the mounting
location is capable of supporting the weight of the tank plus the weight of the water when completely
full. The sight tube can be on either the right or left side of the expansion tank.
0020-145
1” Pex Crimp
Ring
Horizontal Orientation
1” Pex Line
0020-142
1” x 1” Pex
Crimp 90
0020-140
1” Pex x 1” MPT
0020-273
Vent Cap
1” Pex Line
0020-250
1” x 2” Blk nipple
0020-145
1” Pex Crimp
Ring
0020-247
1” Blk St 90
0020-247
1” Blk St 90
1” Pex Line
Expansion Tank (20 Gallon Shown)
To Furnace
14
Flex Fuel Owner’s Manual
2012
5: Installation
Vertical Orientation
Expansion Tank Kit (020-0008)
Part No.
Description
0020-273
Vent Cap
0020-250
1” x 2” Blk nipple
0020-247
1” Blk St 90 (2)
0020-140
1” Pex x 1” MPT (2)
0020-142
1” x 1” Pex Crimp 90 (2)
0020-145
1” Pex Crimp Ring (6)
020-0044
44” of Clear 1” Pex
0020-145
1” Pex Crimp
Ring
0020-247
1” Blk St 90
0020-273
Vent Cap
0020-250
1” x 2” Blk nipple
1” Pex Line
0020-140
1” Pex x 1” MPT
0020-142
1” x 1” Pex
Crimp 90
1” Pex Line
Expansion Tank (20 Gallon Shown)
0020-140
1” Pex x 1” MPT
1” Pex Line
To Furnace
0020-142
1” x 1” Pex
Crimp 90
0020-247
1” Blk St 90
0020-145
1” Pex Crimp
Ring
Note: Contents are the same for both horizontal and vertical layouts.
Buffer Tank
The size of the buffer tank is determined by the size of the furnace. Recommended buffer tank capacities
are approximately 165 gallons for the Flex fuel 30 kW running only on pellets, and approximately 300
gallons if bulk materials are to be used. Approximately 285 gallons is recommended for the Flex fuel
60 kW running only on pellets and approximately 600 gallons if bulk materials are to be used. Different
configurations are available depending on your application. Tanks are available in 165, 220, 285 and 550
gallon sizes. Please contact your WoodMaster Flex fuel Dealer for further assistance. Additional water
storage will increase time between fills if you are running bulk materials. Your buffer tank should be
insulated.
2012
Flex Fuel Owner’s Manual
15
5: Installation
Buffer Tank Kit
The following images shows the basic layout for attaching the Buffer Tank Kit to a buffer tank. This
process remains the same for all buffer tank sizes. Each buffer tank will require its own Buffer Tank Kit.
The kit supplies all necessary attachments to properly set up your buffer tank as well as proper venting
and draining. Additional line may be required to extend the drain. Adapters may be purchased through
your WoodMaster Flex fuel Dealer for using this buffer tank with 1” Pex line or 1” copper line. The tank
should be installed by a qualified plumber. All Threaded fittings require the used of thread seal tape or
pipe dope.
To Buffer Bleed Valve
0020-197
1” FPT Ball Valve
0020-250
1” x 2” Blk Nipple
0020-250
1” x 2” Blk Nipple
0020-649
1 1/4” x 1”
Reducer Bushing
0020-649
1 1/4” x 1”
Reducer Bushing
0020-250
1” x 2” Blk Nipple
0020-197
1” FPT Ball Valve
From Furnace Supply
0109-003
1/2” Thermowell
To Heating Zone
0020-623
1 1/4” Plug
0020-623
1 1/4” Plug
0020-622
1/2” Plug
Buffer Tank
(Not Included)
0020-197
1” FPT Ball Valve
0109-003
1/2” Thermowell
0020-623
1 1/4” Plug
0020-623
1 1/4” Plug
0020-622
1/2” Plug
From Heating Zone
0020-250
1” x 2” Blk Nipple
0020-649
1 1/4” x 1”
Reducer Bushing
To Furnace Return
To Buffer Drain
0020-649
1 1/4” x 1” Reducer Bushing
0020-250
1” x 2” Blk Nipple
0020-197
1” FPT Ball Valve
1” Pex Line
(Not Included)
0020-247
1” Blk St 90
0020-140
1” Pex x 1” MPT
0020-145
1” Pex Crimp
Ring
Buffer Tank Kit (020-0009)
Part No.
Description
0020-140 1” Pex x 1” MPT (2)
0020-145 1” Pex Crimp Ring (2)
0020-195 3/4” F Hose x 1/2”
0020-197 1” FPT Ball Valve (6)
16
0020-140
1” Pex x 1” MPT
Part No.
0020-247
0020-250
0020-260
0020-622
0020-197
1” FPT
Ball Valve
0020-260
1” x 1/2”
Reducer
0020-195
3/4” F Hose x 1/2”
Description
1” Blk St 90
1” x 2” Blk Nipple (5)
1” x 1/2’ Reducer
1/2” Plug (2)
Flex Fuel Owner’s Manual
Part No.
0020-623
0020-649
0109-003
Description
1 1/4” Plug (4)
1 1/4” x 1”Reducer (4)
1/2” Thermowell (2)
2012
5: Installation
Filling the Furnace and Buffer With Water
Your Flex fuel furnace should be filled with clean drinking water that has minimal water impurities. Do
not fill your furnace with water from lakes, rivers, ponds, etc.
Your Flex fuel furnace can be filled with water by adding water to the expansion tank above the furnace.
Ensure that you leave enough room in the expansion tank for when the water is heated to avoid water
from spilling over.
The buffer tank(s) should be filled from the bottom of the tank. while filling the tank the valve on the top
should be open to vent the air out of the system. Once all the air is out of the tank close the top valve.
It is necessary to monitor and bleed off any excess air that may be in the system once the furnace is
operational. However do not try to bleed the buffer tank while the pumps are running. Any air in the
furnace will self bleed into the expansion tank.
Boiler treatment must be used with all water types and system configurations. Antifreeze can be added
to systems that have components that may be subject to freezing if the furnace is not run for an
extended period of time. Boiler treatment must still be used even when antifreeze is present in the
system.
Setting the Diverting Valve
Your furnace requires a return water temperature minimum of 140°F during operating. Adjusting the
valve is a one time process during the initial firing. Start the process by having the valve at the
maximum setting. Start adjusting when the bottom of your buffer tank is below 130°F and the furnace is
above 150°F. Adjust the valve down and monitor the water temperature on the display. Once the furnace
display reads between 140°F and 150°F for the return water temperature the valve is adjusted properly.
5.5 Electrical Connections
Note: Be sure to follow all local, state and federal guidelines. Wiring installation should be preformed
by a qualified electrician.
Main Power Connection
Your Flex fuel needs a 120 V connection with a 20 amp circuit for the basic unit.
The unit must be properly grounded to ensure proper operation. Failure to properly ground the unit will
result in a voided warranty.
Secondary Power Connections
Secondary power connections include a pump, igniter (optional) and the pellet arm (optional).
Main Circulating Pump
Your Flex fuel comes with the proper wiring harness and connections to power a pump at the rear of the
furnace. Pump wiring must be done by a qualified electrician.
2012
Flex Fuel Owner’s Manual
17
18
N L
Solar Pump
7
Draft Inducer
BB Pro
Main Circulating Pump
3
4
Primary Air
5
Secondary Air
6
Flex Fuel Owner’s Manual
N L
N L
N L
N L
Ash Extraction
N L
2
Heat 1
N L1 L2
Mixer 2
Mixer 1
N L1 L2
9
N L
Gate Motor
NO C NC
1
NO C NC
SPARE FUSE 10A
Heat 2
17
Stove
Pump
16
Storage
Tank Pump
15
Storage
Tank
PE N L TK TK
SCP
FOT
N L
120 VAC
60 Hz
21
FS
1 2 1 2 3
Call
1 2 3 4 5
EXP
Bus
DI Temp.
Draft Inducer Speed
Bin Switch
Reverse
MAIN FUSE 10A
TRIAC FUSE 10A
POWER
Extra
Vibrator
18
14
13
12
11
Stove
Temp 2
Outside
Temp
Stack Temp
Return Temp
Supply Temp
Stove Temp
Storage
Tank
Temp 1
Storage
Tank
Temp 2
Room
Temp 2
Flow
Temp 2
Room
Temp 1
Flow
Temp 1
Intake Auger Temp
Display
COM
Secondary
Heat Source
8
Room Feed Auger
Pellet Auger
Solar
Panel
Return Temp
Solar
Panel
Supply Temp
Solar
Panel
Temp
CIRC Temp
10
LAMBDA
5: Installation
5.6 I/O Board
Heat Exchanger Clean
Igniter
2012
SPARE FUSE 10A
5: Installation
2012
Flex fuel 30 kW
Flex fuel 60 kW
#4
Main Circulating Pump
Connections
Flex Fuel Owner’s Manual
19
5: Installation
5.7 Connecting to Heating System
Existing Forced Air
A water to air heat exchanger is inserted in the existing plenum. In most cases the heat exchanger is placed
in a horizontal position, keeping all four sides level. The air must be forced through the finned area of the
heat exchanger evenly. The hot water line coming from the hot-water tube enters the bottom fitting of the
heat exchanger and exits the top fitting, which returns to the furnace. If the plenum is too large or too small,
it must be altered to fit the heat exchanger properly.
Note: The Water to Air Heat Exchanger must be installed below any existing
Off-Peak electric coils already in the plenum.
Cold Water Return to
Flex fuel
Hot Water Supply from Flex fuel
(Always put supply in lower port.)
After the installation of the WoodMaster add-on water to air exchanger, the air flow may need to be increased to fuel furnaces, electric furnaces, and electric/gas furnaces. Contact your dealer for assistance.
Existing Hot Water Heat
A Water to Water Heat Transfer Unit is used to connect to an existing hot water boiler system.
Cold Water Return to
Flex fuel
Existing Heat
Zone Return
Hot Water Supply from
Flex fuel
Circulating Pump
WoodMaster Water to for Existing Hot
Water Heat Transfer Unit Water Heating
System
Existing Hot
Water Boiler
Note: Any changes that are made to an existing boiler should be done by a qualified
plumber and follow all state and local codes.
20
Flex Fuel Owner’s Manual
2012
6: Fuels
All fuels must conform to certain quality standards to ensure trouble free operation of the furnace.
Use of unapproved fuels may result in faulty operation and a voided warranty. Never use the following: trash, plastics, gasoline, rubber, or naphtha. Please contact your WoodMaster Flex fuel dealer for
any questions on fuel use.
6.1 Pellets
Only premium pellets certified by the Pellet Fuels Institute may be used and must follow these
guidelines:
• Bulk density per cubic foot must be a minimum of 40 pounds
• The diameter is between 1/4 inch to 5/16 inch
• Maximum length is 1.5 inches
• Fines (dust) of not more than 0.5% by weight
• Sodium content shall be less than 300 parts per million
• Ash content of 1% or less
• Moisture content of 10% or less
Note: Pellets should be stored in a dry area and should not be allowed to get wet.
Handle pellets with care.
6.2 Bulk Material
Only cut, split, seasoned wood with a internal moisture content of 25% or less may be used. Wood can be
cut to a maximum length of 21 inches for the Flex fuel 30 and a maximum of 26 inches for the Flex fuel
60. The wood should always be placed horizontally and parallel to the firebox wall. The pieces of wood
should be stacked as tightly as possible whereby the face of the wood should NOT touch the firebox
wall. This ensures that it slides correctly. DO NOT burn any large, round pieces of wood. DO NOT burn
any “green wood”, or any wood that is above the 25% moisture limit.
Water Content
The maximum permitted water content is 25%.
Bark Content
The maximum permitted bark content is 20%.
2012
Flex Fuel Owner’s Manual
21
7: Switching the Furnace On/Off
It is only possible to switch the furnace on and off from the start screen. The currently selected
operating mode is indicated on the line “Selected furnace mode” (in this example “Bulk materials”).
The status line “Boiler is switched off!“ indicates that the furnace is switched off. Automatic furnace
start-up is only possible when the furnace is switched on.
Software Version
Date & Clock
Selected
Furnace Mode
FLEX FUEL
V 10.060 Tu, 12.09.10
13:44
Bulk materials
Boiler temperature:
Flue gas temperature:
Air factor:
81ºF
117ºF
7.40
Current
Actual Values
Boiler is switched off!
Status Line(s)
7.1 Switching the Furnace On
The following picture shows a furnace currently running in operating mode “Bulk materials“ with
current operating status “Boiler is switched off!”.
FLEX FUEL
V 10.060 Tu, 12.09.10
13:44
Bulk materials
Boiler temperature:
Flue gas temperature:
Air factor:
81ºF
72ºF
7.40
Boiler is switched off!
To switch on the furnace, press and hold the control knob for 3 – 4 seconds.
The following confirmation message appears on the display for several seconds:
Your boiler
is switched on!
Boiler operating mode:
Bulk materials
22
Flex Fuel Owner’s Manual
2012
7: Switching the Furnace On/Off
The furnace is then switched on and you are returned to the start screen. The status line indicates the
current operational status of the furnace.
The significance of the status lines are best described in sections
• Section 11.6: Status lines during furnace operating mode “Bulk materials”
• Section 12.6: Status lines during furnace operating mode “Bulk materials auto control"
• Section 13.6: Status lines during furnace operating mode “Pellets auto control”
Note: The furnace switch-on procedure is the same in all furnace operating modes
(“Pellets auto control”, “Bulk materials” and “Bulk materials auto control”).
7.2 Switching the Furnace Off
To switch the furnace off, press and hold the ESC button when the start screen is being displayed. A
switch-off message is displayed for several seconds before returning to the start screen.
Your boiler
is switched off!
Boiler operating mode:
Bulk materials
The status line then indicates “Boiler is switched off!”
If the furnace is running in Bulk materials or Bulk materials auto control mode, it is only possible to switch
off the furnace when the following conditions are met:
• Low flue gas temperature (Below factory default)
• Air factor is above 2.50
• Lambda sensor pre-heat time has elapsed (duration 150 seconds)
2012
Flex Fuel Owner’s Manual
23
8: Display
Back lit
Display
ESC
Button
Control Knob and
Operating/Start Button
Overview:
All settings are changed using the Control Knob in the center of the operating unit. Turn the wheel to
scroll through the various menus, move the cursor to the settings or increase/decrease the values. Press
the control knob to access the menus, select the settings, confirm a modified setting. The control knob is
also used to start up the furnace and activate the smoldering gas extraction.
The ESC button to the right of the rotary button may be used at any time to quit a particular sub-menu.
Pressing this button several times will return you to the start screen. Press and hold the ESC button for 3
seconds when the start screen is displayed to switch off the furnace. Smoldering gas extraction can also
be deactivated by pressing the ESC button for 3 seconds. When making changes in a screen, pressing the
ESC button will NOT save the changes.
24
Flex Fuel Owner’s Manual
2012
8: Display
8.1 The Starting Screen
The displayed values are current actual values. The boiler temperature,
the flue gas temperature and the air factor are displayed.
Software Version
Date & Clock
Selected
Furnace Mode
FLEX FUEL
V 10.060 Tu, 12.09.10
13:44
Bulk materials
Boiler temperature:
Flue gas temperature:
Air factor:
81ºF
117ºF
7.40
Current
Actual Values
Boiler is switched off!
Status Line(s)
The lowest line(s) of the starting screen is/are the status line(s). The status line shows the operating
status of the furnace.
Note: This furnace runs on DD/MM/YY date format and on military time format.
The currently selected furnace operating mode is displayed. Depending on the furnace model, the
following furnace operating modes are available:
Read further in this section to gain a better understanding of menu navigation, otherwise proceed to
the next section.
2012
• Bulk materials
• Bulk materials auto control
• Pellets auto control
Flex Fuel Owner’s Manual
25
8: Display
8.2 Menu Navigation
Scrolling Through the System Components
On the starting screen, turn the control knob to the right or left; the actual values and conditions of the
existing system components are displayed by this method. By pressing the control knob you will bring
up the settings menu of the system components. Pressing the ESC button will bring you back to the
starting screen. An example is shown below.
• From the start screen (Screen 1) press the control knob to bring up screen 2.
• Press the control knob again and turn it clockwise to scroll down to “Set clock/date” and press the
control knob to select. (Screen 3)
• This will bring up the Set CLOCK/DATE screen. (Screen 4) Press the control knob to select “Date”. (Screen 5)
• By pressing the control knob again the cursor will move to the date values. (Screen 6)
• You may either turn the control knob to change the value and press on the control knob to set it or
press the ESC button to not change the value and return to the screen heading. (Screen 7)
• Press ESC again to return to the BASIC BOILER SETTINGS screen. (Screen 8)
• Press ESC one more time to return to the start screen. (Screen 1)
Screen 1
FLEX FUEL
Screen 2
V 10.060 Tu, 12.09.10
13:44
Bulk materials
Boiler temperature:
Flue gas temperature:
Air factor:
81ºF
117ºF
7.40
Boiler is switched off!
BASIC BOILER SETTINGS
Set required boiler values
Select boiler operating mode
Boiler cleaning
Vacuum output/heat exchanger
Set clock/date
Service menu
Alarm protocol
Output test - heat cycle
Output test - boiler
Operating hour counter
Language selection & Unit
Screen 8
Screen 3
BASIC BOILER SETTINGS
Set required boiler values
Select boiler operating mode
Boiler cleaning
Vacuum output/heat exchanger
Set clock/date
Service menu
Alarm protocol
Output test - heat cycle
Output test - boiler
Operating hour counter
Language selection & Unit
Screen 4
BASIC BOILER SETTINGS
Set CLOCK/DATE
Set required boiler values
Select boiler operating mode
Boiler cleaning
Vacuum output/heat exchanger
Set clock/date
Service menu
Alarm protocol
Output test - heat cycle
Output test - boiler
Operating hour counter
Date:
Time:
10.09.10
17:05
Language selection & Unit
Screen 7
Set CLOCK/DATE
Date:
Time:
26
10.09.10
17:05
Screen 6
Set CLOCK/DATE
Date:
Time:
10.09.10
17:05
Flex Fuel Owner’s Manual
Screen 5
Set CLOCK/DATE
Date:
Time:
10.09.10
17:05
2012
8: Display
Changing/Viewing Individual Settings
By turning the control knob, you can:
• Navigate between various main menu levels,
• Navigate within a menu,
• View or change individual settings.
A symbol appears in the upper right hand corner of the screen, which will show you at which level you
currently are.
Symbol example
BOILER OPERATING MODE
Bulk materials
Bulk materials auto control
Pellets auto control
Selected boiler mode:
Pellets auto control
UP/DOWN SYMBOL
If this symbol appears, navigate within the just displayed
menu by turning the control knob.
RIGHT/LEFT SYMBOL
If this symbol appears, scroll between various main
menus by turning the control knob.
CHANGE SYMBOL
If this symbol appears on the screen, you will change
a single setting by turning the control knob. If you turn
the knob clockwise, the value increases; if you turn it to
the counterclockwise, the value is reduced.
Note: By pressing the ESC key, you will always move back one level, no matter where you are.
You will always return to the starting screen. Data WILL NOT be changed by using the ESC key.
2012
Flex Fuel Owner’s Manual
27
9: Basic Furnace Settings
If you press the control knob on the starting screen, the menu “BASIC BOILER SETTINGS” will appear
(Shown Below). Press the control knob again and the cursor moves to the first menu item. By turning
the control knob to the right, the cursor moves to the available menu selection items.
BASIC BOILER SETTINGS
Set required boiler values
Select boiler operating mode
Boiler cleaning
Vacuum output/heat exchanger
Set clock/date
Service menu
Alarm protocol
Output test - heat cycle
Output test - boiler
Operating hour counter
Language selection & Unit
9.1 Set Required Boiler Values
In order to set the required boiler values, select “Set required boiler values“. The screen shows following
figure:
REQUIRED BOILER VALUES
Required boiler temp:
Start difference:
Ext. boiler dem:
XXºF
XXºF
off
Return flow temp:
Return increase pump:
XXºF
On
The return flow temperature shown on the screen is the actual temperature of the return. In addition, the
status of the return increase pump is displayed.
Start Difference
If the furnace operating mode is set to “Pellets auto control” or “Bulk materials auto control” and heat is
being demanded by a system component, the furnace will first start when the furnace temperature is
lower than the set “required boiler temperature“ less the set “start difference”.
9.2 Select Furnace Operating Mode
Please refer to section 10 “Operating Modes” if you want to change the operating mode.
9.3 Boiler Cleaning
In this menu you can select to start the furnace cleaning manually by pressing the control knob.
9.4 Vacuum Output/Heat Exchanger
28
The heat exchanger cleaning cycle activates within the set release period depending on the furnace
operating period.It is recommended that a continuous release period is specified (00:00 – 24.00),
otherwise a situation may occur where the furnace is not released to start even though there is a call for
heat (status line “Heat exchanger cleaning waiting to be released!”).
Flex Fuel Owner’s Manual
2012
9: Basic Furnace Settings
9.5 Setting the Clock/Date
Note: There is no automatic conversion for daylight saving time.
Note: This furnace runs on DD/MM/YY date format and on military time format.
Once you have selected this menu item, the clock stops and the following figure appears on the screen.
Set CLOCK/DATE
Date:
Time:
10.09.10
17:05
9.6 Service Menu
The service menu includes factory settings designed to provide ideal combustion characteristics. These
settings have already been optimized in the factory. Access to these settings can only be obtained by
your dealer. Please contact your WoodMaster Flex fuel Dealer for assistance.
9.7 Alarm Protocol
All malfunctions are chronologically listed in the alarm protocol. The alarm protocol menu can be found
in the service menu main page and selecting it will bring up the following screen:
ALARM PROTOCOL
Alarm number:
37
Type of alarm:
acknowl.
Date:
10.12.09
Clock:
10:20:27
SAFETY TEMPERATURE LIMITER
HAS TRIPPED!
Please reset the safety
temperature limiter once the
boiler has cooled down
then press START!
When pressing the control knob on the alarm protocol screen, the symbol LEFT/RIGHT appears in the
upper right hand corner and all previous alarms can be scrolled through.
ALARM PROTOCOL
Alarm number:
30
Type of alarm:
triggered
Date:
10.12.09
Clock:
10:10:13
MAIN FUSE FAULTY!
Follow the instructions in the
operating manual and replace
the main fuse!
The boiler will be operational
again once its run-on time has
expired!
Note: 40 entries are stored. After the 40th entry (alarm number 39), the oldest entry with alarm
number 0 is deleted. It will store when the error message was triggered and when it was cancelled.
Therefore, there are 2 entries in the alarm protocol per error message.
2012
Flex Fuel Owner’s Manual
29
9: Basic Furnace Settings
9.8 Output Test – Heating Cycle
Note: Output tests may be preformed by the owner, however, damage can occur if preformed
incorrectly. Please contact your WoodMaster Flex fuel dealer for assistance.
An output test of all connected pumps and mixers can be performed in this menu, in order to be able to
test the correct operating method.
Note: The heating cycle program is interrupted, as long as the output test is performed.
The heating cycle output test should only be controlled by a professional.
Move the curser by turning the control knob to the output test – heating cycle line and press the control
knob. Following figure will appear on the screen:
Output test 1-heat cycle
Heat
Heat
Heat
Heat
Heat
Heat
Heat
Heat
DHWR
DHWR
DHWR
DHWR
cycle pump
cycle pump
cycle pump
cycle pump
cycle pump
cycle pump
cycle pump
cycle pump
pump 1:
pump 2:
pump 3:
pump 4:
1:
2:
3:
4:
5:
6:
7:
8:
Off
Off
Off
Off
Off
Off
Off
Off
You can now press the control knob to scroll through the items to select one to change. If the control
knob is turned to the right while the cursor is in the heading, then the menu “Output Test 2-heat cycle”
appears for more options. You may turn the control knob again to bring up the “Output Test 3-heat cycle”
menu.
Switching on the Outputs
Press the control knob and the cursor moves from the header to the first menu item mixer 1. By turning
the control knob, select the output that you would like to activate and press the control knob. The cursor
changes to the entry field. You can switch the output on and/or off by turning the control knob. The
input options change from Off to Open to Close in the entry fields of mixer 1 and mixer 2.
Press the control knob in order to save the selection and/or to leave the input field. The cursor now
changes back to the respective menu item. You can now switch another output on and/or off or exit the
menu by pressing the ESC key.
9.9 Output Test – Boiler
Note: Damages may occur to the furnace, for which the manufacturer is not liable, in the event of
an incorrect use of “Output test – boiler”. The outputs should never be activated too long, since this
may result in blocking the screw and therefore in blocking the respective motor. Please contact your
WoodMaster Flex fuel dealer for assistance.
Remarque : ce menu est uniquement visible lorsque la ligne de statut est « Chaudière éteinte ! ».
Toutes les fonctions des composants importants du four peuvent être testées dans ce menu.
30
Flex Fuel Owner’s Manual
2012
9: Basic Furnace Settings
Move the curser by turning the control knob to the output test – boiler line and press the control knob.
The menu “OUTPUTS 1” appears on the screen.
OUTPUTS 1
Primary magnet(5):
Ignition(1):
Burnback Prot.(3):
Heat exchanger(17):
RIB pump(4):
Ash extraction(16):
sec. air flap(6):
sec. servo motor(6):
Lamb. sensor(10):
Ind. draft fan(7):
Off
Off
Off Close
Off
On
Off
Close
Off
Off 02: 21.0%
Man 0
You can now press the control knob to scroll through the items to select one to change. If the control
knob is turned to the right while the cursor is in the heading, then the menu “OUTPUTS 2” appears for
more options. You may turn the control knob again to bring up the “OUTPUTS 3” menu.
Switching on the Outputs
In order to test an output, press the control knob in the header. The cursor moves back to the first menu
item. By turning the control knob, select the system components that you would like to test and press
the control knob again. The cursor now moves to the respective setting parameter, which you can
change by turning the control knob. Confirm your entry with the control knob and verify that the
respective system component is really activated.
Press the ESC key to exit this menu. The cursor now moves to the header and you will exit this menu by
pressing the ESC key. All activated components are automatically switched off.
9.10 Language Selection/Temperature Scale Selection
LANGUAGE SELECTION
German
Italian
French
English
Spanish
Please select your
language!
Temperature unit:
°F
->
°C
In this menu you can select your desired language and temperature scale.
2012
Flex Fuel Owner’s Manual
31
9: Basic Furnace Settings
9.11 Hour Meter
OPERATING HOUR COUNTER
Feed:
Lambda sensor:
Ind. dr.fan PE/SM:
Ind. draft fan BM:
Vacuum turbine:
Second. air motor:
Ignition:
Heat exchanger:
Storage room:
“Bulk materials!”:
“BM part load”:
“Pellet mode!”:
Starts BM:
Starts PE/BM:
8
6
12
0
^^^^^^
0
0
0
^^^^^^
0
0
0
42
9
The following operating hours are also logged:
• Feed runtime (in hours)
• Lambda sensor heating time (in hours)
• Induced draft fan runtime, during which the furnace operating mode was set to pellets (in hours)
• Induced draft fan runtime, during which the furnace operating mode was set to either Bulk materials
or Bulk materials - automatic (in hours)
• Secondary air motor runtime (in hours)
• Igniter runtime (in hours)
• Heat exchanger cleaning runtime (in hours)
• Furnace runtime during which the Operating status was "Bulk materials!" (in hours)
• Furnace runtime during which the Operating status was "Bulk materials! Part load mode!" (in hours)
• Furnace runtime during which the Operating status was "Pellets mode!" (in hours)
• Number of furnace starts (applies to furnace operating modes "Bulk materials" or "Bulk materials automatic") The counter always increases by 1 if the operating status changes either from “Please
ignite!” to “Bulk materials!” (for furnace operating mode “Bulk materials” or from “Automatic ignition!” to
“Bulk materials!” (for furnace operating mode “Bulk materials - automatic”)
• Number of furnace starts (applies to furnace operating mode “Pellets” ”) The counter is always
increased by 1, if the operating status changes from “Ignition phase!” to “Start phase”
32
Flex Fuel Owner’s Manual
2012
10: Operating Modes
10.1 View of the Selected Operating Mode
When booting up the display, the set operating mode is automatically displayed for approximately 3
seconds. All Flex fuel systems contain "Bulk materials" operating mode. The following modes are
possible:
Operating mode - “Bulk materials“
Your furnace has the operating mode "Bulk materials" selected. This mode is available on all units.
Operating mode - “Bulk material auto control“
If your furnace has the optional igniter connected, then the operating mode “Bulk materials-automatic” is
enabled during commissioning or upon installation of an igniter by your dealer.
Operating Mode -”Pellets – Manual Filling“
Your Furnace can be loaded with wood pellets. Next to the furnace is a hopper that the furnace auto
feeds from. The hopper is manually refilled by the operator of the unit. The pellets are automatically
ignited by the igniter.
Note: Your Flex fuel furnace may not have the igniter or pellet option installed. If this is the
case the system will not let you select “ Bulk materials - auto control” or “Pellets - Manual Filling”.
10.2: Setting the Furnace Operating Mode
The currently selected furnace operating mode is shown on the line
“selected boiler operating mode” on the start screen.
Software Version
Date & Clock
Selected
Furnace Mode
FLEX FUEL
V 10.060 Tu, 12.09.10
13:44
Bulk materials
Boiler temperature:
Flue gas temperature:
Air factor:
81ºF
117ºF
7.40
Current
Actual Values
Boiler is switched off!
Status Line(s)
2012
Flex Fuel Owner’s Manual
33
10: Operating Modes
Depending on the installed options, up to three furnace operating modes are available:
• Bulk materials
The furnace is operated using bulk material fuel. This must be manually ignited.
• Bulk materials auto control
The furnace is operated using bulk material fuel. This is automatically ignited by the igniter.
• Pellets auto control
The furnace is operated using pellets for fuel. This is automatically ignited and automatically fed.
Note: Always ensure that the insert corresponding to the furnace operating mode is fitted
in the firebox.
10.3 Changing the Furnace Operating Mode
You have verified that the correct insert for the required furnace operating mode is fitted in the
firebox and want to switch to another furnace operating mode. First check the current operating status
of your furnace since it is not always possible to change the operating mode (bulk material
combustion is in progress and you want to change to operating mode “Pellets auto control”). In this case,
changeover is not possible and the following message is shown on the display for several seconds:
Changeover in status “bulk materials!” not possible!
The following table summarizes the operational states which permit a change of furnace operating
mode:
Change-over
from
Possible Operating Status
Pellets - auto
control to
Bulk materials
Bulk materials
to Pellets - auto
control
“Furnace is
switched off!”
Pellets - auto
control to
Bulk materials
auto control
“Furnace is
switched off!”
Bulk materials
auto control
to Pellets - auto
control
“Furnace is
switched off!”
Bulk materials to
Bulk materials
auto control
“Furnace is
switched off!”
Bulk materials
auto control to
Bulk materials
34
Change-over possible for any operational status!
“Heat exchanger cleaning is
active!”
“Heat exchanger cleaning waiting
to be released!“
“Heat exchanger cleaning is
active!”
“Heat exchanger cleaning waiting
to be released!“
“Stop system!”
“Heat exchanger cleaning is
active!”
“Heat exchanger cleaning waiting
to be released!“
“Stop system!”
“Heat exchanger cleaning is
active!”
“Heat exchanger cleaning waiting
to be released!“
“Stop system!”
“Availability!”
Change-over possible for any operational status!
Flex Fuel Owner’s Manual
2012
10: Operating Modes
Once you have verified that a change-over is possible, press the control knob when the start screen is displayed.
FLEX FUEL
V 10.060 Tu, 12.09.10
13:44
Bulk materials
Boiler temperature:
Flue gas temperature:
Air factor:
XXXºF
XXXºF
X.XX
Boiler is switched off!
After the control knob is pressed, the selection menu “BASIC BOILER
SETTINGS” is displayed.
BASIC BOILER SETTINGS
Set required boiler values
Select boiler operating mode
Boiler cleaning
Vacuum output/heat exchanger
Set clock/date
Service menu
Alarm protocol
Output test - heat cycle
Output test - boiler
Operating hour counter
Language selection & Unit
Press the control knob and then turn it to scroll down until “Select
boiler operating mode” is selected.
BASIC BOILER SETTINGS
Set required boiler values
Select boiler operating mode
Boiler cleaning
Vacuum output/heat exchanger
Set clock/date
Service menu
Alarm protocol
Output test - heat cycle
Output test - boiler
Operating hour counter
Language selection & Unit
Now press the control knob; this opens sub-menu “BOILER OPERATING
MODE”
Note: The display can vary depending on the installation.
Not all furnace operating modes may be available.
BOILER OPERATING MODE
Bulk materials
Bulk materials auto control
Pellets auto control
selected boiler mode:
Bulk materials
The actual display image depicts a combination furnace for bulk material/pellets. The current furnace operating mode is “Bulk materials“.
BOILER OPERATING MODE
Bulk materials
Bulk materials auto control
Pellets auto control
selected boiler mode:
Bulk materials
2012
Flex Fuel Owner’s Manual
35
10: Operating Modes
To change the furnace setting from “Bulk materials” to “Pellets
auto control” follow these directions:
Press the control knob and the line of the current furnace operating
mode will be highlighted (in this case “Bulk materials“).
BOILER OPERATING MODE
Bulk materials
Bulk materials auto control
Pellets auto control
selected boiler mode:
Bulk materials
Turn the control knob to move the cursor to the line of the desired
operating mode. For example, the following picture
illustrates the selection of operating mode “Pellets auto control” .
BOILER OPERATING MODE
Bulk materials
Bulk materials auto control
Pellets auto control
selected boiler mode:
Bulk materials
Confirm the operation by pressing the control knob. If you do not
want to make any changes, press the ESC button to exit the sub-menu.
A confirmation message is displayed once the control knob is pressed
to confirm the change. The following picture illustrates the confirmation of a successful change to operating mode “Pellets auto control” .
You will then be returned to the menu “BOILER OPERATING MODE“.
The line “selected furnace operating mode” also indicates that the
change-over has been successful.
boiler operating mode:
Pellets auto control
BOILER OPERATING MODE
Bulk materials
Bulk materials auto control
Pellets auto control
selected boiler mode:
Pellets auto control
Press the ESC button to navigate backwards until you are returned to
the start screen.
FLEX FUEL
V 10.060 Tu, 12.09.10
13:44
Pellets
Boiler temperature:
Flue gas temperature:
Air factor:
XXXºF
XXXºF
X.XX
Boiler is switched off!
The line displaying the current furnace operating mode will also indicate the successful change to operating
mode “Pellets” . If the furnace indicates the status “Boiler switched off!” and you wish to start the furnace with
the selected furnace operating mode, switch on the furnace by pressing the control knob for three seconds,
as described in section 7.
36
Flex Fuel Owner’s Manual
2012
11: Bulk Materials Mode
Note: Always ensure that the insert corresponding to the furnace operating mode is fitted and the
pellet slide and flap (if installed, section 13.3) are in the correct position for the selected mode. If the
furnace operating mode is changed from “Pellets auto control” to “Bulk materials” or “Bulk materials
auto control”, the pellet feeder will empty (takes approximately 250 seconds). Open the swivel flap
during the emptying process and only close it again once the feeder is empty. Ensure that the diverting valve has been properly set. (Section 5.4)
11.1 General Information
Bulk Materials is the default mode of your furnace. The start screen always indicates the furnace
operating mode which is currently set. If this is not set to “Bulk materials”, change the furnace operating
mode as described in section 10.2.
11.2 Pre-Firing Checks
Check the Firebox
Check that there are no foreign objects in the firebox and place the insert for Bulk Materials Mode is in
the firebox. Ensure also that ash residues are removed from the firebox. In particular the insert should be free from residues so that a down-draft can be guaranteed. The ash residues can be guided into the ash
chamber through the insert using the fire irons. (Section 15)
Check the Primary Air Feed
To guarantee that your Flex fuel receives the oxygen feed necessary for ensuring clean burning, the two
air deflectors which are located on the right and left furnace side walls in the firebox must be
checked or cleaned with the fire irons. (Section 15)
Check the Ash Chamber
Check that there are no foreign objects inside the ash chamber and that the refractory is not damaged.
Any accessories such as ash trays, furnace utensils, etc. should not be in the ash chamber or firebox
during operation. Remove ash build up if needed. Close the ash door and ensure that it seals properly.
(Section 15)
Check the Pellet Slide
If the optional Pellet Arm is installed you must also verify that the pellet slide is removed and the flap is
closed. (Section 13.3) If your furnace does not have this installed you will not see this feature.
Check the Status Line(s)
Check the current operating status which is displayed on the status line. It is only possible
to start the furnace in operating mode “Bulk materials” when the operational status is “Boiler is
switched off!”, “Stop system!” or “Stop system! Fire bed monitoring!”. Further details on the status lines are given in section 11.6.
2012
Flex Fuel Owner’s Manual
37
11: Bulk Materials Mode
Check the Insert
Check that the correct insert is installed in the firebox, and that the insert is free from any buildup that
may block air flow. Remove and clean the insert if needed. Below is the correct insert for this operating
mode.
11.3 Firing
General Instructions
It is necessary to configure the firing process so that a full-area fire bed can form. The purpose of
this section is to clarify bulk material heating with the Flex fuel in a visual manner.
In general your bulk material should correspond to the specification described in section 6.2. It is
particularly important that you determine whether sufficient power demand is available prior to
the firing process. First check the temperatures in your buffer tank(s). If the temperature is still sufficient, you should postpone the firing process until later.
Fuels
The fuel used should have the following
characteristics:
• Small-sized, non-coated, easily
combustible igniting material (cardboard,
newspaper,…)
•
•
Kindling, aka dry, small-sized, easily combustible
material (small chopped bulk material,
shavings and shredded material, sticks, krumbs …)
Dry, medium sized, split bulk materials
• Dry, split bulk materials
Starting the Furnace
Check that the furnace operating mode is set to “Bulk
materials”, and press the control knob for 3
seconds. Then the induced draft fan starts to run and
“Please Ignite” will appear on the screen.
FLEX FUEL
V 10.060 Tu, 12.09.10
13:44
Bulk materials
Boiler temperature:
Flue gas temperature:
Air factor:
XXXºF
XXXºF
X.XX
Please ignite!
38
Flex Fuel Owner’s Manual
2012
11: Bulk Materials Mode
Firing
First take the dry, small-sized and easily combustible
material and arrange it parallel to the firebox side wall
up to the height of the air deflectors, making sure to
fully cover the bottom of the chamber.
Then spread your firing material in the firebox making
sure that it covers the entire bottom of the firebox.
Note: A cardboard and paper combination works
best at starting the fire.
Now ignite the material making sure that it is ignited
in several positions.
2012
Flex Fuel Owner’s Manual
39
11: Bulk Materials Mode
Now close the firebox door and wait unit the
status line changes from “Please ignite” to “Bulk
materials”. This changeover indicates that the
kindling has ignited across its surface and there
is sufficient flame to add wood. The change from
“Please ignite” to “Bulk materials” occurs when the
flue gas temperature exceeds the flue gas start
temperature. The induced draft fan will now regulate according to the furnace temperature.
Now you can begin to lay a layer of the medium sized
bulk material in the firebox. It is recommended to
activate smoldering gas extraction while filling the
furnace. (section11.4) Again, you must ensure that this
is parallel to the walls with no cavities and that the
wood will not bind on the walls of the chamber.
Now wait 1 to 2 minutes until a clean, full-area fire
bed has formed.
40
Flex Fuel Owner’s Manual
2012
11: Bulk Materials Mode
Now you can completely fill the firebox right to the
top with bulk material for a full burn, or a part load,
depending on demand for heat.
Then close the firebox door and deactivate Smoldering Gas Extraction. It is easiest to detect that firing
has been successful by monitoring the air factor. After
closing the firebox door this should quickly drop to
less than 2.00.
FLEX FUEL
V 10.060 Tu, 12.09.10
13:44
Bulk materials
Boiler temperature:
Flue gas temperature:
Air factor:
XXXºF
XXXºF
X.XX
Bulk materials!
11.4 Smoldering Gas Extraction and Adding Fuel
More fuel may be added by activating the smoldering gas extraction function when the operational
status of the furnace is “Bulk materials”. First ensure there is sufficient demand for more heat.
Activating Smoldering Gas Extraction
Smoldering gas extraction is activated by pressing the control knob on the start screen
(3 - 4 seconds). A short activation message appears. "Smoldering gas extraction! SAF reference run!“ is
then displayed on the status line.
The Secondary Air Flap (SAF) is now closed, the induced draft fan runs at maximum speed and the
primary air feed is interrupted. The text “Smoldering gas extraction! Please add more!” will appear on the
status line after several seconds! Carefully open the firebox door and start the filling process.
Deactivating Smoldering Gas Extraction
After filling is completed, close the fuel door and deactivate smoldering gas extraction by
pressing the ESC button for 3 - 4 seconds. A deactivation message briefly appears and the furnace
switches back to regulated operation. Smoldering gas extraction is automatically deactivated after
several minutes.
11.5 Combustion Completed
Furnace combustion is completed when:
• the flue gas temperature drops below the factory default flue gas switch-off temperature and;
• the air factor is above 2.50 for a longer period of time (10 - 20 minutes).
The message “Stop system!” appears on the status line.
Note: The furnace may reignite if conditions permit.
2012
Flex Fuel Owner’s Manual
41
11: Bulk Materials Mode
11.6 Status Lines During Furnace Operating Mode “Bulk materials”
Boiler is switched off!
The furnace is switched off. Press and hold the Control Knob for 3 - 4 seconds if you now want to start
the furnace using bulk materials.
Stop system!
The furnace has just fully completed the combustion cycle for bulk materials; furnace operating mode
“Bulk materials auto control” may be selected at any time.
Stop system! Fire bed monitoring!
The last combustion cycle for bulk materials has just been completed; however the flue gas temperature
is still too high which means that the controller continues to monitor the fire bed.
Please ignite!
The heating procedure can now start. The operating status changes to “Bulk materials!” once the
flue gas temperature exceeds the factory default flue gas start temperature.
Bulk materials!
The combustion of bulk materials is still in progress. If you want to add more material, please start
smoldering gas extraction. The combustion of bulk materials has finished (status “Stop system!”) when
the flue gas temperature drops below the factory default switch-off temperature and the air factor is
above 2.50 for several minutes (factory default setting 10 – 20 minutes).
Bulk materials! Part load!
When the furnace is in “Bulk Materials” mode and there is no call for heat, the furnace may enter “Bulk materials! part load” to avoid overheating. So that it does not overheat, the furnace is controlled based
on the required furnace temperature (factory setting) with its speed adjusted down. This occurs if
the demand for heat is too low, or the buffer has already been completely loaded and there is still bulk
material in the firebox. If this status line is displayed, you should not fill up with any more fuel. However
if you still continue to fill with fuel, this can lead to overheating of the furnace or reduced
combustion. Which may cause sooting of the chimney or heat exchanger.
Smoldering gas extraction! SAF reference run!
You have activated smoldering gas extraction. Wait until the reference run of the secondary air flap has
completed before adding more bulk material (maximum duration 50 seconds).
Heat exchanger cleaner is waiting to be released!
Heat exchanger cleaning is released if:
• a time release is set (section 9)
• the furnace is cooled (below factory default)
• the flue gas temperature is low
Heat exchanger cleaning is active!
The furnace immediately carries out its heat exchanger cleaning. The duration of the cleaning impulse is
system specific and can vary between 3 and 20 minutes.
42
Flex Fuel Owner’s Manual
2012
11: Bulk Materials Mode
Smoldering gas extraction! Please add more!
Smoldering gas extraction is activated. You can now add more bulk material. Press the ESC button for
3 – 4 seconds to deactivate smoldering gas extraction. Smoldering gas extraction is automatically
deactivated after several minutes.
Fan lag! Please wait!
Fan lag is activated for approximately 20 minutes after a power outage or when the safety temperature
limiter (STL) has been reset. The status will immediately change to “Bulk materials!” if any active
combustion is detected in the firebox during this lag period. Detection is based on the flue gas
temperature or air factor. You cannot abort Fan Lag.
11.7 Indications
Your WoodMaster dealer can undertake pre settings so that the system operator receives various
instructions at the display. These instructions are not to be understood as a furnace malfunction or fault.
The instructions are solely to alert the system operator of possible erratic behavior.
The following instructions are possible:
When firing is not necessary
NOTE!
The buffer tank is already
full! Only increase firing
when sufficent demand is
assured!
Do you still wish to increase
firing?
No
This instruction is displayed if the system operator wants to ignite the furnace and the buffer tank(s) is
(are) already full. Before firing, it is recommended that the buffer temperatures are checked. If the
temperature is still sufficient, it is recommended you postpone firing until later.
When filling is not necessary
(smoldering gas extraction is activated by the system operator)
NOTE!
The buffer tank is already
full! A boiler filling is only
reccommended when sufficent
demand is assured!
Do you still wish to add more?
No
This instruction is displayed if the system operator wants to activate smoldering gas extraction and the
buffer tank(s) is (are) already full.
2012
Flex Fuel Owner’s Manual
43
11: Bulk Materials Mode
Before filling, it is recommended that the buffer temperatures are checked. If the existing temperature is
already sufficient, furnace filling is not recommended, rather the furnace should be allowed to burn out.
When filling is not necessary
(Smoldering gas extraction is activated by the system operator)
NOTE!
The boiler is already
controlled in “Part Load”
Sufficent demand is not
guaranteed! Filling the
boiler is only recommended if
sufficent demand is assured!
Do you still wish to add more?
No
This instruction is displayed if the system operator wants to activate smoldering gas extraction and the
furnace is currently in part load mode. Currently sufficient demand is not guaranteed, the furnace is
already being operated at reduced power. Only add more fuel if there is sufficient demand. If this is not
the case, it is recommended that adding fuel is not carried out and the furnace is allowed to burn out.
When filling not is necessary
(Smoldering gas extraction is activated by the system operator)
NOTE!
The boiler has already run
for a lengthy period since the
last time the heat exchangers
were cleaned! It is
recommended to let the boiler
cool down so that cleaning can
be carried out!
Do you still wish to add more?
No
This instruction is displayed if the system operator wants to activate smoldering gas extraction and the
furnace has already run for a long time since the heat exchangers were cleaned. Only add fuel if more
heat is required. If this is not the case, please let the furnace burn out, so that automatic heat exchanger
cleaning can be carried out.
Upon completion of the burn-off
The boiler
controlled
during the
demand was
NOTE!
was already being
in “Part Load”
last burn-off. The
insufficient
Please ensure for the next
firing that there is
sufficent demand!
44
This instruction is displayed if the burn-off has ended and the furnace was already being operated in part
load mode. This instruction provides information to the system operator. At the end of the last burn-off
the furnace had little demand and had to be operated with reduced power. Ensure that at the next firing
there is sufficient demand.
Flex Fuel Owner’s Manual
2012
12: Bulk Materials Auto Mode
Note: Always ensure that the insert corresponding to the furnace operating mode is fitted and the
pellet slide and flap (if installed, section 13.3) are in the correct position for the selected mode. If the
furnace operating mode is changed from “Pellets auto control” to “Bulk materials” or “Bulk materials
auto control”, the pellet feeder will empty (takes approximately 250 seconds). Open the swivel flap
during the emptying process and only close it again once the feeder is empty. Ensure that the diverting valve has been properly set. (Section 5.4)
12.1 General Information
This mode is only available if an igniter has been installed. If you do not have this option and would like
it, please contact your WoodMaster Flex fuel Dealer for information. In this operating mode the bulk
material is automatically ignited by the igniter. This ignition procedure begins when a heating demand
is present, a time release (section 12.4) has been set and the furnace operating mode has been set to
"Bulk materials auto control". The start screen always indicates the furnace operating mode which is
currently set. If this is not set to “Bulk materials auto control”, change the furnace operating mode as
described in section 10.
12.2 Pre-Firing Checks
Check the Firebox
Check that there are no foreign objects in the firebox and place the insert for Bulk Materials Mode is in
the firebox. Ensure also that ash residues are removed from the firebox. In particular the insert should be free from residues so that a down-draft can be guaranteed. The ash residues can be guided into the
ash chamber through the insert using the fire irons. (Section 15)
Check the Primary Air Feed
To guarantee that your Flex fuel receives the oxygen feed necessary for ensuring clean burning, the two
air deflectors which are located on the right and left furnace side walls in the firebox must be checked or
cleaned with the fire irons. (Section 15)
Check the Ash Chamber
Check that there are no foreign objects inside the ash chamber and that the refractory is not damaged.
Any accessories such as ash trays, furnace utensils, etc. should not be in the ash chamber or firebox
during operation. Remove ash build up if needed. Close the ash door and ensure that it seals properly.
(Section 15)
Check the Pellet Slide
If the optional Pellet Arm is installed you must also verify that the pellet slide is removed and the flap is
closed. (Section 13.3) If your furnace does not have this installed you will not see this feature.
2012
Flex Fuel Owner’s Manual
45
12: Bulk Materials Auto Mode
Check the Status Line(s)
Always monitor the current operating status which is displayed on the status line. It is only possible
to start the furnace in operating mode “Bulk materials auto control” when the operational status is “Boiler
is switched off!”, “Stop system!”, “Stop system! Fire bed monitoring!”, “Availability”, “Heat exchanger cleaner
waiting to be released!”, or “Heat exchanger cleaning is active!”. Further details on the status lines are
given in section 12.7 .
Check the Insert
Check that the correct insert is installed in the firebox, and that the insert is free from any buildup that
may block air flow. Remove and clean the insert if needed. Below is the correct insert for this operating
mode.
12.3 Filling the Furnace
Note: Smoldering Gas Extraction is not available at this time. To vent the furnace to prevent ash from
exiting through the firebox door it is possible to turn on the fans via Output Tests - Boiler (Section 9)
and switch the draft fan on (Outputs 1 screen) while you load the furnace, then switch it off.
The filling procedure can begin providing change-over is permitted.
Note: The furnace will ALWAYS switch to “Bulk materials” after a successful ignition process. It is necessary to switch back to “Bulk materials - auto control” every time it is to be used. Caution should be
used to ensure the furnace is cool enough to reload. If the furnace is not allowed to cool the materials
may self combust before the set time release.
First, place a few small pieces of kindling directly on
the insert.
Note: Ensure that the igniter tube is not blocked
by kindling. The igniter tube is located in the bottom of the firebox right next to the insert on the
right side.
46
Flex Fuel Owner’s Manual
2012
12: Bulk Materials Auto Mode
Next cover the small pieces with a layer of paper.
Covered the paper with another small layer of bulk
materials. Ensure that there is paper close to the
igniter tube.
Then begin to cover with a layer of paper, making
sure that the paper is spread across the entire bottom
of the firebox.
Cover the layer of paper with a layer of cardboard,
again making sure to cover the entire bottom of the
firebox.
2012
Flex Fuel Owner’s Manual
47
12: Bulk Materials Auto Mode
Cover the cardboard with a layer of small bulk materials that covers the entire bottom of the firebox.
Now you can fill the entire firebox with medium to
large size bulk materials for a full load, or fill as needed. Ensure the fuels is in a tightly packed group that
is parallel to the firebox walls. Ensure that the fuel will
not bind on the walls and can move freely.
12.4 Setting the Release Period
Note: It is particularly important that you determine whether sufficient power demand is available
prior to the firing process. First check the temperatures in your buffer tank(s) to allow you to determine when to set the release periods.
Note: The draft inducer fan must be switch off before the release period can be set.
Once the furnace has been filled, it is possible to set a release period during which automatic ignition
should take place. If the start screen is not displayed, press the ESC button until it appears.
FLEX FUEL
V 10.060 Tu, 12.09.10
13:44
Bulk materials
Boiler temperature:
Flue gas temperature:
Air factor:
XXXºF
XXXºF
X.XX
Stop system!
48
Flex Fuel Owner’s Manual
2012
12: Bulk Materials Auto Mode
Then turn the control knob to scroll to the screen “BULK MATERIALS AUTO CONTROL“.
BULK MATERIALS AUTO CONTROL
Release type:
Monday - Sunday
Time release:
On
The release mode currently set and current time release status (on/off ) can now be seen. Press the
control knob to change the release mode. The screen “BM AUTO CONTROL – Release” will appear.
BM-AUTO CONTROL - Release
always on
Mon-Fri and Sat-Sun
Monday - Sunday
manual start
acc. to date
selected: Monday - Sunday
Release Mode “always On“
Select release mode “always On” and then switch the furnace operating mode to “Bulk materials auto
control”. The furnace will start as soon as there is a call for heat.
Release Mode “Mo – Fr and Sa – Su“
Select release mode “Mo – Fr and Sa – Su”; operating mode “Bulk materials auto control” can now be
adjusted so that the ignition process only starts at certain times providing a heating circuit demand is
present.
The screen “BM AUTO CONTROL – Mo-Fr/ Sa-Su” is shown on the display.
BM-AUTO CTRL - Mon-Fr/Sa-su
Monday to Friday
Saturday to Sunday
Now you can select whether you wish to modify the release periods for “Monday to Friday…“ or
“Saturday to Sunday…“. For example, select “Monday to Friday” and the screen “BM AUTO CONTROL –
Mo-Fr” is shown on the display.
BM-AUTO CTRL - Mon-Fr
Release period 1: 07:00-09:00
Release period 2: 11:00-14:00
Release period 3: 17:00-22:00
2012
Flex Fuel Owner’s Manual
49
12: Bulk Materials Auto Mode
You can now enter up to three release periods for the weekdays Monday to Friday. If furnace operating
mode “Bulk materials auto control” is set, the furnace will only start on weekdays if a heating circuit
demand is present and a time release is given.
Once you have entered the desired release periods, briefly press the ESC button to quit the menu. The
selection menu “BM AUTO CONTROL – Mo-Fr/ Sa-Su” is shown on the display. The release periods for
Saturday and Sunday are set in the same manner.
BM-AUTO CTRL - Sa-Su
Release period 1: 07:00-09:00
Release period 2: 11:00-14:00
Release period 3: 17:00-22:00
Release Mode “Monday -Sunday”
Select release mode “Monday – Sunday” if you want to enter identical release periods for every day.
The screen “BM AUTO CONTROL – Mo-Su” is shown on the display:
BM-AUTO CTRL - Mo-Su
Release period 1: 07:00-09:00
Release period 2: 11:00-14:00
Release period 3: 17:00-22:00
You can now select up to three release periods. If furnace operating mode “Bulk materials auto control”
is selected and there is a call for heat, the furnace will start as soon as a time window
becomes active.
Release Mode “manual start”
If release mode “manual start” is selected, the ignition process is started immediately if the furnace
operating mode is set to “Bulk materials auto control“. This release mode does not require the presence
of a heating circuit demand. One should therefore ensure that there is sufficient demand. The only
condition for ignition is that the current furnace temperature is lower than the set “boiler target
temperature” less the set “starting difference”.
50
Flex Fuel Owner’s Manual
2012
12: Bulk Materials Auto Mode
Release Mode “acc. to date”
Select release mode “acc. to date” if the furnace should be started on a particular day. The screen “BM
AUTO CONTROL – acc. to date” is shown on the display:
BM-AUTO CTRL - acc.to date
Release period 1: 00:00-00:00
Release period 2: 00:00-00:00
Release period 3: 00:00-00:00
Date:
10.11.10
current date:
Tu 7.9.10
One can now set the exact date and time on which the ignition process should start. The ignition process
always requires a heating circuit demand to be present.
12.5 Activating “Bulk materials auto control”
Once you have filled the furnace with bulk materials and set the required release mode, furnace
operating mode “Bulk materials auto control” can be activated by following the instruction in section 10.
12.6 Status Lines for Operating Mode “Bulk materials auto control”
Boiler is switched off!
Furnace operating mode “Bulk materials auto control” has been set, however the furnace is still switched
off. Press and hold the control knob for 3 – 4 seconds to switch on the furnace.
Bulk materials auto control waiting for time release!
Automatic ignition of the furnace is delayed until the preset time window is active. If the time release is
active, the furnace will automatically start up (automatic ignition).
Availability!
The furnace automatically starts when there is a call for heat and the furnace temperature
is lower than the set “furnace target temperature” less the set “starting difference”.
Automatic ignition!
The furnace will automatically start up (automatic ignition) as soon as a heating circuit demand is
present and a time release has been issued. This will continue until the flue gas temperature exceeds the
factory default flue gas start temperature.
12.7 Automatic Change-Over of Furnace Operating Mode From “Bulk materials auto
control” to “Bulk materials”
The furnace operating mode is automatically changed from “Bulk materials auto control” to “Bulk
materials” when the factory default flue gas start temperature is exceeded. Re-activate operating mode
“Bulk materials auto control” if the material has fully burned and you want to recommence heating in this
furnace operating mode.
Combustion has been completed when the flue gas temperature falls below the factory default
switch-off temperature and the air factor value is above the factory default setting over a long
period (factory default setting 10 minutes). The status then switches to “Stop system!”.
2012
Flex Fuel Owner’s Manual
51
13: Pellets Auto Control
Note: Always ensure that the insert corresponding to the furnace operating mode is fitted and the
pellet slide and flap (sections 13.3) are in the correct position for the selected mode. Ensure that the
diverting valve has been properly set. (Section 5.4)
13.1 General Information
In operating mode “Pellets auto control” your furnace automatically runs on pellets fuel. The furnace
automatically starts when there is a call for heat. Once the call for heat has been met, the feed of pellets
is stopped and the furnace switches to standby mode. The start screen always indicates the furnace
operating mode which is currently set. If this is not set to “Pellets”, change the furnace operating mode as
described in section 10.
13.2 Pre-Firing Checks
Check the Firebox
Check that there are no foreign objects in the firebox and place the insert for Pellets Mode is in the
firebox. Ensure also that ash residues are removed from the firebox. In particular the insert should be free from residues so that a down-draft can be guaranteed. The ash residues can be guided into the
ash chamber through the insert using the fire irons. (Section 15)
Check the Primary Air Feed
To guarantee that your Flex fuel receives the oxygen feed necessary for ensuring clean burning, the two
air deflectors which are located on the right and left furnace side walls in the firebox must be checked or
cleaned with the fire irons. (Section 15)
Check the Ash Chamber
Check that there are no foreign objects inside the ash chamber and that the refractory is not damaged.
Any accessories such as ash trays, furnace utensils, etc. should not be in the ash chamber or firebox
during operation. Remove ash build up if needed. Close the ash door and ensure that it seals properly.
(Section 15)
Check the Pellet Slide
In pellets mode the slide must be installed and can be adjusted with an adjustment screw (section 13.3).
The feeder also has a swivel flap, which must be open for pellet operation.
Swivel Flap Closed
Swivel Flap Open
Pellet Slide
Pellet Slide Removed
Pellet Slide Attached
52
Flex Fuel Owner’s Manual
2012
13: Pellets Auto Control
Check Status Line(s)
Before starting the furnace in “Pellets Auto control” the furnace should be switched off.
Check Pellet supply
Your furnace operating mode is “Pellets - Manual Filling” meaning the operator must fill the hopper
manually. Open the cover of the pellet hopper and check the level of the pellets. Fill the hopper if
needed. Remember to check the level of the pellets daily under normal operating conditions.
Check the Insert
Check that the correct insert is installed in the firebox, and that the insert is free from any buildup that
may block air flow. Remove and clean the insert if needed. Below is the correct insert for this operating
mode.
13.3 Adjusting the Pellet Slide
The furnace must be running in “Pellets” mode to preform these adjustments. It is recommended that
there is a call for heat so the furnace will run continuously for an extended period to correctly adjust the
slide. This is intended to be a one time adjustment.
The pellet slide is used to guide the pellets fall into the center of the insert. The slope of the pellets slide
may be set using an adjustment screw which is accessible from the outside wall of the furnace. The lower
panel cover of the pellet feeder must first be removed to access the bolt. Undo the counter nut of
the adjustment bolt (Fig. 1) and then turn the screw to adjust the slope of the pellet slide. Note: The
adjustment bolt may be hot!
While the furnace is doing its initial fill adjust the slide so that the pellets fall into the center of the grate.
Then close the door to allow the ignition process to start.
Let the furnace run in Pellets mode for one hour and check the pile in the firebox. Do not leave the
firebox door open for an extended period or fan lag may be activated. If it looks like Fig. 2 with a nice
even burn around all the edges of the pile then no further adjustments are needed. If it does not adjust
the adjustment bolt in or out using fig. 3 and 4 as references.
Note: Monitoring can be activated and deactivated the same way Smoldering Gas Extraction
(section 11.4) is activated to prevent the furnace from shutting down and to vent the furnace.
2012
Flex Fuel Owner’s Manual
53
13: Pellets Auto Control
Adjustment Bolt (Fig. 1)
Correct Burn: no further
adjustments needed (Fig. 2)
Incorrect Burn: bolt is
too far out. (Fig. 3)
Incorrect Burn: bolt is
too far in. (Fig. 4)
Allow the furnace to burn for another 45 minutes and check the pile again. If it is still not burning in the
center adjust again. Repeat this process until the pile is evenly centered on the insert. Once this is
achieved lock the counter nut and replace the panel.
Check the slide adjustment once a month to ensure a proper burn.
Note: Adjusting the slide is a time consuming process.
Allow yourself at least 2.5 hours to correctly adjust the slide.
54
Flex Fuel Owner’s Manual
2012
13: Pellets Auto Control
13.4 Starting the Furnace in Operating Mode “Pellets auto control”
Setting the Furnace Operating Mode
Verify that the furnace operating mode is currently set to “Pellets auto control” . The operating mode line must read “Pellets“. If it is in “Bulk materials” , change the furnace operating mode as described on
section 10.
Switching the Furnace On
Switch on the furnace as described in section 7. The status line may be used at any time to verify the
current operating status. The furnace will now fire when there is a demand for heat.
13.5 Opening the Firebox Door During the “Start phase!” or in “Pellets mode”
Normally one should avoid opening the firebox doors for any length of time during the “Start phase!”
or in “Pellets mode!" since this alters measurements of the air factor or flue gas temperature and will not
guarantee correct regulation characteristics. The air factor and flue gas temperature are therefore
constantly monitored; the furnace will shut down if these values deviate from their expected values.
(status line “FGT-drop or air factor too high”) This monitoring function can be deactivated as it is
occasionally necessary to open the firebox doors and look inside the firebox. The monitoring function is
only active in operational states “Start phase!” or “Pellets mode!”.
If the start screen is shown on the display, press and hold the control knob for 3 to 4 seconds; the
following is then displayed: Flue gas and air factor monitoring has been de-activated!
The start screen is then displayed again. The user is also notified by the information message “Monitoring
deactivated!” above the usual status line.
The firebox doors can now be opened during operation without the furnace shutting itself
down. The monitoring function is manually activated by pressing and holding the ESC button or
automatically reactivated after 5 minutes.
The following message appears on the display for several seconds:
Flue gas and air monitoring has been re-activated!
The monitoring function has now been reactivated; do not re-open the doors during operation
(otherwise “FGT-drop or air factor too high! Fan lag!”).
2012
Flex Fuel Owner’s Manual
55
13: Pellets Auto Control
13.6 Status Lines for Operating Mode “Pellets auto control”
Boiler is switched off!
The furnace is switched off. If you want to start the furnace, switch it on as described in section 7.
Availability!
The furnace is in standby mode. All calls for heat have been met. The furnace will automatically start if:
• A demand is present for heat.
• the current furnace temperature is lower than the set “furnace target temperature“ less the set
“starting difference”.
Slider gate opens!
The furnace begins a pellets start. First the fuel shut off gate is opened. This takes approximately 3
minutes.
Lambda sensor heated!
The furnace starts up with a pellet start. First the Lambda sensor is heated. This process lasts for 80 seconds.
Boiler being filled!
As soon as the fuel shut off gate is opened and the Lambda sensor has been heated, the feed starts to
run and transports the fuel into the firebox. The duration of this first feeder pulse can vary between 30 and 200 seconds.
Note: Do not open the firebox door after this point. Doing so will cause the air factor to rise and the
furnace may auto shut down. You should not need to open the firebox door during any point of
operation under “Pellets auto control”
Ignition phase!
Once the insert is covered with pellets, the pellets are ignited by the igniter. The ignition pulse is
activated as soon as the air factor exceeds the factory default. This pulse is switched off after a set time
will completely shut off once the air factor falls to its factory default setting. The number of ignition
pulses can vary between 3 and 20. In addition new pellets are periodically fed into the firebox. The
ignition phase is complete when the re-calculated flue gas start temperature at every start is exceeded
and the air factor has remained lower that the factory default for approximately 2 minutes.
Start phase!
When all the ignition conditions have been fulfilled (flue gas has risen, low air factor), the furnace
switches to the “Start phase!“. The duration of the “Start phase!” is limited to 10 - 20 minutes. The speed of
the induced draft fan increases during the start phase and the pellet fill level in the firebox is regulated
depending on the measured air factor. Once the “Start phase!” has finished, the operating status
switches to “Pellets mode!”.
56
Flex Fuel Owner’s Manual
2012
13: Pellets Auto Control
Pellets mode!
The furnace regulates in “Pellets mode!” as long as there is a call for heat and the furnace temperature is
lower than the set “boiler target temperature“. The speed of the induced draft fan and the pellets fill
level in the firebox will vary depending on the measured furnace temperature, flue gas temperature and
air factor. Once the call for heat has been met, the furnace switches off and outputs the
message “No request! Fan lag!”.
No request! Fan lag!
All calls for heat has been met; the furnace completes “Pellets mode!” by initiating “Fan lag!”. Fan
lag ends when the flue gas temperature falls below the factory default switch-off threshold and the
preset run-on time has elapsed. The furnace then switches to standby mode (“Availability!”) and
automatically restarts when there is a call for heat.
Required boiler temperature is reached! Fan lag!
The set furnace target temperature has been reached. The furnace completes “Pellets mode!” by
initiating “Fan lag!”. Fan lag ends when the flue gas temperature falls below a preset threshold and the
subsequent run-on time has elapsed. The furnace then switches to standby mode (“Availability!”) and
automatically restarts when there is a call for heat.
Boiler is switched off! Fan lag!
The furnace was switched off in operational state “Ignition phase”, “Start phase!” or “Pellets mode!”. The
furnace completes pellets operation by initiating “Fan lag!”. Fan lag ends when the flue gas temperature
falls below the switch-off threshold and the run-on time has elapsed. The furnace then switches to
operational status “Boiler is switched off!“. Only when the operational status “Boiler is switched off!” has
been reached is it possible to switch the furnace back on in operating mode “Pellets auto control”.
Heat exchanger cleaning required! Fan lag!
The furnace will quit pellets mode to perform the heat exchanger cleaning. Fan lag ends when the flue
gas temperature falls below the switch-off threshold and the run-on time has elapsed. The furnace then
automatically cleans its heat exchanger and automatically restarts if a heating circuit demand is present.
Heat exchanger cleaner waiting to be released!
The furnace requires heat exchanger cleaning, before it can start but is still waiting for a release.
Heat exchanger cleaning is released if:
• a time release is set
• the furnace has cooled
• the flue gas temperature is below the factory default release point
Heat exchanger cleaning is active!
The furnace is carrying out its heat exchanger cleaning. The duration of the cleaning impulse is system
specific and can vary between 3 and 20 minutes. After the end of cleaning, the furnace starts
automatically once a heating circuit demand exists.
2012
Flex Fuel Owner’s Manual
57
13: Pellets Auto Control
FGT-drop or AR too high! Fan lag!
The flue gas temperature during the “Start phase!” or in “Pellets mode!” has noticeably dropped or the
measured air factor was noticeably high.
Possible reasons for these noticeable effects could be:
• The firebox door or ash door was opened during the “Start phase!” or in “Pellets mode!” without
deactivating the “Flue gas and air factor monitoring” function.
• The pellet hopper is empty. Check whether there are sufficient pellets.
• The ash chamber or flue pipe is full of ash. Switch off and clean the furnace as soon as operating
status “Boiler is switched off!” is displayed.
• The pellets insert is covered with ash or foreign objects and should be cleaned. Switch off the furnace
and wait until operating status “Boiler is switched off!” is displayed. Then clean the pellets insert.
The furnace completes “Pellets mode!” by initiating “Fan lag!”. Fan lag ends when the flue gas
temperature falls below the factory default switch-off threshold and the run-on time has elapsed. The
furnace then switches to standby mode (“Availability!”) and automatically restarts when a heating circuit
demand is present.
Flue gas temperature too low! Fan lag!
In automatic mode (pellets) the flue gas temperature has not exceeded a necessary threshold or has
fallen below the threshold for a long time. The furnace turns off after a fan lag. Wait until the lag period
expires (the duration is system dependent and varies between 10 and 40 minutes). At the end of this lag,
an error message appears on the display:
FLUEGASTEMPERATURE TOO LOW!
Wait till the boiler is
cooled down! Please clean
the combustion chamber, the
boiler plate, the flue pipe
and switch the boiler on
again!
Boiler temperature:
Flue gas temperature:
Air factor
58
XXºF
XXºF
X.XX
The most probable cause of this error message may be a faulty air supply. Wait until the furnace has
cooled down and is switched off. Then clean the firebox, primary air deflectors, insert, ash chamber and
the flue pipe. Press the control knob to restart the furnace.
Flex Fuel Owner’s Manual
2012
13: Pellets Auto Control
Feeder temperature too high! Fan lag!
The temperature monitor in the feeder has measured an over temperature. Fan lag is activated and the
feeder is emptied. The fan lag cycle (duration 10 – 30 minutes) is completed even if the feeder
temperature drops again.
The furnace starts automatically if the feeder temperature has dropped when the fan lag cycle has
completed. If the feeder temperature remains too high, fan lag is activated and the feeder is emptied.
Air factor too high! Fan lag!
The status line “Air factor too high! Fan lag!” occurs if the air factor remains above 5.00 for approximately
1 minute in “Pellets mode” or during the start phase.
Possible reasons as to why the air factor increases in “Pellets mode” or during the start phase:
• You have opened the firebox door or the ash door either in the start phase, or in “Pellets mode” without
deactivating the “Flue gas and air factor monitoring”.
• The pellet reservoir is empty. Check that sufficient fuel is available.
• The feed runs slowly and is blocked.
• The insert is worn or the fuel has a very high dust fraction so that a lot unburned material falls through
the insert.
• The insert is clogged with ash, foreign bodies, etc, and should be cleaned. Switch the furnace off, wait
until the operating status “Boiler off” is displayed and the furnace to cool, then clean the insert.
The furnace completes “Pellets mode!” by initiating “Fan lag!”. Fan lag ends when the flue gas
temperature falls below the factory default switch-off threshold and the run-on time has elapsed. The
furnace then switches to standby mode (“Availability!”) and automatically restarts when a heating circuit
demand is present.
Ignition time elapsed! Fan lag!
The furnace could not be ignited in the required time (factory default setting 50 minutes). The furnace
completes pellets mode by initiating fan lag. Fan lag ends when the flue gas temperature falls below the
factory default switch-off threshold and the run-on time has elapsed.
A fault message is then shown on the display. Check possible causes of the ignition fault before
acknowledging the message and restarting the furnace.
IGNITION NOT POSSIBLE!
Press START to start up the
boiler and STOP to Switch off
the boiler!
Boiler temperature:
Flue gas temperature:
Air factor
2012
XXºF
XXºF
X.XX
Flex Fuel Owner’s Manual
59
13: Pellets Auto Control
Possible reasons why an ignition fault may be caused:
• The ash chamber or flue pipe is covered in ash.
• The ash door and/or firebox door are not fully closed.
• The igniter is defective.
• One (or more) conveyor screws are defective (pellet arm, hopper screw).
• The pellets insert is contaminated with dirt and should be cleaned.
• The installation was not approved by WoodMaster. The commissioning procedure should be per
formed to ensure optimum system operation.
Before restarting the furnace after the ignition fault has been rectified, ensure there are no unburned
pellets in the insert. If this is the case, clean the grate before restarting the furnace.
Feed blocked or overloaded!
The furnace is currently in automatic mode (Pellets) and the feed is blocked (current draw too high) or is
overloaded (no current draw). If this error is detected more than once, the furnace turns off.
Fan lag! Please wait!
Fan lag has been activated for no apparent reason. Possible causes:
• Power outage
• The safety temperature limiter tripped and has just been reset.
Wait for the run-on cycle to finish (10 – 30 minutes), the furnace will automatically start afterwards.
Note: Fan lag cannot be aborted! The run-on timer is restarted after every power outage.
It can therefore not be shortened by unplugging the mains connector.
Monitoring deactivated!
Flue gas and air factor monitoring was deactivated in “Pellets mode!” or during the “Start phase!”. The
firebox doors can now be opened during operation without the furnace shutting itself down. The monitoring function is automatically reactivated after 5 minutes or manually activated by
pressing and holding the ESC button.
Safety chain is open!
Your furnace is fitted with a safety chain that is currently open. This safety chain is attached to sensor
input “Circulation sensor” on the I/O Board (section 5.6). Close the safety chain and the furnace will
automatically start.
60
Flex Fuel Owner’s Manual
2012
14: Buffer/Thermal Storage
If a buffer is available, the following figure appears on the screen of the actual values of
individual system components. To access the buffer settings turn the control knob while on the start
screen until the following screen appears.
Actual Counter (Buffer 1 To 4)
BUFFER
Top Buffer Temperature
Bottom Buffer Temperature
1
120ºF act. release: always On
Pump:
Off
Request in:
Off
Request
out:
Off
70ºF
Boiler
88ºF
Actual Release
Pump Status
Shows If Buffer Gets A
Request From A Component
Show If Buffer Sends Request
To First Energy Source
Actual Temperature Of Set
Buffer Energy Source
Set Buffer Energy Source
If you would like to check and/or change your buffer settings, press the control knob. The menu
“BUFFER - Settings” will appear on the screen.
14.1 Buffer Settings
BUFFER - Settings
min buffer temp top:
110ºF
max buffer temp bottom: 123ºF
Buffer difference:
8ºF
Release type:
w clock
Release period 1: 17:00-20:00
Release period 2: 00:00-00:00
Release period 3: 00:00-00:00
Minimum Buffer Temperature: Top
(The temperature can be adjusted from 0 - 131 °F)
If the buffer is released chronologically and if the “buffer temperature, top” is less than the minimum
buffer temperature, the furnace is started and the buffer is loaded. If the heater is active, the heating
cycle pumps are switched on as soon as the buffer temperature is greater on the top than the set “min.
buffer temperature, top”.
Maximum Buffer Temperature: Bottom
(The temperature can be adjusted from 0 - 194 °F)
The buffer is charged until the “buffer temperature bottom” is greater than the set “max. buffer
temperature, bottom”, if the buffer has a chronological release.
Buffer Difference
(The temperature can be adjusted from 0 - 68°F)
The buffer difference temperature is the temperature by which the buffer temperature, top may be less
than the required flow temperature before the furnace is started (with furnace operating modes “Pellets auto control” and “bulk material auto control”).
2012
Flex Fuel Owner’s Manual
61
14: Buffer/Thermal Storage
Release Method
You may select 3 different types of releases for the buffer. Likewise, the release type only has an affect in
the furnace operating modes "Pellets automatic", and "Bulk materials-automatic".
Always Off
If you select always off, the buffer is not charged to its required temperature. The buffer is maintained
above 50 °F in the freeze protection mode (outside temperature is lower than auto freeze protection
temp. Refer to general heating cycle 1 settings).
Always On
The buffer temperature is recharged if the buffer temperature top has dropped below the set minimum
buffer temperature top.
With Clock
The buffer is only recharged within the set release periods, if its buffer temperature top has dropped
below the set minimum buffer temperature top.
Release Period 1 to 3
You can set 3 different release periods for the buffer from 0:00 to 24:00 hours. If you do not require all
release period, set the starting and ending value to the same setting value in order to deactivate this
release period.
62
Flex Fuel Owner’s Manual
2012
15: Maintenance
15.1 General Information
Note: The Owner/Operator must follow any local and state codes/laws concerning
the operation of a wood fired furnace.
The operator must follow the guidelines for furnace operation as stated in this Owners Manual.
The Correct function of the safety devices should be checked before every heating period and after
a system fault.
Your Flex fuel should be serviced by your dealer once every three years or following any faults.
The water in your furnace must be tested every year, and treated or replaced if necessary.
Weekly visual inspections for any leaks, corrosion or ash build up should be preformed.
15.2 Cleaning the Furnace
• Disconnect the power source prior to cleaning. Never clean your furnace during operation.
• Wait for the furnace to cool before cleaning the furnace.
• Correctly dispose of the ashes in a sealed metal container away from flammable materials.
• Cleaning intervals will vary depending on the quality of the fuel being used.
Cleaning Intervals
• Air Feed: As required following visual inspections
• Ash Chamber: Every 2 weeks
• Heat Exchanger: Automatic
Cleaning the Air Passages
Before firing the furnace, check that all the air openings above the grate are free of ash. It may be
necessary to use the ash scraper to open them. Regularly check that the air openings are not clogged
with tar. Manually clean the turbulators every 4000 hours. If necessary scrape the primary air feed
openings inside the firebox with the ash scraper to maintain air flow.
Primary Air Feed
2012
Flex Fuel Owner’s Manual
63
15: Maintenance
Cleaning the Ash Chamber
• Check that the furnace is not operational and is cool
• Open the outer enclosure door
• Open the ash chamber door
• Push the ash tray onto the bottom door frame
• Use the ash scraper to carefully pull the ash onto the ash tray. Leave approximately .5 in of ash in the
entire bottom of ash chamber to extend the life of the refractory
• Carefully remove the filled ash try and empty it into a metal container for final disposal
• Clean the area around the door seal to ensure the door closes properly
• Close the ash door, making sure the door is closed tight
Cleaning the Heat Exchanger
Heat exchanger cleaning is automatically activated by the Eco manager. The heat exchanger
cleaning can be manually activated in the Output Test screen. (section 9)
Cleaning the Furnace Surface
Only use a damp cloth to clean the surface of the furnace. A mild soap may be used if needed. DO NOT
use harsh chemicals or abrasive material.
Cleaning the Flue Pipe
Ash should be removed from the flue pipe through the cleaning openings approximately 2 times a year.
Annual Buffer Tank Blow Down
Water should be drained from the bottom of the buffer tank to remove any sediment buildup. The water
should drain until it runs clear, approximately 2 gallons, depending on tank size. A sample of water
should be tested to determine if the water should be replaced.
Annual Furnace Water Jacket Blow Down
Water should also be drained from the bottom of the furnace to remove any sediment buildup. The
water should drain until it runs clear, approximately 2 gallons. You can also completely drain and
flush your furnace separate from the rest of the system.
Annual Water Testing
After the Blow Down procedure is preformed on the furnace, a sample of water is to be taken from the
bottom of the furnace. A water testing kit and mailing instructions is available at your dealer. Failure to
preform this test annually will result in a voided warranty.
64
Flex Fuel Owner’s Manual
2012
15: Maintenance
Notes:
2012
Flex Fuel Owner’s Manual
65
16: Error Messages
If a malfunction occurs, the error message is directly displayed on the screen.
The red LED of the ESC key is switched on.
MAIN FUSE FAULTY!
Follow the instructions in the
operating manual and replace
the main fuse!
The boiler will be operational
again once its run-on time has
expired!
Boiler temperature:
Flue gas temperature:
Air factor
Error
Instructions
XXºF
XXºF
X.XX
The following error messages can appear:
Main fuse faulty!
The I/O Board is fitted with a fuse (10A slow-blow) to protect the controller. If this is faulty, replace the
fuse with the spare fuse located immediately next to the mains fuse on the I/O Board (section 5.6).
Additional replacement fuses can be obtained at your Woodmaster Flex Fuel Dealer.
Disconnect the furnace from the main power supply before replacing the main fuse (unplug the main
connector or switch off the main circuit breaker for the heating system).
Reconnect the furnace to the main after the mains fuse has been replaced. The error
message will disappear and the furnace is operational again after the run-on time has elapsed.
Triac fuse faulty!
The I/O Board is fitted with a fuse (10A FF) to protect the triac outputs. If this is faulty, replace the fuse
with the spare fuse located above and to the side of the triac fuse on the I/O Board (section 5.6).
Additional replacement fuses can be obtained at your Woodmaster Flex Fuel Dealer.
Disconnect the furnace from the main power supply before replacing the triac fuse (unplug the main
connector or switch off the main circuit breaker for the heating system).
Reconnect the furnace to the main power supply after the triac fuse has been replaced. The error
message will disappear and the furnace is operational again after the run-on time has elapsed.
Ignition fault BM auto control!
The bulk materials auto control function could not fulfill the change-over conditions for bulk
materials within the specified time (factory setting 45 minutes).
Press any button to acknowledge the error message and observe the current furnace status on the status
line. Since the furnace operating mode changes to bulk materials when the fault occurs, it may be that
the material had already started to burn and that combustion was successfully completed or is still
ongoing.
66
Flex Fuel Owner’s Manual
2012
16: Error Messages
Safety temperature limiter has tripped!
The furnace temperature can rise above 194 °F if there is a sudden reduction in heat demand.
In this case the built-in safety temperature limiter will trigger a fast shutdown of the furnace.
Fault rectification
1. Wait until the furnace temperature falls below158 °F.
2. Unscrew the screw cap on the safety temperature limiter (located in front of the display) and briefly press the reset button with a small, pointed object to reset the safety temperature limiter. Screw the
screw cap back onto the safety temperature limiter.
3. Press the control knob on the display. The induced draft fan runs down (“Fan lag! Please wait!”).
4. Press and hold the control knob for three seconds. The furnace will then be operational again.
Induced draft fan fault!
The induced draft fan has caused an error.
The following potential causes could result in this error message:
• Fault or loose cabling on fan motor
• The induced draft fan is jammed
• The induced draft fan is faulty
Press Start to activate the fan run-on time (approximately 20 minutes). If combustion is still in progress,
the furnace automatically switches to “Bulk materials” mode, otherwise the fan completes its fan lag
cycle and the furnace shuts down. Press the ESC button to switch off the furnace!
Feed blocked or overloaded!
The causes for this error message could be:
• the feed motor is defective or blocked
• the insert is dirty
• the firebox is overfilled
• the feed motor is incorrectly connected or not connected at all
• blockage at the transfer station between the pellet arm and hopper
If the cause of the feed motor blockage is overfilling of the firebox, then let the furnace burn
out. After the furnace has cooled, check the insert for contamination (cinders, unburned pellets …) and
clean if necessary. After the control knob is pressed, the furnace starts as soon as a system component
makes a request. If the error message occurs again upon the next start attempt, then press the ESC key
and inform an authorized WoodMaster Flex fuel Dealer.
2012
Flex Fuel Owner’s Manual
67
16: Error Messages
Burn back damper blocked!
The burn back damper could not be fully opened during pellets start.
Possible causes of this error message:
• Functional fault of the burn back damper (mechanical or electrical)
• Blockage near the burn back damper
If it was possible to clear the cause of the fault, press the Control Knob, otherwise switch off the furnace
using the ESC button and notify your WoodMaster Flex fuel Dealer.
Ignition not possible!
The ignition procedure in pellets operation could not be completed in the specified time! The
furnace will shut itself down after the fan lag time has elapsed. The error message “IGNITION
NOT POSSIBLE” will be shown on the display.
Causes of this error message:
• No pellets in hopper
• Incorrect or slag-covered insert in firebox
• Furnace not adequately cleaned (ash, heat exchanger)
• Mechanical or electrical causes (conveyor motors, igniter)
If it was possible to clear the cause of the fault, press the Control Knob, otherwise switch off the furnace
using the STOP button and notify your WoodMaster Flex fuel Dealer.
Break of feed sensor!
The selected furnace operating mode is set to “Pellets-automatic” and the feed sensor has been
retracted or has a break. The furnace operating mode is automatically reset to “Bulk materials”.
Check whether the feed sensor is correctly connected to the I/O Board (section 5.6)
of the Flex fuel. If you have checked that the cabling is correct, please contact your WoodMaster Flex fuel
Dealer.
Flue gas temperature too low!
In automatic mode (pellets) the flue gas temperature has not exceeded a necessary threshold or has
fallen below the threshold for a factory set amount of time. The furnace then turns off after a fan lag.
At the end of this lag, this error message appears on the display:
The most probable cause of this error message is a faulty air supply.
Wait until the furnace has cooled down and clean the firebox (primary air deflectors,
insert), ash chamber and flue pipe.
To restart the furnace, please press the control knob.
68
Flex Fuel Owner’s Manual
2012
17: Troubleshooting
Note: Most problems can be resolved by following the on screen instructions. If you encounter a problem that is not resolved on screen or by the owners manual, please contact your
WoodMaster Flex fuel dealer.
Problem
Cause/Solution
Heating system is
not working
Check power connection
Furnace emergency switch is deactivated
Refer to section 23
Activate furnace
Furnace is producing
excessive smoke
Furnace is in part load mode. Do not add more wood until there is sufficient
demand for a full burn.
Furnace is loaded with green wood. Check the moisture content of the wood
that is being used. It must be under 25%.
Bulk materials cavitate
in the firebox
The fuel may be binding on the sides of the firebox. Check that the fuel
used is within the recommended length and is not contacting the walls with
the cut ends.
The furnace has operated in Part Load for an extended period of time. This
can cause the fuel to burn unevenly and can cause pockets to form. Only
fill and fire the furnace when a full burn can occur.
Furnace is not producing
the desired BTU output.
Different types of wood contain different amounts of stored energy. Higher
quality woods such as oak will yield a higher output. If the furnace is being
operated on pellets, different grades and brands of pellets will produce
more/less heat. Please contact your WoodMaster Flex fuel Dealer for different
pellet options.
The furnace does not
The size of bulk material pieces is to large. Medium sized seasoned wood
completely burn all the
burns the most complete. Reduce the size of the pieces if necessary.
fuel in Bulk Materials Mode
Round, unsplit wood may also not burn completely. Used only split wood for
future burns.
2012
Flex Fuel Owner’s Manual
69
18: Specifications
Flex fuel 30 kW
Maximum Current Draw
Average Daily Power Consumption
Max Heat Capacities
Overall Furnace Size
Flex fuel 60 kW
15 Amps @ 120v 60hz. Note: only happens when all components are running, which rarely occurs
2.8 kilowatts per day = less than 1 amp
100,000 btu/h
200,000 btu/h
24”W x 48”L x 54”T (W/O Display) 32.5”W x 60”L x 60”T(W/O Display)
Firebox Dimensions
22.5”L x 14”W x 25”T
26.5”L x 22”W x 28”T
Firebox Door Frame
13.5”W x 9.5”T
21.5”W x 10”T
1225lbs.
1800lbs.
24 Gallons
50 Gallons
Shipping Weight
Water Capacity
Hopper Capacity (Optional)
350 pounds (Max)
Fuel Types
Bulk Materials (Wood); Pellets (Optional)
Refueling
Bulk Materials: Manual; Pellets Auto feed from hopper
Core Furnace Material Thickness
1/4” Firebox, 1/8” Water Jacket
Fan Induced
Draft Control
Water Temperature Control
Eco manager - Digital Display
Measurements and capacities are approximate due to tolerances.
Serial Numbers for Furnace and Accessories
Furnace
Buffer Tank(s)
Expansion Tank
Pellet Accessory
Igniter Accessory
70
Flex Fuel Owner’s Manual
2012
WoodMaster FLEX FUEL Warranty
NORTHWEST MANUFACTURING, INC.
600 Polk Ave. SW – Red Lake Falls, MN 56750
Toll free (800) 932-3629 or (218) 253-4328
Ten-Year Warranty on Firebox and Water Jacket
Northwest Manufacturing, Inc. of Red Lake Falls, MN 56750 warrants material and labor on any defects in workmanship on
the firebox and water jacket for a period of ten (10) years from the purchase date to the original owner only. If there is a leak in your
properly delivered and installed WoodMaster Flex Fuel furnace in the first year, WoodMaster will replace the furnace at no cost to the
original owner. (A leak means; a leak in the firebox or water jacket.) Northwest Manufacturing, Inc. will not be responsible for
environmental conditions we cannot control. Therefore, Northwest Manufacturing, Inc. will only pay these percentages of costs of
warranty work per year, years two (2) through five (5) – 100% of warranty work, the sixth (6) year – 70% of warranty work, the
seventh (7) year – 60% of warranty work, the eight (8) year – 40% of warranty work, the ninth (9) year – 20% of warranty work, the
tenth (10) year – 10% of warranty work. After the tenth year Northwest Manufacturing, Inc. provides no other warranty.
A blow down of the furnace and tank must be performed yearly after each heating season and every six months if the furnace
is used year round. After the furnace has had a blow down performed, an annual water test must be taken and immediately treat and
refill the furnace. Failure to send in a water sample annually will void the warranty.
This warranty is limited to defective parts – repair and/or replacement only, and excludes any incidental and consequential
damages connected therewith. Northwest Manufacturing, Inc. is not responsible for replacement of water, water treatment, antifreeze,
costs of transportation, or shipping charges.
WoodMaster will not cover any construction or modification costs due to the furnace being in a non-accessible area. Any
construction or modification costs are the customer’s responsibility. (Example: We will not pay to remove the furnace out of a
basement or crawl space.)
WARNING: Northwest Manufacturing, Inc. will not warranty the inside of firebox due to ash corrosion. Ashes must be
taken care of as displayed on the maintenance list located in your owner’s manual. The firebox must be completely cleaned of all
ashes and creosote a minimum of two (2) times per year, preferably half way through the heating season and immediately after the
heating season. If the furnace is being used year round, more maintenance is required thus the firebox must be completely cleaned of
all ashes and creosote a minimum of four (4) times per year. Installation of an approved Class “A” insulated chimney and chimney cap
must be used.
Two Year Warranty on Additional Components – Parts and Labor
Northwest Manufacturing, Inc. warrants to the original owner only, any additional components, including, but not limited to
the outer shell, paint, insulation, doors and latches during normal usage for a period of two (2) years from the date of purchase.
One-Year Warranty on Electrical Components – Parts and Labor
Northwest Manufacturing, Inc. warrants to the original owner only, any electrical components in the furnace that is defective
during normal usage for a period of one (1) year from the date of purchase.
Additional Components & Warranty Guidelines.
Northwest Mfg. Inc. will warranty all thermal storage tanks on the WoodMaster Flex Fuel Furnace for a period of one (1)
year. If there is a leak in your properly delivered and installed WoodMaster Flex Fuel Thermal Storage Tank within the first year,
WoodMaster will repair the tank at no cost to the original owner.
Northwest Manufacturing, Inc. will warranty for a period of one (1) year, any factory defects in materials or workmanship to
the wood pellet or wood chip auger attachments and inserts for the WoodMaster Flex Fuel.
High temperature refractory materials are not covered under these warranties. In use, small cracks can occur with these
products and will not change the performance of the furnace.
Parts will be replaced on an even exchange basis. These warranties apply only if the device is installed and operated as
defined in the Owner’s Manual.
WoodMaster Furnaces are not intended to be the only source of heat; therefore a backup system should be in place to prevent
any damage caused by lack of heat.
Your dealer may charge you for a service call to do warranty work.
Damage caused by abuse, accidents, improper installation, overheating, corrosion, freezing, negligence, or excess creosote
buildup will not be covered under warranty. Damage caused by burning flammable materials (such as petroleum products), or green
wood will not be covered under warranty.
Antifreeze – Only nontoxic antifreeze is acceptable. Antifreeze will break down over a period of time and therefore should
be tested annually. Always dispose of antifreeze by state and local codes. Loss of antifreeze under any condition will not be covered.
How to file a claim – ANY CLAIM UNDER THIS WARRANTY MUST BE MADE TO YOUR DEALER.
Customer’s Name ________________________________ Dealer’s Name _____________________________
Customer’s Signature _____________________________ Dealer’s Signature __________________________
OWNER’S REGISTRATION CARD
Name _________________________________________
Address _______________________________________
_______________________________________________
Installed by:
Dealer
If customer, was installation explained to you?
Yes
Phone ________________________________________
Email ________________________________________
House/Garage
Shop/Shed
Greenhouse
Kiln
Other ____________________________
Model No. ______________________________________
(Model and serial numbers are located on the decal on furnace.)
Dealer’s Name __________________________________
No
Type of Installation:
Date of Purchase ________________________________
Serial No. ______________________________________
Customer
Purchased:
With Pellet Arm
Without Pellet Arm
With Igniter
Without Igniter
PLACE
POSTAGE
HERE
Northwest Manufacturing Inc.
600 Polk Ave. SW
Red Lake Falls, MN 56750
Cut here and mail registration card
Northwest Manufacturing Inc.
600 Polk Ave. SW
Red Lake Falls, MN 56750
19: Warranty
WoodMaster FLEX FUEL Warranty
NORTHWEST MANUFACTURING, INC.
600 Polk Ave. SW – Red Lake Falls, MN 56750
Toll free (800) 932-3629 or (218) 253-4328
Ten-Year Warranty on Firebox and Water Jacket
Northwest Manufacturing, Inc. of Red Lake Falls, MN 56750 warrants material and labor on any defects in workmanship on
the firebox and water jacket for a period of ten (10) years from the purchase date to the original owner only. If there is a leak in your
properly delivered and installed WoodMaster Flex Fuel furnace in the first year, WoodMaster will replace the furnace at no cost to the
original owner. (A leak means; a leak in the firebox or water jacket.) Northwest Manufacturing, Inc. will not be responsible for
environmental conditions we cannot control. Therefore, Northwest Manufacturing, Inc. will only pay these percentages of costs of
warranty work per year, years two (2) through five (5) – 100% of warranty work, the sixth (6) year – 70% of warranty work, the
seventh (7) year – 60% of warranty work, the eight (8) year – 40% of warranty work, the ninth (9) year – 20% of warranty work, the
tenth (10) year – 10% of warranty work. After the tenth year Northwest Manufacturing, Inc. provides no other warranty.
A blow down of the furnace and tank must be performed yearly after each heating season and every six months if the furnace
is used year round. After the furnace has had a blow down performed, an annual water test must be taken and immediately treat and
refill the furnace. Failure to send in a water sample annually will void the warranty.
This warranty is limited to defective parts – repair and/or replacement only, and excludes any incidental and consequential
damages connected therewith. Northwest Manufacturing, Inc. is not responsible for replacement of water, water treatment, antifreeze,
costs of transportation, or shipping charges.
WoodMaster will not cover any construction or modification costs due to the furnace being in a non-accessible area. Any
construction or modification costs are the customer’s responsibility. (Example: We will not pay to remove the furnace out of a
basement or crawl space.)
WARNING: Northwest Manufacturing, Inc. will not warranty the inside of firebox due to ash corrosion. Ashes must be
taken care of as displayed on the maintenance list located in your owner’s manual. The firebox must be completely cleaned of all
ashes and creosote a minimum of two (2) times per year, preferably half way through the heating season and immediately after the
heating season. If the furnace is being used year round, more maintenance is required thus the firebox must be completely cleaned of
all ashes and creosote a minimum of four (4) times per year. Installation of an approved Class “A” insulated chimney and chimney cap
must be used.
Two Year Warranty on Additional Components – Parts and Labor
Northwest Manufacturing, Inc. warrants to the original owner only, any additional components, including, but not limited to
the outer shell, paint, insulation, doors and latches during normal usage for a period of two (2) years from the date of purchase.
One-Year Warranty on Electrical Components – Parts and Labor
Northwest Manufacturing, Inc. warrants to the original owner only, any electrical components in the furnace that is defective
during normal usage for a period of one (1) year from the date of purchase.
Additional Components & Warranty Guidelines.
Northwest Mfg. Inc. will warranty all thermal storage tanks on the WoodMaster Flex Fuel Furnace for a period of one (1)
year. If there is a leak in your properly delivered and installed WoodMaster Flex Fuel Thermal Storage Tank within the first year,
WoodMaster will repair the tank at no cost to the original owner.
Northwest Manufacturing, Inc. will warranty for a period of one (1) year, any factory defects in materials or workmanship to
the wood pellet or wood chip auger attachments and inserts for the WoodMaster Flex Fuel.
High temperature refractory materials are not covered under these warranties. In use, small cracks can occur with these
products and will not change the performance of the furnace.
Parts will be replaced on an even exchange basis. These warranties apply only if the device is installed and operated as
defined in the Owner’s Manual.
WoodMaster Furnaces are not intended to be the only source of heat; therefore a backup system should be in place to prevent
any damage caused by lack of heat.
Your dealer may charge you for a service call to do warranty work.
Damage caused by abuse, accidents, improper installation, overheating, corrosion, freezing, negligence, or excess creosote
buildup will not be covered under warranty. Damage caused by burning flammable materials (such as petroleum products), or green
wood will not be covered under warranty.
Antifreeze – Only nontoxic antifreeze is acceptable. Antifreeze will break down over a period of time and therefore should
be tested annually. Always dispose of antifreeze by state and local codes. Loss of antifreeze under any condition will not be covered.
How to file a claim – ANY CLAIM UNDER THIS WARRANTY MUST BE MADE TO YOUR DEALER.
2012
Flex Fuel Owner’s Manual
75
May quality, workmanship and on going product enhancement never be just
a passing thought, but rather an everyday tangible aspect, that improves the
lives of our employees, dealers, and customers alike.