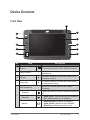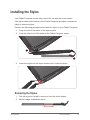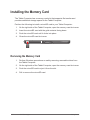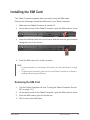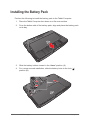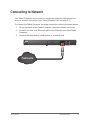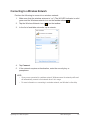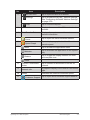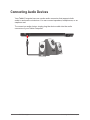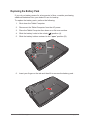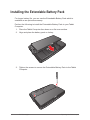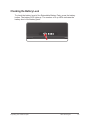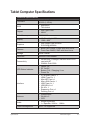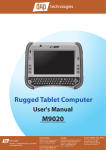
1
2.0MP
Rugged Tablet Computer
User's Manual
MT1010
Toll Free : +1 (855) DAP-TECH (327-8324)
www.daptech.com
United States
Canada
Europe, Middle East, Africa
8945 South Harl Avenue, Suite 112
Tempe, Arizona, 85284 USA
Phone: +1 (855) DAP-TECH
4535 Wilfrid Hamel Blvd., Suite 100
Quebec City, QC Canada G1P 2J7
Toll Free: +1 (800) 363-1993
Phone: +1 (418) 681-9394
Fax: +1 (418) 681-0799
9 The Chambers, Vineyard
Abingdon UK OX14 3PX
Phone: +44 (0) 1235 462130
Fax: +44 (0) 1235 462131
2915 Premiere Parkway, Suite 300
Duluth, Georgia, 30097 USA
Phone: +1 (855) DAP-TECH
Copyright © 2014 DAP Technologies. All rights reserved.
No part of this manual may be reproduced, copied, translated, or transmitted in any form or by any
means, electronic or mechanical, for any purpose, without the written permission of DAP Technologies.
TRADEMARKS
All product names, trademarks or logos mentioned herein are the properties of their respective
owners.
Microsoft, Windows, and the Windows logo are either registered trademarks or trademarks of
Microsoft Corporation in the United States and/or other countries. Microsoft products are licensed to
OEMs by Microsoft Licensing, Inc., a wholly owned subsidiary of Microsoft Corporation.
The Bluetooth® word mark and logos are registered trademarks owned by Bluetooth SIG, Inc.
All other brand and product names are trademarks or registered trademarks of their respective
owners.
NOTE:
Display images shown may vary slightly from actual display. Information in this manual is subject to
change without notice.
DISCLAIMER
DAP Technologies reserves the right to make any product changes without notice, including circuits
and/or software described or contained in this manual in order to improved design and/or performance.
DAP Technologies assumes no responsibility or liability for the use of the described product(s),
conveys no license or title under any patent, copyright, or masks work rights to these products, and
makes no representations or warranties that these products are free from patent, copyright, or mask
are for illustration purposes only. DAP Technologies makes no representation or warranty that such
application will be suitable for the specified use without further testing or modification.
WARRANTY
DAP Technologies warrants that each of its products is free from material and workmanship defect
for a period of one year starting from the invoice date. If the customer discovers a defect, DAP
Technologies will, at its option, repair or replace the defective product at no charge to the customer,
provided it is returned during the warranty period, with transportation charges prepaid. The returned
product must be properly packaged in its original packaging to obtain warranty service.
Contents
Preface...................................................................................................v
Notational Conventions.....................................................................vi
Getting Started..................................................................................... 1-1
Unpacking.........................................................................................1-2
Optional Items............................................................................1-2
Device Overview...............................................................................1-3
Front View..................................................................................1-3
Rear View (Standard Model).....................................................1-5
Rear View (Expanded Model)....................................................1-7
Top and Bottom View.................................................................1-9
Left and Right Views..................................................................1-10
Installing the Stylus...........................................................................1-11
Removing the Stylus..................................................................1-11
Installing the Memory Card...............................................................1-12
Removing the Memory Card......................................................1-12
Installing the SIM Card......................................................................1-13
Installing the Battery Pack.................................................................1-14
Connecting to Network......................................................................1-15
Connecting to AC Power...................................................................1-16
Turning the Tablet Computer On and Off..........................................1-17
Turning On.................................................................................1-17
Turning Off.................................................................................1-18
DAP Technologies
i
Operating Your Tablet
Computer.............................................................................................. 2-1
Using the Touch Screen....................................................................2-2
Calibrating the Screen...............................................................2-3
Using the Input Panel........................................................................2-4
Opening the Input Panel............................................................2-5
Managing the Input Panel..........................................................2-5
Using the Panel Keys........................................................................2-6
Adjusting Volume.......................................................................2-6
Adjusting Screen Brightness......................................................2-6
Using Wireless LAN..........................................................................2-7
Turning the Wireless Antenna On and Off.................................2-7
Connecting to a Wireless Network.............................................2-9
Using Bluetooth.................................................................................2-10
Turning the Bluetooth Adapter On and Off.................................2-10
Pairing with Bluetooth Devices..................................................2-11
Configuring Bluetooth Settings..................................................2-14
Using 3G Network.............................................................................2-15
Connecting to 3G Network.........................................................2-15
Using AirCard® Watcher.............................................................2-16
Configuring AirCard® Watcher Settings......................................2-18
Using GPS.........................................................................................2-20
Location.....................................................................................2-20
Assistance.................................................................................2-21
Using the Camera.............................................................................2-22
Opening the Camera.................................................................2-22
The Camera Screen..................................................................2-23
Shooting Photos........................................................................2-24
Camera Settings........................................................................2-25
Using the Barcode Reader................................................................2-29
Using ScannerManager.............................................................2-30
Working With Bluetooth Scanners.............................................2-33
Using the Fingerprint Reader............................................................2-34
Using AuthenTec TrueSuite.......................................................2-34
Setting Up Your Fingerprints......................................................2-34
ii
DAP Technologies
Removing an Enrolled Fingerprint.............................................2-38
Log On to Windows by Fingerprints...........................................2-40
Using the DAP Control Center..........................................................2-41
Opening the DAP Control Center..............................................2-41
Viewing System Information......................................................2-42
Defining Hotkeys........................................................................2-44
Connecting Your Tablet Computer..................................................... 3-1
Connecting USB Devices..................................................................3-2
USB Port Connection.................................................................3-2
Mini USB Port Connection.........................................................3-2
Connecting HDMI Devices................................................................3-3
Connecting Audio Devices................................................................3-4
Connecting Serial Devices................................................................3-5
Managing Power.................................................................................. 4-1
Battery Pack......................................................................................4-2
Charging the Battery Pack.........................................................4-2
Checking the Battery Level........................................................4-3
Replacing the Battery Pack.......................................................4-4
Power Management..........................................................................4-5
Power Saving Tips.............................................................................4-5
Expanding Your Tablet Computer...................................................... 5-1
Connecting the Docking Station........................................................5-2
Docking the Tablet Computer....................................................5-2
Installing the Expansion Module........................................................5-3
Installing the Extendable Battery Pack..............................................5-4
Checking the Battery Level........................................................5-5
Using BIOS Setup and System Recovery......................................... 6-1
BIOS Setup.......................................................................................6-2
When to Use..............................................................................6-2
Starting BIOS Setup Utility.........................................................6-2
How to Use................................................................................6-3
BIOS Menu................................................................................6-4
DAP Technologies
iii
Maintenance, Troubleshooting and Specifications..........................A-1
Taking Care of the Tablet Computer..................................................A-2
Location Guidelines...................................................................A-2
General Guidelines....................................................................A-2
Cleaning Guidelines...................................................................A-2
Touchscreen Guidelines............................................................A-2
Troubleshooting.................................................................................A-3
Tablet Computer Specifications.........................................................A-5
Regulatory Information.......................................................................B-1
Important Information........................................................................B-2
Safety Information (EN).............................................................B-3
Informations de sécurité (FR)....................................................B-4
About the Batteries....................................................................B-5
About the Adapter.....................................................................B-5
FCC Regulations...............................................................................B-6
CE Notice (European Union).............................................................B-7
RF Exposure Information (SAR) .......................................................B-7
IC Regulations...................................................................................B-7
Important Note...........................................................................B-8
iv
DAP Technologies
Preface
This manual contains information that will help you operate this rugged
Tablet Computer. It is divided into six chapters and two appendices.
• Chapter 1: Getting Started, takes you through the process of setting up
your Tablet Computer and identifying its external components.
• Chapter 2: Operating Your Tablet Computer, tells you how to use the
Tablet Computer’s components and features.
• Chapter 3: Connecting Your Tablet Computer, provides information on
installing and using peripheral devices.
• Chapter 4: Managing Power, provides information on power
management.
• Chapter 5: Expanding Your Tablet Computer, provides information
on installing and using optional accessories, such as docking stations,
expansion modules, etc.
• Chapter 6: Using BIOS Setup and System Recovery, describes the
BIOS Setup utility that configures the Tablet Computer’s BIOS settings and
system recovery utility that reinstalls Windows to the Tablet Computer.
• Appendix A, provides technical specifications and information on caring
for your Tablet Computer, and gives solutions to common problems you
may encounter when using the Tablet Computer.
• Appendix B, provides regulatory information and safety notices on your
Tablet Computer.
DAP Technologies
v
Notational Conventions
Throughout this manual, the following conventions are used to distinguish
elements of text.
NOTE: Identifies additional information that requires special attention.
CAUTION: Identifies important information that, if not followed, may result in loss of data or
damage to the Tablet Computer..
Hardware and keyboard keys are shown in a bold typeset. For example:
Press the F1 key to complete.
A title, command, setup item, value, option, or button that you can see on the
screen is shown in boldface. For example:
Select When I press the power button, set it to Shut down, and then tap
the Save changes button.
vi
DAP Technologies
CHAPTER
1
Getting Started
Congratulations on purchasing this rugged Tablet Computer. The rugged design
allows you to use it in harsh outdoor environments. You can use it under blazing
heat, subzero cold, driving rain or dusty surroundings – places you could not
take a consumer-grade Tablet Computer.
This chapter tells you step by step how to get the Tablet Computer up and
running. You will find instructions for the following procedures:
• Unpacking
• Device Overview (An Explanation of External Components and their
Functions)
• Installing the Stylus
• Installing the Memory Card
• Installing the SIM Card
• Installing Battery Packs and Connecting to AC Power
• Turning the Tablet Computer On and Off
Getting Started
DAP Technologies
1-1
Unpacking
After unpacking the shipping carton, you should find these standard items.
Inspect all items. If any item is damaged or missing, notify your dealer
immediately.
√ Tablet Computer
√ Battery Pack
2.0MP
√ Power Adapter
√ Power Cord and Plugs
√ Stylus
√ Tether for Stylus
√ Cleaning Cloth
√ Screen Protector Film
√ Windows 7 Certificate of Authenticity Label (COA)
√ Quick Start Guide
Keep the shipping carton and packaging materials in case you need to ship or
store the Tablet Computer in the future.
NOTE: Actual items may slightly differ depending on the model you purchased.
Optional Items
√ Expansion Module
1-2
DAP Technologies
√ High Capacity Battery Pack
Getting Started
Device Overview
Front View
6
7
1
2
2.0MP
8
3
9
4
10
5
11
No.
Item
Description
1
Barcode Scanner
Button
Press to activate the barcode scanner located
on the top left corner of the Tablet Computer.
2
Web Camera
Use for video chatting and other interactive
applications.
3
Up Key
▲
On menu selection, moves the cursor up or
increases a value.
4
Down Key
▼
On menu selection, moves the cursor down
or decreases a value.
LED Indicators
5
Getting Started
Shows the current status of the Tablet
Computer.
Thermal
Lights up when the Tablet Computer heater is
on.
Wireless
• Solid green: Wireless antenna is enabled.
• Off: Wireless antenna is disabled.
Battery
• Blinking green: Battery is charging
• Solid greeen: Battery is fully charged.
• Blinking red: Battery power is low.
DAP Technologies
1-3
No.
5
Item
• Solid green: Tablet computer is turned on
• Blinking green: Tablet computer is in
sleep mode.
• Off: Tablet computer is turned off.
Power
6
Ambient Light Sensor
Adjusts the screen brightness according to
the current ambient light.
7
Microphone
Use for chatting and other interactive
applications.
8
Touch Screen
Displays and receives information for the
Tablet Computer.
9
Left Key
10 Right Key
11
1-4
Description
Fingerprint Reader
(Optional)
DAP Technologies
◄
On menu selection, moves the cursor to the
left or decreases a value.
►
On menu selection, moves the cursor to the
right or increases a value.
Scans fingerprints for security or verification
purposes.
Getting Started
Rear View (Standard Model)
1
2
3
4
5.0MP
AF
5
5
6
6
7
8
No.
Item
9
Description
1
Speaker
Sends out sound and voice from your Tablet
Computer.
2
Camera Flash
Provides flash lighting for use with the
camera.
3
CMOS Camera
Allows you to use the camera features.
4
Expansion Port
Connects to expansion modules, such as an
RFID Reader, Smart Card Reader, etc.
Note: Expansion modules are optional items and are
sold separately.
5
Battery Lock
• Slide up to unlock the battery latch.
• Slide down to lock the battery latch.
6
Battery Latch
• Slide inward to latch the battery pack to the
Tablet Computer.
• Slide outward to unlatch the battery pack
from the Tablet Computer.
7
Battery Pack
Supplies power to your Tablet Computer
when external power is not connected.
Getting Started
DAP Technologies
1-5
No.
8
Item
Description
Battery Button
Press the button to light the battery status
LEDs. The LEDs automatically go off after 5
seconds.
Battery Status LEDs
Shows the battery capacity.
Battery full
Battery charged
9
Battery half charged
Battery low
1-6
DAP Technologies
Getting Started
Rear View (Expanded Model)
1
2
3
4
5
6
7
7
8
9
No.
Item
10
Description
1
Expansion Module
Provides additional features for the Tablet
Computer.
2
Camera Flash
Provides flash lighting for use with the
camera.
3
CMOS Camera
Allows you to use the camera features.
4
Expansion Module
Screw
Secures the expansion module to the Tablet
Computer.
5
SIM Card Slot
Stores a SIM card which provides data
network capability to the Tablet Computer.
6
Smart Card Reader
Reads smart cards.
7
Battery Screws
Secures the high capacity battery pack to the
Tablet Computer.
8
High Capacity
Battery Pack
Supplies power to your Tablet Computer when
external power is not connected.
Battery Button
Press the button to light the battery status
LEDs. The LEDs automatically go off after 5
seconds.
9
Getting Started
DAP Technologies
1-7
No.
10
Item
Battery Status LEDs
Description
Shows the battery capacity.
Battery full
Battery charged
Battery half charged
Battery low
1-8
DAP Technologies
Getting Started
Top and Bottom View
1
2
3
Top View
Bottom View
4
5
No.
Item
6
Description
1
Audio Connector
Connects to a set of headphones, external
speakers, or an audio recording device.
2
Antenna
Receives and transmits wireless signals.
3
Barcode Reader
Reads barcodes.
4
Memory Card Slot
Stores the microSD card for additional
storage.
5
Docking Connector
Connects to a docking station (optional).
6
Stylus Holder
Stores the stylus.
7
Stylus
Pull to release the stylus from the holder.
Getting Started
7
DAP Technologies
1-9
Left and Right Views
Left View
Right View
1
5
2
6
3
7
4
No.
Description
1
Kensington Lock
Provides lock mechanism security.
2
Power Button
• Short press to enable sleep mode.
• Long press to turn the Tablet Computer off.
USB Port
Connects to a USB device, such as a USB
flash drive, mouse, printer, keyboard, etc.
Mini USB Port
Connects to a USB device, such as a
computer, printer, scanner, etc.
HDMI Connector
(Type D)
Connects to an HDMI device such as an
external monitor.
4
Power
Connector
Connects to the AC adapter.
5
SIM Card Slot
Stores the SIM card which provides 3G data
connection to your Tablet Computer.
6
Ethernet Port
Connects to a LAN jack for network
connection.
7
RS232 Port
Connects to a serial device, such as a
scanner, printer, etc.
3
1-10
Item
DAP Technologies
Getting Started
Installing the Stylus
Your Tablet Computer comes with a stylus for use with the touch screen.
The stylus holder at the bottom of the Tablet Computer provides a convenient
place to store the stylus.
Perform the following to prepare and install the stylus to your Tablet Computer:
1. Loop one end of the tether to the stylus eyelet.
2. Loop the other end of the tether to the Tablet Computer eyelet.
2
1
3. Insert the stylus into the stylus holder until it locks into place.
Removing the Stylus
1. Pull the stylus by its tab to remove it from the stylus holder.
2. Before usage, expand the stylus.
Getting Started
DAP Technologies
1-11
Installing the Memory Card
The Tablet Computer has a memory card slot that supports file transfer and
provides additional storage space for the Tablet Computer.
Perform the following to install a microSD card to your Tablet Computer:
1. On the right side of the Tablet Computer, open the memory card slot cover.
2. Insert the microSD card with the gold contacts facing down.
3. Push the microSD card until it clicks into place.
4. Close the microSD card slot cover.
Removing the Memory Card
1. Perform Windows procedures on safely removing removable drives from
the Tablet Computer.
2. On the right side of the Tablet Computer, open the memory card slot cover.
3. Push the microSD card to eject it from the slot.
4. Pull to remove the microSD card.
1-12
DAP Technologies
Getting Started
Installing the SIM Card
The Tablet Computer supports data connection using 3G SIM cards.
Perform the following to install the SIM card to your Tablet Computer:
1. Make sure the Tablet Computer is turned off.
2. On the bottom side of the Tablet Computer, open the SIM card slot cover.
3. Insert the SIM card with the cut-off corner side first and the gold contacts
facing the front of the device.
4. Push the SIM card until it clicks into place.
NOTE:
• For more information on connecting to 3G network, see “Using 3G Network” on page
2-15.
• To ensure signal connection, make sure to turn the Tablet Computer on or off before
installing and removing the SIM card.
Removing the SIM Card
1. Turn the Tablet Computer off (see “Turning the Tablet Computer On and
Off” on page 1-17).
2. On the bottom side of the Tablet Computer, open the SIM card slot cover.
3. Push the SIM card to eject it from the slot.
4. Pull to remove the SIM card.
Getting Started
DAP Technologies
1-13
Installing the Battery Pack
Perform the following to install the battery pack to the Tablet Computer.
1. Place the Tablet Computer face down on a flat even surface.
2. From the bottom side of the battery pack, align and place the battery pack
on its bay.
3. Slide the battery latches inward to the “close” position (A).
4. For a more secured installation, slide the battery locks to the lock ( )
position (B).
B
A
1-14
DAP Technologies
Getting Started
Connecting to Network
The Tablet Computer can connect to a local area network or the Internet via
wired or wireless connection (see “Using Wireless LAN” on page 2-7).
To connect the Tablet Computer via wired connection, perform the steps below:
1. On the right side of the Tablet Computer, open the network port cover.
2. Connect one end of an Ethernet cable to the Ethernet port of the Tablet
Computer.
3. Connect the other end to a wall socket or a network hub.
Network
Getting Started
DAP Technologies
1-15
Connecting to AC Power
The Tablet Computer operates either on the external AC power or internal
battery power. It is recommended to use AC power when you start up the Tablet
Computer for the first time.
CAUTION: Use only the AC adapter included with your Tablet Computer. Using other AC
adapters may damage the Tablet Computer.
Perform the following to connect the Tablet Computer to AC power:
1. On the left side of the Tablet Computer, open the power connector cover.
2. With the battery pack installed, plug the DC cord of the AC adapter into the
power connector of the Tablet Computer.
3. Plug the female end of the AC power cord into the AC adapter.
4. Then plug the male end of the AC power cord into an electrical outlet.
3
1
2
When the AC adapter is connected, the battery pack is charging. The
battery LED indicator ( ) shows shows three different states:
• Blinking green: Battery is charging
• Solid greeen: Battery is fully charged.
• Blinking red: Battery power is low.
1-16
DAP Technologies
Getting Started
CAUTION:
• When you disconnect the AC adapter, disconnect from the electrical outlet first and
then from the Tablet Computer. A reverse procedure may damage the AC adapter or
the Tablet Computer.
• When unplugging the connector, always hold the plug head. Never pull on the cord.
Turning the Tablet Computer On and Off
Turning On
1. Make sure that the Tablet Computer is either connected to TouAC power
or the battery pack is charged.
2. Press the power button ( ). Notice the screen remains blank for 8 ~ 10
seconds but the power LED lights up.
The power LED indicator ( ) shows two different states:
• Solid green: Tablet computer is turned on
• Blinking green: Tablet computer is in sleep mode.
• Off: Tablet computer is turned off.
Getting Started
DAP Technologies
1-17
Turning Off
To turn off the Tablet Computer, use the “Shut Down” command of your
operating system.
CAUTION: Wait for at least five seconds after turning off the Tablet Computer before turning
it back on.
When you finish a working session, you can stop the Tablet Computer by
shutting it down or leaving the Tablet Computer in Sleep or Hibernation mode:
To stop in
this mode...
Off
Do this...
Use the Windows Start Menu and follow the shut down
procedure.
You can force the Tablet Computer to turn off by pressing and
holding the power button ( ) for more than 6 seconds. This
is not the recommended method, but may be necessary if the
system is locked up.
Hybrid Sleep Short press the power button ( ) or use the Windows Start
Menu to put the Tablet Computer in Hybrid Sleep mode.
Hibernation
Use the Windows Start Menu to put the Tablet Computer in
hibernation mode.
Press the power button ( ) to resume or turn on the Tablet Computer from any
of these modes. See “Power Management” on page 4-6 for more information.
NOTE: By configuring the BIOS Setup Utility, you can have the Tablet Computer automatically start up or resume when the external AC power is plugged in. See “BIOS Setup” on page
6-2 for more information.
1-18
DAP Technologies
Getting Started
CHAPTER
2
Operating Your Tablet
Computer
This chapter provides information about the use of the Tablet Computer
and describes the operating basics of these components and features:
• Touch Screen
• Input Panel
• Panel Keys
• Wireless LAN Features
• Bluetooth Features
• 3G Network Features
• GPS Features
• Camera
• Barcode Reader
• Fingerprint Reader
• DAP Control Center
Operating Your Tablet Computer
DAP Technologies
2-1
Using the Touch Screen
The touch screen is a touch-sensitive device that allows you to control and
make selections on the Tablet Computer by controlling the location of the
pointer on the screen.
CAUTION: Do not use sharp or pointed objects on the touch screen. These objects may
scratch the screen. Use only the spring-tip end of the stylus or the tip of your finger.
2.0MP
Here are some common terms that you should know when using the touch
screen.
Term
Action
Tap
Tap gently on the touch screen to select or open an item.
Tapping is the same as clicking the left mouse button of a
PC.
Double-tap
Rapidly tap twice on the touch screen. This action is
similar to double-clicking the left mouse button of a PC.
Tap and hold
Tap and hold the stylus lightly on the display. A big circle
appears to indicate that a pop-up menu will soon appear.
Lift up the stylus and a pop-up menu appears. Select the
desired function. This action is similar to a right mouse
click on a PC.
Drag
Hold the stylus on the screen and drag across the screen
to select text and images or move icons to a new location.
For a more customized stylus settings, go to Start > Control Panel > Pen and
Touch.
2-2
DAP Technologies
Operating Your Tablet Computer
Calibrating the Screen
When there is a noticeable discrepancy in the placement of the stylus on
the screen and the indicated position of the onscreen pointer, recalibrate the
screen.
Perform the following to calibrate the screen:
1. Tap Start > Control Panel > Tablet PC Settings.
2. On the Display tab, tap Calibrate.
3. Tap the cross-hair with the stylus as it moves around the screen.
4. When calibration is complete, tap Yes to close the calibration utility screen.
Operating Your Tablet Computer
DAP Technologies
2-3
Using the Input Panel
The Tablet Computer Input Panel is a virtual keyboard that allows you to enter
text and perform various keyboard functions.
There are two types of Input Panels for you to use:
• Touch Keyboard
Allows you to enter text by tapping the keys with the stylus, like pressing the
keys on a standard keyboard.
• Writing Pad
Allows you to write on the writing pad, like writing on a piece of paper. Your
handwriting will be converted into typed text.
2-4
DAP Technologies
Operating Your Tablet Computer
Opening the Input Panel
To open the Input Panel
From the left side of the screen, drag the edge of the Input Panel towards the
center.
To switch between keyboards
To switch between the Touch Keyboard and the Writing Pad, tap
at the upper left corner of the Input Panel.
or
Managing the Input Panel
To change the Input Panel size
To increase the size of the Input Panel, select
the lower right corner of the Input Panel and drag.
To position the Input Panel
The Input Panel floats on top of the screen by default. To move the Input Panel
to an area on the screen, place the stylus on the title bar and drag the Input
Panel to a new location on the screen.
To dock the Input Panel
You can dock the Input Panel to so that it is anchored at the top or the bottom of
the screen. On the Input Panel, tap Tools > Docking, and tap Dock at top of
screen or Dock at bottom of screen.
NOTE: For more information on using the Input Panel, see Windows’ online help.
Operating Your Tablet Computer
DAP Technologies
2-5
Using the Panel Keys
The Panel Keys provide shortcuts for you to utilize the functions of your Tablet
Computer, such as adjusting the brightness setting or volume, and others.
Adjusting Volume
Peform the following to adjust the volume of your Tablet Computer:
• To increase volume, press ▲ or ► repeatedly.
• To decrease volume, press ▼ or ◄ repeatedly.
Adjusting Screen Brightness
Peform the following to adjust the screen brightness of your Tablet Computer:
• To increase brightness, press ▲ or ► repeatedly.
• To decrease brightness, press ▼ or ◄ repeatedly.
2-6
DAP Technologies
Operating Your Tablet Computer
Using Wireless LAN
Your Tablet Computer has a built-in wireless antenna which automatically
detects wireless networks that are within range.
It takes approximately 30 seconds for your Tablet Computer to make a
successful wireless connection and approximately 10 seconds to disconnect.
Turning the Wireless Antenna On and Off
By default, the wireless antenna is turned on. In case you need to turn the
wireless antenna on or off, perform the following:
1. Tap Start > All Programs > Tap Technology > DAP Control Center.
Operating Your Tablet Computer
DAP Technologies
2-7
2. Tap Power Options tab.
3. To turn the wireless antenna on or off, tap ON or OFF.
2-8
DAP Technologies
Operating Your Tablet Computer
Connecting to a Wireless Network
Perform the following to connect to a wireless network:
1. Make sure that the wireless antenna is “on” (The Wifi LED indicator in solid
green and the Wireless network icon on the taskbar shows
).
2. Tap the Wireless Network icon (
) on the taskbar.
3. In the list of available networks, tap a network.
4. Tap Connect.
5. If the network requires authentication, enter the security key or
passphrase.
NOTE:
• Once you are connected to a wireless network, Windows saves the network profile and
will automatically connect to that network when it is in range.
• For more information on connecting to a wireless network, see Window’s online help.
Operating Your Tablet Computer
DAP Technologies
2-9
Using Bluetooth
Your Tablet Computer has integrated Bluetooth capability for short-range
wireless communication between Bluetooth-enabled devices.
By default, the Bluetooth feature is enabled as indicated by the Bluetooth icon
( ) on the taskbar; but your Tablet Computer is not visible to other devices.
To make your Tablet Computer visible, check the Discovery box in Bluetooth
settings (see “Configuring Bluetooth Settings” on page 2-14).
Turning the Bluetooth Adapter On and Off
In case you need to turn the Bluetooth adapter on or off, perform the following:
1. Tap Start > All Programs > Tap Technology > DAP Control Center.
2-10
DAP Technologies
Operating Your Tablet Computer
2. Tap Power Options tab.
3. To turn the Bluetooth feature on or off, tap ON or OFF.
Pairing with Bluetooth Devices
Before you can pair with Bluetooth devices for the first time, you need to add
and save the device profile to your Tablet Computer.
To add and pair a Bluetooth device
Perform the following to pair your Tablet Compuer with Bluetooth devices:
1. Make sure the Bluetooth adapter is on as indicated by the Bluetooth icon
( ) on the taskbar.
2. Tap the Bluetooth icon (
Operating Your Tablet Computer
) to display a pop up menu.
DAP Technologies
2-11
3. Tap Add a Device. The Tablet Computer will scan for Bluetooth devices
within range.
4. Tap the device you want to pair with, then tap Next.
5. Depending on the device you are pairing, you may be prompted to enter
or verify the pairing code. The pairing code entered or shown on your
Tablet Computer and the Bluetooth device must be the same. Click Next
to continue.
2-12
DAP Technologies
Operating Your Tablet Computer
6. Windows will check for the device driver and install, if necessary. Tap
Close to close the screen.
Depending on the paired Bluetooth device, you may use your Tablet Computer
speakers to listen to music played from the Bluetooth device, transfer files, and
more.
NOTE: For more information on using Bluetooth features, see Windows online help.
To reconnect to a Bluetooth device
Once a Bluetooth device has been paired with your Tablet Computer, you do not
need to enter or verify the pairing code as you did the first time.
To reconnect to a Bluetooth device, perform the following:
1. Make sure the Bluetooth adapter is on as indicated by the Bluetooth icon
( ) on the taskbar.
2. Tap the Bluetooth icon (
) to display a pop up menu.
3. Tap Show Bluetooth Devices.
Operating Your Tablet Computer
DAP Technologies
2-13
4. Tap and hold the Bluetooth device to display the pop up menu.
5. Tap Advance Operation, then tap the applicable connection operation.
When a Bluetooth device wants to pair with your Tablet Computer, a pop up
message appears on the taskbar, tap the message to pair with the device.
Configuring Bluetooth Settings
The Bluetooth Settings allows you to configure how you want to connect to
Bluetooth devices, sync data, and other options. To access the settings, tap and
hold the Bluetooth icon ( ) on the taskbar, and tap Open Settings.
2-14
DAP Technologies
Operating Your Tablet Computer
Using 3G Network
Your Tablet Computer has 3G network capabilities that provide wireless
connection to the Internet using a SIM card with data subscription.
Connecting to 3G Network
Your Tablet Computer comes with Sierra Wireless AirCard® Watcher, an
application that allows you to connect to the Internet using your SIM card and
keeps you informed of your wireless connection status. Perform the following to
connect to your 3G network:
1. Install a SIM card to your Tablet Computer (see “Installing the SIM Card”
on page 1-13).
2. Open the AirCard® Watcher application (tap Start > All Programs > Sierra
Wireless > AirCard Watcher).
The application detects the SIM card and displays network information on
the AirCard® Watcher main screen.
TIP: To open AirCard® Watcher faster, create a desktop shortcut icon. Alternatively, you can
set AirCard® Watcher to open and connect automatically with your 3G network (see
“To configure 3G network profiles” on page 2-19).
3. Tap Connect to connect to the 3G network.
Once connected, the AirCard® Watcher main screen displays the network
connection information, such as signal strength, connection speed, and
bitrate transfer. For more information on using the application, see “Using
AirCard® Watcher” on page 2-16.
Operating Your Tablet Computer
DAP Technologies
2-15
Using AirCard® Watcher
The AirCard® Watcher main screen
7
8
1
2
3
9
4
10
5
11
6
No.
1
Item
3G On/Off
Signal Strength
Network Type
2
2-16
Toolbar
Description
• Green: 3G network is on.
• Red: 3G network is off.
• Green: Indicate the network signal
strength. More lit bars indicate stronger
signal.
• Red: No signal.
Indicates the network connection type.
Tap an icon to access the function.
Wireless Profile
Tap to view and modify wireless network
profile.
SMS
Tap to open SMS Express to send and
receive SMS messages on your Tablet
Computer.
NOTE: Your data plan subscription must support this
feature to be able to send and receive SMS messages
on your Tablet Computer.
History
Tap to view the usage history and clear the
bitrate counters.
Airplane Mode
Tap to enable airplane mode. When this
feature is enabled, the icon turns red. Tap the
icon again or tap Turn Radio On to disable
airplane mode.
DAP Technologies
Operating Your Tablet Computer
No.
Item
Description
2
AirCard GPS
Tap to open AirCard GPS Monitor.
Settings
Tap to access the AirCard® Watcher settings.
See “Configuring AirCard® Watcher Settings”
on page 2-18.
Help
Tap to view the help file.
3
Network Name
Displays the name of the SIM card network
provider.
4
Data Transfer Rate
Displays the upstream and downstream
transfer information.
5
6
7
Home
Tap to open the Sierra Wireless website.
Speed Graph
Tap to display a graphical table of the data
transfer speed.
Menu
Tap to access the application menu.
Minimize
Tap to minimize the application to the system
tray.
Restore
Tap to toggle the display between full view
and compact view.
Close
8
9
10
11
Connect / Disconnect
Button
Tap to connect or disconnect from the 3G
network.
Network Info
A graphical display of the network connection
type.
Speed
Indicates the network connection speed.
Customer Support Tap to open Sierra Wireless support website.
Operating Your Tablet Computer
DAP Technologies
2-17
Configuring AirCard® Watcher Settings
On the AirCard® Watcher main screen, tap the Settings (
screen below.
) icon to display the
Tap a menu item on the left panel to display the corresponding settings on the
right. The following menus are available:
Menu
2-18
Description
General
Configures startup/shutdown settings, warning
messages, display properties, and others.
Messaging
Configures message settings such as service center
number, default storage, and message notification.
Network
Configures network mode and radio technology.
SIM Settings
Enables SIM security settings.
Sounds
Enables sound alert when network is connected,
disconnected or when a new message is received.
Profiles
Configures network profiles and auto-connect
functions. See “To configure 3G network profiles” on
page 2-19.
Data Usage Tracking
Enables data usage tracking and configures data
subscription rate plan settings. This feature is useful
when you have limited data rate plan to help you
monitor and control your Internet usage.
Firmware
Displays firmware information.
DAP Technologies
Operating Your Tablet Computer
To configure 3G network profiles
Once a SIM card is used in your Tablet Computer, its network profile is created.
You can view network information, such as profile name, access point name
(APN), TCP/IP settings, and more. You can also set AirCard® Watcher to
automatically connect to the 3G network at startup.
1. On the AirCard® Watcher main screen, tap the Wireless Profile (
NOTE: Alternatively, you can also access the Profiles menu, by tapping
Profiles on the left panel.
) icon.
, and then
2. On the Profiles menu, the following items are displayed:
• Selected profile: Displays the name of your 3G network.
• Autoconnect: Tap the field and then select one of the following:
• Never: Do not auto-connect to network.
• While not roaming: Automatically connects to network while within
the local network coverage.
• Always (even when roaming): Automatically connects to network
even when roaming outside the local network coverage.
NOTE: Connecting to your network while roaming may incur additional
charges. Check with your service provider for details.
• Auto-create: Tap to automatically create a connection profile when
using a new SIM card.
• Auto-select: Tap to automatically select the best connection profile for
the current SIM.
3. Tap Apply to save the settings.
4. To view the SIM card information, tap the network name on the left panel.
5. Tap OK to close the screen.
Operating Your Tablet Computer
DAP Technologies
2-19
Using GPS
Your Tablet Computer has a GPS (Global Positioning System) receiver module
built in and includes the u-blox GPS Location Sensors software.
u-blox GPS Location Sensors is an application that allows you to manage the
following:
• Location
• Assistance
• Satellites
To open u-blox GPS Location Sensors, tap Start > All Programs > u-blox >
u-tray > u-tray 1.1.0.4
Location
The Location tab provides an overview your location and system status.
2-20
DAP Technologies
Operating Your Tablet Computer
Assistance
The Assistance tab allows you to set the schedule and download assistance
data.
• To download update manually, tap Download Assistance Data.
• To set automatic download, check the Automatic box and select the
frequency of automatic download in Offline validity.
Operating Your Tablet Computer
DAP Technologies
2-21
Using the Camera
Your Tablet Computer has a built-in camera for taking photos.
Opening the Camera
Perform the following to open the camera:
Tap Start > All Programs > All Programs > DAP Technologies >
Camera.
2-22
DAP Technologies
Operating Your Tablet Computer
The Camera Screen
2
1
3
4
10
5
9
6
8
7
No.
Item
1
Auto / Landscape /
Macro
2
Settings
3
Minimize
4
Shutter
6
7
Open the Photo
8
9
Flashlight
/
Operating Your Tablet Computer
Tap to view the camera settings. See “Camera
Settings” on page <OV>.
Tap to minimize the camera screen.
Tap to capture a photo.
Tap to open the captured photo.
Tap to add/remove the GPS-based location
information on the photo (by default disabled).
/
Positioning
/
Shows the current shooting mode (by default
Auto).
Tap to close the camera screen.
Exit
5
Description
Flash
Tap to activate/deactivate the flashlight function
(by default deactivated).
Tap to enable/disable flash (by default disabled).
DAP Technologies
2-23
No.
10
Item
/
/
Shooting Mode
Description
Tap to select the shooting mode among the
following options:
•
Automatic Mode: The
shooting mode is selected automatically.
•
Landscape Mode: Select
this mode if you wish to capture subjects
from different distances from the camera, for
example in the nature.
•
Macro Mode: Select this
mode if you want to capture a close up image
of your subject.
Shooting Photos
1. Open the camera (see “Opening the Camera” on page 2-22).
2. Focus on your subject.
3. Tap
to capture the photo.
4. By default, the photo preview is briefly shown on the screen.
2-24
DAP Technologies
Operating Your Tablet Computer
The preview screen automatically closes after 3 seconds. Do one of the
following:
• Tap
to capture the next image.
• Tap
to edit the image in Windows Photo Viewer.
• Tap
to close the camera screen.
NOTE:
By default the system automatically creates a folder with the current date to the logged in
user’s Pictures folder, and saves the images into that folder. For example, C:\Users\My
Name-PC\Pictures\2013-12-16.
Camera Settings
1. Tap
to open the settings pop-up menu.
1
2
3
4
2. Modify the necessary settings.
No.
1
Item
Actions
Operating Your Tablet Computer
Description
• Capture: Tap to capture an image.
• Show Image Folder: Tap to open the image folder.
DAP Technologies
2-25
No.
Item
Description
• Advanced Settings...: Tap to open the Preset
Configuration page. On this page you can modify the
default picture resolution, brightness, flash, auto focus,
focus position, auto white balance and white balance of
the camera. Tap on the parameter and select the desired
value. After all modifications are done, tap Set to save
changes. Tap
to close the page.
2
Camera
• Edit Presets...: Tap to open the Presets page. On this
page you can configure the default parameters of Auto,
Landscape, and Macro shooting modes. Tap on the
mode and then tap Edit.... You can also set the mode as
a default mode, by selecting a mode and clicking on Set
as Default. Tap OK to save changes and exit the page.
2-26
DAP Technologies
Operating Your Tablet Computer
No.
Item
Description
• General...: Tap to open the General Options page. On
this page you can define the file name template, target
image folder location, start in mode and flash light
duration. When all modifications are done, tap OK.
3
Options
Please be noted that you can use variables, to automate
the image naming and image folder location and naming.
For example, instead of manually creating a new folder
every time you capture images, with the help of varaibles
you can let the system to create an image folder for you
with the current date. The corresponding variables are as
follows: %PICTURE%\%YEAR%-%MONTH%-%DAY%.
The %PICTURE% indicates the location of the image
folder in Windows file system,%YEAR%-%MONTH%%DAY% is the current year-month-day. The “\” is the
separator in the folder tree in Windows operating
system. As a result of this example, the images are
saved into the following folder: C:\Users\My Name-PC\
Pictures\2013-12-16.
To see the list of supported variables, tap Variables....
Tap OK to return General Options page.
• Export Configuration...: Tap to select the location,
where you want to save the configuration parameters.
The parameters are saved in XML-format.
Operating Your Tablet Computer
DAP Technologies
2-27
No.
Item
Description
• Shortcuts: Tap to view the camera-function related
shortcuts.
4
• About: Tap to see the camera information page. Tap
Log, to create a log file or tap OK, to return to the
camera screen.
?
3. When settings are complete, do one of the following:
2-28
• Tap
to capture image.
• Tap
to edit the image in Windows Photo Viewer.
• Tap
to close the camera screen.
DAP Technologies
Operating Your Tablet Computer
Using the Barcode Reader
Your Tablet Computer has a built-in barcode reader which is a 2D image CMOS
type scanner that you can use to scan barcodes.
NOTE:
• The built-in barcode reader is an optional accessory. Contact your dealer to purchase.
• Alternatively, you can also use a Bluetooth scanner or connect an external barcode
scanner to the RS232 port. See for more information.
Perform the following to scan barcodes using the built-in barcode reader:
1. Press and hold the barcode button (
barcode reader lights red.
) to active the barcode reader. The
2.
0M
P
2. Place the barcode label facing the barcode reader. Tablet Computer emits
a beep sound when the barcode is read properly.
Operating Your Tablet Computer
DAP Technologies
2-29
CAUTION:
• DO NOT aim the barcode scanner into the eyes. Laser beams may severely damage
the eyes or may cause blindness if pointed directly into eyes.
• The use of optical instruments with your Tablet may increase eye hazard.
Using ScannerManager
The ScannerManager allows you to see the status and configure the settings of
the Internal Scanner, Tethered Scanner, and Bluetooth Scanner.
Opening the ScannerManager
Perform one of the following to open the camera:
• Tap Start > All Programs > All Programs > DAP Technologies >
ScannerManager.
• Press the camera shortcut key (
2-30
DAP Technologies
) icon on the taskbar.
Operating Your Tablet Computer
Using the ScannerManager
1. Open the ScannerManager, see “Opening the ScannerManager” on page
2-30. The settings main page opens on the screen.
1
2
3
4
5
No.
Item
Description
1
Internal Scanner
By default the inner scanner is enabled and
connected. Tap Settings, to modify the decoder properties, import/export parameters,
or disable the internal scanner.
Tap OK, to return to the ScannerManager
main page.
2
Tethered Scanner
By default the tethered scanner is disabled.
Tap Settings, to enable this scanner and do
modifications to the serial link connection
parameters.
Tap OK, to return to the ScannerManager
main page.
3
Bluetooth Scanner
By default the Bluetooth scanner is disabled.
Tap Settings, to configure the Bluetooth
scanner connection parameters. See
“Working With Bluetooth Scanners” on page
2-33.
Tap OK, to return to the ScannerManager
main page.
4
Trigger Options
By default, when you press the barcode
button ( ), the internal barcode scanner
activates. Tap Trigger Options if you want
to remove or assign the barcode scanner a
different shortcut key.
Tap OK, to return to the ScannerManager
main page.
Operating Your Tablet Computer
DAP Technologies
2-31
No.
5
Item
Output to
Description
a) Select where to direct the barcode
scanning output. The available options are
as follows:
- Keyboard Wedge
- Link*One
- SDK.
b) Tap Settings, to modify the selected output
configuration.
2. When the modifications are done, tap
ScannerManager page.
2-32
DAP Technologies
, to close the
Operating Your Tablet Computer
Working With Bluetooth Scanners
ScannerManager recognizes Bluetooth scanners that are in master mode. This
means the scanner initiates the connection. To do that, it must have a way to
know which unit to connect to.
Scanner manufacturers explain how to proceed to configure and pair their
devices in their documentation. Usually, the user must create a special barcode
based on the Bluetooth MAC address of the computer. Once that barcode has
been generated, it does not change. It can be fixed on Tablet Computer, and
the next time any scanner has to be associated with the unit, an operator simply
needs to scan the code and wait the connection to be established automatically.
For DAP and Symbol/Motorola scanners, you can use the Bluetooth Master
Pairing tab in the ScannerManager Bluetooth settings as follows:
Operating Your Tablet Computer
DAP Technologies
2-33
Using the Fingerprint Reader
Your Tablet Computer has a built-in fingerprint reader that you can use to scan
and authenticate your fingerprints for security purposes. Instead of entering a
password, you can simply swipe a finger on the fingerprint reader and log on to
Windows. The fingerprint reader also supports other advanced functions and
applications that may require fingerprint authentication, such as website logon,
quick launch, and stronger identity protection for websites, among others.
NOTE: Applications that may require fingerprint authentication vary and do not come
pre-installed on the Tablet Computer.
Using AuthenTec TrueSuite
Before you can use the fingerprint reader, you must enroll your fingerprints
using the AuthenTec TrueSuite application.
AuthenTec TrueSuite is a biometric software that protects the security of
your data through the use of fingerprint authentication. When you enroll
your fingerprints, your fingerprints are associated with your user name and
password, and stored as a “user identity”.
To open AuthenTec TrueSuite, tap Start > All Programs > AuthenTec
TrueSuite > AuthenTec TrueSuite or tap on fingerprint reader on front panel.
Setting Up Your Fingerprints
To maximize your Tablet Computer security features, register your fingerprints
for authentication.
1. Open the AuthenTec TrueSuite application (Start > All Programs >
AuthenTec TrueSuite > AuthenTec TrueSuite). A screen wizard appears.
2-34
DAP Technologies
Operating Your Tablet Computer
NOTE: The computer images shown on the screen are for reference only and may differ from
your Tablet Computer.
2. Locate the fingerprint reader on your Tablet Computer (see “Device
Overview” on page 1-3), then tap Yes. The screen below appears.
3. Tap Yes.
4. When the screen below appears, tap a finger that you want to register.
5. The tapped finger is marked by a blue icon.
Operating Your Tablet Computer
DAP Technologies
2-35
6. When registering your fingerprints for the first time, you will be prompted
for a Windows Password. This password will be associated with your
fingerprints as your “identity”. Enter a password, and tap OK.
NOTE: If you have not set Windows Password before, you are asked to create a password
and confirm it. Enter a password, confirm the password, and tap OK.
7. Slowly swipe the marked finger on the fingerprint reader from left to right
direction.
The screen below appears. The red bar indicates the scanning process.
2-36
DAP Technologies
Operating Your Tablet Computer
8. Swipe the same finger again.
9. Swipe the same finger for the third time. When done, the screen below
appears, notice that the blue icon turns green to indicate successful finger
enrollment.
10. To register another finger, tap a finger and repeat steps 4 ~ 9. Or, tap
to complete the enrollment.
11. The software registration screen appears. Tap Register Now if you want
to purchase the full version of AuthenTec TrueSuite or tap Register Later
to continue using the version that came with your Tablet Computer.
Operating Your Tablet Computer
DAP Technologies
2-37
12. When the screen below appears, your fingerprint enrollment is complete.
Removing an Enrolled Fingerprint
Perform the following to remove the authentication of an enrolled fingerprint:
1. Open the AuthenTec TrueSuite application (Start > All Programs >
AuthenTec TrueSuite > AuthenTec TrueSuite).
2. Swipe an enrolled fingerprint on the fingerprint reader.
NOTE: Alternatively, you can also enter the Windows Password by tapping I want to use my
Windows password.
2-38
DAP Technologies
Operating Your Tablet Computer
3. Tap and hold the marked fingerprint that you want to remove.
4. Tap Delete finger. The green icon is removed.
Operating Your Tablet Computer
DAP Technologies
2-39
Log On to Windows by Fingerprints
After enrolling your fingerprint, you can use the enrolled finger to log on to
Windows.
Perform the following to use fingerprint authentication for Windows log on:
1. If the Tablet Computer has more than one account, tap the Fingerprint
profile
icon. The screen below appears.
2. Slowly swipe an enrolled finger on the fingerprint reader from left to right
direction. If the fingerprint matches, Windows opens.
2-40
DAP Technologies
Operating Your Tablet Computer
Using the DAP Control Center
Your Tablet Computer has a control center for viewing system information,
setting power options and defining hotkeys.
Opening the DAP Control Center
Perform the following to open the DAP Control Center:
Tap Start > All Programs > All Programs > DAP Technologies > DAP
Control Center.
Operating Your Tablet Computer
DAP Technologies
2-41
Viewing System Information
To view system information, open the DAP Control Center, see “Opening the
DAP Control Center” on page 2-41. The System Info page opens.
2-42
DAP Technologies
Operating Your Tablet Computer
Setting Power Options
To switch off or on the WWAN, WLAN, Bluetooth, or Rear Camera, open the
DAP Control Center (see “Opening the DAP Control Center” on page 2-41),
and tap on Power Options tab.
Operating Your Tablet Computer
DAP Technologies
2-43
Defining Hotkeys
To define hotkeys, do the following:
1. Open the DAP Control Center, see “Opening the DAP Control Center” on
page 2-41.
2. Tap on Hotkeys tab. The Hotkeys page opens.
3. Tap New... (
). The Input Key window opens.
You can assign a hotkey-function to the following keyboard keys:
• ESC (Escape key)
• TAB (Tabular key)
• RETURN (Enter key).
4. Tap on the key in Input key window, for hotkey assignment, and tap OK.
The selected hotkey appears in the table on Hotkeys page .
5. Assign an action to the hotkey. Tap on the hotkey and then tap on Action
field. A list of actions opens on the screen. Tap on the desired action in the
list.
2-44
DAP Technologies
Operating Your Tablet Computer
NOTE:
To activate the hotkey, make sure the Enabled checkbox is checked.
In the following illustration, the TAB key is assigned to open the Wireless
Manager.
6. After the hotkey is assigned, do one of the following:
• Tap New, to assign the next hotkey. Repeat steps from 1 to 6.
• Select the key and tap Delete, to delete the hotkey assignment.
• Tap Reset All to Default, to remove all the hotkey assignments.
• Tap
Operating Your Tablet Computer
, to close the Hotkeys page.
DAP Technologies
2-45
CHAPTER
3
Connecting Your Tablet
Computer
You can extend the capabilities of your Tablet Computer by connecting other
peripheral devices. When using a device, be sure to read the instructions
accompanying the device together with the relevant section in this chapter.
This chapter gives guidelines on installing and using these devices:
• USB Device
• HDMI Device
• Audio Device
• Serial Devices
Connecting Your Tablet Computer
DAP Technologies
3-1
Connecting USB Devices
Your Tablet Computer has two USB ports: one USB (Type A) port and one mini
USB port.
USB Port Connection
Use the USB port to connect USB devices, such as a flash disk drive, scanner,
printer, keyboard, and mouse.
To connect a USB device, simply plug the device cable into the USB port of
your Tablet Computer.
Mini USB Port Connection
Use the mini USB port to connect your Tablet Computer to another computer or
notebook.
To connect, plug the mini USB cable connector to the mini USB port of your
Tablet Computer and plug the other end of the USB cable to a computer or
notebook.
3-2
DAP Technologies
Connecting Your Tablet Computer
Connecting HDMI Devices
Your Tablet Computer has one mini HDMI port for connecting HDMI devices,
such as an external monitor.
To connect an HDMI device, simply plug the device cable into the mini HDMI
connector of your Tablet Computer.
Connecting Your Tablet Computer
DAP Technologies
3-3
Connecting Audio Devices
Your Tablet Computer has one combo audio connector that supports both
audio in and audio out devices. You can connect speakers, headphones, or an
earphone set.
To connect an audio device, simply plug the device cable into the audio
connector of your Tablet Computer.
3-4
DAP Technologies
Connecting Your Tablet Computer
Connecting Serial Devices
Your Tablet Computer has one RS232 port for connecting serial devices, such
as barcode scanners, printers, among others.
To connect a serial device, simply plug the device cable into the RS232 port of
your Tablet Computer. Attach the screws to secure the connection.
Connecting Your Tablet Computer
DAP Technologies
3-5
CHAPTER
4
Managing Power
Your Tablet Computer operates either on external AC power or on battery
power.
This chapter tells you how you can effectively manage power. To maintain
optimal battery performance, it is important that you use the battery in the
proper way.
The topics in this chapter include:
• How to charge the battery pack
• How to check the battery level
• What happens when the battery is low and what actions to take
• What is Power Management
• How to save power
Managing Power
DAP Technologies
4-1
Battery Pack
The operating time of a fully charged battery pack depends on how you use
the Tablet Computer. When you use applications that often access peripherals,
or when you stay connected to a wireless network, the operating time of the
battery may be shortened.
WARNING:
• Do not disassemble the battery pack. There are no user-serviceable parts inside. Doing so
may present risk of exposure to harmful chemicals, explosion or fire.
• Contact your local waste disposal service provider regarding the disposal or recycling of used
battery packs.
Charging the Battery Pack
To charge the battery pack, perform the following:
1. With the battery pack installed, plug the DC cord of the AC adapter into the
power connector of the tablet computer.
2. Plug the female end of the AC power cord into the AC adapter.
3. Then plug the male end of the AC power cord into an electrical outlet.
3
1
2
The battery LED indicator ( ) blinks green to indicate that charging is
in progress. When the battery is fully charged, the battery LED indicator
glows solid green.
4-2
DAP Technologies
Managing Power
Checking the Battery Level
To check the battery level, press the battery button of the battery pack. The
battery LED lights up. The number of lit up LEDs indicates the battery level of
the battery pack.
NOTE: The battery capacity indicator shows only an approximate battery level status.
Managing Power
DAP Technologies
4-3
Replacing the Battery Pack
If you rely on battery power for a long period of time, consider purchasing
additional batteries from your dealer to use for backup.
To replace the battery pack, perform the following:
1. Shut down the Tablet Computer.
2. Disconnect the Tablet Computer from the AC power.
3. Place the Tablet Computer face down on a flat even surface.
4. Slide the battery locks to the unlock (
) position (A).
5. Slide the battery latches outward to the “open” position (B).
A
B
6. Insert your finger on the tab and then lift to remove the battery pack .
4-4
DAP Technologies
Managing Power
7. Install the replacement battery pack in place (see “Installing the Battery
Pack” on page 1-14).
NOTE: You can still operate the Tablet Computer without a battery pack when it is connected to a
power source. However, this action is not recommended as an empty battery pack slot exposes the
Tablet Computer internal parts to environmental hazards, such as dust and water.
Power Management
The power management feature helps reduce power consumption which
extends battery life.
Your Tablet Computer supports ACPI (Advanced Configuration and Power
Interface) for power management. Power supply to different components is
controlled on an as-needed basis. This allows maximum power conservation
and performance at the same time.
Windows comes with pre-defined Power Options (Balanced, Power Saver,
and High Performance) for you to select. You can access Power Options
by tapping Start > Control Panel > Power Options. By default, your Tablet
Computer is in Balanced Mode.
For detailed information on power management, see Windows Help.
Power Saving Tips
Here are some practical suggestions that you can do to maximize the operating
time of the battery:
• Enable Power Management. Choose a power plan that saves power. A
power plan is a collection of hardware and system settings that control how
your Tablet Computer manages power.
• Decrease the LCD brightness to the lowest comfortable level.
• Shorten the length of time before Windows turns off the display.
• Many USB devices use power just by being connected. If you use a USB
flash drive, unplug it when you are not using it.
• Deactivate the Wireless LAN function if you are not using it.
• Deactivate Bluetooth wireless feature if you are not using it.
• Turn off the Tablet Computer when you are not using it.
Managing Power
DAP Technologies
4-5
CHAPTER
5
Expanding Your Tablet
Computer
You can optimize the capabilities of your Tablet Computer by using other
optional accessories.
This chapter gives guidelines on installing and using these accessories:
• Docking Station
• Expansion Module
• Extendable Battery Pack
Expanding Your Tablet Computer
DAP Technologies
5-1
Connecting the Docking Station
The Office Dock, a docking station designed for use with your Tablet Computer
is available as an optional accessory.
The Office Dock has the following features:
• Docks the Tablet Computer with adjustable fangs up to 20° for comfortable
viewing capabilities
• Charges the Tablet Computer
battery pack
• Charges an additional battery
pack with its extra battery bay
• Provides four USB ports
• Provides one RS232 port
• Provides one Line-In and one
Line-out port
• Provides one RJ45 jack that
supports up to 1GB LAN
connection
• With two LED indicators
Docking the Tablet Computer
To dock your Tablet Computer, simply align the docking connectors of the Tablet
Computer to the connectors on the Office Dock.
NOTE: For information on using the Office Dock, refer to the User Manual that comes with the device.
5-2
DAP Technologies
Expanding Your Tablet Computer
Installing the Expansion Module
Your Tablet Computer is designed to extend its functionality with the use of the
Expansion Module. The Expansion Module provides a Smart Card Reader and
a SIM card slot.
Perform the following to install the Expansion Module to your Tablet Computer:
1. Align the expansion connectors (pogo connectors) of your Tablet
Computer to the connectors on the Expansion Module.
2. Tighten the screw to secure the Expansion Module to the Tablet Computer.
NOTE: For information on using the Expansion Module, refer to the User Manual that comes with the
module.
Expanding Your Tablet Computer
DAP Technologies
5-3
Installing the Extendable Battery Pack
For longer battery life, you can use the Extendable Battery Pack which is
available as an optional accessory.
Perform the following to install the Extendable Battery Pack to your Tablet
Computer:
1. Place the Tablet Computer face down on a flat even surface.
2. Align and place the battery pack on its bay.
3. Tighten the screws to secure the Extendable Battery Pack to the Tablet
Computer.
5-4
DAP Technologies
Expanding Your Tablet Computer
Checking the Battery Level
To check the battery level of the Extendable Battery Pack, press the battery
button. The battery LED lights up. The number of lit up LEDs indicates the
battery level of the battery pack.
Expanding Your Tablet Computer
DAP Technologies
5-5
CHAPTER
6
Using BIOS Setup and
System Recovery
BIOS Setup Utility is a program for configuring the BIOS (Basic Input/ Output
System) settings of the tablet computer. The BIOS is a layer of software,
called firmware, that translates instructions from other layers of software into
instructions that the tablet computer hardware can understand. The BIOS
settings are needed by your tablet computer to identify the types of installed
devices and establish special features.
System Recovery reinstalls Windows to your system and configures it to s
factory default settings.
The chapter describes how to use the BIOS Setup and System Recovery.
Using BIOS Setup and System Recovery
DAP Technologies
6-1
BIOS Setup
When to Use
You need to run BIOS Setup utility when:
• You see an error message on the screen requesting that you run BIOS
Setup utility.
• You want to restore the factory default BIOS settings.
• You want to modify some specific hardware settings.
• You want to modify some specific settings to optimize the system
performance.
Starting BIOS Setup Utility
A USB keyboard is required to access, move around, and make selections in
the BIOS Setup Utility.
1. Before turning on the Tablet Computer, connect the USB keyboard to the
USB port of the Tablet Computer.
2. Power on the Tablet Computer.
3. When the system starts up and the post screen logo appears, quickly
press F2 or the Delete key to enter the BIOS Setup Utility.
6-2
DAP Technologies
Using BIOS Setup and System Recovery
How to Use
NOTE:
• The BIOS Setup Utility screens shown in this chapter are for reference only. The actual items
or settings on your Tablet Computer may differ.
• The settings you select in your operating system might override similar settings in BIOS Setup
Utility.
Key
Function
◄/►
Selects a menu title.
▲/▼
Selects an item or option.
Enter
• Brings up the submenu, if available
• When an item is selected, opens or closes the options
window
• Goes to the next field when an item has multiple fields, such
as System Date.
+/-
Changes the option or adjusts the value.
F1
Displays help.
F9
Optimized Defaults.
F10
Save and exit BIOS.
Esc
Returns to the previous menu if in a submenu or Exit BIOS.
Using BIOS Setup and System Recovery
DAP Technologies
6-3
BIOS Menu
Main Menu
The Main menu contains the system date and time settings and shows the
basic system information.
Main
Security
Aptio Setup Utility - Copyright (C) 2011 American Megatrends, Inc.
Advanced Internal Devices Boot Save & Exit
System Date
System Time
[Sat 01/04/2014]
[09:38:55]
Processor Type
Processor Speed
Total Memory
Internal Drive Model
Intel(R) Atom(TM) CPU
1600 MHz
4096 MB
SanDisk SSD (64GB)
System Model
Bios Version
MT1010
E190
Quiet Boot
[Enabled]
Set the Date. Use Tab to
switch between Date elements.
: Select Screen
: Select Item
Enter: Select
+/_:Change Opt.
F1: General Help
F9: Optimized Defaults
F10: Save & Exit
ESC: Exit
Version 2.14.1219. Copyright (C) 2011 American Megatrends, Inc.
• System Date: Sets the system date.
• System Time: Sets the system time.
• Quiet Boot: Enables or disables the Quiet Boot option.
Security Menu
The Security menu contains the security settings, such as configuring the
Supervisor Password and Trusted Computing.
Main
Security
Aptio Setup Utility - Copyright (C) 2011 American Megatrends, Inc.
Advanced Internal Devices Boot Save & Exit
Supervisor Password
Supervisor Password
Trusted Computing
Set Supervisor Password
Clear
To clear supervisor password,
please enter old password
first and leave new password
and new password confirmation
blank.
: Select Screen
: Select Item
Enter: Select
+/_:Change Opt.
F1: General Help
F9: Optimized Defaults
F10: Save & Exit
ESC: Exit
Version 2.14.1219. Copyright (C) 2011 American Megatrends, Inc.
• Supervisor Password: Configures the supervisor password which will be
required before you can enter the BIOS Setup Utility. When the Supervisor
Password is configured, the word “Set” is shown on the screen. If the
6-4
DAP Technologies
Using BIOS Setup and System Recovery
Supervisor Password is not configured, the word “Clear” is displayed.
• Trusted Computing: Enables or disables BIOS support for TPM (Trusted
Platform Module) security devices.
Advanced Menu
The Advanced menu contains the advanced settings, such as Wake On LAN
and Storage Device Data Interface settings.
Main
Security
Aptio Setup Utility - Copyright (C) 2011 American Megatrends, Inc.
Advanced Internal Devices Boot Save & Exit
Storage Device Data Interface
[AHCI]
Hard Disk Controller
Configuration
[IDE]: SATA Controller operates
in native IDE mode.
[SATA]: SATA Controller
operates in enhanced AHCI mode.
[WARNGING]: Changing this
setting may cause your SO to
stop
: Select Screen
: Select Item
Enter: Select
+/_:Change Opt.
F1: General Help
F9: Optimized Defaults
F10: Save & Exit
ESC: Exit
Version 2.14.1219. Copyright (C) 2011 American Megatrends, Inc.
• Storage Device Data Interface: Selects how the hard disk controller
operates, options are IDE or AHCI mode.
Using BIOS Setup and System Recovery
DAP Technologies
6-5
Internal Devices Menu
The Internal Devices menu enables or disables the built-in devices in the Tablet
Computer.
Main
Security
Aptio Setup Utility - Copyright (C) 2011 American Megatrends, Inc.
Advanced Internal Devices Boot Save & Exit
GPS
ALS
[Enabled]
[Enabled]
[Enabled]: GPS is active.
[Disabled]: GPS is not active.
: Select Screen
: Select Item
Enter: Select
+/_:Change Opt.
F1: General Help
F9: Optimized Defaults
F10: Save & Exit
ESC: Exit
Version 2.14.1219. Copyright (C) 2011 American Megatrends, Inc.
• GPS: Enables or disables the GPS antenna.
• ALS: Enables or disables the Ambient Light Sensor (ALS).
Boot Menu
The Boot menu sets the boot order of devices.
Main
Set
1st
2nd
3rd
4th
5th
6th
Security
Aptio Setup Utility - Copyright (C) 2011 American Megatrends, Inc.
Advanced Internal Devices Boot Save & Exit
Boot Priority
Boot
Boot
Boot
Boot
Boot
Boot
Set Boot Priority.
[USB CD/DVD]
[Hard Disk: 64GB SA...]
[USB Hard Disk:Gene...]
[USB KEY]
[USB Floppy]
[Network:Realtek PX...]
: Select Screen
: Select Item
Enter: Select
+/_:Change Opt.
F1: General Help
F9: Optimized Defaults
F10: Save & Exit
ESC: Exit
Version 2.14.1219. Copyright (C) 2011 American Megatrends, Inc.
Save & Exit Menu
The Save & Exit menu displays ways of exiting BIOS Setup Utility. After
modifying the settings, you must save and exit for the changes to take effect.
6-6
DAP Technologies
Using BIOS Setup and System Recovery
Main
Security
Aptio Setup Utility - Copyright (C) 2011 American Megatrends, Inc.
Advanced Internal Devices Boot Save & Exit
Save Changes and Reset
Discard Changes and Exit
Restore Defaults
Discard Changes
Save Changes
Reset the system after saving
the changes.
: Select Screen
: Select Item
Enter: Select
+/_:Change Opt.
F1: General Help
F9: Optimized Defaults
F10: Save & Exit
ESC: Exit
Version 2.14.1219. Copyright (C) 2011 American Megatrends, Inc.
• Save Changes and Reset: Saves the changes then restarts the system.
• Discard Changes and Exit: Exits BIOS Setup Utility without saving the
changes you have made.
• Restore Defaults: Restores the default values for all the setup items.
• Discard Changes: Restores the previous values of all items.
• Save Changes: Saves the changes you have made.
Using BIOS Setup and System Recovery
DAP Technologies
6-7
APPENDIX
A
Maintenance, Troubleshooting
and Specifications
This chapter covers the following topics:
• How to care for your Tablet Computer
• Troubleshoot your Tablet Computer
• Tablet Computer Specifications
Specifications
DAP Technologies
A-1
Taking Care of the Tablet Computer
Location Guidelines
• Keep the tablet computer at least 13 cm (5 inches) away from electrical
appliances that can generate a strong magnetic field such as a TV,
refrigerator, motor, or a large audio speaker.
General Guidelines
• Do not place heavy objects on top of the tablet computer as this may
damage the display.
• The screen surface is easily scratched. Use the screen protector film to
protect it. Do not use paper towels to clean the display but use the included
cleaning cloth. Avoid touching it with a pen or pencil.
• To maximize the life of the backlight in the display, allow the backlight to
automatically turn off as a result of power management. Avoid using a
screen saver or other software that prevents the power management from
working.
Cleaning Guidelines
• Use a soft cloth moistened with water or a non-alkaline detergent to wipe
the exterior of the tablet computer.
• Gently wipe the display with a soft, lint-free cloth. Do not use alcohol or
detergent on the display.
Touchscreen Guidelines
• Use your finger or the included stylus on the display. Using a sharp or
metallic object may cause scratches and damage the display, thereby
causing errors.
• Use a soft cloth to remove dirt on the display. The touchscreen surface has
a special protective coating that prevents dirt from sticking to it. Not using
a soft cloth may cause damage to the special protective coating on the
touchscreen surface. To clean off hard to remove dirt, blow some steam on
the particular area and gently wipe away using a soft cloth.
• Do not use excessive force on the display. Avoid placing objects on top of
the display as this may cause the glass to break.
When there is a noticeable discrepancy in the operation of the touchscreen
function (stylus touch does not correlate to the proper location on the screen),
recalibrate the touchscreen display (see “Calibrating the Screen” on page
2-3).
A-2
DAP Technologies
Specifications
Troubleshooting
When you encounter problems when using the Tablet Computer, try the
following troubleshooting tips first to detect and solve the problem. If the
problem persists, contact customer support.
Problem
Solution
The battery is not
charging.
• Make sure the AC adapter is properly
connected.
• Make sure the battery is not too hot or too cold.
• Make sure the battery pack is installed correctly.
• Make sure the battery terminals are clean.
Nothing appears on the
screen.
• The Tablet Computer may be in sleep mode.
Press the power button to wake up the display.
• The brightness level may be too low. Increase
brightness (see “Adjusting Screen Brightness”
on page 2-6).
The screen suddenly
turns blank and the
power indicator goes off.
• Make sure the AC adapter is properly
connected.
• If using a battery pack, the battery pack may be
depleted, replace or charge the battery.
I cannot use the wireless • Make sure that wireless LAN feature is turned
LAN feature.
on.
Wireless LAN signal
quality is poor.
• The Tablet Computer may be out of range. Move
your Tablet Computer closer to the access point
or another wireless LAN device associated with
it.
• Check if your surroundings have interferences,
such as microwave ovens, cordless phones.
Move the Tablet Computer away from objects
causing interference.
I cannot connect to
another wireless LAN
device.
• Make sure that wireless LAN feature is turned
on.
• Make sure that the SSID setting is the same for
every wireless LAN device in the network.
• Restart the Tablet Computer.
• Make sure the IP address or subnet mask
setting is correct.
Specifications
DAP Technologies
A-3
Problem
A-4
Solution
I cannot connect to
another device with
Bluetooth.
• Make sure that both devices have Bluetooth
turned on.
• Make sure that the distance between the two
devices is within 10 meters and there are no
walls or large obstructions between the devices.
• Make sure that both devices are turned on and
are configured to be discoverable.
• Make sure that both devices are compatible.
No sound is produced.
• Adjust the volume of the Tablet Computer (see
“Adjusting Volume” on page 2-6).
• If using an external audio device, make sure that
the cable is properly connected.
DAP Technologies
Specifications
Tablet Computer Specifications
Technical Specifications
Processor
Intel® Cedar Trail
N2600 (1.6GHz)
BIOS
• AMI Aptio®
• TAA socket
Chipset
• Intel Tiger Point
• NM10
Main Memory
DDR3 2GB
Display
• 10.1” backlight LED
• 1280 x 800
Graphics
• Intel Cedar View SGX545
• SGX545@400MHz
Camera
• Back Cam CMOS, 5.0MP with auto focus
• Front Cam CMOS, 2MP with fixed focus
Storage
32/64/128GB
Card Slot
MicroSD Card Reader
Connectivity
• WLAN: 802.11 a/b/g/n, half-size mini PCI-E
card with BT
• WWAN: Gobi 5000
LED Status Indicator
•
•
•
•
Heater On
RF On/Off
Battery Full / Charging / Low
Power On
Interface
•
•
•
•
•
•
•
•
•
3.5 Φ Audio Jack x 1
HDMI Type D x 1
MicroSD Card x 1
Micro-SIM Card x 1
USB Type A x 1
USB Mini-A x 1
RJ-45 x 1
Expansion Port x 1
Docking Port x 1
Antenna
• WWAN Main
• WLAN x 2
• GPS
Audio
• Single Digital Mic
• 1 x Speaker, 200Hz ~ 16KHz
Power Management
ACPI 3.0 Supported
Specifications
DAP Technologies
A-5
Technical Specifications
Battery Bridge Battery
Lithium-Polymer Battery Pack with power saving
features activated
AC Adapter
AC 100 ~ 240V, 50 ~ 60Hz, DC 12V, 60W
Physical Specifications
A-6
Dimensions (WxHxT)
290 x 195 x 21 mm
Weight
< 1.2 Kg (including battery)
Security
• Infineon chip on board
• Fingerprint Reader Swipe-type biometric
sensor
• Kensington Lock
DAP Technologies
Specifications
APPENDIX
B
Regulatory Information
This appendix provides regulatory statements and safety notices about your
Tablet Computer.
NOTE: Marking labels located on the exterior of your Tablet Computer indicate the regulations that
your model complies with. Check the marking labels and refer to the corresponding statements in this
appendix. Some notices apply to specific models only.
Regulatory Information
DAP Technologies
B-1
Important Information
ATTENTION: Pour réduire le risque d’incendie ou de choc électrique ne pas
exposer l’appareil à la pluie ou à l’humidité. VERIFIER que le cordon électrique
est la prise murale pour un delai d’inactivite prolongé. Pour arrêter complètement
l’alimentation de l’appareil, débranchez le cordon d’alimentation de la prise AC.
N’enlever ni le capot arrière ni les pièces internes de l’appareil. Contactez un
personnel qualifié si nécessaire.
SA1965
AVERTISSEMENT ÉLECTRIQUE
Utilisé pour les instructions destinés à alerter l’utilisateur d’un
CHOC ÉLECTRIQUE mortel ou de blessure grave en cas
d’utilisation incorrecte de l’unité.
SA1966
AVERTISSEMENT
Utilisé pour les instructions destinés à alerter l’utilisateur d’un
risque mortel ou de blessure grave en cas d’utilisation incorrecte
de l’unité.
ATTENTION: Pour réduire le risque d’incendie ou de choc electrique ne pas
exposer l’appareil à la pluie ou à l’humidité FAIRE le cordon électrique est
DÉBRANCHÉ DE LA PRISE MURALE DANS UN DELAI DE PROLONGER
INACTIVITÉ. De se désengager totalement LE POUVOIR DE L’UNITE, S’IL
VOUS PLAÎT DEBRANCHER LE CORDON D’ALIMENTATION DE LA PRISE
AC. NE PAS Romove le capot arrière, pas de PIÈCES À L’INTÉRIEUR.
Contactez un personnel qualifié S’il faut le réparer.
B-2
SA1965
ELECTRIQUE AVERTISSEMENT
Sert aux instructions destin es alerter l’utilisateur d’un CHOC
ÉLECTRIQUE mortel ou de blessure grave en cas d’utilisation
incorrecte de l’unit.
SA1966
AVERTISSEMENT
Sert aux instructions destin es alerter l’utilisateur d’un risque
mortel ou de blessure grave en cas d’utilisation incorrecte de
l’unit .
DAP Technologies
Regulatory Information
Safety Information (EN)
Follow and adhere to all warnings and instructions on the screen. For your
safety, please read all safety and operating instructions before using the Tablet
Computer. Keep this manual for future reference.
1. Carefully read all recommendations and precautions for use before using
this product.
2. Retain all recommendations and precautions for future reference as
necessary.
3. Read and be sure to understand all warnings listed in the precautions.
4. Follow all operating precautions when using this product.
5. Use only a dry cloth to clean this product.
6. Do not place the product near any heat sources such as radiators, warm
air intakes, stoves or other heat-generating devices (including amplifiers or
other heat producing equipment).
7. Do not disregard the safety that a polarized or grounded connection can
provide. A polarized connection consists of two plugs, one of which is
larger than the other. A grounded connection has two blades and a third
one that is grounded. If the main plug provided cannot be inserted into
your outlet, consult an electrician to replace your obsolete outlet.
8. Protect the power cord from being crushed or pinched, particularly in the
area of the plugs, any receptacles used, and the point of exit from the
apparatus. Do not break off the ground pin of the power cord.
9. Use only accessories specified by the manufacturer.
10. Use only with accessories specified by the manufacturer or sold
with the product.
11. Unplug this apparatus during lightning storms or when it is not being used
for long periods.
12. Refer all servicing to qualified service personnel. A technical intervention
is required when the apparatus has been damaged in any way or does not
operate normally.
Regulatory Information
DAP Technologies
B-3
Informations de sécurité (FR)
Suivez et respectez tous les avertissements et instructions figurant sur l’écran.
Pour votre sécurité, s’il vous plaît lire toutes les consignes de sécurité et de
fonctionnement avant d’utiliser le Tablet Computer. Gardez ce manuel pour
référence future.
1. Lire avec attention toutes les recommandations et precautions d’emploi
avant d’utiliser ce produit.
2. Veuillez conserver ces recommandations et précautions pour référence
future.
3. Lire et comprendre tous les avertissements énumérés dans les
précautions d’emploi.
4. Suivre toutes les précautions d’emploi pour utiliser ce produit.
5. Utiliser exclusivement un chiffon sec pour nettoyer ce produit.
6. Ne pas placer le produit près de toute source de chaeur telle que
radiateurs, arrivées d’air chaud, fourneaux ou autres appareils générant
de la chaleur (incluant les amplificateurs producteurs de chaleur) .
7. Ne pas négliger la sécurité que procure un branchement polarisé ou avec
raccordement à la terre, Un branchement polarisé comprend deux fiches
dont l’une est plus large que l’autre. Un branchement à la terre comprend
deux fiches plus une troisième reliée à la terre. Si la fiche secteur fournie
ne s’insert pas dans votre prise de courant. consulter un ‘électricien afin
de remplacer votre prise obsolète.
8. Protéger le cordon d’alimentation de tout écrasement ou pincement,
particulièrement au niveau des fiches, des réceptacles utilisés et à
l’endroit de sortie de l’appareil. Ne pas casser la fiche de terre du cordon
d’alimentation.
9. Utiliser uniquement les accessoires spécifiés par le constructeur.
10. Utilisez seulement des accessoires spécifiés par le
manufacturier ou vendus avec le produit.
11. Débrancher cet appareil lors d’orages ou s’il n’est pas utilize
pendant une longue période.
12. Faire exécuter le service par du personnel qualifié. Une intervention
technique est requise lorsque l’appareil a été endommagé ou n’opère pas
normalement.
B-4
DAP Technologies
Regulatory Information
About the Batteries
Nordic Lithium Cautions (for lithium-ion batteries)
CAUTION!
Dispose of used batteries according to the manufacturer’s instructions. (English)
ATTENTION!
Il y a danger d’explosion s’il y a remplacement incorrect de la batterie.
Remplacer uniquement avec une batterie du mêre type ou d’un type équivalent
recommandé par le constructeur. Mettre au rebut les batteries usagées
conformément aux instructions du fabricant. (French)
About the Adapter
• Use only the supplied AC adapter (Rating: Input DC 12V, 4.16A). Use of
another type of AC adapter will result in malfunction and/or danger.
• Do not use the adapter in a high moisture environment. Never touch the
adapter when your hands or feet are wet.
• Allow adequate ventilation around the adapter when using it to operate the
device or charge the battery. Do not cover the AC adapter with paper or
other objects that will reduce cooling. Do not use the AC adapter while it is
inside a carrying case.
• Connect the adapter to a proper power source. The voltage requirements
are found on the product case and/or packaging.
• Do not use the adapter if the cord becomes damaged.
• Do not attempt to service the unit. There are no serviceable parts inside.
Replace the unit if it is damaged or exposed to excess moisture.
Regulatory Information
DAP Technologies
B-5
FCC Regulations
This device complies with part 15 of the FCC Rules. Operation is subject to the
following two conditions: (1) This device may not cause harmful interference,
and (2) this device must accept any interference received, including interference
that may cause undesired operation.
This device has been tested and found to comply with the limits for a Class B
digital device, pursuant to Part 15 of the FCC Rules. These limits are designed
to provide reasonable protection against harmful interference in a residential
installation. This equipment generates, uses and can radiate radio frequency
energy and, if not installed and used in accordance with the instructions, may
cause harmful interference to radio communications. However, there is no
guarantee that interference will not occur in a particular installation. If this
equipment does cause harmful interference to radio or television reception,
which can be determined by turning the equipment off and on, the user is
encouraged to try to correct the interference by one or more of the following
measures:
• Reorient or relocate the receiving antenna.
• Increase the separation between the equipment and receiver.
• Connect the equipment into an outlet on a circuit different from that to which
the receiver is connected.
• Consult the dealer or an experienced radio/TV technician for help.
Changes or modifications not expressly approved by the party responsible for
compliance could void the user‘s authority to operate the equipment.
Operation on the 5.15-5.25GHz frequency band is restricted to indoor use only.
The FCC requires indoor use for the 5.15-5.25GHz band to reduce the potential
for harmful interference to co-channel Mobile Satellite Systems. Therefore, it
will only transmit on the 5.25-5.35 GHz, 5.47-5.725 GHz and 5.725 –5.850 GHz
band when associated with an access point (AP).
B-6
DAP Technologies
Regulatory Information
CE Notice (European Union)
This device has been tested and found to conform with the limits set for a Class
B product.
• EN 55022 — “Limits and Methods of Measurement of Radio Interference
Characteristics of Information Technology Equipment”
• EN 55024 — “Information technology equipment - Immunity characteristics Limits and methods of measurement”
• EN 61000-3-2 — “Electromagnetic compatibility (EMC) - Part 3: Limits Section 2”
• EN 61000-3-3 — “Electromagnetic compatibility (EMC) - Part 3: Limits Section 3”
• EN 60950 — “Safety of Information Technology Equipment.”
• EN 55022 Emissions requirements
RF Exposure Information (SAR)
This device is compliance with SAR for general population /uncontrolled
exposure limits in ANSI/IEEE C95.1-1999 and had been tested in accordance
with the measurement methods and procedures specified in OET Bulletin 65
Supplement C.
This equipment complies with FCC RF radiation exposure limits set forth for an
uncontrolled environment. This device was tested for operations with the device
contacted directly to the human body to the back side of the EUT. To maintain
compliance with FCC RF exposure compliance requirements, avoid direct
contact to the transmitted antenna during transmitting.
IC Regulations
This device complies with Industry Canada license-exempt RSS standard(s).
Operation is subject to the following two conditions:
(1) this device may not cause interference, and
(2) this device must accept any interference, including interference that may
cause undesired operation of the device.
Regulatory Information
DAP Technologies
B-7
Le présent appareil est conforme aux CNR d’Industrie Canada applicables
aux appareils radio exempts de licence. L’exploitation est autorisée aux deux
conditions suivantes:
(1) l’appareil ne doit pas produire de brouillage, et
(2) l’utilisateur de l’appareil doit accepter tout brouillage radioélectrique subi,
même si le brouillage est susceptible d’en compromettre le fonctionnement.”
This Class B digital apparatus complies with Canadian ICES-003
Cet appareil numérique de la classe B est conforme à la norme NMB-003 du
Canada.
The device could automatically discontinue transmission in case of absence of
information to transmit, or operational failure. Note that this is not intended to
prohibit transmission of control or signaling information or the use of repetitive
codes where required by the technology.
The device for the band 5150-5250 MHz is only for indoor usage to reduce
potential for harmful interference to co-channel mobile satellite systems; the
maximum antenna gain permitted (for devices in the bands 5250-5350 MHz and
5470-5725 MHz) to comply with the e.i.r.p. limit; and The maximum antenna
gain permitted (for devices in the band 5725-5850 MHz) to comply with the
e.i.r.p. limits specified for point-to-point and non point-to-point operation as
appropriate, as stated in section A9.2(3). In addition, High-power radars are
allocated as primary users (meaning they have priority) of the band 5250-5350
MHz and this radar could cause interference and/or damage to LE-LAN devices.
The County Code Selection feature is disabled for products marketed in the US/
Canada. For product available in the USA/ Canada markets, only channel 1~11
can be operated. Selection of other channels is not possible.
Important Note
IC Radiation Exposure Statement
This EUT is compliance with SAR for general population/uncontrolled exposure
limits in IC RSS-102 and had been tested in accordance with the measurement
methods and procedures specified in IEEE 1528.
B-8
DAP Technologies
Regulatory Information
Toll Free : +1 (855) DAP-TECH (327-8324)
www.daptech.com
United States
8945 South Harl Avenue, Suite 112
Tempe, Arizona, 85284 USA
Phone: +1 (855) DAP-TECH
2915 Premiere Parkway, Suite 300
Duluth, Georgia 30097, USA
Phone: +1 (855) DAP-TECH
Canada
4535 Wilfrid Hamel Blvd., Suite 100
Quebec City, QC Canada G1P 2J7
Toll Free: +1 (800) 363-1993
Phone: +1 (418) 681-9394
Fax: +1 (418) 681-0799
Europe, Middle East, Africa
9 The Chambers, Vineyard
Abingdon UK OX14 3PX
Phone: +44 (0) 1235 462130
Fax: +44 (0) 1235 462131
PN: 1506-0P35000
•
January 2014