1
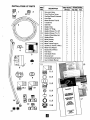
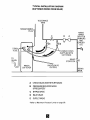
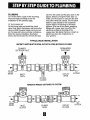
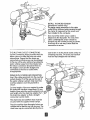
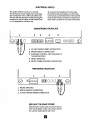
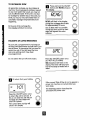
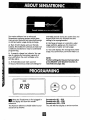
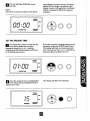
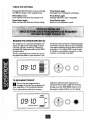
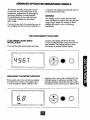
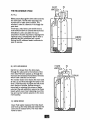
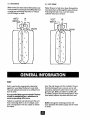
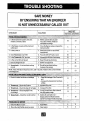
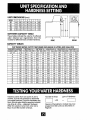
INTRODUCTION Thank you for choosing a Permutit Water Softener from EcoWater. With over 80 years experience we have manufactured your new water softener from quality corrosion free materials to give you many years of trouble-free softened water. This User Manual will guide you through the steps of how to install your unit and how to get the best out of it. Please read it carefully. CONTENTS Page Unpacking your Water Softener 2 Installation of your Water Softener 4 Timetronic Programming 11 Sensatronic Programming 18 How Your Water Softener Works 29 General Information 31 Trouble Shooting 33 Unit Specification and Hardness Setting 35 Guarantee &Service 37 UNIT EXPLOSION Notes 1. Remove all packaging and parts from inside the unit. 2. To remove valve cover for ease of installation follow the instructions carefully. The valve cover is removed by sliding it forwards. First remove the salt lid. Firmly push the faceplate back with both thumbs positioned on the upper grey area. Push until the faceplate is released from the holding support so that the valve cover can slide freely forwards. 1 2 3 4 5 6 7 8 9 Control Valve Cover Salt Lid Brine Cabinet Electronic Faceplate Water Softener Valve & Motor Resin Cylinder Brine Float and Tube Overflow Connection Drain Connection INSTALLATION KIT PARTS 1 PART REF. 1 2 3 4 5 6 Non-return Valve Drain/Overflow Tubing 7 8 9 10 10.1 11 11.1 11.2 11.3 11.4 11.5 11.6 ~ 12 13 4 5 14 15 16 17 7 DESCRIPTION Overflow Elbow & Grommet Hose Clips Water Hardness Test Kit Transformer Inlet Filter Adaptor Clips Adaptor ·0· Rings Adaptor Elbows (1" to 3Ji1 Adaptor Elbows (1" to 1'1 Adaptor Elbow Meter Set Adaptor Elbow Meter Housing Meter Turbine Meter Turbine Support Gasketts (l Black & 1White) Meter Hose Adaptor Bypass Set (3 Valves) Filter Discs Inlet/Outlet Hoses Warranty Card Extended Warranty Details User &Installer Manual TIME"rRONIC SENSATRONIC 307/311 1 1 1 2 1 1 1 2 2 2 1 1 1 2 1 1 1 1 1 1 2 1 1 1 2 2 2 2 o o 1 0 1 N y 1 1 1 1 1 1 Y 1 1 1 1 1 1 o o o o o o 1 2 2 1 1 1 1 0 2 2 0 0 1 1 1 1 1 1 11 6 @ 9 8 10.1 o 1 @ (j)(j) 13 r? o W 11.1 11.5 11 2 . 11.3 USlRl'H!~K 11.4 HANDDV" tAOOiLS 301-3\\ rlnETRON/( 11.5 11.6 MOQ1LS 411-418-426 SENSRTRON/C 17 PLANNING & SITING THE INSTALLATION The installation of a Permutit water softener for any required hard water draw off points, is relatively easy to carry out, but we recommend that this work is undertaken by a plumber or an experienced DIY handyman. Where possible the water softener should be sited close to the rising main, allowing i.e. drinking tap and outside tap. Keep the drain run as short as possible and allow for ease of access for salt refill. Do not install next to a boiler or hot water cylinder. OPERATING CONSIDERATIONS FREEZING The installation of all water fittings should be in accordance with local water byelaws and the water softener, and all associated pipework must be protected against freezing. Take special care where the drain runs outside. Freezing will prevent recharge and cause overfloWing. LEAD PIPEWORK Where lead pipework exists downstream of the proposed location of the water softener, we advise you ask the local water authority for advice on the replacement of lead pipework. Grants may be available. Homes built since 1976 will not have lead pipework. ELECTRICAL REQUIREMENTS The water softener requires a 240 volt 50 Hz electrical supply fused at 3 amps taken off a power supply not a lighting circuit. Power is supplied via a 24 volt 50 Hz transformer. HARDWATER TAP Water Authority byelaws require that one tap in the house remains unsoftened for drinking purposes. It is also recommended that the garden tap is left with a hard water supply. PRESSURE All water softeners have an effect on flow rate and pressure. Low or high pressure could lead to damage or non operation of the water softener. If the daytime pressure exceeds 4.76 BAR (70 psi) a pressure reducing valve should be fitted. If daytime pressure is less than 25 psi a pressure pump is required. Note that night time pressures will be much higher than daytime. FLOW RATES The water flow must be at least 10 litres per minute for the water softener to be working as per its design specification. PLUMBING COMPONENTS NEEDED The Installation Kit provides the basic plumbing components but additional piping and connectors (capillary and/or compression copper "fittings) should be used as required. WARNING FAILURETO MEETTHE FOLLOWING REQUIREMENTS CAN CAUSE DAMAGETO THE WATER SOFTENER, OR RESTRICT ITS OPERATION. SPECI FICATI ON REQU IREM ENTS Maximum Water Temperature 49°C (120°F) Maximum Daytime working pressure 4.76 BAR (70 psi) Minimum working pressure 1.7 BAR (25 psi) Minimum system flow O.6m 3/hr If a pressure reducing valve is required this may be ordered from Ecowater Systems: Quote Part No. 800220 for '12" or 15mm pipework Quote Part No. 800223 for %" or 22mm pipework ID TYPICAL INSTALLATION DIAGRAM (SOFTENER VIEWED FROM REAR) TO STORAGE TANK TRANSFORMER PLUG C DRAIN HOSE A FLEXIBLE HOSES (SUPPLIED WITH SOFTENER) • TO DRAIN B MAINS WATER TAPS FOR DRINKING AND GARDEN USE MAINS STOPCOCK WATER SOFTENER OVERFLOW TO OUTSIDE A CHECKVALVE(NON RETURN VALVE) B PRESSURE REDUCING VALVE (IF REQUIREDr C BYPASS VALVE DINLET VALVE E OUTLET VALVE ·Refer to Maximum Pressure Limits on page (4). RISING MAIN PLUMBING valve for the outlet and the grey valve as the bypass. Before turning the water back on, make sure the bypass is open and the inlet Turn off the water supply at the incoming main and begin plumbing as per the installation on the previous page. and outlet valves are closed. This will allow water to pass directly to the household FIT TH E BYPASS KIT Cut the rising main and install the check valve. Next, plumb the bypass, inlet and outlet valves so that the water supply can be turned on. For ease and future customer confidence, follow the typical installation illustration below. Use the red valve for the inlet, the blue system without it diverting to the water softener. (The use of the plastic plumbing 'fittings with copper pipe may affect the electrical earthing or bonding of the copper pipe. We advise that you contact an electrician about the implications on your system.) TYPICAL VALVE INSTALLATION WATERTO UNIT.INLETIS OPEN, OUTLET IS OPEN, BY-PASS IS CLOSED FROM WATER SOFTENER TO WATER SOFrENER INLET Y A. =:allr-"","-I:::O ,.; rn c TO OUTLET OPEN INLET OPEN SYSTEM BY-PASS CLOSED WATER BY·PASSES SOFTENER TO SYSTEM TO INLET CLOSED BY-PASS OPEN OUTLET CLOSED SYSTEM FIT THE INLET AND OUTLET ADAPTORS Remove the plastic plug from the outlet port on the water softener valve. Fit the '0' rings to the outer groove of each adaptor. Push the adaptors into the valve inlet as far as they will go ensuring that the elbow is pointing vertically down. Timetronic models utilise the same adaptor elbow for both ports. Sensatronic 411 and 418 models must proceed as follows. The 1" to %" Adaptor Elbow should be installed in the Inlet port. The Adaptor Elbow Meter Set (see page 3) must be installed in the outlet port, vertically downwards. FIT THE INLET SCREEN The inlet screen is included in the small parts installation kit. This screen, put in the softener valve inlet, stops dirt and other sediments from getting inside the softener. To install it put the inlet screen into the valve inlet with the pointed end facing outward, towards incoming water. Sensatronic 426 Models proceed by installing the l"to 1" Adaptor in the inlet port and the adaptor elbow meter set (see page 3) in the outlet port. I~ Snap the two large holding clips into place, from the top down. Be sure they snap firmly into place so thatthe adaptors will not pull out. Pull on the adaptors to assure a tight fit has been achieved. - / ~ C THE INLET AND OUTLET CONNECTIONS Use the connecting hoses provided with the elbow unions to make the inlet and outlet connections. Ensure that the hoses are connected such that access can be obtained to the rear of tile water softener by pulling the water softener away from the installed site. The elbow connection should be fitted to the adaptor union and the straight end connected to the inlet or outlet valve as appropriate. INSTALL THE METER SENSOR (Sensatronic models only) The water meter assembles to the valve outlet fitting. Softened water passing through the meter is measured by the sensor and then totalled to the computer. One end of the meter sensor cable is attached to the faceplate. The end of the cable containing the sensor should be inserted into the turbine housing as shown. It will only fit in one way. Ensure that the connection is secure. open drain or via the waste outlet similar to a washing machine. The drain and overflow must be kept straight and not kinked. DRAIN OUTLET/OVERFLOW CONNECTION Insert the rubber grommet into the overflow socket situated % of the way up the rear of the water softener cabinet. Only insert the overflow adaptor once the grommet is secure. Cut two lengths of hose as required to make the drain and overflow connections. Fit one length of hose onto the overflow adaptor and.6:vcfj;:::r one length onto the drain line adaptor. Turn the drain line adaptor so that a straight connection can be made. The drain hose and overflow hose must be secured with the supplied metal clamps. Pass th eoverflow hose through a hole in an outside wall so that its end can be seen. The drain hose may be connected directly into an ~ l! .c:::::o "~' " . ELECTRICAL SUPPLY The water softener works on a 24 volt, 50 Hz electric power supply. You must plug the transformer into a 240 volt outlet only. Be sure that the electrical outlet you plug the transformer into is inside, as the transformer is not designed for outdoor use. To connect the transformer to the valve push the female end plugs on to the male connectors as indicated below. The two flat ends of the female connectors should face each other to allow for an easy connection. SENSATRONIC FACEPLATE 1 2 3 4 5 1 24 VOLTTRANSFORMER CONNECTION 2 MOTOR SWITCH CONNECTION 3 AUXILIARY CONTROL. NOT REQUIRED IN THIS APPLICATION 4 MICRO SWITCHES 5 METER TURBINE SENSOR CONNECTION 1 <2' T_~METR_O_N_IC_:_~_C_E_PL_Jf._J_E DOg 0000 000 __ __3_ ______'1 1 MICRO SWITCHES 2 MOTOR SWITCH CONNECTION 3 24 VOLTTRANSFORMER CONNECTION REPLACE THE VALVE COVER Slide the Valve Cover back into place. Ensure that the faceplate 'snaps' into place. Secure the unit by replacing the salt cover. 8 , ~, :'. , : PR()GRIM'MING Your unit is now fully plumbed in and ready to programme. If the unit is aTimetronic 307 or 311 advance to page 11. If the unit is a Sensatronic 411, 418 or 426 advance to page 18. NOTES TOTHE INSTALLER-BEFORE YOU LEAVE 1. Having programmed your unit you will wish to ensure that the unit is functioning properly before you leave the site. 2. Our Service Department will offer you advice. If you have any queries do not hesitate to call us. 3. Open the inlet and outlet valve and close the bypass as indicated in the diagram (p.6). Check that all the plumbing connections are secure and that there are no leaks. 4. 5. 6. Once the water has run to drain fill the cabinet with salt. You will require a25 Kg bag of Pellet or Tablet salt. Do not use granular salt. For best results Ecowater Systems recommend AQUASOL. Make sure that the brinewell cover is in place and secure as salt must not be allowed to enter the brinewell. Do not fill salt above the overflow. 7. The whole recharge procedure will take approximately 1~12 hours and softened water will gradually replace the hard water in the storage tank over a period of 3-4 days. 8. Advise the customer that those water outlets fed from the header tank will not see softened water immediately. However, following the recharge appliances drawing directly from the water softener may be tested for softened water: ForSensatronic models hold down the recharge button for 3 seconds until RECHARGE flashes in the display. 9. AftEr afew minutes, water will be drawn into the Brine Cabinet and will fill approximately 2" to 2W' from the bottom. This process will take approximately 15-20 minutes. Warranty on the unit will be undertaken by Ecowater's Service Department. However, call outs not due to the water softener but to installation problems will be chargeable. 10. Ensure that the customer is left with all At "this stage the water will be drawn from the cabinet and run to drain. Again check for leaks. literature relating to the unit and that the guarantee card is returned immediately to effect the full warranty. Check that the time of day is correct and that for the Timetronic models, the day is correct and that the days of recharge have been set. Initiate a Recl1arge. For Timetronic Models hold down the OnJOff button for 3 seconds until RCHG shows in the display. II ABOUT TIMETRONIC Your water softener has an advanced electronic mechanism which provides for superior features not available on conventional timeclock units. dials to worry about. The recharge time can be easily altered to suit your requirements. d) Vacation on/off switch. When you go on holiday no water is being used and your unit does not need to recharge. The on/off button switches off the recharge modes without the need to switch off the whole unit. On your return one touch of the button restores all settings. a) A seven day timer programme option. You can automatically recharge the water softener on the days of the week when you need to. b) Simple to effect automatic recharge. This allows an extra provision of softened water at any time, even when your consumption is unexpectedly higher. e) A Microprocessor back up during power cuts. If electrical power to the time goes off, the memory built into the timer circuitry keeps all settings for a minimum of 6 hours. c) Touch button time, recharge time and hardness setting. There are no complicated PROGRAMMING , SETTHETIME D AM =,. ,-", Ie· L'L' '1 SlJ Switch on the transformer, the unit will flash 12.00 a.m. Sunday (whole display flashes). o o o o o AM 1 J. "" I L. • L'L' su Press the TI ME& DAY button once. The hour display will flash. II o o o o o o PM su To advance the hour display press the SET/CLEAR button. Each time you press the SET/CLEAR button the time advances by one hour: Advance the time to the required hour. PM su To advance the minute display press the SET/CLEAR button. Each time you press the SET/CLEAR button the time advances by one minute. Advance 1he time to the required minute setting. o o o o o o II -"" 1 -L/LI su To set the required hour press the TIME & DAY button once. The hour display will cease to flash. The minute display will begin to flash. o o o o o PM o su Press the TIME & DAY button to set. The day display will flash. o o SET THE DAY OF THE WEEK (In normal operation press TIME & DAY three times to reach this point) D o II o o o PM PM MO The day display is flashing. Each time you press the SET/CLEAR button the day advances. Advance until the required day is reached. MO Press the TIME &DAY button to set. The display will be steady. o o o o o SETTHETIME OF RECHARGE NOTE The display should now be steady and read the correct time and day of the week. Only the hour minute/separator will flash as it is pulsing once a second. If an hour, minute, or day display is flashing press the TIME & DAY button once. Repeat pressing the TIME& DAY button until the display steadies. D The unit is factory set to recharge at 2.00 a.m. If you wish to change this time then proceed as follows: (if not proceed to the next section). NOTE 2.00 a.m. is chosen because hard water will enter the system during recharge. Consequently a time is required when very little, if any, water will be used. Press the RECHARGE TIME button once. The display will show the time at which the recharge is set to take place and the days on which this will occur. PM J .,-, 1-' ::J. SUMO L"_' WE SA To advance the recharge time press the SET/CLEAR button. Each time you press the SET/CLEAR button you will advance the time by one hour. Advance the recharge time to the required hour. o o o o SET THE REQUIRED DAYS OF RECHARGE The unit is factory set to recharge on Monday, Wednesday and Friday. You may wish to set the days around your own household requirements or to set the days of recharge according to our user guide on page ?? PM -, • ,-, ,-, C SUMO ·'_'L' WE SA 1.,-, 1 ,.,_, I PM MO Press the TIME &DAY button to set. o o o o o o o D OFF SUMO WE SA Press the RECHARGE day button once and SU (Sunday) begins to 'flash and 'OFF' will be displayed. This means the unit will not recharge on Sunday. o o o o n To change the instruction for Y Sunclays to ON, press the SET/CLEAR button once. The display will advance to show ON. Sunday continues to flash. Pressing the SET/CLEAR button once more will change the instructio nto off again. II ,-, ,-, 0 SU MO 1IJ WE SA To set each day as required, advance through the days of the week by pressing RECHARGE DAY. Each time you depress RECHARGE DAY you will advance one day. The new day will flash. o o o • o n To set the instruction for Sunday press RECHARGE DAY once again. a SUMO On WE SA The display will begin to flash MO (Monday) and ON to indicate that the unit will re-charge on Mondays. To change the instruction for Monday repeat the SET/CLEAR procedure described in II for Sunday. o o • o o '-'-' , 1-"1 PM MO Once all days are set as required, to ON or OFF, press TIME &DAY once to set. The display will return to the time display. 0 o •o o • o o o o CHECK YOUR RE-CHARGE SETIINGS II PM -, - " " ;'-L'L' SUMO WE SA To check the settings you have made press RECHARGETIME once. The displ<lY will show the time that rech arge is set for and the days on ~hich the recharge will take place. o o o o o PM MO If you need to make any changes to these settings, repeat the sections above. PressTIME & DAY to clear and return to the time display. o o o SET THE FILL CYCLE MINUTES The unit is factory set to 'fill the unit with water for 16 minutes to soak the salt and produce brine for recharge. If the time setting for the cyc Ie is too low you may get hard water between recharges. If the time setting is too high you will waste salt. Refer to the user guide on page 36 for the required setting for your particular unit. o D F,ll , Press and hold the RECHARGE TI ME button until Fill shows in the display. After a few seconds, the fill cycle setting will display and flash. II PM NO Once the required setting is reached press the TIME & DAY button once to set. o o o o o o o o o o o o the 'fill cycle press 0 II Totheadvance SET/CLEAR button. ," eLI Each time you press SET/CLEAR the fill cycle will advance by one minute. Advance the fill cycle until required setting is displayed. The display will advance to 59 then begin again at O. * NOTE TO o o o INSTALLER YOU MAY RETURN TO PAGE 10 TO RECHARGE NOW An automatic recharge can be initiated at any time. If you have guests visiting or expect to use more water than usual, you may run out of softened water. If the unit is not due to recharge for another day or two and you think you may run into hard water then an automatic recharge will prevent this from happening. HOLIDAYS OR LONG WEEKENDS As your unit is programmed to recharge on set days it will waste water and salt even if you are not there. To overcome this you need to switch the unit off but still keep the time and cycle setting which have been pre-programmed. Do not switch the unit off at the mains. 1.'-'1 PM ,. '-' I MO Press the DN/OFF button once to return the unit to service. If this is not done the unit will not recharge cmd hard water will enter the system. The corred time and day will show in the display. RCHGI RCHG will flash in the display during the recharge which lasts for approXimately 2 hours. Use as little water as possible during this time period as hard water will bypass the water softener. At the end of the recharge the time display will return to normal. IEJ On return from your holiday. Press and hold the ON/OFF D .button until RCHG shows in the display. o o o o - D Press the ON/OFF button once (DO NOT HOLD DOWN). VAC (Vacation) will flash in the display. The timer will keep time but not recharge to waste salt or water. o o o o - o o o o - If the correct Time & Day do not re-appear a power cut may have occurred whilst you were away. The following section describes the procedure for power cuts. POWER CUTS If electrical power to the timer is interrupted, the "memory" built into the timer circuitry keeps all settings for a minimum of 6 hours. The display is blank and the softener will not recharge, although it will provide softened water. When electrical power is returned, 1 of 3 things will happen. PM MO The present time of day is displayed. The settings have been kept. • B AM 1 =,. 1-'" I L . LILI su Atime will be flashing. This indicates that the settings will need to be re-programmed as the unit has returned to factory settings. To reset, proceed to the beginning of this section and repeat each operation. .. D o o o 00 0 E1 RCHG! If the water softener was in a recharge cycle this will now flash, and the process will continue. o o o o o o o o o o o ~ AS()UT SENSATR()NIC Your water softener has an advanced Sensatronic metering system which gives many product features and important savings on salt and water usage during recharge. a) Back lit LCD display and user friendly buttons. This makes the unit easy to read in all conditions and allows for easy to understand programming. b) A capacity charge bar indicator. You can see at a glance the remaining capacity of your unit before the next recharge cycle will take place. c) An Extended power back up (over 72 hours). The memory retains all settings for extended periods during any power loss and beyond that time only requires the time setting to be reprogrammed. d) Recharge is based on volumetric water usage patterns, giving you the maximum conservation of water and salt usage. e) Your unit displays the average daily water usage. You can monitor your home water use. NOTE To alter settings during normal operation press SELECT until desired function is reached (see page 22). , " , PR()GIMMMING MODEL "°1° '-' When the Transformer is first plugged in D the display will show the model reference. This Number reference should relate to your actual unit as follows: Sensatronic 411- Rll Sensatronic 418 - R18 Sensatronic 426 - R26 The unit will then display a version number. n U The unit will flash 00:00 after a few seconds. panel display a beeper sounds. One beep signals that a change is accepted. If the beeper sounds continually then a different button is required to effect the required operation. NOTE Each time you press a button on the fascia CHARGE •·100" • II " . 1-'" LILI · LILI · • •SO" ·••• PRESENTnME SET THE PRESENT riME The display will continue to flash and the time can be advanced or moved backwards using the (+) or (-) buttons. Holding down the buttons advances the time at 30 minutes per second. D If the time requires changing during normal operation, press the SELECT button once. The display will flash and indicate present time. You may use the (+) or (-) buttons as described above to alter the time. CHARGE ··•·'00" ·••• SO" ·• 1-' ]-"" · LILI LI PRESENTTIME n Once the required time is displayed the U time may be set by pushing the SELECT button once more. CHARGE ·•• ·••SO" =:· .JOt1'JI, HARDNESS The display will flash "15 hardness". SET THE WArER HARDNESS CALCULATION WATER HARDNESS The display will flash 15 hardness" (this is a preset factory setting). The user guide on Page 35 indicates how you might find your water hardness. To set the calculation you will need to use the following table. Read down the left hand side of 1he table and find your current water hardness in degrees Clark or parts per million (ppm) - the water softener setting to the right is the number which requires programming into the unit. For settings above 35 degrees Clark increase unit setting by 5 units for every 5 degrees Clark. g advance or reduce the displayed D Tonumber to your required setting, use the (+) or (-) buttons. DEGREES CLARK 14 15 17 18 20 21 22 24 25 27 28 29 31 32 34 35 (PPM) (200) (220) (240) (260) (280) (300) (320) (340) (360) (380) (400) (420) (440) (460) (480) (500) UNITSETIING 13 14 17 17 19 20 21 22 23 24 25 25 30 30 35 35 Between 25 and 95 the display changes in units of 5. Once 95 is reached the (-) button must be used to return to a lower setting. CHARGE • ·· ·· ·•• '100" J/' L LI HARDNESS ' 50" n Once the required setting is displayed it may be set by pushing the SELECT button once more. U CHARGE ,-, I- 1-' " LIe -LIL' RECHARGE nME ·'00" •• • ·· · ' 50" =: The display will flash 02:00 recharge time. SETTHE RECHARGE TIME display will flash 02:00 recharge D The time which is the pre-set factory setting. If you wish to change this time then proceed as follows: (If not, press SELECT and proceed to the next section). NOTE 02:00 is chosen because hard water will enter the system during recharge. Consequently a time is required when very little, if any, water will be used. CHARGE '100% " _, J -L' · " L' " L' RECHARGE TIME •• ·• '50% • =:· n The recharge time can only be set for hours and not minutes. To select a different recharge time use the (+) or (-) buttons, to advance or retreat one hour at a time. Once the required setting is displayed it may be set by pressing the SELECT button once Y more.The display will show the average daily litre consumption. (Note: Arecharge will take approximately 2 hours. At the time set, each day, the water softener will calculate the capacity remaining and additionally evaluate your water usage patterns to determine if it reqUires a recharge or not)~ CHARGE L ·· ·• '100% AVGOAILY L "' '50%. • • =. VIEW THE AVERAGE DAilY To return to the time display press SELECT. lITRES USED NOTE Your water softener is not designed to be a water meter. The reading measures softened water output but not regeneration water or water drawn that is not softened. Your water softener is similarly not designed to be a quartz accurate clock. Small variations on time keeping may be noticed. The display will show the average daily litre consumption. At first this will read Zero but normally will show the average daily water used for the past 7 days. Asmall L is displayed to indicate the litre setting. No adjustments can be made. CHARGE .100% " 1-- L'L' "" L' •• •• '50% •• =: CHECK THE SETTINGS Pressing the SELECfbutton runs you through the different stages of the programming. Press Select again Recharge time is displayed and flashes. Press Select once Press Select again Time will 'flash and show the present time. Average daily Iitres used is displayed. Press Select again Press Select again Water hardness will flash and shows setting. Returns to the operation mode. READING THE CHARGE BAR DISPLAY The charge bar is continually displayed and shows at a glance the percentage of water softening capacity remaining. Following a recharge, the charge bar returns to the 100% charge position. This is auseful feature as it allows you to see at a glance the status of your machine. If you are about to have an influx of weekend guests and want to ensure that you will not deplete your water softening capacity then check the unit status. If it is below 50% it may be wise to initiate an immediate recharge or set the machine to recharge that night. CHARGE ",-, =, --1"'-' L' 1 ~100% ·· ·50% TO RECHARGE TONIGHT sufficient softened water supply for an expected heavy water usage the next day. Simply press the RECHARGE button once. Recharge tonight will flash on the display. The unit can be programmed to recharge at the next pre-programmed time, regardless of its remaining capacity. This is particularly beneficial to ensure a D CHARGE "0-1" L' _, - L' RECHARGE TONIGHT ·100" ••• • .50" • · ==: n To cancel recharge tonight, press the The display will return to the time display. U RECHARGE BUTTON once and immediately release. CHARGE 7', LI_'·'LI .~ •• "0· ·• • · • • .51/1 TO RECHARGE IMMEDIATELY Alternatively an automatic recharge can be initiated at any time. Simply press the RECHARGE button and hold it down for 3 seconds. Recharge will flash on the display. The process will take a few minutes to begin and lasts approximately 2 hours. It cannot be cancelled once started. Use as little water as possible during this time period as hard water will by-pass the water softener. Once the recharge is complete the recharge display will disappear. The present time will be displayed. NOTE The unit will automatically flash "recharge tonight" once the computer calculates that a recharge is required to restore water softening capacity. At the next programmed recharge time the cycle will automatically begin. Once a recharge is initiated a flashing recharge replaces the flashing "recharge tonight". CHARGE 11·"" I I ·L'L' RECHARGE ··.100" ·••• SO" =:· HOLIDAYS OR LONG WEEKENDS Your unit is programmed to calculate water consumption and the capacity of the water softener remaining. When you are on holiday, no water will be used and the water softener will not recharge, so no salt or water will be wasted. POWER CUTS If the electrical powerto the water softener is interrupted, the time display is blank, but the 'memory' built into the faceplate will keep the correct time for a minimum of 72 hours. The water softener will not recharge but will pass softened water. In the case of a power cut your demand for water will be less as most appliances will not work and so a recharge should not be necessary. When electrical power is returned, 1of 2 things will happen. D Power off up to 72 hours The display returns and is steady. No operation is necessary. CHARGE 11-"" I I - L' L' ···'00" • •·• SO" • =: B Power off over 72 hours The display returns and flashes. Only the time requires re-setting. The Model code, hardness and recharge time will not have been lost as they are stored. CHARGE .100" · ··•SO" " " " • L'L'-LILI ·• =: ,,- PRESENT TIME Even if the time is incorrect after a long period the water softener will continue to work but will recharge at what it believes the time to be. Re-set the time as described in the Programming Section (see page 19). ADVANCED OPTION FOR SENSATRONIC MODELS This section provides instruction on how to enter the secondary functions of the Sensatronic programme. By entering the secondary function you may monitor the performance of your unit and most importantly manage your household water usage. If you are in any part of an operation you do not recognise do not touch any buttons for 2 minutes. The display automatically returns to the present time mode. WARNING The settings for your water softener have been calculated to produce the most efficient usage of your water. Any change to these settings will result in your unit working inefficiently. THE SECONDARY FUNCTIONS TOTAL WATER USAGE SINCE INSTALLATION Press and hold the select button for three seconds. The display will show the total volume of softened water used since the unit was installed. The reading will be in litres (European) or gallons (United States). L I I ,- ,- -, IJOI MEASURING THE WATER FLOW RATE Press select once. The unit will now display the water flow in litres or U.S. gallons per minute through the water softener. If the L ,- ,-, o. -" flOW reading is Zero, open a tap connected to the softened supply to achieve a reading. If the reading is still Zero check that the inlet. outlet and bypass valves are set as per diagram (P.6). COUNTING THE DAYS OF OPERATION AND NUMBER OF RE·CHARGES TURBINE D Press select once. The unit will display a counting meter. If water is passing through the unit this will be advancing. VALVE SWITCHES " ""LI, L'L"_" MOTOR lEI Press (+) once to display the number of days the unit has been in operation. UNIT " - " nME 11 Press (-) once to display the number of times the unit has recharged since it was installed. UNIT I - -; RECHARGE SETTING A 12 HOUR OR 24 HOUR CLOCK Press select once. The display will flash the current setting. The unit is factory set to display a 24 hour clock. L C" , I 111 Press (+) once to activate the 24 hour clock mode. Press (-) once to activate the 12 hour clock mode. SETriNG AUrRES OR GALLON (US) MEASURE Press select. The display will flash the current setting. The unit is factory set to display Iitres and all water flow rate and usage displays are shown in this mode. Press (+) once to activate the litre count mode. Press (-) once to activate the U.S. gallon count mode. MAXIMUM DAYS BETWEEN RE-CHARGE SETIING Press (+) to set a maximum time in days between re-charges. Each press of the (+) button advances 1day. When set the unit will re-charge after the set number of days since the last re-charge irrespective of water usage. Press select once. The display will flash the current setting. The unit is factory set to automatically control all re-charges with intervals based on water usage. We recommend for maximum efficiency that the unit is set to AUTO. RECHARGE DISPLAY THE AUTOMATIC RECHARGE OPTION Press select once. The display will flash between '97' and 'OFF~Thissettingwould be switched to 'ON' in Industrial settings to automatically initiate a recharge once 97% of the capacity was depleted. This is not advised in a domestic application. DISPLAY THE BACKWASH TIME Press select once. The display will flash the current setting. The unit is factory set to backwash for 7 minutes for maximum efficiency. , BACKWASH I MIN DISPLAY THE 2ND BACKWASH SETIING Press select once. The display will 'flash the current setting. The unit is factory set to 0 FF for maximum efficiency. 2ND BACKWASH llrr -,-, DISPLAY THE RINSE TIME Press select once. The display will flash the current setting. The unit is factory set to rinse for 3 minutes for maximum efficiency. Press RINSE ., - - ; MIN select once to return to the primary function the present time will be displayed. SERVICE SOFT WATER IN -oC -oCol : CONTROLLER-DA"'l] Hard water enters from the back of the controller and flows down to the resin tank. As it flows down through the resin bed, the resin beads attract the hardness minerals from the water and holds onto them. This is known as "'on Exchange". Depending on how many hardness minerals are in the water, and how much water is used, the resin bed reaches apoint where it can no longer hold onto any more minerals. The resin bed needs cleaning. Cleaning the bed is known as "Regeneration" or "Recharge". -)\~-.~ RESIN TAN K --t----........-. ~ , ol BRINE_-4 TANK , RESIN BED - - - + - - - + e , , , , , SALT STORAGE--+-- ~ ~~ AREA l~_----::::::'--=::::""_---J RECHARGE Recharge is triggered by different methods according to your type of machine. ATimetronic will recharge on the days programmed regardless of how much of the capacity is used. ASensatronic has a meter built into the valve outlet. As water is used the meter sends electronic pulses to the circuit board computer registering the volume used. The hardness of your water is programmed into the controller. All of this information is collated together with the knowledge of the time since the last recharge and water usage cycles. The computer continually updates this information to calculate when the next recharge is due. When this occurs recharge tonight is displayed. I THE RE-CHARGE CYCLE A) FILL Water passes through the brine valve and into the brine tank. The fill water dissolves the stored salt to make brine solution. This solution is used to Cleanse or re-charge the resin bed. Timetronic units have a pre-set 'fill time to soak sufficient brine to cleanse the resin bed. Sensatronic units calculate the exact proportion of brine required to recharge the capacity used. Consequently the fill time is adjusted and the minimum salt is used. During the fill, softened water continues to pass to service. , , , , BRINE ..---1--+-+---1-_I--VALVE , B) UPFLOW BRINING Salt brine is drawn from the brine tank, through the valve and to the bottom of the resin bed. The brine passes up through the resin bed and releases the hardness minerals which have collected on the resin. The mineral laden brine leaves the resin tank at the top and flows through the valve to the drain. Small deposits of sodium are left on the resin bed as a residue. Upflow brining is important in reducing the volume of water used and the salt saturation required as those beads which need most cleansing are at the top and can be flushed upwards to the drain more quickly. , C) BRINE RINSE Clean fresh water replaces the brine drawn and flows up the resin bed and cleanses the resin bed of residual brine. The rinse water flows to drain. • D) BACKWASH E) FAST RINSE Water enters the resin bed at the bottom and flows upward loosening it and fluffing the bed causing any remaining deposits to release and discharge to drain. Water flows at a fast rate, down through the resin bed, then out through the valve to drain. Following the fast rinse cycle the water softener returns to service. GENERAL INfORMATION SALT Salt is used as the regenerate (cleansing agent) for your Water Softener's resin bed. The salt cabinet will need to be refilled from time to time. It is essential that approximately 6 inches of salt is maintained as a minimum to ensure operating efficiency. Failure to replenish salt will prevent the unit from cleansing itself on its re-charge cycle and consequently it will be unable to soften the water. Pour the salt slowly into the cabinet. Ensure that the brinewell cap is secure, as no salt should be allowed to enter here. Do not use granular salt. Only use tablet or pellet salt. Ecowater Systems recommend Aquasol. Your local water softener stockist will stock salt. NOTE: During the cleaning process salt does not enter the water supply. Salt is rinsed to drain. CLEANING WATER LEVEL Your unit may be cleaned with a damp cloth and detergent. Do not use bleaches, solvents or spirits as they may cause damage. The water level will vary. Generally there will be no more than two inches of water in the cabinet. During re-charge this will increase. Water may normally be visible only when the salt level is very low. THE USE OF SOFTENED WATER WASHING MACHINES HOW SOFTENED IS MY WATER You wi II need much less soap powder. In most washes one tablespoon will be sufficient. Too much lather and clothes will not rinse properly. Test the water hardness from a softened supply using Ecowater's Test kit. Your water should change the colour of the test with one drop of solution. If your unit has been installed for a short period of time it may be 2-3 weeks before the softened water replaces the hard water in your header tank. DISHWASHERS Your dishwasher will no longer need to be filled with salt as this was used to soften the water in the dishwasher. Use much less detergent as too much powder or liquid will result in spotting. STEAM IRONS/CAR BATTERIES Only use distilled or deionised water, not softened water. An Ecowater Distiller (part no. 202100) is a cost effective alternative to buying distilled water. AQUARIUMS Most fsh will thrive on softened water, but ask for expert advice from your local aquarium suppli~r. WA'rERING PLANTS Some household plants dislike softened water whilst others prefer it. Watering the garden with softened water is wasteful and we recommend the external tap is connected to the hard water supply. CLEANING SINKS, BATHS AND BASINS You will find that your cleaning chores are reduced, as cleaning becomes a quick wipe around. Occasionally 'spotting' may result but this is easily rinsed off and nothing to worry about. DRINKING WATER One household tap will be left on a hard water supply. Softened water contains a small amount of sodium. In one pint of softened water the sodium content is the same as in two slices of white bread or ~ pint of milk. Individuals on a low sodium diet should follow the Department of Health's advice that water from a domestic water softener should not be used for drinking and cooking. All water for mixing with powdered milk for babies should be taken from an unsoftened mains tap as powdered milk and softened water both contain sodium for which young babies have a limited tolerance. Anyone on a sodium restricted diet should follow their doctor's advice. If you are concerned about the quality of your drinking water supply ask your local stockist about the benefits of an Ecowater Reverse Osmosis purification system. TROUBLE SHOOTING SAVE MONEY BY ENSURING THAT AN ENGINEER IS NOT UNNECESSARILY CALLED OUT SOLUTION /Jii~:iiji, PAGE REF. TIMETRONIC SENSATRONIC . 1. Is there Salt in the Cabinet, 6 inches of Salt is aminimum level 1 1. Fill the cabinet with salt, add Vz bucket of water, initiate an immediate recharge 16 23 2. Is the Bypass closed and the inlet and outlet open 2. Close the Bypass valve and open the inlet and outlet 6 6 3. Is the power on 3. Switch the power on and check connections 9 9 4. DoesTimetronic read ·VAC· 4. Press the ON/OFF button once 16 5. Is the Timetronic "Fill" time set 5. Increase the fill time if necessary 6. Is the correct time of day set 6. Reset Time & Day functions 7. Is the recharge time set 7. Set the recharge time 15 11 13 8. Sensatronic -Is the hardness setting correct 8. Re-set the hardness settingIncrease if necessary NOTE: If any of the above requires action, add liz bucket of water to the salt and initiate a'recharge now: 1. - Re'set the settings of the Timetronic unit -Increase the Sensatronic hardness setting 19 21 20 16 . 23 13 20 2. Timetronic - Check the Fill time 2. Increase if too low 15 3. Timetronic - Check the days of recharge 3. Increase if too few 13 4. Timetronic - Check Display &Time of recharge 4. Correct if necessary. Set to time of very little water usage 13 5. Sensatronic - Check the model number 5. Switch off unit. Switch on- Display will show Model number. Call Service Department if incorrect 18 ···".:~B:~!~tj:N~·,wilt§liqi~~;·· ····~":")::;;;1~:.·,;·;,;;;;" 1. Check the Mains is open 1. Open Mains 2. Check the Inlet/Outlet valves are open 2. Open valves 5 6 5 6 PAGE REF. 1. Is ihe water soft 1. If yes- take no action 2. Ti metronic - Check that the days of recharge are set 2. Reset the recharge days if incorrect or not set 3. Sensatronic - Check the capacity bar - if %remaining is high and you have hard wate 3. Increase the hardness setting 1. Is the unit in recharge mode 1. If Yes - Wait until completed - Check the Time of Day settings - Check that the recharge time is set as required 2. If No - Bypass the unit - Call Service Department 1. Is the faceplate blank 1. - Check Power - Switch on - Check connection - Push in tight 2. Is the display stuck in one function 3. Does error code appear 2. -Turn off power for 10 seconds and switch back on - Call Service if still stuck 3. - Check all connections are secure - Call Service Hotline 13 20 11 19 13 21 6 6 37 37 9 9 9 9 37 37 9 9 37 37 UNIT DIMENSIONS (mm) MODEL A B C D E F G 307 643 555 515 380 455 55 300 643 555 515 643 555 515 822 735 690 1120 1015 970 380 380 558 725 455 455 455 600 55 55 55 60 300 300 300 360 311 411 418 426 T Jill --G----:·I i:-I-·=-------E====::·I DCBA SOFTENER CAPACITY TABLE These tables indicate the volume of softened water obtained per regeneration from the models for different levels of water hardness. ~I' SIDE REAR CAPACITY TABLES SOFTENED WATER OUTPUT BETWEEN RECHARGE IN L1TRES AND GALLONS MAINS WATER HARDNESS DEGREES CLARK upto _10° 14 15 17 18 20 21 22 24 25 27 28 29 31 32 34 35 P.P.M. to 140 200 220 240 260 280 300 320 340 360 380 400 420 440 460 480 500 TIMETRONIC 307 TIMETRONIC 311 L1TRES GALLONS L1TRES GALLONS 3571 2500 2273 2083 1923 1786 1667 1563 1471 1389 1316 1250 1190 1136 1087 1042 1000 786 551 501 459 424 393 367 344 324 306 290 275 262 250 239 229 220 5143 3600 3273 3000 2769 2571 2400 2250 2118 2000 1895 1800 1714 1636 1565 1500 1440 Hardness varies from one point of use to another. Use the kit provided to determine your water hardness. From the hardwater tap, drain lOml of water. Add the supplied solution one drop at a time - shaking in between. When the solution turns from wine red to blue, record the number of drops. 1132 793 721 661 610 566 529 496 466 441 417 396 378 360 345 330 317 SENSATRONIC 411 SENSATRONIC 418 SENSATRONIC 426 L1TRES GALLONS 5143 3600 3273 3000 2769 2571 2400 2250 2118 2000 1895 1800 1714 1636 1565 1500 1440 L1TRES 1132 793 721 661 610 556 529 496 466 441 417 396 378 360 345 330 317 Number of drops _I x20 7857 5500 5000 4583 4231 3929 3667 3438 3235 3056 2895 2750 2619 2500 2391 2292 2200 GALLONS L1TRES GALLONS 1729 1211 1101 1010 932 865 808 757 713 673 638 606 577 551 527 505 485 11571 8100 7364 6750 6231 5786 5400 5063 4765 4500 4263 4050 3857 3682 3522 3375 3240 2546 1784 1622 1487 1372 1274 1189 1115 1049 991 939 892 850 811 776 743 714 ppm of Hardness I I Owners of Sensatronic models may now programme their units as described on Page 20. DAYS OF RECHARGE AND FILL TIME Timetronic units and the accompanying fill times. These settings are for guidance only and you may find that you need to adjust them according to your own household requirements. SETTINGS FOR llMETRONIC MODELS The following are the recommended frequency of recharge for the relevant TIMETRONIC 307 Hardness in Parts per Million TIMETRONIC 311 Hardness in Parts per Million NO. OF PERSONS 1to 140 160-220 240-300 320·340 360-440 460-500 1to 140 160-220 240-300 320-340 360-440 460-500 M M 1 M M M M M M 9 M 9 9 M M 2 9 M F M M 3 F 9 F M M S TH S 9 9 M S WM F M M M M 9 M W 15 M M M F 9 M M S TH 12 12 M F 15 F M S 15 TH 15 M S TH S 15 15 TH M W F S 9 TH 12 M W F S M F F 15 15 9 M M 9 F 15 9 M F S 9 M TH M 9 999 M TH 9 9 9 F 1-----+----+- 6 M 9 9 M S TH 9 M TH F TH 9 M TH M 4 9 999 9 5 M TH M W S F S 15 • Shaded areas will provide inefficient results. We recommend that the next largest model is used. 9 12 1....-.._ _---'--_ _ 15 STEP 1 - Read down the side ofthe table for the number of persons in your family using water. STEP 2 - Read across the top of the table and find the table listing the relevant hardness for your model (see page 35). and fill times are listed. Refer to the legend below for guidance. STEP 4 - These settings are based on average water usage. You may find that you can reduce these settings to the next lowest hardness level setting. STEP 3 - Read across and down to find the point where steps 1 and 2 meet. At this meeting point the recommended days of recharge STEP 5 - Record your fill time settings in the spaces provided and write ON against those days recommended for recharge in Step 3. LEGEND MONDAY THURSDAY SUNDAY TUESDAY - FRIDAY WEDNESDAY M T W SATURDAY TH F S FILL TIME SU • 12 KG OF SALT USED EACH RECHARGE FOR FlU SmlNG LENGTH OFFILL TIME KG OF SALT USED 9 10 11 12 13 14 15 16 17 19 20 1.2 1.3 1.4 1.6 1.7 1.8 2.0 2.1 2.2 2.5 2.6 RECORD YOUR SETTINGS HERE FILL TIME 0 MINS== 0 DAYS OF RECHARGE KG/RECHARGE (ON/OFF) M T W TH F S SU All Permutit Domestic Water Softeners are fully covered by a one year parts and labour guarantee against manufacturing defect from the date of purchase. This guarantee does not effect the statutory rights of the consumer: Any faults which are not attributable to the water softener but to faulty installation or operation will be chargeable. The following are excluded from your warranty and a call out will be chargeable. 1 2. 3. 4. Water Softeners installed where pressure or flow rates are not within the limits stated in the user and installer handbook. Faults arising from misuse or neglect. Failure to replenish salt. Resetting the programmer in the event of a power failure or incorrect programming. On receipt of your Registration Card we will send your Warranty Number. Please record it here: MY WARRANTY NO. IS YOUR TIMETRONIC WARRANTY The Timetronic 307 and Timetronic 311 are fully covered by a one year parts and labour warranty against manufacturing defect from the date of purchase. 3 year parts and labour warranty free of charge. On receipt of your Registration Card this warranty will be updated to fully cover a three year parts and labour warranty from the date of purchase. Please ensure that this Registration Card is returned immediately and we will send you your Warranty Number. 5. Resetting the programmer when the influent water hardness or the number of people in the household changes. 6. Water Softeners not installed in accordance with the local water authority regulations. 7. Any fault arising from repairs or alterations to the water softener carried out by anyone other than engineers employed by Ecowater Systems Limited. 8. Water Softeners installed outside mainland England and Wales. 9. Faults arising from faulty installation, plumbing or electrical. 10. Any defect or damage occasioned by fire, lighting, explosion, flood, storm, tempest, impact or other extraneous causes. 5 year parts and labour warranty free of charge. On receipt of your Registration Card your warranty will be updated to fully cover a five year parts and labour warranty from the date of purchase. Please ensure that this Registration Card is returned immediately and we will send you your Warranty Number. EXTENDED WARRANTY Ecowater Systems offer an extension to your warranty. Timetronic units can be extended for a further three years,giving a total of six years cover. Sensatronic units can be extended for a further five years, giving a total of ten years cover. The cost of the Extended Warranty is just a few pence a day - call us for more details. YOUR SENSATRONIC WARRANTY SERVICE The Sensatronic 411, Sensatronic 418 and Sensatronic 426 are fully covered by a one year parts and labour warranty against manufacturing defect from the date of purchase. We have a nationwide network of Ecowater employed engineers. In case of any difficulty not covered by this handbook, call us on 0494 484848. Please quote your Warranty Number at the time of your call.