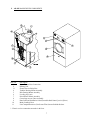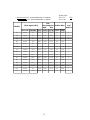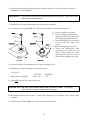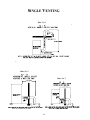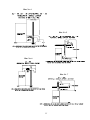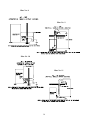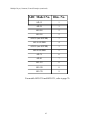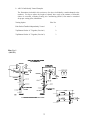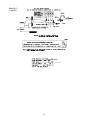
1
CE Gas Directive
Installation Manual
American Dryer Corporation
88 Currant Road
Fall River MA 02720-4781
Telephone: (508) 678-9000 / Fax: (508) 678-9447
E-mail: [email protected]
120297JEV/tf
(for CE models)
ADC Part No. 113007
RETAIN THIS MANUAL IN A SAFE, YET ACCESSIBLE PLACE, FOR FUTURE REFERENCE.
This manual is an addendum only. For specific information regarding the proper installation and
operation of this commercial laundry dryer, refer to the installation and operation manuals included in
the dryer.
WARNING: For your safety the information included in this addendum, and the manuals
included with the dryer must be followed to minimize the risk of fire or explosion
or to prevent property damage, personal injury or death.
THE FOLLOWING INFORMATION MUST BE POSTED IN A PROMINENT LOCATION NEAR
THE DRYER(S) WHERE IT IS EASILY VIEWED.
WHAT TO DO IF YOU SMELL GAS
*
Do not try to light any appliance.
*
Do not touch any electrical switch; do not use any phone in your building.
*
Clear the room, building or area of all occupants.
*
Immediately call your gas supplier from a neighbor's phone.
Follow the gas suppliers instructions.
*
If you cannot reach your gas supplier, call the fire department.
*
Installation and service must be performed by a qualified installer, service agency or the gas
supplier.
NOTE: We have tried to make this manual as complete as possible and hope you will find it
useful. ADC reserves the right to make changes from time to time, without notice or
obligation.
Table of Contents
SECTION I
WARNINGS or IMPORTANT NOTES ....................................................................... 3
SECTION II
"MAJOR DRYER COMPONENTS" ............................................................................ 6
SECTION III
CLEANING / MAINTENANCE ................................................................................ 13
SECTION IV
GAS INFORMATION ................................................................................................ 19
SECTION V
GAS PRESSURE TESTING ...................................................................................... 48
SECTION VI
EXHAUST (FLUE) INFORMATION......................................................................... 49
SECTION VII
PART INFORMATION ............................................................................................... 79
SECTION VIII
ELECTRICAL INFORMATION ................................................................................ 82
SECTION IX
MODEL / CAPACITY................................................................................................. 88
SECTION I
WARNINGS or IMPORTANT NOTES
WARNINGS and IMPORTANT NOTES INCLUDED IN THIS ADDENDUM AND THE INSTALLATION
AND OPERATORS MANUALS INCLUDED WITH DRYER ARE NOT MEANT TO COVER SITUATIONS
OR CONDITIONS WHICH MAY OCCUR. IT MUST BE UNDERSTOOD THAT CAUTION,
CAREFULNESS AND COMMON SENSE ARE FACTORS WHICH CANNOT BE BUILT INTO THIS
PRODUCT. THESE FACTORS MUST BE SUPPLIED BY THE PERSON(S) INSTALLING,
MAINTAINING OR OPERATING THE DRYER.
WARNING: The dryer must never be operated with any of the back guards/panels, outer tops,
or service panels removed. PERSONAL INJURY or FIRE COULD RESULT.
DO NOT store or use gasoline or other flammable vapors and liquids in the vicinity of this or any appliance.
Installation and service must be performed by a qualified installer, service agency, or the gas supplier.
Dryer(s) MUST BE exhausted to the outdoors.
WARNING: Dryer must not be operated without the lint filter in place.
Although ADC produces a very versatile machine, there are some articles that, due to fabric composition or
cleaning method, should not be dried in it.
WARNING: Dry only water-washed fabrics. DO NOT dry articles spotted or washed in dry
cleaning solvents, a combustible detergent, or "all purpose" cleaner.
EXPLOSION COULD RESULT.
WARNING: DO NOT dry rags or articles coated or contaminated with gasoline, kerosene, oil,
paint, or wax. EXPLOSION COULD RESULT.
WARNING: DO NOT dry mop heads. Contamination by wax or flammable solvents will
create a fire hazard.
WARNING: DO NOT use heat for drying articles that contain plastic, foam, sponge rubber, or
similarly textured rubber-like materials. Drying in a heated basket (tumbler) may
damage plastics or rubber and also may be a fire hazard.
3
A program should be established for the inspection and cleaning of lint in the burner area, exhaust duct work,
and area around the back of the dryer. The frequency of inspection and cleaning can best be
determined from experience at each location.
WARNING: The collection of lint in the burner area and exhaust duct work can create a
potential fire hazard. For personal safety, the dryer MUST BE grounded.
UNDER NO CIRCUMSTANCES should the door switch, applicable lint drawer
switch or heat circuit safety devices ever be disabled.
WARNING: PERSONAL INJURY OR FIRE COULD RESULT!
This dryer is not to be used in the presence of dry cleaning solvents or fumes.
Remove articles from the dryer as soon as the drying cycle has been completed.
WARNING: Articles left in the dryer after the drying and cooling cycles have completed can
create a fire hazard.
DO NOT operate steam dryers with more than 125 PSI (8.61 Bars). Excessive steam pressure can damage
steam coil and/or harm personnel.
Replace leaking flexible steam hoses or other steam fixtures immediately. DO NOT operate dryer with leaking
flexible hoses. PERSONAL INJURY MAY RESULT.
READ and FOLLOW ALL CAUTION and DIRECTION LABELS ATTACHED TO DRYER.
WARNING: Failure to properly install, maintain, and/or operate dryer according to this
addendum, and the installation and operators manuals included with dryer may
result in conditions which can cause serious injury, death and/or property damage.
WARNING: DO NOT allow children to play on or in the tumbler. Close supervision of
children is necessary when the tumbler is used near children. This is a safety
rule for all appliances.
DO NOT install or store dryer where it will be exposed to water and/or weather.
The operation of this appliance may effect the operation of other types of gas appliances which take their air for
safe combustion from the same room. If in doubt, consult the appliance manufacturer(s).
4
IMPORTANT: This appliance must only be installed and operated in the country of destination
indicated on the dryer’s data plate. If the appliance is to be installed and operated in
a country other than the one indicated on the data plate, a data plate amendment
must be obtained from American Dryer Corporation.
WARNING: This appliance must only operate with the gas type indicated on the dryer’s data plate. If
the appliance is converted (gas type is changed), a data plate amendment must be
obtained from American Dryer Corporation.
WARNING: This appliance may cause spillage of products of combustion from an open-flue
appliance fitted in the same room, and that such an appliance shall be tested for
clearance of products with the appliance in operation and all windows and doors
closed.
Use this dryer only for its intended purpose, drying fabrics.
WARNING: To reduce the risk of personal injury, install lockable doors to prevent public
access to the rear of the dryers.
Exhaust duct outlet should be checked periodically for blockages, and if any found, removed.
IMPORTANT: A means of restraint must be used to prevent straining of the gas supply when the
appliance is moved.
IMPORTANT: An external means of power removal (disconnect device) must be provided by the installer.
Before installation, check that the local distribution conditions, nature of gas and pressure, and adjustment of the
appliance are compatible.
Always contact your dealer, distributor, or service agent for any conditions or problems you do not
understand, or for replacement (spares) parts. If you cannot locate an ADC dealer or agent, contact the ADC
factory.
ADC Telephone: 508-678-9000
ADC FAX:
508-678-9447
E-mail:
[email protected]
5
SECTION II
"MAJOR DRYER COMPONENTS"
A. AD-15, 25, 30, Super 30, 50, Super 50 and 75 MAJOR DRYER COMPONENTS
Illus. No.
1
2
3*
4
5
6
7
8
9
10
11
12
13
14
Description
Heating Unit
1/8” Compressed Air Supply Inlet
(behind Electric Relay Box for Air Damper Steam Units Only)
Electric Service/Relay Box
Tumbler Bearing Mount Assembly
Idler Bearing Mount Assembly
Blower Motor Assembly (30, 50 and 75 Reversing Models Only)
Leveling Leg (rear)
Drive/Blower Motor Assembly (15, 25 and 30, 50 and 75 Non-Reversing Models)
Drive Motor Assembly for 30, 50 and 75 (Reversing Models ONLY)
Dryer Exhaust Duct Connection
Control (top access) Door Assembly
Data Label and Installation Label (located behind Control [servicing] Door)
Main (loading) Door
Lint Compartment Area (Lint Screen/Filter located behind Door)
Controls
* Electric service connections are made in this box.
6
B. AD-285 MAJOR DRYER COMPONENTS
Illus. No.
1
2
3*
4
5
6
7
8
9
10
11
Description
Dryer Exhaust Duct Connection
Heating Unit
Electric Service/Relay Box
Tumbler Bearing Mount Assembly
Idler Bearing Mount Assembly
Leveling Leg (rear)
Drive/Blower Motor Assembly
Control (top access) Door Assembly
Data Label and Installation Label (located behind Control [service] Door)
Main (Loading) Door
Lint Compartment Area (Lint Screen/Filter) located behind this door.
* Electric service connections are made in this box.
7
C. AD-295/81 MAJOR DRYER COMPONENTS
Illus. No.
1
2
3*
4
5
6
7
8
9
10
11
12
13
Description
Heating Unit
1/8” Compressed Air Supply Inlet
(behind Electric Relay Box for AD-81 Steam Models Only)
Electric Service/Relay Box
Tumbler Bearing Mount Assembly
Idler Bearing Mount Assembly
Blower/Fan Motor Assembly (AD-81 Only)
Leveling Leg (rear)
Drive Motor Assembly (AD-81 Only)
NOTE: AD-295 Drive/Blower Motor Assembly located behind lint drawer (illus. 13)
Dryer Exhaust Duct Connection
Control (top access) Door Assembly
Data Label and Installation Label (located behind Control [servicing] Door)
Main (loading) Door
Lint Drawer
* Electric service connections are made in this box.
8
D. AD-115/120 MAJOR DRYER COMPONENTS
Illus. No.
1
2
3
4
5
6*
7
8
9
10
11
12
13
14
15
Description
Basket (Drive) Motor Assembly
Blower Motor Assembly
Impeller (fan/blower) Assembly
Idler Bearing Mount Assembly
Tumbler Bearing Mount Assembly
Electric Service Relay Box
Heating Unit
Data Label and Installation Label
Top Console (Module) Assembly
Wire Diagram (located behind Control Door)
Control (top access) Door Assembly
Controls
Main (loading) Door
Lint Compartment Door Assembly
Lint (Filter) Drawer Assembly
* Electric service connections are made in this box.
9
E. AD-170 MAJOR DRYER COMPONENTS
Illus. No.
1
2
3
4
5
6
7
8
9
10
11
12
13*
14
15
16
17
18
19
Description
Controls
Control (top access) Door Assembly
Main (Loading) Door Assembly
Lint (Filter) Drawer Assembly
Lint Compartment Door Assembly
Wire Diagram (Located Behind Control Door)
Data Label and Installation Label
Top Console (Module) Assembly
Basket (Drive) Motor Assembly
Blower Motor Assembly
Idler Bearing Mount Assembly
Tumbler Bearing Mount Assembly
Electric Service Relay Box
Heating Unit
Data Label and Installation Label
1/8” Compressed Air Supply Inlet (Behind Gusset)
Side Access Opening
Front Access Opening
Impeller (Fan) Assembly
* Electric service connections are made in this box.
10
F. AD-330 MAJOR DRYER COMPONENTS
Illus. No.
1
2
3
4
5
6
7
8*
9
10
11
12
13
Description
Upper Main Loading Door
Heating Unit (Behind Control Door)
Data Label and Wire Diagram (Behind Control Door)
Lower Tumbler Heating Unit (Behind Control Door)
Lower Lint (Filter) Basket Assembly
Lower Main Loading Door
Controls
Upper Lint (Filter) Basket Assembly
Electric Service Box
Upper Relay/Transformer Box
Upper Duct (Flue) Connection
Lower Duct (Flue) Connection
Tumbler Blaring Assembly
Impeller (Fan/Blower) Assembly
* Electric service connections are made in this box.
11
G. AD-531 MAJOR DRYER COMPONENTS
Illus. No.
1
2
3
4
5
6
7
8
9
10
11
12
13
14
15
16
17
18*
Description
Upper Tumbler Loading Door
Data Label and Installation Label (Located Behind Control Door)
Lower Tumbler Controls
Upper Lint Drawer/Compartment (Lint Filter)
Lower Tumbler Loading Door
Lower Lint Drawer/Compartment (Lint Filter)
Upper Tumbler Controls
Upper Tumbler Bearing Mount Assembly
Upper Tumbler Exhaust Duct Connection
Upper Idler Bearing Mount Assembly
Lower Tumbler Bearing Mount Assembly
Lower Tumbler Exhaust Duct Connection
Lower Idler Bearing Mount Assembly
Lower Tumbler Heating Unit
Lower Drive/Blower Motor
Upper Tumbler Heating Unit
Upper Drive/Blower Motor
Electric Service/Relay Box
* Electric service connections are made in this box.
12
SECTION III
CLEANING / MAINTENANCE
A. LINT CLEANING
1. A program and/or schedule must be established for periodic inspection, cleaning and removal of
lint from various area's of the dryer, as well as throughout the exhaust duct work system. Refer to the
installation operators manual included with the dryer for additional details or frequency of cleaning.
WARNING: Lint from most fabrics is highly combustible. The accumulation of lint can create
a potential fire hazard.
NOTE: Suggested time intervals shown are for average usage which is considered six (6) to
eight (8) operational (running) hours per day.
WARNING: Dryer must not be operated without the lint filter (screen) in place.
2. Lint Screen/Drawer and Lint Compartment TIME TABLE:
LINT SCREEN
OR DRAWER
LINT COMPARTMENT
CHAMBER
DAILY or BEGINNING OF EACH SHIFT
DAILY
AD-30S, AD-50S, AD-81
EVERY THIRD or FOURTH LOAD
WEEKLY
AD-115, 120, and 170
EVERY THIRD or FOURTH LOAD
WEEKLY
DAILY or BEGINNING OF EACH SHIFT
DAILY
MODEL NO.
AD-15, 25, 285, 295, 30, 50 and 75
AD-330, AD-531
13
3. Lint Cleaning Procedure.
a. MODELS 15, 25, 285, 30, 50, Super 30, Super 50 and 75 with LINT SCREEN ...
1) Open the lint door.
2) Lightly brush or remove lint accumulation from lint screen located at the underside area of the lint
trap as well as the top lint screen on models AD-15 and 25. Clean lint from bottom of lint
compartment. Lint left in this compartment is drawn back into the screen and will restrict proper
air flow.
Retainer / Hold Down
Lint Screen / Filter
This bracket is for
shipping purposes
ONLY and should be
removed at time of
installation.
Lint Compartment Area
3) Be sure lint screen is not torn. If it is, replace immediately. A torn lint screen allows lint to pass
into the duct work system which can create an air restriction and a possible fire hazard.
14
4) To replace lint screen, remove retainer (hold down) and slide screen out. Reverse procedure for
installing new screen.
Retainer / Hold Down
Lint
Screen / Filter
Lint Compartment
AD-15 & 25
WARNING: Dryer must not be operated with the lint filter (screen) removed.
5) Close/secure lint door in place.
NOTE: Dryer lint door must be closed securely in place or heat will not activate.
b. MODELS 81, 115, 120, 170 and 295 with LINT DRAWER ...
1) Slide lint drawer open.
2) For all models other than the AD-295, remove lint screen by grasping front area of screen and
lifting upward. Dispose of lint in appropriate receptacle.
15
Lint Screen / Filter
Lint Drawer
The model AD-295 has a lint drawer but no lint screen. Clean either by removing or vacuuming
lint, or remove the lint drawer. Refer to 4 for lint drawer removal. Dispose of lint in appropriate
receptacle.
3) Be sure lint screen or drawer is not torn. If it is, replace immediately. A torn lint screen allows
lint to pass into the duct work system which can create an air restriction and a possible fire
hazard.
WARNING: Dryer must not be operated with the lint filter (screen) removed.
16
4) To remove lint drawer, slide drawer out 2/3rds of the way. Locate retainer at rear top rail of
drawer and push retainer towards you and downward. Slide drawer outward from dryer.
Reverse procedure to reinstall lint drawer.
Retainer
5)
Clean lint from bottom of lint compartment. Lint left in this compartment will pass into the
exhaust duct work system and will create a potential fire hazard.
6)
Close/secure lint drawer in place.
NOTE: Dryer lint drawer/basket must be closed securely in place or dryer will not start.
17
c. MODELS with LINT BASKET (AD-330 & AD-531)....
1) Slide lint drawer open.
2)
Clean either by removing or vacuuming lint, or remove the lint basket. Refer to 4 for lint basket
removal. Dispose of lint in appropriate receptacle.
3) Be sure lint screen or basket is not torn. If it is, replace immediately. A torn lint screen allows
lint to pass into the duct work system which can create an air restriction and a possible fire
hazard.
WARNING: Dryer must not be operated with the lint filter (screen) removed.
4) To remove lint basket, slide basket out 2/3rds of the way. Locate retainer at rear top rail of
basket and push retainer towards you and downward. Slide basket outward from dryer.
Reverse procedure to reinstall lint basket.
Retainer
5)
Clean lint from bottom of lint compartment. Lint left in this compartment will pass into the
exhaust duct work system and will create a potential fire hazard.
6) Close/secure lint basket in place.
NOTE: Dryer lint basket must be closed securely in place or dryer will not start.
18
SECTION IV
GAS INFORMATION
A. Refer to installation/operators manual included with dryer for specific technical piping information etc.
WARNING: Failure to comply with the information stated in this addendum and in the
installation manual included in the dryer can result in personal injury
ALL plumbing connections must be made by a competent professional to assure that the gas plumbing
installation is adequate and conforms with local and national regulations or codes of the country of destination.
IMPORTANT: Dryers manufactured for Germany, Denmark, Iceland, Norway, Netherlands, Luxemburg, Belgium, Finland, Greece and Austria cannot be converted from one family of
gas to another.
IMPORTANT: If connection to this appliance is made with flexible hose it must be suitable for
the appliance category in accordance with national installation regulations of the
country of destination, and if in doubt the installer must contact the supplier.
The manufacturer of this appliance does not recommend the use of flexible gas
supply line/hose.
IMPORTANT: The appliance must be installed in a room or area with an openable window or
equivalent form of opening to provide a method of exhausting products of
combustion and water vapor outside the dwelling. Each dryer must be provided with
makeup air of 6.45 square centimeters per 1.054 megajoule.
The dryer and its individual shut-off valve must be disconnected from the gas supply piping system
during any pressure testing of that system at test pressures in excess of 4 kPa (.58 psig). The dryer
must be isolated from the gas supply piping system by closing its individual manual shut-off valve
during any pressure testing of the gas supply piping system at test pressures equal to or less than
4 kPa (.58 psig).
IMPORTANT: Failure to isolate or disconnect dryer from supply as noted can cause irreparable
damage to the gas valves VOIDING THE WARRANTY.
WARNING: FIRE or EXPLOSION COULD RESULT.
The dryer must be connected to the type of heat or gas indicated on the dryer data label affixed to the
dryer. If this information does not agree with the type of gas available, do not operate the dryer.
Contact the ADC dealer who sold the dryer or the factory.
19
The input ratings shown on the dryer data label are for elevations of up to 609.6 meters (2,000 feet),
unless elevation requirements of over 609.6 meters (2,000 feet) were specified at the time the dryer
was manufactured by ADC. The adjustment or conversion of dryers in the field for elevations over
609.6 meters (2,000 feet) are made by changing each burner orifice to appropriate size determined
by the exact location elevation. If this conversion is necessary, contact the dealer who sold you the
dryer or the ADC factory.
B. Gas Pressures
1.Natural Gas
Regulation is controlled by the dryer's gas valve's internal regulator.
2.Liquid Propane (L.P.) and Butane
Dryers made for use with L.P. or Butane gas have the gas valve's internal pressure regulator blocked
open so that the gas pressure must be regulated upstream of the dryer. There is no regulator or
regulation (ungoverned) provided and the supply pressure must be regulated at the source (i.e. L.P.
tank) or an external regulator must be added to the dryer.
WARNING:
This appliance must only be operated with the gas type indicated on the dryer’s data plate. If
the appliance is converted (gas type changed), a data plate amendment must be obtained from
American Dryer Corporation.
20
C. Heat Input / Gas Consumption / Orifice (injector) Data
Heating Value:
1000 (BTU/ft3)
1. NATURAL GAS (G20 - SUPPLY PRESSURE 20 mBAR)
M odel
Heat Input (±5%)
(BTU/HR) (MJ/HR)
15
50,000
52.7
Gas
Orifice Size
Consumption
(Kw)
(M 3/H )
14.65
1.415
Burner
# Of
P ressure
Orifice
(mBAR)
(DMS) (MM)
41
2.438
2
9.0
25
78,000
82.2
22.85
2.208
31
3.048
2
9.0
285
72,000
75.9
21.10
2.037
33
2.870
2
9.0
295
56,000
59.0
16.41
1.585
28
3.569
1
9.0
30
90,000
94.9
26.37
2.547
30
3.264
2
9.0
SUPER 30
146,000
153.9
42.78
4.132
29
3.454
3
9.0
50
150,000
158.2
43.95
4.245
19
4.216
2
9.0
SUPER 50
165,000
173.9
48.35
4.670
28
3.569
3
9.0
75
200,000
210.9
58.60
5.659
29
3.454
4
9.0
81
270,000
284.7
79.11
7.641
23
3.912
4
9.5
115
343,000
361.6
100.50
9.707
8
5.055
3
9.5
120
375,000
395.4
109.88
10.612
4
5.309
3
9.5
170
550,000
579.9
161.33
15.58
2
5.6
4
9.5
330*
68,000
71.7
19.92
1.924
22
3.988
1
9.0
531*
102,000
107.5
29.89
2.887
10
4.915
1
9.0
080798EL/cj
* Information shown is per pocket/basket.
Heating Value:
830 (BTU/ft3)
2. NATURAL GAS (G25 - SUPPLY PRESSURE 25 mBAR)
M odel
Heat Input (±5%)
(BTU/HR) (MJ/HR)
Gas
Orifice Size
Consumption
(Kw)
(M 3/H )
Burner
# Of
Pressure
Orifice
(mBAR)
(DMS) (MM)
15
50,000
52.7
14.65
1.706
41
2.438
2
12.0
25
78,000
82.2
22.85
2.661
31
3.048
2
12.0
285
72,000
75.9
21.10
2.457
33
2.870
2
12.0
295
56,000
59.0
16.41
1.911
28
3.569
1
12.0
30
90,000
94.9
26.37
3.071
30
3.264
2
12.0
SUPER 30
146,000
153.9
42.78
4.982
29
3.454
3
12.0
50
150,000
158.2
43.95
5.118
19
4.216
2
12.0
SUPER 50
165,000
173.9
48.35
5.630
28
3.569
3
12.0
75
200,000
210.9
58.60
6.824
29
3.454
4
12.0
81
270,000
284.7
79.11
9.213
23
3.912
4
13.7
115
343,000
361.6
100.50
11.703
8
5.055
3
13.7
120
375,000
395.4
109.88
12.795
4
5.309
3
13.7
170
550,000
579.9
161.33
18.766
2
5.6
4
13.7
330*
68,000
71.7
19.92
2.320
22
3.988
1
12.0
531*
102,000
107.5
29.89
3.480
10
4.915
1
12.0
080798EL/cj
* Information shown is per pocket/basket.
21
Heating Value:
G30: 3175
G31: 2500
3. BUTANE GAS (G30 - SUPPLY PRESSURE 28-30 mBAR)
PROPANE GAS (G31 - SUPPLY PRESSURE 37.0 mBAR)
M odel
Heat Input (±5%)
(BTU/HR) (MJ/HR)
(Kw)
Gas
Consumption Orifice Size
G30
G31
BTU
ft3
# Of
Orifice
(M 3/H) (M 3/H) (DMS) (MM)
15
50,000
52.7
14.65
0.446
0.566
54
1.397
2
25
78,000
82.2
22.85
0.696
0.884
51
1.702
2
285
72,000
75.9
21.10
0.642
0.816
52
1.613
2
295
56,000
59.0
16.41
0.499
0.634
46
2.057
1
30
90,000
94.9
26.37
0.803
1.020
49
1.854
2
SUPER 30
146,000
153.9
42.78
1.302
1.654
48
1.93
3
50
150,000
158.2
43.95
1.338
1.699
42
2.375
2
SUPER 50
165,000
173.9
48.35
1.516
1.869
46
2.057
3
75
200,000
210.9
58.60
1.784
2.266
48
1.93
4
81
270,000
284.7
79.11
2.408
3.059
43
2.261
4
115
343,000
361.6
100.50
3.059
3.886
32
2.946
3
120
375,000
395.4
109.88
3.344
4.248
31
3.048
3
170
550,000
579.9
161.33
4.906
6.230
30
3.264
4
330*
68,000
71.7
19.92
0.607
0.770
43
2.261
1
531*
102,000
107.5
29.89
0.910
1.155
35
2.794
1
080798EL/cj
* Information shown is per pocket/basket.
22
4 CITY GAS 1a
MODEL
15
30
50
115
Heating Value
426 (BTU/ft3 )
(G110 - SUPPLY PRESSURE 8mBAR)
BURNER
GAS
ORIFICE SIZE
# OF
CONSUMPTION
PRESSURE
ORIFICE
(M3/H)
(DMS) (MM)
(BTU/HR) (MJ/HR) (Kw)
(mBAR)
HEAT INPUT +/- 7-1/2%
50,000
90,000
150,000
343,000
52.7
94.9
158.2
361.6
14.65
26.37
43.95
100.5
3.324
5.983
9.972
22.803
18
1
M
U
4.305
5.791
7.493
9.347
5 CITY GAS lb (G120 - SUPPLY PRESSURE 8mBAR)
Orifice Size
(Kw)
(M3/H )
(DMS) (MM)
Model
3.0
3.0
3.0
3.0
Heating Value
477 (BTU/ft3)
Gas
Consumption
Heat Input +/- 7-1/2%
(BTU/HR) (MJ/HR)
2
2
2
3
# Of
Orifice
Burner
Pressure
(mBAR)
15
50,000
52.7
14.65
2.969
20
4.089
2
3.0
30
90,000
94.9
26.37
5.344
2
5.613
2
3.0
50
150,000
158.2
43.95
8.906
K
7.137
2
3.0
115
343,000
361.6
100.5
20.365
S
8.839
3
3.0
23
D. Piping / Connections
ALL components/materials must conform to applicable national installation regulations of the
country of destination. It is important that the gas pressure regulators meet applicable pressure
requirements and that the gas meters be rated for the total amount of all appliance Btu’s being
supplied.
The minimum pipe size connection must not be smaller than the size shown in the GAS
CONNECTION SIZE CHART shown in this section. For ease of servicing, the gas supply line of
each dryer must have its own shut-off valve.
The size of the main gas supply line (header) will vary depending on the distance this line travels
from the meter or, in the case of L.P. gas, the supply tank, other gas-operated appliances on the same
supply line, etc. Specific information regarding supply size should be determined by the gas
supplier.
NOTE: Undersized gas supply piping can create a low or inconsistent pressure which will result
in poor drying, and erratic operation of the burner ignition system.
IMPORTANT: Pipe joint compounds that resist the action of natural and L.P. gases must be used.
IMPORTANT: Test ALL connections for leaks by brushing on a soapy water solution
(liquid detergent works well) or a product that is intended for this purpose.
WARNING: NEVER TEST FOR GAS LEAKS WITH A FLAME !
GAS CONNECTION SIZE CHART
MODEL
INCHES
MM
15
.5000
12.70
25
.5000
12.70
285
.5000
12.70
295
.5000
12.70
30
.5000
12.70
SUPER 30
.7500
19.05
50
.5000
12.70
SUPER 50
.7500
19.05
75
.7500
19.05
81
1.0000
25.4001
115
1.0000
25.4001
120
1.0000
25.4001
170
1.5000
38.1000
330*
.5000
12.70
531*
.7500
19.05
* 2 Connections required (one for each tumbler/basket)
24
E. Converting from One Family of Gas to Another
The following pages include information from converting from one type of gas to another. ALL
conversions must be performed by a competent professional.
WARNING:
This appliance must only be operated with the gas type indicated on the dryer’s data plate. If
the appliance is converted (gas type changed), a data plate amendment must be obtained from
American Dryer Corporation.
IMPORTANT: Dryers manufactured for Germany, Denmark, Iceland, Norway, Netherlands, Luxemburg, Belgium, Finland, Greece and Austria cannot be converted from one family of
gas to another.
WARNING: Conversions done improperly can result in a FIRE or EXPLOSION!
1. Conversion from Natural Gas to Propane (L.P.) or Butane Gas
a. Models ADG-15, 25, 30, 50, Super 30, Super 50 and 75.
The following conversion allows the dryer to be operated with either Propane (L.P.) Gas or Butane
Gas. The use of gas valve kit (ADC P/N 140413) disables the internal regulator of the gas valve.
Therefore, the gas supply is ungoverned and an external regulator must be provided at the source
of the supply (example L.P. tank) or the dryer. The P/N: 140411 Kit includes all the parts necessary
for conversion (of the gas valve only) as well as related instructions.
Parts required for conversion:
Description
ADC P/N
QTY.
Valve conversion kit
140413
Burner orifices (Injectors)
See Section IV, C of this addendum for orifice (injector)
size and quantity.
L.P. (Propane) Conversion label
112011
1
1
Instructions:
1) Disconnect electrical power to the dryer.
2) Close all shut-off valves in dryer gas supply line.
3) Disconnect gas valve wiring.
NOTE: Identify location of each wire for correct reinstallation.
4) Break union connection (nut) between union shut-off and gas valve.
5) Loosen and remove screws from brackets holding the gas valve/manifold assembly to the burner box.
6) Remove gas valve/manifold assembly from dryer.
7) Unscrew main burner orifices (injectors) and replace with correct size and quantity of orifice (injector)
as noted in Section IV, C of this addendum.
25
NOTE: Use extreme care when removing and replacing orifices (injectors). These orifices
(injectors) are made of brass which are easily damaged.
8) Convert gas valve using kit ADC P/N: 140413 which includes the following instructions.
a) Remove regulator cover screw.
b) Insert the spring (provided in kit)
through the hole in the center of the
plastic regulator adjustment screw.
c) Insert the blocking pin (provided in
kit) down into the center of the
spring.
d) Replace the regulator cover screw.
e) Attach the WARNING label
(provided in kit) to the gas valve
where it can be readily seen. Also
attach the small round L.P. label to
the top of the regulator cover screw.
9) Reverse procedure for reinstalling valve manifold assembly to dryer.
10) Regulate (govern) gas externally to correct gas pressure ....
TYPE OF GAS:
Supply Pressure (mbar)
BUTANE
28.0 - 30.0
PROPANE
37.0
11) Open ALL shut-off valves and test for leaks.
IMPORTANT: DO NOT TEST FOR LEAKS WITH AN OPEN FLAME. Use a soapy water
solution or product intended for that purpose.
12) Reestablish electrical power to dryer. Operate dryer through one (1) complete cycle to insure proper
operation.
13) Affix Conversion label (ADC P/N: 112011) to the dryers Data Label.
b. Models ADG-115 and ADG-120ES Only.
The following conversion allows the dryer to be operated with either Propane (L.P.) Gas or Butane
Gas. The use of gas valve kit (ADC P/N: 140029) disables the internal regulator of the gas valve.
Therefore, the gas supply is ungoverned and an external regulator must be provided at the source
of the supply (example L.P. tank) or the dryer. The P/N: 140029 Kit includes all the parts necessary
for conversion (of the gas valve only) as well as related instructions.
26
Parts required for conversion:
Description
ADC P/N
QTY.
Valve conversion kit
140029
1
Burner orifices (Injectors)
See Section IV, C of
this addendum for
orifice (injector) size.
3
Burner Baffle
332256
1
Baffle mounting screws
150309
5
L.P. (Propane) Conversion label
112011
1
Instructions:
1) Disconnect electrical power to the dryer.
2) Close ALL shut-off valves in dryer gas supply line.
3) Disconnect gas valve wiring.
NOTE: Identify location of each wire for correct reinstallation.
4) Remove HSI Module/Mounting Bracket from console base.
5) Break union connection (nut) between union shut off and gas valve assembly.
6) Loosen and remove screws from brackets holding the gas valve/manifold assembly to the burner box.
7) Remove gas valve/manifold assembly from dryer.
8) Unscrew main burner orifice (injector) and replace with correct size orifices (injectors) as noted in
Section IV, C of this addendum.
NOTE: Use extreme care when removing and replacing orifices (injectors). These orifices
(injectors) are made of brass which are easily damaged.
9) Convert gas valve using kit ADC P/N: 140029 which includes the following instructions.
a) Partially depress and turn Gas Cock
Dial to “OFF”
27
b) Remove:
1. Two screws through regulator.
2. Regulator.
3. Gasket.
c)
Install gasket, cover plate and 2 screws from kit provided.
d)
Turn gas cock to “ON” position.
10) Reverse procedure for reinstalling valve manifold assembly to dryer.
11) Install Burner Baffle (ADC P/N: 332256). To install Baffle, position the baffle on the lower right
hand side of the burner. Position the baffle so that there is approximately 1-5/8 inches from the
bottom of the baffle to the inner top (refer to illustration below). Secure the baffle using five (5)
ADC P/N: 150414 screws through the holes in the baffle into the burner box.
12) Open ALL shut off valves and test for leaks.
IMPORTANT: DO NOT TEST FOR LEAKS WITH AN OPEN FLAME. Use a soapy water
solution or product intended for that purpose.
13) Reestablish electrical power to dryer. Operate dryer through one (1) complete cycle to insure
proper operation.
14) Affix Conversion label (ADC P/N: 112011) to the dryers Data Label.
28
c. Models ADG-170SE Only.
The following conversion allows the dryer to be operated with either Propane (L.P.) Gas or Butane
Gas. The use of gas valve kit (ADC P/N: 140029) disables the internal regulator of the gas valve.
Therefore, the gas supply is ungoverned and an external regulator must be provided at the source of
the supply (example L.P. tank) or the dryer. The P/N: 140029 Kit includes all the parts necessary for
conversion (of the gas valve only) as well as related instructions.
Parts required for conversion:
Description
ADC P/N
QTY.
Valve conversion kit
140029
1
Burner orifices (Injectors)
See Section IV, C of
this addendum for
orifice (injector) size.
4
Burner Baffle
332256
1
Baffle mounting screws
150309
5
L.P. (Propane) Conversion label
112011
1
Instructions:
1) Disconnect electrical power to the dryer.
2) Close ALL shut-off valves in dryer gas supply line.
3) Disconnect gas valve wiring.
NOTE: Identify location of each wire for correct reinstallation.
4) Remove HSI Module/Mounting Bracket from console base.
5) Break union connection (nut) between union shut off and gas valve assembly.
6) Loosen and remove screws from brackets holding the gas valve/manifold assembly to the burner
box.
7) Remove gas valve/manifold assembly from dryer.
8) Unscrew main burner orifice (injector) and replace with correct size orifices (injectors) as noted in
Section IV, C of this addendum.
NOTE: Use extreme care when removing and replacing orifices (injectors). These orifices
(injectors) are made of brass which are easily damaged.
29
9) Convert gas valve using kit ADC P/N: 140029 which includes the following instructions.
a) Partially depress and turn Gas Cock
Dial to “OFF”
b) Remove:
1. Two screws through regulator.
2. Regulator.
3. Gasket.
c) Install gasket, cover plate and 2
screws from kit provided.
d) Turn gas cock to “ON” position.
10) Reverse procedure for reinstalling valve manifold assembly to dryer.
11) Install Burner Baffle (ADC P/N: 332256). To install Baffle, position the baffle on the lower right
hand side of the burner. Position the baffle so that there is approximately 1-5/8 inches from the
bottom of the baffle to the inner top (refer to illustration below). Secure the baffle using five (5)
ADC P/N: 150414 screws through the holes in the baffle into the burner box.
12) Open ALL shut off valves and test for leaks.
IMPORTANT: DO NOT TEST FOR LEAKS WITH AN OPEN FLAME. Use a soapy water
solution or product intended for that purpose.
13) Reestablish electrical power to dryer. Operate dryer through one (1) complete cycle to insure proper
operation.
14) Affix Conversion label (ADC P/N: 112011) to the dryers Data Label.
30
d. Models ADG-330
The following conversion allows the dryer to be operated with either L.P. Gas or Butane Gas. The use
of gas valve kit (ADC P/N: 140413) disables the internal regulator of the gas valve. Therefore, the gas
supply is ungoverned and an external regulator must be provided at the source of
the supply (example L.P. tank) or the dryer. The P/N: 140413 Kit includes all the parts necessary for
conversion (of the gas valve only) as well as related instructions.
Parts required for conversion:
Description
ADC P/N
QTY.
Valve conversion kit
140413
2*
Burner orifices (Injectors)
See Section IV, C of
this addendum for
orifice (injector) size
and quantity.
L.P. (Propane) Conversion label
112011
2
* This includes one for each pocket/tumbler
Instructions:
1) Disconnect electrical power to the dryer.
2) Close ALL shut-off valves (for both top and bottom basket/tumbler) in dryer gas supply line.
IMPORTANT: The following procedures must be performed on both top and bottom tumblers/
baskets.
3) Break union connection (nut) between union shut off and gas valve assembly.
4) Pull out gas valve train assembly a 1/4 of the way out. Disconnect the gas valve harness power
connector at the top of the assembly.
5) Gently pull/remove the gas valve train assembly from the dryer.
IMPORTANT: When removing the gas valve train assembly, be careful not to snag or damage
the gas valve train wiring disconnected in step 4.
6) With the gas train assembly removed from the dryer, remove the two (2) sets of nuts securing the
manifold bracket to the gas valve train slide.
7) Pull manifold/valve assembly back slightly so the burner orifice (injector) is exposed.
31
8) Unscrew burner orifice (injector) and replace with the correct size L.P. orifice (injector) as noted in
Section IV, C of this addendum.
IMPORTANT: Use extreme care when removing and replacing orifice (injector). This orifice is made
of brass and is easily damaged.
9) Reinstall the valve/manifold assembly by reversing steps 6 through 8.
10) Convert gas valve using kit ADC P/N: 140413 which includes the following instructions.
a) Remove regulator cover screw.
b) Insert the spring (provided in kit)
through the hole in the center of the
plastic regulator adjustment screw.
c) Insert the blocking pin (provided in
kit) down into the center of the
spring.
d) Replace the regulator cover screw.
e) Attach the WARNING label
(provided in kit) to the gas valve
where it can be readily seen. Also,
attach the small round L.P. label to
the top of the regulator cover screw.
11) Reverse procedure for reinstalling gas valve train assembly to dryer.
12) Regulate (govern) gas externally to correct gas pressure ...
Type of Gas:
Supply Pressure (mBAR)
BUTANE
28.0 - 30.0
PROPANE
37.0
13) Open ALL shut-off valves and test for leaks.
IMPORTANT: DO NOT TEST FOR LEAKS WITH AN OPEN FLAME. Use a soapy
water solution or product intended for that purpose.
14) Reestablish electrical power to dryer. Operate dryer through one (1) complete cycle to insure proper
operation.
15) Affix Conversion label (ADC P/N: 112011) to the dryers Data Label.
32
e. Models ADG-531
The following conversion allows the dryer to be operated with either L.P. Gas or Butane Gas. The use
of gas valve kit (ADC P/N: 140413) disables the internal regulator of the gas valve. Therefore, the gas
supply is ungoverned and an external regulator must be provided at the source of
the supply (example L.P. tank) or the dryer. The P/N: 140413 Kit includes all the parts necessary for
conversion (of the gas valve only) as well as related instructions.
Parts required for conversion:
Description
ADC P/N
Valve conversion kit
140413
Burner orifices (Injectors)
See Section IV, C of
this addendum for
orifice (injector) size
and quantity.
L.P. (Propane) Conversion label
112011
QTY.
2*
2
* This includes one for each pocket/tumbler
Instructions:
1) Disconnect electrical power to the dryer.
2) Close ALL shut-off valves (for both top and bottom basket/tumbler) in dryer gas supply line.
IMPORTANT: The following procedures must be performed on both top and bottom tumblers/
baskets.
3) Break union connection (nut) between union shut off and gas valve.
4) Remove screws and nuts securing gas train to the dryer cabinet.
5) Gently pull/remove the gas valve train assembly from the burner tube just enough to expose the
burner orifice (injector).
6) Unscrew burner orifice (injector) and replace with the correct size L.P. orifice (injector) as noted in
Section IV, C of this addendum.
IMPORTANT: Use extreme care when removing and replacing orifice (injectors). This orifice
(injector) is made of brass and is easily damaged.
33
7) Convert gas valve using kit ADC P/N: 140413 which includes the following instructions.
a) Remove regulator cover screw.
b) Insert the spring (provided in kit)
through the hole in the center of the
plastic regulator adjustment screw.
c) Insert the blocking pin (provided in
kit) down into the center of the
spring.
d) Replace the regulator cover screw.
e) Attach the WARNING label
(provided in kit) to the gas valve
where it can be readily seen. Also,
attach the small round L.P. label to
the top of the regulator cover screw.
8) Reverse procedure for reinstalling gas valve train assembly to dryer.
9) Regulate (govern) gas externally to correct gas pressure ...
Type of Gas:
Supply Pressure (mBAR)
BUTANE
28.0 - 30.0
PROPANE
37.0
10) Open ALL shut-off valves and test for leaks.
IMPORTANT: DO NOT TEST FOR LEAKS WITH AN OPEN FLAME. Use a soapy
water solution or product intended for that purpose.
11) Reestablish electrical power to dryer. Operate dryer through one (1) complete cycle to insure proper
operation.
12) Affix Conversion label (ADC P/N: 112011) to the dryers Data Label.
34
f. Models ADG-81 ONLY
The following conversion allows the dryer to be operated with either Propane (L.P.) Gas or Butane
Gas. The use of gas valve kit (ADC P/N: 140029) disables the internal regulator of the gas valve.
Therefore, the gas supply is ungoverned and an external regulator must be provided at the source of
the supply (example L.P. tank) or the dryer. The P/N: 140029 Kit includes all the parts necessary for
conversion (of the gas valve only) as well as related instructions.
Parts required for conversion:
Description
ADC P/N
QTY.
Valve conversion kit
140029
1
Burner orifices (Injectors)
See Section IV, C of this addendum for
orifice (injector) size and quantity.
Burner Baffle
332256
1
L.P. (Propane) Conversion label
112011
1
Instructions:
1) Disconnect electrical power to the dryer.
2) Close ALL shut-off valves in dryer gas supply line.
3) Disconnect gas valve wiring.
NOTE: Identify location of each wire for correct reinstallation.
4) Break union connection (nut) between union shut off and gas valve assembly.
5) Loosen and remove screws from brackets holding the gas valve/manifold assembly to the burner
box.
6) Remove gas valve/manifold assembly from dryer.
7) Unscrew main burner orifice (injector) and replace with correct size orifices (injectors) as noted in
Section IV, C of this addendum.
NOTE: Use extreme care when removing and replacing orifices (injectors). These orifices
(injectors) are made of brass which are easily damaged.
35
8) Convert gas valve using kit ADC P/N: 140029 which includes the following instructions.
a) Partially depress and turn Gas Cock
Dial to “OFF”
b) Remove:
1. Two screws through regulator.
2. Regulator.
3. Gasket.
c) Install gasket, cover plate and 2
screws from kit provided.
d) Turn gas cock to “ON” position.
9) Reverse procedure for reinstalling valve manifold assembly to dryer.
10) Regulate (govern) gas externally to correct gas pressure ...
Type of Gas:
Supply Pressure (mBAR)
BUTANE
28.0 - 30.0
PROPANE
37.0
11) Open ALL shut-off valves and test for leaks.
IMPORTANT: DO NOT TEST FOR LEAKS WITH AN OPEN FLAME. Use a soapy
water solution or product intended for that purpose.
12) Reestablish electrical power to dryer. Operate dryer through one (1) complete cycle to insure proper
operation.
13) Affix Conversion label (ADC P/N: 112011) to the dryers Data Label.
36
2. Conversion from Propane (L.P.) or Butane gas to Natural gas
When converting from propane (G31) or butane (G30) gas to natural (G20 or G25) gas, the supply and manifold
pressures must be changed to the pressures as outlined in Section IV, items C 1 and 2 of this manual.
WARNING:
If the appliance is converted (gas type changed), a data plate amendment must be obtained
from American Dryer Corporation.
a. Models ADG-15, 25, 30, 50, Super 30, Super 50 and 75.
The following conversion allows the dryer to be operated with Natural Gas. A slight modification
has to be done to the gas valve so that the internal regulator is operatable.
Parts required for conversion:
Description
ADC P/N
QTY.
Burner orifices (Injectors)
See Section IV, C of this addendum
for orifice (injector) size and quantity.
Instructions:
1) Disconnect electrical power to the dryer.
2) Close ALL shut-off valves in dryer gas supply line.
3) Disconnect gas valve wiring.
NOTE: Identify location of each wire for correct reinstallation.
4) Break union connection (nut) between union shut off and gas valve.
5) Loosen and remove screws from brackets holding the gas valve/manifold assembly to the burner
box.
6) Remove gas valve/manifold assembly from dryer.
7) Unscrew main burner orifices (injectors) and replace with correct size and quantity of orifice
(injector) as noted in Section IV, C of this addendum.
NOTE: Use extreme care when removing and replacing orifices (injectors). These orifices
(injectors) are made of brass which are easily damaged.
8) Convert gas valve
a) Remove regulator cover screw
(Refer to illustration).
b) Remove the spring and pin from
the regulator (Refer to illustration).
c) Install regulator cover screw.
d) Remove the “L.P. Caution label” from
the gas valve.
9) Reverse procedure for reinstalling valve manifold assembly to dryer.
37
10) Open all shut-off valves and test for leaks.
IMPORTANT: DO NOT TEST FOR LEAKS WITH AN OPEN FLAME. Use a soapy water solution or
product intended for that purpose.
11)Reestablish electrical power to dryer. Operate dryer through one (1) complete cycle to ensure proper
operation.
12) With dryer operating, check the manifold gas pressure at the outlet (manifold) side of the gas valve.
TYPE OF GAS NATURAL:
Supply Pressure (mbar)
Manifold Pressure (mbar)
See Section IV, items C 1 and 2.
To adjust gas valve internal regulator, remove regulator cover screw. With a small slotted screw driver
adjust regulator plastic adjustment screw. Clockwise to increase manifold pressure. Counterclockwise to
decrease manifold pressure.
b. Models ADG-115 and ADG-120ES Only.
The following conversion allows the dryer to
be operated with Natural Gas. The existing
L.P. gas valve cannot be converted and must
be replaced with a Natural gas valve.
Parts required for conversion:
Description
ADC P/N:
Gas Valve
140028
QTY.
1
Burner orifices (Injectors) See Section IV, C of this addendum
for orifice (injector) size and quantity.
Instructions:
1) Disconnect electrical power to the dryer.
2) Close all shut-off valves in dryer gas supply line.
3) Disconnect gas valve wiring.
NOTE: Identify location of each wire for correct reinstallation.
4) Remove HSI Module/Mounting Bracket from console base.
5) Break union connection (nut) between union shut off and gas valve assembly.
6) Loosen and remove screws from brackets holding the gas valve/manifold assembly to the burner
box.
7) Remove gas valve/manifold assembly from dryer.
8) Remove plumbing and manifold from L.P. gas valve and installation on to Natural gas valve
provided.
38
9) Unscrew main burner orifice (injector) and replace with correct size orifices (injectors) as noted in
Section IV, C of this addendum.
NOTE: Use extreme care when removing and replacing orifices (injectors). These orifices
(injectors) are made of brass which are easily damaged.
10) Reverse procedure for reinstalling valve manifold assembly to dryer.
11) Remove Burner Baffle (ADC P/N: 332256) by removing the five (5) screws securing the baffle to the
burner box (Refer to illustration).
12) Open all shut off valves and test for leaks.
IMPORTANT: DO NOT TEST FOR LEAKS WITH AN OPEN FLAME. Use a soapy water
solution or product intended for that purpose.
13) Reestablish electrical power to dryer. Operate dryer through one (1) complete cycle to insure proper
operation.
14) With the dryer operating, check the manifold gas pressure at the
outlet (manifold) side of the gas valve.
TYPE OF GAS NATURAL:
Supply Pressure (mbar)
Manifold Pressure (mbar)
To adjust gas valve internal regulator, remove regulator cover screw. With a small slotted screw driver adjust
regulator plastic adjustment screw. Clockwise to increase manifold pressure. Counterclockwise to decrease
manifold pressure.
39
c. Model ADG-170 Only.
The following conversion allows the dryer to be operated with Natural Gas. The existing L.P. gas valve
cannot be converted and must be replaced with a Natural gas valve.
Parts required for conversion:
Description
ADC P/N:
QTY.
Gas Valve (Natural)
140028
Burner Orifices (Injectors)
See Section IV, C of this addendum
for orifice (injector) size and quantity.
1
Instructions:
1) Disconnect electrical power to the dryer.
2) Close all shut-off valves in dryer gas supply line.
3) Disconnect gas valve wiring.
NOTE: Identify location of each wire for correct reinstallation.
4) Remove HSI Module/Mounting Bracket from console base.
5) Break union connection (nut) between union shut off and gas valve assembly.
6) Remove gas valve and manifold assembly from dryer. To do so, loosen and remove screws from mounting
brackets securing assembly to burner box.
7) Remove plumbing and manifold from L.P. gas valve and install on to Natural gas valve provided.
8) Unscrew main burner orifice (injector) and replace with correct size orifices (injectors) as noted in
Section IV, C of this addendum.
NOTE: Use extreme care when removing and replacing orifices (injectors). These orifices
(injectors) are made of brass which are easily damaged.
9) Reverse procedure for reinstalling valve/manifold assembly to dryer.
10) Remove Burner Baffle (ADC P/N: 332256 by removing the five (5) screws securing the baffle to the
burner box (Refer to illustration).
11) Open all shut-off valves and test for leaks.
40
IMPORTANT: DO NOT TEST FOR LEAKS WITH AN OPEN FLAME. Use a soapy water
solution or product intended for that purpose.
12) Reestablish electrical power to dryer. Operate dryer through one (1) complete cycle to insure proper
operation.
13) With the dryer operating, check the manifold pressure with a manometer at the outlet (manifold) side
of the gas valve.
TYPE OF GAS NATURAL:
Supply Pressure (mbar)
Manifold Pressure (mbar)
See Section IV, items C 1 and 2.
Regulator Adjustment:
Regulators are factory set. When required, readjust as follows:
a. Turn gas cock “OFF”. Remove pressure tap plug and attach
manometer.
b. Turn gas cock to “ON”. Remove regulator cap, turn adjusting
screw with blade screwdriver to change pressure (clockwise to
increase).
c. Turn gas cock “OFF”. Remove manometer, replace pressure tap
plug.
d. Turn gas cock “ON”.
41
d. Models ADG-330
The following conversion allows the dryer to be operated with Natural Gas. A slight modification has
to be done to the gas valve so that the internal regulator is operational.
Parts required for conversion:
Description
ADC P/N
Burner orifices (Injectors)
See Section IV, C of
this addendum for
orifice (injector) size
and quantity.
QTY.
Instructions:
1) Disconnect electrical power to the dryer.
2) Close ALL shut-off valves (for both top and bottom basket/tumbler) in dryer gas supply line.
IMPORTANT: The following procedures must be performed on both top and bottom tumblers/
baskets.
3) Break union connection (nut) between union shut off and gas valve.
4) Pull out gas valve train assembly a 1/4 of the way out. Disconnect the gas valve harness power
connector at the top of the assembly.
5) Gently pull/remove the gas valve train assembly from the dryer.
IMPORTANT: When removing the gas valve train assembly, be careful not to snag or damage
the gas valve train wiring disconnected in step 4.
6) With the gas train assembly removed from the dryer, remove the two (2) sets of nuts securing the
manifold bracket to the gas valve train slide.
7) Pull manifold/valve assembly back slightly so the burner orifice (injector) is exposed.
8) Unscrew burner orifice (injector) and replace with the correct size Natural Gas orifice (injector) as
noted in Section IV, C of this addendum.
IMPORTANT: Use extreme care when removing and replacing orifice (injectors). This orifice
(injector) is made of brass and is easily damaged.
9) Reinstall the valve/manifold assembly by reversing steps 6 through 8.
42
10) Convert gas valve ...
a) Remove regulator cover screw.
(refer to illustration)
b) Remove the spring and pin from the
regulator (refer to illustration).
c) Replace the regulator cover screw.
d) Remove the “L.P. Caution Label”
from the gas valve.
11) Reverse procedure for reinstalling gas valve train assembly to dryer.
12) Open ALL shut-off valves and test for leaks.
IMPORTANT: DO NOT TEST FOR LEAKS WITH AN OPEN FLAME. Use a soapy
water solution or product intended for that purpose.
13) Reestablish electrical power to dryer. Operate dryer through one (1) complete cycle to insure proper
operation.
14) With dryer operating, check the manifold pressure at the outlet (manifold) side of the gas valve to
insure proper operation.
Type of Gas:
Supply Pressure (mbar)
See Section IV, items C 1 and 2.
Manifold Pressure (mbar)
To adjust gas valve internal regulator, remove regulator cover screw.
With a small slotted screw driver adjust regulator plastic adjustment
screw. Clockwise to increase manifold pressure. Counter clockwise
to decrease manifold pressure.
43
e. Models ADG-531
The following conversion allows the dryer to be operated with Natural Gas. A slight modification has
to be done to the gas valve so that the internal regulator is operational.
Parts required for conversion:
Description
ADC P/N
Burner orifices (Injectors)
See Section IV, C of
this addendum for
orifice (injector) size
and quantity.
QTY.
Instructions:
1) Disconnect electrical power to the dryer.
2) Close ALL shut-off valves (for both top and bottom basket/tumbler) in dryer gas supply line.
IMPORTANT: The following procedures must be performed on both top and bottom tumblers/
baskets.
3) Break union connection (nut) between union shut off and gas valve.
4) Remove screws and nuts securing gas train to the dryer cabinet.
5) Gently pull/remove the gas valve train assembly from the burner tube just enough to expose the
burner orifice (injector).
6) Unscrew burner orifice (injector) and replace with the correct size Natural Gas orifice (injector) as
noted in Section IV, C of this addendum.
IMPORTANT: Use extreme care when removing and replacing orifice (injectors). This orifice
(injector) is made of brass and is easily damaged.
44
7) Convert gas valve ...
a) Remove regulator cover screw.
(refer to illustration)
b) Remove the spring and pin from the
regulator (refer to illustration).
c) Replace the regulator cover screw.
d) Remove the “L.P. Caution Label”
from the gas valve.
8) Reverse procedure for reinstalling gas valve train assembly to dryer.
9) Open ALL shut-off valves and test for leaks.
IMPORTANT: DO NOT TEST FOR LEAKS WITH AN OPEN FLAME. Use a soapy
water solution or product intended for that purpose.
10) Reestablish electrical power to dryer. Operate dryer through one (1) complete cycle to insure proper
operation.
11) With dryer operating, check the manifold pressure at the outlet (manifold) side of the gas valve to
insure proper operation.
Type of Gas:
Supply Pressure (mbar) See Section IV, items C 1 and 2.
Manifold Pressure (mbar)
To adjust gas valve internal regulator, remove regulator cover screw. With a small slotted screw driver adjust
regulator plastic adjustment screw. Clockwise to increase manifold pressure. Counter clockwise to decrease
manifold pressure.
45
f. Model ADG-81 ONLY
The following conversion allows the dryer to be operated with Natural Gas. The existing L.P. gas valve
cannot be converted and must be replaced with a L.P. gas valve.
Parts required for conversion:
Description
ADC P/N:
QTY.
Gas Valve (Natural)
140028
Burner Orifices (Injectors)
See Section IV, C of this addendum
for orifice (injector) size and quantity.
1
Instructions:
1) Disconnect electrical power to the dryer.
2) Close ALL shut-off valves in dryer gas supply line.
3) Disconnect gas valve wiring.
NOTE: Identify location of each wire for correct reinstallation.
4) Break union connection (nut) between union shut off and gas valve assembly.
5) Loosen and remove screws from brackets holding the gas valve/manifold assembly to the burner box
and remove assembly from dryer.
6) Remove plumbing and manifold from L.P. gas valve and install on to Natural gas valve provided.
7) Unscrew main burner orifice (injector) and replace with correct size orifices (injectors) as noted in
Section IV, C of this addendum.
NOTE: Use extreme care when removing and replacing orifices (injectors). These orifices
(injectors) are made of brass which are easily damaged.
8) Reverse procedure for reinstalling valve/manifold assembly to dryer.
9) Open all shut-off valves and test for leaks.
IMPORTANT: DO NOT TEST FOR LEAKS WITH AN OPEN FLAME. Use a soapy
water solution or product intended for that purpose.
46
10) Reestablish electrical power to dryer. Operate dryer through one (1) complete cycle to insure proper
operation.
11) With dryer operating, check the manifold pressure at the outlet (manifold) side of the gas valve to
insure proper operation.
Type of Gas:
Supply Pressure (mbar)
Manifold Pressure (mbar)
See Section IV, items C 1 and 2.
To adjust gas valve internal regulator, remove regulator cover screw. With a small slotted screw
driver adjust regulator plastic adjustment screw. Clockwise to increase manifold pressure. Counter
clockwise to decrease manifold pressure.
47
SECTION V
GAS PRESSURE TESTING
For proper operation, the gas pressure must be correct, consistent and maintained at the gas pressure rates
shown in Section IV, C, Heat Input, Gas Consumption and Orifice Injector Data; of this booklet.
Provisions are made at the outlet (manifold) side of each gas valve for taking gas pressure readings. Gas
pressure readings should be made by the use of a manometer.
There are two (2) types of devices used to measure gas pressure. They are the spring/mechanical type gauge and
the manometer. The use of the spring/mechanical type gauge is NOT RECOMMENDED because they are very
easily damaged and are not always accurate. The preferred type of gauge is the manometer because it is a simple
devise to use and is highly accurate. A manometer is simply a glass or transparent plastic tube with a scale
graduated in inches or mbar. When it is filled with water and pressure applied, the water in the tube rises,
showing the exact gas pressure.
1. Gas pressure test procedure.
a. Turn gas cock to “OFF” position.
b. Remove pressure tap plug (located at outlet/manifold side of gas valve) and attach manometer
(see illustration).
c. Turn gas cock to “ON” position.
d. Start dryer. Gas manifold pressure should be as shown in Section IV, C of this
booklet.
e. Once test is complete, turn gas cock to” OFF” position. Remove manometer. Replace pressure tap
plug.
f. Turn gas cock to “ON” position and check for leaks with soap solution with main burner “ON”.
48
SECTION VI
EXHAUST (FLUE) INFORMATION
A. General Exhaust (Flue) Duct Work Information (for Both Individual and Common).
Exhaust duct work should be designed and installed by a qualified professional. Improperly sized
duct work will create excessive back pressure which results in slow drying, increased use of energy,
overheating of the dryer, and shutdown of the burner by the airflow (sail) switch, burner hi-limit, or
basket (tumbler) hi-heat thermostat.
CAUTION: DRYER MUST BE EXHAUSTED TO THE OUTDOORS.
CAUTION: IMPROPERLY SIZED OR INSTALLED EXHAUST (FLUE) DUCT WORK CAN
CREATE A POTENTIAL FIRE HAZARD.
The duct work must be laid out in such a way that the duct work travels as directly as possible to the
outdoors with as few turns as possible. It’s important that where the exhaust duct work ends outside
that it is not located directly near the make up air openings. Otherwise, flue fumes can be drawn back
into the facility.
Independent dryer venting is recommended.
IMPORTANT: Exhaust back pressure measured by a manometer in the exhaust (flue) duct work
must not exceed .817 mbar (0.3 inches of water column).
The shape of the duct work is not critical so long as the minimum cross sectional area is provided. It is
suggested that the use of 90 degree turns be avoided; use 30 degree and/or 45 degree instead. The radius of
the elbows should preferably be 1-1/2 times the diameter of the duct.
ALL duct work should be smooth inside with no projections from sheet metal screws or other
obstructions which will collect lint. When adding ducts, the duct to be added should overlap the duct
to which it is to be connected. ALL duct work joints must be taped to prevent moisture and lint from
escaping into the building. Inspection doors should be installed at strategic points in the exhaust duct
work for periodic inspection and clean-out of lint from the duct work.
NOTE: Where the exhaust duct passes through a wall, ceiling or roof made of combustible
materials, the opening must be 2 inches (5.08 cm) larger (all the way around) than the
duct. The duct must be centered within this opening.
IMPORTANT: The duct work for this appliance must be suitable for the appliance category in
accordance with national installation regulations of the county of destination.
49
Under no circumstances should the size of the duct work (flue) connected to the dryer be smaller than
the dryer’s exhaust duct. With single or independent venting, in many cases the duct work (flue) must
be larger than the dryers exhaust duct. In almost every case where common duct work is used, the
duct work (flue) connection to the dryer must be larger than the dryers exhaust duct. For specific
information regarding various dryer model exhaust (flue) duct size limits, refer to the single and
common exhaust examples shown in this section.
IMPORTANT: For extended duct work runs, the cross section area of the duct work can only be
increased to an extent. When the duct work approaches the maximum limits noted
in this manual, a professional Heating Venting Air Conditioning (HVAC) firm should
be consulted for proper venting information.
NOTE: The use of external booster fans in the location duct work to compensate for inadequate
venting size is NOT RECOMMENDED.
IMPORTANT: THE DUCT WORK SIZE MUST NOT BE REDUCED ANYWHERE
DOWN STREAM OF DRYER.
B. Exhaust Venting Outside Protection (for Both Individual and Common).
To prevent the outside end of horizontal duct work from the weather, a 90 degree elbow bent
downward should be installed where the exhaust exits the building. If the duct work travels
vertically up through the roof, it should be protected from the weather by using a 180 degree turn to
point the opening downward. In either case, allow at least twice the diameter of the duct between the
duct opening and the nearest obstruction.
50
IMPORTANT: DO NOT use screens or caps on the outside opening of exhaust duct work.
It’s important that where the exhaust duct work ends outside that it is not located directly near the
makeup air openings. Otherwise, flue fumes can be drawn back into the facility.
C. Single Dryer Venting.
1. Individual dryer venting.
Where possible, it is suggested to provide a separate exhaust duct for each dryer. The exhaust duct
should be laid out in such a way that the duct work travels as directly as possible to the outdoors with as
few turns as possible. Keep in mind when calculating the dryer exhaust duct work, the elbows used for
outside protection must be included. Refer to Section V, A & B for specific details.
Refer to the duct work chart and examples in this section for specific venting information. When the duct
work approaches the maximum limits noted in this manual, a professional HVAC firm should be
consulted for proper venting information.
IMPORTANT: Exhaust back pressure measured by a manometer in the exhaust (flue) duct work must
not exceed .817 mbar (0.3 inches of water column).
a. Horizontal Venting
Under no circumstances should the size of the duct work (flue) connected to the dryer be smaller than the
dryer’s exhaust duct. With Horizontal single or independent venting, in many cases the duct work (flue)
must be larger than the dryers exhaust duct.
b. Vertical Venting
Being that more elbows are usually necessary for vertical venting, in most cases the duct work (flue)
must be larger than the dryers exhaust duct work.
51
c. Individually Vented Duct Work (Flue) Chart
INDIVIDUALLY VENTED DUCT WORK CHART
(50 Hz & 60 Hz)
DRYER
M ODEL
NO.
15
HORIZONTAL VENTING
VERTICAL VENTING
D RYER DUCT
SIZE
MINIMUM
MAXIMUM
MAXIMUM MINIMUM
MAXIMUM
M
AXIMUM
VENT SIZE
RUN
VENT SIZE
RUN
ELBOWS*
M
INCHES CM INCHES CM
FEET
M INCHES CM
ELBOWS* FEET
6
15.24
6
15.24
1
5
1.52
8
20.32
3
20
6.1
6
15.24
8
20.32
1
35 10.66
25
8
20.32
8
20.32
1
35 10.66
8
20.32
3
20
6.1
285
6
15.24
6
15.24
2
10
3.9
6
15.24
2
13
3.9
295
6
15.24
6
15.24
1
20
6.1
6
15.24
2
10
3.04
30 (not SUPER)
8
20.32
8
20.32
1
35 10.66
8
20.32
3
20
6.1
30 (SUPER)
8
20.32
10
25.4
1
50
15.2
10
25.4
3
20
6.1
50 (not SUPER)
8
20.32
8
20.32
1
35 10.66
8
20.32
3
20
6.1
50 (SUPER)
8
20.32
10
25.4
1
30
9.1
12
30.48
3
75
22.86
75
8
20.32
10
25.4
1
15
4.6
12
30.48
3
20
6.1
81
12
30.48
14
35.56
1
15
4.6
14
35.56
3
15
4.75
115
12
30.48
14
35.56
1
20
6.1
14
35.56
3
20
6.1
120
12
30.48
14
35.56
1
20
6.1
14
35.56
3
20
6.1
170
18
45.72
18
45.72
1
20
6.1
18
45.72
3
20
6.1
330
6
15.24
531
6
15.24
Refer to illustrations in Item D of this section for maximum limits.
* INCLUDES OUTSIDE PROTECTION.
52
d. Individually Vented Duct Work Examples
The illustrations included in this section are for dryers individually vented/exhausted to the out
doors. For dryers where the length of exhaust duct work or the amount of allowable elbows is
exceeded, a Heating Venting Air Conditioning (HVAC) firm must be consulted for proper venting
(flue) information.
ADC Model
Method of Venting
Illus.
AD-15
horizontal
2&3
AD-15
vertical
1
AD-25
horizontal
4
AD-25
vertical
5
AD-285
horizontal
6
AD-285
vertical
7
AD-295
horizontal
8
AD-295
vertical
9
AD-30
horizontal
4
AD-30
vertical
5
AD-30 SUPER
horizontal
10
AD-30 SUPER
vertical
11
AD-330
horizontal
-
AD-330
vertical
-
AD-531
horizontal
-
AD-531
vertical
-
AD-50
horizontal
4
AD-50
vertical
5
AD-50 SUPER
horizontal
12
AD-50 SUPER
vertical
13
AD-75
horizontal
14
AD-75
vertical
15
AD-81
horizontal
16
AD-81
vertical
17
AD-115
horizontal
18
AD115
vertical
19
AD-120
horizontal
18
AD-120
vertical
19
AD-170
horizontal
20
AD-170
vertical
21
53
SINGLE VENTING
Illus. No. 1
Illus. No. 2
Illus. No. 3
54
Illus. No. 4
Illus. No. 5
Illus. No. 6
Illus. No. 7
55
Illus. No. 8
Illus. No. 9
Illus. No. 10
Illus. No. 11
56
Illus. No. 12
Illus. No. 13
Illus. No. 14
Illus. No. 15
57
Illus. No. 16
Illus. No. 17
Illus. No. 18
Illus. No. 19
58
Illus. No. 20
Illus. No. 21
59
2. Multiple Dryer (common) Venting.
a.
If it is not feasible to provide separate exhaust ducts for each dryer, ducts from individual
dryers may be channeled into a “common main duct”. The individual ducts should enter the
bottom or side of the main duct at angle not more than 45 degrees in the direction of flow and
should be spaced at least the width of the dryer being installed. The duct should be tapered,
with diameter increasing before each individual duct is added.
IMPORTANT: No more than four (4) dryers should be connected to main common duct.
In almost every case where common duct work is used, the duct work (flue) connection to the
dryer must be larger than the dryers exhaust duct.
IMPORTANT: Exhaust back pressure measured by a manometer in the exhaust (flue) duct
work must not exceed .817 mbar (0.3 inches of water column).
The main duct may be any shape so long as the minimum cross sectional area is provided. The
illustrations of common venting in this section show the minimum cross section area for
multiple dryer round or square venting. These figures must be increased 10 square inches
when rectangular main ducting is used, and the ratio of duct width to depth should not be
greater than 3-1/2 to 1. These figures must be increased in proportion if the main duct run at
last dryer to where it exhausts to the outdoors is unusually long (fifteen [15] feet), or has
numerous (more than two [2] elbows; including outside protection). In calculating duct
work size, the cross sectional area of a square or rectangular duct must be increased twenty
(20) percent for each additional fifteen (15) feet. The diameter of a round exhaust duct must
be increased ten (10) percent for each additional fifteen (15) feet. Each 90 degree elbow is
equivalent to an additional thirty (30) feet and each 45 degree elbow is equivalent to an
additional (15) feet.
Refer to the duct work chart and examples in this section for specific venting information.
When the duct work approaches the maximum limits noted in this manual, a professional
HVAC firm should be consulted for proper venting information.
b.
Multiple Dryer (Common) Vented Examples
The illustrations included in this section are for single pocket dryers connected to a common
exhaust duct system. For dryers where the length of the exhaust duct work or the amount of
allowable elbows is exceeded, a Heating Venting Air Conditioning (HVAC) firm must be
consulted for proper venting (flue) information.
60
Multiple Dryer (Common) Vented Examples (continued)
ADC Model No. Illus. No.
AD-15
1
AD-25
3
AD-285
2
AD-295
2
AD-30 (not SUPER)
3
AD-30 SUPER
4
AD-50 (not SUPER)
3
AD-50 SUPER
5
AD-75
6
AD-81
7
AD-115
8
AD-120
8
AD-170
9
For models ADG-330 and ADG-531, refer to page 76.
61
Illus. No. 1
Illus. No. 2
62
Illus. No. 3
Illus. No. 4
63
Illus. No. 5
Illus. No. 6
64
Illus. No. 7
Illus. No. 8
65
Illus. No. 9
66
D. Dual Pocket (AD-330 & AD-531) Venting.
1. Individual Dryer Venting.
Where possible, it is suggested to provide a separate exhaust duct for each dryer. The duct work
(flue) can be laid out so that the top and bottom pockets/tumblers are “Y” together, or each tumbler
duct can be vented independently. The exhaust duct work should be laid out in such a way that the
duct work travels as directly as possible to the outdoors with as few turns as possible. Keep in mind
when calculating the dryer exhaust duct work, the elbows used for outside protection must be
included. Refer to Section V, A & B for specific details.
Refer to the duct work examples in this section for specific venting information. When the duct
work approaches the maximum limits noted in this manual, a professional HVAC firm must be
consulted for proper venting information.
NOTE: Exhaust back pressure measured by a manometer in the exhaust (flue) duct work must
not exceed .817 mbar (0.3 inches of water column).
Under no circumstances should the size of the duct work (flue) connected to the dryer be smaller
than the dryer’s exhaust duct. In many cases the duct work (flue) must be larger (than the dryer’s
exhaust duct) and increased just outside of the dryer where the duct work (flue) exits.
a. AD-330 Individually Vented Examples ...
The illustrations included in this section are for dryers individually vented/exhausted to the
outdoors. For dryers where the length of exhaust duct work or the amount of allowable
elbows is exceeded, a Heating Venting Air Conditioning (HVAC) firm must be consulted
for proper venting (flue) information.
Venting Option
Illus. No.
Internal Common Vent Connection
(Flex Duct Work)
1
Internal Common Vent Connection
(Hand Duct Work)
2
Individual Pocket Venting
3
Top & Bottom Pocket Connection
4&5
To protect the outside end of horizontal duct work from the weather, a 90º elbow bent
downward should be installed where the exhaust exits the building. If the exhaust duct
work travels vertically up through the roof, it should be protected from the weather by
using a 180º turn to point the opening downward. In either case, allow at least twice the
diameter of the duct between the duct opening and nearest obstruction.
67
IMPORTANT: DO NOT use screens or caps on the outside opening of exhaust duct work.
Illus. No. 1
(AD-330)
Illus. No. 2
(AD-330)
68
Illus. No. 3
(AD-330)
69
Illus. No. 4
(AD-330)
70
Illus. No. 5
(AD-330)
71
b. AD-531 Individually Vented Examples
The illustrations included in this section are for dryers individually vented/exhausted to the
outdoors. For dryers where the length of exhaust duct work or the amount of allowable
elbows is exceeded, a Heating Venting Air Conditioning (HVAC) firm must be consulted
for proper venting (flue) information.
Venting Option
Illus. No.
Each Pocket/Tumbler Independently Vented
1
Top/Bottom Pocket “4” Together (Version 1)
2
Top/Bottom Pocket “4” Together (Version 2)
3
Illus. No. 1
(AD-531)
72
Illus. No. 2
(AD-531)
Illus. No. 3
(AD-531)
73
2. AD-330/AD-530 Multiple Dryer (Common) Venting
If it is not feasible to provide separate exhaust ducts for each dryer, ducts from individual dryers
may be channeled into a “common main duct”. The individual ducts should enter the bottom or
side of the main duct at an angle not more than 45 degrees in the direction of airflow. The main
duct should be tapered, with the diameter increasing before each individual.
IMPORTANT: Even though the dryer’s individual exhaust outlet is six (6) inches in diameter,
the minimum connections at the point of exit from the dryer in many cases
MUST BE INCREASED. The amount of increase in diameter will depend on
the venting application/layout. See examples in this section for specific details.
The connections between the dryer and the common duct, and the overall length of the common
main duct should be laid out in such a way that the duct travels as directly as possible to the
outdoors with as few turns as possible. Keep in mind when calculating the dryer exhaust duct
work, the elbows used for outside protection must be included. Refer to Section V, A & B for
specific details.
IMPORTANT: WHEN TOP and BOTTOM BASKETS (Tumblers) ARE “Y” TOGETHER,
UNDER NO CIRCUMSTANCES CAN THE DRYER BE VENTED TO
THE OUTDOORS, OR MORE SPECIFIC VENTED INTO A COMMON
DUCT USING A 6-INCH DIAMETER EXHAUST DUCT (FLUE)!!!
Refer to the duct work examples in this section for specific venting information. When the duct
work approaches the maximum limits noted in this manual, a professional HVAC firm must be
consulted for proper venting information.
IMPORTANT: Exhaust back pressure measured by a manometer at the dryer exhaust duct area
must not exceed .817 mbar (0.3 inches of water column).
NOTE: No more than four (4) dryers or eight (8) pockets/tumblers total should be connected to
one (1) main common duct.
a.
Exhaust Connections of Top and Bottom Baskets (Tumblers)
Their is no common venting connection provided with the dryer. Each basket (tumbler) can be
connected to the common main duct independently or top and bottom tumblers connected
together commonly (“Y”) together. Both independent or common “Y” duct work can be rigid
or flexible.
74
The illustration below shows the duct work connection points and what internal duct work is
included in the dryer.
The exhaust connection at the top basket (tumbler) must be made at the blower duct inside the
cabinet. No internal duct work is included for the top basket/tumbler. Depending on the external
duct work layout, the installer has the option of the duct work coming out the top of the back of the
dryer. The duct work used inside of the dryer, from the blower duct to where it exits the dryer, must
be a minimum of 6-inches in diameter (30 square inches cross sectional area). At this point (where
the internal ducting ends) the diameter must be increased to meet the application as described in
this manual.
The bottom basket (tumbler) includes 6-inch duct work which extends from the dryer blower duct
to the lower back guard/panel area. At this point the diameter must be increased to meet the
application as described in this manual.
b.
AD-330 Common (Multiple Dryer) Vented Examples
The illustrations included in this section are for AD-330 dryers commonly vented/exhausted to
the outdoors. For dryers where the length of the exhaust duct work or the amount of allowable
elbows is exceeded, a Heating Venting Air Conditioning (HVAC) firm must be consulted for
proper venting (flue) information.
Venting Option
Illus. No.
Each Pocket/Tumbler Individually
connected to a common duct.
1
Each Dryer (Top and Bottom Pockets
“Y” Together) To Common Duct.
2
75
Illus. No. 1
(AD-330)
Illus. No. 2
(AD-330)
76
c.
AD-531 Common (Multiple Dryer) Vented Examples ...
The illustrations included in this section are for AD-330 dryers commonly vented/exhausted to
the outdoors. For dryers where the length of the exhaust duct work or the amount of allowable
elbows is exceeded, a Heating Venting Air Conditioning (HVAC) firm must be consulted for
proper venting (flue) information.
Venting Option
Illus. No.
Each Pocket/Tumbler Individually
connected to a common duct.
1
Each Dryer (Top and Bottom Pockets
“Y” Together) To Common Duct.
2
Illus. No. 1
(AD-531)
77
Illus. No. 2
(AD-531)
78
SECTION VII
PART INFORMATION
Always contact your dealer, distributor, or service agent for parts. When doing so, always supply the
complete dryer model number and serial number to insure that the correct parts are provided. If you cannot
locate an ADC dealer or agent, or if you require technical parts information, contact the ADC factory (U.S.A.).
ADC Telephone:
ADC Fax:
E-mail:
508-678-9000 (Hours are 8:00 a.m. to 5:00 p.m. Eastern Standard Time)
508-678-9447
[email protected]
A. Spare Parts Listing
1. Due to the amount of various models, options, vintage of the dryer etc. ALL the spares/parts possibly
required for the life of the dryer cannot be listed.
Included are two (2) parts listings. One is a listing of common parts which includes description and part
numbers.
The second list includes items which have many various versions and the description does not include
the part number. Should these parts be needed in the far future, the ADC dealer or agent should be
contacted with the exact dryer model and serial number for correct part identification. If dealer or
agent is unknown or for whatever the reason cannot be found, contact the ADC factory as noted
previously at the beginning of this section.
Most major components used in the ADC product line are labeled with the ADC part number. When
replacing parts, be sure to check to insure the part number of the item being replaced is the same as that
on the new part.
A complete illustrated parts manual is available for each model dryer from the ADC factory upon
request.
2. Common spare parts listing ..
Description
ADC Part No.
Coin keypad assembly. (Coin Microprocessor models only)
Non-Coin keypad assembly (OPL - Non coin Micro models)
Coin Phase 5 Microprocessor controller
OPL Phase 5 non-reverse Microprocessor controller
OPL phase 5 reversing Microprocessor controller
60 minute heat timer
15 minute cool down timer
Dual Timer 24v. Relay (Dual Timer Models Only)
Timer Knobs (Dual Timer Models Only)
Push To Start Relay 24v. (non-Microprocessor models)
Heat Selection Rocker Switch (non-Microprocessor models)
Indicator Light 24v (non-Microprocessor models)
1/8 amp slo blo fuse (for Micro controller)
79
112526
112535
137213
137222
137231
124025
124030
131931
124103
131917
122400
123005
136048
Description
ADC Part No.
1/2 amp slo blo fuse (all 24v circuits)
Plastic (Gray) Main Door Assembly
Plastic (Black) Main Door Assembly
CRS Metal (Black) Main Door Assembly
115/120/170 Main door Assembly (color must be specified)
AD-15 & 25 Tumbler Inner 1 1/4" flange bearing
AD-15 & 25 Tumbler Outer 1" flange bearing
AD-285, 295, 30 Tumbler Inner 1 3/8" flange bearing
AD-50, 75 & 81 Tumbler Inner 1 3/4" flange bearing
AD-285 through 81 Tumbler Outer 1 3/8" pillow block bearing
AD-115 & 120 2 1/4" Tumbler bearing
AD-170 Tumbler Bearing
18" Tumbler Pulley (15 through 75 Non-reverse models)
18" Tumbler Pulley (30 through 81 Reverse models)
Idler Pulley (AD-15 through 30)
Idler Pulley (AD-50 through 81)
Idler bearing assembly (AD-15 through 81)
Microprocessor temperature sensor
225 degree F thermostat (Lint chamber Hi-limit)
330 degree F Burner Hi-limit (gas models only)
290 degree F Oven Hi-limit (electric models only)
130 degree F Low Temp Thermostat (non micro models)
150 degree F Med Temp Thermostat (non micro models)
180 degree F High Temp thermostat (non micro models)
Air Flow (Sail) Switch (all gas and electric models)
Gas Valve 24v. (Natural Gas)
Gas Valve 24v (L.P.)
Gas Valve (170)
Hot Surface Ignition (HSI) Module
Hot Surface Ignitor
Motor Contactor 24v. (single phase models)
Motor Contactor 24v. ( 3 phase non-reverse models)
3 phase Arc Suppressor
Lint Screen/Filter (AD-15, 25, and 30 super)
Lint Screen/Filter (AD-50)
Lint Screen/Filter (AD-285, and 30)
Lint Screen/Filter (AD-50 Super, AD-75)
Lint Screen/Filter (AD-81)
Lint Screen/Filter (AD-115 and AD-120)
Lint Screen Filter (AD-170)
80
136057
881421
881422
881150
800127
880213
880201
880203
880220
880779
880204
100242
101100
101118
101129
101140
801007
880251
130103
130401
130400
130111
130100
130101
122200
128927
880960
140017
128976
881797
132451
132430
137060
800500
800501
800503
800506
802205
820017
820925
3. This secondary list includes items that have many various versions and the description does not
include the part number. Should these parts be needed in the far future, the ADC dealer or agent
should be contacted with the exact dryer model and serial number for correct part identification.
Description
Tumbler to Idler Drive Belt(s)
Motor to Idler Drive Belt(s)
Electric Oven Elements
Electric Oven Contactor
Controls Step Down Transformer
Micro-Processor Coin Acceptor
Micro-Processor Optic Switch
Mechanical Coin Meter 24v.
Main Door Switch
Lint Drawer/Door Switch
Tumbler Support
Basket Only
Tumbler/Basket Tie Rod
Reversing Drive Contactor
3 Phase Blower Contactor
Drive Motor
Blower Motor
Blower/Fan
Steam Coil (battery)
81
SECTION VIII
ELECTRICAL INFORMATION
1.Electrical Requirements
It is the responsibility of the purchaser to have all electrical connections made by a properly licensed
and competent electrician to assure that the installation is suitable for the appliance category in
accordance with national installation regulations of the country of destination.
IMPORTANT: Failure to comply with these codes or ordinances, and/or the requirements
stipulated in this manual can result in personal injury or component failure.
NOTE: Component failure due to improper installation will VOID THE WARRANTY.
Each dryer must be connected to an independently protected branch circuit. The dryer must be
connected with copper wire only. DO NOT use aluminum wire which could cause a fire hazard. The
copper conductor wire/cable must be of proper ampicity and insulation in accordance with electric
codes for making all service connections.
NOTE: The use of aluminum wire will VOID THE WARRANTY.
IMPORTANT: A separate circuit servicing each dryer must be provided.
2.Electrical Service Specifications
Electric Specification Chart
Gas Non-Reversing Models ONLY
SERVICE
VOLTAGE
50 Hz
PHASE
WIRE
SERVICE
APPROX.
AMP
DRAW
FUSING DUAL
ELEMENT TIME
DELAY
CIRCUIT
BREAKER
15, 25, 30
285
240V
240V
380-416V
1Ø
3Ø
3Ø
2
3, 4
3, 4
5A
4A
2A
8A
8A
3.2A
15A
15A
15A
295
240V
1Ø
2
5A
8A
15A
50
240V
240V
380-416V
1Ø
3Ø
3Ø
2
3, 4
3, 4
4.2A
4A
2.2A
8A
8A
4A
15A
15A
15A
SUPER 30, 50
STD 75
240V
240V
380-416V
1Ø
3Ø
3Ø
2
3, 4
3, 4
5A
5A
3A
8A
8A
5.6A
15A
15A
15A
330
240V
1Ø
2
3.6
5A
15
531
240V
1Ø
2
5
8A
15
continued on next page
82
Electric Specification Chart
Gas Reversing Models ONLY
MODEL
SERVICE
VOLTAGE
50 Hz
PHASE
WIRE
SERVICE
APPROX.
AMP
DRAW
FUSING DUAL
ELEMENT TIME
DELAY
CIRCUIT
BREAKER
30, 50
240V
380-416V
3Ø
3Ø
3, 4
7A
5A
12A
8A
15A
15A
SUPER 30, 50
STD 75
240V
380-416V
3Ø
3Ø
3, 4
8.5A
5A
12A
8A
15A
15A
81
240V
380-416V
3Ø
3Ø
3, 4
15A
7.5A
25A
15A
30A
15A
115
240V
380-416V
3Ø
3Ø
3, 4
15.5A
8A
25A
12A
30A
15A
120
240V
380-416V
3Ø
3Ø
3, 4
15.5A
8A
25A
12A
30A
15A
170
240V
380-416V
3Ø
3Ø
3, 4
28A
14A
40A
20A
60A
25A
IMPORTANT: The dryer must be connected to the electric supply shown on the dryers data label.
NOTE: ADC reserves the right to make changes in specifications at any time, without notice or
obligation.
IMPORTANT: The wire size must be properly sized to handle the related current.
3.Grounding
A ground (earth) connection must be provided and installed in accordance with local or regional
codes. In the absence of these codes, grounding must be suitable for the appliance category in
accordance with national installation regulations of the country of destination.
WARNING: For personal safety and proper operation, the dryer must be grounded.
Provisions are made for ground connection in each dryer at the electrical service connection area.
Electrical Connections
NOTE: A wire diagram is provided with this booklet and a copy is also included in the dryer’s
electrical box.
83
4.Single Pocket Wiring Connections
IMPORTANT: A separate circuit servicing each dryer must be provided.
a. Single Phase Wiring Connections (Hookup)
The electrical connections on all
Single-Phase dryers are made into
the rear service box located at the
upper left area of the dryer.
Actual electrical wire connections are made to the L1 and L2 terminals of the power distribution
block located in the rear service box mentioned above. The ground connection is also made to the
copper lug also provided in this box.
Single-Phase Electrical Connections Leads
Black
+
Positive
Red
Neutral
If local codes permit, power to the
dryer can be made by the use of a
flexible power cord/pigtail (wire size
must conform to rating of dryer), or
the dryer can be hard wired directly
to the service breaker panel. In all
cases, a strain relief must be installed
where the wiring enters the dryer.
84
Green
Ground
b. Three (3) Phase Connections
The electrical connections on all Three (3) Phase dryers (including reversing models) are made into
the rear service box located at the upper left area of the dryer. To gain access to the service box
power distribution block, the service box cover must be removed.
NOTE: A circuit serving each dryer must be provided.
Wiring size must conform to rating of dryer.
A strain relief must be installed where the
wiring enters the dryer.
The only electrical connections to the dryer
are the 3-Phase power leads (L1, L2, L3
and Ground) made to the power
distribution block in the electric service box.
The ground connection is made to a
copper lug also provided in this box. Single
phase power for the control circuit is done
internally to the dryer. No single phase
connection is required on a three phase
dryer.
Three (3) phase models are polarity sensitive. To verify proper polarity, when dryer is first started
the basket (tumbler) should turn in the clockwise direction. If it does not, then reverse any two of
the three phase lead connections made at the power distribution block.
85
5.Dual Pocket Wiring Connection
a. AD-330 Single Phase Wiring Connections (Hookup)
IMPORTANT: A separate circuit (power source) servicing each pocket tumbler/basket must be
provided.
The electrical connections (for both top
and bottom pockets) for the AD-330 are
made into the electric service box located
at the top of the dryer (see illustration).
Actual electrical wire connections are made
to the five (5) leads in this box. There are
two (2) black, two (2) red, and one (1) green.
Connect one power source Line 1 to one black
lead, Line 2 to one red lead, and ground to the
green lead. The other power source connections
(Line 1, Line 2, and Ground) are made to the
other black and red leads, and the ground to the
common ground lead. See illustration.
Again, a separate circuit servicing each pocket
tumbler/basket must be provided.
If local codes permit, power to the dryer can be made by the use of a flexible power cord/pigtail (wire
size must conform to rating of dryer), or they can be hard wired directly to the service breaker panel.
In all cases, a strain relief must be installed where the wiring enters the dryer.
86
b. AD-531 Single Phase Wiring Connections (Hookup)
IMPORTANT: A separate circuit (power source) servicing each pocket tumbler/basket must be
provided.
The electrical connections (for both top
and bottom pockets) for the AD-531 are
made into the electric service box located
at the rear top area of the dryer (see illustration).
Actual electrical wire connections are made
at the 4 position power distribution block located
in the above mentioned electric service box.
The top two positions are for the top pocket/
tumbler L1 and L2 service connections, and the
bottom two are for the lower pocket tumbler L1
and L2 service connections. The ground
connections are made to the copper lug also
provided in this box.
Again, a separate circuit servicing each pocket
tumbler/basket must be provided.
If local codes permit, power to the dryer can be made by the use of a flexible power cord/pigtail (wire
size must conform to rating of dryer), or they can be hard wired directly to the service breaker panel.
In all cases, a strain relief must be installed where the wiring enters the dryer.
87
SECTION IX
DRYER MODEL/CAPACITY
ADC DRYER
M ODEL
NUM BER
CAPACITY*
IN P OUNDS
M AXIM UM L OAD M INIM UM L OAD
IN KILOGRAM S
IN KILOGRAM S
ADG-15
15 lbs
6.8 kg
3.4 kg
ADG-25
25 lbs
11.3 kg
5.7 kg
ADG-285
30 lbs
13.6 kg
6.8 kg
ADG-295
30 lbs
13.6 kg
6.8 kg
ADG-531
30 lbs **
13.6 kg **
ADG-30
30 lbs
13.6 kg
6.8 kg
ADG-30 SUPER
30 lbs
13.6 kg
6.8 kg
ADG-330
30 lbs **
ADG-50
50 lbs
22.7 kg
11.4 kg
ADG-50 SUPER
50 lbs
22.7 kg
11.4 kg
ADG-75
75 lbs
34.0 kg
17.0 kg
ADG-81
80 lbs
36.4 kg
18.2 kg
ADG-115
115 lbs
52.2 kg
26.1 kg
ADG-120
120 lbs
54.4 kg
27.2 kg
ADG-170
170 lbs
77.0 kg
38.5 kg
13.6 kg **
* DRY WEIGHT
** EACH POCKET/TUMBLER BASKET
88
6.8 kg **
6.8 kg **
Declaration of Conformity
In accordance with article 10 of European Directive 89/336/EEC (Electromagnetic Compatibility) and article 10 of European Directive 73/23/EEC (Low Voltage Directive), as
amended by Directive 93/68/EEC (CE marking), it is declared that the CE marked
products listed below have been designed and manufactured in conformity with the
following harmonized European Standards:
EN 5 0 0 8 1 - 1 :1 9 9 2
EMC - Ge ne ric Emissio n S ta nd a rd
EN 5 5 0 2 2 :1 9 8 7
RF I Ra d ia te d Emissio n
EN 5 5 0 2 2 :1 9 8 7
Te rmina l Inte rfe re nc e Vo lta ge
EN 5 5 0 1 4
Disc o ntinuo us Inte rfe re nc e
EN 5 0 0 8 2 - 1 :1 9 9 2
EMC - Ge ne ric Immunity S ta nd a rd
IEC 8 0 1 - 3 :1 9 8 4
RF I Ra d ia te d S usc e p tib ility
IEC 8 0 1 - 2 :1 9 8 4
Ele c tro sta tic Disc ha rge
IEC 8 0 1 - 4 :1 9 8 8
Ele c tric a l F a st Tra nsie nts
P ro d uc t
Drye rs
Bra nd
ADC
Mo d e l/De sc rip tio n
ADG- 1 5 , ADG- 2 5 , ADG- 2 3 5 , ADG- 2 9 5 ,
ADG- 3 0 , ADG- 3 0 S up e r, ADG- 3 3 0 , ADG5 3 1 , ADG- 5 0 , ADG- 5 0 S up e r, ADG- 7 5 ,
ADG- 8 1 , ADG- 11 5 , ADG- 1 2 0 , ADG- 1 7 0
Ye a r o f first C E ma rk
Autho rized re p resenta tive in Euro p e
N a me o f signa to ry
P o sitio n
C o mp a ny
C o mp any add ress in
EEC
Signature of Manufacturer’s
Authorized representative in EEC: ______________________________ Date: __________
Ma nufa c ture r
N a me
Ge o rge S ilvia
P o s itio n
Dire c to r o f Engine e ring
C o mp a ny
Ame ric a n Drye r C o rp o r a tio n
C o mp a ny Ad d re s s
8 8 C urra nt Ro a d , F a ll Rive r, M A 0 2 7 2 0
Signature:
89
DECLARATION OF CONFORMITY TO TYPE
We: American Dryer Corporation
88 Currant Road
Fall River, Mass. 02720-4781
Declare that
Product Group: Dryers
Model Number/Description:
ADG-15, ADG-25, ADG-285, ADG-295, ADG-30, ADG-30 Super, ADG-330, ADG-531,
ADG-50, ADG-50 Super, ADG-75, ADG-81, ADG-115, ADG-120, ADG-170
SATISFIES THE ESSENTIAL REQUIREMENTS OF THE GAS APPLIANCE DIRECTIVE 90/
396/EEC AS AMENDED BY 93/68/EEC AND IS MANUFACTURED IN ACCORDANCE WITH
THE HARMONIZED EUROPEAN STANDARDS:
Standards Numbers:
prEN1458 and prEN1020
We also declare that production of each specific model will be in conformity with the type as described in the
EC type-examination certificate:
NUMBER: BG/EC-87/98/87 issued by BG Tech
Name: George Silvia
Title/Position: Director of Engineering
Place and date of issue:
Signature:
080698GS/cj
90
ADC 113007
1- 12/05/97-3
4* 07/14/98-100
7- 10/08/98-0
10* 11/03/98-500
13- 10/20/99-250
2* 03/20/98-5
5- 07/31/98-500
8* 10/23/98-0
11* 04/23/99-250
14- 10/03/00-250
3* 06/03/98-5
6- 08/05/98-2
9* 10/29/98-0
12- 08/09/99-250
15* 12/04/00-300