1
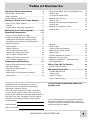
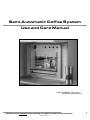
Semi-Automatic Coffee System
Use and Care Manual
Models: CM24TBISAS (Tank model)
CM24PBISAS (Plumbed model)
Read this manual completely before operating your appliance. Keep it for future reference.
Part No. 101984 Rev. A
Table of Contents
Important Safety Instructions.................2
About Safety Instructions ................................. 2
Safety Symbols............................................... 2
General Safety Precautions............................... 3
Getting To Know Your Coffee System ......6
Parts of Your Coffee System ............................. 6
Exterior ........................................................ 6
Control Panel, Parts and Accessories ................ 8
Setting Up Your Coffee System.............. 10
Operating Instructions .......................... 11
Things to Know Before You Start ..................... 11
Preparing to Operate Your Coffee System ......... 12
Loading and Starting the Coffee System ......... 12
Assembling and Using the Drink Dispenser...... 14
Making Hot Drinks......................................... 15
Making Coffee ............................................. 15
Making Espresso .......................................... 16
How To Heat and Foam Milk .......................... 17
Making Hot Drinks (continued) ..................... 18
How To Make a Coffee Latte .......................... 18
Making Hot Drinks (continued) ..................... 20
How To Make a Cappuccino ........................... 20
Cleaning and Maintenance..................... 22
Cleaning the Water Tank (CM24TBISAS Only) ... 24
What to Use ................................................ 24
To Clean the Water Tank ............................... 24
Cleaning the Drip Tray ................................... 25
What to Use ................................................ 25
Cleaning the Used Coffee Grounds Bin ............. 25
What to Use ................................................ 25
Cleaning the Dispenser Collar ......................... 26
What to Use ................................................ 26
System Cleaning Instructions.......................... 27
Dispenser Collar Decalcification (both models) . 27
What to Use ................................................ 27
Boiler Decalcification - Tank Model ................. 28
What to Use ................................................ 28
Cleaning the Exterior and Brewing Compartment
Surfaces ...................................................... 29
What to Use ................................................ 29
How to Clean the Surfaces ............................ 29
Adjusting the Coffee Grinder........................... 30
What to Use ................................................ 30
Grinder Adjustment Process .......................... 30
Adjusting the Grind Time .............................. 31
Regulator Adjustment - Plumbed Model............ 31
Light Replacement......................................... 32
Cleaning and Maintenance Schedule ................ 22
Approved Cleaners ........................................ 23
Cleaning the Steam Nozzle ............................. 23
What to Use ................................................ 23
Cleaning the Drink Dispenser Assembly ........... 24
What to Use ................................................ 24
Before You Call for Service .................... 33
Keep this manual and your sales receipt or
canceled check in a safe place for future
reference. Proof of original purchase date is
required for warranty service.
If you have any questions about this
product, call:
Have the model and serial number information
for your coffee system ready. The numbers are
found on the model-serial number plate located on
the side of the unit. See page 6 for the location.
Record the information below for easy access.
Model Number
Serial Number
Problem Solution Guide.................................. 33
Warranty Information ........................... 35
Product Maintenance .................................... 35
Getting Help................................................ 35
What is Covered .......................................... 36
What is Not Covered .................................... 36
Dacor ® Customer Service
1-800-793-0093 (U.S.A. and Canada)
Monday — Friday 6:00 A.M. to 5:00 P.M. Pacific Time
Web site: www.Dacor.com
In our continuing effort to improve the quality
and performance of our appliances, it may be
necessary to make changes to the coffee system
without revising this guide.
Date of Purchase
Use and Care Manual
1
Important Safety Instructions
IMPORTANT
INSTALLER: PLEASE LEAVE THIS MANUAL WITH THIS APPLIANCE.
CUSTOMER: READ THIS USE & CARE MANUAL COMPLETELY BEFORE USING YOUR APPLIANCE AND
KEEP IT FOR FUTURE REFERENCE. IT PROVIDES PROPER USE AND MAINTENANCE INFORMATION.
About Safety Instructions
IMPORTANT: Warnings and Important Safety Instructions appearing in this guide are not meant to
cover all possible conditions and situations that may occur. Common sense, caution and care must be
exercised when installing, maintaining or operating an appliance.
Always contact the manufacturer about problems or conditions you do not understand.
Safety Symbols
DANGER
WARNING
CAUTION
IMPORTANT
NOTE
2
Instructions that if not followed immediately, will
result in serious injury or death. Severe property
damage may also occur.
Instructions that if not followed could result in
serious injury or death. Property damage may also
occur.
Instructions that if not followed could result in
property damage.
Important things to know about your coffee system
or instructions that must be followed for it to work
properly.
Helpful tips that will make your coffee system
easier to use.
Semi-Automatic Coffee System
Important Safety Instructions
DANGER
• IMPORTANT: Before performing any type of service or installation, make sure that electric power to
the coffee system is turned off or that power is disconnected.
• IMPORTANT: To avoid the possibility of explosion or fire, do not store or use combustible, flammable
or explosive liquids or vapors (such as gasoline) inside or in the vicinity of this or any other appliance.
• IMPORTANT: This appliance is equipped with a
three-prong grounding plug for your protection
against possible electric shock hazards. It must
be plugged into a dedicated, grounded receptacle.
Where a standard two-prong wall receptacle is
encountered, it is the personal responsibility and
obligation of the customer to have it replaced with
a dedicated, properly grounded three-prong wall
receptacle. Do not under any circumstances, cut or
remove the third (ground) prong from the power
cord. Do not use an adapter plug. Do not use an
extension cord. Do not use a power cord that is
frayed or damaged. The use of a ground fault
interrupter (GFI) is not recommended.
Power cord with
three-prong plug
Grounded type
wall receptacle
General Safety Precautions
To reduce the risk of fire, electric shock, serious injury or death when using
your appliance, follow basic safety precautions, including the following:
WARNING
• If you receive a damaged product,
immediately contact your dealer or builder.
Do not install or use a damaged appliance.
• Do not use the coffee system until it has
been properly installed by a qualified installer
according to the accompanying installation
instructions. Have the installer show you the
location of the power connector and the fuse
or junction box so that you know where and
how to turn off power to the coffee system.
• Do not install, repair or replace any part of the
coffee system unless specifically recommended
in the literature accompanying it. A qualified
service technician should perform all other
service.
• Keep packaging materials away from children.
Plastic sheets and bags can cause suffocation.
• Use the coffee system only for tasks expected
of a home appliance as outlined in this
manual. This appliance is not intended for
commercial use.
• DO NOT PUSH ANY BUTTONS OR TURN ANY
KNOBS ON THE FRONT PANEL UNTIL ALL
BODY PARTS AND CLOTHING ARE CLEAR
OF THE BREWING COMPARTMENT. KEEP ALL
BODY PARTS AWAY FROM THE BREWING
COMPARTMENT DURING OR IMMEDIATELY
AFTER DRINK DISPENSING. HOT LIQUIDS
AND STEAM CAN CAUSE SEVERE BURNS.
• Make sure individuals who use the coffee
system know how to operate it properly.
Use and Care Manual
3
Important Safety Instructions
General Safety Precautions (continued)
WARNING
• Never allow anyone, including children to
sit, stand or climb on any part of the coffee
system. Doing so may cause damage, serious
injury or death.
• Do not leave children alone or unattended in
the area around the coffee system. Do not
allow children to use it or touch any part of it.
• Do not store items of interest to children on
top of or above the coffee system. Children
could be burned or injured while climbing on
the appliance.
• Do not tamper with the controls.
• Clean the coffee system completely according
to the Cleaning and Maintenance section
(including System Cleaning) of this manual
before operating it for the first time.
• Clean and maintain the coffee system
according to the maintenance schedule on
the facing page. Clean it only in the manner
indicated in the Cleaning and Maintenance
section. Use only the cleaning agents
specified.
• Do not use a steam or pressure cleaner to
clean the coffee system or any part of it.
Damage caused by cleaning the unit in this
manner could result in electric shock, fire or
explosion.
• Turn off the coffee system and allow it to cool
before cleaning, except when cleaning the
steam nozzle or performing a system cleaning.
• To prevent sickness due to food poisoning,
clean the steam nozzle immediately after
foaming milk. See page 23.
• On model CM24TBISAS (tank model): Change
the water in the tank daily to prevent sickness
due to bacteria growth.
• When cleaning the mechanical parts of the
coffee system, exercise care with hands and
arms around the metal edges.
• Many metal surfaces on top of the coffee
system and inside the brewing compartment
become and remain hot when the power
switch is turned on. Exercise care around the
coffee system’s metal surfaces even after
turning off the power switch.
• During normal operation, the person using the
coffee system may pull it out from the cabinet
to fill the coffee bins, etc. To prevent personal
injury, when pushing the coffee system back
into the cabinet, make sure body parts and
clothing are clear of the portion of the coffee
system behind the front panel.
• To avoid personal injury, make sure no one is
under the coffee system when sliding it in and
out of the cabinet.
• To avoid steam coming out of the unit
unexpectedly, rotate the steam nozzle knob
fully counter-clockwise before turning on the
power switch.
CAUTION
• To prevent jamming of the grinding
mechanism, use only the types of coffee beans
specified in this manual.
• Do not put any part of your coffee system
in a dishwasher. Many of the parts are not
dishwasher safe.
• To prevent clogging of the internal parts, use
only filtered water as specified on the facing
page. Do not use distilled water.
• To avoid damage to the coffee system, do not
put pre-ground coffee into the coffee bean
container.
4
Semi-Automatic Coffee System
Important Safety Instructions
IMPORTANT
%HIRUHRSHUDWLQJ\RXUFRIIHHV\VWHPIRUWKH¿UVWWLPH:
1.
Make sure you are using the right type of water.
¾
Call your local water company. Ask them for the water hardness level of the water supplied to
the building where the coffee system will be installed.
¾
If the water hardness level is above four grains per gallon (4gpg):
»
For CM24TBISAS (tank model), pour only filtered water with a hardness level of 4gpg or
less into the water tank. Do not use distilled water.
»
For CM24PBISAS (plumbed model), contact a water treatment specialist and have a water
treatment system installed to reduce the water hardness level to 4gpg or less.
IMPORTANT: Dacor ® does not recommend installation of a reverse osmosis filtration system. Reverse
osmosis systems can cause low water pressure. When the water pressure is low, the coffee water
volume (level) can fluctuate and the water pump may make a “hammering” sound.
2.
Clean the system completely according to the Cleaning and Maintenance section
(including) System Cleaning, to remove bacteria that may have accumulated during
storage and shipping.
Clean your coffee system regularly according to the chart below:
Coffee System Cleaning Schedule
Steam Nozzle*
Immediately
after use
Daily
9
9
Drink Dispenser
Assembly
9
Water Tank
(CM24TBISAS Only)
9
Drip Tray
9
Used Coffee Ground
Bin and Drawer
9
Collar Gasket
Weekly
Monthly
9
System Cleaning
9
Outside Surfaces and
Brewing Compartment
9
* Always clean the steam nozzle immediately after steaming milk. Otherwise, you may clean it daily.
See the Cleaning and Maintenance section on page 22 for complete instructions.
Use and Care Manual
5
Getting To Know Your Coffee System
Parts of Your Coffee System
NOTE: See the Operating Instructions section for directions on how to use the features below.
Exterior
1 Control Panel
The control panel has buttons and knobs across it that are
used to operate your coffee system. See page 8.
2 Brewing Compartment
The brewing compartment is the area where ground coffee,
steam and hot drinks are dispensed. It is equipped with a drip
tray and a slide out accessory drawer.
3 Drip Tray
The drip tray catches spills and water that the coffee system
purges during the process of making coffee.
4 Accessory Drawer
The pullout accessory drawer holds the used coffee ground
bin. It also has room on the sides to store the accessories that
come with your coffee system.
5 Used Coffee Ground Bin
Use the coffee ground bin to hold used coffee grounds after
you are finished making coffee drinks.
6 Used Grounds Beater Bar
When emptying the drink dispenser assembly, knock it against
the beater bar to loosen the grounds from the drink dispenser
assembly.
7 Drink Dispenser Assembly
Coffee drinks are dispensed from the drink dispenser assembly.
Water filters through the coffee grounds inside it. See page 9
for a picture of the various parts.
8 Dispensing Collar
The drink dispenser assembly (filter holder) attaches to the
dispensing collar when making hot drinks.
9 Coffee Bean Container
The coffee system grinds the roasted coffee beans put in the
coffee bean container.
10 Ground Coffee Dispenser
The ground coffee comes out of the dispenser when the coffee
is ground.
11 Ground Coffee Shelf
Rest the bottom of the drink dispenser assembly (filter holder)
on this shelf during the coffee grinding process. NOTE: Do not
rest the holder on the ground coffee shelf unattended.
12 Steam Nozzle
Use the steam nozzle to foam milk and create various types of
hot drinks.
13 Water Tank
Model CM24TBISAS only. The water tank holds the filtered
water used to make coffee. Use only water with a hardness
of four grains per gallon (gpg) or less. The water tank door is
sealed shut on the plumbed model (CM24PBISAS).
14 Coffee Grinder Adjustment
Allows you to adjust the fineness of the coffee produced by the
coffee grinder. See page 30 for instructions on how to adjust
the coffee fineness.
15 Coffee Grind Time Adjustment Allows you to adjust the amount of time the coffee grinds when
you push the grind button. See page 31 for instructions on how
to adjust the coffee grind time.
16 Regulator
Plumbed model only. The regulator controls the water pressure
of the water supplied to the coffee system. See page 31.
17 Model-Serial Number Label
6
Semi-Automatic Coffee System
Getting To Know Your Coffee System
17
14
15
9
10
2
8
Left Side Panel
13
1
11
16
12
4
3
7
6
Use and Care Manual
5
7
Getting To Know Your Coffee System
Control Panel, Parts and Accessories
A Coffee Grinder Button
Push in on the button to start the coffee grinder.
B Steam Nozzle Knob
Use the steam nozzle knob to turn the steam nozzle on
and off. Turing the knob clockwise to turn it on. Turn
the knob counter-clockwise to turn it off.
C Water Tank Empty Light
The water tank empty light comes on when the water
tank needs to be refilled. The light does not work on the
plumbed model (CM24PBISAS) since the water tank is
not used.
D Heating Element Light
Glows when the heating element is on. NOTE: The unit
may still be hot when the light is off. The element turns
on and off automatically when the power switch is on to
maintain optimal drink heating temperature.
E Drink Volume Knob
Adjusts the amount of coffee that is dispensed when the
drink dispensing button is pushed.
F Drink Dispensing Button
Push the drink dispensing button to start dispensing.
The light next to it glows during the drink dispensing
process.
G Power Switch
Push in on the power switch to turn your coffee system
on or off. The light next to it glows when the unit is on.
H Light Switch
Push in on the light switch to turn the lights in the
brewing compartment on or off.
Filter Holder
Holds the filters that contain the ground coffee. Water
pours through it, making the coffee that pours into the
cup you put below it on the drip tray.
J Filter - Double
Holds the ground coffee during drink dispensing. Use it
to create two drinks at a time.
K Filter - Single
Holds the ground coffee during drink dispensing. Use it
to create one drink at a time.
L Filter - Blind
Used during the system cleaning process. See page 27.
M Dispensing Nozzle - Double
Use the double dispensing nozzle to create one or two
hot drinks at a time. See the operating instructions.
N Dispensing Nozzle - Single
Use the single dispensing nozzle to create one hot drink
at a time. See the operating instructions.
O Tamper
Use the tamper to compact the coffee grounds into the
filters.
P Coffee Scoop
Use the coffee scoop to poor pre-ground coffee into the
filter.
Q Cleaning Brush
Use the cleaning brush to clean the inside of the
brewing unit.
R Filter Removal Tool
Use the filter removal tool to remove the filters from the
filter holder.
S Grinder Adjustment Tool
Use the coffee grinder adjustment wrench to turn the
coffee grinder adjustment screw. See page 30.
I
8
Semi-Automatic Coffee System
Getting To Know Your Coffee System
A
B
C
D
E
F
G
H
J
K
I
L
N
M
Drink Dispenser Assembly
Q
O
P
S
R
Accessories
Use and Care Manual
9
Setting Up Your Coffee System
WARNING
• To avoid sickness, clean the coffee system completely according
to the Cleaning and Maintenance section (including System
Cleaning) before operating it for the first time. Doing so will
remove any bacteria left in the unit during shipping and storage.
• Make sure the hardness of the water supplied to, or poured into
your coffee system does not exceed the maximum stated below.
Using water harder than that specified will eventually damage the
internal parts and void your warranty.
• DO NOT PUSH ANY BUTTONS OR TURN ANY KNOBS ON THE
CONTROL PANEL UNTIL ALL BODY PARTS AND CLOTHING ARE
CLEAR OF THE BREWING COMPARTMENT. KEEP ALL BODY
PARTS AWAY FROM THE BREWING COMPARTMENT DURING OR
IMMEDIATELY AFTER DRINK DISPENSING. HOT LIQUIDS AND
STEAM CAN CAUSE SEVERE BURNS.
Before Your Coffee System is Installed
1.
Call your local water company. Ask them for the water hardness level of the
water supplied to the building where your coffee system will be installed.
2.
If the water hardness level is above four grains per gallon (4gpg):
yIf you are installing model CM24PBISAS, contact a water
treatment specialist and have a water treatment system installed to
reduce the water hardness level to 4gpg or less.
y If you are installing model CM24TBISAS, pour only filtered water with a
hardness level of 4gpg or less into the water tank. DO NOT use
distilled water.
3.
Have a licensed electrician install a dedicated, grounded power receptacle
near the coffee system, if one is not available.
4.
Have a qualified installer install the coffee system in the desired location
according to the accompanying installation instructions.
10
Semi-Automatic Coffee System
Operating Instructions
Things to Know Before You Start
WARNING
• To prevent personal injury, keep your hands out of the coffee
bean container.
• Some of the metal surfaces behind the front panel are
hot when the power switch is on. Avoid contact with these
surfaces.
• Do not pour flavored, un-roasted, partial coffee beans or
ground coffee into the coffee bean container. Doing so may
cause the coffee grinding mechanism to jam. Use flavored
coffee creamers or syrups after making the coffee to flavor it.
You may also make flavored coffee using ground coffee pods
placed inside the dispenser filter instead of ground coffee.
• To avoid steam coming out of the unit unexpectedly, rotate
the steam nozzle knob fully counter-clockwise before turning
on the power switch.
¾
For best results, the filter holder (drink dispensing assembly) must
be hot. Keep it attached to the dispensing collar when the coffee
system is heating up.
¾
A small amount of dripping from the drink dispenser is normal after
drinks are dispensed.
¾
This coffee system is designed to make one or two hot drink(s) at a
time.
¾
For proper operation, clean your coffee system regularly according to
the cleaning schedule on page 22.
¾
The coffee system purges water into the drip tray to ensure that the
water used for drink making is hot. Empty out the drip tray when it
starts to get full.
IMPORTANT
Drink volume and strength will vary due to coffee
type, coffee fineness, grind time, amount of
tamping and the drink volume setting. You may
need to experiment for best results. To adjust the
coffee fineness (grinder adjustment) see page 30.
To adjust the grind time see page 31.
Add Your Own Flair!
With your coffee system you can experiment to come up with all
sorts of coffee drinks that suit your personal preference!
Use and Care Manual
11
Operating Instructions
Preparing to Operate Your Coffee System
Loading and Starting the Coffee System
IMPORTANT
If using your coffee system for the very
first time, make sure to start it according to
the First Time Start Up Procedure in the
installation instructions. The coffee system
will not function properly if not properly
prepared for use the first time.
1.
Make sure the drip tray is in place.
Drip Tray
2.
Grasp both sides of the front panel and slide the unit out.
3.
On model CM24TBISAS (tank version), open the water tank door
and pour filtered water (with a water hardness of 4gpg or less) into
the water tank. The tank holds 1 1/4
gallons (2.5 liters) of water. DO NOT
use distilled water. If you want, you can
remove the tank from the machine to
fill it. To do so, grasp the handles firmly
and pull up. Make sure the outside of
the tank is dry before replacement.
Push down firmly on the handles when
replacing it.
NOTE:
On the tank version of
the coffee system (model
CM24TBISAS), the tank empty
light comes on when the
water tank is nearly empty.
Removing the Water Tank
WARNING
Tank Empty Light
12
On model CM24TBISAS (tank version), clean the
water tank daily to avoid sickness due to bacteria
growth. See page 24.
Semi-Automatic Coffee System
Operating Instructions
4.
Open the coffee bean container lid. Fill it to 1/2”
from the top with, whole, unflavored, roasted
coffee beans. Do not over-fill!
5.
Make sure the water tank and the coffee bean
container lids are closed. Push the coffee system
back into the cabinet.
6.
Using the handle, push the steam nozzle back
into the brewing compartment until the end is
over the drip tray.
7.
Turn the steam nozzle knob fully counterclockwise.
Steam Nozzle
Handle
Steam Nozzle Knob
8.
Turn on the power switch. The power indicator light will come on.
The system will automatically load the boiler tank with water. This
process can take up to three minutes. When the required water
level has been reached, the water will begin to heat. The heating
element light comes on during the heating process. The light will
turn off again when the heating process is complete. Once the
water is heated, the element will go on and off to keep the water
at a constant temperature.
9.
Turn the steam nozzle knob 1/4 turn
clockwise until water starts to come
out of the nozzle, then turn the knob
to the off position.
Power Switch
NOTE
The coffee system is equipped with a safety device
that will stop the unit after approximately 1.5
minutes of continuous pump operation (to prevent
the pump from overheating). If the power indicator
stops glowing when the power switch is on, turn the
power switch off and then back on.
Use and Care Manual
13
Operating Instructions
Preparing to Operate Your Coffee System (continued)
Assembling and Using the Drink Dispenser
1.
Filter
Screw either the single or double dispenser nozzle into the
bottom of the filter holder. The double nozzle is for making two
cups of coffee at the same time. When making two cups at the
same time, put the cups side by side, one on each side of the
nozzle. Or to save time changing nozzles you may center one
cup under the double nozzle.
Filter Holder
Dispenser Nozzle
Making Two Cups
Using the Double
Nozzle for One Cup
2.
Insert the single filter into the top of the filter holder for one
cup of coffee or a shot of Espresso. Insert the large filter for two
shots of espresso, two cups of coffee or for a large travel mug.
When inserting a filter into the dispenser, push down firmly on
both sides until it snaps into place.
3.
To insert the filter holder into the dispenser collar: Insert the
top of the round end of the filter holder into the dispenser collar
with the handle pointed to the left. Turn the handle to the right
to lock it in place. The handle should point straight out when
locked in place.
To remove the filters, use the tool provided. Insert it
between the filter holder and the filter and pry the filter
loose.
WARNING
When the filter holder is attached to
the coffee system it will become hot
when the power switch is on.
Inserting the Filter Holder
14
Semi-Automatic Coffee System
Operating Instructions
Making Hot Drinks
Making Coffee
1.
Snap the single filter onto the filter holder for a single cup of coffee.
Use the double filter for two cups or a single large cup.
2.
Attach the desired dispensing nozzle to the bottom of the filter holder.
3.
To grind the coffee, put the filter holder under the
ground coffee dispenser. Push the coffee grinder
button. NOTE: Do not rest the holder on the
ground coffee shelf unattended.
Coffee Grinder
Button
4.
Tamp the ground coffee down in the
filter holder using the tamper provided
with the coffee system. Pack the grounds
together firmly. The more firmly packed
the grounds, the slower the coffee will
flow, creating a stronger flavored coffee.
Packing also affects the coffee volume.
5.
Insert the filter holder into the dispenser
collar inside the brewing compartment.
See page 14 for instructions.
6.
Place an empty cup (or two cups) under
the filter holder.
7.
Set the drink volume knob to half for
smaller drink sizes. Set the knob to full for
larger drink sizes.
8.
Push the drink dispenser button. Coffee will begin to dispense, dark at
first, then becoming lighter.
Drink Volume
Knob
9.
Before Tamping
Grinding the Coffee
After Tamping
Drink Dispenser
Button
Once the coffee is dispensed, remove the cup(s).
10. Remove the filter holder. Open the accessory drawer and tap the filter
holder on the beater bar inside the coffee grounds bin to remove the
used coffee grounds.
Enjoy!
Use and Care Manual
Coffee Ground
Removal
15
Operating Instructions
Making Hot Drinks (continued)
Making Espresso
1.
Snap the single filter onto the filter holder for a single shot of
espresso. Use the double filter for two shots.
2.
Attach the desired dispensing nozzle to the bottom of the filter holder.
3.
Put the filter holder under the coffee ground
dispenser. Push the coffee grinder button.
NOTE: Do not rest the holder on the ground
coffee shelf unattended.
Coffee Grinder
Button
4.
Tamp the ground coffee down in the
filter holder using the tamper provided
with the coffee system. Pack the grounds
together firmly. The more firmly packed
the grounds, the slower the espresso
will flow, creating a stronger flavored
espresso. Packing also affects the
espresso volume.
5.
Insert the filter holder into the dispenser
collar inside the brewing compartment.
See page 14 for instructions.
6.
Place an empty cup (or cups) under the
filter holder.
7.
Set the drink volume knob to the first
setting for a single shot of espresso. Set the knob to the second
setting for two shots.
8.
Push the drink dispenser button. The Espresso will begin to dispense,
dark at first, then becoming lighter.
Setting for
One Shot
9.
Setting for
Two Shots
Before Tamping
Grinding the Coffee
for Espresso
After Tamping
Drink Dispenser
Button
Once the coffee is dispensed, remove the cup(s).
10. Remove the filter holder. Open the accessory drawer and tap the filter
holder on the beater bar inside the coffee grounds bin to remove the
used coffee grounds.
Enjoy!
16
Coffee Ground
Removal
Semi-Automatic Coffee System
Operating Instructions
How To Heat and Foam Milk
1.
Fill a 12 ounce pitcher 2/3 of the way with milk.
2.
Insert the steam nozzle into the pitcher. Submerge only
the tip of the steam nozzle in the milk.
3.
Slowly open the steam nozzle to maximum as you slowly
move the cup up and down so that the nozzle dips in
and out of the milk. Every fifth dip, submerge the nozzle as far
as possible into the cup. Continue this process until the milk is
hot. This process will take approximately two minutes.
Opening the
Steam Knob
To avoid sickness, clean the
steam nozzle immediately after
steaming milk. See page 23.
Foaming and Steaming Milk
4.
Once the milk is hot, turn the steam nozzle knob to the off
position.
5.
Remove the pitcher and using the handle on the nozzle, push it
back over the drip tray.
6.
Turn the steam knob on
slowly to get excess milk out
of the nozzle. Turn the knob
off.
Enjoy!
WARNING
IMPORTANT
• Using non-dairy creamers or half-and-half may cause poor
quality foam.
• The fat content in milk varies according to region and milk
brand. For best results you may need to experiment with
different milk fat contents (whole, 2%, 1%) and brand
names.
Add Your Own Flair!
With your coffee system you can foam milk
for hot chocolate!
Use and Care Manual
17
Operating Instructions
Making Hot Drinks (continued)
How To Make a Coffee Latte
1.
Snap the single filter onto the filter holder.
2.
Attach the desired dispensing nozzle to the bottom of the filter holder.
3.
Put the filter holder under the ground coffee
dispenser. Push the coffee grinder button.
NOTE: Do not rest the holder on the ground coffee
shelf unattended.
Coffee Grinder
Button
4.
Tamp the ground coffee down in the filter
holder using the tamper provided with the
coffee system. Pack the grounds together
firmly. The more firmly packed the grounds,
the slower the coffee will flow, creating a
stronger flavored coffee. Packing also affects
the coffee volume.
5.
Insert the filter holder into the dispenser
collar inside the brewing compartment. See
page 14 for instructions.
6.
Place an empty cup under the filter holder.
7.
Set the drink volume knob to the second
setting (approximately two ounces).
8.
Push the drink dispenser button. Coffee will begin to dispense, dark at
first, then becoming lighter.
Setting for a
Coffee Latte
9.
Before Tamping
Grinding the Coffee
for a Coffee Latte
After Tamping
Drink Dispenser
Button
Once the coffee is dispensed, remove the cup.
10. Remove the filter holder. Open the accessory drawer and tap the filter
holder on the beater bar inside the coffee grounds bin to remove the
used coffee grounds.
Continued...
Coffee Ground
Removal
18
Semi-Automatic Coffee System
Operating Instructions
Coffee Latte (continued)
11. Fill a 12 ounce pitcher 2/3 of the way with milk.
12. Insert the steam nozzle into the pitcher. Submerge only
the tip of the steam nozzle in the milk.
13. Slowly open the steam nozzle to maximum as you slowly
move the cup up and down so that the nozzle dips in
and out of the milk. Every fifth dip, submerge the nozzle
as far as possible into the cup. Continue this process until the milk
is hot. This process will take approximately two minutes.
Opening the
Steam Knob
WARNING
To avoid sickness, clean the
steam nozzle immediately after
steaming milk. See page 23.
Steaming Milk for Coffee Latte
14. Once the milk is hot, turn the steam nozzle knob to the off position.
15. Remove the pitcher and using the handle on the nozzle, push it
back over the drip tray.
16. Pour the steamed milk into the coffee.
17. Turn the steam knob on slowly to get excess milk out of the nozzle.
Turn the knob off.
Enjoy!
IMPORTANT
• Using non-dairy creamers or half-and-half may cause poor
quality foam.
• The fat content in milk varies according to region and milk
brand. For best results you may need to experiment with
different milk fat contents (whole, 2%, 1%) and brand
names.
Use and Care Manual
19
Operating Instructions
Making Hot Drinks (continued)
How To Make a Cappuccino
1.
Fill a 12 ounce pitcher 2/3 of the way with
milk.
2.
Insert the steam nozzle into the pitcher.
Submerge only the tip of the steam nozzle
in the milk.
3.
Slowly open the steam nozzle to maximum
as you slowly move the cup up and down
so that the nozzle dips in and out of the
milk. Every fifth dip, submerge the nozzle
as far as possible into the cup. Continue this
process until the milk is hot. This process
will take approximately two minutes.
4.
Once the milk is hot turn the steam nozzle
knob to the off position.
5.
Remove the pitcher and using the handle on
the nozzle, push it back over the drip tray.
6.
Turn the steam knob on slowly to get excess
milk out of the nozzle. Turn the steam knob
off.
IMPORTANT
• Using non-dairy creamers or half-and-half
may cause poor quality foam.
• The fat content in milk varies according to
region and milk brand. For best results you
may need to experiment with different milk
fat contents (whole, 2%, 1%) and brand
names.
Steam Knob
WARNING
To avoid sickness, clean the
steam nozzle immediately after
steaming milk. See page 23.
Foaming Milk for a Cappuccino
7.
Attach the desired dispensing nozzle to the
bottom of the filter holder.
8.
Put the filter holder under the ground coffee
dispenser. Push the coffee grinder button. NOTE:
Do not rest the holder on the ground coffee shelf
unattended.
Coffee Grinder
Button
Continued...
20
Grinding the Coffee
for a Cappuccino
Semi-Automatic Coffee System
Operating Instructions
Cappuccino (continued)
9.
Tamp the ground coffee down in the
filter holder using the tamper provided
with the coffee system. Pack the
grounds together firmly. The more
firmly packed the grounds, the slower
the coffee will flow, creating a stronger
flavored coffee. Packing also affects the
coffee volume.
10. Insert the filter holder into the
dispenser collar inside the brewing
compartment. See page 14 for
instructions.
Before Tamping
After Tamping
11. Fill a coffee cup 3/4 full with the hot
foamed milk and put it under the filter holder.
12. Set the drink volume knob to the first setting (approximately one
ounce). Set the grinder timer on the side of the coffee system for
approximately eight seconds. See page 31 for instructions. The
grind time adjustment will take some testing to arrive at the best
setting.
13. Push the drink dispenser button. Coffee will begin to dispense.
Setting for a
Cappuccino
Drink Dispenser
Button
14. Once the coffee is dispensed, remove the cup.
15. Remove the filter holder. Open the accessory drawer and tap the
filter holder on the beater bar inside the coffee grounds bin to
remove the used coffee grounds.
Enjoy!
Coffee Ground
Removal
Use and Care Manual
21
Cleaning and Maintenance
Cleaning and Maintenance Schedule
Coffee System Cleaning Schedule
Immediately
after use
Daily
9
9
Steam Nozzle*
Drink Dispenser
Assembly
9
Water Tank
(CM24TBISAS Only)
9
Drip Tray
9
Used Coffee Ground
Bin and Drawer
9
Dispenser Collar
Weekly
Monthly
9
System Cleaning
9
Outside Surfaces and
Brewing Compartment
9
* Always clean the steam nozzle immediately after steaming milk. Otherwise, you may clean it daily.
WARNING
• Clean and maintain the coffee system regularly as instructed in the table
above. Clean it only in the manner indicated in this manual. To prevent
hazardous fumes and drink contamination, use only the cleaning agents
specified.
• Do not use a steam or pressure cleaner to clean the coffee system or any
part of it. Damage caused by cleaning the unit in this manner could result in
electric shock, fire or explosion.
• Turn off the coffee system and allow it to cool before cleaning, except when
cleaning the steam nozzle or performing a system cleaning.
• To prevent sickness due to food poisoning, clean the steam nozzle
immediately after foaming milk.
• On model CM24TBISAS (tank version), change the water in the tank daily to
prevent sickness due to bacteria growth.
• When cleaning the mechanical parts of the coffee system, exercise care with
hands and arms around the metal edges.
• Use only water with a hardness level of four grains per gallon (gpg) or less
when cleaning or making drinks with your coffee system.
• Do not put any part of your coffee system in a dishwasher. Many of the parts
are not dishwasher safe.
22
Semi-Automatic Coffee System
Cleaning and Maintenance
Approved Cleaners
Approved Cleaners for the Coffee System*
Dacor Part
Number
®
Description
ACDC10
Puly Decalcifying Powder
ACCLKIT
Kit containing Puly Detergent Tablets and Puly Liquid Detergent
A-302
Dacor ® Stainless Steel Cleaner
*Available from Dacor ® dealer or parts distributor.
Cleaning the Steam Nozzle
What to Use
V
A solution of warm water and hand dishwashing soap
WARNING
• DO NOT PUSH ANY BUTTONS OR TURN ANY KNOBS
ON THE CONTROL PANEL UNTIL ALL BODY PARTS AND
CLOTHING ARE CLEAR OF THE BREWING COMPARTMENT.
KEEP ALL BODY PARTS AWAY FROM THE BREWING
COMPARTMENT WHEN THE STEAM NOZZLE IS ON. HOT
LIQUIDS AND STEAM CAN CAUSE SEVERE BURNS.
• Use the handle to position the steam nozzle for cleaning.
Do not touch the metal parts of the steam nozzle directly
with any part of your body.
How to Clean the Steam Nozzle
1.
Make sure the power switch is on and the steam
nozzle knob is in the off (counter-clockwise)
position.
2.
Using the handle, push the steam nozzle back
over the drip tray.
3.
Turn the steam knob on
slowly to get excess milk
out of the nozzle. Turn
the knob off.
4.
Wipe off the end of
the nozzle with a cloth
dampened with a
solution of warm water
and hand dishwashing
soap.
Steam Nozzle
Handle
Steam Nozzle Knob
Use and Care Manual
23
Cleaning and Maintenance
Cleaning the Drink Dispenser Assembly
What to Use
Filter
V
A solution of warm water and hand dishwashing soap
V
Scrub brush
How to Clean the Drink Dispenser
1.
Turn off the power switch and allow the coffee system to
cool.
2.
Remove the dispenser assembly from the dispenser collar
and allow it to cool before cleaning.
3.
Insert the filter removal tool between the filter holder and
the filter. Pry the filter loose.
4.
Unscrew the dispensing nozzle from the filter holder.
5.
Wash the parts in a solution of warm water and hand
dishwashing soap. Use a scrub brush to unblock the holes in
the filters.
Filter Holder
Dispenser Nozzle
Cleaning the Water Tank (CM24TBISAS Only)
In the interest of safety, clean the water tank daily to prevent
bacteria build-up.
What to Use
V
Filtered Water (4gpg maximum water hardness...DO NOT use
distilled water)
To Clean the Water Tank
1.
Slide the coffee system out of the cabinet and
remove the water tank from the top of the unit.
2.
Empty and rinse out the water tank.
3.
Fill the tank with filtered water and put it back in
the top of the unit.
The water tank is now clean.
Water Tank Removal
24
Semi-Automatic Coffee System
Cleaning and Maintenance
Cleaning the Drip Tray
What to Use
V
A solution of warm water and hand
dishwashing soap
How to Clean the Drip Tray
CAUTION
• To prevent damage to stainless steel
surfaces, always wipe in the direction of the
grain.
1.
Turn off the power switch and allow the
coffee system to cool.
• Use only the cleaners indicated. Chlorine or
chlorine compounds in some cleaners are
corrosive to stainless steel.
2.
Pull the drip tray straight out of the bottom
of the brewing compartment and empty it.
• DO NOT use abrasives to clean stainless
steel surfaces.
3.
Grasp the grid on the top of the drip tray
and pull it out of the bottom section.
4.
Wash both parts in a solution of warm
water and hand dishwashing soap.
• Never allow beverage stains, creamers or
sugar to remain on stainless steel for any
length of time.
5.
Dry both sections and put them back
together before replacing them.
Drip Tray
Cleaning the Used Coffee Grounds Bin
What to Use
V
A solution of warm water and hand dishwashing soap
How to Clean the Coffee Bin
1.
Turn off the power switch and allow the coffee system to
cool.
2.
Pull out the accessory drawer and remove the used
coffee ground bin. Empty the coffee ground bin.
3.
Wash the parts in a solution of water and hand
dishwashing soap.
4.
Wipe the surfaces of the accessory drawer with a damp,
soft cloth soaked with mild detergent. You may also use
Dacor ® stainless steel cleaner.
5.
Dry and replace the used coffee ground bin.
Use and Care Manual
25
Cleaning and Maintenance
Cleaning the Dispenser Collar
Clean the dispenser collar to ensure proper operation and a good seal
with the coffee dispenser assembly (filter holder).
What to Use
V
Cleaning brush
V
A solution of warm water and hand dishwashing soap
V
One quart pan
How to Clean the Dispenser Collar
1.
Turn off the power switch and allow the coffee
system to cool.
2.
Remove the coffee filter holder from the brewing
compartment.
3.
Use the cleaning brush to remove any loose
grounds from the screen on the bottom of the
dispenser collar and the surrounding area.
4.
Put a one quart pan under the dispensing collar.
5.
Turn on the power switch.
Collar
Gasket
WARNING
DO NOT PUSH ANY BUTTONS OR
TURN ANY KNOBS ON THE CONTROL
PANEL UNTIL ALL BODY PARTS
AND CLOTHING ARE CLEAR OF THE
BREWING COMPARTMENT. KEEP
ALL BODY PARTS AWAY FROM THE
BREWING COMPARTMENT WHEN THE
STEAM NOZZLE IS ON. HOT LIQUIDS
AND STEAM CAN CAUSE SEVERE
BURNS.
6.
Removing the Filter Holder
Push the drink dispensing button to remove any remaining coffee
grounds from the collar screen.
26
Semi-Automatic Coffee System
Cleaning and Maintenance
Cleaning the Exterior and Brewing
Compartment Surfaces
What to Use
V
A mild solution of warm water and hand dishwashing soap.
V
Dacor ® Stainless Steel Cleaner
How to Clean the Surfaces
1.
Pull the drip tray out of the bottom of the brewing compartment
and empty it.
2.
Pull out the accessory drawer and remove the used coffee ground
bin. Empty and replace it.
3.
Wipe stainless steel surfaces with a damp, soft cloth soaked with
mild detergent to remove beverage stains, fingerprints, and other
smudges. You may also use
Dacor ® stainless steel cleaner.
CAUTION
• To prevent damage to stainless steel surfaces,
always wipe in the direction of the grain.
• Use only the cleaners indicated. Chlorine or chlorine
compounds in some cleaners are corrosive to
stainless steel.
• DO NOT use abrasives to clean stainless steel
surfaces.
• Never allow beverage stains, creamers or sugar to
remain on stainless steel for any length of time.
Use and Care Manual
29
Cleaning and Maintenance
Adjusting the Coffee Grinder
The mesh of the coffee grinder blades is pre-set at the factory.
Adjust the grinder blades only if the quality of the coffee changes.
The finer the coffee is ground, the stronger it will be.
The grinder is adjusted while it is running.
What to Use
V
Grinder adjustment tool
V
Coffee cup
Grinder Adjustment Process
1.
Make sure the drip tray is installed on the floor of the brewing
compartment.
2.
Pull the coffee system out from the cabinet.
3.
Locate the grinder adjustment on the left side of the cabinet.
Insert the grinder adjustment tool.
4.
Put a coffee cup under the ground coffee dispenser.
5.
Make sure the power switch is on.
6.
Push the coffee grinder
button and turn the grinder
adjustment tool while you
hear the grinder motor
running. Adjust the grinder
according to the label on the
side panel. Stop turning the
tool when the grinder motor
stops. To continue adjusting,
push the grinder button
again. Experiment with the
setting until the coffee is
suitable strength.
Grinder Adjustment
30
Semi-Automatic Coffee System
Cleaning and Maintenance
Adjusting the Grind Time
You can set the grind time to suit your personal taste. A longer grind time makes the coffee stronger.
1.
Pull the coffee system out from
the cabinet.
2.
Locate the grinder time
adjustment on the left side of
the cabinet.
3.
Turn the grind time adjustment
knob slightly higher or lower
as desired. Experiment with
the setting until the coffee is
suitable strength.
NOTE: double dose should be done in two
cycles.
Grind Time Adjustment Knob
Regulator Adjustment - Plumbed Model
(CM24PBISAS)
The regulator protects your coffee
system from damage due to
excessive water pressure from your
water supply line. To check and
adjust the regulator:
1.
Pull the coffee system out from
the cabinet.
2.
Locate the regulator viewing
window on the right side of the
cabinet.
3.
Look through the window. The
gauge should read between 1.5
and 3.0 bars (22 to 43 psi).
4.
If the pressure is too low or too
high, pull out on the knob and
turn it to the right or left until
the gauge reads 2.0 bars (30
psi). Push the knob back in after
adjustment.
Window
Knob
Regulator Location
Use and Care Manual
31
Cleaning and Maintenance
Light Replacement
Your coffee system is equipped with a LED lighting system. The
LEDs cannot be replaced by the consumer.
If both lights are not working, please consult the Problem Solution
Guide on page 33 before calling for service.
If only one of the lights is working, call for a qualified service
technician. See page 35.
32
Semi-Automatic Coffee System
Before You Call for Service
Problem Solution Guide
Unnecessary service calls may be expensive, frustrating and time consuming. Before you call for service,
please review this guide.
Problem
Nothing works.
Light not on.
No coffee or water comes
out of dispenser.
May be caused by
What to do
Coffee system not
connected to electrical
power.
Connect coffee system power connector to
dedicated, grounded power receptacle.
Power to receptacle is off.
Turn power on at junction box. Check for
tripped circuit breaker or blown fuse.
Power switch is off.
Turn on power switch. See page 12.
Power outage.
Contact power company.
Pump safety device has
shut down the coffee
system.
The coffee system is equipped with a safety
device that will stop the unit after a long period
of pump operation (to prevent the pump from
overheating). Turn the power switch off and
then back on.
No power to coffee system.
See Nothing works, above.
Light switch off.
Turn on light switch. See page 6.
Light system malfunction.
Call for service.
No water in water tank
(tank model) or water
supply not connected
or turned on (plumbed
model).
Pour water in tank (tank model) or check to
make sure the water supply is connected and
turned on.
Water tank not inserted
The water tank has a safety valve that stays
properly (tank model only). closed until the tank is inserted correctly.
Check to make sure that the water tank is
completely seated.
Filter is clogged.
Clean the filters, dispensing nozzles and filter
holder. See page 14.
Dispensing collar is
clogged.
Clean the dispensing collar assembly. See page
26.
Internal parts are clogged
with scale and minerals.
Perform a system cleaning. See page 27.
Grinding noise while
coffee is being made.
Coffee system is grinding
coffee beans.
This is a normal sound during coffee grinding.
Coffee too strong or too
weak.
Choice of beans affects
coffee strength.
Try changing to a different roast level of coffee
(light, medium or dark roast coffee).
Coffee grinder out of
adjustment.
Adjust coffee grinder. See page 30.
Grind time too long.
Adjust grind time. See page 31.
Coffee tamped too much or
too little.
Change the amount of tamping.
Drink volume setting too
high or too low.
Change drink volume setting.
Continued...
Use and Care Manual
33
Before You Call for Service
Problem Solution Guide (continued)
Problem
May be caused by
What to do
Water goes into drip tray
when coffee is made.
Coffee system clears water
out of pipes after making
coffee.
Milk not hot enough.
Steam nozzle not used long Use steam nozzle for longer period of time.
enough to heat milk.
Poor foam (milk)
consistency.
Wrong type of milk being
used or non-dairy creamer
used.
Use whole milk for best results. Do not use
non-dairy creamer, half-and-half or non-fat
milk.
Coffee system not hot.
Wait for heating element light to go out. See
page 12.
Normal operation. The coffee system purges
water into the drip tray to make sure that the
water is hot for the next cup.
Steam nozzle not used long Use steam nozzle for longer period of time.
enough to heat milk.
Water or coffee drips out
of nozzle after coffee is
dispensed.
A small amount of water
or coffee dripping after
dispensing is normal.
Amount of coffee made is
too small.
Drink volume knob set too
low.
Check drink volume setting.
Coffee not hot enough.
Filter holder is cold.
Keep the filter holder installed on the
dispensing collar to keep it hot.
Coffee system is not hot
yet.
Allow coffee system to heat up until the
heating element light goes out before making
coffee.
Filter is clogged.
Clean the filters, dispensing nozzles and filter
holder. See page 24.
Filter holder not inserted
correctly.
Check to make sure that the filter holder (drink
dispensing assembly) is properly tightened into
place. See page 14.
Dirty dispensing collar
gasket.
Clean dispensing collar assembly. See page 26.
Coffee comes out of sides
of filter holder.
34
Semi-Automatic Coffee System
Warranty Information
Product Maintenance
Do not perform any maintenance other than that instructed in the
Cleaning and Maintenance section of this manual. A qualified
service technician should perform all other service.
Getting Help
Before you call for service, please review the Before You Call
for Service section of this manual, starting on page 33. If you
have performed the checks in the Problem Solution Guide
Use and Care Manual
35
Warranty Information
FULL ONE-YEAR WARRANTY
ur product fails to function within one year of the original date of purchase, due to a defect
If you
in material or workmanship, we will remedy the defect without charge to you or subsequent users.
The owner must provide proof of purchase, upon request, and have the appliance accessible for service.
What is Not Covered
• Failure of the product caused by faulty installation, improper usage, or neglect of required cleaning and
maintenance indicated in the use and care manual.
• Service calls to educate the customer in the proper use and care of the product.
• Failure of the product when used for commercial, business, rental or any application other than for
residential consumer use.
• Replacement of house fuses or fuse boxes, or resetting of circuit breakers.
• 'DPDJHWRWKHSURGXFWFDXVHGE\DFFLGHQW¿UHÀRRGRURWKHUDFWVRI*RG
• Breakage, discoloration or damage to glass, metal surfaces, plastic components, trim, paint, or other
FRVPHWLF¿QLVKFDXVHGE\LPSURSHUXVDJHRUFDUHDEXVHRUQHJOHFW
• 5RXWLQHFOHDQLQJDQGPDLQWHQDQFHDVGH¿QHGLQWKHVHLQVWUXFWLRQV
THE REMEDIES PROVIDED FOR IN THE ABOVE EXPRESS WARRANTIES ARE THE SOLE AND EXCLUSIVE
REMEDIES. THEREFORE, NO OTHER EXPRESS WARRANTIES ARE MADE, AND OUTSIDE THE FIFTY STATES
OF THE UNITED STATES, THE DISTRICT OF COLUMBIA AND CANADA, ALL IMPLIED WARRANTIES,
INCLUDING BUT NOT LIMITED TO, ANY IMPLIED WARRANTY OF MERCHANTABILITY OR FITNESS FOR A
PARTICULAR USE OR PURPOSE, ARE LIMITED IN DURATION TO ONE YEAR FROM THE DATE OF ORIGINAL
PURCHASE. IN NO EVENT SHALL WE BE LIABLE FOR INCIDENTAL
T
EXPENSE OR CONSEQUENTIAL
DAMAGES. NO WARRANTIES, EXPRESS OR IMPLIED, ARE MADE TO ANY BUYER FOR RESALE.
36
Semi-Automatic Coffee System