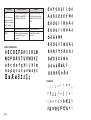
1
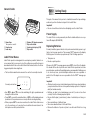
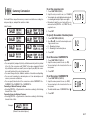
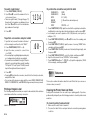
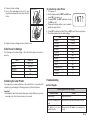
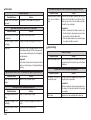
KL-70E
User’s Guide
Important Safety Precautions
Note of the following safety precautions before using the label printer for the
first time. Keep these safety precautions and operating instructions on hand for
future reference.
About safety precaution symbols
The following symbols are used in this manual and on the product itself to alert
you and others to the risk of personal and material injury.
Warning
This symbol indicates an item that can result in death or serious personal injury if ignored.
Caution
This symbol indicates an item that can result in serious personal injury
or material damage if ignored.
Examples
A triangle indicates something you should be careful about. This symbol warns against electrical shock.
A circle indicates something you should not do. This symbol indicates
you should not try to take something apart.
A black circle indicates something you must do. This symbol indicates
you should unplug something.
Warning
Power supply and voltage
• Use only a power source whose output matches the rating marked on
the plate on the bottom of the label printer. Also, avoid plugging too many
appliances into the same extension cord. The wrong voltage or
overloading of an AC outlet creates the danger of fire and electrical shock.
Serious malfunction
• Continued use of the unit when smoke or a strange odor is coming
from it creates the danger of electrical shock. Immediately turn power
off and unplug the power cord from the wall outlet. Request servicing
from your original dealer.
AC adaptor
• Do not allow the power cord to become damaged or broken, and
never modify, over bend, twist, or pull it. Never place heavy objects
on the power cord, and never expose it to direct heat. A damaged
power cord creates the danger of fire and electrical shock.
• Use only the AC adaptor specified for this unit (optional AD-A95100).
Use of another AC adaptor creates the danger of fire and electrical shock.
• Should the power cord become seriously damaged (internal wiring is
exposed or cut), request servicing from your original dealer. Use of a
seriously damaged power cord creates the danger of fire and electrical shock.
• Never touch the AC adaptor when your hands are wet. Doing so creates the danger of electrical shock.
Never try to take the unit apart
• Never try to take the unit apart or modify it in any way. Doing so creates
the danger of electrical shock, burn injury, or other personal injury.
• Never remove the outer cover of the unit. Exposure of high-voltage
components inside creates the danger of electrical shock.
Packaging
• Keep the plastic bag that the unit comes in out of the reach of small
children. Plastic bags create the danger of suffocation for small children.
Avoid dropping
• Should the unit ever become damaged by falling down, immediately
turn off power and unplug the power cord from the wall socket. Request servicing from your original dealer. Use of a damaged unit creates the danger of fire and electrical shock.
Batteries
• Never charge batteries, try to take batteries apart, or allow batteries
to become shorted. Never expose batteries to direct heat or dispose
of them by incineration.
Tape Cutter
• Never touch the tape cutter while a tape cut operation is being performed. Doing so can result in cuts and other personal injury.
E-1
Caution
AC Adaptor
• Do not leave the power cord near stoves or other sources of intense
heat. Doing so can melt power cord insulation and create the danger
of fire and electrical shock.
• When unplugging the power cord from the wall socket, grasp the
plug. Never pull on the cord itself. Doing so can damage the power
cord and create the danger of fire and electrical shock.
• Whenever leaving the unit unattended for long periods, be sure to
unplug it from the wall socket.
• At least once a year, unplug the AC power cord from the electrical
outlet and clean the area around the prongs of the plug. Dust build up
around the prongs creates the danger of fire.
• Whenever moving the unit, be sure to unplug it from the wall socket.
Leaving the unit plugged in when it is being moved can result in damage to the power cord and create the danger of fire and electrical
shock.
• Whenever cleaning the unit, be sure to unplug it from the wall socket.
• When you are through using the unit, use its power switch to turn it
off and then unplug it from the wall socket.
Avoid unstable areas
• Never place the unit on a wobbly table or a high shelf. Doing so can
cause it to fall, resulting in personal injury.
Water and other foreign matter
• Never allow coffee, juice, or other drinks, or flower vases to spill on
the unit. Liquid spilled on the unit creates the danger of fire and electrical shock. Should liquid ever spill onto the unit, immediately turn off
power and unplug the power cord from the wall socket. Request servicing from your original dealer.
• Never allow metal objects or combustible materials to get into the air
vents of the unit. Doing so creates the danger of fire and electrical
shock.
E-2
Location
• Avoid leaving the unit in areas subjected to high humidity and large
amounts of dust. Such conditions create the danger of fire and electrical shock.
• Avoid leaving the unit on a kitchen table, next to a humidifier, or in
any other area where it might come into contact with oil vapors or
steam. Such conditions create the danger of fire and electrical shock.
• Never place heavy objects on the unit. Doing so creates the danger
of the unit falling, resulting in personal injury.
Batteries
• Misuse of batteries can cause them to leak acid that can cause damage to nearby items and creates the possibility of personal injury.
• Be sure that the plus (+) and minus (–) sides of each battery are
facing correctly.
• Never mix batteries of different types.
• Never mix new batteries and dead batteries.
• Remove the batteries if you do not plan to use KL-70E for a long
time.
• Use only the battery type specified for this label printer in this manual.
Memory
• Always keep separate written copies of any information you store in
the memory of this label printer. Data stored in memory can be unexpectedly lost due to malfunction, repair, dead battery, etc.
Loading and replacing batteries
• Do not touch the springs inside the battery compartment cover with
your fingers while loading or replacing batteries. The springs have
sharp areas and can cut your fingers.
Introduction
Congratulations on your selection of the CASIO KL-70E Label Printer. This
CASIO Label Printer makes it possible for you to print adhesive labels for a
wide variety of applications, such as: name tags, cassette tape labels, floppy
disks, binders, and other applications.
Contents
Important Safety Precautions ....................................................... 1
Part 1 Getting Acquainted ............................................................ 4
Important Precautions ..................................................................................... 4
General Guide ................................................................................................. 5
Label Printer Menus ........................................................................................ 5
Part 2 Getting Ready ..................................................................... 5
You can produce attractive, original labels thanks to such features as:
•
•
•
•
•
•
Variable tape sizes (6mm, 9mm, 12mm, 18mm)
Attractive sans-serif font
Font effects (shading, underline, box)
Conversion
Built-in symbols
Text memory
You can even use tapes with optionally available holders to create your own
stamps.
All of this makes the CASIO label Printer the perfect tool for just about all of
your labeling needs!
Power Supply .................................................................................................. 5
Replacing Batteries ......................................................................................... 5
To load the batteries ............................................................................... 6
AC Adaptor ...................................................................................................... 6
AC Adaptor Cap ...................................................................................... 6
To connect the AC adaptor ..................................................................... 7
Turning Power On and Off .............................................................................. 7
Resetting the Memory ..................................................................................... 7
To reset the memory ............................................................................... 7
Auto Power Off Function ................................................................................. 7
Tape Cartridges ............................................................................................... 7
To load a tape cartridge .......................................................................... 7
Tape Width Specification ................................................................................. 8
To specify 6mm tape width ..................................................................... 8
Part 3 Inputting Characters and Symbols ................................... 8
Display Symbols and Indicators ...................................................................... 9
Basic Alpha-Numeric Input ............................................................................ 10
To input alpha-numeric characters ........................................................ 10
About the CODE key… ................................................................................. 10
Special Symbols ........................................................................................... 10
To input special symbols ....................................................................... 10
Part 4 Deleting and Inserting Characters .................................. 11
Important!
• Contact a nearby dealer whenever you require servicing.
• Note that the manufacturer shall not be held liable for any loss or
claims by third parties which may arise out of the use of this product.
• Note that the manufacturer shall not be held liable for any damages
incurred as a result of data loss caused by malfunctions, repairs, or
interruption of power supply.
• It is up to the user to keep backup records of important data.
• Keep this manual on hand for future reference.
Moving the Cursor ......................................................................................... 11
To move the cursor ............................................................................... 11
Deleting Individual Characters ...................................................................... 11
To delete characters using the BS key ................................................. 11
To delete characters using the DEL key ............................................... 11
Clearing the Display ...................................................................................... 11
To clear the display ............................................................................... 11
Text Editing ................................................................................................... 11
To insert new characters ....................................................................... 11
To change existing characters to different ones .................................... 12
E-3
Part 5 Character Size and Text Effects ...................................... 12
Character Size .............................................................................................. 12
To change the character size ................................................................ 12
Text Effects ................................................................................................... 13
To specify a text effect .......................................................................... 13
Part 6 Printing .............................................................................. 13
Printing a Tape .............................................................................................. 14
To print a tape ....................................................................................... 14
Stamp Printing .............................................................................................. 14
To print a stamp tape ............................................................................ 14
Mirror Image Printing .................................................................................... 14
To turn mirror image printing on and off ................................................ 14
Other Printing Features and Operations ....................................................... 15
Auto Feed ..................................................................................................... 15
To turn auto feed on and off .................................................................. 15
To manually feed tape ........................................................................... 15
Print Density .................................................................................................. 15
To adjust the print density ..................................................................... 15
Part 7 Memory ............................................................................. 15
To store data ......................................................................................... 15
To recall text from memory ................................................................... 16
To delete text from memory .................................................................. 16
Part 8 Currency Conversion ....................................................... 17
To set the conversion rate ..................................................................... 17
To specify the number of decimal places .............................................. 17
To set the name of CURRENCY A ........................................................ 17
To set the name of CURRENCY B ........................................................ 17
To select a label format ......................................................................... 18
To perform a conversion and print a label ............................................. 18
Printing a Bargain Label ................................................................................ 18
To perform the calculation and print the label ....................................... 18
Part 9 Reference .......................................................................... 18
Cleaning the Printer Head and Roller ........................................................... 18
To clean the printer head and roller ...................................................... 18
Initial Power On Settings ............................................................................... 19
Initializing the Label Printer ........................................................................... 19
To initialize the Label Printer ................................................................. 19
Troubleshooting ............................................................................................ 19
Error Messages ............................................................................................. 21
Alpha Characters .......................................................................................... 22
Symbols ........................................................................................................ 22
Specifications ................................................................................................ 23
E-4
Part 1
Getting Acquainted
This part of the manual provides you with important information you need to
know in order to use the Label Printer to its full potential. Be sure to read it
carefully before using the Label Printer for the first time.
Important Precautions
• Keep your Label Printer out of areas subject to temperature extremes, moisture and direct sunlight. The recommended temperature range is 10° to 35°C
(50° to 95°F).
• Don’t let coffee, juice or other liquids splash onto the Label Printer.
• Never let paper clips, pins or other foreign objects get into the tape outlet slot
or printer of the Label Printer.
• Do not pile heavy objects on top of the Label Printer.
• Never try to take the Label Printer apart or attempt your own maintenance.
• Do not drop your Label Printer and avoid strong impact.
• Do not pull on the tape or try to force it back into the Label Printer.
• Do not use benzine, thinner, or other volatile chemicals to clean the exterior
of the Label Printer. Use a soft, dry cloth or a cloth dampened in a weak
solution of a mild, neutral detergent and water. Wring the cloth out until all
excess moisture is removed.
• A dirty printer head can cause printing to become smudged. When this happens, clean off the printer head by wiping it with a cotton swab moistened
with alcohol (page 18).
• Use of the Label Printer next to a television or radio may interfere with reception.
General Guide
1
Part 2
Getting Ready
6
2
5
This part of the manual tells you how to load batteries and the tape cartridge,
and how to perform other basic setups for the Label Printer.
Important!
• Be sure to read this section before attempting to use the Label Printer.
3
4
1 Power Keys
Turn power on and off.
2 Function key
3 Letter keys
7
4
5
6
7
Optional AC Adaptor connector
Tape cutter button
Liquid crystal display (LCD)
Tape outlet
Label Printer Menus
Label Printer operation is designed to be as simple as possible, thanks to onscreen menus that you can use to select the settings you need. Each menu is
described in detail in the sections that follow in this manual, but note the following general points when using them.
• The item that is underlined in a menu is the one that is currently selected.
Currently selected item
, .: ;
• Use H, J, K and L to move the underlining left, right, up and down and
change the selected item.
• Press SET to execute the underlined item, or ESC to exit the displayed menu
(and return to the previous menu or screen) without selecting anything.
• When you press SET to execute a menu item, the Label Printer either moves
on to the next menu, or it executes the selected function and returns to the
text input screen that you started from.
Power Supply
The Label Printer can be powered by six AA-size alkaline batteries or an optional AC adaptor (AD-A95100).
Replacing Batteries
A handy low battery power indicator lets you know when battery power is getting too low for proper operation. The message “BATT” appears on the display
if battery power is low when you perform any of the following operations.
• Turn power on
• Execute a print operation
Whenever the “BATT” message appears, press SET to clear it from the display.
You should still be able to perform some Label Printer operations, but some
power intensive operations (like printing) may become impossible if battery power
is too low. In any case, you should replace batteries as soon as possible or
switch to the AC adaptor as soon as possible after the “BATT” message appears.
Important!
• All data stored in memory is deleted whenever batteries go dead and when
you replace batteries. Be sure to keep written backup copies of all important
data (text and documents).
• Batteries can burst or leak and damage your unit if you do not use them
correctly. Note the following important points.
• Be sure that the plus (+) and minus (–) sides of each battery are facing correctly.
• Never mix batteries of different types
• Never leave dead batteries in the Label Printer.
• Remove the batteries if you do not plan to use the Label Printer for a long
time.
E-5
• Replace the batteries in accordance with the battery life marked on the side
of the battery.
Warning!
• Never use recharged batteries with the unit.
• Do not expose batteries to direct heat, do not short circuit them, and do not
try to take them apart.
• Keep batteries out of the reach of small children. If swallowed, consult
with a physician immediately.
• Be sure to replace the batteries in accordance with the battery life printed on
the side of the battery itself.
4. Replace the back cover.
• As shown in the illustration, hook the cover
on the battery side of the compartment first,
and then close the cover.
• Make sure that the tape cartridge is securely
in place and that the back cover is closed
securely before using the label printer. A loose
tape cartridge can cause print quality problems.
AC Adaptor
To load the batteries
Caution
• Do not touch the springs inside the battery
compartment cover with your fingers while
loading or replacing batteries. The springs
have sharp areas and can cut your fingers.
1. Turn power off.
• If you are using the optional AC adaptor for power, you should also unplug it
from the Label Printer.
2. Turn over the label printer and remove the
cover as shown in the illustration.
Note the following important precautions when using an AC adaptor to power
your Label Printer.
• Use only a genuine CASIO AD-A95100 AC adaptor with the same voltage
rating as the household current in your area. Using a wrong adaptor can
damage your Label Printer.
• Be sure to turn the Label Printer off before you connect the adaptor. Do not
turn power on until the adaptor is connected to the Label Printer and plugged
into and AC outlet.
• Be sure to unplug the AC adaptor from the AC outlet whenever you are not
using the Label Printer.
AC Adaptor Cap
Remove the ADAPTOR CAP before connecting
the AC adaptor.
ADAPTOR CAP
3. Load batteries into the battery compartment.
• Be sure to use alkaline batteries.
• Make sure the positive (+) and negative (–)
ends of the batteries are facing correctly when
you load them.
E-6
Insert the adaptor cap into the ADAPTOR CAP
holder located inside the back cover to avoid
losing the cap.
ADAPTOR
CAP holder
Inside
back cover
To connect the AC adaptor
Tape Cartridges
Connect the adaptor to the Label Printer as shown
in the illustration. Plug the other end into a standard household AC outlet.
Use the procedures described below to load a tape cartridge into the Label
Printer. After you load the tape cartridge, be sure to use the procedure described under “Tape Width Specification” on page 8 to tell the Label Printer
what is the width of the tape you are using.
Turning Power On and Off
Important!
• Never try to push the tape back into the cassette. Once tape is out of the
cassette, there is no way to wind it back in. Trying to do so can cause operational problems with the Label Printer.
• The following are the tape widths that can be used with this printer: 6mm,
9mm, 12mm, 18mm.
Press ON to turn power on, and OFF to turn power off.
Important!
• If you are using the Label Printer for the first time, you should reset it first.
Resetting the Memory
You should reset the memory of the Label Printer before using it for the first
time, after you have not used it for a long time, or if nothing happens when you
turn power on, even after you change the batteries.
Important!
• Resetting Label Printer memory clears its memory of all input data.
To reset the memory
1. Make sure that Label Printer power is off.
2. While holding down the PRINT and ESC keys,
press ON to turn power on.
3. Keeping PRINT and ESC held down, release
the ON key only.
To load a tape cartridge
1. Make sure that the Label Printer is turned off.
2. Open the back cover.
• If there is a cartridge already in the Label Printer,
remove it by grasping the cartridge on both sides
with your thumb and forefinger, and lift straight up.
3. Remove the stopper from a new tape cartridge
and check to see that the tape is ready to use.
INT?
4. Press SET to initialize the Label Printer or ESC to abort the reset operation
without initializing anything.
• See “Initializing the Label Printer” on page 19 for information on the initial
default settings of the Label Printer following the reset operation.
• Make sure that the tape is under the tape guide
and that it is not bent or twisted.
Tape guide
OK!
Auto Power Off Function
If you do not perform any key operation for about six minutes, the Label Printer
automatically turns power off. To restore power, press ON.
NO!
E-7
• Make sure that the tape does not extend too far
past the tape guide. If it does, cut off the end
with a pair of scissors.
Tape Width Specification
4. Use a pencil or some other thin object to take
up slack in the ink ribbon as shown in the illustration. Note that the tape does not move at this
time.
• If the ink ribbon is slack when you load it into the
Label Printer, it can break or cause some other
problem.
• Be sure to turn the ink ribbon take up spool only
in the direction indicated by the arrow (a).
• Turn the spool until the other spool (b) starts turning in the direction noted by the arrow. This indicates there is no slack in the ribbon.
To specify 6mm tape width
5. Load the tape cartridge into the Label Printer,
making sure that the tape and ink ribbon pass
between the head and roller.
6. Close the back cover.
Important!
• When using 6mm tape, using certain character sizes can cause characters to
run off the top or bottom of the tape. Be sure to use the following procedure to
tell the Label Printer when you are using 6mm tape.
1. Turn power on.
2. Press FUNCTION and then 9 (6mm).
3. Press H, J, K or L to change the setting shown on the display between
ON (6mm tape) and OFF (other tape width).
4. When the tape width setting is the way you want it, press SET to register it.
• The tape width you set remains in effect until you change it, press ON or reset
the Label Printer’s memory.
(a)
(b)
Part 3
Head
7. Turn on Label Printer power and press FUNCTION and then PRINT (FEED)
two or three times to make sure that the tape comes out without any problem.
• If the tape does not come out normally, turn off power and start again from
step 1 above.
E-8
Inputting Characters and Symbols
Roller
This part of the manual tells you how to input characters. To make things easier
to understand, we call everything you input a character, regardless of whether it
is actually a letter, number, or symbol. Explanations here all use the default
settings that are in effect from the initial power-on screen.
For information on using other character sizes and effects, see page 12.
Important!
• You can input up to 63 characters per label. Further input becomes impossible after you input the 63rd character.
Display Symbols and Indicators
Before getting into actual input, you should first become acquainted with the
symbols and indicators used on the Label Printer display.
Function indicator
Shift
indicator
Code
indicator
FUNCTION
SHIFT
CODE
CAPS
Caps indicator
Effect indicators
Stamp printing indicator
AAA
STAMP
MIRROR
M-FEED
6mm
CAS
Cursor
Mirror image
printing
indicator
Manual feed
indicator
6mm tape indicator
Character position marks
• Function indicator
This indicator appears when you press the FUNCTION key. Pressing a key
while this indicator is on the display causes the function marked above that key
to be executed.
• Shift indicator
This indicator appears when you press the SHIFT key. While this indicator is on
the display, the keyboard is shifted, so the letter keys input upper-case alpha
characters. The number keys input the punctuation symbols marked in the upper right corners of the keys.
If both the caps mode indicator and the shift indicator are shown on the display,
the keyboard is shifted to lower-case input.
The keyboard automatically unshifts (and the shift indicator disappears) as soon
as you input a character.
• Code indicator
This indicator appears when you press the CODE key. While this indicator is on
the display, number keys 1 through 0 input the accents marked above them and
the U, O, P, A, S, J, K, L, Z, C and N keys input the special characters marked
in their lower right corners.
The keyboard automatically returns to normal (and the code indicator disappears) as soon as you input an accent.
• Caps indicator
This indicator appears when the Label Printer is in the caps (upper-case) mode.
All letters you input in the caps mode are upper-case. When the caps mode
indicator is not shown on the display, all letters are input as lower-case.
Note that the Label Printer stays in the caps mode until you press the CAPS
key again.
If both the caps mode indicator and the shift indicator are shown on the display,
the keyboard is shifted to lower-case input.
• Effect indicators
These indicators point to the character effect that is currently in use. You can
select between shading, underline, and box.
• Stamp printing indicator
This indicator appears when the Label Printer is set up for stamp printing. Labels you create with stamp printing can be attached to an optionally available
stamp holder and then used as a pre-inked stamp.
• Mirror image printing indicator
This indicator appears when the Label Printer is set up for mirror image printing.
Normal (non mirror image) printing is performed when this indicator is not shown.
• Manual feed indicator
This indicator appears when you are using manual feed instead of auto feed.
Auto feed is in effect when this indicator is not on the display.
Important!
• After you finish printing when using manual feed, be sure to always press
FUNCTION and then PRINT (FEED) to feed the tape before cutting it. If you
don’t you will cut off part of the printed text.
E-9
• 6mm tape indicator
This indicator appears when you use the procedure on page 8 to specify you
are using 6mm tape. No indicator is shown when you are using other (9mm,
12mm, 18mm) tape.
3. When you reach the end of a line of text, press B (the L cursor key) to
input a newline mark.
• A newline operation is indicated on the display by the B symbol. This shows
where you changed lines.
• Cursor
The cursor shows the next input position. Any character you input appears at
the point where the cursor is located.
4. Input the characters in the second line.
5. To print the text that you input, press PRINT. For details on printing, see
page 13.
• Character position marks
These marks show where characters will appear as you input them. This part of
the display is always blank when you turn power on.
About the CODE key…
Basic Alpha-Numeric Input
The following operation shows you the basic procedures for inputting letters
and numbers. We will explain the procedure by inputting the following characters using the default initial power-on screen.
ABXYZ Computer Company
1234567890
Note
• If you hold down any key, it will repeat its operation or input at high speed until
you release it.
The CODE key makes it possible to input punctuation needed for a number of
different languages. The following shows the key operations you should use for
each of the characters formed using the CODE key.
Key Operation
CODE
CODE
CODE
CODE
CODE
CODE
CODE
U
O
P
A
S*
J
K
Input
Ü
Œ
Å
Æ
ß
Ö
Ä
Key Operation
CODE
CODE
CODE
CODE
CODE
CODE
CODE
L
Z
C
N
1
2
3
Input
J
W
Ç
Ñ
´
`
¨
Key Operation
CODE
CODE
CODE
CODE
CODE
CODE
CODE
4
5
6
7
8
9
0
Input
˜
ˆ
ˇ
°
/
˝
˛
* Lower case only.
Example: To input á.
CODE 1 A
To input alpha-numeric characters
1. Turn power on.
2. Input the first line of characters.
• To input the upper-case letters, you can use either SHIFT or CAPS. With
SHIFT you must shift the keyboard for each character. With CAPS the keyboard stays in upper-case until you press CAPS again.
• Press SPACE to input spaces.
• If you input a wrong character, press BS to delete it and input again. See
page 11 for other details on editing text.
E-10
Special Symbols
You can also access a menu of special symbols by pressing FUNCTION 4
(SYMBOL).
To input special symbols
Example: To input the special symbol #.
1. With the cursor at the location where you want
to input a special symbol, press FUNCTION 4
(SYMBOL).
• The symbol that is underlined on the display is
the one that is currently selected.
, .: ;
2. Use the H, J, K and L cursor keys to move the underlining to the symbol you want.
• Not all of the available symbols fit on the display. The menu will scroll when
you press the cursor keys.
• In this example, underline #.
3. After you underline the symbol you want, press
SET.
• This returns to the input screen, with the symbol
you selected input at the location where the cursor was located when you displayed the symbol
list.
IO#
To delete characters using the BS key
Example: To change the word “commmputer” to “computer”.
1. Use H and J to move the cursor under “p”.
pute
2. Press BS twice to delete the two m’s to the left of the cursor, shifting “puter”
to the left as you do.
3. Press FUNCTION and then J to jump back to the end of the characters for
more input.
To delete characters using the DEL key
Example: To change the word “commmputer” to “computer”.
Part 4
Deleting and Inserting Characters
This section describes everything you need to know about deleting and editing
characters you have already input.
1. Use H and J to move the cursor under the first (far left) “m”.
2. Press DEL twice to delete the two m’s at the cursor’s position, shifting “mputer”
to the left as you do.
3. Press FUNCTION and then J to jump back to the end of the characters for
more input.
Moving the Cursor
Clearing the Display
Use the cursor keys to move the cursor around the display and position it for
deleting and editing characters.
Use the following procedure to clear all input text from the display.
To move the cursor
• Press H to move the cursor to the left, and J to move the cursor to the right.
• Press FUNCTION and then H to make the cursor jump to the beginning (far
left) of the characters on the display.
• Press FUNCTION and then J to make the cursor jump to the end (far right)
of the characters on the display.
• Holding down the H or J cursor key moves the cursor at high speed.
Deleting Individual Characters
You can delete individual characters with either the BS key or the DEL key
(which is the K cursor key). The only difference between the operation of these
two keys is the location of the cursor.
To clear the display
Press FUNCTION and then BS (CLS).
At this time the message CLS? appears on the display to confirm that you want
to clear the display. Press SET to clear or ESC to abort the operation without
clearing anything.
Text Editing
You can use the following procedures to edit text on the display.
To insert new characters
Example: To change the text “ABCDEF” to “ABCXYZDEF”.
1. With the original text on the display, move the cursor under the letter “D”.
E-11
2. Input the new characters (XYZ).
• Inputting the new characters causes them to be inserted at the cursor position. The existing characters are opened up to make room for the new characters.
To change existing characters to different ones
Example: To change the text “ABCDEF” to “XYZDEF”.
Important!
• Any character size specification you make is applied to all the characters on
the display. You cannot make multiple specifications for specific characters.
• The Label Printer automatically adjusts the character size whenever you input a B symbol to create a 2-line label as shown below.
Deleting the B symbol with a backspace or delete operation reverts to the
initial (unadjusted) character size.
Initial Size
JUST
2×1
2×2
2×3
1. With the original text on the display, use either the BS key or DEL key to
delete the characters to be changed (ABC).
• Remember to use the correct cursor location for the key you plan to use to
delete the characters. See page 11 for details.
2. Input the new characters (XYZ).
Size After B Operation
1×1
1×1
1×2
1×3
Note that you cannot input a B symbol if you are using 6mm wide tape.
• The Label Printer automatically adjusts the character size whenever you delete a B symbol to change a two-line label to a 1-line label.
Part 5
Character Size and Text Effects
This part of the manual explains how to change the size of characters. It also
tells you how to assign text effects like underlining, shading, and box printing.
Initial Size
JUST
Size After Delete of B
2×2
To change the character size
Example: To input “ABXYZ” as 2×2 characters.
Character Size
The following table shows the six character sizes that are available.
Character Size Indicator
1×1
1×2
1×3
2×1
2×2
2×3
Actual Size (mm)
3×3
3×6
3×9
6×3
6×6
6×9
Character size changes are applied to printed text only. The size of the displayed text does not change.
E-12
1. Input the text.
2. Press FUNCTION 2 (SIZE) to display the current character size setting.
JUST
3. Use K and L (H and J) to change the displayed size in the following
sequence.
JUST
1×1
1×2
1×3
2×1
2×2
2×3
2×3
2×2
2×1
1×3
1×2
1×1
JUST
4. When the character size you want to specify is
on the display, press SET to select it and return
to the text display.
XYZ
Note
• You could also perform the above procedure in reverse, specifying the character size first and then inputting the text.
3. Use H and J to move the cursor to the effect you want to use.
4. When the cursor is located under the effect you
want to specify, press SET to select it and return to the text display.
XYZ
Note
• You could also perform the above procedure in reverse, specifying the text
effect first and then inputting the text.
Text Effects
There are three text effects that you can assign: shading, underlining, and boxed
text. The following shows examples of each.
Part 6
Shading:
Printing
Underlining:
This part of the manual includes all the information you need to print tapes. It
also tells you how to print special stamp tapes that you can attach to an optional
stamp holder to create your own original stamps.
Boxed Text:
Text effect changes are applied to printed text only. The appearance of the
displayed text does not change, but the text effect indicators will show you
when a text effect is being used.
Important!
• Any text effect specification you make is applied to all the characters on the
display. You cannot make multiple specifications for specific characters.
To specify a text effect
Example: To shade the text “ABXYZ”.
1. Input the text.
2. Press FUNCTION 3 (EFFECT) to display a menu of text effects.
Printing Precautions
• Never turn power off while printing is being performed.
• Make sure that the tape outlet is not blocked before you start printing.
• Never operate the tape cutter while printer is being performed (indicated by
the message “PRNT” on the display).
• During printing at very high density, printing of very long text, or repeat printing of the same text a number of times, the Label Printer may stop printing for
about five seconds. This is not a malfunction, and normal printing should
resume shortly (indicated by the message “P R N T” on the display).
Important!
• Never touch the tape cutter while a tape cut operation is being performed.
Doing so can result in cuts and other personal injury.
Normal (no effects)
Shading
Cursor
–
Box
Underline
E-13
Printing a Tape
To print a stamp tape
Printing a tape is as easy as pressing the PRINT key.
1. Input the text you want to print.
2. Press FUNCTION and then 5
(STAMP).
To print a tape
1. Press the PRINT key to print a tape of the text you have input and laid out.
• To stop a print operation that is in progress, press ESC.
2. After the print operation is complete, press down on the tape cutter button to
cut the tape.
3. Use scissors to trim the tape to the size you want, if necessary.
• After you print a tape, you can peel off its paper
backing and stick the tape onto the object you
Backing
want. Note that the tape will not stick on coarse,
wet, oily, or soiled surfaces. Also, you should not
try to use the tape where it is exposed to direct
Tape
sunlight or rain. Do not stick the tape onto human skin.
• An easy way to remove the backing from a tape
and expose the adhesive surface is to bend the
tape near one of its ends. This should cause the
tape and its backing to separate, allowing you to
pull them apart.
Stamp Printing
The stamp printing feature lets you print on special stamp tape. You can then
attach the finished stamp tape to an optionally available stamp holder to create
your own original pre-inked stamps. The following is the type of stamp holder
currently available for use with stamp tapes.
Type
Maximum Stamp Size
ST-15
5.5cm
Example
5.5cm
PRN?
STAMP
MIRROR
• A mark appears next to the STAMP indicator on the display when mirror printing is turned on.
• If the text you input in step 1 is too long to fit within the maximum length you
specified, an error message (page 21) appears when you press SET.
3. Press SET to print the stamp tape or ESC to abort the print operation and
return to the text input display in step 1.
• After the printing is complete, the Label Printer returns to the input display in
step 1.
4. Cut off the tape and affix it to the optional stamp holder.
• See the instructions that come with the optional stamp holder for information
about how to attach the stamp tape.
Mirror Image Printing
When you specify mirror image for text, it is printed in reverse image. Use mirror image when you plan to print on transparent tape, with the printing on the
inside. When viewed through the transparent tape, the text will appear normal.
You can also use mirror image printing when using iron-on transfer tape to print
iron-on transfers.
Normal
Mirror Image
8.9cm
Note the following important points about stamp printing.
• Stamp printing prints text in mirror image.
• Stamp printing is impossible while 6mm is specified as the tape width.
• An error message (ERR!) appears on the display and the Label Printer refuses
to print whenever you try to print text that is longer than the maximum length
you specify.
E-14
To turn mirror image printing on and off
1. Press FUNCTION and then 6 (MIRROR).
J OFF
2. Press H, J, K or L to change the setting shown on the display between
ON (mirror printing) and OFF (normal).
3. When the mirror image printing setting is the way you want it, press SET to
register it.
• A mark appears next to the MIRROR indicator on the display when mirror
printing is turned on.
• After you turn printing on, input text and perform the print operation as you
normally do (page 14) to produce mirror image tapes.
Other Printing Features and Operations
Print Density
The print density setting controls how darkly figures are printed on your tapes.
To adjust the print density
1. Press FUNCTION and then 8 (DENSITY).
1234
The following are other operations and settings that you may need to use when
printing.
2. Use H and J to move the underlining to the density setting that you want.
• The lightest setting is 1, while the darkest setting is 5. The standard setting is 3.
• Only four of the five settings that are available can appear on the display. The
display scrolls left and right when necessary to show all of the available settings.
Auto Feed
3. When the density setting is the way you want it, press SET to register it.
You can turn the Label Printer’s auto feed feature on and off. When auto feed is
on, the Label Printer automatically feeds the tape about 17.1mm at the beginning and end of each print operation. This creates identical margins on both
sides of your text.
Important!
• After you finish printing when using manual feed, be sure to always press
FUNCTION and then PRINT (FEED) to feed the tape before cutting it. If you
don’t you will cut off part of the printed text.
To turn auto feed on and off
1. Press FUNCTION and then 7 (M-FEED).
J NO
2. Press H, J, K or L to change the setting shown on the display between
YES (manual feed) and NO (auto feed).
3. When the feed setting is the way you want it, press SET to register it.
To manually feed tape
Press FUNCTION and then PRINT (FEED) to feed the tape 18.1mm.
Part 7
Memory
This part of the manual tells you how to store text data in memory for instant
recall when you need it. You can store two blocks of text in memory, each containing up of 63 characters, for a total of 126 characters.
Important!
• All data stored in memory is deleted whenever batteries go dead and when
you replace batteries. Be sure to keep written backup copies of all important
data (text and documents).
• When using the optional AC adaptor, never disconnect the adaptor while batteries are not loaded in the Label Printer or when batteries are dead. Doing
so causes all data stored in memory to be deleted.
To store data
1. Input the text you want to store.
2. Press FUNCTION and then 1 (MEMO).
3. Press L a number of times to change to the
text store prompt.
STR?
E-15
4. Press SET to store the text in memory or ESC
to abort the store procedure without storing
anything.
• If there is nothing in memory yet, your text is
automatically stored in Area 1. If Area 1 already
contains data, your new input is automatically
stored in Area 2.
• If there is not enough room for your text to fit in
memory, the message “FUL!” appears when you
press SET in step 4.
OK
EFG
5. Press SET to recall the text from the area that
is currently on the display.
• Note that recalling data from memory replaces
anything that is currently on the input display.
Memory text cannot be appended.
To delete text from memory
1. While the input screen is on the display, press FUNCTION and then 1
(MEMO).
2. Press L a number of times to change to the
text delete prompt.
To recall text from memory
Example: To recall the contents of Area 2 while memory contains the following
text.
Area 1: ABCDEFG
Area 2: CASIO
1. While the input screen is on the display, press FUNCTION and then 1
(MEMO).
• Note that text recalled from memory will replace any text currently on the
display.
2. Press L a number of times to change to the
text recall prompt.
3. Press SET.
• If all of the text does not fit on the display, you
can use H and J to scroll it to the left and right.
CAL?
ABCD
CASI
Area 2 text
E-16
3. Press SET.
• If all of the text does not fit on the display, you
can use H and J to scroll it to the left and right.
DEL?
ABCD
Area 1 text
4. Use K and L to select Area 1 or Area 2 then
press SET.
OK?
5. Press SET to delete the text from the area that is currently on the display.
Area 1 text
4. Press L to change to Area 2.
• Use K and L to switch between Area 1 and
Area 2.
CASI
Part 8
Currency Conversion
Your Label Printer can perform currency conversion calculations according to a
rate preset by you, and print the results on a label.
Label Formats
1
2
3
4
5
6
7
8
To set the conversion rate
1. Press FUNCTION Z (RATE).
2. Input the rate you want to use. (ex. 1.2345678)
• You can input up to eight digits plus decimal point,
or a leading decimal point plus seven digits.
• Remember to input the correct value for the conversion direction (PRINT A → B, PRINT B → A)
you plan to use.
567
78
3. Press SET.
To specify the number of decimal places
1. Press FUNCTION X (ROUND).
2. Use H and J to select the decimal place setting you want to use.
• 0 ... Rounding to integer
• 2 ... Rounding to two decimal places
02
3. Press SET.
Important!
• You can input text (and specify its style, attributes and size), which is printed
to the left of the conversion result (“SALE!” in the above examples). Default
style, attributes, and size are used if you do not specify any. Only the conversion result is printed if you do not input any text.
• You cannot change the style, attributes, and size of calculation result printing.
• You can select rounding to no decimal places or to two decimal places for
currency conversion calculations.
• You can specify the direction of the conversion as either CURRENCY A →
CURRENCY B or CURRENCY B → CURRENCY A.
Converting a National Currency to Euros
• Selecting [PRINT A → B] performs the conversion according to the following
formula: Value ÷ Rate.
Converting Euros to a National Currency
• Selecting [PRINT B → A] performs the conversion according to the following
formula: Value × Rate.
To set the name of CURRENCY A
1. Press FUNCTION C (CURR A).
2. Input the name you want to use. (ex. DM)
• You can input up to five characters for the currency name.
DM • •
3. Press SET.
To set the name of CURRENCY B
1. Press FUNCTION V (CURR B).
2. Input the name you want to use. (ex. EUR)
• You can input up to five characters for the currency name.
• The initial default name of CURRENCY B is “ ”.
EUR •
3. Press SET.
Example
(Round to two decimal places)
E-17
To select a label format
To perform the calculation and print the label
1. Press FUNCTION B (FORMAT).
2. Use H and J to select the number of the format you want to use.
• There are eight formats (1 through 8: page 17),
though only four numbers are displayed at one
time. Use H and J to scroll the available display numbers left and right.
CURRENCY A
NOW
CURRENCY B
(Blank)
RATE
0.7 (–30%)
ROUND
2 (Round to two decimal places)
FORMAT
1
PRINT
PRINT B → A
1. Press FUNCTION Z (RATE), input the value that the original price should be
multiplied by in order to produce the discounted price, and then press SET.
• In our example, we want to produce a 30% (.30) discount, so we specify a
multiplier of .70.
1234
3. Press SET.
To perform a conversion and print a label
1. Input the text you want to include in the label.
• In this example, we will use the text “SALE!”.
2. Press FUNCTION M (PRINT A → B).
3. Input the value you want to convert from.
(ex. 10.00)
• You can input up to eight digits plus decimal point,
or a leading decimal point plus seven digits.
• If you want zeros included to the right of the decimal point, you must input them as well. Inputting
“123.” prints “123” only. To print “123.00” you must
input all five digits and the decimal point.
.00 •
4. Press SET.
• Pressing SET performs the conversion, inserts it into the format you selected,
and prints the label.
• You can repeat the above procedure with the current RATE, ROUND, CURRENCY A, CURRENCY B, and FORMAT settings as many times as you want.
Printing a Bargain Label
The following example shows how you can print a discount label that calculates
a mark down rather than a currency conversion.
2. Press FUNCTION X (ROUND), use H and J to select the rounding, and
then press SET.
3. Press FUNCTION C (CURR A), input the name of currency (“NOW” in this
example), and then press SET.
4. Press FUNCTION V (CURR B), make sure it is blank (nothing is input), and
then press SET.
5. Press FUNCTION B (FORMAT), select the format, and then press SET.
6. Input the text you want to use (“SPECIAL!” in this example).
7. Press FUNCTION and then
(PRINT B → A), input the original price (10.00
in this example), and then press SET.
,
Part 9
Reference
This section contains information about the Label Printer that you can use as
reference when you need it.
Cleaning the Printer Head and Roller
A dirty printer head and roller can result in poor printing quality. If you have
problems with print quality, use the following procedure to clean the printer head
and roller.
To clean the printer head and roller
Label for 30% discount
E-18
1. Make sure the Label Printer is turned off.
2. Turn over the Label Printer, and open the back cover while pressing down
on its lock.
3. Remove the tape cartridge.
4. Use a cotton swab dipped in alcohol to clean
the printer head and roller as shown in the illustration.
Printer head
To initialize the Label Printer
1. Turn power off.
2. While holding down the PRINT and ESC keys,
press ON to turn power on.
3. Keeping PRINT and ESC held down, release
the ON key only.
• This prompt confirms whether or not you want to
initialize the Label Printer.
INT?
4. Press SET to initialize the Label Printer or ESC to abort the reset operation.
• The following table shows the initial settings.
Item
Display
Memory
SYMBOL
EFFECT
M-FEED
MIRROR
MEMO
DENSITY
6mm
CURRENCY B
FORMAT
ROUND
Roller
5. Replace the tape cartridge and close the back cover.
Initial Power On Settings
The following are the initial settings of the Label Printer whenever you turn it
power on.
Item
SIZE
EFFECT
MIRROR
M-FEED
6mm
Power On
JUST (2×2)
CANCEL
OFF
NO
OFF
Initializing the Label Printer
If you experience serious malfunction of the Label Printer or if operation fails
completely, try performing the following operation to initialize the printer.
Important!
• Initializing the Label Printer deletes all memory contents. Make sure you have
a back-up copy of text stored in memory if you need it.
Reset
Cleared
Cleared
,
CANCEL
NO
OFF
STR?
3
OFF
1
2
Troubleshooting
• Power Supply
Nothing appears on the display.
Possible Cause
Action
Low batteries
Replace batteries.
Batteries loaded incorrectly
Remove batteries and reload them correctly.
AC adaptor is not connected correctly.
Make sure the AC adaptor is connected correctly.
E-19
• Text Input
Ink ribbon is being fed from the tape outlet along with the tape.
Cannot input text.
Possible Cause
FUNC key has been
pressed.
Action
Press ESC to clear FUNC key operation.
Possible Cause
Action
Ink ribbon cassette loaded
while the ink ribbon is
slack.
Remove the ink ribbon cassette and check to
make sure the ink ribbon is not broken. Next,
take up any slack in the ink ribbon and then
reload the tape cartridge.
Tape does not come out when PRINT is pressed.
Possible Causes
Important!
• Before loading an ink ribbon cassette into
the label printer, always make sure you take
up any slack in the ink ribbon first.
• If the ink ribbon is broken, you must change
to another ink ribbon cassette.
Action
Back cover is not closed
completely.
Securely close the back cover.
No more tape left in the
cartridge.
Replace the tape cartridge with a new one.
Tape jam
Remove the tape cartridge and pull out the
jammed tape by hand. Cut off excess tape with
scissors, and carefully replace the cartridge into
the label printer.
Important!
Never allow the tape outlet to become blocked
and never touch tape as it is being fed during
printing.
• Tape Cutting
Cannot cut tape.
Possible Cause
Action
Tape cutter blade is dull.
Take the label printer to the dealer from whom
you purchased it to have the tape cutter blade
replaced.
Printed text is cut off by tape cut operation.
Tape comes out when PRINT is pressed, but nothing is printed on it.
Possible Cause
Only blank spaces were
input.
Action
Input the text you want to print.
Possible Causes
Action
The printer is set up for
manual tape feed.
Be sure to press the FEED key before performing the tape cut operation.
Important!
When the printer is set up for manual tape feed,
the tape is not fed automatically after printing
is complete.
Printing is blurred, blotched, broken, etc.
Possible Causes
Action
Improper print density setting
Adjust the print density setting.
Improper loading of the
cartridge
Remove the tape cartridge and reload it correctly.
Dirty print head or rubber
roller
Clean the printer head and roller.
E-20
Out of tape
Replace the tape cartridge with a new one.
• Using Labels
Error Messages
Label will not adhere to a surface.
Possible Causes
Action
The backing paper is still
on the back of the tape.
Peel the backing paper from the back of the
tape to expose the adhesive.
Surface is unsuitable for
affixing a tape.
Labels do not adhere well to surfaces that are
rough, wet, oily, or dirty.
Message
ERR!
* This message
appears on the
screen for about
one second.
Possible Causes
Action
• Attempt to input two B
marks within the same
text.
• Use only one B mark.
Only two lines of text can
be input, so text can
contain only one B
mark.
• Attempt to input B mark • Do not use B marks.
while 6mm is specified as
6mm tape can have only
the tape width.
one line of text, so text
cannot contain any B
marks.
• Label text containing a
• Delete the B mark to
B mark was input and
print on 6mm tape or
then tape width specificaswitch back to a wider
tion was changed to
tape.
6mm. (ERR! message
appears when you try to
perform a print operation.)
• Text that is longer than
• Shorten the text to be
5.5cm when stamp
printed and try again.
printing is selected.
• Attempt to print a stamp
• Change the tape width
while 6mm is specified for
setting to OFF and try
the tape width.
printing the stamp again.
• Input of any of the
• Input the value correctly.
following for while using
the currency conversion
functions: RATE, PRINT
A → B (÷), or PRINT B→
A (×).
• A value with more than
eight digits or more than
seven digits with a
leading decimal point.
• More than one decimal
point character
E-21
Message
Possible Causes
Action
• Both text memory areas
(AREA 1 and AREA 2)
already contain text.
• Delete text from one of
the text memory areas
and then store the new
text.
BATT
• Battery power is too low.
• Replace batteries.
ERR!
• Memory data has become • Initialize the Label
corrupted for some
Printer.
reason.
FUL!
* This message
appears on the
screen for about
one second.
Alpha Characters
Symbols
E-22
Specifications
Model: KL-70E
Input
Keyboard Layout: Typewriter (QWERTY)
Character Types
Alpha (English and other languages): 151
Numbers: 10
Symbols: 41
Display
Type: Liquid crystal display
Columns: 4
Character matrix: 5×7-dot
Printing
Type: Thermal transfer
Speed: Approximately 6.76mm/second
Width: 4mm (6mm tape) or 8mm (9mm, 12mm and 18mm tapes)
Character Matrix: 24×24-dot
Character font: Sans-serif
Character effects: Shade, underline, box
Character sizes: 1×1, 1×2, 1×3, 2×1, 2×2, 2×3
Number of lines: 1 (6mm tape); 1 or 2 (other tapes)
Memory
Text: Up to approximately 126 characters (total storage for AREA 1 and
AREA 2)
General
Power supply: Six AA-size alkaline batteries or optional AD-A95100 AC
adaptor
Battery life: Approximately 2 tape cartridges (continuous printing)
Power consumption: 9W
Auto Power Off: Approximately six minutes after last key operation.
Dimensions: 53 (H) × 178 (W) × 111 (D)mm (2 1/16"H × 7"W × 4 3/8"D)
Weight: 360g
Ambient Temperature: 10°C~35°C (50°F~95°F)
E-23
CASIO COMPUTER CO., LTD.
6-2, Hon-machi 1-chome
Shibuya-ku, Tokyo 151-8543, Japan