1
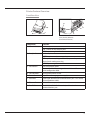
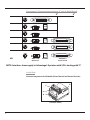
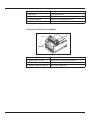
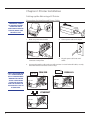
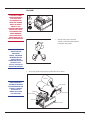
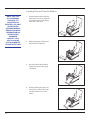
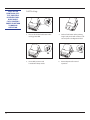
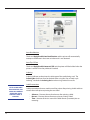
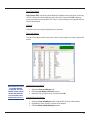
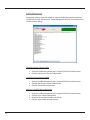
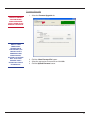
Advantage LX Desktop Label Printer USER GUIDE LXG-UG00000 Rev. B 11/12 Copyright © 2012, CognitiveTPG CognitiveTPG™ is a trademark of CognitiveTPG, LLC. Microsoft® and Windows™ are trademarks of Microsoft Corporation. Other product and corporate names used in this document may be trademarks or registered trademarks of other companies, and are used only for explanation and to their owner’s benefit, without intent to infringe. All information in this document is subject to change without notice, and does not represent a commitment on the part of CognitiveTPG. No part of this document may be reproduced for any reason or in any form, including electronic storage and retrieval, without the expressed written permission of CognitiveTPG. All program listings in this document are copyrighted and are the property of CognitiveTPG and are provided without warranty. To contact CognitiveTPG, Write, email, or call: CognitiveTPG 950 Danby Road Suite 200 Ithaca, NY 14850 E-Mail: [email protected] Telephone: 607-274-2500 Toll free: 800-732-8950 Fax: 607-274-2449 Technical Support: 800-732-8950, extension 4 2 Table of Contents Chapter 1: Introduction........................................................................................4 Welcome.......................................................................................................4 Package Contents......................................................................................4 Operating Environment...........................................................................4 Printer Feature Overview........................................................................5 Chapter 2: Printer Installation............................................................................8 Setting up the Advantage LX Printer..................................................8 Loading Thermal Transfer Ribbon..................................................... 10 Self-Testing:............................................................................................... 12 Chapter 3: Installing CognitiveTPG Printer Administrator and Print Drivers....... 13 Downloading CognitiveTPG Printer Administrator.................... 13 CognitiveTPG Printer Administrator Utility................................... 14 Chapter 4: Cleaning and Maintenance........................................................ 23 Cleaning the Printer............................................................................... 23 Cleaning Supplies................................................................................... 23 Chapter 5: Troubleshooting & Default Settings....................................... 24 3 Chapter 1: Introduction Welcome Congratulations on the purchase of a CognitiveTPG Advantage LX desktop label printer. The Advantage LX carries on the well-known durability of the widely used Blaster printer line. CognitiveTPG is committed to providing a reliable product and user experience. This user guide provides information on how to install the printer and includes all necessary user support information. Package Contents The Advantage LX box will contain the following parts: • (1) Advantage LX Printer • (1) Quick Start Guide • (1) Auto Ranging Power Supply (24 DC output) • (1) Power Cord (Included only on LBxxx-2xx3-01x models) • (1) Spindle and Media Guide (Installed in Printer) IMPORTANT! Advantage LX printers with serial numbers starting with “L” have been updated to use a 24 VDC auto ranging power supply (included with printer). previous 19VAC power supplies will not work with the updated printers. 4 Quick Start Guide 4 4 (Power cord included only on LBxxx-2xx3-01x models) Operating Environment • • 41ºF to 104ºF (5ºC to 40ºC) 20% to 85 % non-condensing R. H. (relative humidity) Storage and Transportation Environment • • 4 4 -4.0ºF to 122ºF (-20ºC to 50ºC) 5% to 95% non-condensing R. H. (relative humidity) 4 Printer Feature Overview Front/Rear View D D G H F A B Front View Component A - Power Indicator B - Ready Indicator C - Feed Button D - On/Off Switch E - Power Connector F - Serial Port G - Ethernet Port H - Parallel Port C E Rear View Serial, Parallel, Ethernet (4-inch Model Shown) Function Indicates power status ON – printer on and ready to print OFF- no power applied Indicates printer status GREEN – printer ready to accept data RED – printer error, empty media roll, or paused operation during batch mode processing OFF- no power applied Press to advance media Press and hold while turning unit on to initiate self test and print configuration label Turns printer power On/Off Input for auto-ranging power supply Serial (DB9) bidirectional communications port - DTE device (Use null modem cable) 10/100 Ethernet port Parallel (1284-B 36-Pin Centronics) unidirectional communications port 5 Advantage LX Communication Interfaces (2” and 4” Model Detail) 2” KEY DC SERIAL 9-PIN ETHERNET (DTE Device) 4” CENTRONICS Parallel 1284-B NOTE: Interfaces shown apply to Advantage LX printers with S/N’s starting with “L” Inside View Common Components for All Models (Direct Thermal and Thermal Transfer) D C A C B (TT Printer Shown) 6 Component (DT & TT Models) A - Printhead B - Platen Roller C - Printhead Latches D - Media Guide & Spindle Function Printing mechanism Friction feed printing surface Latches for printhead mechanism Holds and guides label roll Components for Thermal Transfer Models E F G Component (TT Models) E - Ribbon Take-up Driver F - Ribbon Take-up Mount G - Ribbon Supply Core Mounts Function Ribbon take-up core mount and driver Flexible arm for ribbon take-up core mounting Holds ribbon supply roll 7 Chapter 2: Printer Installation Setting up the Advantage LX Printer Connecting the Interface and Power Cables IMPORTANT! PRIOR TO CONNECTING ANY INTERFACE CABLE AND POWER CABLE TO PRINTER, MAKE SURE PRINTER IS OFF. NOTE: The Advantage LX IS CONFIgured to use a standard null modem crossover serial cable when using the com/ser port to connect to a dte device such as a computer. POWER OFF 1. Make sure power switch is OFF 2. Connect power cable to AC adapter 3. Connect the AC adapter to the power connector on the printer 4. Plug the power cable into an AC outlet 5. Connect the interface cable to the rear of the printer. For Serial or Parallel cables, securely fasten the interface connector screws or clips. IOIO Power OFF Power OFF Serial (DB9) ETHERNET Power OFF Ethernet 8 PARALLEL COM/SER Parallel (Mini-Centronics) CAUTION! CAUTION: DO NOT TOUCH PRINTHEAD. ELECTROSTATIC DISCHARGE (ESD) FROM THE HUMAN BODY OR OTHER OBJECTS CAN DAMAGE PRINTHEAD. PLEASE USE STATICSAFE PROCEDURES WHEN WORKING WITH PRINTHEAD. PRINTHEAD MAY BE HOT AFTER PRINTING. ! 1. NOTE: USE ONLY COGNITIVETPG APPROVED MEDIA. FOR MORE INFORMATION ON COGNITIVETPG APPROVED SUPPLIES, CONTACT US AT 800-732-8950 or at cognitivetpg.com. Unpack and prepare outward wound or inward wound media for installation into printer. 2. Use paper guide and spindle to install media roll as shown. Label roll NOTE: printer is shown with media cover removed for clarity. thermal transfer (tt) model used for illustration. 1 Printhead 3 Printhead release Drive roller 2 Paper spindle Paper guide ON/OFF switch 9 Loading Thermal Transfer Ribbon NOTE: this step is for thermal transfer (TT) Advantage LX printers. Use only CognitiveTPG approve thermal ribbon. For more information on CognitiveTPG approved supplies, call 800.732.8950 or visit our website cognitivetpg.com 10 1. Position ribbon in front of printer with supply core closest to printer and text on ribbon leader facing down. Raise dust cover. 2. Unlatch printhead and fully raise the printhead mechanism. 3. Place the left side of the ribbon supply core into the left supply core mount. 4. Gently pull the right supply core mount open and place the right side of the ribbon core on the mount. Loading Thermal Transfer Ribbon (Continued) reminder: the text on the ribbon leader should be facing out and visible helpful tip: if power is already on, the Advantage LX will take up any excess ribbon upon latching the printhead 5. Gently lower the printhead but DO NOT LATCH printhead at this time. 6. Align the notch on the left side of the ribbon take-up core with the left ribbon take-up driver. 7. Gently pull the right ribbon takeup mount and insert the right side of the ribbon take-up core. 8. Latch both sides of the printhead and turn the power on to take up the slack in the ribbon leader. Click! 11 NOTE: AFTER PRINTING A SELFTEST, PRINTER IS IN HEXIDECIMAL DUMP MODE. CYCLE PRINTER’S POWER TO RETURN TO NORMAL OPERATION. Self-Testing: 2 1 1. Press and hold the feed button while turning printer ON. 2. Release feed button when printing begins and printer will conduct a selftest and print a configuration label. ON OFF 3. 12 Power OFF printer to end hexadecimal dump mode. 4. Power ON printer for normal operation NOTE: installing cognitivetpg printer administrator will also load print drivers for cognitivetpg label printers. Cognitivetpg printer administrator utility is very useful for configuring, troubleshooting, and updating the Advantage LXprinter. NOTE: make sure you have administrative rights to your computer to download the utility and drivers. Chapter 3: Installing CognitiveTPG Printer Administrator and Print Drivers The updated Advantage LX (S/N starting with “L”) is compatible with existing Advantage LX drivers and the Cognitive Printer Configuration Utility. Additionally, it can be used with the latest utility -- CognitiveTPG Printer Administrator. CognitiveTPG Printer Administrator is a Java based utility designed for installation on various operating system platforms. Administrator allows complete control over the profiles and settings of the Advantage LX printer. Downloading CognitiveTPG Printer Administrator In order to easily make printer configuration changes, install the CognitiveTPG Printer Administrator Utility. Follow the CognitiveTPG Printer Administrator installation instructions at http://www.CognitiveTPG.com/resources_utility.aspx for the Advantage LX printer. You can also follow this path: http://www.CognitiveTPG.com > Downloads > Utility. This process will also install Windows driver for the printer on your computer. Note that Ser/COM, or Ethernet connection is preferred for use with this utility. Parallel connection provides limited functionality with Administrator Utility. After downloading and installing CognitiveTPG Printer Administrator and driver files, connect the printer to your computer and power it on. Use the “Add A Printer” wizard to add the appropriate driver. For reference, driver files are downloaded to the following location on the computer: C:\Program Files\Cognitive\Drivers. NOTE: for best results, power off printer prior to installing cognitivetpg printer administrator and printer drivers. 13 CognitiveTPG Printer Administrator Utility Connection Settings Connecting Via Serial 1. Select Use Serial Connection radio dial 2. Select the Com Port to which the printer is connected 3. Select the printer’s Baud Rate setting 4. Click Connect. Note: for serial connection, THE Advantage LX DEFAULT BAUD RATE IS 9600. NOTE: WHEN PRINTER IS PROPERLY CONNECTED, COGNITIVETPG PRINTER ADMINISTRATOR WILL DISPLAY CONNECTED IN A GREEN BOX IN UPPER RIGHT CORNER. 14 Serial Connection Parameters • Baud Rate • XON/XOFF • Buffer Size • Buffer Overflow HELPFUL TIP: PRINT A SELF TEST TO DETERMINE PRINTER’S CURRENT SETTINGS. A SELF TEST CAN BE PERFORMED BY HOLDING THE FEED BUTTON WHILE TURNING PRINTER POWER ON. CONTINUE TO HOLD THE FEED BUTTON UNTIL SELF TEST PRINTS. Connecting Via Ethernet 1. Select the Use Network Connection radio dial 2. Input the printer’s IP Address if static IP Address is to be used, otherwise, with DHCP enabled, your server will assign an IP Address to the printer 3. Input the printer’s RTEL port number Ethernet Connection Parameters • IP Address • Net Mask • Gateway • DHCP • LPD • RTEL • RTEL Port • Ethernet Text Buffer Connecting Via Parallel 1. Select the Use Parallel Connection radio dial 2. Select the Parallel (LPT) Port to which the printer is connected 3. Click Connect Printer Settings NOTE: Using the parallel port connection with Administrator provides limited functionality due to the printer’s uni-directional communications on this port. Settings can be sent via Administrator, but they will not fill in on screen. Print Speed The Print Speed value sets the printing speed of the printer. • Low = 2 inches per second • Normal = 2 inches per second • High = 3 inches per second 15 No-Media Timeout The no media timeout value represents the number of inches of media fed through the printer without detecting an index mark prior to reporting an error. EXAMPLE: IF NO MEDIA TIMEOUT IS SET TO 12, THE PRINTER WILL CONTINUE TO FEED 12 INCHES OF MEDIA WITHOUT DETECTING AN INDEX MARK BEFORE REPORTING AN ERROR. Debug Report Level Specifies the method by which the printer reports error. Values: • None = Turns error reporting Off. • Serial = Printer sends error report to host device via serial port. • Serial & Label = Printer sends error report via serial port and prints an error label. Auxiliary Power ON Check Auxiliary Power ON to enable the 5V serial port output. Enable Automatic Reprint Checking the Enable Automatic Reprint box prompts the printer to reprint a label in the event the printer detects an index mark prior to completing the requested label. 16 Media Adjust Adjusts print contrast on object leading edges for optimum print quality. Adjustment of this parameter is not normally required; refer to Cognitive Programming Language (CPL) Programmer’s Guide for more detail. Pitch The pitch represents the dots per inch (dpi) setting for the printer. Values: 100 or 200 for 200 dpi printers Darkness The Darkness value adjusts the print darkness. Darkness range: -200 to 800 NOTE: THE FACTORY DEFAULT FOR DARKNESS IS 0. Primary Language Selects the primary command language the printer uses. The Advantage LX is defaulted to CPL (Cognitive Programming Language). AUTO, EcPL, and ZcPL are used for other printer models. NOTE: THE Advantage LX DOES NOT SUPPORT TPCL COMMAND LANGUAGE important! thermal transfer mode requires the use of a thermal transfer printer and thermal transfer print ribbon. direct thermal mode requires the use of direct thermal media. Thermal Mode Select direct thermal or thermal transfer based on the model of Advantage LX printer and the type of media being used. Thermal transfer Advantage LX printers can be set to operate in direct thermal mode. Label Positioning Print Width The Print Width value adjusts the printing width of the printer for the particular media being used. Maximum print width is 4.1” (104 mm), media width range is 2.0 to 4.25” (50 to 108 mm) for 4-inch Advantage LX (LBD42 and LBT42) models. Maximum print width is 2.2” (56 mm). Media width range is 1.0” to 2.4” (25 to 61 mm) for 2-inch Advantage LX (LBD24 and LBT24) models. 17 Auto Recalibration Check and Apply Enable Auto Recalibration and the printer will automatically attempt to recalibrate in the event an index mark is not detected. Auto Top Of Form Check and Apply Enable Automatic TOF and the printer will feed a label when the printer is turned ON or the printhead is latched. Indexing Indexing indicates to the printer the index type of the media being used. The Indexing On check box must be checked when using Bar, Gap, or Notch style indexing. Uncheck the Indexing On box when using continuous media. NOTE: WHEN TIME IS SET TO 0 for label presentation, THE LABEL WILL REMAIN ADVANCED UNTIL THE NEXT LABEL IS PRINTED. 18 Label Presentation Label presentation advances media out of the printer after printing a label and then retracts the media prior to printing the next label. • • • Advance = Distance the media advances after printing a label. Retract = Distance the media retracts prior to printing a label. Time = Amount of time in seconds the label remains presented prior to retracting. Top of Form Adjust Top of Form (TOF) sets the top of the label with relation to the print head. Increasing the TOF value moves the printed text down the label. Decrease the TOF setting to move the printed test up the label. This value is set at the factory and typically will not need to be changed. Shift Left Shift left moves the printed image left across the label. Fonts and Objects The Fonts and Objects tab lists the Fonts, Formats and Graphics currently stored in the printer. NOTE: graphics must be monochrome in .bmp or .pcx file format to be stored in printer memory. file name must be 8 characters or less. Loading Fonts and Objects 1. Select the Fonts and Objects tab. 2. Click the Load Objects to Printer button. 3. Select the Font or Object to be stored and click Ok. Deleting Fonts and Objects 1. Select the Fonts and Objects tab in CognitiveTPG Printer Administrator. 2. Highlight the Font, Object or Graphic to be deleted. 3. Click the Delete Selected Objects button. 19 Profile Management Manage the settings of the Advantage LX using the Profile Management section of CognitiveTPG Printer Administrator. Profile Management displays a list of the printer’s current variable settings. Obtaining Printers Current Profile 1. Select the Profile Management tab in CognitiveTPG Printer Administrator. 2. Click the Get Printer’s Current Profile button. Saving the Current Printer’s Profile 1. Select the Profile Management tab in CognitiveTPG Printer Administrator. 2. Click the Get Printer’s Current Profile button. 3. Click the Save Profile to File button. Applying a Saved Profile to the Printer 1. 2. 3. 4. 20 Select the Profile Management tab in CognitiveTPG Printer Administrator. Click the Open Stored Profile button. Select the desired Stored Profile and click Ok. Click the Apply Profile to Printer button. Firmware Upgrade 1. Select the Firmware Upgrade tab. CAUTION! TURNING THE PRINTER OFF DURING FIRMWARE INSTALLATION COULD DAMAGE THE PRINTER. NOTE: If your computer is connected to the internet, use the “get latest firmware from cognitivetpg” button. This action will also load current fonts. Update will take a few minutes. 2. Click the Select Firmware File button. 3. Select the appropriate Firmware file and click Ok. 4. Click the Update Firmware button. 21 Script Editor Use the Script Editor in CognitiveTPG Printer Administrator to send programming language code to the printer. For more information on programming CPL please refer to the CPL Programmers guide located on the CognitiveTPG Web site www. CognitiveTPG.com. Sample Test Script in CPL: ! 0 100 195 1 VARIABLE WIDTH 200 TEXT 3 5 15 PRINTER TEST END For a simple printer test, type in the sample code shown above in the “Printer Input” window and click “Send to Printer” button. The printer should print the phrase “Printer Test.” 22 Chapter 4: Cleaning and Maintenance IMPORTANT! DISCONNECT POWER PRIOR TO CLEANING THE Advantage LX. For optimal printhead performance CognitiveTPG recommends cleaning the interior components (printhead, platen roller, media sensor, peel bar (if installed), ribbon, and media paths) every 20,000 inches (508 m). The thermal printhead should be cleaned every 5,000 inches if pre-printed labels are used. Proper maintenance reduces replacement costs by extending the life of the printhead and improves the performance of the printer. Cleaning the Printer Clean the exterior of the printer and the media tray using a lint-free cloth, and if necessary, a mild detergent solution. Cleaning the Thermal Printhead and Platen WARNING! INCORRECTLY CLEANING PRINTER WILL CAUSE PERMANENT DAMAGE AND VOID WARRANTY. COGNITIVETPG RECOMMENDS USING A CERTIFIED CLEANING PEN FOR CLEANING THERMAL PRINTHEAD. 1. Open the print mechanism. A B PO WER RE AD Y 2. Gently clean the printhead (A), platen roller (B) and media path using a CognitiveTPG approved cleaning pen, card or a soft, lint-free cloth saturated with 99% isopropyl alcohol. Cleaning Supplies Part # 14-00-0001 14-00-0002 Advantage LX Cleaning Supplies Size (inches) Items per box 4.5” x 6” 25 12 Description Cleaning card Cleaning pen 23 Chapter 5: Troubleshooting & Default Settings Use the chart below for troubleshooting your Advantage LX printer prior to contacting Technical Support. If you are unable to resolve the problem using the chart below, please contact our Technical Support. Symptom Red Ready Light Possible Cause Print Head Unlatched Out of Media/Ribbon Printer Paused Red Power Light Incorrect Power Supply Printing Too Light Printer Darkness Setting Driver Darkness Setting Printing Blank Labels 24 Printhead Dirty Incorrect Media Missing Ribbon Continuously Feeding Labels Printer out of Calibration Feed Button Not Working Printer is running a stored program Print Not Positioned Properly Top of Form or Print Width requires adjustment Media Drifting During Printing Skipping Labels During Printing Media Guide improperly adjusted Label Design Printer out of Calibration Recommended Solution Securely latch printhead Replace media/ribbon Press Feed Button to continue printing Verify use of correct power supply Increase printer Darkness using CognitiveTPG Printer Administrator Increase the Darkness value within the printer driver Clean printhead Use direct thermal media Use print ribbon when printing to thermal transfer media Calibrate printer using CognitiveTPG Printer Administrator With print head unlatched, turn printer off and back on then re-latch printhead Adjust Top of Form and Print Width using CognitiveTPG Printer Administrator Verify Media Guide is positioned properly Decrease height of label Recalibrate printer using CognitiveTPG Printer Administrator The Advantage LX ships with the following default settings: Parameter Programming Language Speed Label Width Default Setting CPL - Cognitive Programming Language 3 ips (76 mm/sec) 2” Models: 220 (2.2” or 56 mm) 4” Models: 409 (4.09” or 104 mm) Label Length Measure label (automatically measures and sets label length at power up) Indexing Type Gap Reference Point 0,0 (upper left corner) Auto Top of Form On Enable Label Present Off Advance Label 75 (0.75” or 19 mm) Retract Label 75 (0.75” or 19 mm) Delay Time (Retract Label) 0 seconds Serial Port Settings 9600 bps, 8 bit data, 1 stop bit, no parity (serial port printers only) (DTE configuration - use null-modem cable) Settings below only apply to printers with Ethernet Printer IP Address 10.0.0.12 Net Mask 255.255.255.255 Gateway 0.0.0.0 DHCP On LPD On RTEL On RTEL Port Number 9100 25