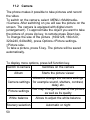
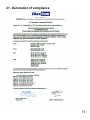
1
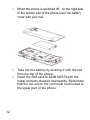
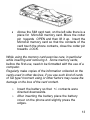
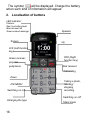
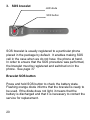
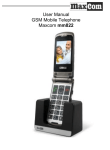
User manual
GSM Mobile phone
Maxcom MM715BB with wireless SOS bracelet
2
If you need a technical assistance, call the hotline
(+48) 32 325 07 00 or write an e-mail to [email protected]
Our website:
http://www.maxcom.pl/
The set includes
GSM phone
Battery
Charger
USB cable
Hands-free kit
Desktop charger
SOS bracelet
User manual
Warranty card
It is recommended to keep the package, because it
may be useful for possible transport
Keep the receipt, it is an inseparable part of the
warranty
Note – The telephone operates in GSM network
900/1800. Before switching on the phone insert the SIM
card correctly.
3
GSM 900/1800 Mobile phone
1,8"- coloured LCD display 160x 128
New SMS / missed call indicator
VGA camera - 1.3MP (interpolated)
Audio and video player
Sound recording
Talking Clip – telling the incoming number or a name
(possibility to record the name and assign it to the contact)
Voice prompts of contacts (number or recorded name)
Bluetooth, GPRS, WAP, MMS
Slot for Micro SD
7 numbers of quick dialing
Hands-free function
300 entries in the phonebook
Possibility of setting TOP 5 contacts (so that they are
displayed at the beginning of the list)
Enlarging SMS type size
The change Menu type size
Alarm clock, Calculator, Calendar, Note
Clock function (in the charger the clock is displayed all the
time)
Dedicated keylock button
Dedicated SOS button
FM radio
Torch
Battery 800 mAh
4
Standby time: to 105 hours, (220 hours, if the option of
wireless SOS bracelet is deactivated)*.
Talking time to 7 hours*
Weight :82g
*depending on conditions and GSM network signal
SOS bracelet
Operational frequency 433.92MHz ,
Interchannel spacing +/-300KHz, ASK modulation
Input power: 81mW
Watertightness IP56
Range to 20m (indoors),to 100m (open space)
Weight 26g
Battery CR2025 (Battery life: to 5 years, usage: to about
7000 times)
5
Table of contents
Rules of safe operation .....................................................................10
1. Installation of elements...............................................................11
1.1 Installation of SIM card and a battery ....................................11
1.2 Charging the battery................................................................14
1.2.1 Desktop charger (option) .....................................................15
1.3 Low battery alarm ....................................................................15
2. Localisation of buttons................................................................16
16
2.1 Basic functions of buttons .......................................................17
3. SOS bracelet ..............................................................................20
4. Using the phone .........................................................................22
4.1 Switching off the phone...........................................................22
4.2 Switching off the phone...........................................................23
4.3 Standby mode .........................................................................23
4.4 Keylock ....................................................................................24
5. Using MENU ...............................................................................25
6. Phonebook..................................................................................25
6.1 Saving contacts .......................................................................25
6.1.1 Adding a photo to the contact ..............................................26
6.1.2 Adding a ringtone/ recording the name ...............................26
6.2 Scrolling contacts ....................................................................27
6.3 Deleting contacts.....................................................................28
6.4 Copying contacts.....................................................................29
6.5 Transferring contacts ..............................................................29
6.6 Black list...................................................................................29
6.7 Marking a few ..........................................................................30
6.8 Groups of contacts ..................................................................30
6.9 Phonebook settings.................................................................30
6.9.1 Top5 – favourite numbers....................................................30
6.9.2 Memory selection .................................................................30
6.9.3 My number ...........................................................................31
6.9.4 Simple dialing .......................................................................31
6
6.9.7 Memory state .......................................................................32
7. Calls ............................................................................................32
7.1 Direct number dialing ..............................................................32
7.2 Dialing the number from the phonebook ................................32
7.3 Dialing numbers from the list of last calls ...............................33
7.4 Quick dialing ............................................................................33
7.1 ICE key ....................................................................................33
7.2 Emergency calls ......................................................................34
7.2.1 Information about the user...................................................35
7.2.2 Entering and modifying emergency contacts ......................35
7.2.3 SOS Button ..........................................................................36
7.2.4 Emergency text ....................................................................36
7.2.5 Deactivating SOS alarm ......................................................36
7.2.6 SOS message ......................................................................36
7.2.7 Setting SOS bracelet ...........................................................37
7.2.7.1Switching off SOS bracelet .................................. 37
7.2.7.2Checking logged SOS bracelet ............................. 37
7.2.7.3Logging in/out SOS bracelet ................................ 38
7.3 Answering calls .......................................................................38
7.4 Handsoff mode button.............................................................38
8. List of calls ..................................................................................38
9. SMS and MMS messages..........................................................39
9.1 Writing and sending SMS-es ..................................................40
9.2 Reading and responding to SMS-es ......................................41
9.3 SMS boxes ..............................................................................42
9.3.1 Inbox .....................................................................................42
9.3.2 Sent messages ....................................................................42
9.3.3 Drafts ....................................................................................42
9.3.4 Outbox ..................................................................................43
9.3.5 Network messages ..............................................................43
9.4 Deleting messages..................................................................43
9.5 Messages settings ..................................................................43
9.5.1 SMS ......................................................................................43
9.5.2 MMS .....................................................................................44
9.5.3 Network messages ..............................................................45
9.5.4 Type size ..............................................................................45
7
9.6 Voice mail ................................................................................45
10. Applicatios...................................................................................45
10.1 Magnifier ..................................................................................45
10.2 FM Radio .................................................................................46
10.3 Calculator ................................................................................47
10.4 Alarm clock ..............................................................................47
10.5 Calendar ..................................................................................48
10.6 Tasks .......................................................................................48
11. Multimedia...................................................................................49
11.1 Files manager..........................................................................49
11.2 Camera ....................................................................................50
11.3 Video recording .......................................................................52
11.1 Picture viewer ..........................................................................52
11.2 Video player.............................................................................53
11.3 Audio player.............................................................................53
11.4 Dictaphone ..............................................................................53
12. Bluetooth .....................................................................................54
13. Settings .......................................................................................55
13.1 Phone settings.........................................................................55
13.1.1 Date and time settings .........................................................55
13.1.2 Planned switching on/off ......................................................55
13.1.3 Language .............................................................................56
13.1.4 Display ..................................................................................56
13.1.5 Dedicated keys.....................................................................56
13.2 Call settings .............................................................................56
13.2.1 Number identyfication ..........................................................56
13.2.2 Waiting call ...........................................................................57
13.2.3 Call transfer ..........................................................................57
13.2.4 Call barring ...........................................................................58
13.2.5 Advanced settings................................................................58
13.3 Profiles .....................................................................................59
13.4 Network settings ......................................................................60
13.5 Security settings ......................................................................60
13.5.1 PIN code...............................................................................60
13.5.2 Phone security .....................................................................61
13.5.3 Automatic keylock ................................................................61
8
13.6 Restoring factory settings .......................................................61
13.7 Shortcuts .................................................................................61
13.8 Data account ...........................................................................61
13.9 Network services .....................................................................62
13.9.1 WAP .....................................................................................62
13.9.2 SIM services.........................................................................63
14. Connection to the computer .......................................................63
15. FAQ (Solving problems) .............................................................63
16. Conditions for use and safety ....................................................67
17. Warranty conditions....................................................................68
18. Information concerning the battery ............................................69
19. Information about SAR ..............................................................70
20. Information concerning the environment protection ..................72
21. Declaration of compliance ..........................................................73
9
Rules of safe operation
Acquainting with the following rules will minimalize the risk
of incorrect usage of the phone.
· Do not use the phone In the area, where it is
forbidden, for example on petrol stations or in
hospitals. Using the phone in such places may put
other persons in danger. Do not switch on the phone if
it may cause the interferences in the operation of other
devices!
· Do not use the phone without appropriate hands-free
set while driving a car.
· Do not use the phone in hospitals, planes, near petrol
stations and near inflammable materials.
· The phone emits the electromagnetic field, which may
have a negative influence on other electronic devices
including, for example medical equipment.
It is advisable to keep the distance, recommended by
the manufacturer, between the phone and implanted
medical device, such as for example peacemaker.
Persons with implanted devices should acquaint with
the guidelines of the implanted device manufacturer
and observe these guidelines. Persons with implanted
pacemaker should not carry the phone in the pocket
on the chest, they should hold the phone to the ear on
the opposite side of the body in order to minimalize the
risk of interferences and they should switch off the
phone immediately if there are any suspects that
interferences are present.
10
·
·
·
The device and its accessories may consist of small
parts. The phone and its elements should be protected
against children.
It is forbidden to perform repairs or modifications of the
phone. All the defects should be removed by qualified
service.
It is recommended to use only original batteries and
chargers. The usage of unoriginal accessories may
result in damaging the device or in explosion.
WATERTIGHTNESS – the phone is not watertight. It
should be kept in dry place.
SOS bracelet has a protection against strong streams
of water or flooding by the wave. It is not resistant to
complete immersion in the water.
1. Installation of elements
Before switching on the phone install the SIM card. Pay
attention not to damage the card while inserting.
SIM cards must be kept away from children.
1.1
Installation of SIM card and a battery
Before inserting the SIM card ensure that the phone is
switched off. The charger should be unplugged.
In order to insert the SIM card first take out the battery as
shown in the picture and indicated in the description:
11
o
When the phone is switched off, on the right side
of the bottom part of the phone lever the battery
cover with your nail.
o
Take out the battery by levering it with the nail
from the top of the phone.
Insert the SIM card to „ SIM NEST” with the
metal contacts directed downwards. Remember
that the cut-out on the card must be directed to
the upper part of the phone.
o
12
·
Above the SIM card nest, on the left side there is a
place for MicroSD memory card. Move the cotter
pin towards OPEN and then lift it up. Insert the
MicroSD memory card so that the contacts of the
card touch the phone contacts, close the cotter pin
towards LOCK.
While using the memory card exercise care, in particular
while inserting and removing it. Some memory cards,
before the first use, need to be formatted with the use of a
computer.
Regularly make copies of the information collected on the
cards used in other devices, if you use such kind of cards
of SD type! Incorrect using or other factors may cause the
damage or the loss of the card content.
o
o
Insert the battery so that +/- contacts were
directed downwards.
After inserting the battery place the battery
cover on the phone and slightly press the
edges.
13
1.2
Charging the battery
Note! Use the battery included in the set. Using another
battery may damage telephone and cause the loss of
warranty.
It is forbidden to connect the charger when the rear cover
of the housing is removed.
To charge the phone:
1. Connect the charger to the socket .
2. Connect the charger’s plug to the socket located on
the bottom of the phone. On the display you will see
the information about the charger being connected
and the lines on the battery charging indicator will
appear and disappear while charging.
3. When the battery will be fully charged disconnect
the charger from the socket and then the cable from
the phone.
When the process of charging will be completed, on the
display you will see the information: „ Battery charged”.
14
1.2.1 Desktop charger (option)
In the case of using the desktop charger, first connect the
small plug of the wall charger to the socket of the desktop
charger, and then connect the power adapter to the power
network. To charge the phone just place it to the desktop
charger with the contacts directed downwards.
Note:
o Before starting the process of charging make sure
that the battery is correctly installed.
o During the process of charging do not remove the
battery – you may damage the phone
o If the voltage of the battery is too low in order to
ensure correct functioning of the phone, you will
see the information that the phone will be
automatically switched off, and then the device will
be automatically switched off.
o If the battery will became totally discharged (for
example because of leaving the switched on
torch), after connecting the charger wait several
minutes until the symbol of charging will appear.
1.3
Low battery alarm
The phone will alarm with the sound signal, (if the sounds
of warnings are switched on in the profile) and with the
information on the display, when the battery level will be
too low. In the case when the battery level is low, LED
indicator flashes red.
15
The symbol
will be displayed. Charge the battery
when such kind of information will appear.
2. Localisation of buttons
LED indicator
Flashes:
Red- low battery level
Blue-missed call
Green-unread message
Screen
Speaker
Up
LFK (Left function
key)
Green reciever,
przycisk
połączenia
RFK (Right
function key)
Red receiver;
Call ending
Down
ICE MENU
Switching on /off
Taking a photo,
/starting/
stopping
recording
Switching on /off
Enlarging the type
16
Silent mode
2.1
Basic functions of buttons
Button
LFK (left
function
key)
RFK (right
function
key)
Function
Entering menu, confirmation key
Entering contacts, return key
Press: return to standby mode; end a
call.
Red receiver
Press and hold: switch on/off the
phone
Green
Making calls; in standby mode
receiver
entering the list of calls
Navigation keys
UP*
Shortcuts
Down*
Alarm
1
2
5
Press: digit 1
Press and hold: voice mail
Press: digit 2
Press and hold: Displaying MENU ICE
„In emergency”
Camera: taking a photo,
Camera: starting/stopping recording
17
3-9
*
#
Press: digits from 3 to 9
Press and hold: dials of the
programmed number of quick dialing
Press: Entering characters: *, +, P, W
Press and hold: Enlarging /Reducing
menu type
Press: Changing the mode of
entering text while writing an SMS;
entering #
Press and hold: Switching on/off the
silent mode
*Depends on user settings.
18
Torch
SOS button
Pressing and
holding will
activate the
emergency
procedure. It will
call the defined
number and it will
send SMS
Volume
adjusting +/button
Ringtones
speaker
Torch switch
Keylock switch
Camera
Earphones
socket
Micro
USB/Charging
socket
19
3. SOS bracelet
LED diode
SOS button
SOS bracelet is usually registered to a particular phone
placed in the package by default. It enables making SOS
call in the case when we do not have the phone at hand.
In order to ensure that the SOS procedure was performed,
the bracelet must be registered and switched on in the
phone. See page 37
Bracelet SOS button
Press and hold SOS button to check the battery state.
Flashing orange diode informs that the bracelet is ready to
be used. If the diode does not light, it means that the
battery is discharged and that it is necessary to contact the
service for replacement.
20
Press and hold SOS button for more than 3 seconds to
start SOS procedure.
To end SOS procedure press and hold SOS button on the
phone
Note.
Indoors the range of the bracelet is up to 20m, outdoors up
to 100m
The range of the bracelet of the phone depends on the
surrounding (line of the land, thickness of walls,
electromagnetic interferences etc.) and it may be
significantly limited.
433MHz band, which is used by SOS bracelet, is also
used by other devices for example by alarm remote
controls, remote controls for garage doors, wireless
doorbells, sockets with remote controls, immobilizers,
alarm detectors and many others.
Because of radio interferences, it can happen that
SOS bracelet will not work in relevant time.
The confirmation that the remote SOS connection was
made can be the alarm signal. That is why, it is not
recommended to switch off SOS alarm in phone’s
menu.
21
SOS bracelet has a protection against strong streams of
water or flooding with the wave. It is not resistant to
complete immersion in the water.
4. Using the phone
4.1
Switching off the phone
Press and hold red button used for ending a call, to switch
on the phone.
If a request for PIN code will appear, you have to enter it.
You will find it in the starter set of SIM card.
After entering the code confirm with left function key (LFK).
Warning: Entering incorrect PIN code 3 times in a
raw will cause that the SIM card will be blocked.
It may be unblocked with the use of PUK code.
Entering incorrect PUK code 10 times in a raw will
cause that the SIM card will be blocked
permanently
22
4.2
Switching off the phone
To switch off the phone press and hold the button used for
ending a call.
4.3
Standby mode
When the phone is switched on, but no operations are
performed then it is in standby mode.
1
Description of the display
2
5
3
4
6
7
1. Network signal
23
2. Icons indicating functions:
Only sound signal
Earphones
connected
Sound signal +
vibrations
New SMS
Only vibrations
Muted
Alarm active
Missed call
Bluetooth switched
on
3.
4.
5.
6.
7.
Call transfer
activated
Roaming
active
*
icon appears also in
domestic roaming in the
situation when the
subscriber uses the
network of the other
operator
Battery level
Operator’s name or own number
Time
Date
Description of function keys
4.4
Keylock
To lock the keys slide the lock switch down. To unlock the
keys slide the switch up.
24
It is not necessary to unlock the keys to answer the call.
5. Using MENU
To enter the MENU in standby mode press left function
key.
To navigate the MENU use UP and DOWN keys.
To confirm the selected function press left function key
(LFK).
To return to the previous MENU (return), press right
function key (RFK). To enter the standby mode, press red
receiver.
6. Phonebook
6.1
Saving contacts
You may save a new contact in one out of three ways:
1. In standby mode enter the number, select
„Options” (left function key), then „Save in the
phonebook”, select whether you want to save the
contact in the phone or on SIM card and enter the
name of the contact, press “Done” (right function
key)
2. You may save the number from the list of missed
and answered calls. In order to do this in standby
mode press green receiver, select the number,
you want to save and press „Options” (LFK).
25
Select „Save”, press LFK, select where you want
to save and enter the name of the contact. Press
Ok, and then „Done”
3. You may add the new contact directly to the
phonebook. In standby mode select MENU>Contacts->New Contact. Select where you want
to save it and enter the name and the number of
the contact. Press OK and then „Done”
6.1.1 Adding a photo to the contact
In the case of saving the contact in the phone’s memory
there is a possibility of adding a photo.
It will be shown during outcoming and incoming call
In contact edition menu select menu: Caller’s photo...
press LFK (Change)> select the source („from the camera”
or „from the file”)
Maximum resolution of a photo: 320x240pixels.
To take a picture press key 5 (see page Błąd! Nie
zdefiniowano zakładki. Camera)
6.1.2 Adding a ringtone/ recording the name
In the case of saving the contact in the phone’s memory
there is a possibility of adding the ringtone or recording the
name.
26
If a special ringtone has been assigned to the contact,
then during a call coming from the contact it will signal the
call instead of a general ringtone.
If the name has been assigned, it will be repeated instead
of the ringtone.
In contact edition menu select: Ringtone... press LFK
(Change)> select the type („System” „Telling the name”)
To record the name select:
Telling the name / dictaphone will turn on/> tell the name>
Press LFK ( Options)> Save (to save)/Repeat (to repeat
recording)
After saving the dictaphone will turn on automatically and it
will play the recorded sound.
In the case of activating the function of telling the name
(see page Telling the name) during scrolling the
phonebook the recorded name will be played.
6.2
Scrolling contacts
Method 1
1. Select MENU->Contacts->Search
2. Enter the first letter of the name that you are searching
3. The phone will go to the names beginning with this
letter. You can scroll the list with UP/DOWN
navigation keys.
Pressing „#” key you change the mode of entering the
text.
27
Method 2
1. In standby mode press right function key
2. Enter the first letter of the name, that you are
searching
3. The phone will go to the names beginning with
this letter. You can scroll the list with UP/DOWN
navigation keys.
Pressing „#” key you change the mode of entering the
text.
6.3
Deleting contacts
If you want to delete a contact from the phone or from the
SIM card, preform the following actions:
1. Select: MENU->Contacts->Delete
2. Select whether you want to delete one contact or all
contacts. If all contacts, select whether from SIM card
or from the phone’s memory and confirm pressing
Yes.
3. If you selected individually, you may mark, which
contacts you want to delete. In order to do this, using
Up/Down keys select appropriate contact, press
Options, then Mark. You may mark more than one
contact. After marking relevant contacts press
”Options” and then „Delete marked” and confirm
pressing Yes.
28
6.4
Copying contacts
To copy the contacts from SIM card to the phone or from
the phone to SIM card:
1. Select: MENU->Contacts->Copy, and then select,
where you want to copy the contacts.
2. Select whether you want to copy the contacts
individually or all. If all contacts confirm pressing Yes.
3. If you have chosen individually, you may mark which
contacts you want to copy. In order to do that, using
Up/Down keys select appropriate contact, press
Options, then Mark. You may Mark more than one
contact. After marking relevant contacts, press
„Options” and then „Copy selected contacts” and
confirm pressing Yes.
6.5
Transferring contacts
You may transfer the contacts from SIM card to pnone’s
memory or the other way round. In order to do this select.
MENU->Contacts->Transfer. Then proceed similarly as in
the case of copying contacts.
6.6
Black list
Select MENU->Contacts->Black list->Status, to activate or
deactivae the black list. If the black list is activated, the
calls coming from the numbers placed on the black list will
not be realized,
29
the person calling from this number will always hear busy
signal.
6.7
Marking a few
Select MENU->Contacts->Mark a few and then:
- Send SMS, if you want to send SMS to few recipients
- Send a business card, if you want to send a business
card to several recipients.
- Add to black list, if you want to place a few contacts on
the black list.
6.8
Groups of contacts
You may create five groups of contacts. Only contacts
saved in the phone’s memory can be added to the group.
6.9
Phonebook settings
6.9.1 Top5 – favourite numbers
You may set five favourite numbers, which will always be
on the top of the list. In order to do this select MENU>Contacts->Settings->Top5 and select desired numbers.
6.9.2 Memory selection
This option makes it possible to select the place of saving
contacts (on SIM card or in phone’s memory)
Select: MENU->Contacts->Memory settings
30
6.9.3 My number
You can enter your number (or other). In the display
settings you may activate the function of displaying this
number on the screen in standby mode.
6.9.4 Simple dialing
Select MENU->Contacts->Settings->Simple dialing->State,
to activate or deactivate quick dialing. If quick dialing is
activated and numbers are assigned to keys 3-9, after
pressing and holding appropriate key the call will be made
with the saved number.
To assign a number to the key, select MENU->Contacts>Settings->Simple dialing->set the keys. Then, select the
key you want to assign the number to, press LFK, select
the number from the list of contacts and press LFK again.
6.9.5 Voice prompts
Select MENU->Contacts->Settings->Voice prompts, to
activate or deactivate the function of voice prompts. If the
function is activated, the digits of a saved number will be
told during scrolling the phonebook.
6.9.6 Telling the name
Select MENU->Contacts->Settings->Telling the name, to
activate or deactivate the function of voice prompts. If the
function is activated and the note is recorded for the
contact,
31
then during scrolling the phonebook the voice note will be
played.
6.9.7 Memory state
This option makes it possible to check the state of card
and phone memory. Select: MENU->Contacts->Settings>Memory state
7. Calls
7.1
Direct number dialing
1. Enter the phone number you want to call
For international calls it is required to enter „00”
or „+” before the number. To enter „+” press „
” key twice.
2. Press green receiver to call selected number.
3. To end a call press red receiver.
7.2
Dialing the number from the phonebook
In standby mode press right function key (RFK), to enter
the phonebook.
32
With the use of UP/DOWN keys select appropriate
contact. If you want to go to the contact quickly beginning
for example with U letter, press 8 key twice. To make a call
with the selected contact press green receiver.
7.3
Dialing numbers from the list of last calls
Press green receiver, when the phone is in standby mode,
to go to the list of last calls. Use UP/DOWN keys, to
navigate the call list. Press green receiver to make a call. ..
7.4
Quick dialing
If you have previously assigned contacts to 3-9 keys, in
standby mode press and hold appropriate key to make a
call.
7.1
ICE key
ICE (In Case of Emergency) – the abbreviation informing
rescue workers who they should call in case of
emergency. Pressing and holding 2 ICE key, displays
contacts and information about the user.
ICE abbreviation is known by rescue workers all over the
world and it allows to obtain important information about
the injured person, that is why it is recommended to fill the
emergency contacts ( ICE Contacts) and information about
the user – see below:
33
Entering and modifying emergency contacts and Informa
7.2
Emergency calls
If you do not have any SOS number set, after pressing and
holding SOS button, the call with 112 number will be
made.
You may set five emergency numbers. After pressing and
holding SOS button (located in the back of the phone)
SOS function will be activated. The phone will activate the
alarm and automatically send SMS and call previously set
emergency contacts one after another. There will be three
attempts of calling each set contact. The phone will call the
next contact, if it will fail to call the previous one.
If one of emergency numbers will answer the call, the
phone will activate the hands-free mode and it will end
SOS procedure.
If none of programmed numbers will answer the call, the
phone will stay in emergency mode for one hour, it means
that each incoming call will be automatically answered in
handsfree mode. To deactivate SOS mode, hold SOS
key.
34
7.2.1 Information about the user
Select MENU->In the case of emergency.->Inf. about the
user, to set the name of the user, their illnesses, allergies
and blood group.
This information will be displayed after the emergency call
as well as after pressing “2” key (ICE)
7.2.2 Entering and modifying emergency contacts
You may select up to 5 emergency numbers.
To set the emergency contact quickly, during scrolling the
phonebook select „Set as ICE1~ICE5
or
Enter main MENU pressing left function key. Then select:
In the case of emergency->Emergency contacts. Select,
which item you want to change, press LFK and select the
option:
From the phonebook, to add new emergency number
from contacts, after selecting relevant number confirm
pressing LFK.
Manually, to enter the emergency number.
Delete, to delete already saved emergency number
Edit, to change already saved emergency number
NOTE:
Entering emergency numbers is tantamount to entering
ICE contacts and the other way round.
35
7.2.3
SOS Button
You may activate or deactivate SOS button. In order to do
this select MENU-> In the case of emergency->SOS
button.
7.2.4 Emergency text
You may change the text of SMS message, which is sent
during the emergency call. The following text is entered by
default: „ Emergency SMS! Call me”. To change the text of
SOS message, in MENU select In the case of
emergency..->Emergency SMS-> SMS’s content. Enter
appropriate text and press OK.
You may activate or deactivate the function of sending
SOS message in emergency mode. In order to do this
select MENU-> In the case of emergency..-> emergency
SMS->Sending SMS.
7.2.5 Deactivating SOS alarm
You may activate or deactivate emergency sound while
making SOS call. In order to do this, in MENU-> In the
case of emergency.->SOS alarm.
7.2.6
SOS message
If the message is activated and SOS call will be answered,
the recipient will hear the following message: „Emergency
call, press 5 key to answer”. If the recipient will not press 5
key within 60 seconds, the phone will dial the next number
saved on the list of emergency numbers. Confirmation of
36
answering the call by pressing 5 ensures that, the call was
answered by a human, and not by for example by a voice
mail.
SOS message can be deactivated only in the case, when
we are sure that saved emergency contacts have all
transfers to the voice mail cancelled ( when busy, when
there is no answer, when out of range, when inaccessible
...)
7.2.7 Setting SOS bracelet
7.2.7.1 Switching off SOS bracelet
You may switch on/off SOS bracelet.
In order to do this in MENU-> In the case of emergency.->
SOS bracelet->State->Switch on/off
Switching off the bracelet is connected with switching off
the receiver in the phone and it automatically lengthens
the time of battery operation. If the bracelet is switched off
it cannot make a remote SOS call.
7.2.7.2
Checking logged SOS bracelet
To check whether any bracelet is logged select
MENU-> In the case of emergency-> SOS bracelet>Logged
If a message “ connected” appears : 0x0 it means that no
bracelet is logged to the phone. If there is a message for
example 0xFDDEE1, it means that bracelet with the
identification FDDEE1 is logged to the phone.
37
7.2.7.3
Logging in/out SOS bracelet
To log out SOS bracelet press
MENU-> In the case of emergency-> SOS bracelet->Log
out the bracelet and press LFK to confirm
To log in SOS bracelet press MENU-> In the case of
emergency-> SOS bracelet->Log in the bracelet and press
and hold SOS button of a bracelet
7.3
Answering calls
To answer an incoming call press green receiver.
To reject an incoming call, press red receiver.
To mute an incoming call, press right function key (RFK).
7.4
Handsoff mode button
During a call press right function key, to switch on the
speaker. If you want to switch off the speaker press right
function key again.
8. List of calls
To enter the list of calls, enter the main MENU->List of
calls, and then select:
38
Missed calls (to display missed calls). If you have not
answered a call, in the readiness mode the symbol of a
receiver will be displayed in the left upper corner of the
screen and LED indicator will flash blue.
Dialed numbers (to display dialed numbers).
Answered calls (to display answered calls)
Delete the list (to delete selected calls from the list)
Call time (allows to check the duration of selected calls)
GPRS Counter
Allows to check the number of sent and received data and
to zero the counter.
Note: To scroll the list of calls just press green receiver in
the readiness mode. Colourful symbols inform about the
type of a call.
Dialed numbers
Answered calls
Missed calls
9. SMS and MMS messages
The phone gives the possibility of sending and receiving
SMS text messages and multimedia MMS messages. The
following icon
is displayed, which means that there is
at least one unread message.
Moreover, the fact that the message is not read is
indicated by LED indicator flashing green.
To enter SMS MENU in standby mode press left function
key and then select Messages->Inbox. When the inbox is
39
full,
icon will flash. Delete messages from inbox, to
solve the problem.
9.1
Writing and sending SMS-es
1. Enter MENU->Messages->Write a message>SMS, to
open the message editor.
2. Write your message.
· Changing the method of entering the text: To
change the method of entering the text (digits, small or
capital letters) press „#” key, if you want to write a
symbol press „ ”.
3. Sending the message: Press left function key to
enter options, select „Send to” and select whether you
want to enter the number manually or select from the
contacts. Select the number and press OK. If you
want to send SMS to many persons, you can add the
next numbers. To send the message, press „Options”
and then „Send”.
4. Saving the message: To save already written
message press left function key,
and then select „Save”. The message will be saved
in Drafts. You may set that sent messages will be
saved automatically, in order to do this enter MENU>Messages->Settings->SMS->Save own.
40
If you want to send MMS, select MENU->Messages>Write a message->MMS,
Press LFK (Options) and select the content (Picture,
sound, video, subject...)> LFK (Options) > Send to >
enter the recipient> LFK (Options)> Send.
9.2
Reading and responding to SMS-es
1. When the icon of unread message will appear on the
display or when you want to read received messages,
select MENU->Messages->Inbox. To read the
message, press „Options” and select „Preview”. During
reading you may use additional options pressing left
function key.
2.
icon next to the message means that this is
unread message.
By pressing „Options” while reading a message, you will
display additional functions:
- Respond via SMS: write SMS to the sender
- Respond via MMS: write MMS to the sender
- Call: call the sender
- Delete: delete the message
- Transfer: allows to send the message to other recipients
- Save as a template: the message is saved in Templates
- Advanced: allows to use the number, URL address or
USSD code.
41
9.3
SMS boxes
9.3.1 Inbox
Shows received messages, sorted by date of receiving.
To navigate the inbox use UP and DOWN keys.
To display additional functions, during scrolling the inbox
press „Options”:
- Preview: allows to read the message
- Respond via SMS: write SMS to the sender
- Respond via MMS: write MMS to the sender
- Call: call the sender
- Transfer: allows to send the message to another
recipient.
- Delete all: deletes all the messages from the inbox
- Save in the phonebook.: zapisuje numer nadawcy w
kontaktach
9.3.2 Sent messages
In the case when you use „Send and save” option the sent
messages are then saved in „Sent messages” folder. For
navigating the the inbox use UP and DOWN keys.
9.3.3 Drafts
You may save messages, which were not sent, in „Drafts”
folder. In order to do this write your message and after
pressing left function key, select „Save”.
Enter Drafts, to send, delete or edit saved messages.
42
9.3.4 Outbox
If the message was not successfully sent it will be saved in
the outbox.
9.3.5 Network messages
Network messages are kind of an information service, they
are sent by the operator. In MENU->Messages->Network
messages you may activate or deactivate the function, set
the channels, language and read the messages.
9.4
Deleting messages
To delete selected message enter options and select
„Delete”.
9.5
Messages settings
Enter MENU->Messages->Settings and then select:
9.5.1
SMS
· SIM
- Number of messages center: Intermediates between
the subscribers while sending SMS messages. In order to
send SMS message from the mobile phone, you need to
have a correct number of SMS center entered.
You will get this number from the service provider.
- Validity period: set the validity period of the message
- Message type: set whether the message is going to be
send as a fax, e-mail or text.
43
- Delivery report.: You may set the phone so that to
receive returnable SMS that your message was delivered
to the sender (network service)
- Respond path: allows to activate or deactivate the
respond path.
- Call: allows to select the type of a call when sending
SMS
· Memory state
Allows to check the memory status on SIM card and in the
phone.
· Save sent messages
Allows to activate/deactivate the function of saving sent
messages
· Memory settings
Allows to select whether the messages are going to be
saved in the phone or on SIM card.
9.5.2
MMS
· Data account
Allows to select the data account necessary to send
MMS-es.
· Together
Allows to activate/deactivate delivery reports, set the
priority and activate the function of saving sent messages.
44
9.5.3 Network messages
You may enable receiving network messages and select
the method they are going to be started.
9.5.4 Type size
Allows to set the type size in SMS. The type size can be
changed with the use of
9.6
key
Voice mail
The voice mail is an operator’s service allowing to leave
the voice recordings, when someone cannot call us. To
get more information contact your operator. If you would
like to change the number of your voice mail select MENU>Messages->Voice mail and enter entire appropriate
number.
You may receive the voicemail number from the service
provider. To call the voicemail press
key
10. Applicatios
10.1 Magnifier
The phone is equipped with the function of magnifier,
which uses the built-in camera.
To activate the magnifier, select Magnifier in MENU.
Approach the phone to the object, which you want to
enlarge. Remember not to cover the lens of the camera.
Using UP/DOWN keys you can additionally enlarge or
45
reduce the picture in size. In order to leave the function of
Magnifier, press red receiver.
10.2 FM Radio
The phone is equipped with built-in FM radio receiver. To
use the radio connect handsfree set. There is no
possibility to receive the radio through the phone’s
speaker.
Warning: The quality of reception depends on the place
you are in. The reception of radio stations is influenced
by many external factors, which may cause poor quality
of reception, however it does not constitute the basis for
product complaint.
To switch on the radio select MENU->FM radio. To switch
off the radio press red receiver. If the option “Play in the
background” is activated, before switching off the radio
stop it with the 5 key, and then press red receiver.
Otherwise, the radio will be played all the time.
Functions of buttons during radio playing:
· +/- (on the left side): loud/quiet
· UP: the increase of frequency by 0,1 MHz
· DOWN: decrease of frequency by 0,1 MHz
· 5: stop/start playing
· 4: previous station
46
·
·
·
6: next station
RFK (right function key): return to menu
LFK (left function key) – options: List of channels,
manual entering, automatic searching, setting (play in
the background)
10.3 Calculator
To switch on the calculator, select MENU->Calculator.
The following mathematic operations are available:
addition, subtraction, multiplication, division.
Enter the first number using 0-9 keys, then using
UP/DOWN keys select the operation, enter the second
number and using Up/Down keys select „=”.
10.4 Alarm clock
You can set five independent alarm clocks in the phone.
In order to activate the alarm select MENU->Alarm. Select
appropriate alarm clock and press Edit. You can
activate/deactivate the alarm, set the time of the alarm,
alarm sound, alarm type and repetition. If the phone is
switched off, the function of alarm will still be active, if the
battery state allows it. If the alarm will switch on, press left
function key to switch off the alarm clock. Press right
function key to activate the function of a snooze, the alarm
clock will switch on again in 4 minutes.
47
10.5 Calendar
To activate the function of the calendar, select MENU>Organizer->Calendar.
To go to the next/previous day use Up/Down keys. To go
to the previous/next week use 2 and 8 keys.
In the calendar you can save the reminders concerning
important events. If for a given day a reminder is set, red
triangle will be displayed next to it. To display all the tasks
from a given day, press “Options”, and then select
„Preview”
Press „Options” and select:
- Preview: allows to view the tasks saved for a given day,
the task can be deleted or edited.
- View all: allows to see all the tasks saved for a given day
- Add the task: allows to set the task for a given day. You
may select the type of the task, the date of starting and
finishing the task, notifying with the alarm etc. After setting
all the options press Execute(right function key)
- Delete the task: allows to delete selected tasks
- Go to the date: enter the date, to which you want to go
- Go to today’s date: allows to go to current date in the
calendar.
10.6 Tasks
To view all saved tasks, select MENU->Organizer>Tasks. Using Up/Down keys select relevant task and
48
press Options (LFK), to view the details of the task, to
delete or edit it. If an alarm was set for the task, the phone
will start ringing on specified time and it will display the
content of the task.
11. Multimedia
11.1 Files manager
Select MENU->Multimedia-Files manager
The available memory is shown in files manager (Phone
or memory card).
Press left program key [Options] :
· Open- select, to open selected folder.
· Format- to format selected drive
· Details
After opening the folder the following options are available
under the left program key:
· Open
· Open the folder- to create a new folder in selected
localization
· Change folder’s name
· Delete: Delete current folder
· Sort: Sort the sequence of displaying
To open a given file, press left function key [Options] and
select the preview or open. You may also select other
functions.
49
11.2 Camera
The phone makes it possible to take pictures and record
the video.
To switch on the camera, select MENU->Multimedia>Camera. After switching on you will see the picture on the
screen. The camera is equipped with digital zoom
(enlargement). To approximate the object you want to take
the picture of, press Up key, to remote press Down key.
To change the size of the picture (160x128, 160x120,
320x240, 640x480), press Options->Picture settings>Picture size.
To take a picture, press 5 key. The picture will be saved
automatically.
To display more options, press left function key.
Switch to camera
Switches on the camera
Album
Starts the picture viewer
Allows to change the camera settings
Camera settings for example sound, shutters, contrast,
delay etc.
You may change the size of the picture
Picture settings
as well as its quality
White balance
Allows to adjust the white balance
Scenery selection
Automatic or night
50
Settings of effects
Memory
Restore default
You may select: normal, sepia, grey
scale etc.
Allows to select whether the pictures are
going to be saved on memory card or in
internal phone’s memory
Restores default camera settings
Internal memory of the phone allows to take several
pictures. To store more pictures install Micro SD memory
card.
During using Album function, select appropriate picture
with the use of Up/Down keys and press left function key
to display the options:
- Preview, enlarges selected picture. If you want to see the
next picture use Up/Down keys
- Information about the picture, displays the details
concerning the picture
- Scroll styles, allows to select the style of displaying
pictures
- Send, allows to send the pictures as MMS or via
Bluetooth
- Use as, you may set the picture as a wallpaper or it will
be displayed at switching on/off the phone
- Change the name, allows to change the name of the
picture
- Delete, deletes the picture
51
- Sort by, allows to change the function of sorting, for
example by date, name, size
- Memory, allows to select whether the pictures are going
to be displayed from the memory card or from phone’s
memory
To record a video, in options select Switch to camera.
11.3 Video recording
To set the option of recording press left function key.
Recording starts after pressing 5 key. To stop recording,
also use 5 key. To end recording, press right function key.
To use the function of the camera it is required to install
MicroSD card (not included) and set the function of saving
on the memory card.
Option ->Memory and select the memory card.
Pictures and films taken with the use of a phone can be
sent to the computer. More information “Connecting the
phone to the computer”.
11.1 Picture viewer
Picture viewer allows to view previously taken pictures.
Options available in the picture viewer are the same as in
the album and they have been described in the previous
point.
52
11.2 Video player
With the use of a video player you may view previously
saved films. Select appropriate film with the use of
Up/Down keys. To start and stop playing press 5 key. To
stop playing, press right function key.
During scrolling the list of films, press “Options, to display
additional Options
- Open
- Send
- Change the name
- Delete
- Sort by
- Memory
11.3 Audio player
Using the audio player you can play recorded sound files.
To start or stop playing, press 5 key. You can move
between previous and next recording with the use of 4
and 6 keys. To change the options of playing, select:
List->Options->Settings.
11.4 Dictaphone
You may record music or sounds from the surrounding.
· Select Menu->Multimedia->Dictaphone
· To start or stop recording, press Up key
· To stop recording, select right MENU key, (Stop).
53
The recordings are saved in the folder Files manager>Phone->Audio.
· Select Options, to enter relevant setting of the
dictaphone.
12.Bluetooth
Thanks to Bluetooth connection you can send and receive
files. You may also connect other devices for example
wireless handsfree set.
Select MENU and go to Bluetooth
In Bluetooth Menu you may select one of the following
options:
Bluetooth State
Activate or deactivate Bluetooth
Activate so other people can find
Visibility
your phone
Devices that you have previously
Connected devices
been connected to
Search external audio devices (for
Search audio devices
example Bluetooth earphone)
54
Name of a device
Select the name of your device
Advanced
Here you can set the output for
audio signal, phone’s network
address as well as memory for
saving data
13. Settings
Select MENU->Settings and then:
13.1 Phone settings
13.1.1 Date and time settings
To set the date and time select MENU->Settings->Phone
settings->Date and time. Select „Time zone”, to set
appropriate town, and then „Set the time” and „Set the
date”, to enter the time and date. To navigate between
particular digits use the Up/Down keys.
To enter date and time use 0-9 keys.
You can also set the time format (12h or 24h), date format
(DD/MM/YYYY, MM/DD/YYYY or YYYY/MM/DD) and date
separator.
If the battery will be taken out from the phone, after placing
it again you have to set date and time.
13.1.2 Planned switching on/off
You can set the time when the phone is going to
automatically switch on or off.
In the case when you set automatic switching off the icon
will be red , if you will set automatic switching on the
icon will be green
55
13.1.3 Language
Allows to change the language of phone’s menu. If you set
a foreign language accidently, to set correct language in
standby mode press:
- 1x LFK (left function key)
- 2x Up
- 2x LFK
- 2x Down
- 1x LFK
Select appropriate language and press LFK
13.1.4 Display
You can set wallpaper, contrast and the time of
highlighting, animation at switching on and off the phone,
as well as switch on/off the function of displaying date and
time in standby mode and showing the operator’s name or
My number. You can also set the clock as a screen saver.
13.1.5 Dedicated keys
You can change the functions of Up/Down keys in standby
mode. Select which key you want to set (Up or Down),
press „Edit”, select appropriate function for example
calendar and press Ok.
13.2 Call settings
13.2.1 Number identyfication
This is the network service. If an operator offers this
service, it is required to perform relevant configuration.
56
This function makes it possible to hide your own number
during the call.
Select „Establish network”, „Hide the number” or „Show
the number” and press „Ok”.
13.2.2 Waiting call
This is the network service. If an operator offers this
service, it is required to perform relevant configuration. On
entering MENU->Settings->Call settings->Waiting call you
can check the state of availability readiness and select
whether you want to activate this function.
If the function of waiting for a call is activated, and the user
carries on a conversation, each next incoming call will be
signaled by emitted signal of the second call.
It is possible to answer the second call and hang up the
first one
13.2.3 Call transfer
The user can set the function of transferring incoming
calls directly to the voice mail or to other selected number.
1. To set the function of Call transfer enter: MENU>Settings->Call settings->Call transfer.
2. Then select when you want to transfer the calls from
available list: 1 Transfer all voice calls Transferring all
incoming calls to selected number), 2 Transfer when
unavailable (Transferring calls when your phone is
switched off or when you are out of range ), 3 Transfer
when there is no answer (Transferring calls when you
do not answer the phone), 4 Transfer when busy
57
(Transferring incoming calls, when you are currently
having a conversation), 5 Transfer all data calls
3. Press Activate and enter the number to which you
want to transfer the calls to activate the service or
Deactivate to deactivate the service.
To check the currently selected state of the service select
Check the state
13.2.4 Call barring
This is the network service. If an operator offers this
service, it is required to perform relevant configuration.
This function makes it possible to block different types of
calls.
1. Enter:
MENU->Settings->Call settings->Call barring
2. From the list select the type of calls you want to block.
You can block all outcoming calls, all outcoming
international calls (with the exception of calls to the
country), all incoming calls and calls incoming while
roaming is activated. You can also change the password
of the blockade.
13.2.5 Advanced settings
·
58
Automatic repetition: When the function is
activated and the attempt of making a call will not
be successful, the phone will automatically try to
make a call
·
·
·
·
Sound in the background: You can set the sound
which will be heard in the background by the
persons having a conversation, for example
motorcycle sound
Displaying call time.: If the function is activated,
during a call the call time will be shown on the
display.
Time reminder: You can set the function of
signaling the call time. Each particular period of
time (30-60sec) or after a particular period of time
(1-3000sec) during a call you will hear a signal
informing you that specified period of time has
passed.
Answering calls: You can set the function of
answering the calls by pressing any key or
automatically when handsfree set is connected.
13.3 Profiles
The phone has several profiles, with the use of which you
can adjust the phone to different situations quickly. Each
profile can be activated and adjusted according to your
needs. The following profiles are available: General, Silent,
Meeting, Outdoors, Handsfree set, Bluetooth
In each profile (apart from Silent) you can change:
- Alert type (only the ringtone, only vibration etc.)
- Ringtone type (single or repeated)
- Ringtone
59
- Ringtone volume
- Message signal
- Message signal volume
- Keys tone
- Keys volume
- Sound at switching on the phone
- Sound at switching off the phone
- Warnings sound (for example signaling low battery)
- Telling the incoming number (during incoming call the
digits of incoming number will be told).
In standby mode press and hold # key to activate silent
mode, press and hold again to return to the previous
profile.
13.4 Network settings
·
·
·
Network selection: You can select an operator
manually or automatically and set the preferred
operator.
GPRS call: Allows to select whether the GPRS
call is going to be made in the case of emergency
or always
Preferred GPRS transfer
13.5 Security settings
13.5.1 PIN code
You can activate/deactivate the request for PIN code at
switching on the phone and change the PIN code
60
13.5.2 Phone security
You can activate the phone blockade. When switching on
the phone you will have to enter the blockade code.
Default code is 1122.
13.5.3 Automatic keylock
The function allows to activate and set after what time the
keys will be automatically blocked.
13.6 Restoring factory settings
Thanks to this option you can restore factory settings.
Select:
MENU->Settings->Restore factory settings.,and then
enter the securing password. Then confirm with left
function key.
Warning: Default password is: 1122
13.7 Shortcuts
You can assign, what functions are going to be available, if
to Up and Down keys the Shortcut function was assigned
(see point Dedicated keys).
13.8 Data account
The phone has WAP/MMS and GPRS call settings of
some operators. To edit/delete/add data account select:
61
Menu->Settings->Data account
Correct configuration can be obtained from your operator.
Some operators enable remote configuration of the phone.
13.9 Network services
13.9.1 WAP
The browser in the phone allows to use different WAP
services.
The phone has settings of some operators. To activate
select:
Menu->Network services>WAP->Settings->Data account>select appropriate account and press OK.
The size of the phone’s display can cause that the
appearance of the websites can be different from the
original ones. Some details of the websites may not be
visible.
To get some information concerning availability of this
service, price list and instructions contact your service
provider.
Necessary configuration settings required for browsing
websites can be obtained from the operator, see point
Błąd! Nie można odnaleźć źródła odwołania.
62
13.9.2 SIM services
Regardless of the functions of the phone itself, SIM card
may offer additional services. Name and functions of this
menu depend on the type of available services.
Services requiring Internet connection may not be
available.
14. Connection to the computer
You may connect the phone to the computer with the use
of USB cable thanks to which you can copy and transfer
files between the phone and a computer.
Connection:
- plug USB cable to the phone
- connect the second end to the port in the computer
- on the phone’s display you will see the following
information: „Mass storage”
15. FAQ (Solving problems)
The phone can be repaired only by authorized service. It is
forbidden to repair or modify the phone, otherwise the
warranty may become invalidated!
Colored diode
flashes ( LED
indicator)
If it flashes:
Green – you have got an unread SMS- check if
all the messages in SMS inbox are read.
Blue- missed call – scroll the list of missed calls
Red – low battery – connect the phone to the
charger
63
„Cannot make a Check whether the dialed number is correct.
call ”
When dialing the number of another country
always add relevant prefix (for example Germany
0049 or +49)
If a user has a card of prepaid type(supplying
with a card), check whether the means on the
account are available to make a call.
„ SIM card is
Make sure if SIM card is correctly installed
inserted, only
emergency
calls (112)”
The phone
The phone may be switched off, switch on the
does not work, phone by pressing and holding the button used
after connecting for switching on the phone (red receiver) for
the charger it about 3 seconds.
does not charge After longer period of the phone not being used
the battery may be in the state of so called “deep
discharge”, to restore proper functioning of the
phone leave connected charger, despite the fact
that there is nothing displayed on the screen.
„Is it possible to If the user is abroad, the phone automatically
make calls
logs into the foreign network, if the function of
while being
ROAMING was activated. Consult the operator
abroad?”
for more information.
64
„Is it possible to
make an
emergency call
in the place
which is out of
range or when
there are no
means on the
account ?”
It is not possible to make any call, if the phone is
out of range.
If the user does not have any means on the
account, it is possible to make emergency calls
112.
If on the display you will see „does not work”, it
„How the range means that there is no relevant signal or means
can be
on the account. However, in this case it is
increased?”
possible to make emergency calls with 112
provided that we are within the range of other
operator.
Places such as buildings restrict the range. It is
recommended to approach the window, or go out
the area where many buildings are concentrated.
„On the display The keylock is activated, Unblock the keys,
appears
sliding the switch down .
„Keylock”, keys
do not work”.
„What is SMS Number of operator’ center, where text messages
message
are stored. The number is stored on SIM card,
center?”
but it can be changed in phone’s menu.
„When the
The charge is calculated just after the call is
charge for the established. To get more information about the
call is
mode of charge calculation consult your operator.
calculated?”
65
How to check Activate the option of delivery report. After the
whether SMS delivery of a message you will get returnable
was delivered SMS with the information that the message was
to the recipient? delivered (network service).
66
16. Conditions for use and safety
·
·
·
·
·
Do not switch on the phone if it can cause
interferences in the operation of other devices!
It is forbidden to use the phone without appropriate
set while driving a car.
The phone emits electromagnetic field, which may
have negative influence on other electronic devices
including for example medical equipment. Keep the
distance between the phone and implanted medical
devices such as a pacemaker, recommended by
manufacturer. Persons with implanted devices should
acquaint with the guidelines of implanted device’s
manufacturer and observe them. Persons with the
pacemaker should not carry the phone in the pocket
on the chest, they should hold the phone at the ear on
the opposite site of the body in order to minimalize the
risk of interferences and immediately switch off the
phone in the case of any suspects that there are any
interferences;
It is forbidden to use the phone in hospitals, planes,
near petrol stations and inflammable materials..
It is forbidden to repair or modify the phone. Any
defects must be removed by qualified service.
67
·
·
·
·
·
·
The device and its accessories may consist of small
parts. The phone and its elements must be protected
against children.
The phone cannot be cleaned with chemical or caustic
substances.
It is forbidden to use the phone in small distance from
pay and credit cards - it can cause the loss of data on
the card.
Because of safety reasons you should not talk by the
phone with the charger connected.
The phone is not watertight, it should not be exposed
to water and any other liquids.
Do not place the device in the place where it can get
splashed with water or other liquid.
It is forbidden to expose the device to low and
high temperatures and direct influence of sunlight.
Do not place the device near heating installations
for example radiator, heater, oven, central heating
furnace, fire, barbecue etc.
17. Warranty conditions
The phone has a warranty which inseparable part is the
receipt.
The repair of phones damaged in the result of improper
using, electrostatic discharge or lighting stroke will be
payable.
68
If the user attempted to repair or modify the phone for
themselves it causes the loss of warranty!
The above information is presented for informative
purposes.
18. Information concerning the battery
There is battery in the phone which may be recharged with
the use of the charger included in the set.
The time of phone operation depends of different operation
conditions. On shorter operation time significantly
influences how far we are from the repeator station as well
as the length and number of calls. During moving, the
phone switches between the repeator stations, which also
have considerable influence on the operation time.
The battery after several hundred processes of charging
and discharging naturally loses its properties. If the user
will notice significant loss of capacity, it is recommended to
buy a new battery.
Use only batteries recommended by the manufacturer. Do
not leave connected charger for more than 2-3 days.
Do not store the phone in the places of too high
temperature. It can negatively influence the battery as well
as the phone itself.
69
Never use the battery with visible damage. It can lead to
short circuit and damaging the phone. The battery must be
installed in compliance with the polarity.
Leaving the battery in the places of too high or too low
temperature will shorten its life. The battery should be
stored in the temperature from 15°C to 25°C. If you install
cold battery in the phone, it may not operate properly and
there is a risk of damage.
the set includes Li-ion accumulator and
CR2025 battery. Used batteries and
accumulators are harmful for the
environment. They should be stored in
specially prepared point, in relevant
container, according to applicable regulations. Batteries
and accumulators cannot be thrown away to the
household waste. They should be brought to the collection
point.
DO NOT THROW THE BATTERIES OR
ACCUMULATORS TO THE FIRE!
19. Information about SAR
This model meets international guidelines in the scope of
radio waves impact. This device is a sender and receiver
of radio waves. It is designed so that not to exceed the
limits of radio waves impact, recommended by
international guidelines.
70
The guidelines have been prepared by ICNIRP
independent scientific organization with the regard of
safety margin in order to ensure the protection for all the
people regardless of age and health state. The guidelines
use the unit of measure called Specific Absorbtion Rate
(SAR) – specific absorption coefficient.
The limit value of SAR coefficient for portable devices is
2,0 W/kg. In the case of this model, the highest measured
value of SAR of this device in the test at the ear is: 0,557
W/kg (GSM900); 0,486W/kg (DCS1800)
SAR values may differ depending on domestic
requirements of reporting and testing and on the frequency
band in a given network.
SAR value is measured at the highest sending power, the
real value during the device operation is usually lower than
the abovementioned level.
It results from automatic changes of device power level, to
ensure that the device uses only the minimum required for
the connection to the network.
Although there may be differences in the values of SAR
coefficient in the case of different models of phones, and
even in the case of different positions of using - they are
all in compliance with the regulations concerning safe level
of radiation.
71
World Health Organization stated that the current
researches indicated that there is no need to use any
special limitations in the usage of mobile devices. It also
indicates that if we want to reduce the influence of
radiation it is recommended to reduce the length of calls or
to use handsfree set, in order not to hold the phone near
the body or head.
20. Information concerning the environment
protection
Note: This device is marked in compliance with European
Directive 2002/96/WE and polish Act concerning
used electric and electronic equipment with the
symbol of crossed out container.
Such marking informs, that this equipment, after
the period of its usage, cannot be disposed with
other household waste.
Note: this equipment cannot be thrown to household
waste!!! This product must be utilized through selective
collection in specially prepared points.
Proper management of used electronic and electric
equipment contributes to avoiding consequences harmful
for humans and natural environment resulting from the
presence of hazardous components and improper storing
and treatment of such kind of equipment.
72
21. Declaration of compliance
73
Some information included in this user manual may differ
depending on the phone’s configuration. It depends on
installed software, service provider and SIM card. The right
to make any changes in the product and its functions,
without prior presentation of information about it, is
reserved.
Technical assistance, - number: 32 325 07 00 or email
[email protected]
74
75
MAXCOM S.A.
43-100 Tychy,
ul Towarowa 23a
POLAND
tel. 32 327 70 89
fax 32 327 78 60
www.maxcom.pl
[email protected]
76
MM715 v01-05-2013
0678