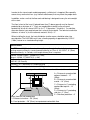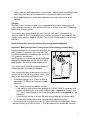
1
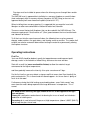
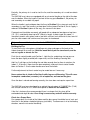
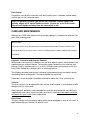
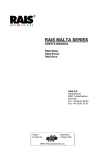
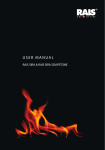
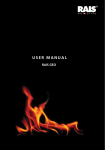
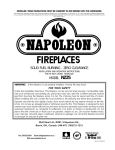
RAIS INSERT 60
USER’S MANUAL
RAIS A/S
Industrivej 20
9900 Frederikshavn
Denmark
Tel.: +45 98 47 90 33
Fax: +45 98 47 92 91
Tested
& Listed by:
Beaverton
Oregon USA
C
OMNI-Test Laboratories, Inc.
TABLE OF CONTENTS
INTRODUCTION .................................................................................................................3
Safety and Environmental Testing .................................................................................3
Features and Items Included .........................................................................................3
INSTALLATION ..................................................................................................................3
Precautions and Specifications......................................................................................3
Specifications.................................................................................................................4
Assembly Instructions ....................................................................................................5
Chimney.........................................................................................................................6
OPERATING INSTRUCTIONS............................................................................................7
First Fire.........................................................................................................................7
Building the Fire .............................................................................................................8
Check for a Proper Burn ................................................................................................8
FIREWOOD .........................................................................................................................9
Specifications.................................................................................................................9
Burning value of wood ...................................................................................................9
A Few Reminders ..........................................................................................................9
Fuel Caution ................................................................................................................10
CARE AND MAINTENANCE ............................................................................................10
Creosote – Formation and Need for Removal .............................................................10
Surfaces.......................................................................................................................10
Glass Doors .................................................................................................................10
Removing the Ashes....................................................................................................11
Cleaning the Smoke Box/Baffle System ......................................................................11
Firebox Lining ..............................................................................................................11
Gaskets........................................................................................................................11
TROUBLE SHOOTING .....................................................................................................12
WARRANTY......................................................................................................................12
Revision 1
October 12, 2006
2
Congratulations on your new RAIS wood burning stove. As a product of award
winning design and superior quality, we wish you many years of warmth and pleasure.
INTRODUCTION
We are asking you to:
PLEASE READ THIS ENTIRE MANUAL BEFORE YOU INSTALL AND USE YOUR NEW RAIS STOVE.
FAILURE TO FOLLOW INSTRUCTIONS MAY RESULT IN PROPERTY DAMAGE, BODILY INJURY, OR EVEN
DEATH. KEEP IT HANDY FOR EASY REFERRAL.
Safety and Environmental Testing
The RAIS 60 Insert stoves have been tested by OMNI-Test Laboratories, Inc. of
Beaverton, Oregon and are listed to UL 1482 and ULC S628. They are also EPA certified.
Features and Items Included
Your RAIS has a built in convection system, so it creates air circulation in the room, to
spread the heat faster and more evenly.
The stove is supplied with a "cool" handle cover, which enables you to operate the handle
without the use of a glove (however, always use caution when touching areas where HOT
surfaces are located).
Included with the RAIS stove (in the firebox) are:
• Flue collar with a 45° elbow (to connect to stove/pipe)
• An oven mitt and handle cover
• A box of RAIS starter matches
• A can of touch-up paint (Remove from the stove!)
Installation
Precautions and Specifications
IF THIS STOVE IS NOT INSTALLED PROPERLY, A HOME FIRE MAY RESULT. TO REDUCE THE RISK,
PLEASE CAREFULLY FOLLOW THE DIRECTIONS FOR INSTALLATION.
Consult your local Building Inspector or Fire Marshall before installation to
determine the need to obtain a permit. Also inquire about restrictions and
installation inspection requirements in your area.
If utilizing an existing chimney, it is suggested that you have a professional mason or stove
installer do a complete check-up of your chimney, liner, and flue.
3
In order for the stove to work and draw properly, sufficient air is important! Be especially
aware of any mechanical fans (e.g. kitchen or bathroom) that may affect the proper draw.
In addition, make sure that the floor and sub-flooring is designed to carry the extra weight
of the stove.
The floor in front of the insert (if placed lower than 5” above ground) must be thermal
protected by a minimum of ½” (1cm) non-combustible material having a thermal
conductivity of k=0.84, where k=BTU in./hr. ft2 °F (based on 1” thickness). To substitute
alternate material, you need to know the k value of that material. The formula to calculate
thickness in inches is (k of the alternate material / 0.84) x ½”.
When installing the insert, the heat distribution to other rooms should be taken into
consideration. The RAIS 60 Inserts have a heating capacity of approximately 1,076 ft²
(100m²) based on a standard ceiling height.
Specifications
UL 1777 Listed 6” (15cm) diameter chimney liner up through the block off plate of an
existing masonry chimney, a zero-clearance chimney, or Class A, UL-103 HT, 6” (15cm)
diameter chimney. In Canada, a full length chimney liner is required.
Optimal Thermal Output – 23,900 BTU (7 kW);
range is 10,200 - 27,300 BTU (3 - 8 kW)
Minimum stove draft pressure at above output –
0.06” WC (15 Pascals)
Efficiency – 67% based on DS standard testing
Tested EPA emission particulate rate – 7.23 grams/hour
Minimum distances from edge of Insert Face Plate to combustible material – as shown:
D
B
C
A
F
E
G
A = Distance to a combustible
adjacent sidewall – 12”
(30cm)
B = Distance to a combustible
mantel – 16” (41cm)
C = Distance to ¾” protruding
combustible top trim – 14”
(36cm)
D = Distance to ¾” protruding
side trim – 2” (5cm)
E = Side floor protection – 8”
(20cm) from the fuel-loading door
F = Distance to furniture – 36” (91cm)
G = Front protection – 20” (51cm) to unprotected combustible floor
4
Assembly Instructions
The detailed dimensions of the RAIS 60 Insert are as shown:
Although the RAIS 60 Insert comes assembled,
it has to be mounted into the fireplace or firebox.
1. First remove the baffle plate by lifting it up on
2. its side towards the top, and then pulling it out
3. the front (refer to “Cleaning the Smoke Box/Baffle System”).
Included is a RAIS flue collar with a 45° elbow,
which enables connection to the chimney or liner.
4. In some cases an offset box may also be needed for adjusting
the position of the insert (as shown in the diagram). Attach the flue collar/offset box to
the chimney/liner.
5. The insert (firebox) can then be placed and centered in the fireplace or built-in opening.
To level the insert, use the 4 leveling screws situated at the bottom of the firebox (the
stones will need to be removed to make the adjustments). Important! At least ½” (1cm)
space should be left between insert and the opening.
6. Now the stovepipe (flexible or solid) can be attached to the offset box/collar on the
insert. Reach up through the insert and pull the flue collar into the opening. Securely
attach by bending the tabs on the collar over the insert’s flange.
5
7. Finally, place the baffle plate back in reverse order. The baffle plate should be pushed
all the way to the back of the firebox with it resting on both sides of the stones.
8. RAIS recommends that a sealer be used between the insert and the face of the
opening.
Chimney
The RAIS inserts must be installed using a code-approved masonry chimney with a 6”
(15cm) diameter flue liner, a zero-clearance chimney, or a Class A UL 103 HT approved
factory-built chimney system.
The chimney must extend through the roof at least 3’ (1m), and 2’ (.6m) above any
structure within 10’ (3m). The condition of the chimney and height is very important. We
suggest a total minimum height of 10’ (3m). Consult your chimney expert if you have any
questions.
Do not connect this stove to a chimney flue serving another appliance.
Important! Make sure that there is easy access to the chimney cleanout door.
For venting directly into a masonry chimney (built to
UBC Chapter 37 standards) with a clay liner, the
installation should be in accordance with the NFPA
211 guidelines and methods.
Insure that there is a secure and airtight connection
between the adapter pipe and the clay liner with a
block off plate. See the illustrated diagram at left.
First, make sure to secure the fireplace damper in
the open position (or remove the damper).
Then, have the chimney examined to insure that it is
safe for use (e.g. not too large and no cracks), and
some of the more critical requirements are:
•
A minimum thickness of 4” (10cm) for brick or
block and a 12” (30cm) for a natural or rubble
stone wall.
•
The 6” (15cm) chimney liner options include:
A full stainless steel chimney liner (meeting ULC S635 CLASS III standards) and
securely attached to the insert and the chimney top is required for Canada. A UL
1777 liner is recommended in the United States for masonry and required for zero
clearance.
A fire clay flue liner that is at least 5/8” thick and installed with refractory mortar.
An equivalent listed chimney liner system or other approved material.
•
A chimney inside the house must have a 2” (5cm) clearance to combustibles, and an
outside chimney must have at least a 1” (2.5cm) clearance to a combustible structure.
6
Fire stops must be installed at spaces where the chimney passes through floors and/or
ceilings.
The RAIS 60 Insert is approved for installation in a masonry fireplace or a metal firebox
(heat exchanger) within a masonry chimney (based on UL 907 listing) or for use in an
approved factory-built zero-clearance fireplace (listed to UL 127).
When installing into a masonry opening, it is suggested that you wrap the insert with
fiberglass or other non-combustible insulation for better heat retention.
There are several factory-built fireplaces that can be used with the RAIS 60 Insert. The
clearance requirement is that there be a 2” (5cm) space between the insert and the back
and sidewalls of the box.
To fit the insert into the zero-clearance firebox, the following items may be removed:
damper, ember catches, fire grate, doors, and viewing screen or curtains. The smoke shelf
or baffle can also be removed if done without cutting the material or permanently altering
the fireplace structure.
Operating instructions
First Fire
Your new RAIS should be broken in gently for top performance and to prevent paint
damage, cracks in the firebrick or firebox lining, and excessive wear and tear.
Start with a small fire (never overload the firebox) to allow the materials to get
accustomed to the higher temperatures,
and then gradually increase the intensity. Use up to a maximum of 2 logs.
For the first few fires you may detect a strange smell that comes from "heat treating" the
paint and materials. This is normal and will soon disappear. Just insure there is plenty of
fresh air in the room!
Furthermore, during the initial heating up and cooling down, some "click-sounds" may
occur from the metals being exposed to the large differences in temperature. This is
normal.
For wood to burn correctly, the right amount of air has to be supplied at the right
time and places.
Primary air is defined as combustion air for burning the “mass of wood" and stimulates
production of volatile gases.
Secondary air is used to burn off the gases at high temperatures (above 1,000°F (540°C))
and to keep the glass free of soot.
7
Basically, the primary air is used to start the fire, and the secondary air is used to maintain
the fire.
The RAIS 60 Insert stoves are equipped with an air control handle on the right of the door
near the bottom. When the handle is pushed all the way up to Position 1, the primary air
and secondary air are both fully open.
When the handle is pushed down about half way to Position 2, the stove gets only the full
secondary air, and if the handle is pushed down further toward Position 0, the air supply is
reduced. At Position 0 (down all the way), the stove will shut down.
Firewood used should be seasoned, split wood with an adequate low degree of moisture
(15 - 22%), and ideally about up to 20” (50cm) in length. In order to get “dry wood”, it
should be stored in a dry place under a roof with sufficient fresh airflow for at least one full
year for softer woods and a minimum of two years for hardwoods.
Only use the wood fuel as described in the FIREWOOD Section of this manual!
Building the Fire
To start the fire lay a few pieces of kindling or dry twigs and paper at the back of the
firebox (enough for a small fire). Build the wood directly on the stove hearth, and do
not use a grate or elevate the fire.
Push the air control handle up to Position 1. Light the fire, and during start up you can
leave the door slightly cracked (with supervision) until the kindling is burning well.
Add 1 or 2 split logs on the kindling fire and allow enough time for them to catch on fire
(about 2 - 5 minutes). Now close the door completely, and push the air control handle
down to Position 2. Use the door handle cover over the handle.
Further adjustments to the air control may be made later on if necessary.
Never reduce the air intake to Position 0 while logs are still burning. This will cause
incomplete combustion (creosote), risk of explosion, and soot on the glass.
Once the door is closed and burning correctly, the stove does not require supervision.
The RAIS 60 Insert was developed to an optimal thermal output of 23,900 BTU/hr (7 kW)
with a water content of 18%, which corresponds to about 4½ lbs wood/hour.
If the fire is fed more than recommended, there is a danger that the stove will be
overloaded and might discolor. Over firing is unnecessary and will void the warranty.
Check for a Proper Burn
For a proper burn, the inside of the firebox and the glass panel should be free of soot, and
the ashes in the bottom should be light gray (not black). To allow more air in to the heating
chamber, move the air control handle up.
8
For normal operation the air control handle should be set at Position 2. However, if the
wood is burning too quickly, you can adjust the air control handle down.
To ensure a proper and safe combustion, there should be bright and lasting
flames/embers. Don'
t let the wood smolder. Do not close the air inlets completely
during normal usage.
Firewood
Specifications
Only burn wood that has been seasoned for at least one full year (2 years is best!). If the
wood has not been "dried”, much of the energy of the fire will go into evaporating the
water. Furthermore, condensation or creosote might occur in the stove and pipe if you
burn moist wood.
The log size should be about 2” (5cm) less than the width of the firebox.
Burning value of wood
Air-dried wood has less moisture (15 - 20%) than freshly cut timber (40%+), and typically
yields 20% more available heat. Wet wood burns at a lower temperature and causes
incomplete combustion (soot and "creosote" formation, which in extreme cases, can lead
to a chimney fire).
All types of wood heat up equally per pound (kilogram); however, the density of wood is
not the same, as shown in the following table:
Type of wood Dry Wood - Lbs/ft³ (Kg/m³)
Beech and Oak
36.2 (580)
Ash
35.6 (570)
Maple
33.7 (540)
Birch
31.8 (510)
Mountain pine
30.0 (480)
Fir
24.3 (390)
Poplar
23.7 (380)
Compared to beech
100%
98%
93%
88%
83%
67%
65%
A Few Reminders
• Store your wood cut and split (split logs dry faster).
• Keep the woodpile in a dry sunny place, protected from the rain. Don'
t cover the pile
with plastic, because that will prevent the wood from drying out properly.
• Stack the wood with enough space between the rows to ensure good air circulation!
9
Fuel Caution
Do not burn trash (plastics and other trash emit harmful gases), driftwood, treated wood,
artificial logs, or non-seasoned wood.
Never use gasoline, gasoline-type lantern fuel, kerosene, charcoal lighter fluid,
naphtha, engine oil, or similar liquids to start or “freshen up” a fire in this heater.
Keep all such liquids well away from the heater while in use.
CARE AND MAINTENANCE
Although your RAIS stove requires little day-to-day upkeep, it is important to maintain it for
your safety and enjoyment.
IMPORTANT:
YOU SHOULD HAVE YOUR CHIMNEY AND STOVE CHECKED ONCE EVERY 2 MONTHS DURING THE
HEATING SEASON OR AT LEAST ONCE A YEAR BY A PROFESSIONAL CHIMNEY SWEEP AND CLEANED
AS NEEDED.
Creosote – Formation and Need for Removal
When wood is burned slowly, it produces tar and other organic vapors, which combine with
expelled moisture to form creosote. The creosote vapors condense in the relatively cool
chimney flue of a slow-burning fire. As a result, creosote residue accumulates on the flue
lining. When ignited this creosote makes an extremely hot fire.
The chimney connector and chimney should be inspected once every two months during
the heating season to determine if a creosote buildup has occurred.
If creosote has accumulated it should be removed to reduce the risk of a chimney fire.
Surfaces
The outer surfaces can be wiped with a dry soft rag, and if needed, a small amount of mild
detergent, but try not to scrub!
Minor scratches and other surface damage can easily be touched up with the RAIS paint
supplied with each stove. Remove any dirt, tar, and rust, and make sure repairs are made
only when the stove is cool (room temperature).
Glass Doors
The glass can be easily cleaned by wiping with a damp rag dipped in some of the ashes. A
good commercial glass cleaner can also be used.
10
If the glass should break, carefully lift off the door. Remove the 9 screws from the back,
and remove the inner frame assembly. Then, remove all the loose pieces of glass and
replace only with a 4mm ceramic new glass panel and gasket available from an authorized
RAIS dealer. Assemble the inner frame, tighten screws evenly (star formation), and put
the door back on.
Removing the Ashes
Clean out the ashes in the firebox through the opening door.
Remember to leave some of the ashes in the firebox (about a 1”/2,5cm layer) for better
insulation!.
DISPOSAL OF ASHES:
ASHES SHOULD BE PLACED IN A METAL CONTAINER WITH A TIGHT FITTING LID. THE CLOSED
CONTAINER OF ASHES SHOULD BE PLACED ON A NONCOMBUSTIBLE FLOOR OR ON THE GROUND,
WELL AWAY FROM ALL COMBUSTIBLE MATERIALS, PENDING FINAL DISPOSAL.
IF THE ASHES ARE DISPOSED OF BY BURIAL IN SOIL OR OTHERWISE LOCALLY DISPERSED, THEY
SHOULD BE RETAINED IN THE CLOSED CONTAINER UNTIL ALL CINDERS HAVE THOROUGHLY
COOLED.
Cleaning the Smoke Box/Baffle System
For best results the smoke box/baffle system should be cleaned about once a year. The
following steps describe the cleaning process:
1. Remove the baffle plate as follows:
a. Push the baffle plate up towards the top of the stove and lift it off the side stones.
b. The baffle plate can now be turned at an angle and pulled out through the door
opening. Note: The baffle plate is made out of vermiculite, which is a porous
material and should be handled with care.
2. Brush the smoke box and vacuum if necessary.
3. The baffle plate can be put back in reverse order. Make sure the plate is correctly in
place.
Firebox Lining
The firebox bottom lining is made out of firebrick and the side lining is made out of
vermiculite slab insulation (skamol), which protects the outer steel plates from overheating.
With time small cracks might appear, and this is normal. If it breaks however, it must be
replaced. Vermiculite is a porous, high-insulating material and must therefore be handled
with care.
Gaskets
It is recommended to replace the door gaskets about every 2 years. When replacing the
door gasket, make sure the door glass is not pressed too hard against the gasket. The
gasket around the ash drawer can also be replaced as needed. Gaskets can be obtained
from an authorized RAIS dealer.
11
Trouble shooting
Problem
Possible Cause/Solution
Smoke
coming out
of the door
Soot on the
glass
The stove is
burning too
quickly
The stove is
burning too
slowly
There may not be enough draft in the chimney (<0.06” WC (<16
Pascals)). Check for an obstruction.
Take care that the stove is warmed up sufficiently before closing the
door.
Check the door gaskets first and replace if needed. The chimney could
also be too high and thus create too much draft (>0.09” WC (>22
Pascals)). A chimney cap reducer may help.
It could be due to too little air getting to the stove. Check that you'
re not
running exhaust fans (kitchen/bath), the chimney is not blocked, or there
is a leak between the chimney, liner, stovepipe, and the stove.
If the problem continues or other conditions, we recommend that you contact your chimney
sweep or your dealer.
If you should experience a chimney fire, quickly close all doors, dampers, vents, and call
you local fire department. Don'
t use water to extinguish the fire.
Warranty
We offer a 5-year warranty on your RAIS stove, which covers any defect in material or
workmanship. It does not cover damage from misuse or neglect. The glass, gaskets,
firebrick and vermiculite stone liners are not covered.
ENJOY YOUR NEW RAIS!
12