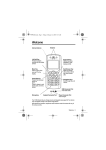
1
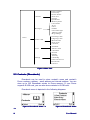
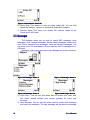
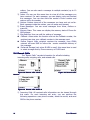
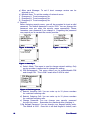
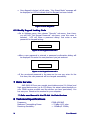
CDMA 1X Fixed Wireless Payphone User Manual (General Function) Model : AWP-V600 (Voice, SMS & Data) All Rights Reserved THIS PUBLICATION AND ITS CONTENTS ARE PROPIETARY TO Asiatelco Technologies Co. NO PART OF THIS PUBLICATIONS MAY BE REPRODUCED IN WHOLE OR IN PART IN ANY FORM OR BY ANY MEANS, WITHOUT THE WRITTEN PERMISSION OF Asiatelco Technologies Co. Table of Contents 1 PHONE OVERVIEW OVERVIEW............................................................................ 6 2 BASIC FUNCTIONS FUNCTIONS............................................................................ 6 3 BASIC OPERATIONS OPERATIONS..........................................................................8 4 IDLE SCREEN SCREEN.....................................................................................9 5 PHONE MENU MENU.................................................................................... 9 6 KEYPAD LOCKING LOCKING........................................................................... 18 7 DATA SERVICE SERVICE................................................................................ 19 8 TECHNICAL SPECIFICATIONS SPECIFICATIONS........................................................ 19 9 QUICK TROUBLESHOOTING GUIDE GUIDE............................................... 19 3 User Manual Introduction Congratulations on your purchase of the CDMA 1X Fixed Wireless Phone (Hereinafter referred to as Phone). The Phone has been designed to operate with the latest digital communication technology - Code Division Multiple Access (CDMA). The CDMA technology has many advanced features and provides excellent voice quality. The Phone has advanced features as follows: Large, easy to read, backlight LCD with status icons Choice of 13 ring tones and power On/Off music Two-way SMS, voice mail and caller ID User friendly Keypad Long battery stand-by and talk time Menu driven interface for easy operation and configuration Last number redial Adjustable ring and voice volume AC power supply Indoor antenna (and optional outdoor antenna) Speaker Phone for hand-free operation Call privacy is also supported by CDMA technology USB data cable is provided for AWP-S600-N Easy service and repair Subscriber call charge meter This user guide provides information on the use and operation of your Phone. Kindly read all the information contained in this user guide carefully prior to using the Phone. This will help you in getting the best performance and shall prevent any unintended damage to the Phone. Check the contents of the box as per the packing list and report any discrepancies immediately to the store from where Phone has been purchased. Do’s & Don’ts 4 Do not clean the Phone while in operation. Before attempting to clean the Phone, turn the Phone off, disconnect the external power adapter and take out the battery. Use a Damp cloth for cleaning. Do not use liquid or aerosol cleaners. Do not hold the antenna. This may affect call quality and cause Phone to operate at unintended power levels. Keep the antenna free from obstructions and position the antenna straight up. This will ensure best call quality. Do not use a damaged antenna. Have this replaced through a qualified technician. Use only antenna approved by the manufacturer. Unapproved antenna may impair the call quality as well as cause damage to the Phone. Only use the battery and the power adapter provided with the Instrument. The instrument might get damaged if any other accessories are used. This will also void User Manual the warranty. 5 It is highly recommended to fully charge the battery before initial use. The battery might have been discharged during storage and delivery. Do not use with car battery. It may lead to electric shock or damage to Phone. Do not throw battery. Batteries are not to be disposed off by putting them in fire. It may explode or catch fire. Do not attempt to change the security codes or components. User is responsible for any consequences arising out of such attempt. Avoid shock or impact. Rough handling can cause damage to the Phone body and internal circuits. Do not paint. During lightening do not touch power plug or Phone line. This can cause Electric shock, even death. Do not touch the external antenna. Your Phone is to work with 90-300V AC. Check the voltage before connecting. Do not plug many power cords in the outlet. Do not touch the plug with wet hands. Always grasp and pull the plug, not the cord. Do not put heavy things on the power cord or bend it too much. Do not take out the backup battery while Phone is on. If the Phone is not working for any reason, do not attempt to repair it. The Phone should be serviced by qualified service personnel only. Place the Phone and the power supply in a properly ventilated place. Do not place the Phone near high temperature objects, under direct sunlight, near source of water, near fire or near inflammable and explosive materials. Do not place any articles over the Phone. Place the Phone in a dry place and do not expose to moisture. Place the Phone away from other electronic devices like TV and Radio to avoid interference. For a better reception, do not place the Instrument in a building with iron or metal roof. Hospitals or health care facilities may use equipment which is sensitive to Radio Frequencies. Please ensure that your Phone is turned “OFF” while in the vicinity of such facilities. Do not use the Phone in designated “No Fixed Phone Use” area. User Manual 1 Phone Overview Figure 1 shows the Keypad layout of the Phone. 1. Left Key 2. Up Key 3. Down Key 4. Right Key 5. IN-USE LED 6. OK Key 7. CANCEL Key 8. MUTE Key 9. END Key 10. CALL/REDIAL Key 11. Speaker Key 12. CALL/REDIAL Key 13. Numerical Keys (0~9, * ,#) Figure 1 Keypad Layout Figure 2 shows the back side of the Phone. 1. R-UIM card slot 2. Battery chamber 3. Hooks for wall-mounting 3 1 2 Figure 2 Backside of the Phone 2 Basic Functions The following table lists the basic functions supports. Table 1 List of Basic Functions 6 User Manual 7 Functions Remark Voice Calls Support caller ID for incoming calls Call Barring Outgoing calls/Incoming calls Contact Store up to 200 entries in Phone memory And up to 200 entries in R-UIM card (if used) Recent Calls Records for incoming calls, outgoing calls, and missed calls (total 30 entries) Phone Setting Sounds, Display, Security, Network, Language (English only), Call Forward, Call Waiting Tools Schedule, Alarm Clock, Calculator Phone Status Software and Hardware Versions and etc Message Sending/Receiving SMS 200 entries in the Phone and 40 in R-UIM card (if used) Battery Management Battery Charging, Battery Capacity Indication AT Commands Standard CDMA 1X Data Service Up to 153.6kbps (only for AWP-S600-N Phone) PC FAX (only for AWP-V600-C Phone) User Manual 3 Basic Operations 3.1 Power On/Off 3.1.1 Power On Hook up handset to your Phone and put the handset to hang up position, then connect DC power supply to the “DC IN” port at the rear of the Phone or insert the battery to the battery chamber. Switch the “Power” switch (on the rear of the Phone) to ON, tyour Phone should go to idle screen and is ready to use. 3.1.2 Power Off You can turn the Phone off directly by switching the “Power ON/OFF” switch (on the rear of the Phone) to OFF position. If the Phone will not be used for long time, please turn this switch to OFF. 3.2 Make a Call While your Phone is on and at idle screen, enter a destination number you wish to call, then press “CALL/REDIAL” Key. (Note: To modify digits you enter, you can press “CANCEL” Key to delete wrong digits first and then enter new digits). Once the call is connected, the Phone’s screen will display the number you have dialed, and the time duration the call has lasted. The Phone also has a speaker. To use the speaker to make a call, press “SPK” Key, enter a phone number, and press “CALL/REDIAL” Key. 3.3 Receive a Call When there is an incoming call, the Phone will ring and display the Phone number of the incoming call (if the number is available). You can pick up the handset or press “SPK” Key to take the incoming call. The ring tone and ring-tone volume can be changed in the setting menu. 3.4 End a Call You can always end call by pressing “END” Key. If you are using the handset for a Phone call, hanging up the handset will end the call automatically. 3.5 MUTE Key functions When the MUTE Key is pressed at idle screen, an MUTE icon (speaker with cross) appears on the top of LCD to indicate the phone is in silent Mode. When there is an incoming call and phone rings, pressing the MUTE Key, would stop the ringer sound. During the call, if MUTE Key is pressed, your voice would NOT be heard by far-end, and the MUTE icon appears on the top of LCD. 8 User Manual Pressing the MUTE Key again, would resume sending the voice to farend. 3.6 Metering Function The Phone support time and tariff unit metering function. When the call is connecting, the screen will display the talk time and tariff unit . User can ask the local operator for the unit price of every tariff unit. Once the unit price is set in the Phone, then the Phone would calculate and display the cost of each phone call. 3.7 Speed Dial User can set the speed dial for quick phone calls Save the Phone number in the contacts of Phone ; Set the speed dial number (1~10) under the menu “M ain menu/ contacts/ speed dial” ; Choose the Phone number from contacts ,and Press “SELECT” ,then save; When use speed dial number, enter speed dial number (1~10) followed by #, then press “CALL/REDIAL” Key . 3.8 Battery Using Notes When using Phone, Li-Ion rechargeable batteries should be inserted. Please switch off the Phone by power switch on the rear side, when not to use the phone for long time. The battery can be automatically charged when the power switch is ON and charger is plugged in. Please DO NOT switch on/off the phone frequently when phone is in use. It is recommended keep the charger plugged even the battery is fully charged. 4 Idle Screen After powered up and phone acquired the network signal, the Phone will display the following idle screen: 9 User Manual Figure 3 Idle Screen 5 Phone Menu The idle screen displays: received CDMA signal strength, battery level, Local date and time from CDMA network, your CDMA operator name, programmable banner, and some other useful information: for example, if you have unread SMS, the message icon would appear 5.1 Main Menu At the bottom of the display (see Figure 4), there is an area called soft Key area, in which there are two soft Keys: Menu and Contact. Pressing Left Key will take you to the main menu. The main menu contains the following sub-menu items: 1) Contacts (Phonebook) 2) Messages 3) Recent Calls 4) Tools 5) Settings The following diagram depicts menu tree: 10 User Manual C ontacts V iew C ontacts N ew E ntry Search N ame E rase A ll G roups Speed D ial M emory State M essages V oice M ail W rite In b o x O utbox E rase M essages M emory State M sg Settings R ecent C alls Incoming C alls O utgoing C alls M issed C alls E rase L ists C all Stat , T o o ls Schedule A larm C lock C alculator Settings Sounds D isp lay S ecu rity C all Setup N etw ork Service Phone Info D a ta /F a x M en u Figure 4 Menu Tree 5.2 Contacts (Phonebook) Phonebook can be used to store contact’s name and contact’s Phone numbers, address, email address and internet address. You can store up to 200 Phonebook entries to Phone memory. If your Phone supports R-UIM card, you can also store contacts to R-UIM card. Phonebook menu is depicted in the following diagrams: Figure 5 Phonebook: Menu –1 Figure 6 Phonebook: Menu –2 11 User Manual Figure 7 Phonebook: Menu –3 Figure 8 Phonebook: Menu –4 1) View Contacts: You can use this menu item to browse all Phonebook entries stored. For each selected Phonebook entries, you can edit, erase the contact, send message and make phone calls. 2) New Entry: You can use this menu item to add a new Phonebook entry to the Phonebook: Figure 9 Phonebook: New Entry -1 Figure 10 Phonebook: New Figure 11 Phonebook: New Entry -3 Figure 12 Phonebook: New Entry -2 Entry –4 3) Search Name: Using this menu item, you can search a Phonebook entry by entering the name of the contact you want to find. 4) Groups: You can use this menu item to group Phonebook entries into five different groups: family, friends, colleagues, business and classmates: Figure 13 Phonebook: Group - 1 Figure 14 Phonebook: Group - 2 5) Erase All: Using this menu item, you can delete all Phonebook entries from Phone memory. or R-UIM card memory: 12 User Manual Figure 15 Phonebook: Erase All 6) Speed Dial: This feature is used to setup speed dial. You can add speed dial number, remove or remove all speed dial numbers. 7) Memory State: This menu can display the memory usage of the Phone and R-UIM card. 5.3 Messages The Message menu can be used to create SMS messages, send messages, view received messages, delete stored messages, extract and store Phone numbers from messages, reply and forward messages. You can store up to 200 messages to Phone memory and 40 messages to RUIM card. Messages’ main menu and menu tree Message are shown as below: -1 Figure 16 Message: Menu Menu-1 Figure 17 Message: Menu-2 Figure 18 Message: Menu-3 Figure 19 Message: Menu-4 1) Voice Mail : You can use this menu item to access your voice mail box (Note: please contact your service provider for voice mail services). 2) New Message: You can use this menu item to create new messages and send out messages. The sent message will be stored to message 13 User Manual 3) 4) 5) 6) 7) outbox. You can also send a message to multiple contacts (up to 10 contacts) Inbox: You can use this menu item to view all of the messages you have received. For each message, you can delete, reply and forward the messages. You can also store the sender’s Phone number and make a call to the sender. Outbox: Outbox stores all of the messages you have sent out so far. Each message inside the outbox, you can erase and forward. Erase Messages: You can erase messages from Inbox, Outbox or erase All. Memory State: This menu can display the memory state of Phone for SMS storage. Msg Settings: User can edit the setting of message. Callback: when active the function and set the Callback number, the recipient can view your callback number in the message sent. Deliver Report: After recipient receives the message, then CDMA network will send SMS to inform the sender successful delivery of the message. Preferred Storage (only when R-UIM is used): this menu item is used to select storage device, Phone memory or R-UIM card. 5.4 Recent Calls The “Recent Calls” records information for all calls including incoming calls, outgoing calls, and missed calls. Figure 20 Recent calls: Menu-1 Menu-2 Menu-2 Figure 21 Recent calls: Figure 22 Recent calls: Menu-3 1) Incoming Calls: All received calls information can be viewed through this menu. For each incoming call entry, you can perform the following operations: save phone number, erase the record, and send SMS to the phone number. 14 User Manual Figure 23 Recent calls: Menu-4 Menu-5 Figure 24 Recent calls: 2) Outgoing Calls: The information of the calls you have made can be viewed through this menu. For each outgoing call, you can perform the following operations: store receiver’s phone number, erase the record, and send SMS to the receiver. 3) Missed Calls: This menu records all of the incoming calls you missed. For each missed call, the following information gets saved: the Phone number of the missed call, the time when the call arrived. 4) Erase Lists: You can erase incoming calls, outgoing calls, missed calls and erase all by using this menu: Figure 25 Recent calls: Menu-6 Menu-7 Figure 26 Recent calls: 5) Call Stat. : This menu stores statistic data for all incoming calls and outgoing calls. The statistic data includes the total number of calls and calling time. 5.5 Tools The Phone provides you with the following tools: 15 User Manual 1 Figure 27 Tools Tools:: MenuMenu-1 2 Figure 28 Tools Tools:: MenuMenu-2 1) Schedule: The schedule can be used as an event reminder. Once a schedule has been setup for an event, the Phone will start ring when the date and time is reached to remind you that there is an event coming up . Up to ten schedules can be set at a time. You can view, edit and erase any schedule. Figure 29 Tools: Menu-3 2) Alarm: The function of this tool is the same as that of regular alarm clock. 4 Figure 30 Tools Tools:: MenuMenu-4 5 Figure 31 Tools Tools:: MenuMenu-5 3) Calculator: “*” Key to enter a decimal point and the “#”Key for a negative sign. Then select the operation by pressing UP/DOWN direction keys. Figure 32 Tools: Menu-6 5.6 Settings You can use Setting menu to customize your Phone’s setup. The Setting menu is shown below: 16 User Manual 1 Figure 33 Setting Setting:: MenuMenu-1 Figure 35 Setting: Menu-3 2 Figure 34 Setting Setting:: MenuMenu-2 Figure 36 Setting: Menu-4 1. Sounds: Ringer: You can select your preferred ring tone. Volume: You can change the volume of ring tone, Key press beep tone, handset receiver, hand-free speaker, handset microphone and hand-free microphone. Alert: You can set the alert tones for service changes, call connect, call disconnect and minute reminder (reminding you every minute during a call). 2. Display Banner: editing the banner for display on idle screen. Backlight: setting backlight’s duration and brightness. Contrast: setting LCD’s contrast. Language: setting Phone’s language (English only). Figure 37 Setting: Menu-5 Figure 38 Setting: Menu- 6 3. CM Setting a) Use Password: Password for enter billing mode as Prepaid, Postpaid and Menu mode, Yes is for enable and No is for disable. b) Change CM PIN: Change the password for billing mode as Prepaid and Postpaid. c) Change Master PIN: Change the password for Main menu from OK key. d) Bill Decimal Digit: Set the decimal digit numbers of billing charge showed. e) Postpaid Limit: Set the value limit for service charge in Postpaid mode, which is take the service first and then pay the bill. f) Allow Incoming Calls: To set if calls outside can be available or not. 17 User Manual g) Allow send Message: To set if short message service can be enjoyed or not. h) Network Num: To set the number of network server. i) Emergency1: To set emergency No. j) Emergency2: To set emergency No. k) Emergency3: To set emergency No. 4. Security Before entering security menu, you will be prompted to input a valid password. The default password is set to 0000. You can change this password once you enter the security menu successfully. Please remember your password if you change it. Forgetting the password may require you to contact the service provider. Figure 16 Security-1 Figure 17 Security-2 Figure 18 Security-3 a) Switch Mode: This menu is used to change network setting. Only service provider is authorized to change this setting. b) PIN Management: This menu allows you to enable/disable PIN and change PIN. This is ONLY used when R-UIM is used. Figure 19 Pin Management c) Restrict Incoming Call: You can enter up to 10 phone numbers for restricted incoming calls. d) Restrict Outgoing Call: You can enter up to 10 phone numbers for restricted outgoing calls. e) Change Password: You can change your security password through this menu. Remember the password after changing it. f)Set Keypad Password: You can change your Keypad locking code. The default is 0000. Once this is set and Keypad is locked, each 18 User Manual time before using the phone, the Keypad password must be entered. g) Load Default: This menu lets you reset your Phone with the default setting same as the default manufacture setting. This is very important feature. For the case that when you think that your Phone is not working the way as you expected, you can always use “Load Default” to reset your Phone to its default setting. 5. Call Setup: This menu allows you to set call answer mode, which includes: a) Auto Answer: Allows you to answer incoming calls automatically. b) Voice Privacy: Turning on “Voice Privacy” can enhance the security of the call by voice encryption. c) Dial Delay Time: delay timer for autodialing. When entered a phone number for making call, once the timer is expired the call would be automatically made even without pressing CALL/REDIAL Key. Figure 20 Call setup 6. Network Service : Figure 21 Network Service a) Call Forward: You can forward incoming calls to a designated phone number. You can forward incoming call under the following situations: Busy forwarding No answer forwarding All calls b) Call Waiting: You can enable/disable call waiting function through this menu. 7. Phone Info a) Phone Number: Your phone number can be entered and stored by using this menu. b) SW Version: This menu can display the software version of the Phone. c) Hardware: This menu is used to list hardware version. 19 User Manual Figure 22 Phone Info 8. Management Enter password: 764200 Set the delay time manually when begin to charge the bill. 9. Port Speed To set the port speed to 9600, 19200,57600, 115200 or 230400. 10. Data/Fax: Use to set the default incoming call mode, for fax/Data mode or voice mode. Suggest NOT to change this option without consulting your service provider. Improper setting may fail to receive incoming calls. 6 Keypad Locking For better protection, the Phone provides you with Keypad locking feature. You can lock your Phone’s Keypad if you do not want someone else to access your Phone while you are away from your Phone. Once Phone’s Keypad is locked, Phone will not allow to make outgoing calls or access other features, such as Contact, Recent Calls. But a locked Phone will allow to accept incoming calls and notify you for any incoming short messages. Unlock the Keypad before using the Phone. 6.1 Lock Keypad When the Phone is at idle state (Phone must be at idle state), firmly pressing “CANCEL” Key for over 2 seconds, the Keypad will be locked, and a pop-up window displayed as following: Key Locked. Input Password to unlock Figure 23 Lock Keypad-1 When any Key is pressed while Keypad is locked, Phone will show a password dialog. The default password for unlocking Keypad is: 0000. Note: In the case that you forgot your Keypad locking code, you (Note: will have to ask your service provide to unlock your phone). Figure 24 Lock Keypad-2 20 User Manual Once Keypad is locked, at Idle state, “Key Guard Mode” message will be displayed on LCD to indicate that the Keypad has been locked: Figure 25 Lock Keypad-3 6.2 Modify Keypad Locking Code Go to Settings menu, then choose “Security” sub-menu, from there, you will find “Set Keypad Password” sub-menu, once this menu is selected, LCD will show a password dialog. Just enter a new password for keypad locking: Figure 26 Set Keypad Password-1 After a new password is entered, a password confirmation dialog will be displayed. Re-enter the new password you just entered: Figure 27 Set Keypad Password-2 If the re-entered password is the same as the one you enter for the first time, the new password will be changed successfully. 7 Data Service AWP-S600-N Phone can provide circuit data service (14.4 kbps) and high speed data service (up to 153.6kbps, the actual speed depends on your CDMA service provider and the service you have purchased). You can use your Phone as the modem for your computer. ** Refer user Manual in the CD disk for Data Services 8 Technical Specifications Frequency: Maximum Transmitting Power: Receiving Sensibility: 21 CDMA 450 MHZ > 23 dBm @ 50 ohm < -105dBm/1.23MHz; User Manual External DC Voltage: Operation Temperature: Ambient Humidity: Storage Temperature: Pressure: DC 6.6 V -10 ~ +45 0~95% -30oC~+60oC 86-106Kpa 9 Quick Troubleshooting Guide Unable to send/receive data/fax calls: Check the connections to computer and verify that necessary software has been properly installed and configured. Moisture or ventilation problems: Visually inspect the Phone body, moisture can damage the Phone. Ventilation is also very important. Move the Phone to improve the ventilation as necessary. No power: Verify that AC power source and its corresponding circuit breaker are functioning properly. If Phone can’t make data connection: 1. Make sure to follow Modem installation procedures 2. Make sure that you have purchased CDMA1x service from your CDMA service provider 3. Make sure that both PC’s modem driver and proper software are installed correctly Unable to receive incoming calls: 1. Make sure that the incoming call is not restricted; 2. Make sure the FAX/DATA mode setting is OFF 3. Make sure that your Phone is having good signal reception Unable to make outgoing calls: 1. Make sure that the numbers you dialed are not restricted; 2. Make sure that your Phone is having good signal reception Unable to receive SMS: Make sure that your Phone’s memory is not full for storing SMS. If the memory is full, please empty inbox. REMEMBER: you can always use “Load Default” sub-menu in “Security” menu to reset your Phone to its default setting. While charging the battery, DON’T disconnect the charger before the battery is fully charged. 22 User Manual