1
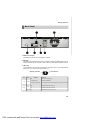
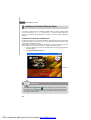
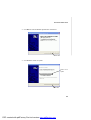
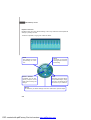
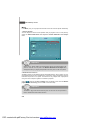
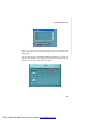
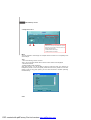
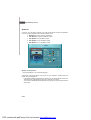
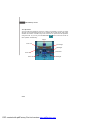
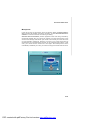
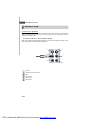
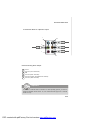
Wind Nettop Series
MS-6496 (V1.X)
G52-64961X4
i
PDF created with pdfFactory Pro trial version www.pdffactory.com
Copyright Notice
T he material in this document is the intellec tual property of M ICRO-STAR
INTERNATIONAL. W e take every care in the preparation of this document, but no
guarantee is given as to the correctness of its contents. Our products are under
continual improvement and we reserve the right to make changes without notice.
Trademarks
All trademarks are the properties of their respective owners.
W indows ® 2000/ XP/ VISTA are registered trademarks of Microsoft Corporation.
U.S. Patent Numbers
4,631,603; 4,819,098; 4,907,093; 5,315,448; and 6,516,132.
This product incorporates copyright protection technology that is protected by U.S.
patents and other intellectual property rights. Use of this copyright protection technology must be authorized by Macrovision, and is intended for home and other limited
viewing uses only unless otherwise authorized by Macrovision. Reverse engineering or disassembly is prohibited.
Revision History
Revision
V1.0
Revision History
First Release
Date
September 2008
Technical Support
If a problem arises with your system and no solution can be obtained from the user’s
manual, please contact your place of purchase or local distributor. Alternatively,
please try the following help resources for further guidance.
Visit the MSI website for FAQ, technical guide, BIOS updates, driver updates and other information: http://global.msi.com.tw/index.php?
func=service
Contact our technical staff at: http://ocss.msi.com.tw
ii
PDF created with pdfFactory Pro trial version www.pdffactory.com
Safety Instructions
1.
2.
3.
4.
5.
Always read the safety instructions carefully.
Keep this user’s manual for future reference.
Keep this equipment away from humidity.
Lay this equipment on a reliable flat surface before setting it up.
The openings on the enclosure are for air convection hence protects the
equipment from overheating. DO NOT COVER THE OPENINGS.
6.
Check power adapter rating: 19V
3.42A, Max 65W .
7.
Make sure the voltage of the power source and adjust properly 110-240V
before connecting the equipment to the power inlet. Rating: 100-240V, 5060Hz, 1.7A.
8.
Place the power cord such a way that people can not step on it. Do not place
anything over the power cord.
9.
Always unplug the power cord before inserting any add-on card or module.
10.
All cautions and warnings on the equipment should be noted.
11.
Never pour any liquid into the opening that could damage or cause electrical
shock.
12.
If any of the following situations arises, get the equipment checked by
service personnel:
The power cord or plug is damaged.
Liquid has penetrated into the equipment.
The equipment has been exposed to moisture.
The equipment does not work well or you can not get it work according to
user’s manual.
The equipment has dropped and damaged.
The equipment has obvious sign of breakage.
13.
DO NOT LEAVE THIS EQUIPMENT IN AN ENVIRONMENT UNCONDITIONED,
STORAGE TEMPERATURE ABOVE 40o C (102oF), IT MAY DAMAGE THE
EQUIPMENT.
WARNING:
1.
For every changes in power cord’s usage, please use an approved power
cord with condition greater or equal to H05VV-F, 3G, 0.75mm2.
2.
Internal part is hazardous moving parts, please keep fingers and other body
parts away.
3.
For pluggable equipment, the socket-outlet shall be installed near the equipment and shall be easily accessible.
4.
Do not disable the protective earth pin from the plug, the equipment must be
connected to an earthed mains socket-outlet.
CAUTION:
Danger of explosion if battery is incorrectly replaced. Replace only with the same or
equivalent type recommended by the manufacturer.
廢電池請回收
For better environmental protection, waste batteries should be
collected separately for recycling or special disposal.
1.
2.
The optical storage devices are classified as a Class 1 Laser products.
Use of controls or adjustments or performance of procedures other
than those specified.
Do not touch the lens inside the drive.
iii
PDF created with pdfFactory Pro trial version www.pdffactory.com
FCC-B Radio Frequency Interference Statement
This equipment has been tested and
found to comply with the limits for a
Class B digital device, pursuant to Part
15 of the FCC Rules. These limits are
designed to provide reasonable protection against harmful interference in a residential installation. This equipment generates, uses and can radiate radio frequency
energy and, if not installed and used in accordance with the instruction manual, may
cause harmful interference to radio communications. However, there is no guarantee that interference will not occur in a particular installation. If this equipment does
cause harmful interference to radio or television reception, which can be determined
by turning the equipment off and on, the user is encouraged to try to correct the
interference by one or more of the measures listed below:
Reorient or relocate the receiving antenna.
Increase the separation between the equipment and receiver.
Connect the equipment into an outlet on a circuit different from that to
which the receiver is connected.
Consult the dealer or an experienced radio/television technician for help.
Notice 1
The changes or modifications not expressly approved by the party responsible for
compliance could void the user’s authority to operate the equipment.
Notice 2
Shielded interface cables and A.C. power cord, if any, must be used in order to
comply with the emission limits.
VOIR LA NOTICE D’INSTALLATION AVANT DE RACCORDER AU RESEAU.
Micro-Star International
Wind Nettop Series
This device complies with Part 15 of the FCC Rules. Operation is subject to the
following two conditions:
(1) this device may not cause harmful interference, and
(2) this device must accept any interference received, including interference that
may cause undesired operation.
iv
PDF created with pdfFactory Pro trial version www.pdffactory.com
WEEE (Waste Electrical and Electronic Equipment) Statement
v
PDF created with pdfFactory Pro trial version www.pdffactory.com
vi
PDF created with pdfFactory Pro trial version www.pdffactory.com
vii
PDF created with pdfFactory Pro trial version www.pdffactory.com
CONTENTS
Copyright Notice.........................................................................ii
Trademarks..................................................................................ii
U.S. Patent Numbers..................................................................ii
Revision History..........................................................................ii
Technical Support.......................................................................ii
Safety Instructions.......................................................................iii
FCC-B Radio Frequency Interference Statement........................iv
WEEE (Waste Electrical and Electronic Equipment) Statement....v
Chapter 1 Getting Started........................................................1-1
Front Panel..........................................................................1-2
Back Panel..........................................................................1-5
Packing Contents..................................................................1-7
Chapter 2 Realtek ALC888 Audio.............................................2-1
Installing the Realtek HD Audio Driver......................................2-2
Software Configuration...........................................................2-4
Hardware Setup....................................................................2-18
viii
PDF created with pdfFactory Pro trial version www.pdffactory.com
Getting Started
Chapter 1
Getting Started
Congratulations for purchasing the Wind Nettop Series
(MS-6496). It is your best slim PC choice. W ith the fantastic appearance and ultra-small form factor, it can
easily be set anywhere. The feature packed platform
also gives you an exciting PC experience.
1-1
PDF created with pdfFactory Pro trial version www.pdffactory.com
Wind Nettop Series
Front Panel
Standard Type
M S-6496A
M S-6496E
1-2
PDF created with pdfFactory Pro trial version www.pdffactory.com
Getting Started
Slim Type
M S-6496B
M S-6496C
1-3
PDF created with pdfFactory Pro trial version www.pdffactory.com
Wind Nettop Series
1. Optical Disk Drive (ODD) (Standard Type and Slim Type)
2. ODD LED
The ODD LED is on when CD/ DVD is read from or written to the optical disk drive.
3. Eject Button
Press the eject button to open and close the optical disk drive.
4. Power Button/ LED
Press the power button to turn the system on and off.
5. HDD LED
The HDD LED is on when data is read from or written to the hard disk drive.
6. Headphone (Green)
This is a connector for headphones or speakers.
7. M icrophone (Pink)
This is a connector for microphones.
8. USB Port
The USB (Universal Serial Bus) port is for attaching USB devices such as mouse,
keyboard, printer, scanner, camera, PDA and other USB-compatible devices.
9. Card Reader Drive (Optional)
This card reader drive supports SD(HC), MMC, MS and XD. You can easily read
photos or other files on the memory card. Your digital cameras, DVs, MP3 players,
PDAs or other digital devices are highly compatible.
1-4
PDF created with pdfFactory Pro trial version www.pdffactory.com
Getting Started
Back Panel
1. VGA Port (Output)
The DB15-pin female port is provided for monitor.
2. USB Port
The USB (Universal Serial Bus) port is provided for attaching USB devices such as
mouse, keyboard, printer, scanner, camera, PDA or other USB-compatible devices.
3. LAN Jack
The standard RJ-45 LAN jack is provided for connection to the Local Area Network
(LAN). You can connect a network cable to it.
Activity Indicator
LED
Left
Color
Yellow
LED State
Link Indicator
Condition
Off
LAN link is not established.
On (steady state)
LAN link is established.
On (brighter & pulsing)
The computer is communicating with another computer on the LAN.
Off
10 Mbit/ sec data rate is selected.
On
100 Mbit/ sec data rate is selected.
On
1000 Mbit/ sec data rate is selected.
Green
Right
Orange
1-5
PDF created with pdfFactory Pro trial version www.pdffactory.com
Wind Nettop Series
4. DC-In Jack
DC-IN, is used for power adapter.
5. Audio Jack
Line-In (Blue) - Line-In, is used for external CD player, tapeplayer or other audio
devices.
Line-Out (Green) - Line-Out, is used for speakers or headphones.
Mic (Pink) - Mic, is used for microphones.
RS-Out (Black) - Rear-Surround Out in 4/ 5.1/ 7.1 channel mode.
CS-Out (Orange) - Center/ Subwoofer Out in 5.1/ 7.1 channel mode.
SS-Out (Gray) - Side-Surround Out in 7.1 channel mode.
6. Ventilation Holes (for system fan)
* We suggest that you should connect the power adapter to the equipment first and
then to the socket-outlet for safety reason.
* It is normal that the spark occurs when you put the power adapter into the socketoutlet.
1-6
PDF created with pdfFactory Pro trial version www.pdffactory.com
Getting Started
Packing Contents
Wind Nettop Series
Stand
MSI Driver/ Utility CD
User’s Guide
Power Adapter
* Please contact us immediately if any of the items is damaged or missing.
* The pictures are for reference only and your packing contents may vary depending
on the model you purchased.
1-7
PDF created with pdfFactory Pro trial version www.pdffactory.com
Realtek ALC888 Audio
Chapter 2
Realtek ALC888 Audio
The Realtek ALC888 provides 10-channel DAC that
simultaneously supports 7.1 sound playback and 2
channels of independent stereo sound output (multiple
streaming) through the Front-Out-Left and Front-OutRight channels.
2-1
PDF created with pdfFactory Pro trial version www.pdffactory.com
Wind Nettop Series
Installing the Realtek HD Audio Driver
You need to install the driver for Realtek ALC888 codec to function properly before
you can get access to 2-, 4-, 6-, 8- channel or 7.1+2 channel audio operations.
Follow the procedures described below to install the drivers for different operating
systems.
Installation for Windows 2000/XP/Vista
For W indows ® 2000, you must install W indows ® 2000 Service Pack4 or later before
installing the driver. For Windows ® XP, you must install W indows ® XP Service Pack1
or later before installing the driver.
The following illustrations are based on W indows ® XP environment and could look
slightly different if you install the drivers in different operating systems.
1. Insert the application CD into the CD-ROM drive. The setup screen will automatically appear.
2. Click Realtek HD Audio Driver.
Click here
Important
The HD Audio Configuration
software utility is under continuous update
to enhance audio applications. Hence, the program screens shown here in
this section may be slightly different from the latest software utility and shall
be held for reference only.
2-2
PDF created with pdfFactory Pro trial version www.pdffactory.com
Realtek ALC888 Audio
3. Click Next to install the Realtek High Definition Audio Driver.
Click here
4. Click Finish to restart the system.
S el ec t t hi s
option
Click here
2-3
PDF created with pdfFactory Pro trial version www.pdffactory.com
Wind Nettop Series
Software Configuration
After installing the audio driver, you are able to use the 2-, 4-, 6- or 8- channel audio
feature now. Click the audio icon
from the system tray at the lower-right corner of
the screen to activate the HD Audio Configuration. It is also available to enable the
audio driver by clicking the Realtek HD Audio M anager from the Control Panel.
Double click
2-4
PDF created with pdfFactory Pro trial version www.pdffactory.com
Realtek ALC888 Audio
Sound Effect
Here you can select a sound effect you like from the Environment list.
Environment Simulation
You will be able to enjoy different sound experience by pulling down the arrow,
totally 23 kinds of sound effect will be shown for selection. Realtek HD Audio Sound
Manager also provides five popular settings “Stone Corridor”, “Bathroom”, “Sewer
pipe”, “Arena” and “Audio Corridor” for quick enjoyment.
You may choose the provided sound effects, and the equalizer will adjust automatically.
If you like, you may also load an equalizer setting or make an new equalizer setting to
save as an new one by using the “Load EQ Setting” and “Save Preset” button,
click “Reset EQ Setting” button to use the default value, or click “Delete EQ Setting” button to remove a preset EQ setting.
There are also other pre-set equalizer models for you to choose by clicking “Others”
under the Equalizer part.
2-5
PDF created with pdfFactory Pro trial version www.pdffactory.com
Wind Nettop Series
Equalizer Selection
Equalizer frees users from default settings; users may create their owned preferred
settings by utilizing this tool.
10 bands of equalizer, ranging from 100Hz to 16KHz.
Save
The settings are saved
permanently for future
use
Reset
10 bands of equalizer
would go back to the default setting
Enable / Disable
To disable, you can temporarily s top the sound
effect without losing the
settings
Lo ad
W henever you would like to
use preload settings, simply
click this, the whole list will
be shown for your selection.
Delete
To delete the pre-saved settings which are created from previous steps.
2-6
PDF created with pdfFactory Pro trial version www.pdffactory.com
Realtek ALC888 Audio
Frequently Used Equalizer Setting
Realtek recognizes the needs that you might have. By leveraging our long experience
at audio field, Realtek HD Audio Sound Manager provides you certain optimized equalizer settings that are frequently used for your quick enjoyment.
[How to Use It]
Other than the buttons “Pop” “Live” “Club” & “Rock” shown on the page, to pull down
the arrow in “Others”, you will find more optimized settings available to you.
Karaoke M ode
Karaoke mode brings Karaoke fun back home. Simply using the music you usually
play, Karaoke mode can help you eliminate the vocal of the song or adjust the key to
accommodate your range.
1.Vocal Cancellation: Single click on “Voice Cancellation”, the vocal of the song would
be eliminated, while the background music is still in place, and you can be that
singer!
2.Key Adjustment: Using “Up / Down Arrow” to find a key which better fits your vocal
range.
Raise the key
Remov e the
human voice
Lower the key
2-7
PDF created with pdfFactory Pro trial version www.pdffactory.com
Wind Nettop Series
Mixer
In the Mixer part, you may adjust the volumes of the rear and front panels individually.
1. Adjust Volume
You can adjust the volume of the speakers that you pluged in front or rear panel by
select the Realtek HD Audio rear output or Realtek HD Audio front output
items.
Important
Before set up, please make sure the playback devices are well plugged in the
jacks on the rear or front panel. The Realtek HD Audio front output item
will appear after you pluging the speakers into the jacks on the front panel.
2. Multi-Stream Function
ALC888 supports an outstanding feature called Multi-Stream, which means you may
play different audio sources simultaneously and let them output respectively from the
indicated real panel or front panel. This feature is very helpful when 2 people are
using the same computer together for different purposes.
button and the Mixer ToolBox menu will appear. Then check the Enable
Click the
playback multi-streaming and click OK to save the setup.
Important
You have to plug audio device into the jacks on the rear and front panel first
before enable the multi-stream function.
2-8
PDF created with pdfFactory Pro trial version www.pdffactory.com
Realtek ALC888 Audio
W hen you are playing the first audio source (for example: use W indows Media
Player to play DVD/VCD), the output will be played from the rear panel, which is the
default setting.
Then you must to select the Realtek HD Audio front output from the scroll list
first, and use a different program to play the second audio source (for example: use
Winamp to play MP3 files). You will find that the second audio source (MP3 music) will
come out from the Line-Out audio jack of Front Panel.
2-9
PDF created with pdfFactory Pro trial version www.pdffactory.com
Wind Nettop Series
3. Playback control
Tool
Mute
Playback device
This function is to let you freely decide which ports to
output the sound. And this is essential when multistreaming playback enabled.
- Realtek HD Audio Rear Output
- Realtek HD Audio Front Output
M u te
You may choose to mute single or multiple volume controls or to completely mute
sound output.
Tool
- Show the following volume controls
This is to let you freely decide which volume control items to be displayed.
- Advanced controls
- Enable playback multi-streaming
W ith this function, you will be able to have an audio chat with your friends via
headphone (stream 1 from front panel) while still have music (stream 2 from back
panel) in play. At any given period, you can have maximum 2 streams operating
simultaneously.
2-10
PDF created with pdfFactory Pro trial version www.pdffactory.com
Realtek ALC888 Audio
4. Recording control
Tool
Mute
Recording device
-Back Line in/Mic, Front Lin in
-Realtek HD Audio Input
M u te
You may choose to mute single or multiple volume controls or to completely mute
sound input.
Tool
- Show the following volume controls
This is to let you freely decide which volume control items to be displayed.
- Enable recording multi-streaming
Important
ALC888 allows you to record the CD, Line, Mic and Stereo Mix channels
simultaneously, frees you from mixing efforts. At any given period, you may
choose 1 of the following 4 channels to record.
2-11
PDF created with pdfFactory Pro trial version www.pdffactory.com
Wind Nettop Series
Audio I/O
In this tab, you can easily configure your multi-channel audio function and speakers.
You can choose a desired multi-channel operation here.
a. Headphone for the common headphone
b. 2CH Speaker for Stereo-Speaker Output
c. 4CH Speaker for 4-Speaker Output
d. 6CH Speaker for 5.1-Speaker Output
e. 8CH Speaker for 7.1-Speaker Output
Speaker Configuration:
1. Plug the speakers in the corresponding jack.
2. Dialogue “connected device” will pop up for your selection. Please select the
device you have plugged in.
- If the device is being plugged into the correct jack, you will be able to find the icon
beside the jack changed to the one that is same as your device.
- If not correct, Realtek HD Audio Manager will guide you to plug the device into the
correct jack.
2-12
PDF created with pdfFactory Pro trial version www.pdffactory.com
Realtek ALC888 Audio
Connector Settings
Click
to access connector settings.
Disable front panel jack detection (option)
Find no function on front panel jacks? Please check if front jacks on your system are
so-called AC’97 jacks. If so, please check this item to disable front panel jack detection.
M ute rear panel output when front headphone plugged in.
Enable auto popup dialogue, when device has been plugged in
Once this item checked, the dialog “Connected device” would automatically pop up
when device plugged in.
2-13
PDF created with pdfFactory Pro trial version www.pdffactory.com
Wind Nettop Series
Test Speakers
You can select the speaker by clicking it to test its functionality. The one you select
will light up and make testing sound. If any speaker fails to make sound, then check
whether the cable is inserted firmly to the connector or replace the bad speakers
with good ones. Or you may click the auto test
button to test the sounds of
each speaker automatically.
Center
Front Left
Front Right
Side Right
Side Left
Rear Left
Subwoof er
Rear Right
2-14
PDF created with pdfFactory Pro trial version www.pdffactory.com
Realtek ALC888 Audio
Microphone
In this tab you may set the function of the microphone. Select the Noise Suppression to remove the possible noise during recording, or select Acoustic Echo Cancellation to cancel the acoustic echo druing recording.
Acoustic Echo Cancellation prevents playback sound from being recorded by
microphone together with your sound. For example, you might have chance to use
VOIP function through Internet with your friends. The voice of your friend will come
out from speakers (playback). However, the voice of your friend might also be
recorded into your microphone then go back to your friend through Internet. In that
case, your friend will hear his /her own voic e again. W ith AEC(Ac oustic Echo
Cancellation) enabled at your side, your friend can enjoy the benefit with less echo.
2-15
PDF created with pdfFactory Pro trial version www.pdffactory.com
Wind Nettop Series
3D Audio Demo
In this tab you may adjust your 3D positional audio before playing 3D audio applications like gaming. You may also select different environment to choose the most
suitable environment you like.
2-16
PDF created with pdfFactory Pro trial version www.pdffactory.com
Realtek ALC888 Audio
Information
In this tab it provides some information about this HD Audio Configuration utility,
including Audio Driver Version, DirectX Version, Audio Controller & Audio Codec. You
may also select the language of this utility by choosing from the Language list.
Also there is a selection Show icon in system tray. Switch it on and an icon
will show in the system tray. Right-click on the icon and the Audio Accessories
dialogue box will appear which provides several multimedia features for you to take
advantage of.
2-17
PDF created with pdfFactory Pro trial version www.pdffactory.com
Wind Nettop Series
Hardware Setup
Connecting the Speakers
W hen you have set the Multi-Channel Audio Function mode properly in the software
utility, connect your speakers to the correct phone jacks in accordance with the
setting in software utility.
n 2-Channel M ode for Stereo-Speaker Output
Refer to the following diagram and caption for the function of each phone jack on the
back panel when 2-Channel Mode is selected.
1
4
2
5
3
6
1
Line In
2
Line Out (Front channels)
3
MIC
4
No function
5
No function
6
No function
2-18
PDF created with pdfFactory Pro trial version www.pdffactory.com
Realtek ALC888 Audio
n 4-Channel M ode for 4-Speaker Output
1
4
2
5
3
6
4-Channel Analog Audio Output
1
Line In
2
Line Out (Front channels)
3
MIC
4
Line Out (Rear channels)
5
No function
6
No function
2-19
PDF created with pdfFactory Pro trial version www.pdffactory.com
Wind Nettop Series
n 6-Channel M ode for 6-Speaker Output
1
2
4
5
3
6
6-Channel Analog Audio Output
1
Line In
2
Line Out (Front channels)
3
MIC
4
Line Out (Rear channels)
5
Line Out (Center and Subwoofer channel)
6
No function
2-20
PDF created with pdfFactory Pro trial version www.pdffactory.com
Realtek ALC888 Audio
n 8-Channel M ode for 8-Speaker Output
1
4
2
5
3
6
8-Channel Analog Audio Output
1
Line In
2
Line Out (Front channels)
3
MIC
4
Line Out (Rear channels)
5
Line Out (Center and Subwoofer channel)
6
Line Out (Side channels)
Important
To enable 7.1 channel audio-out function on Vista operating system, you have to
install the Realtek Audio Driver. Or, the mainboard will support 5.1 channel
audio-out only.
2-21
PDF created with pdfFactory Pro trial version www.pdffactory.com