1
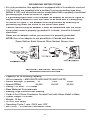
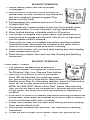
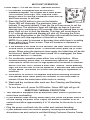
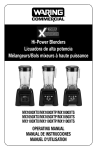
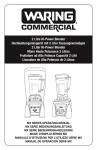
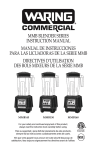
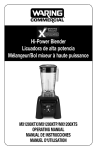
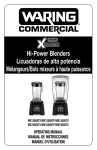
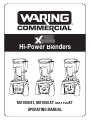
Hi-Power Blenders
MX1000XT, MX1050XT,
XT, MX1100XT
XT
OPERATING MANUAL
IMPORTANT SAFEGUARDS
When using electrical appliances, basic safety precautions should always be
followed including the following:
1. READ ALL INSTRUCTIONS.
2. To protect against electrical hazards, do not immerse the blender base
in water or other liquid.
3. Close supervision is necessary when any appliance is used by or
near children or individuals with certain disabilities.
4. Unplug from outlet when not in use, before putting on or taking off parts,
and before cleaning.
5. Avoid contact with moving parts.
6. Do not operate any appliance with a damaged cord or plug or after the
appliance malfunctions or is dropped or damaged in any manner.
Return appliance to the nearest authorized service facility for examination, repair, or electrical or mechanical adjustment.
7. The use of attachments including canning jars not recommended by the
appliance manufacturer may cause hazards.
8. Do not use outdoors.
9. Do not let cord hang over edge of table or counter, or touch hot surfaces.
10. Keep hands and utensils out of container while blending, to prevent the
possibility of severe personal injury and/or damage to the blender.
A rubber scraper may be used, but must be used only when the blender
is not running.
11. CAUTION: Blades are sharp. Handle carefully.
12. Always operate blender with lid in place.
13. When blending hot liquids, remove center piece of two-piece cover.
See Hot Blending Instructions.
14. The use of ear protection is recommended during extended
operating periods.
15. Do not leave blender unattended while it is running.
16. See Cleaning and Sanitizing Instructions for all Waring® Blenders.
NOT FOR WATERJET CLEANING.
SAVE THESE INSTRUCTIONS
2
GROUNDING INSTRUCTIONS
• For your protection, this appliance is equipped with a 3-conductor cord set.
• 120 Volt units are supplied with a molded 3-prong grounding-type plug
(NEMA 5-15P) and should be used in combination with a properly connected
grounding-type outlet as shown in Figure A.
If a grounding-type outlet is not available, an adapter, as shown in Figure B,
may be used to enable a 2-slot wall outlet to be used with a 3-prong plug.*
As shown in Figure C, the adapter must be grounded by attaching its
grounding lug under the screw of the outlet cover plate.
Caution: Before using an adapter, it must be determined that the outlet
cover plate screw is properly grounded. If in doubt, consult a licensed
electrician.
Never use an adapter unless you are sure it is properly grounded.
NOTE: Use of an adapter is not permitted in Canada and Europe.
Green/Yellow: Earth Ground. Blue: Neutral. Brown: Live.
MX1000XT, MX1050XT, MX1100XT
BLENDER SPECIFICATIONS
• Capacity: 64 oz Working Capacity
(48 oz capacity – MX1000XTP, MX1050XTP, MX1100XTP)
• Switch Settings: (2 speeds) Hi
Low
Pulse
• Speed (RPMs)
30,000
26,000
30,000
• Rating: 120 Volts - 13.0 Amps
• Base Material: Polycarbonate
• Bearing: High Precision Ball Bearing
• Cord: 6-Foot Three-Conductor Ground Cord with Strain Relief in Base
• Overall Height: 19 Inches
• Weight: 15 lbs
• CETLUS, NSF listed
• Operating Cycle: 1 min. ON/3 min. OFF
• MX1100XT – 30-Second Countdown Timer
3
MX1000XT OPERATION
1. Before starting, make sure that the blender
is unplugged.
2. With the unit in Off position, place container on
blender base. Be sure container is fully seated and
that drive coupling is properly engaged. Plug
blender cord into outlet.
3. Put ingredients into container and cover it. Do not
fill above MAX line.
4. This blender has 2 speed settings: Hi and Low. Press paddle switch
to desired position. To crush ice quickly, use high speed setting.
5. When finished blending, set paddle switch to Off position.
6. This blender is equipped with a pulse option. Hold paddle switch in
down position to engage pulse function. Unit will run on high speed
until the paddle switch is released.
7. Allow motor to come to a complete stop before removing container
from blender base. Never place the container on the motor base or
remove it from the motor base while motor is running.
8. Always hold container with one hand when starting and while blending.
Never operate without jar lid.
9. Wash and dry container after each use. See Cleaning and Sanitizing
Instructions.
MX1050XT OPERATION
Follow steps 1-3 above.
1. This blender is equipped with an electronic
membrane keypad. The keypad has a main power
On/Off button, High, Low, Stop and Pulse buttons.
2. Press the On/Off button to turn on the blender.
Green LED will illuminate. For continuous operation, press either Low or High button. When finished
blending, press Stop. For momentary operation, press the Pulse button;
motor will run on High speed until the button is released.
NOTE: Your MX1050XT utilizes a Slow Start™ feature. When pressing
High, the unit will start in the low speed for 2 seconds and then switch
to high speed. This allows for a more even blending of ingredients in
container.
3. Allow motor to come to a complete stop before removing container from
blender base. Never place the container on the motor base or remove it
from the motor base while motor is running.
4. Always hold container with one hand when starting and while blending.
Never operate without jar lid.
5. Wash and dry container after each use. See Cleaning and Sanitizing
Instructions.
6. To turn the unit off, press On/Off button. Green LED light will go off.
4
MX1100XT OPERATION
Follow steps 1-3 in the MX1000XT Operation section.
1. This blender is equipped with an electronic
membrane keypad. The keypad has a main power
On/Off button, plus High, Low, Stop and Pulse
buttons and a 30-second countdown timer with Up
and Down arrows to set time.
2. Press the On/Off button to turn on the blender.
Green LED will illuminate. The electronic timer will
indicate 10 seconds (default). Press the Up or Down arrow to set the
desired time. The electronic timer will indicate run time in 5-second
intervals up to a maximum of 30 seconds. After the desired time is set,
press High or Low to start the blender. The timer will count down to
0 in 1-second intervals and blender will shut off. Pressing the Pulse
button, the Stop button or the On/Off button will override the timer and
the blender will stop regardless of time left on timer.
NOTE: If you want to increase or decrease time while timer is counting
down, press Up or Down arrows. Time will increase or decrease in
5-second intervals.
3. If the blender is not used for five seconds, the timer function will turn
off and return to manual mode. To reactivate timer, press Up or Down
arrows. When using the electronic timer again, the initial time will be the
last time set. Note: If unit has been turned off or unplugged, the timer
will default back to 10 seconds.
4. For continuous operation, press either Low or High button. When
finished blending, press Stop. For momentary operation, press the
Pulse button. Motor will run on high speed until the button is released.
NOTE: Your MX1100XT utilizes a Slow Start™ feature. When pressing
High, the unit will start in the low speed for 2 seconds and then switch
to high speed. This allows for a more even blending of ingredients in
container.
5. Allow motor to come to a complete stop before removing container
from blender base. Never place the container on the motor base or
remove it from the motor base while motor is running.
6. Wash and dry container after each use. See Cleaning and Sanitizing
Instructions.
7. To turn the unit off, press On/Off button. Green LED light will go off.
RESETTING THERMAL PROTECTION
• Your blender is equipped with an automatic reset switch to protect the
motor from overheating.
• If your blender stops running under heavy use, press the power switch to
Off and unplug the power cord. Empty the blender container of all its
contents and allow approximately 5 to 10 minutes for the motor to cool
down.
• Plug the power cord back into the outlet and continue blending.
• If your blender does not function properly following this procedure,
discontinue use and contact a certified Waring Customer Service Center.
5
IMPORTANT – HOT BLENDING INSTRUCTIONS
To minimize the possibility of being scalded when blending hot materials,
the following precautions and procedure must be observed.
• Hot materials are those which are 100°F (38°C) or hotter.
• Limit the amount of materials processed to 1 pint.
• Completely remove the center portion of the two-piece container lid
before starting motor (this will allow venting of the rapidly heated and
expanding air inside the container when blender is running).
• Always start blending on lowest speed setting, and then progress to
desired speed.
• Never stand directly over blender when it is being started or while it
is running.
CLEANING AND SANITIZING INSTRUCTIONS
THE CONTAINER MUST BE CLEANED AND DRIED AFTER EACH USE
OF THE BLENDER ACCORDING TO THE FOLLOWING INSTRUCTIONS.
FAILURE TO DO SO MAY ALLOW RESIDUES OF PROCESSED MATERIAL
TO COLLECT ON THE INTERNAL SEALS OF THE BLADE ASSEMBLY,
RENDERING THEM INEFFECTIVE.
• Wash, rinse, sanitize and dry container prior to initial use and whenever it
will not be used again within a period of 1 hour.
Wash
and rinse container after each use.
•
• Clean and sanitize motor base prior to initial use and after each use.
solutions based on non-sudsing detergents and chlorine-based
• Washing
sanitizing solutions having a minimum chlorine concentration of 100 PPM
are recommended.
The following washing, rinsing, and sanitizing solutions, or their equivalents,
may be used.
SOLUTION
PRODUCT
DILUTION IN WATER TEMPERATURE
Washing
Diversy Wyandotte
4 Tablespoons
Hot 115˚F ( 46˚C )
Diversol BX/a or CX/A
/Gallon
Rinsing
Plain Water
Warm 95˚F (35˚C)
Sanitizing
Clorox®
1 Tablespoon/Gallon
Cold 50-70˚F
Institutional Bleach
( 10-21˚C)
• In repetitive batch-processing applications, frequent cleaning of the
container will prolong the life of the blade assembly. In no case should
actual running time between cleanings exceed one-half hour.
• Do not use container to store processed foods or beverages.
TO WASH AND RINSE CONTAINER
1. REMOVE CONTAINER FROM MOTOR BASE. Remove lid. Rinse
container interior and lid under running water. Add washing solution to
container. Scrub and flush out the container interior and lid to dislodg
and remove as much food residue as possible. Empty container.
2. Wipe down exterior of container with a soft cloth or sponge dampene
with washing solution. Wash lid and lid insert in fresh washing solution.
Fill container one-quarter full with fresh washing solution, cover (with lid
only), place on motor base and run on high speed for one (1) minute.
Empty container.
3. Repeat step (2) using clean rinse water in place of washing solution.
6
IMPORTANT
NOTE: IN ORDER TO MINIMIZE POSSIBILITY OF SCALDING,
TEMPERATURE OF WASHING SOLUTION AND RINSE WATER MUST
NOT EXCEED 115˚F (46˚C), AND QUANTITY USED MUST NOT EXCEED
ONE-QUARTER CONTAINER FULL.
IF HIGHER TEMPERATURES OR LARGER QUANTITIES ARE USED,
OBSERVE ALL PRECAUTIONS GIVEN IN THE OPERATING MANUAL UNDER
“HOT BLENDING INSTRUCTIONS”, page 6.
1.
2.
3.
4.
TO SANITIZE AND DRY CONTAINER
Wipe down exterior of container with a soft cloth or sponge dampened
with sanitizing solution.
Fill container with sanitizing solution, cover, place on motor base, and
run on high speed for two (2) minutes. Empty container. Dislodge any
residual moisture from blade assembly by placing empty container on
motor base and running on high speed for two (2) seconds.
Sanitize lid and lid insert by immersing in sanitizing solution for two
(2) minutes.
Do not rinse container, lid, or lid insert after sanitizing is completed.
Allow parts to air-dry.
TO CLEAN AND SANITIZE MOTOR BASE
UNPLUG POWER CORD. Wipe down exterior surfaces of motor base
with soft cloths or sponges dampened with washing solution, rinse
water, and sanitizing solution. Prevent liquid from running into motor
base by wringing all excess moisture from cloths or sponges before
using them.
DO NOT IMMERSE MOTOR BASE IN WASHING SOLUTION, RINSE WATER
OR SANITIZING SOLUTION.
2. Allow motor base to air-dry before using.
1.
SERVICE
Refer to the list of Authorized Service Centers enclosed with your Waring®
Commercial Blender for the name of the nearest Service Center, or
write to:
Waring Factory Service Center
P.O Box 3201
314 Ella T. Grasso Avenue
Torrington, CT 06790
(800) 492-7464
Ship blenders for repair to the above address or to an Authorized Service
Center. Do not ship to a Waring Sales Office.
Note: If your application involves the processing of biologically active
material, we request that any items returned for service be sterilized
before being shipped. Such items must be clearly identified as having
7
been sterilized, both by a tag on the item itself and by a statement in
the accompanying correspondence. Waring will not accept delivery of
any return unless it is so identified.
Replacement parts for your out of warranty repairs are obtainable at the
below address.
LIMITED THREE YEAR MOTOR WARRANTY
LIMITED TWO YEAR WARRANTY
Waring warrants every new Waring Commercial Blender to be free from defects
in material and workmanship for a period of two years from the date of purchase
when used with foodstuffs, nonabrasive liquids (other than detergents) and
nonabrasive semi-liquids, providing it has not been subject to loads in excess of
the indicated rating. In addition, the motor in this appliance has a full three year
warranty.
®
Under this warranty, Waring will repair or replace any part which, upon our
examination, is defective in materials or workmanship, provided the product
is delivered prepaid to the Waring Service Center at: 314 Ella T. Grasso Ave.
Torrington, CT 06790, or any Factory Approved Service Center.
This warranty does not: a) apply to any product which has become worn, defective,
damaged or broken due to use or due to repairs or servicing by other than the
Waring Service Center or a Factory Approved Service Center, or due to abuse,
misuse, overloading or tampering; or b) cover incidental or consequential
damages of any kind.
The two year warranty is applicable only to appliances used in the United States
or Canada; this supersedes all other express product warranty or warranty
statements. For Waring products sold outside of the U.S. and Canada, the
warranty is the responsibility of the local importer or distributor. This warranty
may vary according to local regulations.
Warning: This warranty is void if appliance is used on Direct Current (D.C.)
WARING COMMERCIAL
314 Ella T. Grasso Ave.
Torrington, CT 06790
Waring Commercial
314 Ella T. Grasso Avenue
Torrington, CT 06790
1-800-4-WARING
www.waringproducts.com
Part# 113-028489
REV 00 0610
Any trademarks or service marks of third parties used herein are the
trademarks or service marks of their respective owners.
06WC30142
IB-7157