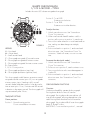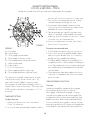
1
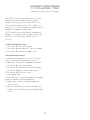
OPERATING INSTRUCTIONS
WARRANTY & SERVICE GUIDE
37
TABLE OF CONTENTS
ABOUT MOVADO
Page 2
CARE & MAINTENANCE Page 3
OPERATING INSTRUCTIONS
Page 6
Standard 2-Hand Models
Quartz and Automatic (Includes most Movado Museum Dial watches)
Page 6
Standard 3-Hand Day/Date Models
Quartz and Automatic (Includes Datron, SE, and Series 800 Sub-Sea quartz watches,
and Red Label and Series 800 Sub-Sea automatics)
Page 7
Quartz Chronographs
1/1 Second (Includes Series 800 Sub-Sea and Movado BOLD large
43.5MM quartz chronographs)
1/1 Retrograde (Includes the Series 800 Sub-Sea retrograde chronograph)
1/10 Second – Type A (Includes the Movado Junior Sport quartz chronograph)
Page 9
Page 12
Page 14
1/10 Second – Type B (Includes the original Series 800 sport and sport elegant
quartz chronographs)
1/10 Second – Type C (Includes Datron and Sapphire Synergy quartz chronographs)
1/10 Second – Type D (Includes the Movado BOLD mid-size 38mm chronograph)
1/100 Ana-Digi (Includes the Movado Dura ana-digi quartz chronograph)
Page
Page
Page
Page
16
18
21
23
Automatic Chronographs
1/1 Second – Type A (Includes Circa, Movado Master and Vizio automatic chronographs)
1/1 Second – Type B (Includes new SE automatic chronographs)
Page 27
Page 30
Rotating Bezel
Page 32
Screw-down Crown
Page 33
OBTAINING SERVICE
Page 34
WARRANTY
Page 35
AUTHORIZED SERVICE CENTERS
Page 36
A premier Swiss watch company renowned for its modern design aesthetic, Movado has earned more
than 100 patents and 200 international awards for artistry and innovation since 1881. It is the
hallmark of some of the most famous timepieces ever created, notably the Movado Museum® Watch.
Designed in 1947 by artist Nathan George Horwitt and regarded today as an icon of Modernism,
the watch dial defined by a single dot at 12 o’clock, symbolizing the sun at high noon, has been
acclaimed for purity of design unrivaled in the history of time-keeping.
The Movado collection features precise Swiss-engineered quartz and automatic movements, solid
stainless steel craftsmanship, sapphire crystals, genuine diamonds and fine leather straps. Select styles
are fashioned of solid 18K gold, while others incorporate exciting materials like carbon fiber, rubber,
ceramic and titanium.
Movado Series 800 sport models are crafted of high grade Performance Steel™, some equipped with
XTremeResin™ straps reinforced by KEVLAR®. Movado BOLD timepieces have scratch-resistant K1 crystals;
most feature new TR90 high-tech composite material/stainless steel or aluminum cases.
Swiss made and water resistant, every Movado watch is distinguished by a legacy of design
innovation and a dedication to the future of time. Congratulations on your purchase.
2
CARE AND MAINTENANCE
Like any finely crafted mechanism, your Movado watch requires periodic maintenance to ensure optimal
performance. Maintenance includes complete disassembly, cleaning, replacement of parts as needed, reassembly
and lubrication of the movement. A maintenance interval of 3 to 5 years is recommended, in addition to any
required battery replacement.
Never open the watch yourself. If your watch needs repair or adjustment, take or mail it directly to a Movado
Authorized Service Center. For a complete worldwide listing, visit us online at www.movado.com.
NOTE: The Movado Watch Company assumes responsibility only for service performed at its Authorized Service
Centers.
SHOCK
All Movado watches have shock-resistant movements, individually tested to meet international standards.
DUST
Dust can enter a watch if the case, crystal or crown is not intact. A small particle is enough to stop the movement.
Have your watch repaired promptly if the crystal becomes loose, chipped or cracked, or if there is damage to the
case or crown.
MAGNETISM
The exposure of a timepiece to strong magnetic fields will affect its time-keeping, and may cause it to stop.
A quartz watch should resume working with its original accuracy when removed from the magnetic field; a
mechanical timepiece may require demagnetization before it will operate again.
WATER RESISTANCE
All Movado watches are tested to meet international standards for water resistance.
Most styles are water resistant to 3 bar (3 ATM/30 meters/99 feet); certain models are water resistant to even
greater pressures/depths, as marked on the dial or case back.
CAUTION: If the water resistance limit is not marked on your watch, do not subject it to a pressure/depth greater
than 3 bar (3 ATM/30 meters/99 feet), or your watch could be damaged and your warranty will be voided.
IMPORTANT: Do not operate the watch crown, push-buttons on a chronograph model, or any other pushers/
buttons when the timepiece is wet or under water.
NOTE: The Movado Watch Company will not be responsible for any damage caused by or related to leakage
originating from improper handling or damage to the case, crown, gaskets or crystal.
To maintain water resistance, yearly maintenance is required. The gaskets and crown which seal the case are
subject to wear and deterioration under normal use. These parts should be inspected and replaced as needed
each time the watch is opened for service, including battery changes.
3
CARE AND MAINTENANCE
Your Authorized Movado Service Center will automatically retest your watch for water resistance as a routine step
in all service orders.
OTHER PRECAUTIONS:
If your watch is equipped with a screw-down crown or pushers, be sure to screw it/them back down into the case
after every operation.
Water resistance applies only to the watch case; some watch straps should not be worn under water or subjected
to wet conditions. Please see STRAP CARE.
Avoid exposing your watch to sudden and excessive temperature variations.
Do not drop your watch or bang it against a hard surface. Water resistance must be rechecked after every
violent shock.
Clean your watch regularly by wiping it with a soft cloth dampened with fresh water, especially after exposure
to seawater.
STRAP CARE
While the life span of a watch strap depends on your care and wearing habits, as well as the climate in which
you live, proper care will extend its life.
Leather straps should be kept dry. Exposure to water may cause a leather watch strap to become brittle and
eventually break. To preserve the finish of the leather, contact with perfumes should be avoided. Following
exposure to chlorinated or salt water, gently damp wipe your leather strap with fresh water, and air dry.
To help preserve the natural elasticity and quality of a Series 800 ThermoResin™ or XTremeResin™ strap, rinse it
using a soft cloth soaked in fresh water following exposure to salt water, chemicals or abrasive substances.
Use warm water and a neutral pH soap applied to a soft cloth to gently clean a white Series 800
ThermoResilient™ strap or a Movado Master white rubber strap; then wipe with a second clean cloth dipped
in warm water, or rinse carefully under warm running water. Contact with acetone and ethyl alcohol should be
avoided.
A natural gum rubber or “rubber cement pick-up” (found in art supply stores) may be used to remove most surface
stains from a Movado BOLD coated white leather strap or white TR90/silicone bracelet. Simply rub the natural
gum gently across the soiled area until the strap/bracelet is clean.
For stains that have penetrated the surface of a white Movado BOLD strap or bracelet, organic solvents like Zymol
liquid leather cleaner or Columbus gel super cleaner, a de-inking roller (ethyl alcohol and propylene ink remover)
or an ethyl alcohol-based solution such as Purell hand sanitizer (62% ethyl alcohol) may be used. Wipe soiled
area with a soft wet cloth. Then dampen a cotton ball or soft clean white cloth with the cleansing solution, and rub
soiled area gently. Repeat 2 to 3 times until stain disappears. Please test for color fastness on inside surface before
applying any solution. For best results, treat all stains/soil promptly.
4
CARE AND MAINTENANCE
NOTE: Movado watch straps are not covered by the Movado watch warranty.
BATTERY INFORMATION
A Movado quartz timepiece has a 1.55 Volt silver-oxide battery that is specially designed for watches. It will last
approximately 18 – 36 months under normal use.
NOTE: Frequent use of special functions, like the stopwatch timer on chronograph models, may shorten
battery life.
End-of-life feature: The seconds hand on many models will start to move haltingly in 4-second increments when the
battery is almost exhausted, signaling the need to have it replaced.
Battery replacement: It is important to use only the replacement battery recommended by Movado. Take or send
your watch to an Authorized Service Center to have battery changed – your old battery will be disposed of/
recycled properly. Do not attempt to change the battery yourself.
5
STANDARD 2-HAND MODELS
QUARTZ AND AUTOMATIC
Includes most Movado Museum Dial watches
FIGURE 1
Crown positions:
Position 1 – Normal running position.
Crown pushed into case.
Position 2 – T o set TIME:
Rotate crown in either direction.
To manually wind an automatic movement:
The motion of your arm during normal daily activities
should be sufficient to keep the movement of your
Movado automatic timepiece wound. However, if you
have not worn your watch for 38 hours or more, and
the watch has stopped, you will need to wind it by
hand before setting the time:
1. With the crown in position 1, turn the crown
clockwise approximately 20 revolutions.
2. Reset time following instructions above.
6
STANDARD 3-HAND/DATE AND 3-HAND/DAY/DATE MODELS
QUARTZ AND AUTOMATIC
Includes Datron, SE, and Series 800 Sub-Sea quartz watches, and Red Label and Series 800 Sub-Sea automatics
Crown positions:
Position 1 – Normal running position.
Crown pushed into case.
Position 2 – To set DATE*:
Rotate crown clockwise.
To set DAY*:
Rotate crown counterclockwise.
Position 3 – To set TIME*:
Rotate crown in either direction.
FIGURE 2
*NOTE: If your watch has a screw-down crown, before
you can set the Date (Day/Date) or Time, you must
first unlock the crown by turning it counterclockwise
approximately six rotations. After Time/Date (Day/
Date) setting, the crown must be screwed back down
into the case to ensure water resistance
To manually wind an automatic movement:
The motion of your arm during normal daily activities
should be sufficient to keep the movement of your
Movado automatic timepiece wound. However, if you
have not worn your watch for 38 hours or more, and
the watch has stopped, you will need to wind it by
hand before setting the time:
1. W
ith the crown in position 1, turn the crown
clockwise approximately 20 revolutions.
2. Reset time following instructions above.
FIGURE 3
7
CHRONOGRAPH MODELS
A chronograph combines two time-keeping functions. It incorporates a “stopwatch” device to measure intervals of
time, independent of the time of day.
All Movado Swiss chronographs are water resistant to a minimum depth of 3 bar (3 ATM/30 meters/99 feet).
8
QUARTZ CHRONOGRAPH
1/1 OF A SECOND – TYPE A
Includes Series 800 Sub-Sea and Movado BOLD large 43.5MM quartz chronographs
These chronograph models feature a minute
counter (up to 30), hour counter, and small
seconds
subdial; center-mounted chronograph seconds
hand; and date or big date window. They can be
used to time an event up to 12 hours in duration
to the nearest second.
TIME/DATE SETTING
To set the time:
1. U
nlock screw-down crown on models with this
feature. See “Screw-down Crown” for instructions.
2. P ull crown out to position 3; watch stops.
3. T urn crown in either direction until hands indicate
desired time.
4. Push crown back in to position 1; watch restarts.
5. S
crew crown back into case on models with screwdown crown.
FIGURE 4A
To adjust the time to the exact second:
1. Unlock crown on models with screw-down crown.
2. A
s soon as small seconds hand S reaches <<60>>
position, pull crown out to position 3; watch stops.
3. T urn crown to move hands and set time, making
sure date changes at midnight, not noon.
4. M
ove hands slightly ahead of exact time, then
slowly turn crown counterclockwise to align minute
hand with correct minute marker.
5. T ake an accurate time signal (from a radio news
station, for example). When audible tone signals
exact time, immediately push crown back in to
position 1; watch restarts, now set to the exact time.
6. S
crew crown back down into case on models with
screw-down crown.
FIGURE 4B
LEGEND:
H – Hour hand
M – Minute hand
S – Small seconds hand C – Chronograph 60-seconds counter
E – Chronograph 30-minutes counter
F – Chronograph 12-hours counter
D – Date window
1, 2, 3 – Crown positions
A – Chronograph push-button (start/stop)
B – Chronograph push-button (split-time/reset)
To correct the date (quick mode):
1. P ull unlocked crown out to position 2; watch
continues to run.
2. T urn crown clockwise until correct date appears in
window D.
9
QUARTZ CHRONOGRAPH
1/1 OF A SECOND – TYPE A
Includes Series 800 Sub-Sea and Movado BOLD large 43.5MM quartz chronographs
3. P ush crown back in to position 1 and screw back
down into case.
NOTE: If date is adjusted between 9:00 PM and
12:00 AM when automatic date changes are already
in progress, it should be set to the following day: The
date will not automatically advance at midnight if it has
been corrected via quick mode during these hours.
case, one or more of the chronograph hands may
become de-synchronized. Should this occur,
follow instructions at end for synchronizing
chronograph hands.
Simple chronograph functions:
To measure the duration of a single, non-stop event:
1. Press button A to start chronograph.
2. P ress button A a second time to stop chronograph,
and read the 3 chronograph hands to determine
elapsed time, for example: 1 hour, 8 minutes,
47 seconds.
3. Press button B to reset chronograph hands to zero.
To set date/time following a battery change:
1. Pull unlocked screw-down crown out to position 2;
watch continues to run.
2. Turn crown clockwise until yesterday’s date appears
in window D.
3. Pull crown out to position 3; watch stops.
4. Turn crown clockwise until today’s date appears in
window D.
5. Continue to turn crown clockwise until hands
indicate correct time.
NOTE: Be sure to take AM/PM into account when
setting time.
6. Push crown back in to position 1, and screw back
down into case.
Accumulated time functions:
To measure the combined time of a series of shorter
events, for example the actual playing time of a
football game, where play is repeatedly interrupted:
1. Press button A to start chronograph.
2. P ress button A a second time to stop chronograph
and read elapsed time, for example: 15 minutes,
22 seconds.
3. Press button A again to resume measurement.
4. P ress button A a fourth time to stop chronograph
again, and read new elapsed time, for example:
28 minutes, 35 seconds.
NOTE: Each time you stop chronograph, chronograph
hands will indicate total accumulated time.
5. R epeat steps 1 and 2 to add each additional
interval of time.
6. A
fter you have taken your final accumulated time
reading, press button B to reset chronograph hands
to zero.
CHRONOGRAPH FUNCTIONS
Overview
Use buttons A and B to operate the chronograph.
Pressing button A the first time will start the
chronograph. Pressing button A a second time will
stop the chronograph, allowing elapsed time to be
read. Pressing button A a third time will restart the
chronograph. Pressing button B will reset chronograph
hands C, E and F to zero. Adjusting the time does not
stop the chronograph, but it does block buttons A and
B for as long as the crown is pulled out.
NOTE: Crown must be in position 1 and hands must
be at zero before chronograph is started. Press button
B to reset hands to zero.
IMPORTANT: Do not push button A or B when crown
is pulled out to position 2 or 3. If button A or B is
accidentally activated while crown is not flush against
Split-time or intermediate-time functions:
To take intermediate time readings as a race
progresses: 1. Press button A to start chronograph.
2. Press button B to momentarily stop chronograph.
3. R ead off the intermediate time, for example: 11
minutes, 16 seconds.
10
QUARTZ CHRONOGRAPH
1/1 OF A SECOND – TYPE A
Includes Series 800 Sub-Sea and Movado BOLD large 43.5MM quartz chronographs
4. P ress button B to resume chronograph function. The
3 chronograph hands will quickly catch up with
ongoing event.
5. To read a second split time, press button B again.
Repeat steps 2 through 4 to take any additional
split times.
6. Press button A to stop chronograph.
7. Take a reading of the final time, for example: 2
hours, 14 minutes, 7 seconds.
8. Press button B to reset chronograph hands to zero.
8. W
hen hand F reaches zero position, push crown
back in to position 1 (and screw back down into
case). Timing hands are now synchronized at zero
position, and chronograph is ready for use.
Synchronizing chronograph hands:
After a battery change or in the event of an error,
you may need to manually adjust one or more of the
chronograph hands to align them all correctly at their
zero positions.
NOTES: Once in corrective mode, each press
and release on push-button A will advance active
chronograph hand by one increment. To advance
hand rapidly, depress and hold push-button A. You
may exit correction mode at any time in the sequence
by returning crown to position 1 (and screwing it back
down into the case).
1. Pull unlocked screw-down crown out to position 3.
2. Press and hold push-buttons A and B simultaneously
for at least 2 seconds to enter corrective mode.
When chronograph seconds hand C rotates 360°,
corrective mode is activated; release buttons A
and B.
3. Adjust center-mounted chronograph seconds hand C
using push-button A.
4. When hand C reaches zero position, press pushbutton B.
5. Now press push-button A to adjust minute counter
hand E.
6. When hand E reaches zero position, press pushbutton B.
7. Use push-button A again to adjust hour counter
hand F.
11
QUARTZ CHRONOGRAPH
1/1 OF A SECOND – TYPE B
Includes the series 800 sub-sea retrograde chronograph
Position 2 - T o set DATE:
Rotate crown clockwise.
Position 3 - T o set TIME:
Rotate crown in either direction.
FIGURE 5
LEGEND:
H – Hour hand
M – Minute hand
S – Small seconds hand C – Chronograph retrograde 30-seconds counter E – Chronograph retrograde 60-minutes counter F – Chronograph retrograde 5-minutes counter counter
D – Date window
1, 2, 3 – Crown positions
A – Chronograph push-button (start/stop)
B – Chronograph push-button (split-time/reset)
This chronograph model features a center-mounted
retrograde seconds counter (up to 30), two retrograde
minutes counters (up to 5 and up to 60), a small
seconds subdial, and date window. It can be used to
time an event up to 1 hour, 5 minutes and 59 seconds
in duration to the nearest second. The chronograph will
stop automatically after 2 hours.
To adjust the time:
1. U
nlock screw-down crown. See “Screw-down
Crown” for instructions.
2. W
hen small seconds hand S reaches <<60>>
position, pull crown out to position 3; watch stops.
3. T urn crown in either direction to move hands and set
time, making sure date changes at midnight,
not noon.
4. P ush crown back in to position 1, and screw back
down into case . See “Screw-down Crown” for
instructions. Watch will restart, now set to correct
time.
To correct the date (quick mode):
1. U
nlock screw-down crown. See “Screw-down
Crown” for instructions.
2. P ull crown out to position 2; watch continues to run.
3. T urn crown clockwise until correct date appears in
window D.
4. P ush crown back in to position 1, and screw back
down into case. See “Screw-down Crown” for
instructions.
CHRONOGRAPH FUNCTIONS
Overview
Use buttons A and B to operate the chronograph.
Pressing button A the first time will start the
chronograph. Pressing button A a second time will
stop the chronograph, allowing elapsed time to be
read. Pressing button A a third time will restart the
chronograph. Pressing button B will reset chronograph
hands C, E and F to zero.
IMPORTANT: Crown must be in position 1, screwed
TIME/DATE SETTING
Crown positions:
Position 1 - Normal running position.
Crown screwed-down into case.
12
QUARTZ CHRONOGRAPH
1/1 OF A SECOND – TYPE B
Includes the Series 800 Sub-Sea retrograde chronograph
down into case, and counter hands must be at zero
before chronograph is started. Press button B to reset
hands to zero, or, if necessary, reset them following
instructions below.
again, and read new elapsed time.
NOTE: Each time you stop chronograph, chronograph
hands will indicate total accumulated time.
5. R epeat steps 1 and 2 to add each additional
interval of time.
6. A
fter you have taken your final accumulated time
reading, press button B to reset chronograph hands
to zero.
To reset chronograph counters to zero:
All chronograph hands must be in the zero position
before you start a timing. Unlock crown and follow
these steps as needed to reset the hands of the
counters:
Split-time or intermediate-time functions:
To take intermediate time readings as a race
progresses: 1. Press button A to start chronograph.
2. Press button B to momentarily stop chronograph.
3. R ead off the intermediate time, for example: 6
minutes, 4 seconds.
4. P ress button B to resume chronograph function; the
3 chronograph hands will quickly catch up with
ongoing event.
5. T o read a second split time, press button B again.
Repeat steps 2 through 4 to take any additional split
times.
6. Press button A to stop chronograph.
7. T ake a reading of the final time, for example: 25
minutes, 18 seconds.
8. Press button B to reset chronograph hands to zero.
60-Minutes counter:
Pull crown to position 2, press and hold push-button B
and rotate crown clockwise.
30-Seconds counter:
Pull crown to position 3, press and hold push-button A
and rotate crown clockwise.
5-Minutes counter:
Pull crown to position 3, press and hold push-button B
and rotate crown clockwise.
Simple chronograph functions:
To measure the duration of a single, non-stop event:
1. Press button A to start chronograph.
2. Press button A a second time to stop chronograph,
and read the chronograph hands to determine
elapsed time, for example: 5 minutes, 57 seconds.
3. Press button B to reset chronograph hands to zero.
Accumulated time functions:
To measure the combined time of a series of shorter
events, for example the actual playing time of a
football game, where play is repeatedly interrupted:
1. Press button A to start chronograph.
2. Press button A a second time to stop chronograph
and read elapsed time
3. Press button A again to resume measurement.
4. Press button A a fourth time to stop chronograph
13
QUARTZ CHRONOGRAPH
1/10 OF A SECOND – TYPE A
Includes the Movado Junior Sport quartz chronograph
2. T urn crown in either direction to move hands and set
the time – check that the date changes at midnight,
not at noon.
3. M
ove the hands slightly ahead of the exact time,
then slowly turn the crown counterclockwise to align
the minute hand M with the correct minute marker.
4. T ake an accurate time signal (from a radio news
station, for example). When the audible tone signals
the exact time, push crown back in to position 1;
watch will restart, now set to the exact time.
To correct time zone and date:
IMPORTANT: Do not change the date between
10:00 PM and 2:00 AM when automatic calendar
changes are in progress. Doing so could damage
the movement.
These adjustments will not stop the watch and do
not affect the time indicated by the minute and
seconds hands.
1. Pull crown out to position 2.
2. T urn crown in either direction to move hour hand H
one or several hours ahead or back, or to change
the time after crossing into another zone.
3. T o change the date J, advance the hour hand H
by two complete revolutions, so that the date will
change at midnight, not noon.
4. O
nce the adjustments have been made, return the
crown to position 1 immediately.
FIGURE 6
LEGEND:
H – Hour hand
M – Minute hand C – Chronograph seconds hand
E – Chronograph 30-minutes counter
G – Chronograph tenths-of-a-second counter
S – Small seconds hand D – Date window
1, 2, 3 – Crown positions
A – Chronograph push-button (start/stop)
B – Chronograph push-button (split-time/reset)
This quartz chronograph model features a tenthsof-a-second counter, minute counter (up to 30),
and small seconds subdials; center-mounted
chronograph seconds hand; and date window. It
can be used to time an event up to 29 minutes and
59.9 seconds in duration to the nearest 1/10 of
a second.
CHRONOGRAPH FUNCTIONS
Overview
Use buttons A and B to operate the chronograph.
Pressing button A the first time will start the chronograph.
While the chronograph is running, once chronograph
second hand C has completed one turn, minute-counter
hand E will jump ahead one minute. Tenths-of-a-second
hand G does not move when the chronograph is
running. Pressing button A a second time will stop the
TIME/DATE SETTING
To adjust the time:
1. As soon as the small seconds hand S in the subdial
at 6 o’clock reaches the <<60>> position, pull
crown out to position 2; watch stops.
14
QUARTZ CHRONOGRAPH
1/10 OF A SECOND – TYPE A
Includes the Movado Junior Sport quartz chronograph
chronograph and move hand G to the relevant tenth-ofa-second mark. Pressing button B will reset hands G, E
and C to zero.
IMPORTANT: Crown F must be in position 1, and hands
must be at zero before the chronograph is started. If
necessary, press button B to reset to zero. DO NOT use
chronograph while crown is pulled out to position 2 or
3. DO NOT operate chronograph buttons A and B
while the timepiece is under water.
NOTE: Adjusting the time does not stop the
chronograph, but it does block buttons A and B for as
long as the stem of crown F in pulled out.
3. W
hen the second runner crosses finish line, press
button A.
4. Note the time for the winner as shown on the dial.
5. T hen press button B; the hands will move up to
indicate the time for the runner-up.
6. Press button B again to return all hands to zero.
Synchronization of chronograph hands:
After changing the battery, or in the event of an
error, the chronograph hands can be realigned to zero
if needed:
Crown position 2:
Adjust minute-counter hand E using button B.
Simple chronograph functions:
1. Press button A to start chronograph.
2. Press button A a second time to stop chronograph.
3. Press button B to reset chronograph to zero.
Crown position 3:
Adjust chronograph seconds hand C using button A.
Adjust tenths-of-a-second counter hand G using button B.
Split-time functions:
You can take intermediate time readings as a
race progresses:
1. Press button A to start chronograph.
2. Press button B to momentarily stop chronograph.
3. Read off the intermediate time.
4. Press button B to resume chronograph function.
Hands will catch up with the ongoing event.
5. To read a second split time, press button B again.
Repeat steps 2 through 4 to take any additional split
times.
6. Press button A to stop chronograph.
7. Take a reading of the final time.
8. Press button B to reset chronograph to zero.
To advance hands rapidly, press push buttons and hold
longer than one second.
First place and runner-up results:
These chronograph models also allow you to measure
both a winning time and runner-up results:
1. Press button A to start chronograph.
2. As soon as the winner crosses finish line, press
button B. The chronograph will stop.
15
QUARTZ CHRONOGRAPH
1/10 OF A SECOND – TYPE B
Includes the original Series 800 sport and sport elegant quartz chronographs
3.
4.
5.
6.
FIGURE 7
position, pull crown out to position 3; watch stops.
T urn crown to move hands and set time, making
sure date changes at midnight, not noon.
M
ove hands slightly ahead of exact time, then
slowly turn crown counterclockwise to align minute
hand M with correct minute marker.
T ake an accurate time signal (from a radio news
station, for example). When audible tone signals
exact time, push crown back in to position 1; watch
will restart, now set to the exact time.
S
crew crown back down into case. See “Screwdown Crown” for instructions.
To correct time zone and date:
1. Pull unlocked screw-down crown out to position 2.
2. T urn crown to move hour hand H ahead or back
after crossing into another zone, or to correct for
daylight savings/standard time change.
3. T o change date D, advance hour hand H by two
complete revolutions, otherwise date will change at
noon. These adjustments will not stop the watch and
do not affect the time indicated by the minute and
seconds hands.
4. O
nce adjustments have been made, return crown
to position 1 immediately, then screw crown back
down into case.
LEGEND:
H – Hour hand
M – Minute hand C – Chronograph seconds hand
E – Chronograph 30-minutes counter
G – Chronograph tenths-of-a-second counter
S – Small seconds hand D – Date window
1, 2, 3 – Crown positions
A – Chronograph push-button (start/stop)
B – Chronograph push-button (split-time/reset)
This quartz chronograph model features a tenthsof-a-second counter, minute counter (up to 30),
and small seconds subdials; center-mounted
chronograph seconds hand; and date window. It
can be used to time an event up to 29 minutes and
59.9 seconds in duration to the nearest 1/10 of
a second.
CHRONOGRAPH FUNCTIONS
Overview
Use buttons A and B to operate the chronograph.
Pressing button A the first time will start the
chronograph. While the chronograph is running,
once the chronograph seconds counter hand C has
completed one turn, minute-counter hand E will jump
ahead one minute. Tenths-of-a-second hand G does
not move when the chronograph is running. Pressing
button A a second time will stop the chronograph and
move hand G to the relevant tenth-of-a-second mark.
TIME/DATE SETTING
To adjust the time:
1. Unlock screw-down crown. See “Screw-down
Crown” for instructions.
2. As soon as small seconds hand S reaches <<60>>
16
QUARTZ CHRONOGRAPH
1/10 OF A SECOND – TYPE B
Includes the original Series 800 sport and sport elegant quartz chronographs
Pressing button B will reset hands G, E and C to zero.
Adjusting the time does not stop the chronograph, but it
does block buttons A and B for as long as the crown is
pulled out.
IMPORTANT: Crown must be in position 1 and hands
must be at zero before chronograph is started. Press
button B to reset hands to zero. DO NOT push button
A or B while crown is pulled to position 2 or 3. If
button A or B is accidentally activated while crown is
not flush against case, one or more of the chronograph
hands will become de-synchronized. Should this occur,
follow instructions below.
4. Press button A a fourth time to stop chronograph
again.
NOTE: Each time you stop chronograph, chronograph
hands will indicate total accumulated time.
5. R epeat steps 1 and 2 to add each additional
interval of time.
6. A
fter you have taken your final accumulated time
reading, press button B to reset chronograph hands
to zero.
Split-time or intermediate time functions:
You can take intermediate time readings as a race
progresses with these models:
1. Press button A to start chronograph.
2. Press button B to momentarily stop chronograph.
3. R ead off the intermediate time, for example: 10
minutes, 26 seconds, 3/10 of a second.
4. P ress button B to resume chronograph function.
Hands will catch up with ongoing event.
5. T o read a second split time, press button B again.
Repeat steps 2 through 4 to take any additional split
times.
6. Press button A to stop chronograph.
7. T ake a reading of the final time, for example: 27
minutes, 3 seconds, 7/10 seconds.
8. P ress button B to reset chronograph hands to zero.
Synchronization of chronograph hands:
After changing the battery, or in the event of an error,
the chronograph hands can be realigned to zero if
needed. A single push (quick press and release) will
advance hands by one increment. To advance hands
rapidly, depress and hold push buttons for longer than
one second.
Crown position 2:
Adjust minute-recorder hand E using button B.
Crown position 3:
Adjust chronograph seconds hand C using button A.
Adjust tenths-of-a-second hand G using button B.
First place and runner-up results:
These chronograph models also allow you to measure
both a winning time and runner-up results:
1. Start chronograph by pressing button A.
2. A
s soon as winner crosses finish line, press button B.
Chronograph will stop.
3. W hen second runner crosses finish line, press
button A.
4. Note time for the winner as shown on the dial.
5. P ress button B; hands will move up to indicate time
for the runner-up.
6. Press button B again to return all hands to zero.
OPERATING THE CHRONOGRAPH
Simple chronograph functions:
1. Press button A to start chronograph.
2. Press button A a second time to stop chronograph.
3. Press button B to reset chronograph to zero.
Accumulated time functions:
1. Press button A to start chronograph.
2. Press button A a second time to stop chronograph.
3. Press button A again to resume measurement.
17
QUARTZ CHRONOGRAPH
1/10 SECOND – TYPE C
Includes Datron and Sapphire Synergy quartz chronographs
These chronograph models feature a minute
counter (up to 30), tenths-of-a-second counter which
becomes an hour counter after 30 minutes, and
small seconds hand subdials, and center-mounted
chronograph seconds hand; some have a Big Date
feature. They can be used to time an event up to
29 minutes and 59.9 seconds in duration to the
nearest 1/10 of a second; or up to 9 hours, 59
minutes and 59 seconds in duration to the nearest
full second.
TIME/DATE SETTING
FIGURE 8A
To set the time:
1. Pull crown out to position 3; watch stops.
2. T urn crown in either direction until hands indicate
desired time.
3. Push crown back in to position 1; watch restarts.
To adjust the time to the exact second:
1. A
s soon as small seconds hand S reaches <<60>>
position, pull crown out to position 3; watch stops.
2. T urn crown to move hands and set time, making
sure date changes at midnight, not noon.
3. M
ove hands slightly ahead of exact time, then
slowly turn crown counterclockwise to align minute
hand with correct minute marker.
4. T ake an accurate time signal (from a radio news
station, for example). When audible tone signals
exact time, immediately push crown back in to
position 1; watch will restart, now set to the
exact time.
FIGURE 8B
LEGEND:
H – Hour hand
M – Minute hand
S – Small seconds hand C – Chronograph 60-seconds counter
E – Chronograph 30-minutes counter
F – Chronograph tenths-of-a-second counter
D – Big Date window
1, 2, 3 – Crown positions
A – Chronograph push-button (start/stop)
B – Chronograph push-button (split-time/reset)
To correct the Big Date (quick mode):
Only for models with Big Date feature at 12 o’clock
(see Figure 8A)
1. Pull crown out to position 2; watch continues to run.
2. T urn crown clockwise until correct date appears in
big date window D.
3. P ush crown back in to position 1.
18
QUARTZ CHRONOGRAPH
1/10 SECOND – TYPE C
Includes Datron and Sapphire Synergy quartz chronographs
NOTES: If date is adjusted between 9:00 PM and
12:00 AM when automatic date changes are already
in progress, it should be set to the following day: The
date will not automatically advance at midnight if it has
been corrected via quick mode during these hours.
NOTE: Crown must be in position 1 and hands must
be at zero before chronograph is started. Press button
B to reset hands to zero.
IMPORTANT: Do not push button A or B when crown
is pulled out to position 2 or 3. If button A or B is
accidentally activated while crown is not flush against
case, one or more of the chronograph hands may
become de-synchronized. Should this occur, follow
instructions at end for synchronizing chronograph
hands.
If crown is turned too rapidly during quick mode date
setting, the date may not change properly at midnight.
To correct the date manually, pull crown out to position
2, turn it clockwise until correct date appears in
window; then return it to position 1.
Simple chronograph functions:
To measure the duration of a single, non-stop event:
1. Press button A to start chronograph.
2. P ress button A a second time to stop chronograph,
and read the 3 chronograph hands to determine
elapsed time, for example: 4 minutes, 38 seconds,
7/10-of-a-second.
3. Press button B to reset chronograph hands to zero.
Setting date/time following a battery change:
For models without date, follow To set the time
instructions above.
For models with Big Date feature at 12 o’clock (see
Figure 8A):
1. Pull crown out to position 2; watch continues to run.
2. Turn crown clockwise until yesterday’s date appears
in window D.
3. Pull crown out to position 3; watch stops.
4. Turn crown clockwise until today’s date appears in
window D.
5. Continue to turn crown clockwise until hands
indicate correct time.
NOTE: Be sure to take AM/PM into account when
setting time.
6. Push crown back in to position 1.
Accumulated time functions:
To measure the combined time of a series of shorter
events, for example the actual playing time of a
football game, where play is repeatedly interrupted:
1. Press button A to start chronograph.
2. P ress button A a second time to stop chronograph
and read elapsed time, for example: 15 minutes,
5 seconds.
3. Press button A again to resume measurement.
4. P ress button A a fourth time to stop chronograph
again, and read new elapsed time, for example:
28 minutes, 10 seconds.
NOTE: Each time you stop chronograph, chronograph
hands will indicate total accumulated time.
5. R epeat steps 1 and 2 to add each additional
interval of time.
6. A
fter you have taken your final accumulated time
reading, press button B to reset chronograph hands
to zero.
CHRONOGRAPH FUNCTIONS
Overview
Use buttons A and B to operate the chronograph.
Pressing button A the first time will start the
chronograph. Pressing button A a second time will
stop the chronograph, allowing elapsed time to be
read. Pressing button A a third time will restart the
chronograph. Pressing button B will reset chronograph
hands C, E and F to zero. Adjusting the time does not
stop the chronograph, but it does block buttons A and
B for as long as the crown is pulled out.
19
QUARTZ CHRONOGRAPH
1/10 SECOND – TYPE C
Includes Datron and Sapphire Synergy quartz chronographs
5. N
ow press push-button A to adjust tenths-of-a-second
chronograph hand F.
6. W
hen hand F reaches zero position, press pushbutton B.
7. U
se push-button A again to adjust minute counter
hand E.
8. When hand E reaches zero position, push crown
back in to position 1. Timing hands are now
synchronized at zero position, and chronograph is
ready for use.
Split-time or intermediate-time functions:
To take intermediate time readings as a race
progresses:
1. Press button A to start chronograph.
2. Press button B to momentarily stop chronograph.
3. Read off the intermediate time, for example: 10
minutes, 10 seconds.
4. Press button B to resume chronograph function. The
3 chronograph hands will quickly catch up with
ongoing event.
5. To read a second split time, press button B again.
Repeat steps 2 through 4 to take any additional
split times.
6. Press button A to stop chronograph.
7. Take a reading of the final time, for example: 2
hours, 14 minutes, 7 seconds.
8. Press button B to reset chronograph hands to zero.
Synchronizing chronograph hands:
After a battery change or in the event of an error,
you may need to manually adjust one or more of the
chronograph hands to align them all correctly at their
zero positions.
NOTES: Once in corrective mode, each press
and release on push-button A will advance active
chronograph hand by one increment. To advance
hand rapidly, depress and hold push-button A. You
may exit correction mode at any time in the sequence
by returning crown to position 1.
1. Pull crown out to position 3.
2. Press and hold push-buttons A and B simultaneously
for at least 2 seconds to enter corrective mode.
When chronograph seconds hand C rotates 360°,
corrective mode is activated; release buttons A
and B.
3. Adjust center-mounted chronograph seconds hand C
using push-button A.
4. When hand C reaches zero position, press pushbutton B.
20
QUARTZ CHRONOGRAPH
1/10 OF A SECOND – TYPE D
Includes the Movado BOLD mid-size 38mm chronograph
NOTE: Date D will advance by one each time hour
hand H by two completes two clockwise revolutions,
passing midnight.
3. Push crown back in to position 1; watch restarts.
To
1.
2.
3.
adjust the date rapidly using crown:
Pull crown out to position 2; watch stops.
T urn crown counterclockwise to advance date.
W
hen correct date is displayed in window D, push
crown back in to position 1; watch restarts.
CHRONOGRAPH FUNCTIONS
FIGURE 9
Overview
Use buttons A and B to operate the chronograph.
Pressing button A the first time will start the
chronograph. While the chronograph is running,
once the chronograph seconds counter hand C has
completed one turn, minute-counter hand E will jump
ahead one minute. Tenths-of-a-second hand G does
not move when the chronograph is running. Pressing
button A a second time will stop the chronograph and
move hand G to the relevant tenth-of-a-second mark.
Pressing button B will reset hands G, E and C to zero.
Adjusting the time does not stop the chronograph, but it
does block buttons A and B for as long as the crown is
pulled out.
IMPORTANT: Crown must be in position 1 and hands
must be at zero before chronograph is started. Press
button B to reset hands to zero. Do not push button A
or B while crown is pulled to position 2 or 3. If button
A or B is accidentally activated while crown is not flush
against case, one or more of the chronograph hands
will become de-synchronized. Should this occur, follow
instructions below.
LEGEND:
H – Hour hand
M – Minute hand C – Chronograph seconds hand
E – Chronograph 30-minutes counter
G – Chronograph tenths-of-a-second counter
S – Small seconds hand D – Date window
1, 2, 3 – Crown positions
A – Chronograph push-button (start/stop)
B – Chronograph push-button (split-time/reset)
This quartz chronograph model features a tenths-of-asecond counter, minute counter (up to 30), and small
seconds subdials; center-mounted chronograph seconds
hand; and date window. It can be used to time an
event up to 30 minutes and 60 seconds in duration to
the nearest 1/10 of a second.
TIME/DATE SETTING
To set the time:
1. Pull crown out to position 3; watch stops.
2. Turn crown in either direction until hands indicate
desired time – check that the date changes at
midnight, not at noon.
21
QUARTZ CHRONOGRAPH
1/10 OF A SECOND – TYPE D
Includes the Movado BOLD mid-size 38mm chronograph
Synchronization of chronograph hands:
After changing the battery, or in the event of an error,
the chronograph hands can be realigned to zero if
needed. A single push (quick press and release) will
advance hands by one increment. To advance hands
rapidly, depress and hold push buttons for longer than
one second.
Split-time or intermediate time functions:
You can take intermediate time readings as a race
progresses with these models:
1. Press button A to start chronograph.
2. Press button B to momentarily stop chronograph.
3. R ead off the intermediate time, for example: 10
minutes, 26 seconds, 3/10 of a second.
4. P ress button B to resume chronograph function.
Hands will catch up with ongoing event.
5. To
read a second split time, press button B again.
Repeat steps 2 through 4 to take any additional
split times.
6. Press button A to stop chronograph.
7. T ake a reading of the final time, for example: 27
minutes, 3 seconds, 7/10 seconds.
8. Press button B to reset chronograph hands to zero.
Crown position 2:
Adjust minutes-counter hand E using button B.
Crown position 3:
Adjust chronograph seconds hand C using button A.
Adjust tenths-of-a-second hand G using button B.
OPERATING THE CHRONOGRAPH
Simple chronograph functions:
1. Press button A to start chronograph.
2. Press button A a second time to stop chronograph;
read time.
3. Press button B to reset chronograph to zero.
Accumulated time functions:
1. Press button A to start chronograph.
2. Press button A a second time to stop chronograph.
3. Press button A again to resume measurement.
4. Press button A a fourth time to stop chronograph
again.
NOTE: Each time you stop chronograph, chronograph
hands will indicate total accumulated time.
5. Repeat steps 1 and 2 to add each additional
interval of time.
6. After you have taken your final accumulated time
reading, press button B to reset chronograph hands
to zero.
22
ANA-DIGI QUARTZ CHRONOGRAPH
1/100 OF A SECOND
Includes the Movado Dura ana-digi quartz chronograph
different functions. The chronograph function may be
used to time an event up to 47 hours, 59 minutes and
59.99 seconds in duration.
IMPORTANT: Never operate the setting crown when
the timepiece is underwater. Make sure the crown is
returned to position 1 (neutral position) after each use.
Selecting the functions:
With crown in position 1 (neutral position), turn it in
either direction to select a function. When the crown
is turned counterclockwise, the available functions will
appear in the upper display in this sequence:
1: Neutral (no display) → 2: Local Time H-M-S
3: Seconds/Date → 4: Day/Date → 5. Timer TM
→ 6. Second Time Zone T2 → 7. Chrono ADD Mode
CHR → 8. Chrono SPLIT Mode CHR → 9. Alarm AL.
If the crown is turned clockwise, the functions will
appear in the opposite order.
NOTE: This timepiece is equipped with a battery endof-life indicator: The digital display will begin to flash
when the battery is nearing the end of its life, signaling
the need to have it replaced promptly.
FIGURE 10
LEGEND:
H – Hour hand
M – Minute hand SF – Indication of selected function
DD – Digital display
PC – Setting crown
Crown Positions:
0 – Pushed into case
Press to arm/disarm Alarm
Press to start/stop/reset Chronograph
Synchronizing analog hands with digital display:
After a battery change, or in the event of an error, you
may need to synchronize the time indicated by the
analog watch hands with the time shown in the digital
display:
1. W
ith crown in position 1, select neutral function (no
digital information displayed).
2. P ull crown out to position 2: the symbol R will
appear in upper display.
3. Turn crown in either direction until hands indicate the
same time as the numerals in the digital display: a
rapid rotation will advance or reverse the hour hand
by a full hour; a slower rotation enables adjustment
of the minutes.
4. P ush crown back in to position 1 (neutral position),
then turn it to select function for Local Time setting.
1–N
eutral position
Rotate crown to select function
0 – P ulled-out position
Rotate crown to simultaneously correct lower
Digital Display indication and position of analog
watch hands
GETTING STARTED
This analog/digital chronograph features an upper
selected function indicator display (SF), a lower 6-digit
LCD (liquid crystal display) digital information display
(DD), and a unique programming crown (PC) that
allows you to move between, select and operate the
23
ANA-DIGI QUARTZ CHRONOGRAPH
1/100 OF A SECOND
Includes the Movado Dura ana-digi quartz chronograph
5. Proceed to time setting.
Checking/changing time display mode:
The digital time can be displayed in either 12-hour
(AM/PM) or 24-hour mode:
1. With crown in position 1, select T2 function.
2. Push crown in once: If letter A or P appears, the
time is being displayed in the 12-hour mode.
NOTE: When in 12-hour display mode, a small letter P
appears next to the numerals indicating the time when
it is between noon and midnight.
3. Push crown in twice to return to/select 24-hour mode.
for the seconds will reset to zero (00).
NOTE: If the numerals have been flashing between
0 and 30 seconds when you push the crown to reset
the seconds, the time will be set to the current minute.
If the seconds have been flashing between 31 and 60
seconds before you push the crown, the time will be
adjusted to the next minute. Once the seconds are set,
check the display and if necessary, correct the time if
by plus/minus one minute.
Setting the date and month:
1. Select the Seconds/Date function.
2. P ull crown out to position 2: The seconds will
disappear; the numeral for the month appears next
to the date; both numerals flash.
3. Turn crown in either direction: A rapid rotation
changes the month; a slow rotation changes the date.
4. P ush crown back in to position 1 (neutral position):
The month display disappears and the seconds
display reappears.
NOTE: Even though the month is not displayed while
the watch is being used in normal mode, it must be set
for the perpetual calendar function (up to 2099) to
work properly.
DIGITAL TIME AND DATE SETTING
Setting the hours and minutes:
1. Select and display local time.
2. Pull crown out to position 2: the symbol T appears
in upper display; the numerals indicating hours and
minutes flash in lower display.
3. Turn crown in either direction to change the lower
digital time display: a rapid rotation changes the
hour display; a slower rotation adjusts the minute
display.
NOTE: Analog watch hands will move in synch with
digital time display.
4. When correct hours and minutes appear in lower
digital display, push crown back to position 1.
Correcting the day:
1. Select the Day-Date function.
2. P ull crown out to position 2: A letter indicating
the language in which the day is displayed (E =
English, F = French, S = Spanish, D = German)
appears in place of the date; the language and
year flash.
3. T urn crown in either direction to reach desired
language and year: A rapid rotation changes the
language; a slow rotation changes the year..
4. P ush crown back in to position 1 (neutral position):
The language and year disappear; the day of the
week and date reappear.
NOTE: If the date, month and year are set, the correct
Setting the exact second:
1. Select and display local time.
2. Pull crown out to position 2: the symbol T appears
in upper display; the numerals for hours and minutes
flash in lower display.
3. Push crown in to position 1: The numerals
displaying the seconds will flash for 1 minute.
4. While the seconds are flashing, take an accurate
time signal (from a radio news station, for example).
The instant the audible tone signals the exact time,
push crown in to position 0. The numerals displayed
24
ANA-DIGI QUARTZ CHRONOGRAPH
1/100 OF A SECOND
Includes the Movado Dura ana-digi quartz chronograph
day of the week will appear automatically as part of
the perpetual calendar function.
Changing the time zone:
When you change the time zone, or in the event
automatic daylight savings time changes do not occur,
you may adjust the hour indicated by the lower digital
display and analog watch hands forward or back by
several hours without affecting the digital minutes and
seconds display. To do so:
1. Select and display local time.
2. P ull crown out to position 2: the symbol T appears
in upper display; the numerals indicating hours and
minutes flash in lower display.
3. T urn crown rapidly in either direction to change the
lower digital hour display; the analog watch hands
will move simultaneously to synchronize with the
digital display.
4. W
hen correct hour appears in lower digital display,
push crown back to position 1.
NOTE: In the event that the movement does not adjust
automatically for a daylight savings time change,
you will also need to adjust the second time zone
accordingly.
Using the countdown timer:
1. Select the Timer TM function.
2. Pull crown out to position 2: The numerals indicating
hours and minutes start to flash in lower display.
3. Turn crown in either direction to set how much time
you want to count down: A rapid rotation changes
the hours; a slow rotation changes the minutes.
4. Push crown back in to position 1 (neutral position):
The countdown function starts automatically; the
watch alarm will ring when the preset time period
has elapsed.
5.Push crown in to position 0 to stop the alarm.
NOTE: The countdown function can be cancelled at any
time by pushing the crown in to position 0 and holding
it down for more than 2 seconds. A running countdown
can be restarted by pushing the crown in once.
Displaying the time in another time zone:
In addition to the local time, you can display the time
in a second time zone with this timepiece:
1. Select the Second Time Zone T2 function.
2. Pull crown out to position 2: The numerals indicating
hours and minutes for the second time zone start to
flash in lower display.
3. Turn crown in either direction to change the flashing
settings: A rapid rotation changes the hours; a slow
rotation changes the minutes.
4. Push crown back in to position 1 (neutral position).
NOTES: The seconds display cannot be adjusted for
a second time zone: the display will show the same
seconds as the local time setting.
The time zone display is corrected in ½-hour increments.
When reading the time shown for a second time zone,
you’ll need to take into account whether the watch is
operating in 12-hour (AM/PM) or 24-hour mode.
USING THE CHRONOGRAPH
Overview
This digital chronograph may be used to time an event
up to 47 hours, 59 minutes and 59.99 seconds in
duration in one of two modes.
To operate the Chronograph, select the Chronograph
function CHR in either the ADD (Ad) Mode (to take an
accumulated time reading) or the SPLIT (SP) Mode (to
measure intermediate times during an ongoing event.)
The chronograph counter is started/stopped/restarted
by consecutive pushes on the crown.
To reset the digital display counter to zero, push the
crown and hold it down for more than 2 seconds.
25
ANA-DIGI QUARTZ CHRONOGRAPH
1/100 OF A SECOND
Includes the Movado Dura ana-digi quartz chronograph
NOTES: You can use only one of the two Chronograph
functions – ADD or SPLIT – at a time; they cannot be
used simultaneously. To switch to the other mode, you
must first stop the chronograph and reset the counter
display to zero. However you can select and use the
other timepiece functions while the chronograph is
running.
(Ex: “01 35 28” and “Ad
55” alternate)
USING THE ALARM
Setting the alarm:
1. Select the Alarm AL function.
2. P ull crown out to position 2: The numerals indicating
hours and minutes start to flash in lower display.
3. T urn crown in either direction to set the Alarm to the
desired time: A rapid rotation changes the hours; a
slow rotation changes the minutes.
4. P ush crown back in to position 1 (neutral position):
The alarm is now set, and AL appears in the lower
display.
5. Push crown in to position 0 to stop the alarm.
NOTE: The countdown function can be cancelled at any
time by pushing the crown in to position 0 and holding
it down for more than 2 seconds. A running countdown
can be restarted by pushing the crown in once.
Choosing a mode:
In ADD Mode, you can start and stop the counter
to measure the combined time of a series of shorter
events, for example the actual playing time of a
football game, where play is repeatedly interrupted.
Each time you stop the counter, the timing is halted: it
does not continue to track elapsed time.
In SPLIT Mode, you can take intermediate time
readings as a continuing event, a race for example,
progresses. The chronograph will continue to track the
elapsed time in the background while the intermediate
time reading is displayed. When the crown is pushed
again, the counter display will change to reflect the
ongoing elapsed time.
Turning the alarm on or off:
To activate or deactivate the alarm, select the Alarm AL
function, then push on the crown.
The display will indicate whether the alarm is turned on
or off after each push:
AL shows on display – alarm is activated to go
off at set time.
OF shows on display – alarm is turned off.
To silence the alarm when it goes off, push down on
the crown.
NOTE: Please take into account whether the watch is
operating in 12-hour (AM/PM) or 24-hour mode when
setting the alarm and when reading the time it is set to
go off.
Reading the display:
When the chronograph is running in either mode
– ADD or SPLIT– the counter display will show the
following information:
Timed period < 1 minute:
SP or Ad Mode – seconds + hundredths.
(Ex: “Ad 05 58”)
Timed period > 1 minute and < 1 hour:
SP or Ad Mode – Ad and minutes + seconds
+ hundredths appear alternately.
(Ex: “Ad” and “05 50 36” alternate)
Testing the alarm:
Select the Alarm AL function, then push and hold the
crown down for more than 2 seconds: the alarm will
start to sound. Release the crown to stop the alarm test.
Timed period > 1 hour and < 48 hours:
SP or Ad Mode – minutes – seconds –
hundredths appear alternately.
26
AUTOMATIC CHRONOGRAPH
1/1 OF A SECOND – TYPE A
Includes Circa, Movado Master and Vizio automatic chronographs
P
LEGEND:
H – Hour hand
M – Minute hand
S – Small seconds hand C – Chronograph seconds counter
D – Chronograph 12-hour counter
E – Chronograph 30-minutes counter
J – Date display
P – 30 pulsations graduation
1, 2, 3 – Crown positions
A – Chronograph push-button (start/stop)
B – Chronograph push-button (split-time/reset)
R -– Rapid correction of date
FIGURE 11A
These automatic chronograph models feature a
fine 27-jewel Swiss movement with 48-hour power
reserve, minute counter (up to 30), hour counter,
and small seconds subdials; center-mounted
chronograph seconds hand, and date display.
Some models have a rapid date corrector button,
while select other models have a heart rate bezel
scale that can be used to calculate your pulse rate.
They can all be used to time an event up to 12
hours, 30 minutes and 29 seconds in duration to
the nearest second.
FIGURE 11B
NOTE: The motion of your arm during normal daily
activities should be sufficient to keep an automatic
timepiece wound. However, if you have not worn
your watch for more than 48 hours and it has
stopped, you will need to wind your chronograph
movement by hand before setting the time or
operating the chronograph functions:
1. With the crown in position 1, flush against the
case, turn the crown clockwise approximately 20
revolutions.
2. Reset time following instructions below.
FIGURE 11C
27
AUTOMATIC CHRONOGRAPH
1/1 OF A SECOND – TYPE A
Includes Circa, Movado Master and Vizio automatic chronographs
TIME/DATE SETTING
time will stop the chronograph. Pressing button B will
reset hands C, E and D to zero.
IMPORTANT: The crown must be in position 1, and
hands must be at zero before the chronograph is
started. If necessary, press button B to reset to zero. Do
not use chronograph while crown is pulled out
to position 1.
Do not operate chronograph buttons A and B while
timepiece is under water.
NOTE: Hand S is the seconds hand for standard timekeeping. It is not part of the chronograph function, and
therefore will run continuously while the crown is
in position 1.
To set the time:
1. Pull crown out to position 2; watch stops.
2. Turn crown in either direction to move hands to
desired time – check that the date changes at
midnight, not at noon.
3. Push crown back in to position 1; watch restarts.
To adjust the date rapidly using crown:
(see Figures 11A and 11B)
1. Pull crown out to position 2; watch stops.
2. Turn crown to move hands back and forth between
the hours of 9:00 PM (21H) and just past midnight
(24H); each time the hands hit midnight, the date
will advance by one.
3. When correct date is displayed in window J, push
crown back in to position 1; watch restarts.
Simple chronograph functions:
1. Press button A to start chronograph.
2. Press button A a second time to stop chronograph.
3. Press button B to reset chronograph to zero.
To adjust the date rapidly using corrector (select
models only):
(see Figure 11C)
IMPORTANT: DO NOT use the date corrector button
between 8:30 PM (20:30H) and 11:00 PM (23H)
when automatic calendar changes are in progress.
Doing so could damage the movement.
1. Depress date corrector button R, located along
the side of the case at 10 o’clock; each push and
release of button R will advance the date in window
J by one
Accumulated time functions:
To measure the combined time of a series of shorter
events, for example the actual playing time of a
football match, where play is repeatedly interrupted:
1. Press button A to start chronograph.
2. Press button A a second time to stop chronograph.
3. Press button A again to resume measurement.
4. P ress button A a fourth time to stop chronograph
again.
NOTE: Each time you stop chronograph, chronograph
hands will indicate total accumulated time.
5. R epeat steps 1 and 2 to add each additional
interval of time.
6. A
fter you have taken your final accumulated time
reading, press button B to reset chronograph hands
to zero.
CHRONOGRAPH FUNCTIONS
Overview
Use buttons A and B to operate the chronograph.
Pressing button A the first time will start the
chronograph. While the chronograph is running,
the three chronograph counter hands will sweep
continuously, indicating the number of currently elapsed
seconds (hand C), minutes up to 30 (hand E), and
hours up to 12 (hand D). Pressing button A a second
28
AUTOMATIC CHRONOGRAPH
1/1 OF A SECOND – TYPE A
Includes Circa, Movado Master and Vizio automatic chronographs
FIGURE 11D
To measure your heart rate (select models only):
(see Figure 11D)
Your Movado automatic chronograph may also feature
an inner bezel ring calibrated to measure your heart
rate, using the chronograph seconds hand C:
1. If necessary, press button B to reset chronograph to
zero.
2. Find your pulse.
3. Press button A, count off 30 heart beats, then
immediately press button A a second time.
4. Your heart rate (beats per minute) is the number
indicated by chronograph seconds hand C on the
graduated inner bezel ring. For example, 9 seconds
= 200 beats/minute, and 45 seconds = 40 beats/
minute.
5. Press button B to reset all chronograph hands to zero.
29
AUTOMATIC CHRONOGRAPH
1/1 OF A SECOND – TYPE B
Includes new SE automatic chronographs
movement by hand before setting the time or
operating the chronograph functions:
1. W ith the crown in position 1, flush against the
case, turn the crown clockwise approximately
20 revolutions.
2. Reset time following instructions below.
TIME/DATE SETTING
To set the time:
1. Pull crown out to position 3; watch stops.
2. T urn crown in either direction to move hands to
desired time – check that the date changes at
midnight, not at noon.
3. Push crown back in to position 1; watch restarts.
FIGURE 12
LEGEND:
H - Hour hand
M - Minute hand
S - Small seconds hand
C - Chronograph seconds counter
G – 24-Hour hand
D - Chronograph 12-hour counter
E - Chronograph 30-minutes counter
J - Date display
1, 2, 3 - Crown positions
A - Chronograph push-button (start/stop)
B - Chronograph push-button (split-time/reset)
To adjust the date rapidly:
IMPORTANT: Do not change the date rapidly between
8:00 PM (20H) and 2:00 AM (2H) when automatic
calendar changes are in progress. Doing so could
damage the movement.
1. Pull crown out to position 2.
2. Turn crown clockwise to change the date J.
NOTE: Turning the crown in the opposite direction
(counter-clockwise) will change the 24-hour hand G.
3. W
hen correct date is displayed in window J, push
crown back in to position 1.
These automatic chronograph models feature a
fine 25-jewel Swiss movement with 48-hour power
reserve, minute counter (up to 30), hour counter,
and small seconds subdials; center-mounted
chronograph seconds hand, and date display. They
can be used to time an event up to 12 hours, 30
minutes and 59 seconds in duration to the nearest
second.
NOTE: The motion of your arm during normal daily
activities should be sufficient to keep an automatic
timepiece wound. However, if you have not worn
your watch for more than 48 hours and it has
stopped, you will need to wind your chronograph
CHRONOGRAPH FUNCTIONS
Overview
Use buttons A and B to operate the chronograph.
Pressing button A the first time will start the
chronograph. While the chronograph is running,
the three chronograph counter hands will sweep
continuously, indicating the number of currently elapsed
seconds (hand C), minutes up to 30 (hand E), and
hours up to 12 (hand D). Pressing button A a second
time will stop the chronograph. Pressing button B will
reset hands C, E and D to zero.
30
AUTOMATIC CHRONOGRAPH
1/1 OF A SECOND – TYPE B
Includes new SE automatic chronographs
IMPORTANT: The crown must be in position 1, and
hands must be at zero before the chronograph is
started. If necessary, press button B to reset to zero.
Do not use chronograph while crown is pulled out to
position 2 or 3. Do not operate chronograph buttons A
and B while timepiece is under water.
NOTE: Hand S is the seconds hand for standard timekeeping. It is not part of the chronograph function, and
therefore will run continuously while the crown is in
position 1.
Simple chronograph functions:
1. Press button A to start chronograph.
2. Press button A a second time to stop chronograph.
3. Press button B to reset chronograph to zero.
Accumulated time functions:
To measure the combined time of a series of shorter
events, for example the actual playing time of a
football match, where play is repeatedly interrupted:
1. Press button A to start chronograph.
2. Press button A a second time to stop chronograph.
3. Press button A again to resume measurement.
4. Press button A a fourth time to stop
chronograph again.
NOTE: Each time you stop chronograph, chronograph
hands will indicate total accumulated time.
5. Repeat steps 1 and 2 to add each additional
interval of time.
6. After you have taken your final accumulated time
reading, press button B to reset chronograph hands
to zero.
31
ROTATING BEZEL
Select Movado sport models feature a unidirectional bezel for measuring elapsed time. The engraved bezel
turns counterclockwise only. It can be used, for example, to monitor the number of minutes left on a timed snorkel
expedition or similar group excursion:
1. Align the arrow marker on the bezel with the current position of the minute hand.
2. As the minute hand advances around the dial, the number it points to on the bezel indicates how many minutes
(1 to 59) have passed since you began the timing.
3. When not in use, turn bezel counterclockwise until marker is aligned at 12 o’clock.
32
SCREW-DOWN CROWN
Many Movado sport watches and chronographs are equipped with a special screw-down crown that helps seal
the case against water and moisture. Before attempting to set the time or date, you must first unlock the screwdown crown by turning it counterclockwise until it loosens (approximately six rotations).
After your watch has been set to the correct time and date following the instructions provided, the crown must be
screwed back down into the case to ensure water resistance:
1. Return the crown to position 1, flush against case.
2. Turn the crown clockwise while gently pressing in on it.
3. Continue to turn the crown until you feel resistance. Do not over-tighten.
33
OBTAINING SERVICE
Should your Movado watch require service or repair, you may take or send it to any Movado Authorized Service
Center. For the most current and complete worldwide listing, visit www.movado.com.
PACKING AND MAILING INSTRUCTIONS:
Be sure to include your complete return address and phone number along with a brief note describing the problem
with your watch and/or service needed. List all the items you would like to have serviced or repaired.
Your watch should be packed securely in padded wrapping materials, for protection against shock, in a sturdy box
sealed with tape. Do not use your watch’s original gift box for shipping.
We recommend that you use registered mail and insure your watch for its full replacement value.
TRACKING SERVICE ONLINE
In the US, when you send your watch directly to Movado in Moonachie, New Jersey, for service, we will send you
a written acknowledgement that includes a personal User ID and Password. With them, you may authorize and track
the status of your watch service online via our secure internet site: www.mgiservice.com
SERVICE UNDER WARRANTY
Your Movado timepiece is protected from the date of purchase by a two-year limited warranty. To obtain service
under the warranty, you must present a valid warranty card and proof of purchase. See “Warranty Information” for
details.
NOTE: Movado is not to be held liable for any incidental or consequential damages occurring from the failure or
malfunction of its product.
34
WARRANTY INFORMATION
Congratulations on your purchase. Movado watches are not only beautiful in design, they are crafted to meet exacting standards of Swiss watch precision and performance. Made by highly skilled craftsmen and comprising only the
highest quality materials and components, your watch left our factory in perfect running condition after undergoing
stringent quality testing. We proudly stand behind each fine Movado timepiece we sell.
MOVADO LIMITED WARRANTY
Movado will, within two (2) years from date of purchase, repair or replace (at Movado’s option), the movement
of your Movado watch free of charge if such movement proves to be defective in material or workmanship under
normal use.
The finish on Movado galvanic gold-plated, ion-plated and PVD-finished watches will be warranted for a period of
five (5) years against flaking and peeling only; scratching/erosion due to normal wear and tear is not covered. The
case and/or bracelet will be refinished or replaced (at Movado’s option) should such finish prove to be defective in
material or workmanship.
This warranty does not cover batteries, straps, bracelets, cases or crystals, nor does it cover damage arising from
normal wear, scratches, accidents or misuse, or from any alteration, service or repair performed by any party other
than Movado Watch Company or one of its Authorized Service Centers.
This warranty is void if the timepiece was not purchased from an Authorized Movado Dealer, as evidenced by a
valid warranty card or proof of purchase. To be valid (for watches purchased from any authorized dealer in North
America), the warranty card must be embossed with the name of the Authorized Movado Dealer, as well as dated
and signed by that dealer. To be valid (for watches purchased from any authorized dealer outside North America),
the warranty card must be duly completed, dated and stamped by the authorized Movado Jeweler.
This warranty gives you, the consumer, specific legal rights. You may also have additional legal rights under applicable law which may vary from State to State and Country to Country, and which are not affected by the terms of
this warranty.
Please address any Movado Warranty claim to a Movado Authorized Service Center. For the most current and
complete listing, visit www.movado.com.
35
MOVADO AUTHORIZED SERVICE CENTERS
For a complete worldwide listing, visit www.mgiservice.com.
36