1
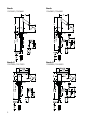
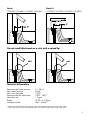
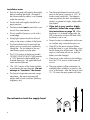
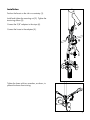
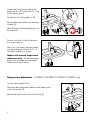
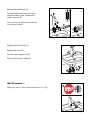
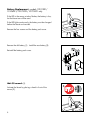
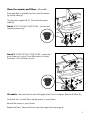
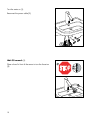
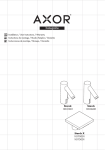
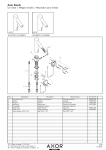
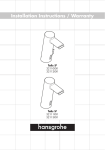
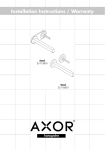
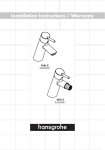
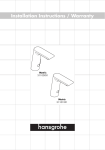
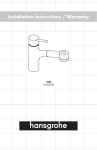
Installation Instructions / Warranty
Starck
10101XX1
10140XX1
Starck
10106XX1
10145XX1
Starck X
10170001
10175001
10180001
10185001
Starck
10101XX1/10106XX1
Starck
10140XX1/10145XX1
Starck X
10170001/10175001
Starck X
10180001/10185001
2
Starck
10101XX1/10106XX1/10140XX1/10145XX1
Starck X
10170001/10175001/10180001/10185001
Do not install this faucet on a sink with a raised lip.
ok!
no!
Technical Information
Recommended water pressure
Max. water pressure
Max. hot water temp.
Recommended hot water temp.
Max. flow rate
Battery
Automatic shutoff
15 - 58 psi
58 psi
176°F*
120°F - 140°F*
1.5 gpm
CR-P2 / 6 V Lithium
after 1 minute**
*Please know and follow all local plumbing codes when setting the temperature on the water heater.
**This is the maximum amount of time the faucet will run while a hand is within range of the sensor.
3
*OTUBMMBUJPOOPUFT
• Flush the hot and cold supplies thoroughly
before installing the faucet. Damage to
the faucet caused by debris is not covered
under the warranty.
• The hot and cold supplies should be of
equal pressure.
• The faucet should not be used with a continuous flow water heater.
• Do not install the faucet on a sink with a
raised edge.
• Strong light sources should not shine directly on the sensor window of the faucet.
• The faucet should only be used with the
battery pack or power pack supplied by
Hansgrohe. Do not attempt to use any
other battery pack or power pack.
• The 110 V version of the faucet (models
10180/10185/10140/10145) requires
a 110 V electrical outlet installed by a
licensed electrician. All applicable local
codes must be followed.
•
The 110 V version of the faucet includes
a transformer that must be used. Do not
attempt to “hardwire” the faucet.
• The faucet incorporates automatic range
adjustment -- the sensor automatically
adjusts itself to local conditions (lavatory,
brightness, etc.)
Do not bend or twist the supply hose!
4
• The distance between the switch on/off
point to the faucet is approx. 6 1/4” - 8”
under normal conditions. The detection
area may be less for dark, non-reflective
objects, or greater for bright, highly reflective objects.
• If the sink is very small or highly
reflective, follow the range reduction instructions on page 13. When
the faucet is in reduced range mode, the
LED in the sensor window will flash while
the faucet is not in use.
• Drops of water or condensation on the sensor window may cause the faucet to run.
• If the LED in the sensor window flashes
while the faucet is in use, the battery is low,
but the faucet may still be used. If the LED
stays on, the faucet will not run, and the
battery must be changed.
• If the power to the outlet or to the building
fails, the 110 V version of the faucet will
not run.
• The spray pattern will be unattractive immediately after installation or service, due
to air in the faucet. After the faucet is used
10 - 15 times, the spray pattern will clear.
Installation
Position the faucet on the sink or countertop (1).
Install and tighten the mounting nut (2). Tighten the
tensioning screws (3).
Connect the 3/8” adapters to the stops (4).
Connect the hoses to the adapters (5).
Tighten the hoses with two wrenches, as shown, to
prevent the hoses from twisting.
5
Connect the faucet power cable to the
battery pack or AC power pack (1). Plug
the AC power pack in.
Turn the hot and cold supplies on (2).
Remove the protective film from the sensor
window (3).
Wait 30 seconds before attempting to use
the faucet (4).
Position your hand in front of the sensor
to turn the water on.
Due to air in the faucet, the spray pattern
may be unattractive for the first 10 - 15
uses after installation or service.
Models with manual temperature
adjustment only: pull the temperature
lever forward to make the water cooler,
backward to make it warmer.
Temperature adjustment - 10106XX1/10145XX1/10175001/10185001 only
Turn the water supplies off (1).
Disconnect the faucet power cable from the battery pack
or AC power pack (2).
Remove the screw from the rear of the faucet (3).
6
Remove the faucet body (1).
Turn the temperature screw forward to
make the water cooler, backward to
make it warmer (2).
Dry any drops of water from the faucet
or mounting surface.
Replace the faucet body (1).
Replace the screw (2).
Turn the water supplies on (3).
Reconnect the power cable (4).
Wait 30 seconds (1).
Place your hand in front of the faucet to turn it on (2).
7
Battery Replacement -- models 10101XX1/
10106XX1/10170001/10175001 only
If the LED in the sensor window flashes, the battery is low,
but the faucet can still be used.
If the LED lights continuously, the battery must be changed
before the faucet can be used.
Remove the four screws and the battery pack cover.
Remove the old battery (1). Install the new battery (2).
Reinstall the battery pack cover.
Wait 30 seconds (1).
Activate the faucet by placing a hand in front of the
sensor (2).
8
Clean the aerator and filters -- all models
If the water flow is reduced over time, clean the aerator
(a) and the filters (b).
Turn the water supplies off (1). Disconnect the power
cable (2).
Starck 10101/10106/10140/10145 -- unscrew and
remove the aerator (a).
Starck X 10170/10175/10180/10185 -- remove the
spray former (a), using a 2 mm Allen wrench to loosen
the screws. Do not lose the screws!
All models -- disconnect the hot and cold supply hoses from the adapters. Remove the filters (b).
At another sink, rinse the filters and the aerator or spray former.
Reinstall the aerator or spray former.
Replace the filters. Reconnect the hot and cold supply hoses (see page 4).
9
Turn the water on (1).
Reconnect the power cable (2).
Wait 30 seconds (1).
Place a hand in front of the sensor to turn the faucet on
(2).
10
Cleaning
The faucet may be turned off temporarily so that the sink
may be cleaned.
Cover the sensor window with a hand for approximately
10 seconds.
The faucet will turn off for approximately 60 seconds, so
that the sink may be cleaned.
The LED in the sensor window will flash.
When the LED no longer flashes, the faucet may be used
normally.
11
Change the Spray Former -- Starck X 10170 / 10175
/ 10180 / 10185 only
The waterfall spray former is installed on the faucet at the factory.
A round monospray spray former is included with the faucet.
The spray former may be changed easily, if desired.
Use a 2 mm Allen wrench to remove the spray former screws.
Remove the old spray former.
Install the new spray former. Tighten the screws.
12
Reduce the Sensor Range
The sensor is set for maximum range at the factory. If
the faucet is used on a very small or highly reflective
lavatory, the sensor range may be reduced by approximately 2”.
Disconnect the power cable for approximately 10
seconds (1). Reconnect the power cable (2).
The LED will blink once to indicate that it is in the
“maximum range” mode.
When the LED stays on, cover the sensor window with
your hand or with a white card for 20 - 40 seconds to
reset the electronics*.
*If the card or hand is removed in less
than 20 seconds, or after 40 seconds,
the sensor mode will not reset.
When the hand or card is removed, the LED will blink
-- once for “maximum range”, twice for “reduced
range”.
The LED will then stay on while the sensor recalibrates
itself.
When the LED turns off, the faucet is ready for use.
13
Replacement Parts
4
3
6
1
10
5
2
8
9
7
1
2
3
4
5
6
7
8
9
10
14
battery, lithium
connection hose
spray former
aerator, Starck
fixing set
electronics, Starck
electronics, Starck X
AC adapter
battery box
check valve
aerator, Starck X
CR-P2 / 6V
98809000
98867000
95379XX0
13961000
98799000
98849000
98801000
96456000
95377000
XX = color
00 = chrome
80 = Steel
Maintenance note: the check valves (item #9)
should be removed and checked yearly.
Cleaning Recommendation for Hansgrohe Products
Modern lavatory faucets, kitchen faucets, and showers consist of very different materials to comply with the needs of the
market with regard to design and functionality. To avoid damage and returns, it is necessary to consider certain criteria when
cleaning.
Cleaning Materials for Faucets and Showers
Acids are a necessary ingredient of cleaning materials for removing lime, however please pay attention to the following points
when cleaning faucets and showers:
•
Only use cleaning materials which are explicitly intended for this type of application.
•
Never use cleaning materials which contain hydrochloric, formic, phosphoric, or acetic acid, as they cause considerable
damage.
•
Never mix one cleaning material with another.
•
Never use cleaning materials or appliances with an abrasive effect, such as unsuitable cleaning powders, sponge pads,
or micro fiber cloths.
Cleaning Instructions for Faucets and Showers
Please follow the cleaning material manufacturer’s instructions. In addition, pay attention to the following points:
•
Clean the faucets and showers as and when required
•
Use the amount of cleaning product and the amount of time recommended by the manufacturer. Do not leave the cleaner
on the fixture longer than necessary.
•
Regular cleaning can prevent calcification.
•
When using spray cleaners, spray first onto a soft cloth or sponge. Never spray directly onto the faucet as droplets can
enter openings and gaps and cause damage.
•
After cleaning, rinse thoroughly with clean water to remove any cleaner residue.
Important
Residues of liquid soaps, shampoos, and shower foams can also cause damage, so rinse with clean water after using.
Please note: if the surface is already damaged, the effect of cleaning materials will cause further damage.
Components with damaged surfaces must be replaced or injury could result.
Damage caused by improper treatment is not covered under the warranty.
Limited Lifetime Consumer Warranty
This product has been manufactured and tested to the highest quality standards by Hansgrohe, Inc. (“Hansgrohe”). This warranty is limited to
Hansgrohe products which are purchased by a consumer in the United States after March 1, 1996, and installed in either the United States or
Canada.
WHO IS COVERED BY THE WARRANTY
This warranty extends to the original consumer purchaser only. This warranty is non-transferable.
WHAT IS COVERED BY THE WARRANTY
This warranty covers only your Hansgrohe manufactured product. Hansgrohe warrants this product against defects in material or workmanship
as follows: Hansgrohe will repair at no charge for parts only or, at its option, replace any product or part of the product that proves defective
because of improper workmanship and/or material, under normal installation, use, service and maintenance. If Hansgrohe is unable to provide a
replacement and repair is not practical or cannot be timely made, Hansgrohe may elect to refund the purchase price in exchange for the return of
the product.
LENGTH OF WARRANTY
Replacement or repaired parts of products will be covered for the term of this warranty as stated in the following two sentences. If you are a
consumer who purchased the product for use primarily for personal, family, or household purposes, this warranty extends for as long as you
own the product and the home in which the product is originally installed. If you purchased the product for use primarily for any other purpose,
15
including, without limitation, a commercial purpose, this warranty extends only (i) for 1 year, with respect to Hansgrohe and Commercial products,
and (ii) for 5 years, with respect to AXOR products.
THIS WARRANTY DOES NOT COVER, AND HANSGROHE WILL NOT PAY FOR:
A.
Conditions, malfunctions or damage not resulting from defects in material or workmanship.
B.
Conditions, malfunctions or damage resulting from (1) normal wear and tear, improper installation, improper maintenance, misuse, abuse,
negligence, accident or alteration, or (2) the use of abrasive or caustic cleaning agents or “no-rinse” cleaning products, or the use of the
product in any manner contrary to the product instructions. (3) Conditions in the home such as excessive water pressure or corrosion.
C.
Labor or other expenses for the disconnection, deinstallation, or return of the product for warranty service, or for installation or reinstallation
of the product (including but not limited to proper packaging and shipping costs), or for installation or reinstallation of the product.
D.
Accessories, connected materials and products, or related products not manufactured by Hansgrohe.
TO OBTAIN WARRANTY PARTS OR INFORMATION
Contact your Hansgrohe retailer, or contact Technical Service at:
Hansgrohe Inc.
1492 Bluegrass Lakes Parkway
Alpharetta GA 30004
Toll-free (800) 334-0455.
In requesting warranty service, you will need to provide
1.
2.
3.
The sales receipt or other evidence of the date and place of purchase.
A description of the problem.
Delivery of the product or the defective part, postage prepaid and carefully packed and insured, to Hansgrohe Inc. 1492 Bluegrass Lakes
Parkway, Alpharetta, Georgia 30004, Attention: Technical Service, if required by Hansgrohe.
When warranty service is completed, any repaired or replacement product or part will be returned to you postage prepaid.
EXCLUSIONS AND LIMITATIONS
REPAIR OR REPLACEMENT (OR, IN LIMITED CIRCUMSTANCES, REFUND OF THE PURCHASE PRICE) AS PROVIDED UNDER THIS WARRANTY IS
THE EXCLUSIVE REMEDY OF THE PURCHASER. HANSGROHE NEITHER ASSUMES NOR AUTHORIZES ANY PERSON TO CREATE FOR IT ANY
OBLIGATION OR LIABILITY IN CONNECTION WITH THIS PRODUCT.
Some States do not allow the exclusion or limitation of incidental or consequential damages, so the above limitation or exclusion may not apply
to you. This warranty gives you specific legal rights, and you may have other rights which vary from State to State. You may be required by law
to give us a reasonable opportunity to correct or cure any failure to comply before you can bring any action in court against us under the
Magnuson-Moss Warranty Act.
PRODUCT INSTRUCTIONS AND QUESTIONS
Upon purchase or prior to installation, please carefully inspect your Hansgrohe product for any damage or visible defect. Prior to installing,
always carefully study the enclosed instructions on the proper installation and the care and maintenance of the product. If you have questions at
any time about the use, installation, or performance of your Hansgrohe product, or this warranty, please call or write to us or call us toll-free at
800 334 0455.
Hansgrohe, Inc. • 1490 Bluegrass Lakes Parkway • Alpharetta, GA 30004
Tel. 770 360-9880 • Fax 770 360 9887
www.hansgrohe-USA.com
US - Installation Instructions • Part No. 90423023 • Revised 05/2009
HANSGROHE SHALL NOT BE LIABLE TO PURCHASER OR ANY PERSON FOR ANY INCIDENTAL, SPECIAL, OR CONSEQUENTIAL DAMAGES,
ARISING OUT OF BREACH OF THIS WARRANTY OR ANY IMPLIED WARRANTY (INCLUDING MERCHANTABILITY).