1
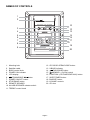
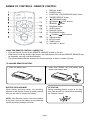
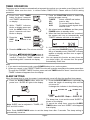
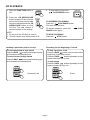
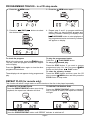
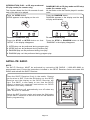
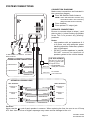
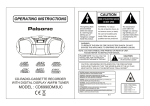
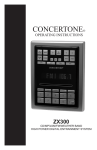
TM
OPERATING INSTRUCTIONS
COMPACT DISC SATELLITE
STEREO RADIO SYSTEM
WARRANTY
ONE (1) YEAR LIMITED WARRANTY
CONCERTONE warrants to the original retail purchaser of this radio that it or any part therein,
under normal use and conditions, be proven defective in material or workmanship within 1 year
from the date of original purchase, such defect/s will be repaired or replaced at CONCERTONE’S
option without charge for parts and repair labor.
This warranty does not extend to the elimination of externally generated static or noise, to the
correction of antenna generated noise or to the cost incurred to correct this noise. The warranty
does not cover the removal reinstallation of this radio or damage to any tapes, CD’s speakers,
accessories, or the vehicles electrical system.
This warranty does not cover the cabinet appearance or apply to the radio or any part of the
radio which in the opinion of CONCERTONE, has been damaged through alterations, improper
installation, mishandling, misuse, neglect, or accident. THE EXTENT OF CONCERTONE’S
LIABILITY UNDER THIS WARRANTY IS LIMITED TO THE REPAIR OR REPLACEMENT
PROVIDED ABOVE, AND IN NO EVENT, SHALL CONCERTONE’S LIABILITY EXCEED THE
PURCHASE PRICE PAID BY THE ORIGINAL BUYER FOR THE RADIO.
This warranty extends only to the original purchaser of the radio and is not transferable.
Some states do not allow limitations on how long an implied warranty last, and some states do
not allow the exclusion or limitation of incidental or consequential damages, so the above
limitations or exclusion may not apply to you. This warranty gives you specific legal rights.
To obtain repair or replacement within the terms of this warranty, the radio is to be delivered with
proof of purchase with a description of the defect/s, freight prepaid, to the original dealer or to
Concertone , 574-389-1801, 725 Industrial Parkway, Elkhart, IN 46516, Technical
Assistance, Warranty, Parts and Service 574-534-3167.
TM
WARNING
RISK OF ELECTRIC SHOCK
DO NOT OPEN
The lightning flash and arrowhead
within the triangle is a warning
sign alerting you of “dangerous
voltage” inside the product.
WARNING: TO REDUCE THE RISK OF ELECTRIC
SHOCK, DO NOT REMOVE COVER (OR BACK)
NO USER-SERVICEABLE PARTS INSIDE. REFER
SERVICING
TO
QUALIFIED
SERVICE
PERSONNEL.
CAUTION: INVISIBLE LASER RADIATION WHEN
OPEN AND INTERLOCKS DEFEATED. AVOID
EXPOSURE TO BEAM.
ADVARSEL: USYNLIG LASERSTRALING VED
ÁBNING NÁR SIKKERHEDSAFBRYDERE ER UDE
FUNKTION UNDGÁ UDSÆTTELSE FOR STRÁLING.
VARO: AVATTAESSA JA SUOJALUKITUS OHITETTAESSA OLET ALTTINA NÄKYMÄTTÖMÄLLE LASERSÄTEILYLEE. ÄLÄ KATSO SÄTEESEEN!
VARNING: OSYNLIG LASERSTRÁLNING NÄR DENNA
DEL ÄR ÖPPNAD OCH SPÄRREN ÄR URKOPPLAD
BETRAKTA EJ STRÄLEN!
WARNING: TO REDUCE THE
RISK OF FIRE OR ELECTRIC
SHOCK, DO NOT EXPOSE
THIS APPLIANCE TO RAIN OR
MOISTURE.
The exclamation point within the
triangle is a warning sign alerting
you of impor tant instr uctions
accompanying the product.
• THIS DEVICE COMPLIES WITH PART 15 OF THE FCC
RULES. OPERATION IS SUBJECT TO THE
FOLLOWING TWO CONDITIONS: (1) THIS DEVICE
MAY NOT CAUSE HARMFUL INTERFERENCE, AND
(2) THIS DEVICE MUST ACCEPT ANY
INTERFERENCE
RECEIVED,
INCLUDING
INTERFERENCE THAT MAY CAUSE UNDESIRED
OPERATION.
• COMPLIES WITH DHHS RULES 21CFR SUBCHAPTER J APPLICABLE AT DATE OF
MANUFACTURE.
This product contains a low power laser device.
To ensure continued safety, do not remove any
covers or attempt to gain access to the inside of
the product. Refer any servicing to qualified
personnel.
Page 2
NAMES OF CONTROLS
1
2
10
11
3
4
12
13
5
6
14
15
16
7
8
17
18
19
9
20
1.
2.
3.
4.
5.
6.
7.
8.
9.
10.
11.
Mounting hole
Satellite cradle
BASS control knob
POWER ON indicator
LCD display
TUNING/SKIP
button
POWER ON/OFF button
STOP/BAND button
REMOTE SENSOR
A/A+B/B SPEAKER selector switch
TREBLE control knob
12.
13.
14.
15.
16.
17.
18.
19.
20.
Page 3
CD DOOR OPEN/CLOSE button
X-BASS indicator
PLAY/PAUSE button
MEMORY • CLOCK control
FUNCTION (CD/TUNER/SAT/AUX) button
SLEEP/TIMER button
SNOOZE button
VOLUME controls
CD door
NAMES OF CONTROLS - REMOTE CONTROL
1.
2.
3.
4.
5.
6.
7.
8.
9.
10.
11.
12.
13.
14.
15.
16.
DISPLAY button
POWER button
FUNCTION (CD/TUNER/SAT/AUX) button
PRESET/REPEAT button
STOP/BAND button
TUNING/
SKIP buttons
MEMORY
button
RANDOM button
SLEEP button
SNOOZE button
PLAY/PAUSE button
TUNING/
SKIP buttons
X-BASS button
INTRO button
TIMER button
VOLUME +/- button
USING THE REMOTE CONTROL CORRECTLY
• Point the Remote Control at the REMOTE SENSOR located on the unit.
• When there is a strong ambient light source, the performance of the infrared REMOTE SENSOR may
be degraded, causing unreliable operation.
• The recommended effective distance for remote operation is about 6 meters (19 feet).
TO CHANGE REMOTE BATTERY
1. Open the battery door.
2. Insert one CR2025 (3V) size battery and
replace the battery door.
BATTERY REPLACEMENT
When battery becomes weak, the operating
distance of the Remote Control is greatly reduced
and you will need to replace the battery.
NOTE: If the Remote Control is not to be used for
a long time, remove the battery to avoid damage
caused by battery leakage corrosion.
Page 4
ATTENTION
Before operating remote control for the first
time. Take out the PVC sheet before operating
the Remote Control.
TURNING ON THE UNIT
TO TURN ON THE UNIT
Press the POWER ON/OFF button, the POWER
ON indicator will light up. Select the desired
function and the corresponding function indicator
will light up.
TO TURN OFF THE UNIT
Press the POWER ON/OFF button to STANDBY,
the POWER ON indicator will turn off and the
clock display will be shown.
CLOCK SETTING
1. In standby mode, press and
hold the
MEM button for
about 3 seconds until time
format blinks on display.
4. Press the
TUNING/
SKIP
buttons to set
correct hour.
2. Press the
TUNING/
SKIP
buttons to set 12
Hour or 24 Hour time format.
5. Press the
MEM button,
the Minute blinks.
6. Press the
TUNING/
SKIP
buttons to set
correct minute, and then
press the MEM button to
start the clock.
3. Press the MEM button, the
Hour blinks.
Note: Your unit is factory preset in 12 hour display.
However, if there is a power failure or the unit
has not been connected to power for a long period
of time, the display may shift to 24 hour.
ADJUSTING THE SOUND
TO ADJUST VOLUME
TO ADJUST BASS AND TREBLE
Turn the slide knobs to adjust the bass and treble
output.
TO SELECT X-BASS (for remote only)
X-BASS is designed specifically to boost the low
frequency sound to obtain a more powerful bass.
Note: Press the X-BASS button, the indicator of
X-BASS will light up.
Page 5
TIMER OPERATION
The power can be turned on automatically at a preset time so that you can wake up and listen to the CD
or RADIO. Make sure the clock is correct before TIMER PLAY. Please refer to CLOCK setting
procedure.
6. Press the FUNCTION button to select the
desired program source:
TUNER:
Select a BAND and station.
CD:
Insert a disc.
SAT:
To connect Satellite Radio
AUX:
To listen to audio signals from
external units.
7. Set volume level and X-Bass, and then press
POWER button to standby mode.
8. When the timer that has been set is reached,
the system will turn on automatically and
“TIMER” indicator will blink on the display.
1. Press and hold TIMER
button for about 3 seconds
until “TIMER” indicator blinks
on display.
2. While “TIMER” indicator
blinks on display, press and
hold the MEM button for
about 3 seconds until hour
blinks on display.
3. Press the
SKIP
hour.
TUNING/
buttons to set
4. Press the MEM button. The minute will blink.
5. Press the
TUNING/SKIP
buttons to
set minutes and press the MEM button to
“confirm”. Finally the “TIMER” indicator will
stop blinking after 3 seconds on display.
9. If you want to snooze for a few more minutes,
you can press SNOOZE button. The system
will go to standby mode (“SNOOZE” indicator
appear on display) and then turn on again 5
minutes later.
You can repeat this function as many times as
you desire within 119 minutes from the preset
automatically PLAY time.
Note:
1. If you want to exit snooze mode, press POWER button to turn on the system.
2. Unless you cancel it, the “PRESET TIMER” function will be active everyday at the same preset time.
To cancel the “PRESET TIMER” function, press and hold TIMER button for about 3 seconds until the
“TIMER” indicator disappears from the display.
SLEEP SETTING
When the sleep timer is used, the power is automatically turned off after the specified time passes.
1. Press the SLEEP/TIMER button while the
power is on. “SLEEP 90” lights in the display.
2. Press the SLEEP/TIMER button repeatedly to
select the length of remaining time until the
unit turns off.
It changes the indicator in the following way:
SLEEP
OFF
Note: SLEEP can be adjusted in TUNER, CD,
SAT and AUX modes.
SLEEP 90
SLEEP 80
SLEEP 10
....SLEEP 20
The sleep timer is set and the word “SLEEP” is
shown on the display.
To cancel the sleep timer, press the SLEEP/
TIMER button once and “SLEEP” will disappear
from display.
Note: Press SLEEP/TIMER button to set the sleep timer after 5 seconds. The sleep setting is
automatically turned on.
Page 6
LISTENING TO THE RADIO
TUNING INTO A STATION MANUALLY
1. Press the FUNCTION button
to TUNER.
3. Press the
SKIP
a station.
TUNING/
buttons to select
2. Press the
STOP/BAND
button to select the desired
band.
TO SEARCH FOR A STATION
AUTOMATICALLY
Press the
TUNING/SKIP
button for 1 to
2 seconds, and a station is searched for
automatically. After tuning in a station, the search
stops.
The search may not stop at a station with a very
weak signal.
TO RECEIVE THE FM BROADCAST IN
STEREO
When receiving FM broadcasts in stereo, the word
“STEREO” will illuminate.
PRESETTING STATION (for remote only)
Your favourite radio stations can be tuned in to by selecting their preset numbers. It is possible to store
stations of any band in order of your choice.
Manual memory presetting
This feature allows you to manually preset stations to any desired channel.
1. Set to the desired band and
station.
2. Press the MEM button until
the MEMORY indicator
blinks.
3. Press the PRESET/REPEAT
button to select a channel
number for the preset station
on the remote control.
4. Press the MEM button again
to memorize the station.
5. Repeat steps 1 to 4 for the next preset.
TUNING INTO A PRESET STATION
Press the PRESET/REPEAT button on the remote control to select a preset number.
PRESET
REPEAT
NOTE:
If a button is not pressed within 10 seconds the preset mode will exit automatically.
Page 7
CD PLAYBACK
1. Press the FUNCTION button to
CD.
2. Press the CD OPEN/CLOSE
button to open CD door. Place a
disc in the CD tray with the label
face front and then press the CD
OPEN/CLOSE button to close
CD door. The total number of
tracks will show on the display.
NOTE:
1. Do not push the CD door to close it.
2. CD door cannot open while power is off.
Locating a particular point in a track
3. To start playing, press the
PLAY/PAUSE button.
TO INTERRUPT PLAYBACK
Press the
PLAY/PAUSE button.
The track time will blink.
To resume playback, press the
PAUSE button again.
PLAY/
TO STOP PLAYBACK
Press the
STOP button.
Searching for the beginning of a track
To move backward at high speed
Keep the SKIP
button pressed during play
and release at the desired point.
To move forward at high speed
Keep the SKIP
button pressed during play
and release at the desired point.
To find a previous track
Press the SKIP
button once to return to the
beginning of the current track.
Press the SKIP
button repeatedly to skip
tracks backward one by one.
To skip tracks
Press the SKIP
button repeatedly to skip
track(s) forward one by one.
Press and hold
Press
Page 8
PROGRAMMING TRACKS - in a CD stop mode
1. Press the
MEM button.
2. Press the
SKIP
the desired tracks.
3. Press the
buttons to select
To check the program
While in the stop mode, press the
MEM button.
The disc, track and program numbers will appear
on the display.
Press the
MEM button again to view the other
programmed selections.
These displays do not appear during programmed
play.
MEM button again.
4. Repeat step 2 and 3 to program additional
tracks, after you have finished program and
memory indicator is blinking on display. Press
PLAY/PAUSE button to start playback of
the programmed tracks and memory indicator
will appear on display.
To play the programmed tracks
Press the
PLAY/PAUSE button.
To stop programmed play
Press the STOP button, if you want to recover
programmed play. You can first press
MEM
button and then press
PLAY button.
To clear the memory content
Press the STOP button and then open the CD
door or press
MEM button and then press the
STOP button in stop mode.
REPEAT PLAY (for remote only)
This function will allow a single tracks or all the tracks on the disc to be played repeatedly.
TO REPEAT THE SAME TRACK
Press the PRESET/REPEAT button once during
playback, the repeat one indicator will blink.
PRESET
REPEAT
TO REPEAT THE WHOLE DISC
Press the PRESET/REPEAT button a second
time to repeat all tracks, the repeat all indicator
will light.
PRESET
REPEAT
TO CANCEL REPEAT PLAY
Press the PRESET/REPEAT button until REPEAT indicator is switched off.
Page 9
INTRODUCTION PLAY - at CD stop mode and
CD play mode (for remote only)
This function allows the first 10 seconds of each
track of the disc to be played.
Press the INTRO button.
INTRO appears in the display on the unit.
RANDOM PLAY at CD play mode and CD stop
mode (for remote only)
All the tracks on the disc can be played in random
order.
Press the RANDOM button.
RANDOM appears in the display and the disc
will play automatically.
RANDOM
To cancel introduction play
Press the STOP or INTRO button so that
“INTRO” in the display disappears.
1.
2.
3.
4.
To cancel random play
Press the STOP or RANDOM button so that
“RANDOM” in the display disappears.
INTRO play can be performed during program play.
INTRO play can be performed during random play.
RANDOM play can be performed during intro play.
RANDOM play can’t be performed during program play.
SATELLITE RADIO
NOTE:
The SKYFi Receiver MUST be activated by contacting XM RADIO. (1-800-852-9696 or
www.xmradio.com) Follow the instructions included in the SKYFi Receiver carton to contact XM
RADIO and activate the SKYFi Receiver.
Place the SKYFi Receiver firmly in the cradle. Change
the function to SAT. Push the ON button on the SKYFi
Receiver and the display on the SKYFi Receiver will
light. The SKYFi is now ready to use. Use the SKYFi
owner’s manual for complete instructrions on SKYFi
operation and many features.
The SKFi Receiver will automatically turn off when any
other function is selected.
Select the SAT function again and press the ON button
on the SKYFi Receiver to return to receive XM Satellite
Radio programming.
Page 10
MAINTENANCE
CLEAN CD
If the CD skips or will not play, the disc may need cleaning. Before playing, wipe the disc
fromthe centre out with a cleaning cloth. After playing, store the disc in its case.
CLEANING THE UNIT
Do not use volatile chemicals on the unit. Clean by lightly wiping with a soft cloth.
IMPORTANT NOTICE:
• If an abnormal display indication or an operating problem occurs, turn off power. Wait at least 5
seconds, then turn on power.
• Before transporting the unit, remove the disc from the CD tray.
SPECIFICATIONS
TUNER SECTION
Frequency range
Antenna
AMPLIFIER SECTION
Power output 10% T.H.D.
FM 87.5 -108 MHz
AM 520 - 1,710 kHz (USA and Canada)
External 75ohm automotive type antenna
Power requirements
(A) 20W x 2 (Subwoofer) + 10W x 4
(B) 10W x 2
10/16 Volts DC
COMPACT DISC PLAYER SECTION
Frequency Response
Signal to noise ratio
Dynamic Range
Total harmonic Distortion
Separation
40 - 20,000 Hz
60 dB
70 dB
0.5% (Normal) T.H.D.
40 dB (at 1 kHz)
GENERAL (Tuner/CD Player)
Installation size:
Weight:
Approx: 8-1/4” (W) x 6-1/2” (D) x 10-3/4” (H) (Inch)
Approx: 5.28 Lbs.
Specifications and external appearance are subject to change without advance notice due to continuous
product improvement.
Page 11
SYSTEM CONNECTIONS
CONNECTION DIAGRAM
Make correct connections as illustrated in
the connection diagram.
A
From XM Satellite Radio Antenna
NOTE: Some XM antennas will have only
one antenna cable. This is a factory
design and will function normally.
B
C
From Antenna
From optional TV output jack
SPEAKER CONNECTIONS
Be sure to connect stripe to stripe (-) and
plain to plain (+) when hooking up speaker
wires. This is to prevent any ‘phasing’
problems.
Notes:
• Use speakers with an impedance of 4
to 8 ohms, and with adequate power
handling capacities. Otherwise, speaker
may be damaged.
• DO NOT connect speakers in parallel.
DO NOT connect the terminals of
speaker system to the vehicle chassis.
A
B
C
TV/Aux-in
RCA female
To XM Satellite To Antenna connector
Radio Antenna
FUSE REPLACEMENT
SUBWOOFERS CONNECTION
SUBWOOFER 1
The fuse is in the Fuse
Filter Box. Replace with
15 Amp ATC Fuse.
WHITE
Black wire
To Grounded
metal part of vehicle
Yellow wire
To constant
+12 volt source
WHITE/BLACK
SUBWOOFER 2
GREEN
GREEN/BLACK
SPEAKERS CONNECTIONS
LEFT SPEAKER
RIGHT SPEAKER
SPEAKER A
FRONT
WHITE
SPEAKER A
REAR
GREEN
WHITE/BLACK
GREEN/BLACK
SPEAKER B
BLUE
BLUE/BLACK
YELLOW
SPEAKER A
FRONT
YELLOW/BLACK
GREY
SPEAKER A
REAR
GREY/BLACK
ORANGE
SPEAKER B
ORANGE/BLACK
Caution:
Never use the
cord of each speaker in common. When replacing the fuse, be sure to use 15 Amp
ATC fuse. Use of a fuse of higher amperage may cause serious damage to the unit.
Page 12
Printed in China
811-RV0491-010