1
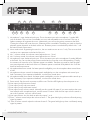
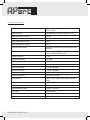
MANUAL
PM7400 MKII Professional two-zone stereo pre-amplifier/mixer
[email protected]
Safety first!
aution: hot and sharp surfaces! This professional device needs to be installed by qualified perC
sonnel only.
Please check the packing for any kind of damage upon reception of the goods. If the packing is
damaged, please contact your dealer before opening it.
!!!! Danger!!!! Exposure to high sound pressure levels may cause permanent hearing loss. Hearing loss induced by exposure to high sound pressure levels will vary from individual to individual,
but nearly everyone will lose some hearing when exposed for a sufficient amount of time. Therefore it is recommended that all persons exposed to equipment capable of producing high sound
pressure levels, such as this amplifier, wear sufficient ear protection while installing or operating
this unit.
Read all documentation before operating your equipment.
Keep all documentation for future reference.
Keep the carton and packing material, even if the equipment has arrived in good condition.
Should you ever need to send the unit back, use only the original factory packing.
Do not spill water or other liquids on or into the unit.
Make sure power outlets conform to the power requirements listed on the back of the unit.
Do not use the unit if the electrical power cord is damaged.
Always operate the unit with the AC ground wire connected to the electrical system ground.
Turn the level controls on the amplifiers all the way down during power-up to prevent speaker
damage if there are high signal levels at the inputs.
Do not connect the inputs / outputs of amplifiers or consoles to any other voltage source, such
as batteries, mains sources or power supplies, regardless of whether the amplifier or console is
turned ON or OFF.
Power down and disconnect units from mains voltage before making connections.
Do not use the unit near stoves, heat registers, radiators, or other heat producing devices.
Do not operate equipment on a surface or in an environment which may distort the normal flow of
air around the unit. If the unit is used in an extremely dusty or smoky environment, the unit should
regularly be “blown free” of dust.
Do not remove the cover. Removing the cover will expose you to potentially dangerous volt-ages.
Do not drive the inputs with a signal level higher than that which is required to drive equipment to
full output.
Do not run the output of any amplifier back into another input.
In case of malfunction, this device should be serviced by qualified service personnel only.
2
WWW.APART-AUDIO.COM
Features
• 2 zone stereo mixer, 1 balanced line output and 1 unbalanced line output with individual
volume controls
• 6 line inputs, 1 balanced (XLR), 5 unbalanced (RCA)
• 2 balanced microphone inputs with switchable phantom power
• Switchable vox mute on mic 1 with adjustable music mute level
• Microphone priority contact
• 3 band tone control for line and mic inputs
• Toroidal power transformer
• Mono/stereo switch
• 19 inch rack mountable with fixed rack-ears
How to mix music and microphone signals?
• You can mix spoken microphone messages with music in different ways.
• 1. Mix the microphone signals with the music by setting the mic and line level volume controllers to an appropriate level. In order to do this, the Vox/Ext. mute switch should not be pressed
in and the mute contact at the back should be open. You will notice that you have to push the
microphone level to a very high level. This is not recommended.
• 2. Mix the microphone signal of mic 1 with the music using the ‘vox’ or ‘voice-over’ circuitry:
The Vox/Ext. mute switch must be pressed in, and the mute contact at the back must be open.
By setting the mic 1 and vox mute level at the back to an appropriate level, you can create an
automatic music muting by talking into mic 1. This is not valid for the mic 2 input, i.e. mic 2
signals can not activate the vox circuitry.
• 3. By closing the external mute contact at the back, you will mute the music signal. Now you
can speak into mic 1 or mic 2. The muting circuitry will only mute the music signals and allow
the mic signals to pass through. This way you can create a microphone priority system easily.
Please note that the external mute contact at the back can only be connected to a switch.
Never apply any voltages to the external mute contacts !
3
[email protected]
5
3
1
2
4
6
11
9
7
8
10
13
12
14
15
16
1) Microphone 1 input: balanced jack input. This is the same input as the microphone 1 combo XLR/
jack at the back. This mic has a switchable vox circuit with adjustable music mute level. This way, a
spoken message will suppress the music. Alternatively, you can use the priority contacts at the back.
Closing the contacts will mute the music. Phantom power is available. Therefore you need to close the phantom power dipswitch at the back of the unit. Phantom power is switched off by default. Mic 1 will
be heard in both output zones.
2) Mute mode switch: by pressing this switch in, the vox mode is active on mic 1 only. The vox mute level
can be set via a potmeter on the back of the unit.
3) Mic 1 volume control: this volume control adjusts the mic 1 level.
4) Mic 2 volume control: this volume control adjusts the mic 2 level.
5) Microphone 2 input: balanced jack input. This is the same input as the microphone 2 combo XLR/jack
at the back. You can use the priority contacts at the back to mute the music while speaking. Closing
the contacts will mute the music. Phantom power is available. Therefore you need to close the phantom power dipswitch at the back of the unit. Phantom power is switched off by default. Mic 2 will be
heard in both output zones.
6) Microphone bass tone control: for better speech intelligibility, turn the microphone bass control down
a little.
7) Microphone mid tone control: for better speech intelligibility, turn the microphone mid control up a
little if necessary. If you experience feedback, turn the tone control down.
8) Microphone treble tone control: for better speech intelligibility, turn the microphone treble control up a
little if necessary. If you experience feedback, turn the tone control down.
9) Power switch: flip the switch to power on/off the unit. The blue LED lights up when the power is on.
10) Line inputs (music) bass tone control.
11) Line inputs (music) mid tone control.
12) Line inputs (music) treble tone control.
13) Line inputs (music) volume control. Normally, set this control fully open. If you want to adjust the music
level relative to the microphone level, use this control. Caution: when the line input volume control is
set to the 0 position, no music will be heard.
14) Line input selector: turn this knob to select line inputs 1 to 6.
15) Zone 1 volume control: adjust the volume of zone 1. The green leds light up when a sufficiently strong
signal is present.
16) Zone 2 volume control: adjust the volume of zone 2. The green leds light up when a sufficiently strong
signal is present.
4
WWW.APART-AUDIO.COM
1
5
2
3
4
7
6
9
8
11
13
14
10
12
15
16
17
1) GND connection: connect an additional ground wire here if necessary.
2) Line 1 balanced right channel input on XLR.
3) Line 1 balanced left channel input on XLR.
4) Line 2 unbalanced L/R input on RCA connectors.
5) Line 3 unbalanced L/R input on RCA connectors.
6) Line 4 unbalanced L/R input on RCA connectors.
7) Line 5 unbalanced L/R input on RCA connectors.
8) Line 6 unbalanced L/R input on RCA connectors.
9) Zone 1 unbalanced line output on RCA connectors.
10) Mono/stereo, GND lift and phantom power dipswitches. For mono operation in both zones, flip
dipswitch 1 to the on position (down). Dipswitch 2 is normally to the on position: if you want to separate the audio ground from safety ground, flip this switch up. Dipswitch 3 and 4 activate the phantom
power for mic 2 or mic 1 when switched on.
11) External mute contacts: close these contacts to mute the music for microphone 1-2 priority. Do not apply any foreign voltage to these connectors. Connect a potential free contact only!
12) Vox mute level control: turn this control to set the microphone 1 activated vox circuit mute level. This
control has no function when the front mute switch is not pressed to the in position.
13) Zone 2 right balanced right channel output on XLR.
14) Zone 2 left balanced left channel output on XLR.
15) Microphone 2 input: balanced XLR/jack combo input. This is the same input as the microphone 2 jack
at the front. You can use the priority contacts at the back to mute the music while speaking. Closing the
contacts will mute the music.
16) Microphone 1 input: balanced XLR/jack combo input. This is the same input as the microphone 1 jack
at the front. This mic has a switchable vox circuit with adjustable mute level. This way, a spoken message will suppress the music. Alternatively, you can use the priority contacts at the back (11). Closing
the contacts will mute the music.
17) Power cord receptacle with built in mains fuse: connect the power cord here. Mains voltage is 230
VAC/50-60Hz. The mains fuse is located inside this connector and can be reached without opening
the unit. When the fuse is broken, replace only with a fuse of the same voltage and current rating. Fuse
rating: 315mAT/250V. 5
[email protected]
Technical Specifications
Inputs line level
Balanced stereo inputs on XLR, 5 x unbalanced
stereo on RCA
Inputs mic level
2 x balanced on jack and combo jack / XLR
Input sensitivity line inputs
500 mV
Input sensitivity mic inputs
5 mV
Input impedance line inputs
10 KΩ
Input impedance mic inputs
500 Ω
Phantom power supply
Approx 15V, switchable via dipswitches for MIC1
and MIC2
Outputs
Stereo unbalanced ZONE1 on RCA
Stereo balanced ZONE2 on XLR
Output impedance
<600 Ω
Nominal output level
1V / 0dBV
Liftable ground
yes, via dipswitch
Mono / Stereo switch
yes, via dipswitch
S/N ratio line inputs
>90 dB A weighted
S/N ratio mic inputs
>70 dB A weighted
THD
<0.1%
Frequency response
20-25 Khz +0/-3dB
Tone controls
80Hz, 1.5KHz, 10KHz / up to 12dB attenuation /
boost
Channel separation
>70dB @ 1KHz
Max power consumption
10VA
Mains operating voltage
230VAC / 50-60Hz
Fuse rating
315mAT/250V
Dimensions
48.3 x 4.4 x 27.5 CM (without rubber feet)
Net weight
2.6Kg
6
WWW.APART-AUDIO.COM
7
[email protected]
ANY SUGGESTION?
They are well appreciated and eventually
rewarded!
Send your ideas or suggestions to
[email protected]
Company names, product names, and names of formats etc. are the trademarks
or registered trademarks of their respective owners.
© 2011 APart-Audio specifications subject to change without notice.
PM7400MKII is developed by
Audioprof nv
Industriepark Brechtsebaan 8 bus 1
BE-2900 Schoten
BELGIUM
8
WWW.APART-AUDIO.COM