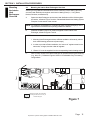
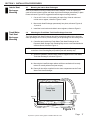
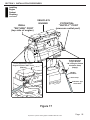
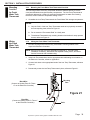
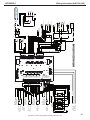
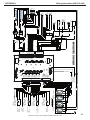
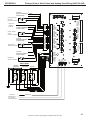
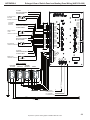
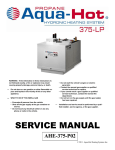
1
Installation Manual
Model Numbers
AHE-100-04S - 12 VDC
AHE-130-04X - 12 VDC
TABLE OF CONTENTS
Section 1
Hydronic Heating System Overview
1.1
Section 2
2
Aqua-Hot Overview
2.1
2.2
Section 3
Heating System Overview. . . . . . . . . . . . . . . . . . . . . . . . . . . . . . . . . . . .
Page
Aqua-Hot Overview. . . . . . . . . . . . . . . . . . . . . . . . . . . . . . . . . . . . . . . . .
Aqua-Hot Model Differentiation. . . . . . . . . . . . . . . . . . . . . . . . . . . . . . . .
4
4
Installation Procedures
3.1
3.2
3.3
3.4
3.5
3.6
3.7
3.8
3.9
3.10
3.11
3.12
3.13
3.14
3.15
3.16
3.17
3.18
3.19
3.20
3.21
3.22
3.23
3.24
3.25
3.26
3.27
3.28
3.29
3.30
Appendix A
Installation Procedure . . . . . . . . . . . . . . . . . . . . . . . . . . . . . . . . . . . . . . .
Mounting the Aqua-Hot Overview. . . . . . . . . . . . . . . . . . . . . . . . . . . . . .
Mounting the Aqua-Hot . . . . . . . . . . . . . . . . . . . . . . . . . . . . . . . . . . . . . .
Mounting the Interior Heat Exchangers Overview . . . . . . . . . . . . . . . . .
Mounting the Interior Heat Exchangers . . . . . . . . . . . . . . . . . . . . . . . . .
Mounting the Fresh Water Tank Heat Exchanger Overview . . . . . . . . . .
Mounting the Fresh Water Tank Heat Exchanger . . . . . . . . . . . . . . . . . .
Plumbing the Heat Exchangers Overview . . . . . . . . . . . . . . . . . . . . . . .
Installing the Interior/Fresh Water Tank Plumbing Lines. . . . . . . . . . . . .
Plumbing the Engine Preheat System Overview . . . . . . . . . . . . . . . . . .
Attaching Plumbing Lines to the Vehicle’s Engine . . . . . . . . . . . . . . . . .
Domestic Hot Water Plumbing Overview . . . . . . . . . . . . . . . . . . . . . . . .
Attaching Plumbing Lines to the Domestic Hot Water System . . . . . . . .
Electronic Controller Overview . . . . . . . . . . . . . . . . . . . . . . . . . . . . . . . .
Wiring the Interior and Fresh Water Tank Heat Exchangers. . . . . . . . . .
Mounting Locations for Interior Room Thermostats Overview . . . . . . . .
Wiring the Interior Room Thermostats . . . . . . . . . . . . . . . . . . . . . . . . . .
Mounting the Fresh Water Tank Thermostat Overview. . . . . . . . . . . . . .
Wiring the Fresh Water Tank Thermostat . . . . . . . . . . . . . . . . . . . . . . . .
Installing and Wiring the Switch Panel . . . . . . . . . . . . . . . . . . . . . . . . . .
Diesel-Burner’s Fuel System Overview . . . . . . . . . . . . . . . . . . . . . . . . .
Installing the Diesel-Burner’s Fuel System and Lines . . . . . . . . . . . . . .
Overview and Installation of the Aqua-Hot’s Exhaust System . . . . . . . .
Installing the Aqua-Hot’s Expansion Bottle . . . . . . . . . . . . . . . . . . . . . . .
Connecting 12 Volt-DC Power to the Aqua-Hot . . . . . . . . . . . . . . . . . . .
Bleeding the Interior/Fresh Water Tank Hydronic Heating System . . . . .
Bleeding the Domestic Water System. . . . . . . . . . . . . . . . . . . . . . . . . . .
Bleeding the Engine Preheat System . . . . . . . . . . . . . . . . . . . . . . . . . . .
Connecting 120 Volt-AC Power to the Aqua-Hot . . . . . . . . . . . . . . . . . .
Initial Activation of the Aqua-Hot. . . . . . . . . . . . . . . . . . . . . . . . . . . . . . .
Wiring Diagrams
AHE-100-04S Wiring Information . . . . . . . . . . . . . . . . . . . . . . . . . . . . . . . . . . . . . . . . . . . . . . . . .
AHE-130-04X Wiring Information . . . . . . . . . . . . . . . . . . . . . . . . . . . . . . . . . . . . . . . . . . . . . . . . .
AHE-100-04S Enlarged View of Switch Panel and Heating Zone Wiring . . . . . . . . . . . . . . . . . . .
AHE-130-04X Enlarged View of Switch Panel and Heating Zone Wiring . . . . . . . . . . . . . . . . . . .
Appendix B
Wire Gauge Chart
7
7
8
12
17
17
20
20
20
25
25
29
30
30
32
33
33
34
34
40
40
42
45
47
48
51
52
54
54
57
A1
A2
A3
A4
Wire Gauge Information
. . . . . . . . . . . . . . . . . . . . . . . . . . . . . . . . . . . . . . . . . . . . . . . . . . . . . . . . B1
TABLE OF CONTENTS (continued)
Referenced Illustrations
Figure 1:
Figure 2:
Figure 3:
Figure 4:
Figure 5:
Figure 6:
Figure 7:
Figure 8:
Figure 9:
Figure 10:
Figure 11:
Figure 12:
Figure 13:
Figure 14:
Figure 15:
Figure 16A:
Figure 16B:
Figure 17:
Figure 18:
Figure 19:
Figure 20:
Figure 21:
Figure 22:
Figure 23A:
Figure 23B:
Figure 24A:
Figure 24B:
Figure 25:
Figure 26:
Figure 27:
Figure 28A:
Figure 28B:
Figure 29:
Figure 30:
Figure 31:
Figure 32:
Figure 33:
Figure 34A:
Figure 34B:
Aqua-Hot and Inclusive Components . . . . . . . . . . . . . . . . . . . . . . . . . . . . . . . . . . . .
Heat Exchanger Heating Loops . . . . . . . . . . . . . . . . . . . . . . . . . . . . . . . . . . . . . . . .
Aqua-Hot Marking Plate . . . . . . . . . . . . . . . . . . . . . . . . . . . . . . . . . . . . . . . . . . . . . .
Aqua-Hot Combustion Air Overview . . . . . . . . . . . . . . . . . . . . . . . . . . . . . . . . . . . . .
Aqua-Hot Dimensions . . . . . . . . . . . . . . . . . . . . . . . . . . . . . . . . . . . . . . . . . . . . . . . .
Aqua-Hot Mounting Template . . . . . . . . . . . . . . . . . . . . . . . . . . . . . . . . . . . . . . . . . .
Interior Heat Exchanger Mounting Locations . . . . . . . . . . . . . . . . . . . . . . . . . . . . . .
Interior Heat Exchanger Location Overview . . . . . . . . . . . . . . . . . . . . . . . . . . . . . . .
Interior Heat Exchanger Dimensions, Wiring, and Mounting . . . . . . . . . . . . . . . . . .
Allowable Cozy III Heat Exchanger Mounting Configurations. . . . . . . . . . . . . . . . . .
Fresh Water Storage Tank’s Heat Exchanger. . . . . . . . . . . . . . . . . . . . . . . . . . . . . .
Minimum Cozy III Heat Exchanger Clearance . . . . . . . . . . . . . . . . . . . . . . . . . . . . .
Cozy III Heat Exchanger Mounting Template . . . . . . . . . . . . . . . . . . . . . . . . . . . . . .
Heat Exchanger Plumbing Overview . . . . . . . . . . . . . . . . . . . . . . . . . . . . . . . . . . . .
Installing the Heat Exchanger Plumbing . . . . . . . . . . . . . . . . . . . . . . . . . . . . . . . . . .
“Supply” Heating Loop Ports and Plumbing . . . . . . . . . . . . . . . . . . . . . . . . . . . . . . .
“Return” Heating Loop Ports and Plumbing . . . . . . . . . . . . . . . . . . . . . . . . . . . . . . .
Installing the Engine Preheat Plumbing on the Vehicle’s Engine . . . . . . . . . . . . . . .
Engine Coolant Supply and Return Port Locations. . . . . . . . . . . . . . . . . . . . . . . . . .
Attaching Plumbing Lines to the Domestic Hot Water System . . . . . . . . . . . . . . . . .
Domestic Hot Water System Overview. . . . . . . . . . . . . . . . . . . . . . . . . . . . . . . . . . .
Wiring the Fresh Water Tank Thermostat . . . . . . . . . . . . . . . . . . . . . . . . . . . . . . . . .
Switch Panel Mounting Templates . . . . . . . . . . . . . . . . . . . . . . . . . . . . . . . . . . . . . .
AHE-100-04S Switch Panel and Indicator Light Wiring . . . . . . . . . . . . . . . . . . . . . .
AHE-100-04S Switch Panel Wiring Schematic . . . . . . . . . . . . . . . . . . . . . . . . . . . . .
AHE-130-04X Switch Panel and Indicator Light Wiring . . . . . . . . . . . . . . . . . . . . . .
AHE-130-04X Switch Panel Wiring Schematic . . . . . . . . . . . . . . . . . . . . . . . . . . . . .
Fuel System Specifications. . . . . . . . . . . . . . . . . . . . . . . . . . . . . . . . . . . . . . . . . . . .
Installing the Diesel-Burner’s Fuel Lines . . . . . . . . . . . . . . . . . . . . . . . . . . . . . . . . .
Diesel Fuel Supply and Return Port Locations . . . . . . . . . . . . . . . . . . . . . . . . . . . . .
Fuel Filter Overview . . . . . . . . . . . . . . . . . . . . . . . . . . . . . . . . . . . . . . . . . . . . . . . . .
Fuel Filter Overview . . . . . . . . . . . . . . . . . . . . . . . . . . . . . . . . . . . . . . . . . . . . . . . . .
Exhaust System Overview . . . . . . . . . . . . . . . . . . . . . . . . . . . . . . . . . . . . . . . . . . . .
Installing the Expansion Bottle . . . . . . . . . . . . . . . . . . . . . . . . . . . . . . . . . . . . . . . . .
VDC Power Overview . . . . . . . . . . . . . . . . . . . . . . . . . . . . . . . . . . . . . . . . . . . . . . . .
Low Voltage Reset Button. . . . . . . . . . . . . . . . . . . . . . . . . . . . . . . . . . . . . . . . . . . . .
Air-Pressure Testing the Hydronic Heating System . . . . . . . . . . . . . . . . . . . . . . . . .
AHE-100-04S VAC Power Installation . . . . . . . . . . . . . . . . . . . . . . . . . . . . . . . . . . .
AHE-130-04X VAC Power Installation . . . . . . . . . . . . . . . . . . . . . . . . . . . . . . . . . . .
Page
1
3
6
9
10
11
12
14
15
16
17
18
19
22
23
24
24
26
28
30
31
34
35
36
37
38
39
41
42
43
44
44
46
47
49
50
53
55
56
Generalized Motorhome Heating System Floorplan . . . . . . . . . . . . . . . . . . . . . . . . . . . . . . . . . . . 13
AQUA-HOT HYDRONIC HEATING SYSTEM
Aqua-Hot
and Inclusive
Components
ELECTRONIC CONTROLLER
������ ���
R
Motor Coach Heating Specialists
Switch Panel
Low Tank-Level
Cutoff
Electric Heating
Element Status
Low Voltage
Heating Status
Reset
������������������
Engine Preheat
Pump
#5
#4
Pump #1
Heating Zones
Status
Diesel
Electric
Engine
Preheat
#3
Pump #2
#2
#1
Pump #3
Low Battery
Voltage Fault
Diesel-Burner
Status
Low Temp
Cutoff Status
Ho
Overload Fault
Electronic
Controller
Expansion
Bottle
Co
t
ld
Heating Zones
Supply and Return
Ports
Fill/Radiator
Cap
Circulation
Pump #1
VAC Service
Input
Circulation
Pump #2
VAC Access
Panel
Circulation
Pump #3
Hour Meter
Engine Preheat
Circulation
Pump
Thermostat/AC Relay
Access Panel
Marking
Plates
Diesel-Burner
Electric Heating
Element Access
Panel
Engine Coolant
Supply
Boiler Tank
Drain Valve
Diesel Fuel
Supply
Diesel-Burner
Controller
Diesel Fuel
Return
Hot Water
Outlet
(Domestic Water)
Tempering Valve
(Domestic Water)
Engine
Coolant
Return
Pressure-Relief
Valve
Cold Water
Inlet
(Domestic Water)
Aqua-Hot™ Hydronic Heating System Installation Manual 07/05
Figure 1
Page
1
SECTION 1: HYDRONIC HEATING SYSTEM OVERVIEW
Introduction
1.1
Heating System Overview
The Aqua-Hot Hydronic Heating System utilizes an FDA approved “GRAS” (Generally
Recognized as Safe) Propylene Glycol based antifreeze and water heating solution as its
heating medium. This heated solution is circulated by three centrifugal Circulation
Pumps to the heating system’s Heat Exchangers whenever a Room and/or Bay
Thermostat “calls-for-heat.” As the heated solution is circulated through the Heat
Exchangers, heat is transferred from the heating loop to the exchangers and delivered to
each independent heating zone.
Aqua-Hot™ Hydronic Heating System Installation Manual 07/05
Page
2
SECTION 1: HYDRONIC HEATING SYSTEM OVERVIEW
Independent
(Heat Exchanger)
Heating Zones
Heating Loop #1
r
m
oo ge
dr an
Be xch
E
at
He
Heating Zone #1
Heating Loop #2
nk
Ta
ter nger
a
h W xcha
es
Fr at E
e
H
at
He
om ger
o
thr an
Ba xch
E
Heating Zone #3
Heating Zone #2
Heating Loop #3
t
ea
n H er
e
g
tch n
Ki xcha
E
m
oo er
g R ang
n
i
h
Liv Exc
at
He
m
oo
g R nger
n
i
Liv xcha
E
Heating Zone #5
Supply Plumbing Lines
Return Plumbing Lines
Circulation
Pump #1
Circulation
Pump #2
Circulation
Pump #3
Figure 2
Supply Ports
Return Ports
Aqua-Hot™ Hydronic Heating System Installation Manual 07/05
Page
3
SECTION 2: AQUA-HOT OVERVIEW
Aqua-Hot
Overview
2.1
Aqua-Hot
Model
Differentiation
2.2
Aqua-Hot Overview
The Aqua-Hot Hydronic Heating System combines a continuous supply of domestic hot
water and interior heating into one space-saving design. Both heating features are
accomplished by a 12 Volt-DC powered Diesel-Burner and a minimum of one 120
Volt-AC Electric Heating Element. As Vehicle Systems manufactures two separate
models of the Aqua-Hot, the number and wattage of the Electric Heating Element(s) may
vary; reference Section 2.2 for model differentiation information. These two heating
sources maintain the temperature of the Aqua-Hot’s antifreeze and water heating
solution. The antifreeze and water heating solution captures and stores the heat
produced by the heating system, thereby providing continuous domestic hot water, as
well as interior/fresh water tank heating. The Aqua-Hot has also been designed to
preheat the vehicle’s engine prior to starting, which provides easy engine start-up when
cool weather conditions exist.
Aqua-Hot Model Differentiation
Vehicle Systems, Inc. manufactures two individual models of the Aqua-Hot Hydronic
Heating System. The varying factor between these two models is the number of Electric
Heating Elements featured, as well as the wattage employed by each Electric Heating
Element. In order to determine which of the following Aqua-Hot models has been
employed, locate the Marking Plate on the Heating System (reference Figures 1 and 3 for
Marking Plate information) and view the Model Number Box.
AHE-100-04S
This model features a single 120 VAC/1650 Watt Electric Heating Element.
Diesel-Burner, Heat Input (Firing Rate)
50,000 BTU/hr
Diesel-Burner, Fuel Consumption (Continuous
Operation)
0.40 gal/hr
Diesel-Burner, Voltage/Power Consumption
12 VDC/60 watts
Electric Heating Element specifications
120 VAC/1650 watts
Circulation Zone Pump specifications
(3) 12 VDC/21 watts/ea
Number of Heating Zones
maximum of 5, plus
Engine Preheat
Domestic Water Heating Capacity
continuous/on-demand
Dimensions
18.5” H x 18.5” W x 36.75” L
Dry Weight
approximately 200 lbs.
NOTE: All vehicle installations must comply with the requirements listed in the Recreational Vehicle Industry Association’s (RVIA) ANSI/NFPA 1192 Handbook for Recreational Vehicle Standards. To receive a copy of this Handbook and other pertinent RVIA
Standards, write to: Recreation Vehicle Industry Association, 1896 Preston White Drive,
P.O. Box 2999, Reston, VA 22090-0999, call them at (703) 620-6003, or visit them online
at www.rvia.org.
Aqua-Hot™ Hydronic Heating System Installation Manual 07/05
Page
4
SECTION 2: AQUA-HOT OVERVIEW
Aqua-Hot
Model
Differentiation,
continued
AHE-130-04X
This model features two 120 VAC/2000 Watt Electric Heating Elements.
Diesel-Burner, Heat Input (Firing Rate)
50,000 BTU/hr
Diesel-Burner, Fuel Consumption (Continuous
Operation)
0.40 gal/hr
Diesel-Burner, Voltage/Power Consumption
12 VDC/60 watts
Electric Heating Element specifications
(2) 120 VAC/2000 watts
Circulation Zone Pump specifications
(3) 12 VDC/21 watts/ea
Number of Heating Zones
maximum of 5, plus
Engine Preheat
Domestic Water Heating Capacity
continuous/on-demand
Dimensions
18.5” H x 18.5” W x 36.75” L
Dry Weight
approximately 200 lbs.
NOTE: All vehicle installations must comply with the requirements listed in the Recreational Vehicle Industry Association’s (RVIA) ANSI/NFPA 1192 Handbook for Recreational
Vehicle Standards. To receive a copy of this Handbook and other pertinent RVIA Standards, write to: Recreation Vehicle Industry Association, 1896 Preston White Drive, P.O.
Box 2999, Reston, VA 22090-0999, call them at (703) 620-6003, or visit them online at
www.rvia.org.
Aqua-Hot™ Hydronic Heating System Installation Manual 07/05
Page
5
SECTION 2: AQUA-HOT OVERVIEW
Aqua-Hot
Marking Plate
By Vehicle Systems, Inc. Ft. Lupton, CO 80621
Model Number
Box
AHE-100
04S
Model Number
Serial Number
Box
Diesel-Burner / DC Power
AH04-637
120 VAC, 60 Hz / 1.65 kW
Serial Number
Manufactured
Date Box
Electric Heating
Element / AC Power
06-04
DIESEL / 50,000 BTU
Manufactured Date
Testing
Engineers
International
R
Listing No. 02L01
12 VDC / 184 Watts
Fuel Type / Firing Rate
Complies with the requirements
of UL 307A
Made in U.S.A.
For Installation Only in Compartment Completely Closed Off from Living Quarters and Accessible
Only from the Outdoors.
Exhaust system MUST NOT terminate beneath the vehicle or under an openable window or vent.
Combustion Air MUST BE supplied from outside the vehicle.
�
CAUTION: This appliance operates on both AC and DC Electrical Power.
The AC Powered Electrical Heating Element can be wired using flexible nonmetallic cable (ROMEX).
USE COPPER CONDUCTORS ONLY
Use 25 Amp fuse for over current protection for DC Power Supply.
Use 20 Amp Circuit Breaker for over current protection for AC Power Supply.
Mount Heater near a Bay / Storage Door so Access Cover can be easily removed
Use 25 Amp fuse for over current protection for DC Power Supply.
Use 20 Amp Circuit Breaker for over current protection for AC Power Supply
Minimum Heater clearances
Front (Decal Sides) - Open Access
Back (non-Decal sides) - 0 inches
Top - 6 inches
Install in strict compliance with local codes, NFPA
501c and manufacturer’s instructions.
For additional product instllation information visit www.vehiclesys.com or call 1-800-685-4298
Mount Heater near a Bay / Storage Door so Access Cover can be easily
removed
Minimum Heater clearances
Front (Decal Sides) - Open Access
Back (non-Decal sides) - 0 inches
Top - 6 inches
Figure 3
Reference Figure 1
for Marking Plate
locations.
For additional product instllation information visit www.aqua-hot.com or call
Install in strict compliance with local codes, NFPA
501c and manufacturer’s instructions.
1-800-685-4298
Aqua-Hot™ Hydronic Heating System Installation Manual 07/05
Page
6
SECTION 3: INSTALLATION PROCEDURES
Installation
Procedure
3.1
Mounting
the Aqua-Hot
Overview
3.2
Installation Procedure
All installations must be done in strict compliance with all applicable Codes, Laws, and
Regulations having the force of Law.
Mounting the Aqua-Hot Overview
Because Motorhome applications will vary, the Aqua-Hot’s permanent mounting location
should be chosen carefully. Adhering to the guidelines listed below will ensure maximum
system performance and safe operation.
A.
The permanent mounting location must be capable of supporting a minimum
of 400 lbs. Inspect the area beneath the mounting location to ensure no
structural members will interfere with the Exhaust and Combustion-Air Intake
Holes.
B.
Because combustion-air must be drawn from outside the motorhome, the AquaHot cannot be installed anywhere inside the passenger compartment or any
living area.
C.
Centralize the Aqua-Hot nearest the area where Domestic Hot Water will be
used most frequently (i.e., Bathroom and Kitchen areas); reference Figure 7 and
the “Generalized Motorhome Heating System Floorplan” in Section 3.4.
This will ensure that the domestic hot water lines will be as short as possible.
D.
Mount the Aqua-Hot near a Storage Bay Door so the Aqua-Hot’s Access Cover
can be easily removed for product servicing, and the Heater can be easily
accessed from outside the Motorhome. Mounting the Aqua-Hot in this location
will also ensure a minimal length of Exhaust Pipe (reference Section 3.23,
“Overview and Installation of the Aqua-Hot’s Exhaust System,” for details).
E.
The Aqua-Hot’s Exhaust must be able to freely exit away from the Vehicle
without any obstructions. In addition, the Exhaust Pipe is hot and must be kept
away from any heat sensitive material.
F.
Adequate ventilation from underneath the Motorhome must be supplied to the
Aqua-Hot at all times. This will ensure the Diesel-Burner receives a sufficient
supply of combustion-air.
CAUTION: The combustion air cannot be supplied from any compartment possibly
containing combustible gases (e.g., Battery gases, Gasoline fumes,
Propane fumes, etc.).
!
NOTE: Although preinstalled, the Combustion-Air Intake Sleeve MUST BE UTILIZED in
order for the product to comply with the UL 307A listing; reference Figure 4.
G.
The permanent mounting location must allow for mounting of the Electronic
Controller within the allowable wire harness length; reference Section 3.14 for
specific mounting details.
Aqua-Hot™ Hydronic Heating System Installation Manual 07/05
Page
7
SECTION 3: INSTALLATION PROCEDURES
Aqua-Hot
Mounting
3.3
Mounting the Aqua-Hot
Once a mounting location for the Aqua-Hot has been selected, utilize the following
illustrations for mounting information:
- Overall Aqua-Hot Dimensions; reference Figure 5.
- Required size and locations of the Combustion-Air Hole and Exhaust
Holes; reference Figure 6.
- Required size and location of the Mounting Bracket Holes; reference
Figure 6.
- Minimum Heater clearances; reference the Aqua-Hot’s Marking Plate
(Figure 3).
1.
Drill all the necessary holes prior to mounting the Aqua-Hot permanently into
place; reference Figure 6.
NOTES:
A.
Be sure to drill the holes for the Exhaust System and Combustion-Air
Intake prior to placing the Aqua-Hot into the permanent mounting
position.
B.
Be sure to utilize all four Mounting Brackets to ensure that the Aqua-Hot
does not move or shift under normal operating conditions.
2.
Place the Aqua-Hot into the permanent mounting position.
3.
Using 1/4 inch Bolts (total of eight required), fasten down the Aqua-Hot.
Aqua-Hot™ Hydronic Heating System Installation Manual 07/05
Page
8
SECTION 3: INSTALLATION PROCEDURES
Aqua-Hot
Combustion
Air Overview
Combustion-Air
Intake Shutter
Combustion-Air
Hole in Aqua-Hot
Cabinet
Hose Clamp
Combustion-Air
Intake Sleeve
Rubber Boot
Combustion-Air Hole
in Bay Floor
Aqua-Hot™ Hydronic Heating System Installation Manual 07/05
Figure 4
Page
9
SECTION 3: INSTALLATION PROCEDURES
Aqua-Hot
Dimensions
Access Cover
18.5 in.
n.
i
.75
36
18
.5
in.
Figure 5
Aqua-Hot™ Hydronic Heating System Installation Manual 07/05
Page
10
SECTION 3: INSTALLATION PROCEDURES
TOP VIEW
1.312 in.
2.187 in.
11.125 in.
All "Mounting
Bracket Holes"
require a 0.312
inch hole.
0.750 in.
Mounting
Holes
36.500 in. (ref.)
33.062 in.
9.250 in.
2.187 in.
37.312 in.
19.187 in.
2.187 in.
2.187 in.
18.500 in. (ref.)
Aqua-Hot
Mounting
Template
Front of Aqua-Hot
(Access Cover area)
Aqua-Hot™ Hydronic Heating System Installation Manual 07/05
16.750 in.
9.250 in.
Combustion
Air Intake
Hole
6.750 in.
3.750 in.
15.750 in.
3.000 in.
Exhaust
Hole
Figure 6
Page
11
SECTION 3: INSTALLATION PROCEDURES
Mounting
the Interior
Heat
Exchangers
Overview
3.4
Mounting the Interior Heat Exchangers Overview
Adhering to the guidelines listed below will ensure maximum interior heating efficiency
and even-heat distribution throughout each interior Heating Zone (i.e., Living Room,
Kitchen, Bedroom, and Bathroom).
A.
Space the Heat Exchangers so that even-heat distribution will be felt throughout
the interior; reference Figure 7 and the “Generalized Motorhome Heating System
Floorplan” in this section of the manual.
NOTE: For “Slideout” configurations, it is simplest to place a Heat Exchanger(s) on the
opposite side of the Motorhome pointing towards the Slideout.
B.
Sufficient ventilation (return-air) must be supplied to each interior Heat
Exchanger; reference Figures 7 and 8.
NOTES:
1. Mounting Heat Exchangers without sufficient ventilation will severely reduce
their overall heating performance (heat output).
2. In order to provide sufficient ventilation, the “return-air” registers must be the
same size, or larger, than the outlet-air registers.
3. “Return-Air” must be supplied from the corresponding interior heating zones.
C.
Allow for easy access to all Heat Exchangers for potential servicing and cleaning
(e.g., dust, etc.). Reference Figures 10 and 12 for allowable Cozy-III mounting
configurations.
Co
Cozy III
Cozy III
Return-Air
Return-Air
Cozy III
Front
III
Return-Air
zy
Cozy III
Cozy III
Indicates generally recommended
mounting locations for the Cozy III
Heat Exchangers
Figure 7
Aqua-Hot™ Hydronic Heating System Installation Manual 07/05
Page
12
Aqua-Hot™ Hydronic Heating System Installation Manual 07/05
Page
13
Living Room
Heat Exchanger
Aqua-Hot
Heating System
Heating Loop 3
(Kitchen and
Living Room)
Living Room
Heat Exchanger
Fresh
Water Tank
Heat Exchanger
Heating Loop 2
(Bathroom and Fresh
Water Tank Bay)
Heating Loop 1
(Bedroom)
Kitchen
Heat Exchanger
Bathroom
Heat Exchanger
Bedroom
Heat Exchanger
Generalized Motorhome Heating
System Floorplan
Engine Preheating
Engine
SECTION 3: INSTALLATION PROCEDURES
Interior Heat
Exchanger
Location
Overview
CABINET/COUCH
HEAT
EXCHANGER
REGISTER
REGISTER
HOT-AIR
OUTLET
COLD-AIR
RETURN
BASE-BOARD / TOE-KICK AREA
Figure 8
Aqua-Hot™ Hydronic Heating System Installation Manual 07/05
Page
14
SECTION 3: INSTALLATION PROCEDURES
Interior Heat
Exchanger
Dimensions,
Wiring, and
Mounting
Overview
+ (Positive) Red Wires
To the “Fan +” connection on
the Electronic Controller
NOTE: Tolerance
+/- .030
3.63 in.
- (Ground) Black Wires
To the “Fan -” connection on
the Electronic Controller
14.44 in.
13.06 in.
6.44 in.
Figure 9
Aqua-Hot™ Hydronic Heating System Installation Manual 07/05
Page
15
SECTION 3: INSTALLATION PROCEDURES
Allowable Cozy III
Heat Exchanger
Mounting
Configurations
Vertical Mount
Figure 10
Horizontal Mount
Aqua-Hot™ Hydronic Heating System Installation Manual 07/05
Page
16
SECTION 3: INSTALLATION PROCEDURES
Interior Heat
Exchanger
Mounting
3.5
Mounting the Interior Heat Exchangers
Once all permanent mounting locations have been selected, cut out the opening for
each hot-air and cold-air register and fasten each Heat Exchanger permanently in place.
Please reference Figure 8 for suggested Heat Exchanger mounting locations.
1. Cut out a 2.5 inch x 10 inch opening for each Cozy III hot-air outlet and
cold-air return register; reference Figures 7 and 8.
2. Mount each Heat Exchanger permanently into place; reference Figures 9,
10, and 12.
3. Install the hot-air outlet and cold-air return registers; reference Figure 8.
Fresh Water
Tank Heat
Exchanger
Mounting
3.6
Mounting the Fresh Water Tank Heat Exchanger Overview
The Fresh Water Tank Heat Exchanger should be strategically placed in the domestic
water plumbing area in order to prevent freezing of the plumbing lines and storage tank.
A. Centralize and position the Fresh Water Tank Heat Exchanger in the
Domestic Water Storage Tank Plumbing Bay area so even-heat distribution
will be achieved; reference Figure 11.
NOTE: In order to achieve the best heating results, place the Heat Exchanger as close
to the floor of the Plumbing Bay as possible (heat will naturally rise).
B. Sufficient ventilation (cold-air return) must be supplied to the Fresh Water
Tank Heat Exchanger; reference Figure 11.
NOTES:
A. Mounting the Heat Exchanger without sufficient ventilation will severely
reduce its overall performance (heat output).
B. Return-Air should be supplied from the same compartment as the Fresh
Water Tank Heat Exchanger.
Fresh Water
Storage Tank
Cold Air Return
Optional
Vent
Heat Output
Figure 11
Aqua-Hot™ Hydronic Heating System Installation Manual 07/05
Page
17
SECTION 3: INSTALLATION PROCEDURES
Minimum
Cozy III Heat
Exchanger
Clearance
INTERIOR WALL/CABINET WALL
4 inch Minimum
Clearance
Required
Figure 12
Aqua-Hot™ Hydronic Heating System Installation Manual 07/05
Page
18
SECTION 3: INSTALLATION PROCEDURES
Cozy III Heat
Exchanger
Mounting
Template
NOTE: Tolerances on the
dimensions shown are as follows:
.XX (i.e., 6.44 in.) = +/- .030
.XXX (i.e., 6.500 in.)= +/- .015
6.44 in.
10.500 in.
14.44 in.
13.687 in.
13.06 in.
6.500 in.
2.812 in.
1.06 in.
3.500 in.
0.38 in.
5.50 in.
Figure 13
Aqua-Hot™ Hydronic Heating System Installation Manual 07/05
Page
19
SECTION 3: INSTALLATION PROCEDURES
Fresh Water
Tank Heat
Exchanger
3.7
Plumbing
the Heat
Exchangers
Overview
3.8
Installing
the Interior/
Fresh Water
Tank Plumbing
Mounting the Fresh Water Tank Heat Exchanger
Once a permanent mounting location for the Fresh Water Tank Heat Exchanger has been
selected, fasten the Heat Exchanger permanently in place. Please reference Section 3.6
and use Figures 8, 10, 11, 12, and 13 for mounting information.
Plumbing the Heat Exchangers Overview
Once all Heat Exchangers have been mounted, a plan should be formulated for the
routing of the Plumbing Lines from each heating zone to the Aqua-Hot. The Plumbing
Lines are the roadways that carry the antifreeze and water heating solution from the
Aqua-Hot to the Heat Exchangers in each heating zone; reference Figures 2 and 7.
Adhering to the guidelines listed below will ensure maximum heating performance (heat
output):
A.
The Kitchen and Living Room Heat Exchangers (typically three) must be plumbed
together in-series on “Heating Loop #3.” Be sure to reference Figure 2 and the
“Generalized Motorhome Heating System Floorplan” in Section 3.4 for additional
information.
B.
The Fresh Water Tank and Bathroom Heat Exchangers (typically two) must be
plumbed together in-series on “Heating Loop #2.” Be sure to reference Figure 2
and the “Generalized Motorhome Heating System Floorplan” in Section 3.4 for
additional information.
C.
The Bedroom Heat Exchanger (typically one) is plumbed solely on “Heating Loop
#1.”
D.
Use 5/8 in. I.D. (Inside Diameter) Plumbing Lines for all Heating Zones.
E.
Use wide-sweeping elbows or “Bend-Supports” whenever Plumbing Lines may be
susceptible to kinking (i.e., 90° bends).
3.9 Installing the Interior/Fresh Water Tank Plumbing Lines
1.
Prior to installing the Plumbing Lines, mark each line with arrows and/or labels at
both ends. This can be done while the lines are being laid out in order to indicate
which Heating Loop the Plumbing Lines pertain to (i.e., Heating Loop 1, Heating
Loop 2, or Heating Loop 3) and whether the Plumbing Line is a Supply or a Return
line; reference Figures 2, 16A, and 16B.
NOTES:
A. All Plumbing Lines should be laid as flat as possible, and any extreme rises in
height should be avoided.
B. Run all Plumbing Lines in areas where they cannot be pinched off or damaged
under normal operating conditions.
C. Be sure to secure all Lines where necessary and apply protective shielding in
areas where chafing may occur.
D. Vehicle Systems suggests using Rubber Coated/Closed-Type Clamps when
securing the Plumbing Lines.
2.
Connect and clamp the Supply line from the Heater to the lowest port on each Heat
Exchanger in each heating zone; reference Figures 2 and 14.
Aqua-Hot™ Hydronic Heating System Installation Manual 07/05
Page
20
SECTION 3: INSTALLATION PROCEDURES
Installing
the Interior/
Fresh water
Tank Plumbing,
continued
3.
Connect and clamp the Return line from the Heater to the highest port on each
Heat Exchanger; reference Figures 2 and 14.
NOTE: Reference Figure 15 for visual instructions on how to properly connect PEX type
tubing to each Heat Exchanger.
NOTE: Plumbing Heat Exchangers in this manner will allow air to escape naturally. If air
is trapped in any Heat Exchanger, it will significantly reduce the Heat
Exchanger’s overall heating performance (heat output).
4. Connect and tighten all interior Plumbing Lines, Supply and Return, to the
Aqua-Hot’s appropriate Heating Zone ports; reference Figures 16A and 16B.
Aqua-Hot™ Hydronic Heating System Installation Manual 07/05
Page
21
SECTION 3: INSTALLATION PROCEDURES
Installing
the Heat
Exchanger
Plumbing
Cozy III Heat Exchanger
(Rear View)
“Return” Port
(Highest Port)
Mounting
Bracket
Mounting
Bracket
“Supply” Port
(Lowest Port)
Figure 14
Aqua-Hot™ Hydronic Heating System Installation Manual 07/05
Page
22
SECTION 3: INSTALLATION PROCEDURES
Installing
the Heat
Exchanger
Plumbing,
continued
Automotive Type Rubber
Heater-Hose Coupler
(3/4 inch I.D.)
PEX Plumbing Line
3/4 in. Rubber
Coupler
5/8 inch I.D.
3/4 inch O.D.
Return
PEX
Insert
Constant Tension
Clamps
Supply
PEX
Insert
5/8 inch I.D.
3/4 inch O.D.
3/4 in. Rubber
Coupler
PEX Plumbing Line
Automotive Type Rubber
Heater-Hose Coupler
(3/4 inch I.D.)
Figure 15
Aqua-Hot™ Hydronic Heating System Installation Manual 07/05
Page
23
SECTION 3: INSTALLATION PROCEDURES
Installing
the Heat
Exchanger
Plumbing,
continued
“Return” Heating Zone
Ports
PEX Tube
PEX Insert
Compression
Fitting
“Supply” Heating Zone
Ports
Heating
Loop 3
Return Port
PEX Tube
PEX Insert
Heating
Loop 1
Return Port
Compression
Fitting
Heating
Loop 2
Return Port
Heating
Loop 3
Suppply Port
Heating
Loop 2
Supply Port
Heating
Loop 1
Supply Port
Figure 16B
Figure 16A
Aqua-Hot™ Hydronic Heating System Installation Manual 07/05
Page
24
SECTION 3: INSTALLATION PROCEDURES
Engine
Preheat
Plumbing
Overview
3.10
Plumbing the Engine Preheat System Overview
Engine preheating is accomplished by a “Water-to-Water” Heat Exchanger that is an
integral part of the Aqua-Hot’s Heat-Tank. Adhering to the guidelines listed below will
ensure maximum engine preheating efficiency.
A. The Supply and Return ports on the vehicle’s engine should be kept as far apart as
possible. This will ensure that the entire engine is thoroughly preheated; reference
Figure 17. If assistance is needed in determining the best Supply and Return ports
for a specific engine, please contact Vehicle Systems’ Product Application Support
Department at 1-800-685-4298 or contact the specific Engine‘s Manufacturer.
NOTES:
1. The engine’s coolant should be allowed to flow as freely as possible to maximize
the Aqua-Hot’s engine preheating system.
2. The engine’s Return port returns the heated coolant to the Engine Block from
the Aqua-Hot. This port should be a high connection point on the Engine
Block or a suction port on the engine’s Water Pump; reference Figure 17.
3. The engine’s Supply port supplies the engine’s coolant to the Aqua-Hot’s Engine
Preheat Circulation Pump. This port should be a low connection point on the
Engine Block or a pressure outlet port on the Engine’s Water Pump; reference
Figure 17.
B. Use 3/4 in. I.D. (Inside Diameter) Plumbing Lines/Automotive type Heater-Hose for
the engine preheating system.
Installing
Engine
Preheat
Plumbing
3.11
Attaching Plumbing Lines to the Vehicle’s Engine
1. Install both engine preheat Plumbing Lines and mark with Arrows and/or Labels at
both ends. The labels should indicate whether the Plumbing Line is supplying
coolant to the Aqua-Hot or whether it will be returning heated coolant to the vehicle’s
engine; reference Figures 1, 17, and 18.
NOTES:
A. Lay both Engine Preheat Lines as flat as possible and avoid any extreme
rises in height. This will eliminate the potential for air traps.
B. Run both Plumbing Lines in areas where they cannot be pinched off or
damaged during normal operating conditions.
C. Be sure to secure both Plumbing Lines where necessary and apply
protective shielding in areas where chafing may occur.
D. Vehicle Systems suggests using Rubber Coated/Closed-Type Clamps when
securing the Plumbing Lines.
2.
Drain the Engine’s Coolant.
3.
Remove the selected Supply and Return port “Plugs” from the engine.
Aqua-Hot™ Hydronic Heating System Installation Manual 07/05
Page
25
SECTION 3: INSTALLATION PROCEDURES
Installing
Engine
Preheat
Plumbing,
continued
IDEAL
"RETURN" PORT
(top side of engine)
ToIdeal
the Aqua-Hot's
outlet
Return Port
Engine
Preheat
"OUT"
T(ToTTop side ofPort
the
(Return)
VEHICLE'S
ENGINE
POTENTIAL
"SUPPLY" PORT
(pressure outlet port)
engine)
To the Aqua-Hot’s
Engine Preheat
“IN” on Engine Preheat
Circulation Pump
(Supply)
(M) NPT/
Hose Barb
Hose Clamp
Automotive Type
Heater-Hose
45˚ (M)NPT /
Hose Barb
Hose Clamp
Automotive Type
Heater-Hose
Figure 17
Aqua-Hot™ Hydronic Heating System Installation Manual 07/05
Page
26
SECTION 3: INSTALLATION PROCEDURES
Installing
Engine
Preheat
Plumbing,
continued
NOTE: Should one or both of the selected engine ports already have Plumbing Fittings
attached to them, it may be necessary to “tee” into those existing Plumbing
Fittings. If assistance is needed for a specific engine, please contact Vehicle
Systems’ Product Application Support Department at 1-800-685-4298.
4.
Install and tighten the Plumbing Fittings into the Supply and Return ports on the
Vehicle’s Engine.
NOTE: One-piece Plumbing Fittings are recommended in order to reduce the potential
for coolant leaks. It is also suggested that Pipe Thread Sealant be used on all
Plumbing Fittings.
5.
Install and clamp both the Supply and Return engine Plumbing Lines/Automotive
Type Heater-Hoses to the Engine’s Plumbing Fittings; reference Figure 17.
6.
Install and tighten the Plumbing Fittings into the “IN” and “OUT” ports on the
Aqua-Hot’s Engine Preheating System; reference Figures 1 and 18.
CAUTION: Be sure to use two wrenches when tightening these Plumbing Fittings.
Failure to do so could result in serious damage to the Aqua-Hot’s internal
Engine Preheating System.
!
7.
Attach and clamp the Engine’s Supply Plumbing Line to the Aqua-Hot’s “IN”
connection; reference Figure 18.
8.
Attach and clamp the Engine’s Return Plumbing Line to the Aqua-Hot’s “OUT”
connection; reference Figure 18.
9.
After all Plumbing Lines, Fittings, and Connections have been tightened, refill the
Engine’s Coolant System.
Aqua-Hot™ Hydronic Heating System Installation Manual 07/05
Page
27
SECTION 3: INSTALLATION PROCEDURES
Installing
Engine
Preheat
Plumbing,
continued
Engine Coolant
Supply Port
(IN)
Engine Coolant
Return Port
(OUT)
Figure 18
Aqua-Hot™ Hydronic Heating System Installation Manual 07/05
Page
28
SECTION 3: INSTALLATION PROCEDURES
Domestic Hot
Water Plumbing
Overview
3.12
Domestic Hot Water Plumbing Overview
One major feature of the Aqua-Hot is that it possesses the ability to provide a continuous
supply of domestic hot water. Because the Aqua-Hot heats the domestic water ondemand, there is no need for a separate Storage Type Water Heater. Adhering to the
following guidelines will ensure maximum domestic hot water efficiency.
A. The following information concerning the sizing of Water Supply Piping was taken
directly from the ANSI A119.2/NFPA 501C Standard on Recreation Vehicles, 1993
Edition. This information should be used as a general guideline:
“Piping Systems shall be sized to provide an adequate quantity of Water to each
Plumbing Fixture at a flow rate sufficient to keep the Fixture in a clean and sanitary
condition without any danger of back-flow or siphoning.”
The size of Water Supply Piping and Branch Line shall not be less than shown in
Table 4-6.5.1.
NOTE: A Water Heater or Ice Maker shall not be counted as a Water-Using Fixture
when computing pipe sizes.
Table 4-6.5.1 Minimum Size Tubing and Pipe
for Water Distribution Systems*
Pipe
Tubing
*
**
***
Number of
Fixtures
Inner Dia.
(inches)
Outer Dia.
(inches)
Iron Pipe Size
(inches)
1
2
3
4
5 or more
1/4**
1/4***
3/8
3/8
1/2
3/8**
3/8***
1/2
1/2
5/8
3/8
3/8
1/2
1/2
1/2
Minimum size for toilet water supply line shall not be less than the size recommended by the toilet
manufacturer
12-feet (3.7 m) maximum length allowable only from water service connection to a single fixture.
6-feet (1.8 m) maximum length.
NOTE: The Aqua-Hot is equipped with a Pressure-Relief Valve, which releases
excessive pressure in the domestic water system, if necessary.
Aqua-Hot™ Hydronic Heating System Installation Manual 07/05
Page
29
SECTION 3: INSTALLATION PROCEDURES
Installing
Domestic
Hot Water
Plumbing
3.13
Attaching Plumbing Lines to the Domestic Hot Water System
The Aqua-Hot is equipped with a Tempering Valve, which regulates the temperature of
the hot water; reference Figure 19.
1.
Connect a domestic water Plumbing Line from the Domestic Water Demand
Pump/Water Manifold to the Cold Water Inlet port on the Aqua-Hot; reference
Figures 19 and 20.
NOTE: Please note that it may be necessary to utilize an Accumulator Tank within the
Domestic Water System; reference Figure 20. Although the Aqua-Hot is
equipped with a Pressure-Relief Valve, the utilization of an Accumulator Tank will
help prevent excessive “weeping” of the aforementioned valve, if applicable.
Manufacturers of Pressure-Relief Valves indicate that excessive weeping of
these valves will cause the “seat” in the valve to deteriorate, and, in turn, the
valve will fail prematurely. For additional information regarding Accumulator
Tanks, please be sure to reference the Recreational Vehicle Industry
Association’s (RVIA) technical publication titled “Recreational Vehicle Plumbing
Systems.” To obtain a copy of this particular publication, please contact RVIA at
(703) 620-6003 or visit them online at www.rvia.org.
Connect a domestic water Plumbing Line from the Aqua-Hot’s Hot Water Outlet
port to the hot water system’s Distribution Lines/Water Manifold; reference Figures
19 and 20.
2.
Figure 19
Hot Water
Outlet
(Domestic
Water)
Electronic
Controller
Overview
3.14
Cold Water
Inlet
(Domestic
Water)
Tempering
Valve
Pressure Relief
Valve
Electronic Controller Overview
The Aqua-Hot utilizes an Electronic Controller (E.C.) to monitor specific heater activities,
supply electrical power to specific internal and external components, and control the
overall operation of the heater. The following are important installation details regarding
the Electronic Controller. Please read this section thoroughly for specific details.
NOTE: Please reference Appendix A for specific wiring information pertaining to the
precise model of Aqua-Hot being installed.
A.
All Electronic Controller Fan Power connections (and two switch connections)
possess a “(+)” or a “(-)” symbol, which indicates that they are Polarity Sensitive.
Therefore, be sure to use care when wiring these particular components to the
Electronic Controller.
Aqua-Hot™ Hydronic Heating System Installation Manual 07/05
Page
30
SECTION 3: INSTALLATION PROCEDURES
Domestic Hot
Water System
Overview
To Hot Water Faucets
Domestic
Hot Water
OUTLET
Domestic
Cold Water
INLET
Fresh
Water Storage
Tank
Demand
Pump
AT
Arrows indicate directional flow of
domestic water
AT
AT - Indicates options
for mounting an
Accumulator Tank
AT
To Cold Water
Faucets
Figure 20
Aqua-Hot™ Hydronic Heating System Installation Manual 07/05
Page
31
SECTION 3: INSTALLATION PROCEDURES
Electronic
Controller
Overview,
continued
B.
All Electronic Controller Thermostat and Switch connections (excluding two)
possess an “(I)” or an “(O)” symbol. The “(O)” symbol indicates a positive 12
Volt-DC output to a particular Thermostat or Switch, while the “(I)” symbol indicates
a positive 12 Volt-DC input signal from a particular Thermostat or Switch. The 12
Volt-DC output signal is always present as long as the Electronic Controller is
powered by a 12 Volt-DC Power Source, while the 12 Volt-DC input signal is only
present whenever a Switch is activated or whenever a Thermostat is “calling for
heat”; reference Appendix A.
C.
Each heating zone “FAN” circuit can supply up to 2.0 Amps of Direct Current. This
12 Volt-DC allows for multiple Cozy III Heat Exchangers to be wired “in-parallel”
(e.g., Heating Zone 5); reference Figure 2, Appendix A, and the “Generalized
Motorhome Heating System Floorplan” in Section 3.4.
D.
Heating Zone 5 is reserved electrically for the “Living Room/Kitchen
Heating Zone” (Heating Loop 3) ONLY; Heating Zones 2, 3, and 4 are reserved
electrically for the “Bathroom, Fresh Water, and Optional Heating Zone” Tank
Heating Zone” (Heating Loop 2) ONLY. Heating Zone 1 is reserved electrically for
the “Bedroom Heating Zone” (Heating Loop 1) ONLY. Reference Figure 2.
E.
All Switch connections are to be wired directly to the Aqua-Hot’s “Switch Panel
Connections”; reference Figures 23A, 23B, 24A, and 24B and Appendix A. Both
the “IND-LT(+)B3” and the “IND-LT(-)B6” connections are reserved electrically
ONLY for the “Diesel” Switch connections.
F.
The Aqua-Hot’s Electronic Controller is designed to work with most Electronic
Room Thermostats; however, the chosen Thermostat must produce a constant 12
Volt-DC output signal and must receive its 12 Volt-DC Power Supply from the
Aqua-Hot’s Electronic Controller (i.e., “THERM O”). This will ensure that the
Thermostat/Electronic Controller is properly fuse protected.
G.
Be sure to use the wire colors illustrated in Appendix A. This will ensure installation
consistency, differentiate the separate Heating Zones, and assist Service Personnel
with troubleshooting.
H.
The Electronic Controller can be either recessed or surface mounted. Cut out an
opening of 7.25 inches x 10.25 inches for recessed mounting and be sure to utilize
all four mounting tabs.
NOTES:
Wiring
Interior/
Bay Heat
Exchangers
3.15
A.
Be sure to fasten the wire harness connections to the Electronic Controller
by securing the screw-type fasteners on the Terminal Strip/Plug of the
Wiring Harness to the Header on the Electronic Controller.
B.
Be sure to secure the wire harness connections at the Electronic Controller
by clamping the wire harness permanently into place.
Wiring the Interior and Fresh Water Tank Heat Exchangers
The Aqua-Hot’s Electronic Controller is designed to supply 12 Volt-DC Electrical Power,
as well as a ground source (negative), to all Interior and Fresh Water Tank Heat Exchangers. Therefore, whenever a particular heating zone Thermostat “calls for heat,” the
Aqua-Hot’s Electronic Controller will output a 12 Volt-DC power supply and provide
ground to each Heat Exchanger in that heating zone.
NOTE: DO NOT use a “chassis ground” as a ground source for any of the Heat
Exchangers. Ground MUST BE supplied by the Aqua-Hot’s Electronic Controller.
Aqua-Hot™ Hydronic Heating System Installation Manual 07/05
Page
32
SECTION 3: INSTALLATION PROCEDURES
Wiring
Interior/
Bay Heat
Exchangers,
continued
Mounting
Locations
for Interior
Thermostats
1.
Run two 16 Gauge Wires, Red for (+) and Black for (-), from each particular Heating
Zone’s Heat Exchanger(s) to the Aqua-Hot’s Electronic Controller.
NOTE: For heating zones with multiple Heat Exchangers (e.g., Living
Room/Kitchen/Heating Loop 1, etc.), run two wires from the closest Heat
Exchanger to the Aqua-Hot’s Electronic Controller and then wire the other Heat
Exchangers in-parallel; reference Figure 9 and Appendix A.
2.
Label the wires indicating the heating zone they pertain to (e.g., Living Room/
Kitchen, Bedroom, Fresh Water Tank, etc.)
3.
Insert all Heat Exchanger wires into the appropriate terminal/heating zone location
on the Electronic Controller (e.g., “#3 FAN +/#3 FAN -,” for the Fresh Water Tank
Heating Zone, etc.); reference Appendix A.
4.
Connect all Electronic Controller “FAN” wires to the positive and negative leads of
each Heat Exchanger; reference Figure 9 and Appendix A.
3.16
Mounting Locations for Interior Room Thermostats Overview
The mounting locations for the Interior Thermostats and/or the Electronic Thermostat’s
Temperature Sensors should be selected carefully to ensure even-heat distribution
throughout each heating zone.
A.
Locate each Thermostat at approximately chest level, if applicable.
NOTE: Do not mount the thermostat where it can be affected by:
- drafts or dead spots behind doors and in corners
- hot or cold air from ducts
- radiant heat from the sun or appliances
- heat from concealed pipes and chimneys
- unheated (uncooled) areas such as an outside wall behind the thermostat
Wiring
Interior
Thermostats
3.17
1.
Wiring the Interior Room Thermostats
Run two 16 Gauge wires from each interior room thermostat mounting location to
the Aqua-Hot’s Electronic Controller.
NOTE: Be sure to use the wire colors illustrated in Appendix A. This will ensure
installation consistency, differentiate the separate Heating Zones, and assist
Service Personnel with troubleshooting.
2.
Insert all interior room thermostat wires into the appropriate terminal/heating zone
location on the Electronic Controller; reference Appendix A.
3.
Connect all wires to the appropriate leads of each room thermostat.
NOTE: The Aqua-Hot’s Electronic Controller is designed to work with most Electronic
Room Thermostats; however, the chosen Thermostat must produce a constant
12 Volt-DC output signal and must receive its 12 Volt-DC Power Supply from the
Aqua-Hot’s Electronic Controller (i.e., THERM O”). This will ensure that the
Thermostat/Electronic Controller is properly fuse protected.
4.
Permanently mount all interior room thermostats in place.
5.
Be sure to turn OFF all interior room thermostats at this time.
Aqua-Hot™ Hydronic Heating System Installation Manual 07/05
Page
33
SECTION 3: INSTALLATION PROCEDURES
Mounting
Location
for Fresh
Water Tank
Thermostat
3.18
Mounting the Fresh Water Tank Thermostat Overview
The mounting location of the Bay Thermostat should be selected carefully to ensure
even-heat distribution throughout the Bay compartment. The Low-Temp Thermostat is
specifically designed as a means of preventing the domestic hot water from freezing;
therefore, it has a maximum temperature setting of 50°F.
A. Centralize the Low-Temp Thermostat in the Fresh Water Tank storage compartment.
NOTES:
1. Only the “Bulb” of the Low-Temp Thermostat needs to be physically mounted in
the area requiring heat; reference Figure 21.
2. Do not mount the Thermostat “Bulb” in a drafty area.
3. The selected Thermostat body mounting location should allow for easy operator
access; reference Figure 21.
Wiring
the Fresh
Water Tank
Thermostat
3.19
Wiring the Fresh Water Tank Thermostat
1. Run two 16 Gauge wires from the Bay Thermostat’s mounting location to the
Aqua-Hot’s Electronic Controller.
NOTE: Be sure to use the wire colors illustrated in Appendix A. This will ensure
installation consistency, differentiate the separate Heating Zones, and assist
Service Personnel with troubleshooting.
2. Insert both Thermostat wires into the appropriate terminal/heating zone location on
the Electronic Controller; reference Appendix A.
3. Connect both wires to the appropriate leads of the Low-Temp Thermostat; reference
Figure 21.
4. Permanently mount the Low-Temp Thermostat in place; reference Figure 21.
0 10
Black Wire
(Connect to Heating Zone #3 “Therm
O” on the Electronic Controller)
20
30
Mounting
Tabs
0
60
F
Figure 21
Blue Wire
(Connect to Heating Zone #3 “Therm I”
on the Electronic Controller)
Bulb
Aqua-Hot™ Hydronic Heating System Installation Manual 07/05
Page
34
SECTION 3: INSTALLATION PROCEDURES
Switch Panel
Mounting
Template
AHE-100-04S Interior Switch Panel
5.00
.25
.25
4.50
3.75
6
3.00
1.50
6
2
4
6
2
4
1
2.50
2
4
1
1
.75
.150 (4x)
1.00 (3x)
.75
1.50
2.75
Figure 22
AHE-130-04X Interior Switch Panel
6.50
6.00
.25
.25
5.25
6
3.00
1.50
6
2
4
6
2
4
1
1
6
2
4
1
2
4
2.50
1
.75
1.00 (4x)
.75
.150 (4X)
1.50
2.75
4.25
* All dimensions listed are in inches
Aqua-Hot™ Hydronic Heating System Installation Manual 07/05
Page
35
SECTION 3: INSTALLATION PROCEDURES
Switch Panel
and Indicator
Light Wiring
Overview
AHE-100-04S
Model ONLY
Switch Panel
Back Side View
“Engine Preheat”
Switch
“Electric”
Switch
6
1
Electronic Controller
Jumper Wire
Jumper Wire
4
Switch
6
6
2
Switch
“Diesel”
Switch
2
2
4
1
Electronic Controller
4
1
Switch
Electronic Controller
Pin # 1
to “Preheat-O”
Pin # 1
to “Electric-O”
Pin # 1
to “Diesel-I”
Pin # 2
to “Preheat-I”
Pin # 2
to “Electric-I”
Pin # 2
to “Diesel-O”
Pin # 6
to Chassis Ground
Pin # 6
to Chassis Ground
Pin # 4
to “IND-LT (+) B3”
Pin # 6
to “IND-LT (-) B6”
Switch to Electronic Controller
connections
Switch to Electronic Controller
connections
Switch to Electronic Controller
connections
NOTE: The “Engine Preheat” and “Electric” switches require a Jumper
Wire, which connects Terminal 2 to Terminal 4.
Figure 23A
Aqua-Hot™ Hydronic Heating System Installation Manual 07/05
Page
36
SECTION 3: INSTALLATION PROCEDURES
Switch Panel
and Indicator
Light Wiring
Overview
AHE-100-04S
Model ONLY
AHE-100-04S Switch Panel
ENGINE
ELECTRIC
PREHEAT
-
+
4
���
6
2
Jumper Wire
Jumper Wire
6
1
To the
“Preheat-O”
Terminal on
the Electronic
Controller
To the
“Preheat-I”
Terminal on
the Electronic
Controller
-
+
4
DIESEL
2
6-
2
1
+
4
1
To the
“Electric-O”
Terminal on
the Electronic
Controller
To the
“IND-LT (+) B3”
Terminal on
the Electronic
Controller
To the
“Electric-I”
Terminal on
the Electronic
Controller
To the
“Diesel-I”
Terminal on
the Electronic
Controller
To the
“Diesel-O”
Terminal on
the Electronic
Controller
To the
“IND-LT (-) B6”
Terminal on
the Electronic
Controller
Figure 23B
Aqua-Hot™ Hydronic Heating System Installation Manual 07/05
Page
37
SECTION 3: INSTALLATION PROCEDURES
Switch Panel
and Indicator
Light Wiring
Overview
AHE-130-04X
Model ONLY
Switch Panel
Back Side View
“Electric
High/Low”
Switch
“Electric”
Switch
6
2
1
6
2
4
1
Jumper Wire
Jumper Wire
6
4
“Engine Preheat”
Switch
“Diesel”
Switch
6
2
4
2
4
1
1
Jumper Wire
Switch
Electronic Controller
Switch
Electronic Controller
Pin # 1
to 1-Way Plug
Pin # 1
to “Diesel-O”
Pin # 2
to 1-Way Plug
Pin # 2
to “Diesel-I”
Pin # 6
to Chassis Ground
Pin # 4
to “IND-LT (+) B3”
Pin # 6
to “IND-LT (-) B6”
“Electric High/Low” Switch to
Electronic Controller connections
“Diesel” Switch to Electronic
Controller connections
Switch
Electronic Controller
Pin # 1
to “Electric-O”
Switch
Pin # 2
to “Electric-I”
Pin # 1
to “Preheat-O”
Pin # 6
to Chassis Ground
Pin # 2
to “Preheat-I”
Pin # 6
to Chassis Ground
“Electric” Switch to Electronic
Controller connections
Electronic Controller
“Engine Preheat” Switch to
Electronic Controller connections
Figure 24A
NOTE: The “Engine Preheat” and “Electric” switches require a Jumper Wire, which connects
Terminal #2 to Terminal #4. The “Electric High/Low” switch also requires a Jumper Wire,
which connects its Terminal #4 to Terminal #2 on the “Electric” switch.
Aqua-Hot™ Hydronic Heating System Installation Manual 07/05
Page
38
SECTION 3: INSTALLATION PROCEDURES
Switch Panel
and Indicator
Light Wiring
Diagram
AHE-130-04X
Model ONLY
AHE-130-04X Switch Panel
ELECTRIC
HI / LOW
2
4
1
ELECTRIC
DIESEL
6
2
6
2
6
2
4
1
4
1
4
1
Jumper Wire
6
ENGINE
PREHEAT
Jumper Wire
Jumper Wire
to the
“Electric-O”
Terminal on the
Electronic
Controller
to 1-Way
Plug
to 1-Way
Plug
GND
to the
“IND-LT(+) B3”
Terminal on the
Electronic
Controller
to the
“Preheat-O”
Terminal on the
Electronic
Controller
to the
“Electric-I”
Terminal on the
Electronic
Controller
to the
“Preheat-I”
Terminal on the
Electronic
Controller
to the
“Diesel-I”
Terminal on the
Electronic
Controller
to the
“Diesel-O”
Terminal on the
Electronic
Controller
to the
“IND-LT(-) B6”
Terminal on the
Electronic
Controller
Figure 24B
Aqua-Hot™ Hydronic Heating System Installation Manual 07/05
Page
39
SECTION 3: INSTALLATION PROCEDURES
Installing/
Wiring the
Switch Panel
3.20
Installing and Wiring the Switch Panel
The chosen location for the Switch Panel should allow for easy operator access. Also,
because the “Diesel” switch incorporates a fault light, which indicates a Diesel-Burner
malfunction, the Switch Panel should be easily visible to the operator.
1.
Cut out an opening for the Switch Panel Plate; reference Figure 22.
AHE-100-04S: 3.75 in. W x 1.50 in. H
AHE-130-04X: 5.25 in. W x 1.50 in. H
2.
Run eight 16 Gauge wires from the Switch Panel to the Electronic Controller.
NOTE: Be sure to use the wire colors illustrated in Appendix A. This will ensure
installation consistency, differentiate between the separate switches and assist
Service Personnel with troubleshooting.
DieselBurner’s
Fuel System
3.
Strip and crimp insulated female terminals onto each wire at the Switch Panel
location. Also, be sure to prepare the necessary Jumper Wires.
4.
Connect all switch wires as illustrated in Figure 23A and 23B for the AHE-100-04S
Model and Figure 24A and 24B for the AHE-130-04X Model. Reference Appendix A
for additional wiring information.
5.
Insert all switch wires into the appropriate terminal/switch panel connection on the
Electronic Controller; reference Appendix A.
6.
Permanently mount the Switch Panel in place.
7.
Be sure to move all three switches to their OFF position by pressing them in a
downward motion.
3.21
Diesel-Burner’s Fuel System Overview
The Diesel-Burner is the Aqua-Hot’s primary heat source; therefore, care should be taken
when installing the fuel system.
A.
The diesel fuel supply should be drawn directly from the Vehicle’s main Fuel Tank or
from a separate auxiliary Fuel Tank, if applicable. The Fuel Tank should be
equipped with a dedicated fuel pick-up (”Supply” port and “Return” port); reference
Figure 26.
NOTES:
1. If an auxiliary Fuel Tank is required, be sure to consult the ANSI/NFPA 1192
Handbook concerning Diesel Fuel System specifications.
2. These particular Aqua-Hot Hydronic Heating System models utilized two
unique Fuel Filters; therefore, please reference Figures 28A and 28B in
order to determine the Fuel Filter utilized in the particular model being
installed.
B.
Fuel head pressure should not exceed 2 feet; reference Figure 25.
C.
Use 1/4 inch I.D. (Inside Diameter) Fuel Lines.
D.
The combined length of the supply and return Fuel Lines should not exceed 66 feet
in total length; reference Figure 25.
Aqua-Hot™ Hydronic Heating System Installation Manual 07/05
Page
40
SECTION 3: INSTALLATION PROCEDURES
Fuel System
Specifications
33' max
Maximum
Allowable Suction/Lift
height 6’6” max.
33' max
Maximum
Allowable
Head Pressure
2’
Figure 25
Aqua-Hot™ Hydronic Heating System Installation Manual 07/05
Page
41
SECTION 3: INSTALLATION PROCEDURES
Diesel-Burner’s
Fuel System,
continued
E.
Mount the Fuel Filter in a location that provides easy access for changing the Filter
Element and for catching any potential fuel spillage when servicing.
F.
Be sure to securely tighten all fuel fittings so that air cannot enter into the fuel
system. Air in the fuel system will cause excessive “White Smoke” emissions.
Installing
the DieselBurner’s Fuel
Lines
3.22
1.
Installing the Diesel-Burner’s Fuel System and Lines
Run two 1/4 inch I.D. (Inside Diameter) Fuel Lines from the Fuel Tank/Fuel Pick-Up
to the Aqua-Hot.
NOTES:
A. Both Fuel Lines should be laid as flat as possible, and any extreme rises in
height should be avoided. This procedure will eliminate any potential air-traps.
B. Run both Fuel Lines in areas where they cannot be pinched off, kinked, or
damaged during normal operating conditions.
C. Be sure to secure all Fuel Lines where necessary and apply protective shielding
in areas where chafing may occur.
CAUTION:
!
A kinked Fuel Line (Return side) will increase the fuel pressure to
hazardous levels and may cause a Fuel Line to rupture. A kinked Fuel
Line could also severely damage the Diesel-Burner’s internal fuel system.
2.
Label both Fuel Lines indicating whether they are a Supply line or a Return line.
3.
Connect the Supply and Return lines to the Fuel Tank/Fuel Pick-Up; reference
Figure 26.
SUPPLY PORT:
to the Aqua-Hot’s
Fuel Filter, see Figures
28A and 28B.
RETURN PORT:
from the Aqua-Hot's
"Return" Port, see
Figure 27.
Dedicated
Fuel Pick-Up
NOTE: The Fuel Pick-Up
should not extend further than
the Motorhome’s engine fuel
supply pick-up and should
be consistent with the
on-board Generator’s
fuel supply pick-up length.
Aqua-Hot™ Hydronic Heating System Installation Manual 07/05
Figure 26
Page
42
SECTION 3: INSTALLATION PROCEDURES
Diesel
Fuel Ports
Diesel Fuel
Supply
Diesel Fuel
Return
Figure 27
Aqua-Hot™ Hydronic Heating System Installation Manual 07/05
Page
43
SECTION 3: INSTALLATION PROCEDURES
Fuel
Filters
Fuel Filter
TOP VIEW:
of Fuel Filter Head
Plug
����������
��������������
������������������
���������
2
4
1
3
��������������
���������������
��������������
���������
���������
Plug
NOTE: Reference Figure 27 for details
on the Fuel Tank connections.
Reference Figure 28 for details
on the Aqua-Hot’s Fuel Connections.
Figure 28A
Fuel Filter
��������������
���������������
��������������
���������
���������
Figure 28B
TOP VIEW:
of Fuel Filter Head
����������
��������������
������������������
���������
NOTE: Reference Figure 27 for details on the Fuel
Tank connections.
Reference Figure 28 for details on the
Aqua-Hot’s Fuel Connections.
Aqua-Hot™ Hydronic Heating System Installation Manual 07/05
Page
44
SECTION 3: INSTALLATION PROCEDURES
Installing the
Diesel-Burner’s
Fuel Lines,
continued
Exhaust
System
Overview/
Installation
4.
Install and tighten the appropriate fuel fittings into the Aqua-Hot’s Fuel Ports, as well
as the two selected ports of the Fuel Filter; reference Figures 27, 28A, and 28B.
5.
Connect the Supply and Return lines to the Aqua-Hot’s fuel port connections;
reference Figures 1 and 27.
6.
Cut the Supply line at the Fuel Filter mounting location and connect the Fuel Lines
as illustrated in Figures 28A and 28B.
3.23
Overview and Installation of the Aqua-Hot’s Exhaust System
WARNING: The Aqua-Hot’s exhaust is hot and must be kept away from any heat
sensitive material. DO NOT direct exhaust downward as a fire may result
when parked in dry, grassy areas. In addition, the exhaust must not terminate beneath the vehicle or beneath an openable window or vent. Refer to
“Internal Combustion Engine Exhaust Pipe Termination” Section 3-4.3 in the
RVIA Standards Manual for additional exhaust system information.
!
A.
The exhaust must be able to freely exit away from the vehicle without any
obstructions.
B.
Run the Exhaust Pipe to the driver’s side of the vehicle and ensure that the exhaust
fumes cannot enter into the passenger compartment.
NOTES:
1. The Exhaust System MUST NOT terminate beneath the vehicle. Failure to
conform will void the Aqua-Hot’s UL listing.
2. Angle the Exhaust Pipe towards the rear of the vehicle so that the exhaust
fumes will naturally move away while the vehicle is in motion.
C.
DO NOT terminate the Exhaust Pipe within the awning area of the Motorhome, if
applicable. Be sure to keep the exhaust away from the slideout areas. Reference
RVIA’s ANSI/NFPA 1192 Handbook for additional information.
D.
From the Aqua-Hot’s 1-1/2 inch (F) NPT Exhaust Port, use a 1-3/4 inch I.D. (Inside
Diameter) Exhaust Pipe; reference Figure 29.
NOTES:
1. Be sure to use standard Automotive Type Exhaust piping and avoid bends, if
possible.
2. The total length of Exhaust Pipe should not exceed 12 feet. Should your
particular application require more than 12 feet of Exhaust Pipe, please contact
Vehicle Systems’ Product Application Support Department at 1-800-685-4298
for assistance.
3. A maximum of two 90° Exhaust Pipe bends is allowed.
E.
A condensation drain must be provided in the exhaust system. This can be
accomplished by drilling a small hole (approximately 1/8 inch diameter) at the
Exhaust Pipe’s lowest point (slightly sloping the Exhaust Pipe away from the
Aqua-Hot will achieve the same results); reference Figure 29.
F.
Be sure to secure the end of the Exhaust Pipe to the vehicle with the proper Exhaust
Hanger/support hardware.
Aqua-Hot™ Hydronic Heating System Installation Manual 07/05
Page
45
SECTION 3: INSTALLATION PROCEDURES
Exhaust
System
Overview
NOTE: A maximum
of two 90º bends
is allowed.
5i
1.7
1.5 inch Black
Pipe Exhaust
Nipple
90˚ Bend
h
nc
to
Au
.
D
I.
m
ve
oti
12
F
typ
e
Pip
t
us
ha
x
eE
tM
ee
ax
.
1.5 inch Black
Pipe Exhaust
Nipple
Condensation drain
hole location
NOTE: A Condensation drain is not required if the Exhaust
Pipe slopes away from the Heater.
Aqua-Hot™ Hydronic Heating System Installation Manual 07/05
Figure 29
Page
46
SECTION 3: INSTALLATION PROCEDURES
Installing the
Expansion
Tank
3.24
Installing the Aqua-Hot’s Expansion Bottle
The selected mounting location for the Expansion Bottle should allow for easy access
(i.e., for filling) and clear visibility whenever the particular Storage Bay door is open.
1.
Mount the Expansion Bottle, as illustrated in Figure 30.
2.
Connect and clamp the Overflow Tubing from the Expansion Bottle to the
Aqua-Hot’s Filler Neck Overflow Connection; reference Figure 30.
NOTE: The Expansion Bottle can be mounted either above or below the top of the
Aqua-Hot.
3.
Drill a hole in the Bay floor and connect (secure with a clamp) a large enough piece
of Overflow Tubing so that it can be connected to the top of the Expansion Bottle
and extend through the Bay floor; reference Figure 30.
FULL HOT
Expansion
Bottle
NOTICE:
Use only a non-toxic Propylene Glycol based
Boiler Antifreeze. For more information call
1-800-685-4298
Filler Neck
Overflow
Connection
FULL COLD
Tension
Clamp
Tension
Clamp
Overflow
Tube
Overflow
Tube
Overflow Tube
hole in Bay
Floor
Figure 30
Aqua-Hot™ Hydronic Heating System Installation Manual 07/05
Page
47
SECTION 3: INSTALLATION PROCEDURES
VDC Power
Installation
3.25
Connecting 12 Volt-DC Power to the Aqua-Hot
WARNINGS:
!
A. Do not activate the Aqua-Hot’s Diesel-Burner until the antifreeze and
water heating solution has been added to the Aqua-Hot’s Heat Tank
and the heating system has been completely bled of air. Operating
the Aqua-Hot without the antifreeze and water heating solution will
cause serious damage to the Aqua-Hot’s Heat Tank.
B. Do not connect the 12 Volt-DC Power or the Ground Wires to the
Aqua-Hot if the Vehicle requires welding. Electrical welding will cause
serious damage to the Diesel-Burner’s Controller and the Aqua-Hot’s
Electronic Controller.
NOTE: All Electric Installations, Systems, and Equipment must comply with Article 551,
Part A and other Sections of NFPA 70, “National Electrical Code.”
1. Run two 10 Gauge wires, Red for (+) and Black for (-), from the Vehicle’s Batteries to
the Aqua-Hot’s Electronic Controller; reference Appendix A and Figure 31.
NOTES:
A. If the combined length of the two 10 Gauge wires is in excess of 20 feet,
reference Appendix B for proper wire gauge sizing. Please note that under
full load conditions, the Aqua-Hot can draw as much as 15.33 Amps of VDC
current. Because the Aqua-Hot is designed to shut down in the event
that the VDC Voltage Level drops too low to properly operate, it is
imperative that the proper wire gauge be determined and utilized.
B. The maximum allowable voltage drop, for the 12 Volt-DC Aqua-Hot, is 0.75
Volts-DC. Please reference Appendix B to ensure proper wire gauge sizing
is utilized.
NOTE: Be sure to use the wire colors illustrated in Appendix A. This will ensure
installation consistency, differentiate between the two Power Wires, and assist
Service Personnel with troubleshooting.
2. Attach the VDC Power wires onto the appropriate terminal/battery connection on the
Electronic Controller; reference Appendix A.
3. Connect both Power and Ground wires directly to the Vehicle’s batteries.
NOTE: Be sure to protect against accidental shorting (i.e., chassis shorting) by
incorporating a 25-Amp rated In-Line Fuse into the Power wire at the Battery
location; reference Figure 31.
NOTE: The Aqua-Hot’s Electronic Controller must be reset anytime VDC Power is
disconnected and then reconnected to the heater. The Electronic Controller
can be reset either by depressing the “Low Voltage Reset” button located on the
Electronic Controller (use a thin, straight object to access the reset button
through the small hole in the faceplate) or by turning OFF the “Diesel” switch on
the Heater’s Interior Switch Panel for approximately 30 seconds, then turning
the switch back ON. Reference Figure 32 for the location of the “Low Voltage
Reset” button on the Electronic Controller.
Aqua-Hot™ Hydronic Heating System Installation Manual 07/05
Page
48
SECTION 3: INSTALLATION PROCEDURES
VDC Power
Overview
25 Amp
Fuse
ELECTRONIC CONTROLLER
®
Motor Coach Heating Specialists
Low Tank-Level
Cutoff
Electric Heating
Element Status
Positive/Power
Low Voltage
Heating Status
Reset
Engine Preheat
Pump
#5
#4
Pump #1
Heating Zones
Status
#3
Pump #2
#2
#1
Pump #3
Low Battery
Voltage Fault
Diesel-Burner
Status
Low Temp
Cutoff Status
Overload Fault
NOTE: Reference Appendix A
for specific Electronic
Controller details.
Negative/Ground
Figure 31
Aqua-Hot™ Hydronic Heating System Installation Manual 07/05
Page
49
SECTION 3: INSTALLATION PROCEDURES
Low Voltage
Reset Button
ELECTRONIC CONTROLLER
Low Tank-Level
Cutoff
Electric Heating
Element Status
Low Voltage
Heating Status
Reset
Engine Preheat
Pump
#5
#4
Low Voltage
Reset
Pump #1
Heating Zones
Status
#3
Pump #2
#2
#1
Pump #3
Low Battery
Voltage Fault
Diesel-Burner
Status
Low Temp
Cutoff Status
Overload Fault
Figure 32
Aqua-Hot™ Hydronic Heating System Installation Manual 07/05
Page
50
SECTION 3: INSTALLATION PROCEDURES
System
Bleeding
3.26
Bleeding the Interior/Fresh Water Tank Hydronic Heating System
It is necessary to utilize a propylene glycol based “boiler” type antifreeze in the AquaHot Hydronic Heating Systems. Propylene glycol is a safer alternative to the more toxic
ethylene glycol antifreeze; however, as mandated by IAPMO (International Association
of Plumbing and Mechanical Officials), only those propylene glycol based “boiler” type
antifreezes deemed “Generally Recognized as Safe” (GRAS) by the FDA can be
utilized.
NOTE: Because of the significant impact various types of antifreeze can have on a
Hydronic Heating System - including the level of safety provided, Vehicle Systems, Inc.
has recognized a need to provide an explanation regarding two additional prominent
types of antifreeze/coolant available. The following information should be utilized as an
educational means of ensuring that the proper type of propylene glycol based antifreeze
is selected:
RV & Marine Antifreeze: These types of propylene glycol based antifreeze products
are formulated specifically for “winterizing” applications only. Although RV & Marine
antifreeze is often “Generally Recognized as Safe” by the FDA, it should never be used
in the Aqua-Hot’s Hydronic Heating System. This type of antifreeze is not formulated to
transfer heat, which is essential to the Heating System’s functionality and does not
contain rust inhibitors.
Automotive Antifreeze/Coolant: These type of propylene glycol based antifreeze
products are formulated specifically to protect automotive engines against corrosion,
freezing temperatures, and overheating. They also have excellent heat transfer and
thermal conductivity characteristics. Although these types of antifreeze products are
considered less toxic and safer than ethylene glycol for people, pets, and the
environment, they are not “GRAS” (Generally Recognized as Safe) rated by the FDA.
Therefore, they must be marked with a “harmful if swallowed warning. This additional
warning is required because these types of antifreeze products contain high levels of
chemical rust inhibitors. Due to their potentially hazardous properties, they should never
be used in the Aqua-Hot’s Hydronic Heating System.
Prior to bleeding the Aqua-Hot Hydronic Heating System with the proper solution of
antifreeze and water, it is recommended that the plumbing system be tested for potential
leaks. The following instructions detail how to properly perform a plumbing system
pressure test:
A. Remove the Aqua-Hot’s Radiator Cap and replace it with a ”Cooling System
Pressure Tester”; reference Figure 33. Please note that these types of Pressure
Testing products can typically be obtained from a local Automotive Parts
Supplier.
B. Apply 15 pounds (PSI) of air pressure to the Aqua-Hot’s Hydronic Heating
System.
NOTE: DO NOT exceed 15 PSI of air pressure, as this could cause damage to the
internal plumbing components of the Aqua-Hot.
C. Allow the air pressure to remain in the plumbing system for a minimum of 30
minutes.
D. After the minimum 30 minute interval has expired, check the “Cooling System
Pressure Tester’s” gauge for any loss of pressure.
Aqua-Hot™ Hydronic Heating System Installation Manual 07/05
Page
51
SECTION 3: INSTALLATION PROCEDURES
System
Bleeding,
continued
NOTE: Should it be discovered that a loss of pressure has occurred, be sure to check
all plumbing system connections for leaks (air leaks, in the form of bubbles, can
be visually detected by applying a solution of soapy water to each plumbing
system connection).
E. If applicable, repair all plumbing leaks.
1. Remove the Aqua-Hot’s Fill/Radiator Cap and completely fill the Heat Tank by
pouring in 16 gallons of a 50/50 antifreeze and water heating solution.
NOTE: As antifreeze itself does not possess acceptable heat transfer characteristics,
water is added to the antifreeze due to its excellent heat conduction properties.
In order to provide the best freeze protection, boil-over protection, and
anti-corrosion and rust protection, a 50/50 mixture ratio of propylene glycol
antifreeze and water is recommended to provide the best performance
combination of the aforementioned functions. If excess propylene glycol exists
within an antifreeze and water heating solution, the water’s heat absorption
properties are compromised, which could ultimately inhibit the Aqua-Hot
Hydronic Heating System from providing adequate domestic hot water and
interior heating. Also, if there is a shortage of antifreeze, the Aqua-Hot Hydronic
Heating System is not as well protected in terms of freeze protection and
anti-rust/anti-corrosion protection.
2. Replace the Aqua-Hot’s Fill/Radiator Cap, but do not tighten completely.
NOTE: The Fill Radiator Cap should remain loose during the Bleeding and Filling
Procedure in order to allow air to escape from the top portion of the Aqua-Hot’s
Heat Tank.
3. To activate one of the Aqua-Hot’s Circulation Pumps, switch ON any Interior Zone
Thermostat to its maximum temperature setting. Allow the Circulation Pump to
operate for approximately one minute, then switch it OFF. This will fill the Heating
System’s plumbing lines.
4. Again, remove the Aqua-Hot’s Fill/Radiator Cap and completely fill the Heat Tank
with additional antifreeze and water heating solution.
5. Repeat steps 3 and 4 for all Heating Loops until all air has been completely bled
from the entire Hydronic Heating System.
6. Once all air has been bled from the Hydronic Heating System and the Aqua-Hot’s
Heat Tank has been completely filled, completely tighten the Fill/Radiator Cap.
Domestic
Water
System
Bleeding
3.27
Bleeding the Domestic Water System
NOTE: Verify that the Domestic Water Tank is full prior to bleeding the Fresh Water
System.
1. Ensure that the Domestic Water Pump has 12 Volt-DC power, then activate the
Domestic Water Pump by opening all water faucets separately.
2. Once the Domestic Water System is completely bled, check for leaks.
Aqua-Hot™ Hydronic Heating System Installation Manual 07/05
Page
52
SECTION 3: INSTALLATION PROCEDURES
Pressure the Aqua-Hot
Heating System to 15 PSI,
then, allow the air pressure
to remain for 30 minutes
and check for loss of
pressure.
Figure 33
Should a loss of pressure
occur, check the connections
at each Heat Exchanger using
a soapy water solution, and
watch for bubbles to appear,
which indicates an air leak.
Aqua-Hot™ Hydronic Heating System Installation Manual 07/05
Page
53
SECTION 3: INSTALLATION PROCEDURES
Bleeding
the Engine
Preheat
System
3.28
Bleeding the Engine Preheat System
1. Ensure that the Engine’s Coolant System has been completely refilled.
2. Start and run the Engine until it reaches normal operating temperatures.
3. Turn the Engine OFF.
4. Check the engine coolant level and top off, if necessary.
5. Turn ON the “Preheat” switch located on the Switch Panel. During this procedure,
check for leaks in the Engine Preheat plumbing system and connections.
6. Move the “Preheat” switch to the OFF position by pressing it in a downward motion.
VAC Power
Installation
3.29
Connecting 120 Volt-AC Power to the Aqua-Hot
WARNING: Do not activate the Aqua-Hot’s Electric Heating Element until the antifreeze
and water heating solution has been added to the Aqua-Hot’s Heat Tank
and the heating system has been completely bled of air. Operating the
Aqua-Hot without the antifreeze and water heating solution will cause
serious damage to the Aqua-Hot’s Heat Tank.
!
NOTE:
All Electric Installations, Systems, and Equipment must comply with Article
551, Part A and other Sections of NFPA 70, “National Electrical Code.”
1. For Aqua-Hot Model AHE-100-04S:
Run one 12-2 ROMEX wire, with Ground, from an over-current protected (20 Amp
Circuit Breaker required) 120 Volt-AC power supply to the Aqua-Hot’s VAC Service
Input; reference Figure 34A.
For Aqua-Hot Model AHE-130-04X:
Run two 12-2 ROMEX wires, with Ground, from two over-current protected (25-Amp
Circuit Breaker required) 120 Volt-AC power supplies to the Aqua-Hot’s VAC Service
Input; reference Figure 34B.
2. Insert the wire(s) through the Aqua-Hot’s ROMEX Clamp and connect the 120
Volt-AC Power supply to the Aqua-Hot’s Electric Heating Element wires as illustrated
in Figure 34A for the AHE-100-04S Model or Figure 34B for the AHE-130-04X
Model.
Aqua-Hot™ Hydronic Heating System Installation Manual 07/05
Page
54
SECTION 3: INSTALLATION PROCEDURES
VAC Power
Installation
AHE-100-04S
Model ONLY
L1
12-2 ROMEX
wire w/ground
VAC Service
Input
VAC Junction
Box
Electric Heating
Element Access
Cover
1650 Watt
Electric Heating
Element
Figure 34A
3-WHT
�������������������������
�������������
1-BLK
����
16 RED
15 RED
14 BLK
13 BLK
12 BLU
11 ORG
LLCO-O
#5 FAN #5 THERM-O
#5 THERM-I
#4 FAN +
TSTAT-O
AC REL AC REL +
LTCO-I
LTCO-O
EPPUMP-
#4 FAN -
EPPUMP+
#4 THERM-0
#3 FAN #3 THERM-O
#3 THERM-I
#2 FAN +
PUMP1 PUMP1 +
Circ. Pump 2
JP 1
#3 FAN +
PUMP2 PUMP2 +
PUMP3 PUMP3 +
1
JUNCTION BOX
3-WHT
8 BRN
7 RED
6 WHT
5 VIO
4 GRN
3 BRN
2 BLK
1 RED
BLK
12 BLU
������
#4 THERM-I
JP 3
#5 FAN +
Circ. Pump 1
TSTAT-I
BLK
��������������
N
11 ORG
���������
BLK
GRN
L1
G
TO 120 VAC
LLCO-I
#2 FAN -
#1 FAN +
#1 FAN #1 THERM-O
#1 THERM-I
���
B1 +
C7-I
C1-O
B2 B4 +
JP 4
#2 THERM-I
Circ. Pump 3
#2 THERM-O
B3 +
B6 DIESEL-O
1
JP 2
DIESEL-I
ELECTRIC-O
ELECTRIC-I
PREHEAT-O
PREHEAT-I
IND-LT (+)
B3
IND-LT (-)
B6
JP8
JP5
B4 IN +12V
JP7
GND
Aqua-Hot™ Hydronic Heating System Installation Manual 07/05
Page
55
SECTION 3: INSTALLATION PROCEDURES
VAC Power
Installation
AHE-130-04X
Model ONLY
L1
12-2 ROMEX
wire w/ground
L2
VAC Service
Input
Electric Heating
Element Access
Cover
2000 Watt
Electric Heating
Element
VAC Junction
Box
2000 Watt
Electric Heating
Element
Figure 34B
Electric Heating
Element Access
Cover
12 VDC
N.C.
7 BLK
LTCO-I
LTCO-O
E PP U M P -
#4 FAN -
E PP U M P +
#4 THERM-0
#3 FAN #3 THERM-I
#2 FAN +
PUM P1 +
Circ. Pump 2
JP 1
#3 FAN +
#3 THERM-O
P UM P 2 +
Circ. Pump 3
#4 THERM-I
P UM P 1 -
C7-I
PUMP2 -
PUMP3 P UM P 3 +
1
N.C.
3-WHT
+
12 BLU
11 ORG
JUNCTION BOX
8 BRN
7 RED
6 W HT
5 VI O
4 GRN
3 BRN
2 BLK
1 RED
5 RED
3 W HT
2 BLK
L1
N
L2
N
G
G
#2 THERM-O
#1 THERM-O
#1 THERM-I
B1 +
C1-O
B2 -
JP 4
#1 FAN +
#1 FAN -
B4 +
B3 +
B6 DIESEL-O
1
GRN
7 YEL
6 WHT
5 ORG
4 BRN
3 RED
2 BLUE
1 GRN
SWITCH PANEL
ELECTRIC
ENGINE
PREHEAT
2
6
2
6
1
4
1
4
ELECTRIC
HI / LOW
DIESEL-I
JP 2
ELECTRIC HEATING ELEMENT
120VAC,2000W
VAC RELAY
#2 FAN #2 THERM-I
4 RED
VAC HIGH LIMIT
TO 120 VAC
#4 FAN +
AC REL +
5 R ED
GND
#5 THERM-I
AC REL -
JP 3
#5 THERM-O
Circ. Pump 1
#5 FAN -
ELECTRIC HEATING ELEMENT
120VAC,2000W
VAC RELAY
12 VDC
#5 FAN +
TSTAT-I
TSTAT-O
2 BLK
3-WHT
+
-
16 RED
15 RED
14 BLK
13 BLK
12 BLU
11 ORG
LLCO-I
LLCO-O
1-BLK
VAC HIGH LIMIT
ELECTRIC-O
DIESEL
ELECTRIC-I
PREHEAT-O
6
PREHEAT-I
IND-LT (+)
B3
IND-LT (-)
B6
JP8
JP5
B4 IN +12V
JP7
GND
4
+
+
+
2
6
1
4
+
Y EL
2
1
GRN
GND
Aqua-Hot™ Hydronic Heating System Installation Manual 07/05
Page
56
SECTION 3: INSTALLATION PROCEDURES
Activating
the Aqua-Hot
3.30
1.
Initial Activation of the Aqua-Hot
Move the Aqua-Hot’s “Diesel” switch to the ON position. Do this by pressing the
switch in an upward motion.
NOTE: Activate the “Diesel” switch for approximately five seconds ONLY and then
switch it OFF. This procedure will purge the Diesel-Burner’s fuel system by
allowing the Heater’s Fuel-Pump to operate for approximately three minutes
during its normal shutdown/purge cycle. After the three minute purge cycle has
ended, repeat this procedure once more.
2.
Move the Aqua-Hot’s “Diesel” switch to the ON position and leave it on. This
procedure will activate the Diesel-Burner and the Indicator Light circuit of the switch.
NOTES:
A. It will take approximately 30 seconds before the Diesel-Burner will ignite
and exhaust can be heard exiting the heater.
B. Allow approximately 10-20 minutes for the Aqua-Hot to reach normal
operating temperature (approximately 195°F).
3.
Because the number and voltage of the Electric Elements vary by model, locate the
Marking Plate on the Aqua-Hot (reference Figure 1 for the Marking Plate locations,
as well as Figure 3 for additional information) to determine which model is employed.
Follow the Electric Element activation instructions below.
AHE-100-04S
Move the Aqua-Hot’s “Electric” switch to the ON position. This will supply 120
Volt-AC Power to the Aqua-Hot’s Electric Heating Element.
AHE-130-04X
Move the Aqua-Hot’s “Electric” switch to the ON position and move the “High/Low”
switch to the “High” position. This will supply 120 Volt-AC power to both Electric
Heating Elements.
NOTE: Both the 12 Volt-DC powered Diesel-Burner and all Electrical Heating Elements
are thermostatically controlled. Either or both heating sources will automatically
maintain the temperature of the Aqua-Hot’s antifreeze and water heating
solution.
4.
Once the Aqua-Hot has reached its normal operating temperature of approximately
195°F, switch ON each Interior and Fresh Water Tank Thermostat to their maximum
temperature settings. This procedure will activate all Interior and Fresh Water Tank
Heat Exchangers in each particular heating zone.
5.
The Aqua-Hot is now ready for normal operation and use.
Aqua-Hot™ Hydronic Heating System Installation Manual 07/05
Page
57
APPENDIX A
Wiring Diagrams
Aqua-Hot™ Hydronic Heating System Installation Manual 07/05
1
TO 12VDC
POWER SUPPLY
(I.E., BATTERY
CONNECTIONS)
���
+
2
-
+
+
ENGINE
PREHEAT
BEDROOM
HEATING ZONE#1
4
����������
+
4
6
+
-
1
2
ELECTRIC
-
GRN
(OPTIONAL)
1
2
DIESEL
12VDC
+
4
6
SWITCH PANEL
����������
TO COZY
HEAT EXCHANGERS
24 WATTS MAX.
BATHROOM
HEATING ZONE #2
-
+
TO COZY
HEAT EXCHANGERS 12VDC
24 WATTS MAX.
-
����������
VIO
BLU
YEL
BLU
RED
BLK
VIO
VIO
RED
BLK
BLU
BLU
RED
BLK
WHT
WHT
RED
BLK
ORG
ORG
WHT
BRN
ORG
������
������
BLK
C2
C6
�
CIRCULATION PUMP 1
IND-LT (+)
B3
IND-LT (-)
B6
WIRING DIAGRAM
�����������������
����������������
BLU
BLK
YEL
GRN
BRN
C8
����
�������������
������
������������
FUEL
SOLENOID
12 VDC
��������������
C5
C4
12VDC
MOTOR
�
CIRCULATION PUMP 3
12VDC
�
CIRCULATION PUMP 2
RED
�
12VDC
- +
JP7
GND
�
12VDC PUMP
ENGINE PREHEAT
�������������������������
�������������
GRN
BLK
G
N
L1
3-WHT
JUNCTION BOX
12VDC
7 YEL
6 WHT
5 ORG
4 BRN
3 RED
2 BLUE
1 GRN
11 ORG
���������������
���������������
�����
1
1
8 BRN
7 RED
6 WHT
5 VIO
4 GRN
3 BRN
2 BLK
1 RED
12 BLU
BLK
3-WHT
����
B6 -
B3 +
B4 +
B2 -
C1-O
C7-I
B1 +
PUMP3 +
PUMP3 -
PUMP2 +
PUMP2 -
PUMP1 +
PUMP1 -
EPPUMP+
EPPUMP-
LTCO-O
LTCO-I
AC REL +
AC REL -
BLK
1-BLK
PREHEAT-I
JP8
JP5
B4 IN +12V
LLCO-O
TSTAT-I
TSTAT-O
16 RED
15 RED
14 BLK
13 BLK
12 BLU
11 ORG
2
4
6
����
TO 120 VAC
��������������
���
8
���������
0
1
PREHEAT-O
ELECTRIC-I
ELECTRIC-O
DIESEL-I
DIESEL-O
#1 THERM-I
#1 THERM-O
#1 FAN -
#1 FAN +
#2 THERM-I
#2 THERM-O
#2 FAN -
#2 FAN +
#3 THERM-I
#3 THERM-O
#3 FAN -
#3 FAN +
#4 THERM-I
#4 THERM-0
#4 FAN -
#4 FAN +
#5 THERM-I
#5 THERM-O
#5 FAN -
#5 FAN +
LLCO-I
������
������
������
6
����������
+
TO COZY
HEAT EXCHANGERS 12VDC
24 WATTS MAX.
-
FRESH WATER
TANK
HEATING ZONE #3
OPTIONAL
HEATING
ZONE #4
LIVING ROOM/
KITCHEN
HEATING ZONE #5
JP 1
JP 2
Circ. Pump 3
Circ. Pump 2
Circ. Pump 1
JP 3
JP 4
+
TO COZY
HEAT EXCHANGERS 12VDC
24 WATTS MAX.
-
APPENDIX A
Wiring Information (AHE-100-04S)
A1
+
1
2
4
+
1
4
+
-
1
2
6
2
6
-
ENGINE
PREHEAT
ELECTRIC
SWITCH PANEL
THERMOSTAT
4
6
+
-
DIESEL
1
2
Aqua-Hot™ Hydronic Heating System Installation Manual 07/05
GRN
WHT
GRN
Y EL
-
+
+
IND-LT (+)
B3
IND-LT (-)
B6
PREHEAT-I
PREHEAT-O
ELECTRIC-I
ELECTRIC-O
DIESEL-I
DIESEL-O
#1 THERM-I
#1 THERM-O
#1 FAN -
#1 FAN +
#2 THERM-I
#2 THERM-O
#2 FAN -
#2 FAN +
#3 THERM-I
#3 THERM-O
#3 FAN -
#3 FAN +
#4 THERM-I
#4 THERM-0
#4 FAN -
#4 FAN +
#5 THERM-I
#5 THERM-O
#5 FAN -
#5 FAN +
TO 12VDC
POWER SUPPLY
(I.E., BATTERY
CONNECTIONS)
ORG
VIO
BRN
BLU
Y EL
BLU
R ED
BLK
VIO
VIO
R ED
BLK
BLU
BLU
R ED
BLK
WHT
WHT
R ED
BLK
ORG
ORG
JP8
JP5
B4 IN +12V
JP7
GND
1
1
JP 3
7 YEL
6 WHT
5 ORG
4 BRN
3 RE D
2 BLUE
1 GRN
8 BRN
7 RED
6 WHT
5 VI O
4 GRN
3 BRN
2 BLK
1 RED
16 RED
15 RED
14 BLK
13 BLK
12 BLU
11 ORG
DIESEL-BURNER
CONTROLLER
12 VDC
B-PLUG
C-PLUG
12 BLU
11 ORG
VAC/VDC CONTROL
THERMOSTAT
WIRING DIAGRAM
B6 -
B3 +
B4 +
B2 -
C1-O
C7-I
B1 +
PUM P3 +
PU M P3 -
PUM P2 +
PU M P2 -
PU M P 1 +
PUM P1 -
EP P U M P +
EP P U M P -
LTCO-O
LTCO-I
AC REL +
AC REL -
TSTAT-O
TSTAT-I
LLCO-O
LLCO-I
FLOAT
SWITCH
BLU
BLK
RED
BLK
+
+
-
4
6
8
4
6
8
C8
C2
C6
12VDC PUMP
GRN
BRN
- +
N.C.
M
M
12VDC
CIRCULATION PUMP 3
FUEL SOLENOID VALVE
IGNITION COIL
12 VDC
M
12VDC
CIRCULATION PUMP 2
12 VDC
VDC HIGH LIMIT
N.C.
12VDC
MOTOR
M
GRN
L2
N
G
12VDC
CIRCULATION PUMP 1
5 RED
3 W HT
2 BLK
L1
N
ELECTRIC HEATING ELEMENT
120VAC,2000W
ELECTRIC HEATING ELEMENT
120VAC,2000W
2 BLK
JUNCTION BOX
3-WHT
4 RED
3-WHT
1-BLK
FLAME SENSOR
C5
C4
VAC HIGH LIMIT
5 R ED
M
N.C.
VAC HIGH LIMIT
ENGINE PREHEAT
VAC RELAY
0 2
1
LEFT
VAC RELAY
0 2
1
RIGHT
HOUR
METER
-
Y EL
7 BLK
GND
4
-
THERMOSTAT
+
TO COZY
12VDC
HEAT EXCHANGERS
24 WATTS MAX.
BEDROOM
HEATING ZONE #1
6
THERMOSTAT
+
TO COZY
HEAT EXCHANGERS 12VDC
24 WATTS MAX.
-
BATHROOM
HEATING ZONE #2
ELECTRIC
HI / LOW
THERMOSTAT
+
TO COZY
HEAT EXCHANGERS 12VDC
24 WATTS MAX.
-
FRESH WATER
TANK
HEATING ZONE #3
OPTIONAL
HEATING
ZONE #4
LIVING ROOM/
KITCHEN
HEATING ZONE #5
JP 1
JP 2
Circ. Pump 3
Circ. Pump 2
Circ. Pump 1
12 VDC
(OPTIONAL)
12 VDC
JP 4
+
TO COZY
HEAT EXCHANGERS 12VDC
24 WATTS MAX.
-
APPENDIX A
Wiring Information (AHE-130-04X)
A2
GND
TO 120 VAC
APPENDIX A
Enlarged View of Switch Panel and Heating Zone Wiring (AHE-100-04S)
+
TO COZY
HEAT EXCHANGERS 12VDC
24 WATTS MAX.
LIVING ROOM/
KITCHEN
HEATING ZONE #5
LLCO-I
LLCO-O
#5 THERM-O
#5 THERM-I
#4 FAN +
AC REL AC REL +
LTCO-I
LTCO-O
EPPUMP-
#4 FAN -
FRESH WATER
TANK
HEATING ZONE #3
EPPUMP+
#4 THERM-0
BATHROOM
HEATING ZONE #2
����������
#3 FAN #3 THERM-O
#3 THERM-I
#2 FAN +
PUMP1 PUMP1 +
PUMP2 PUMP2 +
PUMP3 PUMP3 +
1
#2 FAN #2 THERM-O
#2 THERM-I
#1 FAN +
#1 FAN #1 THERM-O
#1 THERM-I
B1 +
C7-I
C1-O
B2 B4 +
B3 +
+
TO COZY
12VDC
HEAT EXCHANGERS
24 WATTS MAX.
B6 -
BLU
DIESEL-O
BLU
YEL
VIO
BEDROOM
HEATING ZONE #1
JP 1
+
TO COZY
HEAT EXCHANGERS 12VDC
24 WATTS MAX.
-
#3 FAN +
Circ. Pump 2
RED
BLK
VIO
VIO
RED
BLK
BLU
BLU
RED
BLK
WHT
WHT
Circ. Pump 1
����������
#4 THERM-I
JP 3
#5 FAN -
TSTAT-O
JP 4
TO COZY
HEAT EXCHANGERS 12VDC
24 WATTS MAX.
-
#5 FAN +
Circ. Pump 3
TSTAT-I
RED
BLK
ORG
ORG
+
����������
1
DIESEL-I
ORG
BRN
WHT
JP 2
OPTIONAL
HEATING
ZONE #4
����������
ELECTRIC-O
ELECTRIC-I
PREHEAT-O
PREHEAT-I
IND-LT (+)
B3
IND-LT (-)
B6
JP8
JP5
B4 IN +12V
JP7
GND
SWITCH PANEL
ENGINE
PREHEAT
6
4
2
6
1
4
+
ELECTRIC
+
DIESEL
2
6
-
2
1
+
4
1
���
GRN
TO 12VDC
POWER SUPPLY
(I.E., BATTERY
CONNECTIONS)
+
(OPTIONAL)
+
-
Aqua-Hot™ Hydronic Heating System Installation Manual 07/05
A3
APPENDIX A
Enlarged View of Switch Panel and Heating Zone Wiring (AHE-130-04X)
+
TO COZY
HEAT EXCHANGERS 12VDC
24 WATTS MAX.
LIVING ROOM/
KITCHEN
HEATING ZONE #5
LLCO-I
LLCO-O
#5 FAN #5 THERM-O
#5 THERM-I
#4 FAN +
TSTAT-I
TSTAT-O
AC REL AC REL +
LTCO-I
LTCO-O
EPPUMP-
#4 FAN -
EPPUMP+
#4 THERM-0
BATHROOM
HEATING ZONE #2
THERMOSTAT
#3 FAN #3 THERM-O
#3 THERM-I
#2 FAN +
PUMP1 PUMP1 +
Circ. Pump 2
+
TO COZY
HEAT EXCHANGERS 12VDC
24 WATTS MAX.
-
#3 FAN +
PUMP2 +
Circ. Pump 1
R ED
BLK
VIO
VIO
RED
BLK
BLU
BLU
R ED
BLK
WHT
W HT
THERMOSTAT
#4 THERM-I
C7-I
PUMP2 -
PUMP3 PUMP3 +
1
#2 FAN #2 THERM-O
#2 THERM-I
#1 FAN +
#1 FAN #1 THERM-O
#1 THERM-I
B1 +
C1-O
B2 -
JP 4
FRESH WATER
TANK
HEATING ZONE #3
JP 3
#5 FAN +
Circ. Pump 3
R ED
BLK
ORG
OR G
+
TO COZY
HEAT EXCHANGERS 12VDC
24 WATTS MAX.
-
JP 1
OPTIONAL
HEATING
ZONE #4
THERMOSTAT
B4 +
B3 +
+
TO COZY
12VDC
HEAT EXCHANGERS
24 WATTS MAX.
B6 -
BLU
ORG
VIO
BRN
BEDROOM
HEATING ZONE #1
ELECTRIC-O
ELECTRIC-I
PREHEAT-O
PREHEAT-I
IND-LT (+)
B3
IND-LT (-)
B6
THERMOSTAT
1
DIESEL-I
JP 2
BLU
Y EL
DIESEL-O
JP8
JP5
B4 IN +12V
J P7
GND
SWITCH PANEL
ENGINE
PREHEAT
6
4
-
2
6
2
6
+
1
4
1
4
+
+
DIESEL
2
6
1
4
+
2
1
WHT
GND
YEL
GRN
(OPTIONAL)
ELECTRIC
ELECTRIC
HI / LOW
GRN
TO 12VDC
POWER SUPPLY
(I.E., BATTERY
CONNECTIONS)
+
+
-
To the 1-Way Plugs
Aqua-Hot™ Hydronic Heating System Installation Manual 07/05
A4
APPENDIX B
Wire Gauge
Information
APPENDIX B
Wire Gauge Chart
A M E R I C A N B O A T A N D YA C H T C O U N C I L R E C O M M E N D A T I O N S
TOTAL
CURRENT
ON CIRCUIT
IN AMPS.
C O N D U C T O R S S I Z E S F O R 3 % D R O P I N V O LTA G E
Length of Conductor from Source of Current to Device and back to Source
10
15
20
25
30
40
50
60
70
80
90
100
110
120
Feet
130
140
150
160
170
12 Volts - 3% Drop Wire Sizes (gage) - Based on Minimum CM Area
5
18
16
14
12
12
10
10
10
8
8
8
6
6
6
6
6
6
6
6
10
14
12
10
10
10
8
6
6
6
6
4
4
4
4
2
2
2
2
2
15
12
10
10
8
8
6
6
6
4
4
2
2
2
2
2
1
1
1
1
20
10
10
8
6
6
6
4
4
2
2
2
2
1
1
1
0
0
0
2/0
25
10
8
6
6
6
4
4
2
2
2
1
1
0
0
0
2/0
2/0
2/0
3/0
30
10
8
6
6
4
4
2
2
1
1
0
0
0
2/0
2/0
3/0
3/0
3/0
3/0
40
8
6
6
4
4
2
2
1
0
0
2/0
2/0
3/0
3/0
3/0
4/0
4/0
4/0
4/0
50
6
6
4
4
2
2
1
0
2/0
2/0
3/0
3/0
4/0
4/0
4/0
60
6
4
4
2
2
1
0
2/0
3/0
3/0
4/0
4/0
4/0
70
6
4
2
2
1
0
2/0
3/0
3/0
4/0
4/0
80
6
4
2
2
1
0
3/0
3/0
4/0
4/0
90
4
2
2
1
0
2/0
3/0
4/0
4/0
100
4
2
2
1
0
2/0
3/0
4/0
24 Volts - 3% Drop Wire Sizes (gage) - Based on mInimum CM Area
5
18
18
18
16
16
14
12
12
12
10
10
10
10
10
8
8
8
8
8
10
18
16
14
12
12
10
10
10
8
8
8
6
6
6
6
6
6
6
6
15
16
14
12
12
10
10
8
8
6
6
6
6
6
4
4
4
4
4
2
20
14
12
10
10
10
8
6
6
6
6
4
4
4
4
2
2
2
2
2
25
12
12
10
10
8
6
6
6
4
4
4
4
2
2
2
2
2
2
1
30
12
10
10
8
8
6
6
4
4
4
2
2
2
2
2
1
1
1
1
40
10
10
8
6
6
6
4
4
2
2
2
2
1
1
1
0
0
0
2/0
50
10
8
6
6
6
4
4
2
2
2
1
1
0
0
0
2/0
2/0
2/0
2/0
60
10
8
6
6
4
4
2
2
1
1
0
0
0
2/0
2/0
3/0
3/0
3/0
3/0
70
8
6
6
4
4
2
2
1
1
0
0
2/0
2/0
3/0
3/0
3/0
3/0
4/0
4/0
80
8
6
6
4
4
2
2
1
0
0
2/0
2/0
3/0
3/0
3/0
4/0
4/0
4/0
4/0
90
8
6
4
4
2
2
1
0
0
2/0
2/0
3/0
3/0
4/0
4/0
4/0
4/0
4/0
100
6
6
4
4
2
2
1
0
2/0
2/0
3/0
3/0
4/0
4/0
4/0
Aqua-Hot™ Hydronic Heating System Installation Manual 07/05
B1
��������������������������������������������������������������
15549 East Highway 52
Fort Lupton, Colorado 80621
1-800-685-4298
© Copyright 2005 Vehicle Systems, Inc. All rights reserved.
www.vehiclesys.com
�����������
Fax: 303-857-9000