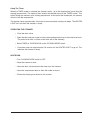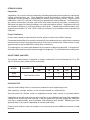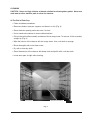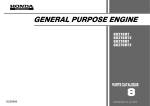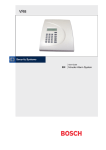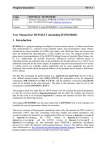
1
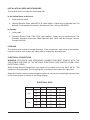
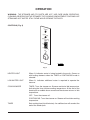
INSTALLATION &
OPERATION MANUAL
VPX SERIES STEAMERS
MODELS
VPX3
VPX5
ML- 126586
ML- 126588
www.energystar.gov
Model VPX3
For additional information on Vulcan-Hart or to locate an authorized parts
and service provider in your area, visit our website at www.vulcanhart.com
VULCAN-HART
DIVISION OF ITW FOOD EQUIPMENT GROUP, LLC
WWW.VULCANHART.COM
P.O. BOX 696, LOUISVILLE, KY 40201-0696
TEL. (502) 778-2791
FORM 31136 Rev. A (08-04)
TABLE OF CONTENTS
GENERAL . . . . . . . . . . . . . . . . . . . . . . . . . . . . . . . . . . . . . . . . . . . . . . . . . . . . . . . . . . . . . . . . . . . . . 3
INSTALLATION . . . . . . . . . . . . . . . . . . . . . . . . . . . . . . . . . . . . . . . . . . . . . . . . . . . . . . . . . . . . . . . . 3
Unpacking . . . . . . . . . . . . . . . . . . . . . . . . . . . . . . . . . . . . . . . . . . . . . . . . . . . . . . . . . . . . . . . 3
Location . . . . . . . . . . . . . . . . . . . . . . . . . . . . . . . . . . . . . . . . . . . . . . . . . . . . . . . . . . . . . . . . 3
Assembly . . . . . . . . . . . . . . . . . . . . . . . . . . . . . . . . . . . . . . . . . . . . . . . . . . . . . . . . . . . . . . . 3
Installation Codes and Standards . . . . . . . . . . . . . . . . . . . . . . . . . . . . . . . . . . . . . . . . . . . . 4
Leveling . . . . . . . . . . . . . . . . . . . . . . . . . . . . . . . . . . . . . . . . . . . . . . . . . . . . . . . . . . . . . . . . 4
Electrical Connections . . . . . . . . . . . . . . . . . . . . . . . . . . . . . . . . . . . . . . . . . . . . . . . . . . . . . 4
Service Connections . . . . . . . . . . . . . . . . . . . . . . . . . . . . . . . . . . . . . . . . . . . . . . . . . . . . . . 5
Water Condition . . . . . . . . . . . . . . . . . . . . . . . . . . . . . . . . . . . . . . . . . . . . . . . . . . . . . . . . . . 6
Vent Hood . . . . . . . . . . . . . . . . . . . . . . . . . . . . . . . . . . . . . . . . . . . . . . . . . . . . . . . . . . . . . . . 6
Before First Use . . . . . . . . . . . . . . . . . . . . . . . . . . . . . . . . . . . . . . . . . . . . . . . . . . . . . . . . . . 6
Testing Procedure . . . . . . . . . . . . . . . . . . . . . . . . . . . . . . . . . . . . . . . . . . . . . . . . . . . . . . . . 7
OPERATION . . . . . . . . . . . . . . . . . . . . . . . . . . . . . . . . . . . . . . . . . . . . . . . . . . . . . . . . . . . . . . . . . . 8
Controls . . . . . . . . . . . . . . . . . . . . . . . . . . . . . . . . . . . . . . . . . . . . . . . . . . . . . . . . . . . . . . . . 8
Operating the Steamer . . . . . . . . . . . . . . . . . . . . . . . . . . . . . . . . . . . . . . . . . . . . . . . . . . . . . 9
Shutdown . . . . . . . . . . . . . . . . . . . . . . . . . . . . . . . . . . . . . . . . . . . . . . . . . . . . . . . . . . . . . . . 9
Steam Cooking . . . . . . . . . . . . . . . . . . . . . . . . . . . . . . . . . . . . . . . . . . . . . . . . . . . . . . . . . 10
Acceptable Pan Sizes . . . . . . . . . . . . . . . . . . . . . . . . . . . . . . . . . . . . . . . . . . . . . . . . . . . 10
Cooking Tips . . . . . . . . . . . . . . . . . . . . . . . . . . . . . . . . . . . . . . . . . . . . . . . . . . . . . . . . . . . 10
Cleaning . . . . . . . . . . . . . . . . . . . . . . . . . . . . . . . . . . . . . . . . . . . . . . . . . . . . . . . . . . . . . . 11
MAINTENANCE . . . . . . . . . . . . . . . . . . . . . . . . . . . . . . . . . . . . . . . . . . . . . . . . . . . . . . . . . . . . . . 12
Service and Parts Information . . . . . . . . . . . . . . . . . . . . . . . . . . . . . . . . . . . . . . . . . . . . . 12
© VULCAN-HART, 2004
–2–
INSTALLATION, OPERATION AND CARE OF
MODEL VPX SERIES STEAMERS
PLEASE KEEP THIS MANUAL FOR FUTURE USE
GENERAL
The Vulcan-Hart steamer cooks vegetables, frankfurters, eggs, chicken, sausage, fish, corned
beef, and many other meats and food items. These steamers are produced with quality materials
and workmanship.
The VPX3 Steamer is rated at 9.0 kW and the VPX5 Steamer is rated at 15.0 kW.
Proper installation, usage and maintenance of your steamer will result in many years of satisfactory
performance.
Thoroughly read this entire manual and carefully follow all of the instructions provided.
INSTALLATION
Before installing, verify that the electrical service agrees with the specifications on the machine data
plate located on the left side panel. If the supply and equipment requirements do not agree, do not
proceed with the installation. Contact your dealer or Vulcan-Hart immediately.
UNPACKING
This steamer was inspected before leaving the factory. The transportation company assumes full
responsibility for safe delivery upon acceptance of the shipment. Immediately after unpacking,
check for possible shipping damage. If the steamer is found to be damaged, save the packaging
material and contact the carrier within 15 days of delivery. Carefully unpack the steamer and place
in a work-accessible area as near to its final installed position as possible.
LOCATION
The installation location must allow adequate clearances for servicing and proper operation.
Minimum clearances for proper air circulation is 2" (5.1 cm) on the sides and 6" (15.2 cm) on the
back.
ASSEMBLY
This steamer comes with four 4 1/2" (11.4 cm) support legs and four large flat washers. Place the
steamer on its left side, being careful to avoid scratching the finish. Place one flat washer on the bolt
side of each leg. Thread the four legs into the provided mounting holes. Do not mount steamer
directly to a counter top unless the support legs are in place.
–3–
INSTALLATION CODES AND STANDARDS
The steamer must be installed in accordance with:
In the United States of America:
1. State and local codes.
2. National Electrical Code, ANSI/NFPA-70 (latest edition). Copies may be obtained from The
National Fire Protection Association, Batterymarch Park, Quincy, MA 02269.
In Canada:
1. Local codes.
2. Canadian Electric Code, CSA C22.2 (latest edition). Copies may be obtained from The
Canadian Standard Association, 5060 Spectrum Way, Suite 100, Mississauga, Ontario,
Canada L4W 5N6.
LEVELING
The steamer must be level for proper operation. Place a carpenter's level on top of the steamer.
Level the steamer front to back and side to side by turning the adjustable feet.
ELECTRICAL CONNECTIONS
WARNING: ELECTRICAL AND GROUNDING CONNECTIONS MUST COMPLY WITH THE
APPLICABLE PORTIONS OF THE NATIONAL ELECTRICAL CODE AND/OR OTHER LOCAL
ELECTRICAL CODES.
When making electrical connections, use copper wire suitable for at least 200°F (90°C). The
steamer must be grounded. The wiring diagram is located on the inside of the right panel.
Steamers wired for 1 phase can be changed to 3 phase or vice versa by relocating the jumper wires
on the terminal block as shown on the wiring diagram.
ELECTRICAL DATA
Model
Volts
208
VPX3
240
480
208
VPX5
240
480
KW
Amp @ 1 PH
Amp @ 3 PH
6
9
6
9
6
9
10
15
10
15
10
15
28.9
43.3
25
37.5
12.5
18.8
48.1
72.2
41.7
62.5
20.9
31.3
NA
25
NA
21.7
NA
10.9
NA
41.7
NA
36.1
NA
18.1
–4–
SERVICE CONNECTIONS
Plumbing Connections
No plumbing connections are required as the steamer is filled manually.
Drain Connections
No drain connection is required. Drain the
steamer into a suitable container with a three
gallon minimum capacity. (See Fig. 1. Drain Kit
No. 854217)
Caution: Do not connect steamer drain solidly
to any drain piping. The steamer drain must vent
to the atmosphere to avoid creating a back
pressure and possible back siphoning into the
compartment.
Fig. 1
ELECTRICAL CONNECTION:
1-1/4" HOLE FOR ELECTRICAL CONNECTION.
DRAIN: 1/2" NPT
25 635
17 432
4 [102]
12 304.80
D
D
PX-3
PX-5
19.0 483
25.5 648
4.75 121
4.5 114
2.25 57.15
5.5 [140]
O
P
E
N
21 533
VENT
4 102
D
IN mm
17 432
19.25 489
PL-53566
Fig. 2
–5–
WATER CONDITION
For best results, Vulcan recommends that the water supply meet the following specifications:
• Hardness of 2 grains or 35 ppm.
• Total dissolved solids (TDS) — 60 ppm.
• Ph factor of 7.0 to 7.5.
These specifications can easily be obtained with the use of a properly maintained water softener.
VENT HOOD
Some local codes may require the steamer to be located under an exhaust hood. Information on
the construction and installation of ventilating hoods may be obtained from the standard for "Vapor
Removal for Cooking Equipment", NFPA No. 96 (latest edition).
BEFORE FIRST USE
Thoroughly clean the steamer before using for the first time. See the CLEANING section in this
manual.
–6–
TESTING PROCEDURE
WARNING: THE STEAMER AND ITS PARTS ARE HOT. USE CARE WHEN OPERATING,
CLEANING OR SERVICING THE STEAMER. THE COOKING COMPARTMENT CONTAINS LIVE
STEAM AND HOT WATER. STAY CLEAR WHILE OPENING THE DOOR.
Once the steamer is at its final location, thoroughly test the steamer before operation.
1. Make sure the door opens and closes properly.
2. Close the drain valve on the bottom of the steamer. Open the door and pour water into the
cooking compartment up to the water level mark (the water level mark is visible on the back
wall of the steamer).
3. Select CONTINUOUS on the COOKING MODE switch.
4. With the door open, press the small rod located above the door catch. The HEATER LIGHT
should come on. Release the rod; the HEATER LIGHT should go off.
5. Close the compartment door and wait approximately 10 minutes. When the HEATER LIGHT
goes off, the steamer is ready.
6. Select TIMED on the COOKING MODE switch.
7. Set the timer for 5 minutes.
8. When the timer returns to 0, a buzzer should sound signaling the end of the cooking cycle.
To silence the buzzer, turn the dial timer to OFF.
9. To turn the steamer off:
a. Select the OFF mode on the COOKING MODE switch
b. Allow the steamer to cool.
c. Open the drain valve and drain the water from the steamer.
d. Open the compartment door to allow the inside to dry out.
–7–
OPERATION
WARNING: THE STEAMER AND ITS PARTS ARE HOT. USE CARE WHEN OPERATING,
CLEANING OR SERVICING THE STEAMER. THE COOKING COMPARTMENT CONTAINS LIVE
STEAM AND HOT WATER. STAY CLEAR WHILE OPENING THE DOOR.
CONTROLS (Fig. 3)
HEA
TER
LOW
WAT
ER
COO
KING
M
TIME ODE
D
OFF
CON
TINU
OUS
TIME
R
PL-53567
Fig. 3
HEATER LIGHT
When lit, indicates water is being heated in the cavity. Comes on
with heating elements when the TIMED or CONTINUOUS mode is
selected.
LOW WATER LIGHT
When lit, indicates additional water is required to operate the
steamer.
COOKING MODE
TIMED: Turns the steamer on. Steamer maintains idle temperature.
Activating the timer initiates cooking temperature. At the end of the
timed cycle an audible alarm sounds and the steamer returns to idle
temperature.
OFF: Turns the steamer off.
CONTINUOUS: Turns the steamer on. Steamer will maintain cooking
temperature.
TIMER
Sets cooking time (0 to 60 minutes). An audible alarm will sound at the
end of the timed cycle.
–8–
Using The Timer
When the TIMED mode is selected, the steamer comes up to idle temperature (lower than the
cooking temperature). The operator then selects the desired time with the TIMER control. This
quickly brings the steamer up to cooking temperature. At the end of the timed cycle, the steamer
returns to the idle temperature.
The steamer takes approximately 10 minutes to warm up before cooking can begin. The HEATER
LIGHT turns off when the steamer is ready.
OPERATING THE STEAMER
• Close the drain valve.
• Open the door and pour water into the cooking compartment up to the water level mark.
The water level mark is visible on the back wall of the steamer).
• Select TIMED or CONTINUOUS on the COOKING MODE switch.
• Close door and wait approximately 10 minutes for the HEATER LIGHT to go off. This
indicates the steamer is ready.
SHUTDOWN
• Turn COOKING MODE switch to OFF.
• Allow the steamer to cool.
• Open the drain valve and drain the water from the steamer.
• Open the compartment door to allow the inside to dry out.
• Follow the cleaning instructions in this manual.
–9–
STEAM COOKING
Preparation
Vegetables, fruits, meats, seafood, and poultry should be prepared normally by cleaning, separating,
cutting, removing stems, etc. Root vegetables should be cooked in a perforated pan. Other
vegetables may be cooked in a perforated pan unless juices are being saved. Liquids can be
collected in a solid 12" x 20" (30.5 x 50.8 cm) pan placed under a perforated pan. Perforated pans
are used for frankfurters, hot dogs, and similar items when preserving the juices is unnecessary.
Solid pans are good for cooking puddings, rice, and hot breakfast cereals. Vegetables and fruits
are cooked in solid pans in their own juices to retain broth. Canned foods can be heated in their
opened cans placed in 12" x 20" (30.5 x 50.8 cm) solid pans, or the contents may be poured into
solid pans.
Frozen Food Items
Frozen foods should be separated into smaller pieces to allow more efficient cooking.
Precooked frozen dishes that cannot be cooked in the covered containers in which they are packed
should use a pan cover if they require more than 15 minutes of cooking time. When a cover is used,
approximately one-third additional cooking time is necessary.
The cooking time for frozen foods depends on the amount of defrosting required. If time permits,
allow the frozen foods to partially thaw overnight in a refrigerator. This will reduce their cooking time.
ACCEPTABLE PAN SIZES
The steamer compartment is designed to accept combinations of the following size 12" x 20"
(30.5 x 50.8 cm) pans (either solid or perforated):
MODEL
INCHES
1
2.5
4
6
mm
25
64
102
152
6
3
2
1
10
5
3
2
PAN DEPTH
VPX3
Total Quantity of Pans
VPX5
COOKING TIPS
Keep hot food holding time to a minimum to produce the most appetizing results.
After steaming, sausage, chicken, or fish may be browned in a radiant broiler.
Save juice from fish, chicken, turkey, or vegetables to make soups, sauces, or casserole dishes.
Vegetables retain their color and are more nutritious if you schedule cooking of fresh vegetables
so they will be served soon after cooking. If they are prepared in advance, plunge into cold water
(with ice is recommended), drain thoroughly, and refrigerate until needed. Reheating will take
approximately 5-10 minutes, depending on amount and variety.
Prepare small batches, cook only enough to start serving, then cook additional amounts to meet
demand.
– 10 –
CLEANING
CAUTION: Never use high chlorine or bleach solution for cleaning door gasket. Never use
steel wool or other metallic pads to clean the steamer.
At The End of Each Day:
• Follow shutdown procedures.
• Remove stainless steel pan supports and clean in a sink (Fig. 4).
• Clean the drain opening and make sure it is clear.
• Use a nonabrasive cleaner to remove discolorations.
• Pull out the vent baffle assembly and clean with hot soapy water. To remove, lift the assembly
straight up (Fig. 4).
• Wipe the interior of the steamer with hot soapy water. Use a soft cloth or sponge.
• Rinse thoroughly with warm clean water.
• Dry with a clean dry cloth.
• Clean the exterior of the steamer with damp cloth and polish with a soft dry cloth.
• Leave door open at night after cleaning.
VENT BAFFLE ASSEMBLY
PAN SUPPORTS
Fig. 4
– 11 –
PL-41511-1
MAINTENANCE
WARNING: THE STEAMER AND ITS PARTS ARE HOT. USE CARE WHEN OPERATING,
CLEANING OR SERVICING THE STEAMER. THE COOKING COMPARTMENT CONTAINS LIVE
STEAM AND HOT WATER. STAY CLEAR WHILE OPENING THE DOOR.
Steamer must be cleaned daily, see CLEANING.
SERVICE AND PARTS INFORMATION
To obtain service and parts information concerning this model, contact the Vulcan-Hart Service
Agency in your area (refer to our website, www.vulcanhart.com for a complete listing of Authorized
Service and Parts depots).
When calling for service, the following information must be available: model number, serial number,
manufacture date (MD) and voltage.
FORM 31136 Rev. A (08-04)
– 12 –
PRINTED IN U.S.A.