1
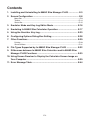
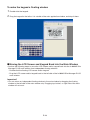
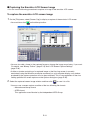
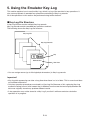
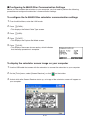
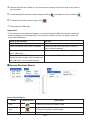
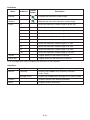
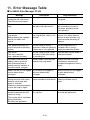
For fx-9860G Slim
fx-9860G Slim
Manager PLUS
User’s Guide
CASIO Worldwide Education Website
http://edu.casio.com
CASIO EDUCATIONAL FORUM
http://edu.casio.com/forum/
E
Note
Screen shots shown in this User’s Guide are intended for illustrative purposes only.
The actual text and values that appear on display may differ from the examples shown in this
User’s Guide.
Getting Started
• fx-9860G Slim Manager PLUS is an emulator that lets you perform fx-9860G Slim operations on
your computer.
• You can record key operations you perform on the emulator as “Key-Log records”, and edit KeyLog records as required.
• The keys on the Key-Log editor screen as well as the emulator LCD screen contents can be
pasted into other applications. This means that emulator data can be used to create assignments,
tests, and other materials.
• A presentation feature lets you play back saved Key-Log records.
• You can connect your fx-9860G Slim unit to your computer and display its contents on your
computer screen.
Important!
• Be sure to install the fx-9860G Slim Manager PLUS before you connect fx-9860G Slim to your
computer. Connecting before you install the fx-9860G Slim Manager PLUS can result in improper
operation.
k Using This Manual
• This manual covers the software included on the fx-9860G Slim Manager PLUS CD-ROM.
For details about operation of the fx-9860G Slim Graphing Calculator, see the user
documentation that comes with the calculator.
• The procedures in this manual assume that you are already familiar with the following standard
computer operations.
- Menu operations using the mouse, including: clicking, double-clicking, dragging, etc.
- Text input using the keyboard
- Icon operations, general window operations, etc.
- If you are not familiar with these types of operations, refer to the user documentation for your
computer.
• The screen shots shown in this manual are all from the English version of Windows® XP.
• Note that the actual appearance of the screen that appears when using this software depends on
your computer system setup and on the operating system you are using.
E-1
Contents
1. Installing and Uninstalling fx-9860G Slim Manager PLUS ................. E-3
2. Screen Configuration ............................................................................ E-8
Menu Bar ........................................................................................................................ E-9
Toolbar .......................................................................................................................... E-14
Status Bar ..................................................................................................................... E-15
3. Emulator Mode and Key-Log Editor Mode ........................................ E-16
4. Emulating fx-9860G Slim Calculator Operation ................................ E-17
5. Using the Emulator Key-Log ............................................................... E-23
6. Configuring Options Dialog Box Setting ........................................... E-28
7. Other Functions ................................................................................... E-29
Printing .......................................................................................................................... E-29
Shortcut Menu .............................................................................................................. E-31
8. File Types Supported by fx-9860G Slim Manager PLUS .................. E-32
9. Differences between fx-9860G Slim Calculator and fx-9860G Slim
Manager PLUS Functions ................................................................... E-33
10. Using Screen Receiver to Display the Calculator Screen Image on
Your Computer ..................................................................................... E-39
11. Error Message Table ............................................................................ E-44
E-2
1. Installing and Uninstalling fx-9860G Slim
Manager PLUS
This section explains how to install and uninstall fx-9860G Slim Manager PLUS.
To install fx-9860G Slim Manager PLUS
1. Place the CD-ROM into your computer’s CD-ROM drive.
• After a short while, the CASIO Manager PLUS for fx-9860G Series screen will appear
on the display.
The following describes what each item on this screen does.
fx-9860G Slim Manager PLUS ... Installs fx-9860G Slim Manager PLUS.
fx-9860G Manager PLUS ... Installs fx-9860G Manager PLUS.
GRAPH85 Manager PLUS ... Installs GRAPH85 Manager PLUS.
Add-In Application ... Displays the Add-In application screen, which shows folders that contain
Add-In applications and provides access to Add-In application documentation.
CASIO Web Site ... Goes to the website at http://edu.casio.com
Open folder to view files ... Opens a folder on the CD-ROM.
Français ... Displays the screens in steps 1 and 2 in French.
E-3
2. Click “fx-9860G Slim Manager PLUS”.
• This displays the screen shown below.
The following describes what each item on this screen does.
Install fx-9860G Slim Manager PLUS ... Starts installation of fx-9860G Slim Manager PLUS.
User’s Guide ... Click a language to open the corresponding user’s guide.
Calculator User’s Guide ... Click a language to open the corresponding calculator user’s guide.
Install Adobe® Reader ® ... Installs Adobe® Reader ®.
3. Click “Install fx-9860G Slim Manager PLUS”.
• This displays a language selection menu.
• The option you select here specifies the language of the screen text that appears during
installation. The screen text language of the fx-9860G Slim Manager PLUS application itself is
English, regardless of what you select here.
• The setting you select here will determine the language version for installation of the fx-9860G
Slim and fx-9860G Slim Manager PLUS manuals.
E-4
4.
Select a language and then click the [OK] button to advance to the next screen.
• If the [Next] button appears, click it.
• This displays the end user license agreement (EULA).
• The EULA will appear in the language you selected in step 3, except if you selected Spanish.
The EULA appears in English when Spanish is selected in step 3.
5. Carefully read the EULA.
6. If you agree to be bound by the terms and conditions of the EULA, choose “I accept the
terms...”, and then click [Next].
This will display the user registration screen.
• If you do not want to agree, choose “I do not accept the terms ...” and then click [Cancel] to
exit the installation operation.
7. Input the appropriate information in the following boxes and then click [Next].
User Name ... Input your name.
Installkey ... Input the Install Key sticker number on the software package.
E-5
8. Perform either of the two following steps to specify the installation drive and folder.
• To use the default settings
Simply click the [Next] button.
• To specify a different folder
Click the [Browse…] button. Select the folder you want and then click [Next].
9. Click the [Next] button to start the installation.
10. When a message appears telling you that installation is complete, click the [Finish] button.
• This completes installation and will restart your computer automatically.
Note
• Installing the software will put a “9860SlimManager+” shortcut icon on your Windows desktop.
E-6
To uninstall fx-9860G Slim Manager PLUS
1. Display the Windows Control Panel.
2. Click [Add/Remove Program].
3. On the list of applications that appears, select “fx-9860G Slim Manager PLUS”.
4. Click the [Add/Remove] button.
• This will display the program maintenance wizard.
5. Click the [Yes] button.
• This completes the uninstall operation.
To start up fx-9860G Slim Manager PLUS
1. On your computer’s desktop, click the “9860SlimManager+” icon.
• You could also start up the application by clicking [Start] - [Program] - [CASIO] - [fx-9860G
Slim Manager PLUS] - [fx-9860G Slim Manager PLUS].
E-7
2. Screen Configuration
The following shows the fx-9860G Slim Manager PLUS screen.
Menu Bar
Toolbar
Emulator
Status Bar
File Display Area
* A pixel resolution setting of 1024 × 768 is recommended for your computer screen.
* When you have both the emulator window and Key-Log (or bitmap file) window open on the
display, the emulator window always will be displayed on top.
E-8
Menu Bar
• This section explains the fx-9860G Slim Manager PLUS menu bar.
• If a menu command can also be executed by clicking a toolbar button, the applicable toolbar
button is also provided.
k File Menu
File History
Menu
Toolbar
Button
Description
New
Creates a new Key-Log file.
Open
Opens an existing file.
Close
Closes the currently open file.
Screen Cap
Captures the emulator screen.
Save
Saves the current work file, overwriting the previous
(unedited) version.
Save As
Saves the current work file under a new name.
Print
Prints the currently displayed bitmap file.
Print Preview
Displays a preview of the print image.
Print Setup
Displays the print setup dialog box.
(File History)
Shows up to four of the last files you worked on.
Exit
Exits fx-9860G Slim Manager PLUS.
E-9
k Edit Menu
Menu
Toolbar
Button
Description
Undo
Undoes the last operation.
Redo
Redoes the last undone operation.
Cut
Cuts the currently selected screen area and places it onto
the clipboard.
Copy
Copies the currently selected screen area to the clipboard.
Paste
Pastes the clipboard contents.
Clear
Deletes the currently selected area.
Select All
Selects all Key-Log records.
* The Edit menu is disabled during emulator operation.
E-10
k View Menu
Menu
Calc Key
Calc Screen
Tool Bar
Submenu
Normal
Description
Selects normal-size calculator keys.
Large
Selects large-size calculator keys.
×1
Specifies an actual size display.
×2
Specifies a 2X size display.
×3
Specifies a 3X size display.
×4
Specifies a 4X size display.
×5
Specifies a 5X size display.
Standard
Toggles display of the standard toolbar on and off.
Log
Toggles display of the log toolbar on and off.
Edit
Toggles display of the edit toolbar on and off.
Bitmap
Toggles display of the bitmap toolbar on and off.
E-11
k Key-Log Menu
Emulator mode
Menu
Key-Log editor mode
Toolbar
Button
Description
Add
Adds a new Key-Log record.
Delete
Deletes the currently displayed Key-Log record.
Emulator
Enters the emulator mode.
Editor
Enters the Key-Log editor mode.
Auto Play
Starts Key-Log auto playback.
Step Play
Starts Key-Log manual playback.
Stop
Stops Key-Log playback or recording.
Pause
Pauses Key-Log playback.
Record
Starts Key-Log recording.
Insert Pause
During Key-Log editing, inserts a pause character into
Key-Log playback.
E-12
k Window Menu
Menu
Description
Tiled
Displays all windows in a tiled configuration.
Horizontal
Displays all windows in a horizontal line.
• The Window menu also shows the names of files that you have open. When you have multiple
files open, the file name at the top of the list is the one you are currently working with the active
file.
k Tools Menu
Menu
Toolbar
Button
Button
Description
Screen Receiver
Starts up Screen Receiver.
Options
Displays a dialog box for configuring optional settings.
k Help Menu
Menu
Manual
Submenu
Description
Calculator
Displays the fx-9860G Slim Graphing Calculator
User’s Guide.
Manager PLUS
Displays the fx-9860G Slim Manager PLUS
User’s Guide.
License
Displays the end user license agreement.
About
Displays version information.
E-13
Toolbar
• This section explains the fx-9860G Slim Manager PLUS toolbar buttons.
• The toolbar buttons correspond to menu bar commands. See the section of this manual that
explains the menu bar for details about each button’s function.
k Standard Toolbar
Editor
New Open Save Print Print
Cut Copy Paste Undo Redo Screen
Receiver
Preview
Emulator
k Log Toolbar
Play
Step
Stop Pause
Record
k Edit Toolbar
1 2 3
4
5
1 Add
2 Delete
3 Insert Pause
4 Font ... Specifies the font of input text.
5 Font Size ... Specifies the font size of input text.
6 Key-Log Record ... Selects the Key-Log record to be played back or edited.
E-14
6
k Bitmap Toolbar
1
2
3
1 Screen Cap
2 Outer Frame
Specifies an outer frame for screen captures.
3 Bitmap Size
Specifies the bitmap size. A setting of 1 through 10 can be selected.
Status Bar
2
1
3
1 Help text is displayed here.
2 Displays the process currently being performed.
3 Toggles between the insert and overwrite modes.
Clicking here while in the Key-Log editor mode toggles between the insert mode and overwrite
mode.
E-15
3. Emulator Mode and Key-Log Editor Mode
fx-9860G Slim Manager PLUS has two modes.
You can use either of the following to operations to select the mode you want.
• On the [KeyLog] menu, select either [Emulator] or [Editor].
• On the standard toolbar, click
or
.
Emulator Mode
Use this mode when you want to perform mainly emulator operations.
Key-Log Editor Mode
Use this mode when you want to perform mainly Key-Log data operations.
E-16
4. Emulating fx-9860G Slim Calculator
Operation
• The emulator makes it possible to mimic fx-9860G Slim calculator operation using your
computers mouse and keyboard.
• For details about emulator operations, see the fx-9860G Slim User’s Guide. You can view the
User’s Guide by selecting [Manual] - [Calculator] on the Help menu.
• Note that some emulator functions are different from the functions of the fx-9860G Slim calculator.
For details, see “9. Differences between fx-9860G Slim Calculator and fx-9860G Slim Manager
PLUS Functions” (page E-33).
k Using the Emulator
• Key operations are identical to those you perform on the calculator.
• Operation results appear on the LCD screen.
LCD Screen
Keypad
In the Emulator Mode, you use your computer keyboard to operate the emulator. The following
explains the keyboard keys you should use to perform each emulator key operation.
(1) Computer keyboard keys that have the same key markings as the emulator keys
a—j, ., +, -, (, ), ,, M, 1—6, f, c, d, e
E-17
(2) Computer keyboard keys that have different key markings as the emulator keys
Computer Key
Emulator Key
[Tab]
A
[Insert]
!
[Home]
K
[Page Up]
J
[Page Down]
m
[End]
a
[Esc]
J
[Delete]
D
[Back Space]
D
[Enter]
w
[*]
*
[/]
/
Important!
• Always use the emulator’s keys whenever creating eActivity Guide operations. Computer key
operations cannot be recorded. For details about the eActivity Guide function, see “10-6 eActivity
Guide” in the fx-9860G Series Software Version 1.10 User’s Guide.
k Changing the Size of the Emulator
You can select one of two sizes for the emulator’s keypad and one of five sizes for the display area.
To specify the size of the keypad
1. On the [View] menu, select [Calc Key].
2. From the submenu that appears, select the keypad size you want.
To specify the size of the LCD screen
1. On the [View] menu, select [Calc Screen].
2. From the submenu that appears, select the LCD screen size you want.
E-18
k Moving the LCD Screen Area and Keypad
• You can drag the LCD screen and the keypad to any location you want on your computer screen.
k Using the Floating Emulator Feature
• You can display the emulator LCD screen and its keypad in their own windows that are separate
from the fx-9860G Slim Manager PLUS window.
To make the LCD screen a floating window
1. Double-click the LCD screen.
2. Drag the LCD screen to the left so it is outside of the main application window, and drop it there.
E-19
To make the keypad a floating window
1. Double-click the keypad.
2. Drag the keypad to the left so it is outside of the main application window, and drop it there.
k Moving the LCD Screen and Keypad Back into the Main Window
• Perform the following steps to move the LCD screen and/or keypad back into the fx-9860G Slim
Manager PLUS main window from independent floating windows.
- Double-click the floating LCD screen and/or keypad.
- Drag the LCD screen and/or keypad back to the left side of the fx-9860G Slim Manager PLUS
main window.
Important!
• You can return an independent floating window to the main window by dragging the floating
window to the left side of the main window only. Dragging top, bottom, or right side of the main
window will not work.
E-20
k Capturing the Emulator LCD Screen Image
• You can use the following procedure to capture an image of the emulator LCD screen.
To capture the emulator LCD screen image
1. On the [File] menu, select [Screen Cap] to display a capture of the emulator LCD screen.
• You could also click
on the bitmap toolbar.
• You can also add a frame to the captured image or change the image zoom factor, if you want.
For details, see “Bitmap Toolbar” (page E-15) and “LCD Screen Capture Settings”
(page E-28).
• If either a window containing of a captured image or the Key-Log screen is currently
maximized (using the Windows maximize command) on your computer display, any window
produced by the capture operation will also be maximized. This is true regardless of the size
setting specified for screen capture on the Options dialog box (page E-28).
2. Select the captured screen image window and then click
to save it to a file.
* You can save a screen capture as either of the two following file formats.
• Monochrome bitmap format
• JPEG format
This application uses libraries by the Independent JPEG Group.
E-21
k Opening a Saved LCD Screen Image
• You can open a saved LCD screen image and display it on your computer. You can have multiple
screen images open at the same time.
• LCD screen images can be copied and pasted into other applications in order to create operation
example handouts, assignments, etc.
* Only bitmap files can be opened using this procedure. Opening of JPEG files is not supported.
To copy an LCD screen image and paste it into another application
1. Click
and then open the file that contains the LCD screen image you want to copy.
2. Select the LCD screen image window and then click
to copy it to the clipboard.
3. Open the other application and then paste the contents of the clipboard.
E-22
5. Using the Emulator Key-Log
This section explains how to use the Key-Log, which is a log of the emulator’s key operations. It
also covers playback of recorded key operations and editing of Key-Log records.
All of the operations in this section are performed using toolbar buttons.
k Key-Log File Structure
A Key-Log file can contain multiple Key-Log records.
Key-Log records contain recorded key operations and text.
The following shows the Key-Log file structure.
Key-Log File
Key-Log Records
bw
Key
Mathematics
Text Data
• You can assign names (up to 20 single-byte characters) to Key-Log records.
Important!
• Key-Log data processing can take a long time when there is a lot of data. This is normal and does
not indicate malfunction.
• Only key operation procedures are stored in a Key-Log file. Because of this, replaying Key-Log
contents starting from an initial screen that is different from the one that was displayed when the
data was originally stored may produce different results.
• A key operation may not be stored to a Key-Log if you click it while an emulator calculation
operation is in progress.
E-23
To record emulator key operations using Key-Log
1. Click
to start Key-Log recording.
2. Perform operations on the emulator.
Keys appear in the
sequence you
press them.
3. Click
to stop Key-Log recording.
4. Click
to save the Key-Log file.
E-24
To perform Key-Log auto play of a recorded key operation
1. Click
and then open the Key-Log file you want to play.
2. Click
to start playback.
The next key to be
played back is orange.
The last played key
is blue.
• Click
Click
Played key operations
are blue.
The next key to be played
is framed in orange.
to pause playback.
to restart playback after pausing it.
3. To stop playback, click
. Stopping playback causes all keys to return to their original colors.
Note
• You can use the optional settings dialog box (page E-28) to configure playback settings like the
key playback interval following a pause, the color of playback keys, etc.
• Simultaneous playback of multiple Key-Log files is not supported. If you try to open a Key-Log file
while another Key-Log file is already open, the currently open file will close automatically. If the
currently open file has been edited, a message will appear asking if you want to save it before
closing.
E-25
To playback a Key-Log record manually (STEP playback)
1. Click
and then open the Key-Log file you want to play.
2. Click
to play the first key operation in the Key-Log.
3. Keep pressing
to play Key-Log contents one step at a time.
4. To stop playback, click
.
To edit a Key-Log record
1. Click
and then open the Key-Log file you want to edit.
2. Select the Key-Log record you want to edit.
Select the Key-Log record from this menu.
3. Edit the key operations and text of the Key-Log record.
• You can use normal text input and editing operations to edit the keys in a Key-Log record.
• When inputting text, you can specify the font and font size you want to use.
Font
4. Click
Font Size
to save the Key-Log file.
E-26
To add a Key-Log record to the currently open Key-Log file
After opening the Key-Log file to which you want to add the record, click
.
This automatically assigns the Key-Log record a name (Example: “Data1”) and displays it in the
menu.
To rename a Key-Log record
1. Select the Key-Log record you want to rename from the menu.
2. Click the name of the Key-Log record and then change it.
3. Press the [Enter] key.
To delete a Key-Log record
1. Select the Key-Log record you want to delete from the menu.
2. Click
to delete the selected Key-Log record and display the next one.
Note
• There must be at least one Key-Log record in memory. You will not be able to delete a Key-Log
record if it is the only one left in memory.
k Inputting a Pause Character
A pause character causes Key-Log playback to pause automatically when it reaches the character.
To input a pause character, click
.
k Copying Keys or Text and Pasting It into Another Application
Keys and text can be copied and pasted into other applications in order to create operation
example handouts, assignments, etc.
To copy keys or text and paste it into another application
1. Drag the cursor across the keys or text you want to copy.
2. Click
to copy the selected keys or text to the clipboard.
3. Open the other application and then paste the contents of the clipboard.
E-27
6. Configuring Options Dialog Box Setting
• This section explains the settings on the Options dialog box.
k LCD Screen Capture Settings
1
2
1 Select this option to add a frame to an LCD screen capture.
2 Specifies the screen size during LCD screen capture. You can select a setting
in the range of 1 through 10.
k Key-Log Playback
1
2
3
4
1 Select this option to highlight the current key in blue.
2 Select this option to frame the next key in orange.
3 Specifies how much time should be allowed to elapse to resume paused playback. You can
set an interval in the range of 10 seconds to 10 minutes in 10-second steps.
4 Specifies the key playback interval during auto play. You can set an interval of 0.1 second, or
any interval in the range of 0.5 to 5 seconds, in 0.5-second steps.
E-28
7. Other Functions
Printing
• You can use the following procedure to print LCD screen captures.
1. Click the window of the LCD screen capture that you want to print to select it.
2. Click
. This will display the Print dialog box.
3. Click [OK] to start printing.
Important!
• Each screen image is printed on a separate page.
• Images are printed in accordance with width setting of the paper size selected on the Print dialog
box.
Examples:
Portrait Orientation
Landscape Orientation
• If you are printing a bitmap image that was created using another application and does not fit
within the preview area, only the part within the preview area will be visible. Also, only that part
will be printed.
E-29
k Print Preview
• Selecting [Print Preview] on the [File] menu displays the print preview image.
1
2 3
4
1 Displays the Print dialog box.
2 Enlarges the preview image.
3 Reduces the size of the preview image.
4 Closes the print preview window image.
k Print Setup Dialog Box
• Selecting [Print Setup] on the [File] menu displays the Print Setup dialog box.
E-30
Shortcut Menu
• Right-clicking the mouse displays one of the shortcut menus shown below.
• During Key-Log Editing
• During Bitmap Display of the Calculator
Screen
A screen zoom operation affects only the screen where
you display the shortcut menu. If you have multiple
screens on the display, the other screens are not affected
by the zoom operation.
• When Using the Emulator
• On the Emulator Keypad
E-31
8. File Types Supported by fx-9860G Slim
Manager PLUS
• fx-9860G Slim Manager PLUS supports files with the file name extensions described below.
Extension
Description
g1m
Emulator or calculator user memory data file (variables, programs, etc.)
g1e
eActivity file
g1a
Add-In application
g1l
Add-In message
g1n
Add-In menu
g1k
fx-9860G Slim Manager PLUS Key-Log file
Note
• You can use the MEMORY application to import all file types (except g1k) into the emulator.
• Files with the extension g1k can be used in Key-Log files.
E-32
9. Differences between fx-9860G Slim
Calculator and fx-9860G Slim Manager
PLUS Functions
• This section explains the differences between fx-9860G Slim calculator functions and fx-9860G
Slim Manager PLUS emulator functions.
k eActivity Applications (SD Card Access)
Calculator: SD card access not supported.
Emulator: Performing an operation that accesses an SD card displays a dialog box, which can be
used to open an eActivity saved on your computer or save an eActivity on your
computer. Trying to perform an optimize operation while accessing an SD card will
cause an error.
Example: To use the emulator to create a new eActivity file (ABC.g1e) on an SD card (actually
your computer’s hard disk)
1. From the Main Menu, enter the e·ACT mode.
2. Click 6(SD).
• This displays the SD access screen.
3. Click 2(NEW).
• This displays a file name input
dialog box.
E-33
4. Select the location on your computer where you want to save the file, input the file name
(ABC.g1e), and then click [Save].
• This displays the eActivity file editing screen.
* Subsequent operations are identical to those you would perform on the calculator.
* After you are finished, perform the required operation to save the file.
Example: To use the emulator to open an eActivity file (ABC.g1e) that is stored on an SD card
(actually your computer’s hard disk)
1. From the Main Menu, enter the e·ACT mode.
2. Click 6(SD).
• This displays the SD access screen.
3. Click 1(OPEN).
• This displays a file selection dialog
box.
4. Type in the file name (ABC.g1e), and then click [Open].
• This displays the eActivity file editing screen.
E-34
k LINK Application
Calculator: Data transfer execution supported.
Emulator: Data send/receive, and configuring cable, wakeup, and capture settings are not
supported. Attempting to perform any of these operations causes an error.
k MEMORY Applications (SD Card Access)
Calculator: SD card access not supported.
Emulator: Performing an operation that accesses an SD card displays a dialog box, which can be
used to store data to a computer file and to import a file.
Trying to perform the SD card optimize operation on the emulator will cause an error.
SD card (actually your computer’s hard disk) access can be performed by selecting
either a folder or a file. What you select depends on the type of operation you want to
perform.
When to select a folder on your computer’s hard disk
Select a folder on your computer’s hard disk when you want to perform any one of the following
operations.
• Copying main memory or storage memory contents to an SD card (actually your computer’s hard
disk)
• Loading backup data from an SD card (actually your computer’s hard disk)
• Saving backup data to an SD card (actually your computer’s hard disk)
Example: To use the emulator to save backup data to your computer
1. From the Main Menu, enter the MEMORY mode.
2. Click 4(BKUP)1(SAVE).
• This displays the save location selection screen.
E-35
3. Click 2.
• This displays the folder selection screen.
4. Select the folder you want and then click [OK].
• The backup data is saved to the folder you select.
When to select a file on your computer’s hard disk
Select a file on your computer's hard disk when you want to perform the following operation.
• Copying a file on an SD card (actually your computer's hard disk) to main memory or storage
memory
1. From the Main Menu, enter the MEMORY mode.
2. Click 3(SD).
• This displays the file selection
screen.
3. Select the file you want and then click [Open].
• This displays the main memory/storage memory selection screen.
• Selecting a destination (main memory or storage memory) will start the copy operation.
E-36
k SYSTEM Applications (Contrast, Auto Power Off, Reset)
Calculator: Contrast adjustment and auto power off setting configuration supported.
Emulator: Contrast adjustment and auto power off setting configuration not supported. Attempting
to perform any of these operations causes an error.
k Installing an Add-In
You can perform the following procedure on the emulator to install an Add-In application, Add-In
language, or an eActivity.
Example: To install an Add-In application
1. From the Main Menu, enter the MEMORY mode.
2. Click 3(SD).
• This displays a dialog box for opening a file.
3. Select the Add-In file you want and then click [Open].
4. Click 2.
5. Click E.
6. Click J.
E-37
7. Click m.
• The icon of the application you just installed should be
visible on the Main Menu.
• Some Add-In applications may act differently on the fx-9860G Slim calculator than they do on
the emulator.
k LIGHT Key
Calculator: Turns on the display backlight.
Emulator: No operation
k HELP Key
Calculator: Enables the HELP function.
Emulator: Enables the HELP function only if Key-Log recording is stopped or paused. The HELP
key is disabled while Key-Log recording or playback is in progress.
k OFF (! + A)
Calculator: Turns off power.
Emulator: Does not turn off the emulator. (! + O does not perform any operation.)
k COPY & PASTE
Calculator: COPY & PASTE supported on the calculator.
Emulator: COPY & PASTE supported on the calculator, and between the calculator and other
applications running on the computer. Note, however, that in the case of spreadsheet
formulas and values, copy and paste of the values only is supported. Copy and paste of
error data is not supported.
Copy and paste of fx-9860G Slim calculator-specific input codes between fx-9860G Slim Manager
PLUS and other applications is not supported in some cases. Windows® 98 SE in particular is not
able to display a relatively large number of input codes. Because of this, use of Windows® Me,
Windows® 2000, Windows® XP, or Windows Vista™ is recommended.
E-38
10. Using Screen Receiver to Display the
Calculator Screen Image on
Your Computer
This section explains how to connect an fx-9860G Slim calculator to a computer and display the
calculator screen image on the computer.
Important!
• Check to make sure that the operating system version of the fx-9860G Slim calculator is 1.02 or
greater. If it isn’t, you will need to update your operating system. For details, see the information
about updating the operating in the readme.txt file on the fx-9860G Slim Manager PLUS
CD-ROM.
• A USB driver install dialog box will appear the first time you connect the fx-9860G Slim calculator
to your computer with the USB cable. Follow the instructions that appear on the dialog box.
Screen Receiver will not operate properly if you cancel the install operation.
Attention Windows ® XP Users
1. Connecting fx-9860G Slim to a computer running Windows
below to appear on your computer display.
E-39
®
XP causes the screen shown
2. Select “Install the software automatically (Recommended)” and then click [Next].
3. Though a message appears to let you know that the software has not passed the “Windows
Logo Test”, there is no need for concern. Simply click [Continue Anyway] and proceed with
installation.
4. Click [Finish].
E-40
k Configuring fx-9860G Slim Communication Settings
Before you can connect the calculator to your computer, you first need to perform the following
procedure and configure the calculator’s communication settings.
To configure the fx-9860G Slim calculator communication settings
1. From the Main Menu, enter the LINK mode.
2. Press $(CABL).
• This displays the Select Cable Type screen.
3. Press !(USB).
4. Press &(CAPT).
• This displays the Capture Set Mode screen.
5. Press #(OHP).
• This displays the screen shown nearby, which indicates
that the setup procedure is complete.
To display the calculator screen image on your computer
1. Use the USB cable that comes with the calculator to connect the calculator to your computer.
2. On the [Tools] menu, select [Screen Receiver], or click
on the toolbar.
3. A short while after Screen Receiver starts up, an image of the calculator screen will appear on
your computer.
E-41
4. Operate the calculator. When you do, the calculator screen image will change in real time on
your computer.
5. You can enlarge the calculator screen image by clicking
6. To close the calculator screen image, click
and reduce its size by clicking
.
7. Disconnect the USB cable.
Important!
• If the calculator screen does not appear, try disconnecting the USB cable and then restart the
above procedure from the beginning. If the calculator screen still does not appear, check the
points described below.
If this is the problem:
Do this:
The USB cable is disconnected.
Reconnect the USB cable.
There are multiple calculators connected.
Disconnect the other calculators so there is
only one left connected.
There is another CASIO product connected
with a USB cable.
The message “!CESG502” appears on the
Device Manager screen which indicates that
Disconnect the other CASIO product.
Reinstall fx-9860G Slim Manager PLUS.
the USB driver is not installed correctly.
k Screen Receiver Menus
Screen Receive Menu
Menu
Toolbar Button
Description
Start
Displays the calculator screen image.
Stop
Closes the calculator screen image.
Exit
Exits Screen Receiver.
E-42
.
View Menu
Menu
Submenu
Toolbar
Button
Description
Expand
Enlarges the calculator screen image.
Reduce
Reduces the size of the calculator screen image.
Zoom*
×1
Shows the calculator screen image in actual size.
×2
Shows the calculator screen image is ×2 size.
×3
Shows the calculator screen image is ×3 size.
×4
Shows the calculator screen image is ×4 size.
×5
Shows the calculator screen image is ×5 size.
×6
Shows the calculator screen image is ×6 size.
×7
Shows the calculator screen image is ×7 size.
×8
Shows the calculator screen image is ×8 size.
×9
Shows the calculator screen image is ×9 size.
×10
Shows the calculator screen image is ×10 size.
Toolbar
Toggles display of the toolbar on and off.
Status Bar
Toggles display of the status bar on and off.
* The allowable zoom size is limited by the resolution of the computer.
Help Menu
Menu
Manual
Submenu
Description
Calculator
Displays the fx-9860G Slim Graphing Calculator
User’s Guide.
Manager PLUS
Display the fx-9860G Slim Manager PLUS User’s Guide.
License
Displays the end user license agreement.
About
Displays version information.
E-43
11. Error Message Table
k fx-9860G Slim Manager PLUS
Message
Description
Required Action
An error occurred while
reading the file <file name>.
The file may be corrupted.
Wrong file format.
Check the file to see if it is
corrupted.
There is no more playable
data.
There are no playable keys to
the right of the input cursor.
Move the input cursor to the
left of the keys you want to
play back, and perform the
play operation.
You cannot delete all KeyLog records.
Before deleting the selected
record, first add a new
record.
You are trying to delete all
Key-Log records, which is not
allowed.
To delete all of the current
records, first add a different
record. At least one Key-Log
record must be remaining in
memory.
This application cannot run
on this computer’s operating
system.
You are trying to run the
application under an operating
system that is not supported.
Run the application on a
computer that is using a
supported operating system.
<file name>
This file is read-only.
Use a different file name.
You are trying to save a readonly Key-Log file after editing
or recording to it.
Save the Key-Log file under a
different file name.
A problem occurred while
adding a Key-Log record.
After confirming there is
enough memory capacity to
store the record, try again.
Some problem occurred while
adding a Key-Log record.
Make sure there is enough
free memory remaining to
complete the operation and try
again.
Make sure that you are logged You currently are logged on
on with administrator
with non-administrator
privileges.
privileges.
Make sure that you are logged
on with administrator
privileges.
A problem occurred while
writing to the file <file name>
because not enough disk
space is available.
Check the remaining capacity
of your disk and try again.
There is not enough disk
Make sure there is enough free
space available to save the file. memory available and try
again.
This application cannot be
started up because the DLL
version is wrong.
This may be due to a problem
during installation.
Re-install the application.
Your computer has the wrong
DLL version.
E-44
Installation may have failed, so
re-install the application.
Message
Description
Required Action
A problem occurred while
reading file <file name>.
The disk being read from may
be damaged or may not exist.
Check the disk and try again.
A problem occurred while
reading from a disk.
Check the disk for data
corruption and confirm that the
disk exists. Then try again.
A problem occurred while
writing file <file name>.
The disk being written to may
be damaged or may not exist.
Check the disk and try again.
A problem occurred while
writing to a disk.
Check the disk for data
corruption and confirm that the
disk exists. Then try again.
A problem occurred while
reading file <file name>.
The file may have been moved
or deleted.
A problem occurred when you
tried opening a file from the list
of previously opened files on
the File menu.
Check to see if the file has
been moved or deleted.
There is not enough memory. There is not enough memory
Increase memory capacity and to perform the operation.
try again.
Increase memory capacity and
try again.
A problem occurred while
launching the emulator.
Try re-starting the application.
If you still cannot launch, it
could mean that the emulator
is damaged. Update the
emulator or reinstall it.
A problem occurred during
emulator startup.
Try restarting the application.
If this does not work, it could
mean that the emulator is
damaged. Update the emulator
or reinstall it.
A problem occurred while
launching the manual (***.pdf)
viewer.
Download the viewer from the
site below and reinstall it.
http://www.adobe.com/
products/acrobat/readstep2_
allversions.html
A problem occurred during
manual viewer startup.
Download and install a new
viewer from
http://www.adobe.com/
products/acrobat/readstep2_
allversions.html.
The following characters
cannot be used in a Key-Log
record name.
:\ /?*[]
The Key-Log record name you
are trying to use contains an
illegal character.
The following characters are
not allowed in Key-Log record
names.
:\ /?*[]
A system error has occurred.
Exit the emulator and restart it.
If this does not correct the
problem, it could mean that the
emulator file is damage.
Reinstall the emulator.
—
E-45
Follow the steps that are
shown on the display and try
again.
Message
A system error has occurred.
(1) Shut down all other
applications that you are
not currently using.
(2) Check how much free
space is available on your
computer’s hard disk.
(3) Exit the emulator and
restart it.
If this does not correct the
problem, it could mean that the
emulator file is damage.
Reinstall the emulator.
Description
Required Action
Follow the steps that are
shown on the display and try
again.
—
A problem occurred while
accessing the registry.
Check to make sure that the
emulator is installed correctly.
fx-9860G Slim Manager PLUS Reinstall the USB driver.
cannot be started up. The USB
driver is not installed correctly.
The path and/or filename
exceeds the maximum length
allowed by your Windows
operating system.
The number of letters in the
Shorten the specified path or
path or file name you specified file name.
exceeds the allowable limit.
A problem occurred while
importing <file name>.
Note that import of a file
created on another model is
not supported.
Some problem occurred while
importing the file.
Make sure that the file was
created using a calculator with
the same model name as this
calculator.
A Key-Log file cannot be
created or opened while KeyLog data is being played back
or recorded.
Stop playback or recording
and try again.
You are trying to create a new
Key-Log file or open an
existing Key-Log file while
Key-Log data is being played
back or recorded on the
calculator.
Stop playback or recording and
try again.
File Extension Error
The file you selected has an
invalid file name extension.
Make sure that the extension
of the file you are selecting is
bmp or jpg.
<path> Invalid Extension
The file path you selected has
an invalid file name extension.
Make sure that the extension
of the file path you are
selecting is bmp or jpg.
A problem occurred while
Some problem occurred during
accessing the registry.
registry access.
Check to make sure that the
emulator is installed correctly.
A system error has occurred.
A system error occurred.
Exit the emulator and restart it.
If this does not correct the
problem, it could mean that the
emulator file is damaged.
Reinstall the emulator.
E-46
Re-installation of the emulator
is recommended.
Re-installation of the emulator
is recommended.
Message
Invalid File Name
Description
You specified an invalid file
name.
Required Action
Make sure that you are
specifying the file name
correctly.
Invalid Folder Name
You specified an invalid folder
name.
Make sure that you are
specifying the folder name
correctly.
Too Many Files Selected
The number of files you
Reduce the number of
selected exceeds the allowable selected files.
limit.
k Screen Receiver
Message
Description
Required Action
A connection could not be
established.
Either the calculator is not
connected or the connected
calculator is not in the OHP
Mode.
Correct the problem and try
again.
For details, select the following
on the menu bar: Help Manual - Manager PLUS, or
refer to the Manager PLUS
user’s guide.
You started a data
communication operation while
the USB cable was not
connected.
Check for proper connection of
the calculator to the computer
and confirm that the calculator
is in the OHP mode. Then try
again.
See “10. Using Screen
Receiver to Display the
Calculator Screen Image on
Your Computer” for details.
A problem occurred during
Some problem occurred during
communication.
data communication.
Disconnect the USB cable,
check the setup of the
calculator, and try again.
For details, select the following
on the menu bar: Help Manual - Manager PLUS, or
refer to the Manager PLUS
user’s guide.
Disconnect the USB cable and
check the setup of the
calculation. Then try again.
See “10. Using Screen
Receiver to Display the
Calculator Screen Image on
Your Computer” for details.
Multiple calculators have been Multiple calculators are
detected.
connected to the computer.
To start communication, make
sure there is a USB connection
with a single calculator.
Make sure that there is only
one USB connection to a single
calculator before starting
communication.
See “10. Using Screen
Receiver to Display the
Calculator Screen Image on
Your Computer” for details.
E-47
Message
The image could not be sent
from the calculator.
(1) Try pressing a key on the
calculator.
(2) Check to make sure that
the calculator is in the OHP
Mode.
If the screen is not sent after
you perform the above steps,
disconnect the USB cable and
check the calculator setup.
Next, reconnect and try again.
For details, select the following
on the menu bar: Help Manual - Manager PLUS, or
refer to the Manager PLUS
user’s guide.
The connection has been
broken for some reason and is
being restored.
If data communication does
not resume after some time,
perform the operation
described below.
Try pressing a key on the
calculator. If the screen is not
sent after you perform the
above steps, disconnect the
USB cable and check the
calculator setup. Next,
reconnect and try again.
For details, select the following
on the menu bar:
Help - Manual - Manager
PLUS, or refer to the Manager
PLUS user’s guide.
Description
The calculator screen image
cannot be sent for some
reason.
Required Action
Follow the steps that are
shown on the display and try
again.
See “10. Using Screen
Receiver to Display the
Calculator Screen Image on
Your Computer” for details.
Follow the steps that are
shown on the display and try
again.
—
E-48
CASIO COMPUTER CO., LTD.
6-2, Hon-machi 1-chome
Shibuya-ku, Tokyo 151-8543, Japan
SA0704-A