1
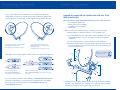
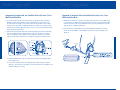
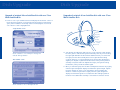
Multi-Satellite Antenna
Upgrade Kit Installation Guide
HEM 62639
Getting Started
Before proceeding, please refer to your satellite system’s
“Installation Instructions/User Manual” for detailed Safety
Instructions.
• Do not locate the satellite dish antenna near overhead power
lines or electric lights.
• Do not install the satellite dish or its components in high winds
or when there is a danger of a lightning strike.
• Use safety glasses and avoid wearing loose clothing during
installation.
• Use caution with ladders.
• Use caution when working on your roof. Wear shoes with good
tread to ensure good traction on the roof surface and be sure
that your work path is clear and dry. Use of a safety harness is
recommended.
• Ground your satellite system as outlined in the original
instructions, and as prescribed by local electrical codes.
With the launch of a second satellite, certain Bell ExpressVu customers will
have to upgrade their satellite system dish equipment to ensure they are
capable of receiving television signals from both Bell ExpressVu satellites,
Nimiq 1 and Nimiq 2. If you subscribe to one of Bell ExpressVu’s ‘specialty’
TV services such as High Definition TV or international programming then
you will have to complete this Multi-Satellite Antenna Upgrade in order to
watch these specialty channels.
This Multi-Satellite Antenna Upgrade Kit Installation Guide was developed
as an easy-to-use companion to the Installation Instructions and User Guide
originally provided with your satellite receiver and it outlines the necessary
changes that must be made to your current satellite dish antenna.
Bell is a trade-mark of Bell Canada used under license; ExpressVu and Vu! are trade-marks of Bell ExpressVu, L.P.
1
Getting Started
First, you must identify which satellite dish you currently have. Of the two
satellite dishes shown below, identify the one that resembles the satellite dish
you have based on its overall SIZE, and the LIKENESS of the satellite dish arm.
Dish Upgrade
Upgrade of original 46 cm Satellite dish with new 51cm
Multi-Satellite dish
The components in your Upgrade Kit which will you use in this section are:
– a 51 centimetre satellite dish
– satellite dish arm with Y-adapter
– one LNBF (low noise amplifier)
– coaxial cables
1. Remove original 46 cm satellite dish by completing the following steps:
a) Detach LNBF from satellite dish arm by loosening LNBF screw
b) Disconnect LNBF from the coaxial cable located in satellite dish arm and
set the LNBF aside for now, you will need it for later for the upgrade
installation
c) Loosen mast clamp bolts located on the back of the satellite dish.
46 centimetre Satellite Dish with one LNBF
(available before October, 2002)
Dish Upgrade instructions begin on page 3
51 centimetre Satellite Dish with one
LNBF and expansion slot (available after
September, 2002)
d) Dismount satellite dish from mast by lifting it upwards, taking care that
the coaxial cable pulls away from the dish arm and is left protruding out
the top of the dish mast.
Dish Upgrade instructions begin on page 9
Next, determine how many satellite receivers will be connected to the satellite dish.
Y-Bracket Screw and Nut has
fine thread, 1 set each
Dish Screws
Mast Clamp
Bolts
Y-Bracket
Up-to-two receiver set-up
Three-to-four receiver set-up
After completing Dish Upgrade,
consult page 11 for wiring instructions
After completing Dish Upgrade, consult page 13 for wiring
instructions
Dish Bolts
Coaxial
Cable
Mast
If you encounter any problems when installing your Bell ExpressVu Multi-Satellite
Dish Antenna Upgrade Kit, or have any questions regarding these new satellite
dish components, you are welcome to contact Bell ExpressVu directly at
1 888 SKY-DISH (759-3474).
2
2. Assemble new 51 cm Multi-Satellite Dish by attaching mount plate bracket to
the back of the satellite dish with supplied screws and bolts. Attach Y-adapter
bracket to dish support arm using Y-bracket screw and nut.
3
Dish Upgrade
Dish Upgrade
Upgrade of original 46 cm Satellite dish with new 51cm
Multi-Satellite dish
Upgrade of original 46 cm Satellite dish with new 51cm
Multi-Satellite dish
3. Loosen both skew bolts and set the skew by rotating the dish mounting
bracket to align the red mark with the required angle on the skew scale.
Consult the ‘Look Angles’ section at the back of this guide to for the skew
setting in your area. Once adjusted, tighten the skew bolts securely to keep
the dish from rotating. Once the skew is set, do not try to fine-tune the skew
angle when aiming the dish.
7. Starting from the back of the dish assembly, take the main coaxial cable which
is connected your satellite receiver inside the home and slowly thread the cable
end through the inside of the satellite dish arm until it protrudes through the
opening of the Y-adapter labeled 91°.
4. Set the elevation by tilting the dish mounting bracket to align the red edge
with the required angle on the elevation scale. Consult the ‘Look Angles’
section at the back of this guide to for the elevation setting in your area.
Tighten the elevation bolts, but do not tighten the pivot bolt at this time.
8. Connect end of coaxial cable to the original LNBF that had been set aside
earlier. Attach the LNBF to the Y-adapter and secure it with the LNBF screw
and bolt.
Y-Bracket
SKE
W
ON
SK
I
AT
EV
EW
ELEVATION
EL
Elevation Bolt
5. Slide the satellite dish down over the mast and secure it by tightening the
mast clamp bolts.
LNBF Screw has coarse thread,
2 each
Mast
6. Position the satellite dish to the appropriate azimuth setting (compass
direction). Consult the ‘Look Angles’ section at the back of this guide for the
azimuth setting in your area.
4
5
Dish Upgrade
Upgrade of original 46 cm Satellite dish with new 51cm
Multi-Satellite dish
Dish Upgrade
Upgrade of original 46 cm Satellite dish with new 51cm
Multi-Satellite dish
Elevati
on
9. Power on one of your satellite receivers and display the ‘Point Dish’ screen on
the TV by pressing ‘Menu’ on the remote and selecting the ‘System Set-up’
option, then ‘Installation’ and finally select ‘Point Dish/Signal’. You will see
one of the two screens displayed below.
‘Single satellite’ screen
uth
m
i
Az
Pivot Bolt
Mast Clamp
Mast Clamp
Bolts
Skew Bolts
Elevation/Skew
Bracket
Elevation Bolts
Ensure ‘Satellite’ is set to Nimiq 91– message will
indicate “Wrong Satellite”
‘Dual satellite’ screen
10. Turn the dish assembly back and forth very slowly, until the signal strength
bar turns green to indicate the signal. Ensure that your body is not blocking
the signal path between the dish and the satellite! Note: If you cannot find
the signal, turn the dish assembly back to the original azimuth setting
(compass direction). Loosen the elevation bolts and increase the elevation
angle by two degrees. Tighten the elevation bolts and try turning the dish
assembly slowly back and forth. Repeat these steps, raising and lowering
the elevation, until you find the satellite signal.
11. Once you have the signal, turn the dish assembly back and forth very slightly
until the signal strength bar displays the maximum signal strength. Tighten
the mast clamp bolts. Then, loosen the elevation bolts and adjust the
elevation of the dish up and down slightly until the signal strength bar
displays the maximum signal. Do not adjust the skew setting! Tighten all
the bolts in the satellite dish assembly so that the dish cannot be moved.
Ensure ‘Satellite’ is set to ‘Bell ExpressVu 82’
6
7
Dish Upgrade
Dish Upgrade
Upgrade of original 46 cm Satellite dish with new 51cm
Multi-Satellite dish
Upgrading current 51 cm Multi-Satellite dish with
second LNBF
12. Detach the LNBF from the Y-adapter and disconnect the coaxial cable.
Thread the cable through the satellite dish arm so that it protrudes through
the opening of the Y-adapter labeled 82°.
The components in your Upgrade Kit which will you use in this section are:
13. Connect end of coaxial cable to the new LNBF that was packed in your
Upgrade Kit. Attach the LNBF to the Y-adapter and secure it with the LNBF
screw and bolt.
– one LNBF (low noise amplifier)
To upgrade your 51 cm Multi-Satellite Antenna Dish to enable it to receive
two satellite signals, you must perform the following steps:
1. Remove expansion slot cover on the Y-adapter located at the end of the
satellite dish arm.
2. Detach the LNBF from the Y-adapter and disconnect the coaxial cable.
Thread the cable through the satellite dish arm so that it protrudes through
the opening of the Y-adapter labeled 82°.
Y-Bracket
Y-Bracket
Mast
14. Using the ‘Point Dish’ screen, confirm that a signal is being received by the
satellite dish. On the ‘Single Satellite’ screen you will see a message indicating
‘Wrong satellite!’ which is perfectly acceptable. On the ‘Dual Satellite’ screen
select ‘Bell ExpressVu 82’ to indicate the signal strength.
You have now completed the ‘Dish Upgrade’ and can now proceed to the
‘Wiring Upgrade’:
• If you are wiring your satellite system for up to two receivers,
go to page 11
• If you are wiring your satellite system for three-to-four receivers,
go to page 13
8
3. Connect end of coaxial cable to the new LNBF that was packed in your
Upgrade Kit. Attach the LNBF to the Y-adapter and secure it with the LNBF
screw and bolt.
9
Dish Upgrade
Wiring Upgrade
Upgrading current 51 cm Multi-Satellite dish with
second LNBF
4. Power on one of your satellite receivers and display the ‘Point Dish’ screen on
the TV by pressing ‘Menu’ on the remote and selecting the ‘System Set-up’
option, then ‘Installation’ and finally select ‘Point Dish/Signal’. You will see
one of the two screens displayed below.
‘Single satellite’ screen
‘Dual satellite’ screen
Wiring for up to two receivers
At this stage, you should already have a 51 cm Multi-Satellite dish mounted the
top of your mast with two LNBF’s attached to the Y-adapter located at the end of
the dish arm. Also, you should have conducted tests to ensure the satellite dish is
aimed in the proper direction to receive both Bell ExpressVu satellite signals at
optimum strength. If this is not the case, do not proceed with these ‘Wiring
Upgrade’ instructions until you complete the ‘Dish Upgrade’ section.
The components in your Upgrade Kit which will you use in this section are:
– Two 2:1 multi-switches (SW21)
– Four coaxial cables
1. Remove both LNBF’s from the Y-adapter at the end of the satellite dish arm.
2. Starting from the back of the dish assembly, slowly thread two coaxial cables
(not included) through the inside of the satellite dish arm until the cables
protrude through the opening of the Y-adapter labeled 91°. Label these
cables at 91° to help identify them when connecting them later.
Ensure ‘Satellite’ is set to Nimiq 91–
message will indicate “Wrong Satellite”
Ensure ‘Satellite’ is set to
‘Bell ExpressVu 82’
You have now completed the ‘Dish Upgrade’ and can now proceed to the
‘Wiring Upgrade’:
3. Take either LNBF, connect the cables to each of its outputs and insert the LNBF
into 91° slot on the Y-adapter. Tighten LNBF screw and bolt.
Y-Bracket
• If you are wiring your satellite system for up to two receivers,
go to page 11
• If you are wiring your satellite system for three-to-four receivers,
go to page 13
4. At the back of the dish assembly, thread the other two coaxial cables through
the inside of the satellite dish arm until the cables protrude through the
opening of the Y-adapter labeled 91°. Label these cables at 91° to help identify
them when connecting them later.
10
11
Wiring Upgrade
Wiring Upgrade
Wiring for up to two receivers
Wiring for three-to-four receivers
5. Connect cables to each output of the remaining LNBF and insert it into 82°
slot on the Y-adapter. Tighten LNBF screw and bolt.
At this stage, you should already have a 51 cm Multi-Satellite dish mounted top of
your mast with two LNBF’s attached to the Y-adapter located at the end of the dish
arm. Also, you should have conducted tests to ensure the satellite dish is pointed in
the proper direction to receive both Bell ExpressVu satellite signals at optimum
strength. If this is not the case, do not proceed with these ‘Wiring’ instructions
until you return and complete the Multi-Satellite dish upgrade section.
6. Take the cables leading from the LNBF in the 91° Y-adapter slot and connect
each one to the ‘Dish 1’ input of each 2:1 multi-switch.
7. Take the cables from the 82° LNBF and connect each one to the ‘Dish 2’ input
of each 2:1 multi-switch.
The components in your Upgrade Kit which will you use in this section are:
– one 4:4 multi-switch (SW44)
1. Remove both LNBF’s from the end of the satellite dish arm.
2. Starting from the back of the dish assembly, slowly thread two coaxial cables
(not included) through the inside of the satellite dish arm until the cables
protrude through the opening of the Y-adapter labeled 91°. Label these cables at
91° to help identify them when connecting them later.
3. Take either LNBF, connect the cables to each of its outputs and insert the LNBF
into 91° slot on the Y-adapter. Tighten LNBF screw and bolt.
8. Connect the cable(s) that will go inside the home to the output(s) of each 2:1
multi-switch
9. Mount each 2:1 switch to the brackets and attach the brackets to the back of
the dish assembly.
10. You have now completed the ‘Wiring Upgrade’ and can now proceed to the
‘System Set-up’ section on page 15.
12
13
Wiring Upgrade
Wiring for three-to-four receivers
4. At the back of the dish assembly, thread the other two coaxial cables
(not included) through the inside of the satellite dish arm until the cables
protrude through the opening of the Y-adapter labeled 82°.
5. Connect cables to each input of the remaining LNBF and insert it into 82° slot
on the Y-adapter. Tighten LNBF screw and bolt.
6. Take the cables leading from the LNBF in the 91° Y-adapter slot and connect
them to the ‘1A’ and ‘1B’ inputs on the 4:4 multi-switch.
7. Take the cables leading from the LNBF in the 82° Y-adapter slot and connect
them to the ‘2A’ and ‘2B’ inputs on the 4:4 multi-switch.
8. Connect the cable(s) that will go inside the home to the output(s) of the 4:4
multi-switch.
9. You must ensure the power inserter is connected to the output labeled ‘1’ on
the 4:4 switch. Furthermore, the power inserter must be located indoors.
10. You have now completed the ‘Wiring Upgrade’ and can now proceed to the
‘System Set-up’ section on page 15.
WARNING!
System Set-up
Finalizing the Upgrade With Multi-Satellite
‘Point Dish’ Set-up
At this stage, you should already have a 51 cm Multi-Satellite dish installed with
two LNBF's. Coaxial cables leading from each LNBF are connected to the multiswitch(es), which then supply signal(s) to the satellite receiver(s) inside the home.
If this is not the case, you must complete the ‘Dish Upgrade’ and ‘Wiring’ sections
before embarking upon these ‘System Set-up’ instructions.
1. Power on one of your satellite receivers and display the ‘Point Dish’ screen on
the TV by pressing ‘Menu’ on the remote and selecting the ‘System Set-up’
option, then ‘Installation’ and finally select ‘Point Dish/Signal’.
2. Verify that the display shows ‘Dual Satellite’ reception from both 91° and 82°.
(If the ‘Point Dish’ screen is displaying single satellite only, power off the satellite
receiver so it can begin to download the new Multi-Satellite software. Ensure the
receiver is set to “Without my permission” via the System Upgrades menu. Once
you have the Dual satellite software, you may proceed to step three.
3. Using the remote, confirm the signal strength by selecting one satellite then
the other.
The SW44 Multi-Satellite switch MUST use a power inserter which
MUST be located indoors. Connect the power inserter to PORT 1
as per the instructions provided with the SW44 switch.
4. Next, perform a test on the satellite system switches by selecting the ‘Check
Switch’ option on the screen. On the following display, select ‘Check’ to initiate
the switch test.
14
15
System Set-up
Look Angles for Bell ExpressVu Multi-Satellite Dish (82° & 91°)
Community
Community
Compass Vertical
Direction Elevation
Finalizing the Upgrade With Multi-Satellite
‘Point Dish’ Set-up
5. Once the test is completed, an ‘Installation Summary’ screen will appear and
indicate the various settings for each switch output and also verify proper
satellite reception.
Skew
130.7
126.0
132.3
129.2
132.4
130.7
130.7
133.8
125.2
121.4
122.7
132.4
123.1
130.6
135.8
123.4
134.0
124.2
129.2
127.4
23.8
25.4
27.8
26.1
25.0
26.5
23.8
21.6
19.3
20.8
20.3
26.9
22.9
27.4
25.7
18.1
28.1
20.7
25.2
22.2
72.2
68.4
70.3
69.7
72.2
70.3
72.2
75.1
73.1
69.6
70.8
70.9
68.7
69.6
73.4
73.2
71.0
71.3
70.3
71.7
114.2
117.8
125.9
120.1
108.1
115.2
118.5
120.4
121.8
109.5
115.3
121.7
111.9
116.4
108.3
117.7
123.1
121.7
116.6
121.8
116.5
117.7
22.2
24.4
27.1
20.4
13.2
16.1
19.2
23.7
25.0
17.4
23.4
25.8
21.2
20.0
16.9
21.2
24.6
22.5
23.9
25.0
24.6
22.0
62.7
63.4
67.0
69.1
68.9
70.5
69.3
66.1
65.9
64.1
62.3
65.2
61.7
66.8
63.7
66.6
67.3
68.2
62.7
65.9
62.1
65.8
Congratulations! The installation of your new Bell ExpressVu Multi-Satellite
System is complete!
If you are an existing subscriber, just relax and enjoy all the added ‘specialty’
programming you’ll be watching on your television from now on.
If you are a new customer, you must take one final step before you can
start enjoying your new Bell ExpressVu Multi-Satellite system. Simply call
1 888 SKY-DISH (759-3474) to activate your satellite receiver(s).
Manitoba
Brandon
Churchill
Dauphin
Grand Rapids
Gypsumville
Hodgson
Lynn Lake
Portage La Prairie
The Pas
Thompson
Winnipeg
16
Bath
Bathurst
Dalhousie
Edmundston
Fredericton
Grand Falls
Moncton
Oromocto
Saint John
Woodstock
225.2
227.0
227.0
223.7
225.2
184.2
228.3
226.9
226.8
226.9
33.7
31.4
31.4
33.0
33.7
36.0
33.0
33.3
34.3
33.3
107.7
107.4
107.4
106.4
107.7
89.5
109.3
108.5
109.2
108.5
243.1
237.8
241.3
240.0
240.2
240.4
243.1
26.1
27.5
26.2
28.3
25.8
25.0
26.1
116.2
112.3
114.2
115.1
112.9
112.2
116.2
101.6
118.6
134.4
127.3
101.9
109.9
128.5
7.6
15.7
19.7
18.1
7.3
11.4
16.8
73.0
75.0
78.0
76.0
75.0
75.0
78.0
234.0
229.9
234.1
229.8
235.4
203.9
231.3
226.8
226.8
31.4
33.6
32.3
32.6
31.0
38.6
33.2
36.2
35.3
112.4
110.8
113.1
110.0
113.1
98.6
111.6
110.4
109.8
239.6
174.9
252.3
144.8
223.9
253.6
122.5
262.6
181.8
8.4
17.3
11.5
11.8
17.0
9.5
11.7
2.0
12.9
92.0
87.5
101.0
85.0
97.0
97.5
80.5
91.0
88.0
Newfoundland
Bonavista
Corner Brook
Gander
Grand Bank
Springdale
St. Anthony
St. Johns
Northwest
Territories
British Columbia
Campbell River
Chilliwack
Cranbrook
Dawson Creek
Dease Lake
Fort Nelson
Fort St. John
Kamloops
Kelowna
Kitimat
Nanaimo
Penticton
Port Alice
Prince George
Prince Rupert
Quesnel
Revelstoke
Valemount
Vancouver
Vernon
Victoria
Williams Lake
Skew
New Brunswick
Alberta
Athabasca
Banff
Brooks
Calgary
Camrose
Drumheller
Edmonton
Fort McMurray
Fort Vermilion
Grande Prairie
Grimshaw
Hanna
Jasper
Lethbridge
Lloydminster
Meander River
Medicine Hat
Peace River
Red Deer
Slave Lake
Compass Vertical
Direction Elevation
155.2
172.9
153.3
158.2
159.8
162.2
154.5
159.6
153.9
161.3
161.9
31.3
22.7
30.0
28.3
30.6
30.8
23.9
31.7
26.9
25.4
31.8
79.0
85.6
78.6
80.8
80.9
81.7
80.8
80.6
79.8
82.4
81.4
Fort McPherson
Fort Simpson
Fort Smith
Hay River
Inuvik
Norman Wells
Yellowknife
Nova Scotia
Cape Breton Island
Halifax
Port Hawkesbury
Springhill
Sydney
Trenton
Truro
Wedgeport
Yarmouth
Nunavut
Arctic Bay
Baker Lake
Broughton Island
Cambridge Bay
Cape Dorset
Clyde River
Coppermine
Eureka
Gjoa Haven
17
Look Angles for Bell ExpressVu Multi-Satellite Dish (82° & 91°)
10
Community
Community
Compass Vertical
Direction Elevation
Nunavut (cont’d)
Grise Fiord
Hall Beach
Iqualuit
Lake Harbour
Pond Inlet
Rankin Inlet
Repulse Bay
Resolute Bay
18
Skew
Prince Edward
Island
251.6
231.5
241.6
238.5
249.5
186.4
212.2
217.8
5.1
12.5
15.8
16.9
8.4
19.0
15.1
6.8
92.0
94.0
101.0
101.0
99.5
89.5
92.0
89.0
204.1
199.5
206.1
201.7
208.4
201.6
200.4
199.5
212.5
195.5
170.7
186.3
185.3
195.0
199.4
204.0
197.3
192.5
201.9
168.7
206.1
200.6
199.4
197.0
204.4
199.8
182.6
202.3
208.4
197.6
199.8
206.5
208.4
194.8
203.9
191.1
173.4
198.1
179.8
198.9
195.3
199.8
201.6
192.2
37.5
38.9
38.4
38.7
37.1
39.8
35.6
38.9
36.7
36.9
33.4
26.2
32.7
39.1
40.0
37.5
39.0
32.7
37.8
32.2
38.4
34.5
40.0
40.1
36.4
31.4
33.8
36.6
37.1
37.8
37.8
36.2
37.1
40.2
38.6
37.0
32.6
35.7
34.8
33.5
38.0
37.8
39.8
41.4
98.3
96.6
99.6
97.6
100.3
97.9
96.0
96.6
102.1
94.3
84.4
89.0
89.6
94.6
96.9
98.3
95.6
91.2
97.4
83.8
99.6
95.8
96.9
95.8
98.1
94.4
88.7
97.1
100.3
95.4
96.4
99.0
100.3
94.8
98.6
92.4
85.4
95.1
87.8
94.7
94.5
96.4
97.9
93.9
Ontario
Bancroft
Barrie
Belleville
Bradford
Brockville
Burlington
Cobalt
Collingwood
Cornwall
Elliot Lake
Fort Frances
Fort Severn
Geraldton
Goderich
Guelph
Haliburton
Hanover
Hearst
Huntsville
Kenora
Kingston
Kirkland Lake
Kitchener
London
Mattawa
Moosonee
Nipigon
North Bay
Ottawa
Owen Sound
Parry Sound
Pembroke
Perth
Sarnia
Peterborough
Sault St Marie
Sioux Lookout
Sudbury
Thunder Bay
Timmins
Tobermory
Toronto
Welland
Windsor
Compass Vertical
Direction Elevation
Skew
Charlottetown
Summerside
231.4
231.4
32.2
32.2
110.9
110.9
213.8
218.8
214.6
228.8
214.8
208.8
212.6
218.5
222.2
202.8
225.9
216.4
214.6
205.0
31.5
32.9
35.6
30.1
34.4
35.0
35.7
33.9
32.3
34.4
29.8
36.2
35.4
34.3
100.2
103.3
102.6
107.5
102.2
99.6
101.7
103.9
105.0
96.7
105.5
104.0
102.6
97.5
148.7
151.6
137.5
145.5
143.0
135.7
139.4
143.3
145.1
141.3
159.8
141.1
137.0
151.2
31.6
27.8
27.9
25.1
29.8
28.5
26.3
26.8
29.1
27.5
22.1
29.5
19.1
29.8
76.2
78.8
72.9
77.6
74.5
71.7
74.7
76.0
75.7
74.8
82.7
73.8
77.2
77.9
103.6
100.6
103.1
106.8
111.1
105.1
10.8
8.5
11.2
12.2
14.8
12.2
69.0
70.0
68.0
70.0
70.5
68.5
Quebec
Chibougamau
Chicoutimi
Drummondville
Gaspe
La Tuque
Mont-Laurier
Montreal
Quebec
Rimouski
Rouyn
Sept-Iles
Sherbrooke
Trois-Rivieres
Val d'Or
Saskatchewan
Estevan
Hudson Bay
Kindersley
La Ronge
Moose Jaw
Moosomin
North Battleford
Prince Albert
Regina
Saskatoon
Stony Rapids
Swift Current
Uranium City
Yorkton
Yukon
Carmacks
Dawson
Haines Junction
Ross River
Watson Lake
Whitehorse