1
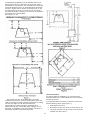
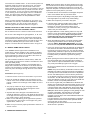
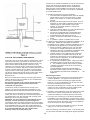
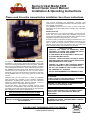
Sierra Cricket Model 5300
Wood Heater Insert Manual
Installation & Operating Instructions
Please read this entire manual before installation. Save these instructions.
This m anual describes the installation, operation and
m aintenance of the SIERRA CRICKET m odel num ber 5300
non-catalytic wood heater.
Your SIERRA generates a lot of heat, so treat it with care.
Read this m anual thoroughly before installing and operating
your stove.
SAFETY NOTICE
If this appliance is not properly installed, a house fire m ay
result. For your safety, follow the installation instructions.
Check with local building or fire officials about restrictions and
installation inspection requirem ents in your area.
It is best to have a professional install your Sierra Stove. If you
prefer to install it yourself (see Installation Instructions), be
sure to obtain the proper perm its. Have the local building
officials inspect the stove and chim ney pipe for safety and
code com pliance after the installation is com plete.
SAFETY NOTICES
< CAUTION: HOT W HILE IN OPERATION. KEEP
CHILDREN, CLOTHING AND FURNITURE AW AY.
CONTACT M AY CAUSE SKIN BURNS.
< IF THIS HEATER IS NOT PROPERLY INSTALLED,
A HOUSE FIRE M AY RESULT.
GENERAL INFORMATION
W e wish to welcom e you as a new owner of a SIERRA
W oodstove. You join m any thousands of happy owners who
have been heating with SIERRA stoves since 1972. SIERRA
stoves have changed a great deal during that tim e, and all of
our knowledge and experience have culm inated in this stove,
the SIERRA CRICKET Model 5300. Please read this entire
m anual before you install and use your new room heater,
especially if you have owned another woodstove in the past.
W e at SIERRA wish you m any happy years of warm th and
com fort.
Designed with you, the consum er, in m ind, your SIERRA
5300 provides the versatility of five possible installation
applications, including both m asonry and zero clearance
fireplaces, freestanding with optional pedestal, corner or
alcove placem ent, and m obile hom e approval.
Its optional jacket and blower package insures good
clearances to com bustibles, and extrem ely clean glass and
the ability to m eet the m ost stringent clean air requirem ents
with catalytics insures ease of m aintenance.
< CONTACT LOCAL BUILDING OFFICIALS ABOUT
RESTRICTIONS AND INSTALLATION INSPECTION
REQUIREM ENTS IN YOUR AREA.
< FAILURE TO COM PLY W ITH OW NERS' M ANUAL
INSTRUCTIONS W ILL VOID YOUR W ARRANTY!
< DO NOT USE CHEM ICALS OR FLUIDS TO START
OR “FRESHEN UP” THE FIRE!
< DO NOT BURN GARBAGE OR FLAMMABLE FLUIDS.
DO NOT CONNECT TO ANY AIR DISTRIBUTION DUCT
OR SYSTEM .
DO NOT CONNECT THIS APPLIANCE TO A CHIM NEY
FLUE SERVING ANOTHER APPLIANCE.
W ARNING: DO NOT INSTALL IN SLEEPING ROOM
IF THE UNIT IS IN A M OBILE HOM E.
THIS UNIT APPROVED FOR M OBILE HOM ES
CAUTION: IN A M OBILE HOM E INSTALLATION, THE
STRUCTURAL INTEGRITY OF THE M OBILE HOM E
FLOOR, W ALL, AND CEILING/ROOF M UST BE
M AINTAINED.
FAILURE TO FOLLOW THESE INSTRUCTIONS M AY
RESULT IN PROPERTY DAM AGE, BODILY INJURY,
OR EVEN DEATH.
YOUR SIERRA CRICKET 5300 HAS BEEN TESTED
BY WARNOCK-HERSEY LABORATORIES TO ANSI/UL
STANDARD 1482, UL 737.
PLEASE LEAVE THIS MANUAL WITH THE OWNER !!
Listed by Warnock Hersey
CAUTION: IN A M OBILE HOM E INSTALLATION, THE
STRUCTURAL INTEGRITY OF THE M OBILE HOM E
FLOOR, W ALL, AND CEILING/ROOF M UST BE
M AINTAINED.
DO NOT USE M ORE THAN ONE STOVE TO A
CHIM NEY. DO NOT USE A FLUE INTENDED FOR A
GAS APPLIANCE.
• The Cricket is approved for use in specified zero clearance
(ZCF’s). Use the list on Page 6 or contact your dealer for
additional units.
• This room heater m ust be connected to
1) a chim ney com plying with the requirem ents for type H
chim neys in the standard for chim neys, factory-built,
residential type and building heating appliance, IL 103 or
• A factory-built pre-fabricated chim ney m ay be used for
your SIERRA when installed in com pliance with the
m anufacturer’s specifications and uniform building code.
2) a code-approved m asonry chim ney with a flue line.
• Install and operate this SIERRA unit according to
instructions provided in this m anual. Local building codes
m ay apply; therefore, contact your local building inspector
or fire m arshal for necessary installation requirem ent and
perm its which m ay go beyond these instructions.
• Your chim ney m ust be properly sized. A chim ney that is to
sm all or large in diam eter, or too short can cause your
stove to spill sm oke when the door is opened.
• Have your existing chim ney inspected before attaching the
cricket to it. Som e chim ney m ust be relined or replaced
before they are safe to use.
2
INSTALLATION INSTRUCTIONS
The first step in this type of installation is to determ ine the
acceptability of the fireplace and chim ney for use with a
woodstove. Both the construction and condition of the
fireplace are im portant considerations when installing a
wood stove. Do not install this stove in a poorly
constructed fireplace or chim ney.
TABLE OF CONTENTS
I.
TECHNOLOGY
II.
REPLACE INSERT INSTALLATION
Installation into a Factory-built Fireplace
Approval list
Installation into a Masonry Fireplace Draft
Requirements
III
The following are general guidelines for a safe installation
and are based on recom m endations of the National Fire
Protection Association (NFPA). Contact your local building
code agency or fire safety inspector for specific details.
Local codes m ay vary by area.
FREESTANDING INSTALLATION
Clearances to combustibles
IV.
MOBILE HOME INSTALLATION
V.
OPERATING INSTRUCTIONS
VI.
STOVE AND CHIMNEY MAINTENANCE
Creosote
Stove Maintenance
1. The chim ney should have a fire clay liner in good
condition. Loose or cracked liner sections can be
hazardous. If the chim ney does not have a liner, one
can be installed by a qualified professional. Som e m etal
liners area acceptable to use. Check with your stove
dealer or local building code agency for acceptability of
these liners.
2. No part of the chim ney should have any leaks, m issing
m asonry, cracks, loose m ortar or soft m ortar.
Care and cleaning of W oodstove Glass
3. There should be no m ortar or parts of the chim ney
blocking the chim ney flue.
This m anual describes the installation, operation, and
m aintenance of the SIERRA Cricket Model 5300 noncatalytic wood heater. This heater is certified to com ply
with July 1992 EPA Standards. Under specific test
conditions, this heater has been shown to deliver the heat
at the following rates:
4. The fireplace and chim ney should be built on a solid
concrete footing supported by the ground and not
attached to the house.
Older chim neys are som etim es supported by the
fram ework of the building itself. These can be
structurally unsound due to settling and shifting of the
building and possible cracking of the chim ney itself.
5300 from 11,000 to 36,400 BTU/hr.
DO NOT OVERFIRE THIS HEATER. Attem pts to achieve
heat output that exceeds the heater design can result in
perm anent dam age to the heater and to the catalytic
com bustor. Do not exceed surface tem peratures of 800
degrees F. Do not burn with the ash pan open. Over firing
can also void the m anufacturer’s warranty.
I.
5 . The chim ney m ust have a good natural draft and should
be self-starting. A chim ney that has poor draft and is
subject to draft reversal should be repaired or replaced
before using..
6. The chim ney should be the proper size. Som e fireplace
chim neys are quite large and will cause poor stove
perform ance and excessive creosote. The rule of
thum b is that the chim ney flue should be roughly no
m ore than three tim es the flue opening on the stove. A
6 inch stove flue will work in an 8 inch by 12 inch
fireplace flue. It m ay be necessary to install another
liner in an oversized chim ney.
TECHNOLOGY
Your 5300 Cricket is a non-catalytic unit designed to m eet
the m ost stringent em ission standards without the use of a
catalytic com bustor. This effect is achieved through the
use of a secondary air which is m ixed with the prim ary air
in the unit’s firebox.
7.The chim ney should extend at least 3 feet above the roof
and at least 2 feet above any point on the roof within 10
feet.
The prim ary air, which is controlled by the user, burns the
wood. Secondary air is adm itted into the firebox through
the secondary air tubes at the top of the firebox. This
secondary air burns the im purities in the sm oke released
from the initial wood burning. The tem perature necessary
for this com bustion is m aintained through the firebrick
refractory and the heavily insulated box.
8. This stove m ust be used alone in the chim ney. Any
unused opening m ust be perm anently sealed with
m asonry by a skilled brick m ason. A clip-in type flue
liner is not acceptable for this use because of the
possibility of it com ing loose during a chim ney fire and
possibly causing the fire to spread.
Your local building code agency or fire safety inspector
can refer you to a qualified professional who can inspect
the chim ney for you.
General Information
The following item s are shipped inside the Am bassador:
•
•
This m anual
Sierra W arranty
9. W hen installing, m ake sure the chim ney can be
rem oved to a point lower than the highest point of the
roof for future transportation of the m obile hom e.
BASIC FIREPLACE AND CHIMNEY
REQUIREMENTS
Remember to have your chimney inspected for leaks and
blockage before you install your stove.
A Sierra woodstove m ay be installed using an all m asonry
fireplace build in accordance with the Uniform Building
Code.
Draft Requirements
3
Draft is the force which m oves air from the appliance up
through the chim ney. The am ount of draft in your chim ney
depends on the size, height and general condition of your
chim ney, local geography, nearby obstructions, and other
factors. Inadequate draft will cause the appliance to leak
sm oke into the room when starting a fire or adding fuel to
the existing fire. Excessive draft, on the other hand, m ay
cause excessive tem peratures in the appliance, burning
the wood too quickly and dam aging the unit.
Minim um Chim ney Requirem ents
Size
Height
Draft
6x6
15 ft
.06 W .C.
Note: 9 out of 10 tim es, dirty glass, lack of “heating”, or
failure to continue burning after the door are shut is
evidence of inadequate draft.
In all cases, if you experience anything unusual with your
Evolution, your Sierra dealer is the local expert on local
conditions, and you need to contact him or her.
C. Sheet steel chim ney connector, m inim um 24 gauge
thickness, with a ventilated thim ble, m inim um 24 gauge
in thickness, having two 1 inch air channels, separated
from com bustibles by a m inim um of 6 inch of glass fiber
insulation. Opening shall be covered, and thim ble
supported with a sheet steel support, m inim um 24
gauge in thickness.
Your Sierra dealer is ALW AYS your best source of
information on local codes and requirements
CHIM NEY CONNECTOR SYSTEM S AND CLEARANCES
FROM COM BUSTIBLE W ALLS FOR RESIDENTIAL
HEATING APPLIANCES
A. Minim um 3.5 inch thick brick m asonry all fram ed into
com bustible wall with a m inim um of 12 inch brick
separation from clay liner to com bustibles. The fireclay
liner shall run from the outer surface of brick wall to, but
not beyond, the inner surface of chim ney flue liner and
shall be firm ly cem ented in place.
D. Solid insulated, listed factory-build chim ney length with
an inside diam eter 2 inch larger than the chim ney
connector and having 1 inch or m ore of insulation,
serving as a pass-thru for a single wall sheet steel
chim ney connector of m inim um 24 gauge thickness,
with a m inim um 2 inch air space between the outer wall
of chim ney section and com bustibles. Minim um length
of chim ney section shall be 12 inch chim ney section
spaced 1 inch away from connector using sheet steel
support plates on both ends of chim ney section.
Opening shall be covered, and chim ney section
supported on both sides with sheet steel supports
securely fastened to wall surfaces of m inim um 24 gauge
thickness. Fasteners used to secure chim ney section
shall not penetrate chim ney flue liner
B. Solid-insulated, listed factory-build chim ney length of the
sam e inside diam eter as the chim ney connector and
having 1 inch or m ore of insulation with a m inim um 9
inch air space between the outer wall of the chim ney
length and com bustibles.
4
Typical Factory Built or Masonry Chimney
Installations
Your local building code agency or fire safety inspector
can refer you to a qualified professional who can inspect
the chim ney for you.
.
5
W ARNING-DO NOT INSTALL OR USE A CRICKET IN
AN INSTALLATION W HERE THERE HAS PREVIOUSLY
BEEN A CHIM NEY FIRE W ITHOUT FIRST HAVING AN
INSPECTION BY A CERTIFIED CHIM NEY SW EEP.
II. FIREPLACE INSERT INSTALLATION
A. Installation into a Factory-Built Fireplace
Your Cricket has been tested by W arnoch-Hersey
International for installation in the following SPECIFIED
zero clearance fireplaces (ZCF) which are furnished with
an 8" m inim um listed chim ney system . The Cricket m ust
be installed in a ZCF with the rear m anifold and blower
option.
Heatilator Models 3036, 3038, 3130, 3138, 3336R,
3336L, 3042, 3048, 3342R, 3342L, HE36BG, HE42B,
HE28B, TD36A, TD36B, TD42B, TD46BI, HF42A, HF36A,
Mark 123, HB36, AM, NA42-A1
M ajestic Models M28, M36, M36AO, M42, L-36, L-36B,
L-42, L-42R, L-42L, L-42B, MD-36, MD36AO, MD-36R,
MD-36L, M.H.C.36, MBUC36, MBUC42, MRC36, RC36,
W MII-36, W MII-42, MFC-36, MEC-36A, MEC-36F, MECB36, MBC-36A, MB-42, MBU-36, MD-42, MD-42AO, MHC28, MHC-42
M arco Models 36-X, 36-1X, 36N-X, 36NI-X, DW F-36CF,
DW F-36GO-X, DW F-36C, DW F/DF41-D, DW F/DF41-F,
DW F/DF41-GO, DW F-36DR,FR,FL,DL,-3,DW F31D,DW F-31GO,DW F-36ST,036,B41-HC
Prew ay Models DW 36, DW 36A, DL36DW , DW 42, FF42,
DL42DW , BE48, PB48, FF48, BE41, FF41, BE41ST,
B142D, FF36, B136SEM, DL360A5, BE41SEM, B136D3M, B136D, DL36DOA, PB4250, DL36D, SL36PB
M artin Models BC3642, BC3642M, BB3642, BB3642C,
A39, AC39, A33, AC33, A/AC36, A42, AC42, DBB36,
DBC36, BW 36B, BW 42B, B-36, C-36, C-36M, DBB361,
DBC361, M42, M36, BB4250, BB4250C, BC4250,
BW 4245A, LF36B
Superior Models SP38C-1, RD-3300, RD-3800, RD4300, RC-3310, RC-3310, PC-3310, PC-3810, RC-4310,
HC 3320, HC-3820, HC-4320, HCE-3550, HCE-4050,
HCE-4550, CF-3860, and Hearthstar Fireplace 33A, 33B,
38A,38B,43A,43B,35B-N,38H, 40B-N, 45B-N, 3800 Series
Temco Models 36-5, TBF42-2RSA, EE36-1
Your ZCF m ust be sound and in good operating condition.
The chim ney should be cleaned before installation if
necessary. Inspection by a local building official, fire
m arshal, certified chim ney sweep, or other qualified
personnel is recom m ended.
Your ZCF MUST have been installed in accordance with
the m anufacturer’s specifications and to all local building
codes.
Installation:
1. Check your fireplace dim ensions - 25" wide in front, 20"
wide in back, 18" deep and 19" high. (See figure 1)
2. The fireplace’s ash lip, sm oke shelf, sm oke baffle, and
firebrick m ay be rem oved if necessary. The dam per
m ust be rem oved.
3. Check proper clearance to com bustibles as shown in
Figures 2 and 3.
6
4. Install the provided heat shield on the upper face of the
fireplace as shown in Figure 1. W hile holding shield in
place on the face of the ZCF, m ake a m ark through the
screw holes in the shield. Using a 3/16" bit, drill holes in
the face of the ZCF. After the shield has been attached
with the screws provided, use the large plug buttons to
close the 1" holes in the face of the shield.
5. Rem ove the dam per and dam per rod assem bly from the
fireplace. Note: Any parts rem oved should be stored in
the fireplace or given to the hom eowner for
re-installation if and when the stove is rem oved.
is to determ ine the acceptability of the fireplace and
chim ney for use with a woodstove. Both the construction
and condition of the fireplace are im portant considerations
when installing a woodstove. Do not install this stove in a
poorly constructed fireplace or chim ney.
The following are general guidelines for safe installation
and are recom m endations of the National Fire Protection
Association (NFPA). Contact your local building code
agency or fire safety inspector for special details. Local
codes m ay vary by area.
6. The Cricket m ust be directly connected to the chim ney
of the ZCF. There are two acceptable m ethods of direct
connecting.
a. Using an increaser that goes from 6" to the exact
diam eter of your chim ney. The increaser m ust be
m ade of 24 gauge (m inim um .) W hen installed, the
increaser m ust be sealed with refractory cem ent
where the connection is m ade to the chim ney.
Standard 6" x 24 gauge stove pipe m ay be used to
connect the increaser to the stove. In sm all
fireplaces where there is not m uch room to
m aneuver the stove pipe, you m ay want to use a 6"
slip join connector on the bottom of the pipe. The
bottom of the pipe m ust be secured to the flue collar
of stove with three m etal screws.
b. Ceramic W ool M ethod
W rap the top of a section of 6 x 24 gauge stovepipe
with ceram ic wool (available from your dealer.) Insert
the wrapped pipe into the fireplace chim ney and use
m ore ceram ic to tightly pack the space between the
outside of the stovepipe and the inside of the
fireplace chim ney. The stovepipe should extend into
the fireplace chim ney at least 18".
DO NOT USE GLASS OR FIBERGLASS AS IT W ILL
M ELT DUE TO EXTREM E HEAT.
7. Adjust the stove pipe to approxim ately the height of the
flue collar.
8. Slide the unit into the fireplace and center the flue collar
under the stove pipe.
9. Slide the stove pipe or slip joint into the flue collar as far
as possible.
DO NOT BREAK THE SEAL OF THE REFRACTORY
CEM ENT OR LOOSEN THE CERAM IC W OOL.
10. Install at least three m etal screws into the pipe through
the flue collar.
11. Place an approved floor protector of proper size (See
Figure 4) in front of hearth.
12. Install a m antel protector if required(See figures 1 & 2)
Your installation is now com plete. Read the operation
section of this m anual before using the stove.
Note: Each fireplace and installation m ay be different.
1. 6" flexible pipe m ay be used in place of standard stove
pipe. (See figure 3)
2. You m ay use a flexible stove pipe elbow (See Figure 3)
3. Always install your pipe with the crim ped end down so
that the hot creosote will drain into the stove to be
burned.
B. Installation into a M asonry Fireplace.
A SIERRA woodstove m ay be installed using an all
m asonry fireplace built in accordance with the Uniform
Building Code. The first step in this type of installation
7
If your chim ney is lined with a clay tile liner which is no
sm aller than 6" x 6" or larger than 8" x 12" inside
m easurem ents, you m ay install the Cricket in your
fireplace.
1. The chim ney should have a fire clay liner in good
condition. Loose or cracked liner sections can be
hazardous. If the chim ney does not have a liner, one can
be installed by a qualified professional. Som e m etal
liners are acceptable to use. Check with your stove
dealer or local building code agency for acceptability of
these liners.
The general accepted rule is the cross-sectional area of
the chim ney should be no m ore than three tim es the crosssectional area of the flue exit of the stove. The crosssectional area of a 6" flue or your Cricket is 28 sq. inches.
2. No part of the chim ney should have any leaks, m issing
m asonry, cracks, loose m ortar or soft m ortar.
Installation:
3. There should be no m ortar or parts of chim ney blocking
the chim ney flue.
Your stove m ust be directly connected to your chim ney in
one of the following 3 m ethods:
4. There should be a m inim um 2-inch clearance between
any part of the fireplace or chim ney and any com bustible
m aterials.
1. Ceramic W ool
A. Rem ove or secure open the existing fireplace
dam per. Install a section of flexible pipe through the
dam per, up the chim ney at least ½ the way up the
first chim ney liner. Oval or round pipe m ay be used,
if oval pipe is used you will need to adapt it to the 6"
flue collar of he stove.
B. Pack the area around the pipe and the dam per area
or the chim ney liner with ceram ic wool. Make sure it
is packed tight so no air can go between the pipe
and chim ney liner.
C. Adjust the pipe to the approxim ate height of the flue
collar on the stove.
D. Slide the pipe down into the flue collar as far as
possible.
5. The fireplace and chim ney should be built on a solid
concrete footing supported by the ground and not
attached to the house.
6. The chim ney m ust have a good natural draft and should
be self-starting. A chim ney that has a poor draft and is
subject to draft reversal should be repaired or replaced
before using.
7. The chim ney should be the proper size. Som e fireplace
chim neys are quite large and will cause poor stove
perform ance and excessive creosote. The rule of thum b
is that the chim ney flue should be roughly no m ore than
three tim es the flue opening on the stove. A 6-inch stove
flue will work in a 8-inch by 12-inch fireplace flue. It m ay
be necessary to install another liner in an oversized
chim ney.
E. Slide the pipe down into the flue collar as far as
possible. Secure te pipe to the flue collar with at
least three m etal screws.
F. Make sure the ceram ic wool is still in place and no
heat from the stove can fo up the chim ney.
8. The chim ney should extend at least 3 feet above the
roof and at least 2 feet above any point of the roof within
10 feet.
2. Positive Connect Kit
You m ay want to obtain a “positive connect kit” from you
dealer. They are m ade of m etal and are designed to
close off the entire upper part of your fireplace allowing
only the stove pipe to exit up the chim ney. Norm ally
these kits are not offered to or intended for the do-ityourselfer.
9. This stove m ust be used alone in the chim ney. Any
unused opening m ust be perm anently sealed with
m asonry by a skilled brick m ason. A clip-in type flue
cover is not acceptable for this use because of the
likelihood of it com ing loose during a chim ney fire and
possibly spreading the fire.
3. Total Reline
10. The stove m ay be installed using a m asonry relining
system or m etallic chim ney or m etallic relining
system that m eets or exceeds UL 1777.
Total relining of your chim ney m ay be required where
the existing chim ney is too large to draw properly or does
not have a clay chim ney liner. Total relining is norm ally
beyond the expertise of the best do-it-yourselfer, and we
urge you to have your dealer or a certified chim ney sweep
do it for you.
11. The Cricket is approved for installation with Class “A”
pipe.
Your local building Code agency or Fire Safety inspector
can refer you to a qualified professional who can inspect
your chim ney for you.
III. FREESTANDING INSTALLATION
1. Rem ove the hardware package taped to the inside of
the pedestal.
2. Position the Cricket on top of the pedestal.
3. Be sure that the holes in the brackets on the stove line
up with the notched brackets on the insides of the
pedestal.
4. Using the hardware provided (nuts, bolts, and washers),
secure the stove to the pedestal by running the bolts
through the stove bracket holes and installing washers
and nuts.
IT IS IM PORTANT THAT THE STOVE BE TIGHTLY
BOLTED TO THE PEDESTAL.
Remember to have your chimney inspected for leaks
and blockage before you install your stove.
Installation into a masonry fireplace is very similar to
installation into a factory-built fireplace.
CAUTION: Before using the Cricket, or any other
w oodstove with a 6" flue, it is critical to first determine
if the chimney is lined and that the liner is neither too
small or too large for the stove you wish to use. Either
your SIERRA woodstove dealer or a qualified chimney
sw eep should first inspect your chimney.
8
A freestanding installation m ust be installed with 6" x 24
gauge (m inim um ) stove pipe from the stove flue collar to
the thim ble of your chim ney. The crim ped end of each pipe
should be toward te stove. On horizontal pipe it should be
at least 1" higher where it enters the chim ney than on the
end toward the stove. Do not use m ore than (2) elbows
and keep the length of the pipe to a m inim um , but m aintain
the clearances to com bustibles.
See Figure 4, 5, & 6.
Jacket Installation:
An optional jacket is available for your Cricket which
reduces clearances to com bustibles to 8" from the sides
and rear of the unit.
The Cricket m ay also be installed with a UL listed
m anufactured chim ney. These norm ally attach to the flue
collar of the stove ad extend straight up through the ceiling
and the roof. Make sure all the m anufacturers
specifications are followed closely, especially when
passing through any com bustible walls, ceilings, or roof.
Norm ally, an installation using m anufacturer’s chim ney is
beyond the expertise of the do-it-yourselfer.
If you purchased this accessory, it attaches to the stove
with the following steps: (See Figure 7)
1. Slide jacket over stove.
2. Bolt jacket on with one screw on either side of unit.
3. Hook top of jacket over lip at front of stove and lay
lid back over top of stove.
9
Floor Protection
All woodstoves require floor protection when installed on a
com bustible surface. You m ust place use protector
equivalent to 3/8' asbestos m illboard covered with 24
gauge m etal. The floor protector m ust extend 16" in front of
the door side, 8" on each side and 8" in the rear of the unit
and under the chim ney connection and 2" beyond each
side. See Figure 4.
The k, C or R factor that correlates with the floor protector
m aterial used during the test if the room heater is not
provided with a floor protector. The units of m easure for k,
C and R factors shall use the sam e applicable units.
Directions and exam ples on how to use alternate m aterials
and how to calculate equivalent thickness shall be shown.
An easy m eans of determ ining if a proposed alternate floor
protector m eets requirem ents listed in the appliance
m anual is to follow this procedure:
1. Convent specifications to R-value
a. R-value is given - no conversion is needed.
b. K-factor is given with a required thickness (T) in
inches: R=1/k+T
c. C-factor is given: R=1/C
2. Determ ine the R-value of the proposed alternate floor
protector.
a. Use the form ula in step 1 to convert values not
expressed as “R”.
b. For m ultiple layers, add R-values of each layer to
determ ine the overall R-value.
3. If the overall R-value of the system is greater than the Rvalue of the specified floor protector, the alternate is
acceptable.
EXAM PLE:
The specified floor protector should be 3/4 inch thick
m aterial with a k-factor of .84.
The proposed alternate is 4" brick with a C-factor of 1.25
over 1/8" m ineral board with a k-factor of .29.
Step 1: Use form ula above to convert specification to
R-value. R=1/kT = 1/0.84 x .75 = .893
Step 2: Calculate R of proposed system .
4" brick of C - 1.25, therefore
R brick = 1/C = 1/1.25 = 0.80
1/8" m ineral board of k+ 0.29, therefore
R m in.bd. = 1/0.29 x 0.125 = 0.431
Total R = R brick + R brick + R m ineral Board
= 0.8 + 0.431 = 1.231
Step 3: Com pare the proposed system R of 1.231 to
specified R of 0.893. Since proposed system
R is greater than required, this is acceptable.
Definitions:
Note: Asbestos cannot be used. Asbestos is used as a
standard only. 3/8 inch asbestos m illboard has a “K” factor
of 0.84. The newer substitute CERAFORM board has a “K”
factor of 0.21. Your floor protector m ust have an equivalent
or better “K” factor than the above recom m endations.
10
The Cricket is a radiant heater - so m ost owners place in a
frequently used area such as a fam ily room . It is best to
select a central location on the first level of the house
where heated air can flow naturally by convection to the est
of the house. Heated air rises by natural convection to the
rest of the house, so you m ay want to install ceiling vents
or use existing ones to heat upper room s in a m ulti-level
house. For large room s with high ceilings, a ceiling fan
switched to blow upwards can help distribute the heat
evenly.
NOTE: For the first few days, the stove will give off an odor
and a small amount of smoke. This happens when the high
temperature paint is bonding to the metal. It is normal, will
stop when the paint is cured, and will reoccur every time you
repaint or touch up the paint on your stove.
1. Crumble three or four full sheets of newspaper and place
them on the firebrick floor of your Sierra stove.
2. Crisscross two layers of dry kindling on the paper. Add a
few larger splits of dry wood on top of the kindling.
W hen you have selected the location for your stove, you
m ust m ake sure that any com bustible m aterials (i.e. walls,
furniture, drapes, etc.) are not any closer than the
laboratory approved clearances shown in Figure 4.
3. Make sure the primary air control is fully open.
4. Light the paper under the kindling with a match or lighter.
Do not use gasoline, lighter fluid, charcoal starter,
kerosene or any other such fuel to start a fire in a
woodstove. You may use any type of woodstove fire
starter. See your Sierra dealer.
NEVER USE A BLACK PIPE OR ANY OTHER CHIM NEY
CONNECTOR TO PASS THROUGH A W ALL.
Do not install a stove in a closet or other sm all enclosure.
5. At higher altitudes, or when starting a fire on a very cold
chimney, it may be necessary to leave the door cracked
open to encourage a hot fire. Never leave your stove
unattended with the door unlatched! Never leave the
door cracked more than 5-10 minutes.
Do not use a flue designed for gas appliance, or “B” vent.
Always m aintain the m inim um clearances and m inim um
floor protection as shown in Figures 4 and 5. Review this
inform ation before deciding where to locate the stove and
its chim ney. NEVER place your stove closer to walls,
drapes, or furniture than the distances shown in Figure 5.
6. W hen the kindling has been consumed and larger splits
are burning well, load the stove to the level you desire,
using dry, WELL SEASONED DRY WOOD ( wet wood
does not heat well) DO NOT BURN COAL IN THIS UNIT.
7. Once your chimney and stove are warmed up and drawing
well, close the air inlets to the desired heat output. W hen
the primary air control is set at 1/4", your unit will maintain
approximately 7000 BTU output may be achieved for when
the primary air is fully opened. Reload when convenient,
but always while you still have a good bed of glowing
embers.
IV. MOBILE HOM E INSTALLATION
Your SIERRA 5300 is approved for installation into a
m obile hom e, with the addition of the outside air adapter,
Part no 405348. The outside air kit allows com bustion air
to be bought into the stove from outside of the house as
opposed to taking air from the room .
8. W hen opening the door to reload or poke the fire, crack the
door and hesitate just a few seconds before swinging it
open. All this is to prevent flashbacks which occur when a
very smoky fire suddenly is given a lot of oxygen.
For space heaters installed in m obile hom es, attach the
space heater to the structure. Install in accordance to 224
CFR, part 3280 (HUD)
The outside air adapter consists of a m etal plate with a
flange that is attached to the bottom of the stove with two
screws. The hom eowner or installer m ust attach a pipe (4"
m inim um ) from this flange through the floor of the m obile
hom e.
Be sure your electrical cord is not routed in front of or close
to the firebox.
NOTE: Every stove-chimney combination functions a little
differently. Be patient, and expect the stove to be different
in January when its cold outside, than it was in September
when it was relatively warm. Once a chimney is warmed
up, its draft is a function of how much warmer it is than the
air around it. On still mild fall evenings, stoves can appear
finicky and difficult, but the very next night, in the midst of a
fall storm, act like a completely different stove.
Installation: (See Figure 8)
1. Rem ove the two screws from the bottom of your stove.
2. Place an outside air adapter over the opening on the
bottom of the stove ad attach with the screws rem oved
in Step 1. Make sure the flange of the adapter is on the
bottom .
9. Do not use a grate with your SIERRA stove. Build the fire
directly on the firebrick. W henever the ashes get one to two
inches deep, remove them with a shovel and place them in
a metal container with a tight-fitting lid. Assume that there
are still hot coals mixed in them for at lest three days. DO
NOT place them with the garbage or in the garbage or near
anything combustible. The best idea is to leave them
outside, three feet away from the house, in a metal
container, for three days. ASK YOUR DEALER FOR THE
SIERRA ASH HOD.
Fuel and ash door must remain closed when in operation.
Fireplace stoves with doors should be operated with the
doors fully open or fully closed.
All fueling and ash removal doors must remain closed
while stove is in operation.
3. The pipe (4" alum inum dryer vent pipe) m ust be
connected to the flange, passed through the stove
pedestal and through the floor.
4. Squeeze the end of the pipe to be attached to the
outside air adapter to from an oval. Slide the form ed end
of the pipe over the flange o the adapter and secure with
two m etal screws in holes provided.
5. Make sure to add flashing to the pipe where it passes
through the floor and screen over the pipe as a guard
against birds, rodents, etc.
6. Make sure your stove is properly fastened to the floor on
all four corners.
V. OPERATING INSTRUCTIONS
11
Provisions for outside com bustion air m ay be necessary to
ensure that fuel burning appliances do no discharge
products of com bustion into the house. Guidelines to
determ ine the need for additional com bustion air m ay not
be adequate for every situation. If in doubt, it is advisable
to provide additional air.
a. Outside com bustion air m ay be required if:
1. The solid fuel fired appliance does not draw steadily,
sm oke rollout occurs, fuel burns poorly, or backdrafts occur whether or not there is com bustion
present.
2. Existing fuel fired equipm ent in the house, such as
fireplaces or other heating appliances sm ell, do no
operate properly, suffer sm oke roll-out when
opened, or back-draft whether or not there is
com bustion present.
3. Opening a window slightly on a calm (windless) day
alleviates any of the above sym ptom s.
4. The house is equipped with a well sealed vapor
barrier and tight fitting windows and/or has any
powered devices that exhaust house air.
5. There is excessive condensation on windows in
winter.
6. A ventilation system is installed in the house.
b. If these or other indications suggest that infiltration air is
inadequate, additional com bustion air should be
provided from the outdoors. Outside com bustion air can
be provided to the appliance by the following m eans.
1. Direct connection: appliances can only use direct
connection of outside com bustion air if they are
certified for the type of installation. Installations shall
com ply with the m anufacturer’s instructions.
2. Indirect m ethod: for an appliance not certified for
direct connection of outside com bustion air, the
outside air is ducted to a point no closer than (12 in)
300 m m from the appliance, to avoid affecting the
perform ance of the appliance.
3. A m echanical ventilation system : if the house has a
ventilation system (air change or heat recovery):
a. The ventilation system m ay be able to provide
sufficient com bustion m ake-up air for the solid
fuel fired appliance.
b.
The householder should be inform ed that the
ventilation system m ight need to be re-balanced
by a ventilation technician after installation of
the
appliance.
VI. STOVE AND CHIM NEY M AINTENANCE.
Creosote is one of the facts of life for wood burners. W hen
wood is burned slowly, it produces tar and other organic
vapor which com bines with expelled m oisture (even “dry”
wood contains approxim ately 20% m oisture) to form
creosote. The creosote vapors condense in the relatively
cool chim ney connectors and flue of a slow-burning fire. As
a result, creosote residue accum ulates on the flue lining.
Large am ounts of this tough, gum m y, tar-like substance
can pile up quickly and virtually choke a stove pipe. W hen
ignited, this creosote m akes an extrem ely hot and
dangerous fire.
M inimizing Creosote
1. Proper sizing of the stove to the house will help reduce
creosote problem s - too large a stove will force the
owner to burn a slow fire resulting in rapid creosote
build-up. It is recom m ended that you do not burn slow
fires for an extended period of tim e.
Be sure to exam ine the chim ney connector pipe and the
chim ney above it every few weeks so you can determ ine
the rate of creosote build up.
Any excessive build up of creosote (more than 1/4")
w ill then be apparent and must be removed for
continued safe operation.
2. Avoid slow sm oldering fires. A better way to reduce heat
output is to have a sm all but hot fire by adding sm all
am ounts of wood at m ore frequent intervals.
The chim ney m ust be inspected from the top of the
chim ney. For a thorough cleaning and inspection, your
SIERRA woodstove should be rem oved from the hearth.
3. Regularly, when loading the stove, encourage a hot, brisk
fire for 10-15 minutes. This will tend to “burn-off” any
sm all accumulations of creosote since the last hot fire.
If creosote has accum ulated, it should be rem oved to
reduce the risk of a chim ney fire. Creosote form ations can
be chipped away from flue openings with a sturdy m etal
blade such as a heavy duty scraper.
CAUTION: The acid content can cause burns to skin
and eyes, so wear protective glasses and gloves.
The chim ney itself is norm ally cleaned from the roof. Most
stove dealers carry stiff m etal brushes in sized and shapes
to fit standard flue liners. These are usually attached to
rods which can be extended for the length of the chim ney.
It is recom mended that you call a professional
chimney cleaner to do the job for you.
4. If you do have a chim ney fire, call the fire departm ent
im m ediately. Only then attem pt to control the fire. Throw
soda on the logs, close the draft regulators com pletely to
shut off air to the fire. W et down your roof and adjacent
areas to keep the fire from spreading.
5. If you m ust use green wood (and we urge you to avoid
doing so), be sure to m ix with dry logs.
Care and cleaning of woodstove Glass - The window glass
on your Sierra woodstove is designed for high tem perature
12
perform ance and will withstand norm al woodstove
tem peratures. However, like m ost glass, it will break if
struck with sufficient force, so be careful when loading
wood. You can break your glass by jam m ing a log against
it or by attem pting to push a log into eh fire with the stove
door. Never load your Sierra stove with com bustible
m aterials. Even the sm allest explosions in a sm all airtight
stove m ay blow out the glass.
Keep a Hotter Fire for Cleaner Glass - Here are nine
hints for keeping your window glass as clean as possible.
1. A hotter fire near the window keeps it clean (don’t
expect any stove window to stay perfectly clean)
2. Add a log or two frequently, avoid a sm oldering fire.
3. Move burning logs to window area, add new logs
behind.
Inspect the glass regularly for cracks or breaks. If you find
one, obtain a new glass from your dealer or SIERRA.
4. Encourage a hot burn when adding logs.
Always use the fiberglass window gasket supplied with the
replacem ent glass.
5. Use dryer wood - green wood stains glass.
CONSUM ER PROTECTION W ARRANTY
7. Or use a dam p rag to wipe window, but be sure to avoid
a steam burn.
6. To clean window when dirty, burn a hot fire.
Your Sierra Stove has a Lim ited Five-Year W arranty.
Please read it carefully, fill out the short registration form
and return it, within 30 days of purchase, to
Sierra Products, Inc., 5061 Brooks St. Ste. B
Montclair, CA 91763.
8. Keep air intakes clean for a good wash of air.
9. Stir ashes as little as possible.
By following the m anufacturer’s recom m endations your
Sierra Stove will give you years of service
Sierra Products, Inc.
5061 Brooks St., Ste B
Montclair, CA 91763
(909) 399-3355
P/N 140822 CRICKET MODEL 5300 MANUAL r1
13