1
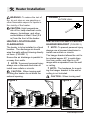
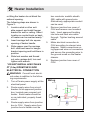
Owner’s Manual Model CUH05B31T IMPORTANT SAFETY INFORMATION: Always read this manual first before attempting to install or use this heater. For your safety, always comply with all warnings and safety instructions contained in this manual to prevent personal injury or property damage. To view the full line of Dimplex products, please visit www.dimplex.com 7208960100R03 Table of Contents Welcome & Congratulations. . . . . . . . . . . . . . . . . 3 IMPORTANT INSTRUCTIONS . . . . . . . . . . . . . . . 4 Heater Installation . . . . . . . . . . . . . . . . . . . . . . . . . 5 Operation. . . . . . . . . . . . . . . . . . . . . . . . . . . . . . . . 8 Maintenance and Cleaning. . . . . . . . . . . . . . . . . . 8 Warranty . . . . . . . . . . . . . . . . . . . . . . . . . . . . . . . . 9 Replacement Parts. . . . . . . . . . . . . . . . . . . . . . . . . 9 Always use a qualified technician or service agency to repair this heater. ! NOTE: Procedures and techniques that are considered important enough to emphasize. CAUTION: Procedures and techniques which, if not carefully followed, will result in damage to the equipment. WARNING: Procedures and techniques which, if not carefully followed, will expose the user to the risk of fire, serious injury, or death. 2 www.dimplex.com Welcome & Congratulations Thank you and congratulations for choosing to purchase an electric heater from Dimplex. Please carefully read and save these instructions. CAUTION: Read all instructions and warnings carefully before starting installation. Failure to follow these instructions may result in a possible electric shock, fire hazard and will void the warranty. Please record your model and serial numbers below for future reference. Model and serial numbers can be found on the Model and Serial Number Label of your heater. Model Number NO NEED TO RETURN TO THE STORE Questions with operation or assembly? Require Parts Information? Product Under Manufacturer’s Warranty? Contact us at: OR www.dimplex.com/customer_support For Troubleshooting and Technical Support Toll-Free 1-888-DIMPLEX (1-888-346-7539) Monday to Friday 8:00 a.m. to 4:30 p.m. EST Please have your model number and product serial number ready. (See above) 3 IMPORTANT INSTRUCTIONS When using electrical appliances, basic precautions should always be followed to reduce the risk of fire, electric shock, and injury to persons, including the following: ① Read all instructions before using this heater. ② The heater is hot when in use. To avoid burns, do not let bare skin touch hot surfaces. The trim around the heater outlet becomes hot during heater operation. Keep combustible materials, such as furniture, pillows, bedding, papers, clothes, and curtains at least 3 ft (0.9 m) from the front of the unit and keep them away from the sides and rear. ③ Extreme caution is necessary when any heater is used by or near children or invalids and whenever the heater is left operating and unattended. ④ Do not install less than 6 feet (1.9m) from the floor. ⑤ Do not operate any heater after it malfunctions. Disconnect power at the service panel and have the heater inspected by a reputable electrician before reusing. ⑥ Do not use outdoors. ⑦ Heater not intended for use in bathrooms, laundry areas and similar indoor locations. Never locate heater where it may fall into a bathtub or 4 other water container. ⑧ Connect to properly grounded power source only. ⑨ To disconnect the unit, turn the controls off, and then switch off at main power supply panel. ⑩ Do not insert or allow foreign objects to enter any ventilation or exhaust opening as this may cause an electric shock or fire, or damage to the heater. ⑪ To prevent a possible fire, do not block air intake or exhaust in any manner. ⑫ All electrical heaters have hot and arcing or sparking parts inside. Do not use in areas where gasoline, paint, or flammable liquids are used or stored. ⑬ Do not modify this heater. Use it only as described in this manual. Any other use is not recommended by the manufacturer and may cause fire, electric shock or injury to persons. ⑭ This heater includes a visual alarm (red light) to warn that parts of the heater are overheating. If the red light turns on, immediately turn heater off and inspect for any objects on or adjacent to the heater that may cause high temperatures. DO NOT OPERATE WHEN RED LIGHT IS ON. ⑮ Always use a certified electrician should new circuits or outlets be www.dimplex.com IMPORTANT INSTRUCTIONS required. ⑯ Disconnect all power supplies before performing any cleaning, maintenance or relocation of the heater. ⑰ When transporting or storing the heater, keep in a dry place, free from excessive vibration and store so as to avoid damage. SAVE THESE INSTRUCTIONS 5 Heater Installation WARNING: To reduce the risk of fire, do not store or use gasoline or other flammable vapors or liquids in the vicinity of the heater. CAUTION: High temperature, risk of fire, keep electrical cords, drapery, furnishings, and other combustibles at least 3 feet (0.9 m) from the front of the heater. HEATER LOCATION AND CLEARANCES The heater is to be installed in a fixed location. The discharge air should wipe the walls without blowing directly on them. (FIGURE 1) Ensure the air discharge is parallel to or away from walls. ! NOTE: To prevent personal injury always use a licensed electrician to install new outlets or circuits. CAUTION: When turning and/ or tilting the heater do not block the exhaust opening. Figure 2 6 FIGURE 1 OUTSIDE WALL E RG A CH S DI INSTALLATION WALL/CEILING HANGER BRACKET (FIGURE 2) ! NOTE: To prevent personal injury always use a licensed electrician to install new outlets or circuits. The hanger bracket allows the unit to be rotated approx 45° in each direction from center, and tilted in a 45° range while suspended from the wall or ceiling. ! NOTE: The hardware for mounting the hanger bracket to the wall or ceiling is not included. CAUTION: When turning and/ Figure 3 www.dimplex.com Heater Installation or tilting the heater do not block the exhaust opening. The following steps are shown in Figure 3: 1. Locate a stud or other suitable support and install hanger bracket on wall or ceiling. Select location so control knob on back of heater can be reached easily. * 2. Insert carriage bolt into square opening of heater handle. 3. Slide spacer over the carriage bolt shaft and insert in hanger bracket opening and hold them in position. 4. Slide lock washer and thread nut onto carriage bolt, turn and tighten with wrench. * DO NOT INSTALL LESS THAN 6 FT (1.9m) FROM THE FLOOR two conductor metallic sheath (BX) cable with ground wire. Alternatively, appropriate conduit can be used. 4. Remove junction box cover of CUH and remove one knockout hole. Insert approved bushing into hole and feed wire cable through. Tighten bushing around cable. 5. Make electrical connection to CUH according to relevant wire diagram. Make connections using approved wire nut connectors and secure the grounding wire to the ground screw on the heater chassis. 6. Replace junction box cover of CUH. ELECTRICAL CONNECTION W ARNING: Consult local electrical codes in addition to the following requirements: 1. Turn off main power supply at the electrical panel. 2. Route supply wires from circuit breaker to an approved junction box, located near compact unit heater. Each heater should be on an individual, properly fused circuit. 3. Route supply wires from junction box to CUH. Supply wires from junction box to heater must be Wiring L1 GROUND THERMOSTAT CYCLE OFF CUT-OUT ELEMENT R OVER TEMP. FAN DELAY M L2 7 Operation WARNING: This heater must be properly installed before it is used. Figure 4: Thermostat Control Knob Setting the Thermostat LOW 1. Before connecting or disconnecting the power, turn unit off by turning knob fully counter clockwise. (See FIGURE 4) 2. Heater is equipped with a thermostat. To adjust temperature to your individual requirements, turn thermostat control knob clockwise all the way to turn heater on. When room reaches desired temperature, turn thermostat knob counter clockwise until you hear a click. Leave in this po- HI sition to maintain room temperature at this setting. For additional heat, turn clockwise until you hear a click again and heater will turn on. To turn heater to lowest setting, turn thermostat knob counter clockwise all the way. Maintenance and Cleaning W ARNING: Disconnect power before attempting any maintenance or cleaning to reduce the risk of fire, electric shock or damage to persons. ! NOTE: This heater should not be operated with an accumulation of dust or dirt on or in the unit, as this can cause a build up of heat and eventual damage. For this reason the heater must be inspected regularly, 8 depending upon conditions and at least at yearly intervals. Allow at least 30 minutes for the heater to cool before attempting any maintenance or cleaning. To clean the exterior surface, use a solution of water and mild detergent, apply with damp sponge. Wipe dry with a dry cloth. DO NOT re-energize unit until it has dried thoroughly. www.dimplex.com Warranty Dimplex Electric Heaters are tested and inspected prior to shipment and are guaranteed free from defect to the purchaser of each new product. Any part which proves to be defective in material or workmanship under normal use within one year will be repaired or replaced without charge. The Company will not be responsible for any expense incurred for installation, removal from service, or transportation costs. Any such defect should be brought to the attention of the Dealer where the product was purchased and is authorized to repair or replace within the terms of this warranty. The Company’s only obligation under this warranty will be at its sole option to repair or replace any part proving defective or to refund the purchase price thereof. The owner/user assumes all other risks, if any, including the risk of any direct, indirect or consequential loss or damage arising out of the use of or inability to use the product. The warranty will not apply if, in the sole judgment of the Company, damage or failure has resulted from accident, alteration, misuse, abuse, incorrect installation, or operation on an incorrect power source. The foregoing is in lieu of all other warranties expressed, implied, or statutory, and the Company neither assumes, nor authorizes any person to assume for it any other obligation, or liability in connection with said product. Replacement Parts Fan Blade . . . . . . . . . . . . . . . . . . . . . . . . . . . . . . . . . . . . . . . . . 5300220100RP Motor Kit . . . . . . . . . . . . . . . . . . . . . . . . . . . . . . . . . . . . . . . . . . 2000260300RP Element . . . . . . . . . . .. . . . . . . . . . . . . . . . . . . . . . . . . . . . . . . . 2200070622RP Thermostat . . . . . . . . . . . . . . . . . . . . . . . . . . . . . . . . . . . . . . . 2600060600RP Cutout . . . . . . . . . . . . . . . . . . . . . . . . . . . . . . . . . . . . . . . . . . . 03005035RP Knob - Clear . . . . . . . . . . . . . . . . . . . . . . . . . . . . . . . . . . . . . . 8801200100RP Dimplex North America Limited 1367 Industrial Road Cambridge ON Canada N1R 7G8 © 2013 Dimplex North America Limited 9