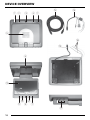
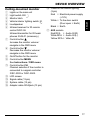
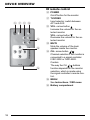
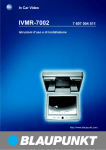
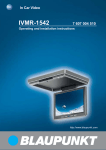
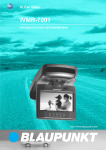
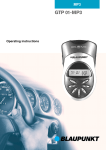
1
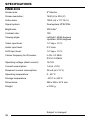
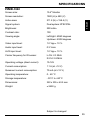
In Car Video
IVMR-9002
IVMR-1042
7 607 003 586
7 607 003 587
Operating and installation instructions
http://www.blaupunkt.com
DEVICE OVERVIEW
?
>
12
3
4 1
5
@
=
6
<
: 8
; 9 7
A
16
ENGLISH
Black = Earth
NEDERLANDS
ITALIANO
FRANÇAIS
A AUX sockets
Red RCA = Audio IN (R)
White RCA = Audio IN (L)
Yellow RCA = Video IN
SVENSKA
7 Control button
Increase the monitor volume /
navigate in the OSD menu
8 Control button
Decrease the monitor volume /
navigate in the OSD menu
9 On/off button for the monitor
: Control button MENU
See Instructions / OSD menu.
; Control button CH
Channel selection if the monitor is
connected to a signal controller
IVSC-3302 or IVSC-5502.
< LCD screen
= Signal cable (13 pin)
> System cable (13 pin)
? Adapter cable RCA/jack (13 pin)
White = To the door switch
(Door open = Earth)
ESPAÑOL
Lights on the main unit
Light switch ON
Monitor latch
Vehicle interior lighting switch
Loudspeaker
Infrared receiver for IR remote
control IVRC-06
Infrared transmitter for IR headphones IVHS-01 (accessory)
PORTUGUÊS
1
2
3
4
5
6
@ Cable for the interior lighting
(3 pin)
Red = Electrical power supply
(+12V)
DANSK
Ceiling-mounted monitor
DEUTSCH
DEVICE OVERVIEW
17
DEVICE OVERVIEW
IR remote control
D E F G
H
I
J
D POWER
On/off button for the monitor.
E TV/VIDEO
Input selector: switch between
AV1 and AUX.
F VOL • arrow button
Increase the volume for the selected monitor.
VOL • arrow button
Decrease the volume for the selected monitor.
G MUTE
Mute the volume of the loudspeaker inside the monitor.
H CH • arrow button /
Channel selection if the monitor is
connected to a signal controller
IVSC-3302 or IVSC-5502.
Caution:
The way the CH / buttons
function depends on the monitor
selection, which is made using
the signal controller’s remote control.
I MENU
See Instructions / OSD menu.
J Battery compartment
18
CONTENTS
DEUTSCH
Device overview ..................... 16
Ceiling-mounted monitor ................ 17
IR remote control ........................... 18
ENGLISH
Contents ................................. 19
Notes for the user .................. 20
Precautionary measures ................ 20
Safety notices ........................ 21
FRANÇAIS
Supplied parts ........................ 21
Installing the monitor ............. 22
Installing the monitor (mechanical) . 22
Cables .......................................... 23
ITALIANO
Operation ............................... 24
ESPAÑOL
SVENSKA
NEDERLANDS
Controlling the interior lighting
(monitor) ....................................... 24
Opening the monitor ...................... 24
Adjusting the position of the
monitor .......................................... 25
Closing the monitor ....................... 25
Switching on the monitor ............... 25
OSD menu .................................... 26
IR headphones IVHS-01
(accessory) ................................... 26
Changing the light bulb ................. 27
Changing the battery in the
remote control ............................... 27
Specifcations ......................... 28
DANSK
PORTUGUÊS
IVMR-9002 .................................... 28
IVMR-1042 .................................... 29
19
NOTES FOR THE USER
Thank you for choosing a Blaupunkt
product. We hope you enjoy using this
new piece of equipment.
Please read these operating instructions before using the equipment for
the first time.
The Blaupunkt editors are constantly
working on making the operating instructions clearer and easier to understand. However, if you still have any
questions on how to operate the device,
please contact your dealer or the telephone hotline for your country. You will
find the telephone number printed at the
back of this booklet.
We provide a manufacturer guarantee
for our products bought within the European Union. You can view the guarantee conditions at www.blaupunkt.de
or ask for them directly at:
Blaupunkt GmbH
Hotline
Robert-Bosch-Str. 200
31139 Hildesheim
Germany
We should like to point out that the right
to make a claim under the guarantee
could be forfeited if the device is
changed or modified in any way without the express authorization of the
manufacturer.
Long-term operation or storage outside
the specific temperature range can lead
to a shortening of the useful life of the
LC display.
20
Precautionary measures
Please observe all the warning notices,
precautionary measures and maintenance tips contained in these operating instructions so as to extend the life
of your monitor.
●
If you are the driver you must never
use the monitor during the journey
in order to avoid causing a road accident.
●
Do not place the monitor in the following positions:
1. Positions in which it could
restrict the driver’s view.
2. Positions in which it could
become a danger to safety
(e.g. handbrake, steering wheel,
gearshift lever and airbag).
●
Only operate the device with the
recommended voltage supply of
12 V direct current.
●
Do not attempt to open or dismantle the monitor, since you could suffer an electric shock as a result.
●
If the monitor’s housing is damaged or broken, take it to your local
specialist dealer or send it in to our
customer service centre.
●
Avoid using the monitor in environments where it is subjected to dust,
dirt or moisture.
●
Do not install the monitor in places
where it is subjected to direct sunlight or extreme temperatures.
NOTES FOR THE USER
Monitor (including mounting fixture
and screws)
- Disconnect the negative and positive terminals of the battery.
●
Remote control IVRC-06 with
battery
- When doing so, please observe the
safety notices provided by the vehicle manufacturer.
●
5 m long 13-pin system cable
(for signal controller IVSC-3302 or
IVSC-5502)
- Before drilling the holes necessary
for mounting the equipment and for
laying cables, please make sure
that concealed cables, the fuel tank
and fuel lines cannot be damaged
in the process!
●
Connection adapter (13-pin RCA/
jack)
●
Operating instructions
DEUTSCH
DANSK
PORTUGUÊS
ESPAÑOL
SVENSKA
NEDERLANDS
●
ENGLISH
Please observe the following safety
notices during installation and whilst
making the connections.
The monitor is supplied with all the parts
listed below. Please check that the
range of parts supplied with your device is complete. If one of the listed parts
is missing, please contact your dealer
immediately.
FRANÇAIS
Safety notices
Supplied parts
ITALIANO
Note
We recommend that you allow a specialist workshop to carry out the installation.
SUPPLIED PARTS
21
INSTALLING THE MONITOR
Installing the monitor
(mechanical)
Select a suitable position for secure
installation of the monitor:
●
The device must not distract the
driver or restrict the driver’s view.
●
The ability to enter and get out of
the vehicle must not be impeded.
●
The device must not be installed in
such a way that could prevent the
other vehicle components from
functioning properly (e.g. sliding
sunroof).
●
Make sure that the device is installed in a safe and secure position and that it cannot become detached in the event of an emergency stop.
●
Do not attach the device merely to
the roof liner.
●
If you need to drill additional holes,
make sure you do not drill through
the sheet metal of the vehicle’s
roof.
●
Avoid using the monitor over a
longer period of time whilst the engine is off in order to prevent the
battery from becoming discharged.
22
Screws for securing the
mounting plate
Screws for securing the
ceiling-mounted monitor
To avoid discharging the battery, we
recommend you use a switched operating voltage (ignition).
Warning notice: The operating voltage
cable must be protected with at least a
1.5 A fuse.
@
Or
Use the plug-in adapter cable ? to
connect to the 12 V supply voltage and
an external video/DVD device:
Red
= +12 V direct current
Black
= Earth
Red RCA
= Audio IN (R)
White RCA = Audio IN (L)
Yellow RCA = Video IN
Jack plug
(blue)
ITALIANO
Connect the system cable (13 pin) >
to a signal controller (IVSC-3302 or
IVSC-5502). (The voltage supply is provided by these devices. Operating instructions are supplied with the devices).
ESPAÑOL
=
Cable for the
interior lighting
(3 pin)
Monitor connection (13 pin)
PORTUGUÊS
Signal cable
(monitor housing) (13 pin)
Adapter cable
= Do not use!
(Only for special
devices)
DANSK
System cable
(13 pin)
ENGLISH
Black
= Operating voltage (+12 V)
= To the door switch
(Door open = Earth)
= Earth
NEDERLANDS
?
>
Red
White
FRANÇAIS
Interior lighting connection (3 pin)
SVENSKA
Cables
DEUTSCH
INSTALLING THE MONITOR
23
OPERATION
Controlling the interior lighting
(monitor)
Opening the monitor
➮ Pull back the monitor release latch
There are two switches for the lights:
2 and interior lighting
4.
ON
➮ To watch television, lower the mon-
ON
:
This button is used to switch the lights
on/off.
Interior lighting
24
itor until it is at an angle of approx.
90° to the monitor’s base unit.
3
:
If activated, the lights only come on
when the vehicle’s doors are opened.
2
3 to flip down the LCD display.
4
OPERATION
DEUTSCH
Adjusting the position of the
monitor
FRANÇAIS
ENGLISH
The monitor can be rotated by up to
approx. 30° to the right and left from its
central viewing position.
NEDERLANDS
ITALIANO
: 8
; 9 7
D E F G
H
ESPAÑOL
viewing position and push it into its
base unit so that it clips back into
the releasing/locking mechanism.
SVENSKA
Closing the monitor
➮ Turn the monitor back to its central
I
Switching on the monitor
J
DANSK
Note:
The button 9 lights up blue before the
monitor is switched on. This means that
the monitor is connected to the 12 V
voltage supply.
PORTUGUÊS
Press the power-on button 9 on the
main unit or the button D on the remote control to switch the monitor on/
off.
25
OPERATION
OSD menu
●
Operation
➮ Press the MENU button : on the
display or the MENU button I on
the remote control to open the
OSD menu.
●
Use the arrow buttons 7 / 8 or
I / to select the options. After
you press the MENU button : or
I you can use the arrow buttons
to change the settings.
Change the picture height/width
- FULL
- NORMAL
- WIDE
●
BRIGHTNESS:
To adjust the brightness
●
CONTRAST:
To adjust the contrast
●
COLOR:
To adjust the colour
●
TINT:
To adjust the picture shade (only
for NTSC)
●
REVOLVE:
To revolve the screen display
➮ Select the “EXIT” option to close
the OSD menu again.
SPEAKER ON
ZOOM
BRIGHTNESS
CONTRAST
COLOR
TINT
REVOLVE LEFT-RIGHT
UP-DOWN
RESET PICTURE
EXIT
●
SPEAKER ON
Switch the internal loudspeaker on/
off (same function as the MUTE
button G on the remote control).
The sound then continues to be
outputted over the IR headphones
IVHS-01 (accessory).
26
ZOOM (picture size)
only IVMR-9002:
- LEFT - RIGHT:
Mirror horizontally
- UP - DOWN:
Mirror vertically
●
RESET PICTURE:
To reset the configured parameters
to the factory default settings.
●
EXIT:
To close the OSD menu
IR headphones IVHS-01
(accessory)
The IR transmitter window 6 must not
be covered up when using the IR headphones IVHS-01 (accessory).
OPERATION
DEUTSCH
Length:
28 mm
Voltage:
12 V, 3 W
ENGLISH
Diameter: 8 mm
Changing the battery in the
remote control
➮ Push the button on the battery
compartment J to the right (see A
below).
Screws for securing the
ceiling-mounted monitor
➮ Pull the battery compartment J
out of the remote control (see B
below).
NEDERLANDS
➮ Change the 3 V battery (CR 2025).
FRANÇAIS
plate (4 screws).
Light bulb specifications
ITALIANO
Changing the light bulb
➮ Detach the monitor from the ceiling
➮ Remove the 3 screws of the metal
cover (see picture below).
A
PORTUGUÊS
ESPAÑOL
SVENSKA
➮ Take out the old bulb.
➮ Fit a new bulb (12 V, 3 W).
➮ Refit the monitor.
B
Metal cover
DANSK
J
Bulb
27
SPECIFICATIONS
IVMR-9002
Screen size:
9" Monitor
Screen resolution:
1440 (H) x 234 (V)
Active area:
198.0 (H) x 111.74 (V)
Signal system:
Dual system NTSC/PAL
Brightness:
300 cd/m2
Contrast ratio:
100
Viewing angle:
Left/right: 65/65 degrees
Up/down: 50/65 degrees
Video input level:
1.0 Vpp ± 10 %
Audio input level:
0.3 Vrms
AUX input level:
1.0 Vpp ± 10 %
Carrier frequency for IR sensor:
L-CH: 2.3 MHz
R-CH: 2.8 MHz
Operating voltage (direct current):
10-16V
Current consumption:
1 A (at +12V)
Quiescent current consumption:
35 mA (at +12 V)
Operating temperature:
0 - 60 °C
Storage temperature:
- 30°C to +80°C
Dimensions:
286 x 258 x 57.4 mm
Weight:
≤ 2150 g
Subject to changes!
28
SPECIFICATIONS
Dual system NTSC/PAL
Brightness:
290 cd/m2
Contrast ratio:
100
Viewing angle:
Left/right: 60/60 degrees
Up/down: 40/50 degrees
Video input level:
1.0 Vpp ± 10 %
Audio input level:
0.3 Vrms
AUX input level:
1.0 Vpp ± 10 %
Carrier frequency for IR sensor:
L-CH: 2.3 MHz
R-CH: 2.8 MHz
Operating voltage (direct current):
10-16V
Current consumption:
1.1 A (at +12 V)
Quiescent current consumption:
70 mA (at +12 V)
Operating temperature:
0 - 60 °C
Storage temperature:
- 30°C to +80°C
Dimensions:
322 x 305 x 63.5 mm
Weight:
≤ 2450 g
ENGLISH
Signal system:
FRANÇAIS
211.2 (H) x 158.4 (V)
ITALIANO
Active area:
NEDERLANDS
1920 (H) x 480 (V)
SVENSKA
Screen resolution:
ESPAÑOL
10.4" Monitor
DANSK
PORTUGUÊS
Screen size:
DEUTSCH
IVMR-1042
Subject to changes!
29
Service-Nummern / Service numbers / Numéros du service aprèsvente / Numeri del servizio di assistenza / Servicenummers /
Telefonnummer för service / Números de servicio / Números de
serviço / Servicenumre
Country:
Phone:
Fax:
WWW:
http://www.blaupunkt.com
Germany
(D)
0180-5000225
05121-49 4002
Austria
Belgium
Denmark
Finland
France
Great Britain
Greece
Ireland
Italy
Luxembourg
Netherlands
Norway
Portugal
Spain
Sweden
Switzerland
(A)
(B)
(DK)
(FIN)
(F)
(GB)
(GR)
(IRL)
(I)
(L)
(NL)
(N)
(P)
(E)
(S)
(CH)
01-610 390
02-525 5454
44 898 360
09-435 991
01-4010 7007
01-89583 8880
210 57 85 350
01-4149400
02-369 6331
40 4078
023-565 6348
66-817 000
01-2185 00144
902-120234
08-7501500
01-8471644
01-610 393 91
02-525 5263
44-898 644
09-435 99236
01-4010 7320
01-89583 8394
210 57 69 473
01-4598830
02-369 6464
40 2085
023-565 6331
66-817 157
01-2185 11111
916-467952
08-7501810
01-8471650
Czech. Rep.
Hungary
Poland
(CZ)
(H)
(PL)
02-6130 0441
01-333 9575
0800-118922
02-6130 0514
01-324 8756
022-8771260
Turkey
(TR)
0212-3350677
0212-3460040
USA
(USA) 800-2662528
Brasil
(Mercosur)
(BR)
708-6817188
+55-19 3745 2769 +55-19 3745 2773
Malaysia
(Asia Pacific) (MAL) +604-6382 474
+604-6413 640
Blaupunkt GmbH
01/04
CM/PSS2 - 8 622 403 936