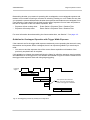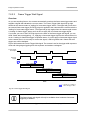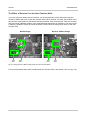
1
Basler ace USER’S MANUAL FOR CAMERA LINK CAMERAS Document Number: AW000985 Version: 04 Language: 000 (English) Release Date: 7 February 2013 The information relating to acA NIR cameras describes the cameras in their prototype stage. For customers in the U.S.A. This equipment has been tested and found to comply with the limits for a Class A digital device, pursuant to Part 15 of the FCC Rules. These limits are designed to provide reasonable protection against harmful interference when the equipment is operated in a commercial environment. This equipment generates, uses, and can radiate radio frequency energy and, if not installed and used in accordance with the instruction manual, may cause harmful interference to radio communications. Operation of this equipment in a residential area is likely to cause harmful interference in which case the user will be required to correct the interference at his own expense. You are cautioned that any changes or modifications not expressly approved in this manual could void your authority to operate this equipment. The shielded interface cable recommended in this manual must be used with this equipment in order to comply with the limits for a computing device pursuant to Subpart J of Part 15 of FCC Rules. For customers in Canada This apparatus complies with the Class A limits for radio noise emissions set out in Radio Interference Regulations. Pour utilisateurs au Canada Cet appareil est conforme aux normes Classe A pour bruits radioélectriques, spécifiées dans le Règlement sur le brouillage radioélectrique. Life Support Applications These products are not designed for use in life support appliances, devices, or systems where malfunction of these products can reasonably be expected to result in personal injury. Basler customers using or selling these products for use in such applications do so at their own risk and agree to fully indemnify Basler for any damages resulting from such improper use or sale. Warranty Note Do not open the housing of the camera. The warranty becomes void if the housing is opened. All material in this publication is subject to change without notice and is copyright Basler AG. Contacting Basler Support Worldwide Europe: Basler AG An der Strusbek 60 - 62 22926 Ahrensburg Germany Tel.: +49-4102-463-515 Fax.: +49-4102-463-599 [email protected] Americas: Basler, Inc. 855 Springdale Drive, Suite 203 Exton, PA 19341 U.S.A. Tel.: +1-610-280-0171 Fax.: +1-610-280-7608 [email protected] Asia: Basler Asia Pte. Ltd. 8 Boon Lay Way # 03 - 03 Tradehub 21 Singapore 609964 Tel.: +65-6425-0472 Fax.: +65-6425-0473 [email protected] www.baslerweb.com AW00098504000 Table of Contents Table of Contents 1 Specifications, Requirements, and Precautions . . . . . . . . . . . . . . . . . . . . . . . 1 1.1 Models . . . . . . . . . . . . . . . . . . . . . . . . . . . . . . . . . . . . . . . . . . . . . . . . . . . . . . . . . . . . . . 1 1.2 General Specifications . . . . . . . . . . . . . . . . . . . . . . . . . . . . . . . . . . . . . . . . . . . . . . . . . . 2 1.3 Spectral Response . . . . . . . . . . . . . . . . . . . . . . . . . . . . . . . . . . . . . . . . . . . . . . . . . . . . . 4 1.3.1 Monochrome Cameras. . . . . . . . . . . . . . . . . . . . . . . . . . . . . . . . . . . . . . . . . . . . 4 1.3.2 Color Cameras . . . . . . . . . . . . . . . . . . . . . . . . . . . . . . . . . . . . . . . . . . . . . . . . . . 6 1.4 Mechanical Specifications . . . . . . . . . . . . . . . . . . . . . . . . . . . . . . . . . . . . . . . . . . . . . . . 7 1.4.1 Camera Dimensions and Mounting Points. . . . . . . . . . . . . . . . . . . . . . . . . . . . . 7 1.4.2 Maximum Allowed Lens Thread Length. . . . . . . . . . . . . . . . . . . . . . . . . . . . . . . 8 1.5 Software Licensing Information . . . . . . . . . . . . . . . . . . . . . . . . . . . . . . . . . . . . . . . . . . . 9 1.5.1 LZ4 Licensing. . . . . . . . . . . . . . . . . . . . . . . . . . . . . . . . . . . . . . . . . . . . . . . . . . . 9 1.6 Avoiding EMI and ESD Problems . . . . . . . . . . . . . . . . . . . . . . . . . . . . . . . . . . . . . . . . . 10 1.7 Environmental Requirements . . . . . . . . . . . . . . . . . . . . . . . . . . . . . . . . . . . . . . . . . . . . 11 1.7.1 Temperature and Humidity. . . . . . . . . . . . . . . . . . . . . . . . . . . . . . . . . . . . . . . . 11 1.7.2 Heat Dissipation . . . . . . . . . . . . . . . . . . . . . . . . . . . . . . . . . . . . . . . . . . . . . . . . 11 1.8 Precautions. . . . . . . . . . . . . . . . . . . . . . . . . . . . . . . . . . . . . . . . . . . . . . . . . . . . . . . . . . 12 2 Installation . . . . . . . . . . . . . . . . . . . . . . . . . . . . . . . . . . . . . . . . . . . . . . . . . . . . . 17 3 Camera Drivers and Tools for Changing Camera Parameters . . . . . . . . . . . 19 3.1 The Pylon Driver Package . . . . . . . . . . . . . . . . . . . . . . . . . . . . . . . . . . . . . . . . . . . . . . 19 3.1.1 The pylon Viewer . . . . . . . . . . . . . . . . . . . . . . . . . . . . . . . . . . . . . . . . . . . . . . . 20 3.1.2 The pylon API. . . . . . . . . . . . . . . . . . . . . . . . . . . . . . . . . . . . . . . . . . . . . . . . . . 20 3.2 The Basler Binary Protocol Library . . . . . . . . . . . . . . . . . . . . . . . . . . . . . . . . . . . . . . . . 21 4 Camera Functional Description. . . . . . . . . . . . . . . . . . . . . . . . . . . . . . . . . . . . 23 4.1 Overview. . . . . . . . . . . . . . . . . . . . . . . . . . . . . . . . . . . . . . . . . . . . . . . . . . . . . . . . . . . . 23 5 Physical Interface . . . . . . . . . . . . . . . . . . . . . . . . . . . . . . . . . . . . . . . . . . . . . . . 25 5.1 General Description of the Camera Connections . . . . . . . . . . . . . . . . . . . . . . . . . . . . . 25 5.2 Camera Connector Pin Assignments and Numbering . . . . . . . . . . . . . . . . . . . . . . . 26 5.2.1 4-Pin Receptacle . . . . . . . . . . . . . . . . . . . . . . . . . . . . . . . . . . . . . . . . . . . . . . . 26 5.2.2 26-Pin SDR Connectors. . . . . . . . . . . . . . . . . . . . . . . . . . . . . . . . . . . . . . . . . . 27 5.3 Camera Connector Types . . . . . . . . . . . . . . . . . . . . . . . . . . . . . . . . . . . . . . . . . . . . . . 29 5.3.1 4-Pin Receptacle . . . . . . . . . . . . . . . . . . . . . . . . . . . . . . . . . . . . . . . . . . . . . . . 29 5.3.2 26-Pin SDR Connectors. . . . . . . . . . . . . . . . . . . . . . . . . . . . . . . . . . . . . . . . . . 29 5.4 Cabling Requirements . . . . . . . . . . . . . . . . . . . . . . . . . . . . . . . . . . . . . . . . . . . . . . . . . 5.4.1 Camera Link Cables. . . . . . . . . . . . . . . . . . . . . . . . . . . . . . . . . . . . . . . . . . . . . 5.4.2 Standard Power and I/O Cable . . . . . . . . . . . . . . . . . . . . . . . . . . . . . . . . . . . . 5.4.3 PLC Power and I/O Cable . . . . . . . . . . . . . . . . . . . . . . . . . . . . . . . . . . . . . . . . 5.5 Camera Power . . . . . . . . . . . . . . . . . . . . . . . . . . . . . . . . . . . . . . . . . . . . . . . . . . . . . . . 32 5.5.1 Supplying Power Over Camera Link . . . . . . . . . . . . . . . . . . . . . . . . . . . . . . . . 32 5.5.2 Supplying Power Via the 4-Pin M5 Connector . . . . . . . . . . . . . . . . . . . . . . . . . 33 Basler ace Camera Link 30 30 30 31 i Table of Contents AW00098504000 5.6 LED Indicator . . . . . . . . . . . . . . . . . . . . . . . . . . . . . . . . . . . . . . . . . . . . . . . . . . . . . . . . 34 5.7 General Purpose I/O (GPIO) . . . . . . . . . . . . . . . . . . . . . . . . . . . . . . . . . . . . . . . . . . . . 5.7.1 Introduction . . . . . . . . . . . . . . . . . . . . . . . . . . . . . . . . . . . . . . . . . . . . . . . . . . . 5.7.2 Operation as an Input . . . . . . . . . . . . . . . . . . . . . . . . . . . . . . . . . . . . . . . . . . . 5.7.2.1 Voltage Requirements. . . . . . . . . . . . . . . . . . . . . . . . . . . . . . . . . . . 5.7.2.2 Electrical Characteristics . . . . . . . . . . . . . . . . . . . . . . . . . . . . . . . . . 5.7.2.3 Response Time . . . . . . . . . . . . . . . . . . . . . . . . . . . . . . . . . . . . . . . . 5.7.3 Selecting the Input as the Source Signal for a Camera Function . . . . . . . . . . 5.7.4 Operation as an Output . . . . . . . . . . . . . . . . . . . . . . . . . . . . . . . . . . . . . . . . . . 5.7.4.1 Voltage Requirements. . . . . . . . . . . . . . . . . . . . . . . . . . . . . . . . . . . 5.7.4.2 Electrical Characteristics . . . . . . . . . . . . . . . . . . . . . . . . . . . . . . . . . 5.7.4.3 Response Time . . . . . . . . . . . . . . . . . . . . . . . . . . . . . . . . . . . . . . . . 5.7.4.4 Selecting a Source Signal for the Output Line . . . . . . . . . . . . . . . . 5.8 I/O in the Camera Link Interface. . . . . . . . . . . . . . . . . . . . . . . . . . . . . . . . . . . . . . . . . . 46 5.8.1 Inputs . . . . . . . . . . . . . . . . . . . . . . . . . . . . . . . . . . . . . . . . . . . . . . . . . . . . . . . . 46 5.8.2 Outputs . . . . . . . . . . . . . . . . . . . . . . . . . . . . . . . . . . . . . . . . . . . . . . . . . . . . . . 46 35 35 35 35 37 39 40 41 41 41 44 45 6 I/O Control . . . . . . . . . . . . . . . . . . . . . . . . . . . . . . . . . . . . . . . . . . . . . . . . . . . . . 49 6.1 Input Lines . . . . . . . . . . . . . . . . . . . . . . . . . . . . . . . . . . . . . . . . . . . . . . . . . . . . . . . . . . 6.1.1 Available Input Lines . . . . . . . . . . . . . . . . . . . . . . . . . . . . . . . . . . . . . . . . . . . . 6.1.2 Setting the GPIO Line to Operate as an Input . . . . . . . . . . . . . . . . . . . . . . . . . 6.1.3 Selecting an Input Line as the Source Signal for a Camera Function . . . . . . . 6.1.4 Input Line Debouncer. . . . . . . . . . . . . . . . . . . . . . . . . . . . . . . . . . . . . . . . . . . . 6.1.5 Setting an Input Line for Invert. . . . . . . . . . . . . . . . . . . . . . . . . . . . . . . . . . . . . 49 49 49 50 51 53 6.2 Output Lines . . . . . . . . . . . . . . . . . . . . . . . . . . . . . . . . . . . . . . . . . . . . . . . . . . . . . . . . . 6.2.1 Available Output Lines . . . . . . . . . . . . . . . . . . . . . . . . . . . . . . . . . . . . . . . . . . . 6.2.2 Setting the GPIO Line to Operate as an Output . . . . . . . . . . . . . . . . . . . . . . . 6.2.3 Selecting the Source Signal for an Output Line . . . . . . . . . . . . . . . . . . . . . . . . 6.2.4 Setting the State of a User Settable Output Line . . . . . . . . . . . . . . . . . . . . . . . 6.2.5 Setting an Output Line for Invert . . . . . . . . . . . . . . . . . . . . . . . . . . . . . . . . . . . 54 54 54 55 57 59 6.3 Checking the State of the I/O Lines . . . . . . . . . . . . . . . . . . . . . . . . . . . . . . . . . . . . . . . 61 6.3.1 Checking the State of a Single Line. . . . . . . . . . . . . . . . . . . . . . . . . . . . . . . . . 61 6.3.2 Checking the State of All Lines . . . . . . . . . . . . . . . . . . . . . . . . . . . . . . . . . . . . 62 6.4 Checking the Line Logic . . . . . . . . . . . . . . . . . . . . . . . . . . . . . . . . . . . . . . . . . . . . . . . . 63 7 Image Acquisition Control . . . . . . . . . . . . . . . . . . . . . . . . . . . . . . . . . . . . . . . . 65 ii 7.1 Overview. . . . . . . . . . . . . . . . . . . . . . . . . . . . . . . . . . . . . . . . . . . . . . . . . . . . . . . . . . . . 65 7.2 The Acquisition Start Trigger . . . . . . . . . . . . . . . . . . . . . . . . . . . . . . . . . . . . . . . . . . . . 7.2.1 Acquisition Start Trigger Mode. . . . . . . . . . . . . . . . . . . . . . . . . . . . . . . . . . . . . 7.2.1.1 Acquisition Start Trigger Mode = Off . . . . . . . . . . . . . . . . . . . . . . . . 7.2.1.2 Acquisition Start Trigger Mode = On . . . . . . . . . . . . . . . . . . . . . . . . 7.2.2 Acquisition Frame Count . . . . . . . . . . . . . . . . . . . . . . . . . . . . . . . . . . . . . . . . . 7.2.3 Setting The Acquisition Start Trigger Mode and Related Parameters . . . . . . . 69 69 69 69 71 71 Basler ace Camera Link AW00098504000 7.2.4 7.2.5 7.3 Table of Contents Using a Software Acquisition Start Trigger Signal . . . . . . . . . . . . . . . . . . . . . . 7.2.4.1 Introduction . . . . . . . . . . . . . . . . . . . . . . . . . . . . . . . . . . . . . . . . . . . 7.2.4.2 Setting the Parameters Related to Software Acquisition Start Triggering and Applying a Software Trigger Signal . . . . . . . . . . . . . Using a Hardware Acquisition Start Trigger Signal . . . . . . . . . . . . . . . . . . . . . 7.2.5.1 Introduction . . . . . . . . . . . . . . . . . . . . . . . . . . . . . . . . . . . . . . . . . . . 7.2.5.2 Acquisition Start Trigger Delay . . . . . . . . . . . . . . . . . . . . . . . . . . . . 7.2.5.3 Setting the Parameters Related to Hardware Acquisition Start Triggering and Applying a Hardware Trigger Signal . . . . . . . . . . . . The Frame Start Trigger . . . . . . . . . . . . . . . . . . . . . . . . . . . . . . . . . . . . . . . . . . . . . . . . 7.3.1 Frame Start Trigger Mode . . . . . . . . . . . . . . . . . . . . . . . . . . . . . . . . . . . . . . . . 7.3.1.1 Frame Start Trigger Mode = Off . . . . . . . . . . . . . . . . . . . . . . . . . . . 7.3.1.2 Frame Start Trigger Mode = On . . . . . . . . . . . . . . . . . . . . . . . . . . . 7.3.1.3 Setting the Frame Start Trigger Mode and Related Parameters . . . 7.3.2 Using a Software Frame Start Trigger Signal . . . . . . . . . . . . . . . . . . . . . . . . . 7.3.2.1 Introduction . . . . . . . . . . . . . . . . . . . . . . . . . . . . . . . . . . . . . . . . . . . 7.3.2.2 Setting the Parameters Related to Software Frame Start Triggering and Applying a Software Trigger Signal . . . . . . . . . . . . . 7.3.3 Using a Hardware Frame Start Trigger Signal . . . . . . . . . . . . . . . . . . . . . . . . . 7.3.3.1 Introduction . . . . . . . . . . . . . . . . . . . . . . . . . . . . . . . . . . . . . . . . . . . 7.3.3.2 Exposure Modes . . . . . . . . . . . . . . . . . . . . . . . . . . . . . . . . . . . . . . . 7.3.3.3 Frame Start Trigger Delay . . . . . . . . . . . . . . . . . . . . . . . . . . . . . . . . 7.3.3.4 Setting the Parameters Related to Hardware Frame Start Triggering and Applying a Hardware Trigger Signal . . . . . . . . . . . . 73 73 73 75 75 75 76 78 78 78 79 81 83 83 84 86 86 87 90 91 7.4 Setting the Exposure Time . . . . . . . . . . . . . . . . . . . . . . . . . . . . . . . . . . . . . . . . . . . . . . 94 7.5 Overlapping Exposure with Sensor Readout . . . . . . . . . . . . . . . . . . . . . . . . . . . . . . . . 96 7.6 Acquisition Monitoring Tools. . . . . . . . . . . . . . . . . . . . . . . . . . . . . . . . . . . . . . . . . . . . . 99 7.6.1 Acquisition Status Indicator . . . . . . . . . . . . . . . . . . . . . . . . . . . . . . . . . . . . . . . 99 7.6.2 Trigger Wait Signals. . . . . . . . . . . . . . . . . . . . . . . . . . . . . . . . . . . . . . . . . . . . 101 7.6.2.1 Acquisition Trigger Wait Signal . . . . . . . . . . . . . . . . . . . . . . . . . . . 101 7.6.2.2 Frame Trigger Wait Signal. . . . . . . . . . . . . . . . . . . . . . . . . . . . . . . 104 7.6.3 Exposure Active Signal . . . . . . . . . . . . . . . . . . . . . . . . . . . . . . . . . . . . . . . . . 109 7.6.4 Frame Cycle Signal . . . . . . . . . . . . . . . . . . . . . . . . . . . . . . . . . . . . . . . . . . . . 112 7.7 Acquisition Timing Chart. . . . . . . . . . . . . . . . . . . . . . . . . . . . . . . . . . . . . . . . . . . . . . . 115 7.8 Maximum Allowed Frame Acquisition Rate . . . . . . . . . . . . . . . . . . . . . . . . . . . . . . . . 117 7.8.1 Increasing the Maximum Allowed Frame Rate . . . . . . . . . . . . . . . . . . . . . . . 119 7.9 Use Case Descriptions and Diagrams . . . . . . . . . . . . . . . . . . . . . . . . . . . . . . . . . . . . 121 8 Color Creation and Enhancement . . . . . . . . . . . . . . . . . . . . . . . . . . . . . . . . . 129 8.1 Color Creation. . . . . . . . . . . . . . . . . . . . . . . . . . . . . . . . . . . . . . . . . . . . . . . . . . . . . . . 129 8.1.1 Bayer Color Filter Alignment . . . . . . . . . . . . . . . . . . . . . . . . . . . . . . . . . . . . . 130 8.1.2 Pixel Data Formats Available on Color Cameras. . . . . . . . . . . . . . . . . . . . . . 130 8.2 Integrated IR Cut Filter (All Color Models) . . . . . . . . . . . . . . . . . . . . . . . . . . . . . . . . . 131 Basler ace Camera Link iii Table of Contents 8.3 AW00098504000 Color Enhancement Features. . . . . . . . . . . . . . . . . . . . . . . . . . . . . . . . . . . . . . . . . . . 8.3.1 White Balance . . . . . . . . . . . . . . . . . . . . . . . . . . . . . . . . . . . . . . . . . . . . . . . . 8.3.2 Gamma Correction. . . . . . . . . . . . . . . . . . . . . . . . . . . . . . . . . . . . . . . . . . . . . 8.3.3 Matrix Color Transformation . . . . . . . . . . . . . . . . . . . . . . . . . . . . . . . . . . . . . 8.3.3.1 "Custom" Light Source Setting . . . . . . . . . . . . . . . . . . . . . . . . . . . 132 132 133 136 138 9 Sensor Bit Depth, Pixel Formats, Tap Geometries, and Clock Speeds . . . 141 9.1 Sensor Bit Depth . . . . . . . . . . . . . . . . . . . . . . . . . . . . . . . . . . . . . . . . . . . . . . . . . . . . 142 9.2 Pixel Formats . . . . . . . . . . . . . . . . . . . . . . . . . . . . . . . . . . . . . . . . . . . . . . . . . . . . . . . 143 9.3 Camera Link Tap Geometry . . . . . . . . . . . . . . . . . . . . . . . . . . . . . . . . . . . . . . . . . . . . 9.3.1 Overview . . . . . . . . . . . . . . . . . . . . . . . . . . . . . . . . . . . . . . . . . . . . . . . . . . . . 9.3.2 1X2-1Y Tap Geometry Description . . . . . . . . . . . . . . . . . . . . . . . . . . . . . . . . 9.3.3 1X3-1Y Tap Geometry Description . . . . . . . . . . . . . . . . . . . . . . . . . . . . . . . . 9.3.4 1X4-1Y Tap Geometry Description . . . . . . . . . . . . . . . . . . . . . . . . . . . . . . . . 9.3.5 1X6-1Y Tap Geometry Description . . . . . . . . . . . . . . . . . . . . . . . . . . . . . . . . 9.3.6 1X8-1Y Tap Geometry Description . . . . . . . . . . . . . . . . . . . . . . . . . . . . . . . . 9.3.7 1X10⁻¹Y Tap Geometry Description . . . . . . . . . . . . . . . . . . . . . . . . . . . . . . . 9.3.8 Setting the Tap Geometry . . . . . . . . . . . . . . . . . . . . . . . . . . . . . . . . . . . . . . . 9.4 Camera Link Pixel Clock Speed . . . . . . . . . . . . . . . . . . . . . . . . . . . . . . . . . . . . . . . . . 155 146 146 148 149 150 151 152 153 154 10 Features . . . . . . . . . . . . . . . . . . . . . . . . . . . . . . . . . . . . . . . . . . . . . . . . . . . . . 157 10.1 Gain . . . . . . . . . . . . . . . . . . . . . . . . . . . . . . . . . . . . . . . . . . . . . . . . . . . . . . . . . . . . . . 157 10.2 Black Level . . . . . . . . . . . . . . . . . . . . . . . . . . . . . . . . . . . . . . . . . . . . . . . . . . . . . . . . . 159 10.3 Image Area of Interest (AOI) . . . . . . . . . . . . . . . . . . . . . . . . . . . . . . . . . . . . . . . . . . . 160 10.3.1 Setting the Image AOI . . . . . . . . . . . . . . . . . . . . . . . . . . . . . . . . . . . . . . . . . . 161 10.4 Stacked Zone Imaging . . . . . . . . . . . . . . . . . . . . . . . . . . . . . . . . . . . . . . . . . . . . . . . . 164 10.4.1 Setting Stacked Zone Imaging. . . . . . . . . . . . . . . . . . . . . . . . . . . . . . . . . . . . 167 10.5 Sequencer . . . . . . . . . . . . . . . . . . . . . . . . . . . . . . . . . . . . . . . . . . . . . . . . . . . . . . . . . 170 10.6 Binning . . . . . . . . . . . . . . . . . . . . . . . . . . . . . . . . . . . . . . . . . . . . . . . . . . . . . . . . . . . . 176 10.6.1 Considerations When Using Binning . . . . . . . . . . . . . . . . . . . . . . . . . . . . . . . 178 10.7 Mirror Imaging . . . . . . . . . . . . . . . . . . . . . . . . . . . . . . . . . . . . . . . . . . . . . . . . . . . . . . 10.7.1 Reverse X . . . . . . . . . . . . . . . . . . . . . . . . . . . . . . . . . . . . . . . . . . . . . . . . . . . 10.7.2 Reverse Y . . . . . . . . . . . . . . . . . . . . . . . . . . . . . . . . . . . . . . . . . . . . . . . . . . . 10.7.3 Enabling Reverse X and Reverse Y . . . . . . . . . . . . . . . . . . . . . . . . . . . . . . . 179 179 181 183 10.8 Luminance Lookup Table . . . . . . . . . . . . . . . . . . . . . . . . . . . . . . . . . . . . . . . . . . . . . . 184 10.8.1 Entering LUT Values and Enabling the LUT . . . . . . . . . . . . . . . . . . . . . . . . . 187 10.9 Auto Functions . . . . . . . . . . . . . . . . . . . . . . . . . . . . . . . . . . . . . . . . . . . . . . . . . . . . . . 10.9.1 Auto Function Operating Modes . . . . . . . . . . . . . . . . . . . . . . . . . . . . . . . . . . 10.9.2 Auto Function AOIs . . . . . . . . . . . . . . . . . . . . . . . . . . . . . . . . . . . . . . . . . . . . 10.9.2.1 Assignment of an Auto Function to an Auto Function AOI . . . . . . 10.9.2.2 Relative Positioning of an Auto Function AOI . . . . . . . . . . . . . . . . 10.9.2.3 Setting an Auto Function AOI Position and Size . . . . . . . . . . . . . . 10.9.3 Using an Auto Function . . . . . . . . . . . . . . . . . . . . . . . . . . . . . . . . . . . . . . . . . 10.9.4 Gain Auto . . . . . . . . . . . . . . . . . . . . . . . . . . . . . . . . . . . . . . . . . . . . . . . . . . . . 10.9.5 Exposure Auto . . . . . . . . . . . . . . . . . . . . . . . . . . . . . . . . . . . . . . . . . . . . . . . . iv 189 190 191 192 194 196 198 199 202 Basler ace Camera Link AW00098504000 Table of Contents 10.9.6 Auto Function Profile . . . . . . . . . . . . . . . . . . . . . . . . . . . . . . . . . . . . . . . . . . . 205 10.9.7 Balance White Auto . . . . . . . . . . . . . . . . . . . . . . . . . . . . . . . . . . . . . . . . . . . . 206 10.10 Error Detection . . . . . . . . . . . . . . . . . . . . . . . . . . . . . . . . . . . . . . . . . . . . . . . . . . . . . . 208 10.10.1 LED Indicator . . . . . . . . . . . . . . . . . . . . . . . . . . . . . . . . . . . . . . . . . . . . . . . . . 208 10.10.2 Error Codes . . . . . . . . . . . . . . . . . . . . . . . . . . . . . . . . . . . . . . . . . . . . . . . . . . 209 10.11 Test Images . . . . . . . . . . . . . . . . . . . . . . . . . . . . . . . . . . . . . . . . . . . . . . . . . . . . . . . . 211 10.11.1 Test Image Descriptions . . . . . . . . . . . . . . . . . . . . . . . . . . . . . . . . . . . . . . . . 212 10.12 Device Information Parameters . . . . . . . . . . . . . . . . . . . . . . . . . . . . . . . . . . . . . . . . . 214 10.13 User Defined Values. . . . . . . . . . . . . . . . . . . . . . . . . . . . . . . . . . . . . . . . . . . . . . . . . . 216 10.14 Configuration Sets . . . . . . . . . . . . . . . . . . . . . . . . . . . . . . . . . . . . . . . . . . . . . . . . . . . 10.14.1 Selecting a Factory Setup as the Default Set . . . . . . . . . . . . . . . . . . . . . . . . 10.14.2 Saving User Sets . . . . . . . . . . . . . . . . . . . . . . . . . . . . . . . . . . . . . . . . . . . . . . 10.14.3 Loading a Saved User Set or the Default Set into the Active Set . . . . . . . . . 10.14.4 Selecting a "Startup" Set . . . . . . . . . . . . . . . . . . . . . . . . . . . . . . . . . . . . . . . . 217 219 220 221 223 11 Technical Support. . . . . . . . . . . . . . . . . . . . . . . . . . . . . . . . . . . . . . . . . . . . . . 225 11.1 Technical Support Resources. . . . . . . . . . . . . . . . . . . . . . . . . . . . . . . . . . . . . . . . . . . 225 11.2 Obtaining an RMA Number. . . . . . . . . . . . . . . . . . . . . . . . . . . . . . . . . . . . . . . . . . . . . 225 11.3 Before Contacting Basler Technical Support . . . . . . . . . . . . . . . . . . . . . . . . . . . . . . . 226 Revision History . . . . . . . . . . . . . . . . . . . . . . . . . . . . . . . . . . . . . . . . . . . . . . . . . . . . . . . . . . 229 Index. . . . . . . . . . . . . . . . . . . . . . . . . . . . . . . . . . . . . . . . . . . . . . . . . . . . . . . . . . . . . . . . . . . . . 231 Basler ace Camera Link v Table of Contents vi AW00098504000 Basler ace Camera Link AW00098504000 Specifications, Requirements, and Precautions 1 Specifications, Requirements, and Precautions This chapter lists the camera models covered by the manual. It provides the general specifications for those models and the basic requirements for using them. This chapter also includes specific precautions that you should keep in mind when using the cameras. We strongly recommend that you read and follow the precautions. 1.1 Models The current Basler ace Camera Link® camera models are listed in the top row of the specification table on the next page of this manual. The camera models are differentiated by the sensor size and whether the camera’s sensor is mono or color. Unless otherwise noted, the material in this manual applies to all of the camera models listed in the specification table. Material that only applies to a particular camera model or to a subset of models, such as to color cameras only, will be so designated. Basler ace Camera Link 1 Specifications, Requirements, and Precautions 1.2 AW00098504000 General Specifications Specification acA2000-340km acA2000-340kmNIR acA2000-340kc Sensor Resolution ( H x V pixels) 2048 x 1088 2048 x 1088 2046 x 1086 Sensor Type CMOSIS CMV 2000 Progressive scan CMOS CMOSIS CMV2000--2E12M Progressive scan CMOS CMOSIS CMV 2000 Progressive scan CMOS Optical Size 2/3" Pixel Size 5.5 µm x 5.5 µm Max Frame Rate (at full resolution and 10 bit sensor depth) 340 fps Mono/Color Mono Mono (NIR) Color Sensor Bit Depth 12 bits or 10 bits (selectable) Data Output Type Camera Link base or medium, or full configuration Camera Link Connectors Two 26-pin SDR connectors (also known as Mini Camera Link connectors) Camera Link Clock Speed 32.5 MHz, 48 MHz, 65 Mhz, or 82 MHz (selectable) Camera Link Tap Geometry 1X2-1Y, 1X3-1Y, 1X4-1Y, 1X6-1Y, 1X8-1Y or 1X10⁻¹Y Pixel Data Formats Mono 8, Mono10, or Mono 12 Synchronization Via external trigger signal, software trigger signal, or free run Exposure Control Trigger width or timed Power Requirements PoCL (Power over Camera Link compliant) Bayer GB 8, Bayer GB 10, or Bayer GB 12 or +12 VDC (± 10%), < 1% ripple, supplied via the camera’s 4-pin connector Max Power Consumption 3.0 W @ 12 VDC I/O Lines 1 GPIO (can be set to operate as an input or an output) Lens Adapter C-mount Size 43.5 mm x 29.0 mm x 29.0 mm (without lens adapter or connectors) (L x W x H) 58.9 mm x 29.0 mm x 29.0 mm (with lens adapter and connectors) Weight < 90 g (typical) Conformity CE, FCC, GenICam, RoHS, Camera Link, IP30 Driver Basler pylon (release 2.3 or newer) API for Configuration Register-based API for C or VB6 Basler pylon C++ API Table 1: General Specifications 2 Basler ace Camera Link AW00098504000 Specifications, Requirements, and Precautions Specification acA2040-180km acA2040-180kmNIR aca2040-180kc Sensor Resolution ( H x V pixels) 2048 x 2048 Sensor Type CMOSIS CMV 4000 Progressive scan CMOS Optical Size 1" Pixel Size 5.5 µm x 5.5 µm Max Frame Rate (at full resolution and 10 bit sensor depth) 180 fps Mono/Color Mono Sensor Bit Depth 12 bits or 10 bits (selectable) Data Output Type Camera Link base or medium configuration Camera Link Connectors Two 26-pin SDR connectors (also known as Mini Camera Link connectors) Camera Link Clock Speed 32.5 MHz, 48 MHz, 65 Mhz, or 82 MHz (selectable) Camera Link Tap Geometry 1X2-1Y, 1X3-1Y, 1X4-1Y, 1X6-1Y, 1X8-1Y or 1X10⁻¹Y Pixel Data Formats Mono 8, Mono10, or Mono 12 Synchronization Via external trigger signal, software trigger signal, or free run Exposure Control Trigger width or timed Power Requirements PoCL (Power over Camera Link compliant) 2046 x 2046 CMOSIS CMV4000--2E12M Progressive scan CMOS CMOSIS CMV 4000 Progressive scan CMOS Mono (NIR) Color Bayer GB 12, Bayer GB 10, or Bayer GB 8 or +12 VDC (± 10%), < 1% ripple, supplied via the camera’s 4-pin connector Max Power Consumption 3.0 W @ 12 VDC I/O Lines 1 GPIO (can be set to operate as an input or an output) Lens Adapter C-mount Size 43.5 mm x 29.0 mm x 29.0 mm (without lens adapter or connectors) (L x W x H) 58.9 mm x 29.0 mm x 29.0 mm (with lens adapter and connectors) Weight < 90 g (typical) Conformity CE, FCC, GenICam, RoHS, Camera Link, IP30 Driver Basler pylon (release 2.3 or newer) API for Configuration Register-based API for C or VB6 Basler pylon C++ API Table 2: General Specifications Basler ace Camera Link 3 Specifications, Requirements, and Precautions 1.3 Spectral Response 1.3.1 Monochrome Cameras AW00098504000 The following graphs show the spectral response for each available monochrome camera model. The spectral response curve excludes lens characteristics and light source characteristics. 70 Quantum Efficiency 60 50 40 30 20 10 0 Wave Length (nm) Fig. 1: acA2000-340km, acA2040-180km Spectral Response (From Sensor Data Sheet) 4 Basler ace Camera Link AW00098504000 Specifications, Requirements, and Precautions 70 Quantum Efficiency 60 50 40 30 20 10 0 400 500 600 700 800 900 1000 Wave Length (nm) Fig. 2: acA2000-340kmNIR, acA2040-180kmNIR Spectral Response (From Sensor Data Sheet) Basler ace Camera Link 5 Specifications, Requirements, and Precautions 1.3.2 AW00098504000 Color Cameras The following graph shows the spectral response for all color cameras. The spectral response curves excludes lens characteristics, light source characteristics, and IR cut filter characteristics. To obtain best performance from color models of the camera, use of a dielectric IR cut filter is recommended. The filter should transmit in a range from 400 nm to 700 ... 720 nm, and it should cut off from 700 ... 720 nm to 1100 nm. A suitable IR cut filter is included in the standard C-mount lens adapter on color models of the camera. 60 50 Blue Quantum Efficiency Green 40 Red 30 20 10 0 Wave Length (nm) Fig. 3: Color Camera Spectral Response 6 Basler ace Camera Link AW00098504000 1.4 Specifications, Requirements, and Precautions Mechanical Specifications The camera housing conforms to protection class IP30 assuming that the lens mount is covered by a lens or by the protective plastic seal that is shipped with the camera. 1.4.1 Camera Dimensions and Mounting Points The camera dimensions in millimeters are as shown in Figure 4. Camera housings are equipped with mounting holes on the bottom as shown in the drawings. 23.7 (dimension for M3) Bottom 12 20 15 M3; 3 deep 2x M2; 3 deep 2x M2; 3 deep 22 (dimension for M2) 16.5 2x M3; 3 deep 20° 29 Ø 27.46 19.2 22.25 6.5 29 12 43.5 55.5 17.526 3.4 Photosensitive surface of the sensor Top Fig. 4: Mechanical Dimensions (in mm) Basler ace Camera Link 7 Specifications, Requirements, and Precautions 1.4.2 AW00098504000 Maximum Allowed Lens Thread Length The C-mount lens mount on all cameras is normally equipped with a plastic filter holder. As shown in Figure 5, the length of the threads on any lens you use with the camera can be a maximum of 9.6 mm, and the lens can intrude into the camera body a maximum of 10.8 mm. If either of these limits is exceeded, the lens mount or the filter holder will be damaged or destroyed and the camera will no longer operate properly. Note that on color cameras, the filter holder will be populated with an IR-cut filter. On monochrome cameras, the filter holder will be present, but will not be populated with a filter. (11) Filter Holder (9.6) 23.1 Max C-mount Thread C-mount Lens Not to Scale IR-Cut Filter (color cameras only) Unthreaded Thread - 9.6 Max 10.8 Max Fig. 5: Maximum Lens Thread Length (dimensions in mm) 8 Basler ace Camera Link AW00098504000 Specifications, Requirements, and Precautions 1.5 Software Licensing Information 1.5.1 LZ4 Licensing The software in the camera includes the LZ4 implementation. The copyright information for this implementation is as follows: LZ4 - Fast LZ compression algorithm Copyright (C) 2011-2012, Yann Collet. BSD 2-Clause License: www.opensource.org/licenses/bsd-license.php Redistribution and use in source and binary forms, with or without modification, are permitted provided that the following conditions are met: 1. Redistributions of source code must retain the above copyright notice, this list of conditions and the following disclaimer. 2. Redistributions in binary form must reproduce the above copyright notice, this list of conditions and the following disclaimer in the documentation and/or other materials provided with the distribution. THIS SOFTWARE IS PROVIDED BY THE COPYRIGHT HOLDERS AND CONTRIBUTORS "AS IS" AND ANY EXPRESS OR IMPLIED WARRANTIES, INCLUDING, BUT NOT LIMITED TO, THE IMPLIED WARRANTIES OF MERCHANTABILITY AND FITNESS FOR A PARTICULAR PURPOSE ARE DISCLAIMED. IN NO EVENT SHALL THE COPYRIGHT OWNER OR CONTRIBUTORS BE LIABLE FOR ANY DIRECT, INDIRECT, INCIDENTAL, SPECIAL, EXEMPLARY, OR CONSEQUENTIAL DAMAGES (INCLUDING, BUT NOT LIMITED TO, PROCUREMENT OF SUBSTITUTE GOODS OR SERVICES; LOSS OF USE, DATA, OR PROFITS; OR BUSINESS INTERRUPTION) HOWEVER CAUSED AND ON ANY THEORY OF LIABILITY, WHETHER IN CONTRACT, STRICT LIABILITY, OR TORT (INCLUDING NEGLIGENCE OR OTHERWISE) ARISING IN ANY WAY OUT OF THE USE OF THIS SOFTWARE, EVEN IF ADVISED OF THE POSSIBILITY OF SUCH DAMAGE. Basler ace Camera Link 9 Specifications, Requirements, and Precautions 1.6 AW00098504000 Avoiding EMI and ESD Problems The cameras are frequently installed in industrial environments. These environments often include devices that generate electromagnetic interference (EMI) and they are prone to electrostatic discharge (ESD). Excessive EMI and ESD can cause problems with your camera such as false triggering or can cause the camera to suddenly stop capturing images. EMI and ESD can also have a negative impact on the quality of the image data transmitted by the camera. To avoid problems with EMI and ESD, you should follow these general guidelines: Always use high quality shielded cables. The use of high quality cables is one of the best defenses against EMI and ESD. Try to use camera cables that are the correct length and try to run the camera cables and power cables parallel to each other. Avoid coiling camera cables. If the cables are too long, use a meandering path rather then coiling the cables. Avoid placing camera cables parallel to wires carrying high-current, switching voltages such as wires supplying stepper motors or electrical devices that employ switching technology. Placing camera cables near to these types of devices may cause problems with the camera. Attempt to connect all grounds to a single point, e.g., use a single power outlet for the entire system and connect all grounds to the single outlet. This will help to avoid large ground loops. (Large ground loops can be a primary cause of EMI problems.) Use a line filter on the main power supply. Install the camera and camera cables as far as possible from devices generating sparks. If necessary, use additional shielding. Decrease the risk of electrostatic discharge by taking the following measures: Use conductive materials at the point of installation (e.g., floor, workplace). Use suitable clothing (cotton) and shoes. Control the humidity in your environment. Low humidity can cause ESD problems. The Basler application note called Avoiding EMI and ESD in Basler Camera Installations provides much more detail about avoiding EMI and ESD. This application note can be obtained from the Downloads section of our website: www.baslerweb.com 10 Basler ace Camera Link AW00098504000 Specifications, Requirements, and Precautions 1.7 Environmental Requirements 1.7.1 Temperature and Humidity Housing temperature during operation: 0 °C ... +50 °C (+32 °F ... +122 °F) Humidity during operation: 20 % ... 80 %, relative, non-condensing Storage temperature: -20 °C ... +80 °C (-4 °F ... +176 °F) Storage humidity: 20 % ... 80 %, relative, non-condensing 1.7.2 Heat Dissipation You must provide sufficient heat dissipation to maintain the temperature of the camera housing at 50 °C or less. Since each installation is unique, Basler does not supply a strictly required technique for proper heat dissipation. Instead, we provide the following general guidelines: In all cases, you should monitor the temperature of the camera housing and make sure that the temperature does not exceed 50 °C. Keep in mind that the camera will gradually become warmer during the first hour of operation. After one hour, the housing temperature should stabilize and no longer increase. If your camera is mounted on a substantial metal component in your system, this may provide sufficient heat dissipation. The use of a fan to provide air flow over the camera is an extremely efficient method of heat dissipation. The use of a fan provides the best heat dissipation. Basler ace Camera Link 11 Specifications, Requirements, and Precautions 1.8 AW00098504000 Precautions NOTICE Avoid dust on the sensor. The camera is shipped with a protective plastic seal on the lens mount. To avoid collecting dust on the camera’s IR cut filter (color cameras) or sensor (mono cameras), make sure that you always put the protective seal in place when there is no lens mounted on the camera. NOTICE On all cameras, the lens thread length is limited. All cameras (mono and color) are equipped with a plastic filter holder located in the lens mount. The location of the filter holder limits the length of the threads on any lens you use with the camera. If a lens with a very long thread length is used, the filter holder or the lens mount will be damaged or destroyed and the camera will no longer operate properly. For more specific information about the lens thread length, see Section 1.4.2 on page 8. NOTICE If you are supplying power to the camera via Power over Camera Link (PoCL), you must use a PoCL compliant frame grabber and you must use Camera Link cables that are specifically designed for PoCL as specified in the Camera Link standard. Failure to use a PoCL compliant frame grabber or the correct cables can result in severe damage to the camera. If you are supplying power to the camera via the 4-pin M5 connector, the voltage of the power to the camera must be between +10.8 VDC and +13.2 VDC. 1. If the voltage is greater than +13.2 VDC, severe damage to the camera can result. 2. If the voltage is less than +10.8 VDC, the camera may operate erratically. Applying power with the wrong polarity can result in severe damage to the camera. For more information about camera power, see Section 5.5 on page 32. 12 Basler ace Camera Link AW00098504000 Specifications, Requirements, and Precautions NOTICE Making or breaking Camera Link connections incorrectly can severely damage the camera. 1. If you are supplying power to the camera via the Camera Link connection (PoCL), be sure that the power to the frame grabber is switched off before you connect or disconnect the Camera Link cables. 2. If you are supplying power to the camera via the 4-pin M5 connector, switch off the power to the connector before you connect or disconnect the Camera Link cables. NOTICE The camera’s GPIO line can be set to operate as an input or as an output. Applying incorrect electrical signals to the camera’s GPIO line can severely damage the camera. 1. Before you connect any external circuitry to the GPIO line, we strongly recommend that you set the GPIO line to operate as an input or as an output (according to your needs). 2. Once the line is set, make sure that you only apply electrical signals to the line that are appropriate for the line’s current setting. For more information about setting the GPIO line operation, see Section 6.1 on page 49. For more information about the electrical requirements for the GPIO line, see Section 5.7 on page 35. NOTICE An incorrect plug can damage the 4-pin connector. The plug on the cable that you attach to the camera’s 4-pin connector must have 4 female pins. Using a plug designed for a smaller or a larger number of pins can damage the connector. Basler ace Camera Link 13 Specifications, Requirements, and Precautions AW00098504000 NOTICE Inappropriate code may cause unexpected camera behavior. 1. The code snippets provided in this manual are included as sample code only. Inappropriate code may cause your camera to function differently than expected and may compromise your application. 2. To ensure that the snippets will work properly in your application, you must adjust them to meet your specific needs and must test them thoroughly prior to use. 3. The code snippets in this manual are written in C++. Other programming languages can also be used to write code for use with Basler pylon. When writing code, you should use a programming language that is both compatible with pylon and appropriate for your application. For more information about the programming languages that can be used with Basler pylon, see the documentation included with the pylon package. Warranty Precautions To ensure that your warranty remains in force: Do not remove the camera’s serial number label If the label is removed and the serial number can’t be read from the camera’s registers, the warranty is void. Do not open the camera housing Do not open the housing. Touching internal components may damage them. Keep foreign matter outside of the camera Be careful not to allow liquid, flammable, or metallic material inside of the camera housing. If operated with any foreign matter inside, the camera may fail or cause a fire. Avoid Electromagnetic fields Do not operate the camera in the vicinity of strong electromagnetic fields. Avoid electrostatic charging. Transport Properly Transport the camera in its original packaging only. Do not discard the packaging. Clean Properly Avoid cleaning the surface of the camera’s sensor if possible. If you must clean it, use a soft, lint free cloth dampened with a small quantity of high quality window cleaner. Because electrostatic discharge can damage the sensor, you must use a cloth that will not generate static during cleaning (cotton is a good choice). 14 Basler ace Camera Link AW00098504000 Specifications, Requirements, and Precautions To clean the surface of the camera housing, use a soft, dry cloth. To remove severe stains, use a soft cloth dampened with a small quantity of neutral detergent, then wipe dry. Do not use solvents or thinners to clean the housing; they can damage the surface finish. Read the manual Read the manual carefully before using the camera! Basler ace Camera Link 15 Specifications, Requirements, and Precautions 16 AW00098504000 Basler ace Camera Link AW00098504000 Installation 2 Installation The information you will need to do a quick, simple installation of the camera is included in the Installation and Setup Guide for Ace Camera Link Cameras (AW000996xx000). You can download the Quick Installation Guide from the Downloads section of our website: www.baslerweb.com Basler ace Camera Link 17 Installation 18 AW00098504000 Basler ace Camera Link AW00098504000 Camera Drivers and Tools for Changing Camera Parameters 3 Camera Drivers and Tools for Changing Camera Parameters This chapter provides an overview of the camera drivers and the options available for changing the camera’s parameters. The options available with the Basler pylon Driver Package let you change parameters and control the camera by using a stand-alone GUI (known as the pylon Viewer) or by accessing the camera from within your software application using the driver API. You can also control the camera and change parameters via direct access to the camera’s register structure. 3.1 The Pylon Driver Package The Basler pylon Driver Package is designed to operate all Basler cameras that have an IEEE 1394a interface, an IEEE 1394b interface, or a GigE interface. It will also operate some newer Basler camera models with a Camera Link interface. The pylon drivers offer reliable, real-time image data transport into the memory of your PC at a very low CPU load. Features in the pylon driver package include: The Basler GigE Vision filter driver The Basler GigE Vision performance driver IEEE 1394a/b drivers A Camera Link configuration driver for some newer camera models A pylon camera API for use with a variety of programming languages A pylon DirectShow driver A pylon TWAIN driver A variety of adapters for third party software imaging processing libraries The Basler pylon Viewer Source code samples A programming guide and API reference. You can obtain the Basler pylon Driver Package from the Downloads section of our website: www.baslerweb.com To help you install the driver for use with ace Camera Link cameras, you can use the Installation and Setup Guide for Ace Camera Link Cameras (AW000996xx000). You can obtain the guide from the Downloads section of the website. Basler ace Camera Link 19 Camera Drivers and Tools for Changing Camera Parameters AW00098504000 The pylon package includes several tools that you can use to change the parameters on your camera, including the pylon Viewer and the pylon API. The remaining sections in this chapter provide an introduction to these tools. 3.1.1 The pylon Viewer The pylon Viewer is included in Basler’s pylon Driver Package. The Viewer is a standalone application that lets you view and change most of the camera’s parameter settings via a GUI based interface. Using the pylon Viewer software is a very convenient way to get your camera up and running quickly when you are doing your initial camera evaluation or doing a camera design-in for a new project. For more information about using the viewer, see the Installation and Setup Guide for Ace Camera Link Cameras (AW000996xx000). 3.1.2 The pylon API After the pylon Driver Package has been installed on your PC, you can access all of the camera’s parameters and can control the camera’s full functionality from within your application software by using the pylon API. The pylon Programmer’s Guide and the pylon API Reference contain an introduction to the API and include information about all of the methods and objects included in the API. The programmer’s guide and API reference are included in the pylon SDK. The Basler pylon Software Development Kit (SDK) includes a set of sample programs that illustrate how to use the pylon API to parameterize and operate the camera. These samples include Microsoft® Visual Studio® solution and project files demonstrating how to set up the build environment to build applications based on the API. 20 Basler ace Camera Link AW00098504000 3.2 Camera Drivers and Tools for Changing Camera Parameters The Basler Binary Protocol Library Basler ace Camera Link cameras have blocks of mapped memory space known as registers. By reading values from the registers, you can determine basic information about the camera and information about the camera’s current settings. By writing values to the registers, you can control how the camera’s features will operate. If you use the Basler pylon software described in the previous section, the camera’s register structure is hidden. With pylon, a series of function calls allows you to change camera parameter settings without the need to know anything about the register that underlies each parameter. If you desire, you can also change the camera parameter settings and control the camera by directly accessing the camera’s register structure. The Basler Binary Protocol Library (BBPL) provides functions that allow you to read data from or write data to the camera’s registers. The BBPL is an extension of the clALLSerial/clSerial API defined in Appendix B of the Camera Link Standard version 1.1 or higher. The BBPL adds convenience functions to this API that allow you to read from and write to the registers in Basler Camera Link cameras. The read and write requests are transmitted to the camera via a serial link between the camera and the frame grabber; the serial link is part of the standard Camera Link interface. Sample code showing how to use the BBPL along with supporting documentation can be downloaded from the Basler website: www.baslerweb.com When using the BBPL to change parameter values, you will need to know the details of the camera’s register structure. For details of the register structure, refer to the document called Ace and Aviator Register Structure and Access Methods (AW000997xx000). The document can also be downloaded from the Basler website. Note that if you are using an earlier Baser Camera Link camera that was originally designed to work with the Basler Binary Protocol II (e.g., the A400k, L400k, L800k, and the sprint), you can now use either the BBPL or the Binary Protocol II to access the camera’s registers. Basler ace Camera Link 21 Camera Drivers and Tools for Changing Camera Parameters 22 AW00098504000 Basler ace Camera Link AW00098504000 Camera Functional Description 4 Camera Functional Description This chapter provides an overview of the camera’s functionality from a system perspective. The overview will aid your understanding when you read the more detailed information included in the later chapters of the user’s manual. 4.1 Overview Each camera provides features such as a full frame shutter and electronic exposure time control. Exposure start, exposure time, and charge readout can be controlled by parameters transmitted to the camera via the Camera Link interface. Exposure start can also be controlled via an externally generated electrical trigger (ExFrameStTrig) signal. The ExFrameStTrig signal facilitates periodic or non-periodic acquisition start. Modes are available that allow the length of exposure time to be directly controlled by the ExFrameStTrig signal or to be set for a pre-programmed period of time. Accumulated charges are read out of the sensor when exposure ends. The accumulated charges are read out of the sensor sequentially, row-by-row. As shown in Figure 6 on page 24, each row passes through an "analog front end" where the charges are transformed to voltages, gain and black level are adjusted, and an analog to digital conversion is performed. The A to D conversion can be performed at 10 bit or at 12 bit depth. As shown in Figure 7 on page 24, the digitized values from each row are passed to an LVDS block where they are transmitted to the camera’s FPGA. The Image data is then transmitted via the Camera Link interface to the frame grabber in your PC. Several different "tap geometries" are available to determine how the pixel data will be transmitted over the Camera Link interface. The user can select the desired tap geometry. See Figure 9.3 on page 146 for more detailed information about tap geometries. The user can also select from several available pixel clock speeds for the Camera Link interface. See Section 10.1 on page 157 for more information about selecting the pixel clock speed. Basler ace Camera Link 23 Camera Functional Description AW00098504000 CMOSIS Sensor Pixel Array Analog Front End LVDS Block Digitized Pixel Data Fig. 6: CMOSIS Sensor Architecture Camera GPIO (1) I/O PC Sensor FPGA Image Data Camera Link Interface Image Data CC1 CC2 Frame Grabber CC3 Serial Port Control Control: AOI, Gain, Black Level MicroController Control Data Fig. 7: Camera Block Diagram 24 Basler ace Camera Link AW00098504000 Physical Interface 5 Physical Interface This chapter provides detailed information, such as pinouts and voltage requirements, for the physical interface on the camera. This information will be especially useful during your initial design-in process. 5.1 General Description of the Camera Connections The camera is interfaced to external circuity via connectors located on the back of the housing: Two 26-pin, 0.03” pin spacing, Shrunk Delta Ribbon (SDR) female connectors used to transmit video data, control signals, and configuration commands. (This type of connector is also known as a Mini Camera Link connector.) These connectors can also be used to supply power to the camera in accordance with the Power over Camera Link (PoCL) specifications in the Camera Link standard. One 4-pin, M5 receptacle used to connect to the camera’s GPIO line. This connector can also be used to provide power to the camera if PoCL is not used. The drawing below shows the location of the three connectors. There is also an LED indicator located on the back of the camera as shown in the drawing. LED Indicator 26-pin SDR Connector (Medium/Full Camera Link Connection) 26-pin SDR Connector (Base Camera Link Connection) 4-pin M5 Receptacle Fig. 8: Camera Connections Basler ace Camera Link 25 Physical Interface AW00098504000 5.2 Camera Connector Pin Assignments and Numbering 5.2.1 4-Pin Receptacle The 4-pin receptacle is used to supply power to the camera and to access the camera’s GPIO line. The pin assignments and pin numbering for the receptacle are as shown in Table 1. Pin 4 1 3 2 Designation 1 +12 VDC Camera Power (+12 VDC ± 10%) 2 General Purpose I/O (GPIO) 3 Camera Power Ground 4 GPIO Ground Table 1: Pin Assignments and Numbering for the 4-pin Receptacle 26 Basler ace Camera Link AW00098504000 5.2.2 Physical Interface 26-Pin SDR Connectors Two 26-pin, 0.03” pin spacing, Shrunk Delta Ribbon (SDR) female connectors are used to transmit video data, control signals, and configuration commands. The pin assignments and pin numbering for the base Camera Link SDR connector are as shown in Table 2 for the medium Camera Link SDR connector are as shown in Table 3 on page 28. Pin Number Signal Name Direction Level Function 1, 26 * Cam Pow. In +12 VDC Camera power, +12 VDC nominal, < 1% ripple. For more details about PoCL power requirements see the Camera Link specifications v. 2.0 and above. 13, 14 ** Power Ret. Return Camera power return (Gnd) 2 X0- Output Data from transmitter circuit X 15 X0+ Camera Link LVDS 3 X1- Output Data from transmitter circuit X 16 X1+ Camera Link LVDS 4 X2- Output Data from transmitter circuit X 17 X2+ Camera Link LVDS 6 X3- Output Data from transmitter circuit X 19 X3+ Camera Link LVDS 5 XClk- Output Pixel clock from transmitter circuit X 18 XClk+ Camera Link LVDS 7 SerTC+ Input 20 SerTC- RS-644 LVDS Serial communication data receive (SerTC = "serial to camera") 8 SerTFG- Output 21 SerTFG+ RS-644 LVDS Serial communication data transmit (SerTFG = "serial to frame grabber") 9 CC1- Input Configurable 22 CC1+ RS-644 LVDS 10 CC2+ Input Configurable 23 CC2- RS-644 LVDS 11 CC3- Input Configurable 24 CC3+ RS-644 LVDS 12 None None None None 25 None- 13 1 * Pins 1 and 26 are tied together in the camera. ** Pins 13 and 14 are tied together in the camera. 26 14 Table 2: Pin Assignments and Numbering for the Base Configuration 26-pin SDR Connector Basler ace Camera Link 27 Physical Interface Pin Number AW00098504000 Signal Name Direction 1, 26 * Cam Pow. In 13, 14 ** Power Ret. 13 Level Function 10 kOhm resistor to camera power return (Gnd). Not carrying power. Return Camera power return (Gnd) Output Camera Link LVDS Data from transmitter circuit Y Output Camera Link LVDS Data from transmitter circuit Y Output Camera Link LVDS Data from transmitter circuit Y Output Camera Link LVDS Data from transmitter circuit Y Output Camera Link LVDS Pixel clock from transmitter circuit Y 2 Y0- 15 Y0+ 3 Y1- 16 Y1+ 4 Y2- 17 Y2+ 6 Y3- 19 Y3+ 5 YClk- 18 YClk+ 7 T+ Connected to T- with 100R; not used 20 T- Connected to T+ with 100R; not used 8 Z0- 21 Z0+ 9 Z1- 22 Z1+ 10 Z2- 23 Z2+ 12 Z3- 25 Z3+ 11 ZClk- 24 ZClk+ 1 Output Camera Link LVDS Data from transmitter circuit Z Output Camera Link LVDS Data from transmitter circuit Z Output Camera Link LVDS Data from transmitter circuit Z Output Camera Link LVDS Data from transmitter circuit Z Output Camera Link LVDS Pixel clock from transmitter circuit Z * Pins 1 and 26 are tied together in the camera. ** Pins 13 and 14 are tied together in the camera. 26 14 Table 3: Pin Assignments and Numbering for the Medium/Full Configuration 26-pin SDR Connector 28 Basler ace Camera Link AW00098504000 Physical Interface 5.3 Camera Connector Types 5.3.1 4-Pin Receptacle The 4-pin connector on the camera is a Binder M5 receptacle (part number 09-3111-86-04) or the equivalent. A recommended mating connector is the Binder M5 plug (part number 79-3108-52-04) or the equivalent. Several other mating connectors in a variety of different form factors are also available from Binder. 5.3.2 26-Pin SDR Connectors The 26-pin connectors on the camera are female, 0.03 inch pin spacing, SDR connector as called for in the Camera Link specification. The recommended mating connector is also defined in the Camera Link Specification. The "SDR" (Shrunk Delta Ribbon) designation is the naming used by the 3M company. Other companies use different names for this type of connector. For example, Honda uses "HDR" as the connector name. Basler ace Camera Link 29 Physical Interface AW00098504000 5.4 Cabling Requirements 5.4.1 Camera Link Cables The Camera Link cables must meet the Mini Camera Link cable specifications specified in Appendix D of the Camera Link Standard. 5.4.2 Standard Power and I/O Cable The standard power and I/O cable is intended for use when the camera is not connected to a PLC device. If the camera is connected to a PLC device, we recommend using a PLC power and I/O cable rather than the standard power and I/O cable. See the following section for more information about PLC power and I/O cables. A "standard power and I/O cable" is used to connect to the 4-pin connector on the camera. This cable can be used both to supply power to the camera (when Power over Camera Link is not used) and to connect to the camera’s GPIO line as shown in Figure 9. The end of the standard power and I/O cable that connects to the camera must be terminated with a Binder M5 plug or the equivalent (the Binder part number for one possible mating plug is 79-310852-04; Binder makes mating plugs in a variety of form factors). The cable must be wired to conform with the pin assignments shown in the pin assignment table. The maximum length of the standard power and I/O cable is at least 10 meters. Close proximity to strong magnetic fields should be avoided. The required 4-pin Binder plug is available from Basler. Basler also offers pre-made standard power and I/O cable assemblies that are terminated with a 4-pin Binder plug on one end and unterminated on the other. Contact your Basler sales representative to order connectors or cables. NOTICE An incorrect plug can damage the 4-pin connector. The plug on the cable that you attach to the camera’s 4-pin connector must have 4 female pins. Using a plug designed for a smaller or a larger number of pins can damage the connector. 30 Basler ace Camera Link AW00098504000 Physical Interface Binder 4-pin Plug Standard Power and I/O Cable +12 VDC Cam Pwr GPIO DC Power Supply Cam Pwr Gnd GPIO Gnd 1 2 3 4 Fig. 9: Standard Power and I/O Cable 5.4.3 PLC Power and I/O Cable We recommend using a PLC power and I/O cable when the camera is connected to a PLC device. If the GPIO is set to function as an input and power is supplied to the input at 24 VDC, you can use a PLC power and I/O cable even if the camera is not connected to a PLC device. If the GPIO is set to function as an output, you can use a standard power and I/O cable. As with the standard power and I/O cable described in the previous section, the PLC power and I/O cable is a single cable that can be used both to supply power to the camera (when Power over Camera Link is not used) and to connect to the camera’s GPIO line. The PLC power and I/O cable adjusts the voltage levels of PLC devices to the voltage levels required by the camera’s GPIO line and it protects the camera against negative voltage and reverse polarity. Close proximity to strong magnetic fields should be avoided. Basler offers a PLC power and I/O cable that is terminated with a 4-pin Binder plug on the end that connects to the camera. The other end is unterminated. Contact your Basler sales representative to order the cable. Basler ace Camera Link 31 Physical Interface 5.5 AW00098504000 Camera Power Power can be supplied to the camera in either one of two ways: Via the Camera Link cables. This is commonly known as Power over Camera Link or PoCL. Via the 4-pin M5 connector. 5.5.1 Supplying Power Over Camera Link Power can be supplied to the camera via the Camera Link cables as specified in Appendix E of the Camera Link standard. This method of supplying power to the camera is known as Power over Camera Link or PoCL. Nominal operating voltage for the camera is +12 VDC (± 10%) with less than one percent ripple. Power consumption is as shown in the specification tables in Section 1 of this manual. The power for the camera is supplied by the connection to your frame grabber. Therefore, if you are planning to use PoCL to power the camera, your frame grabber must be PoCL compliant. NOTICE If you are supplying power to the camera using PoCL: 1. Failure to use a Power over Camera Link compliant frame grabber can result in severe damage to the camera. 2. Failure to use Camera Link cables that are specifically designed for PoCL (as specified in the Camera Link standard) can result in severe damage to the camera. NOTICE Making or breaking Camera Link connections incorrectly can cause severe damage to the camera. If you are supplying power to the camera via the Camera Link connection (PoCL), be sure that the power to the frame grabber is switched off before you connect or disconnect the Camera Link cables. 32 Basler ace Camera Link AW00098504000 5.5.2 Physical Interface Supplying Power Via the 4-Pin M5 Connector Power can be supplied to the camera via the 4-pin M5 connector on the back of the camera. Nominal operating voltage is +12 VDC (± 10%) with less than one percent ripple. Power consumption is as shown in the specification tables in Section 1 of this manual. Close proximity to strong magnetic fields should be avoided. See Section 5.2.1 on page 26 for a description of the connector pinouts. See Section 5.4.2 on page 30 for a description of the cable to be used with the 4-pin connector. NOTICE If the voltage of the power to the camera is greater than +13.2 VDC, damage to the camera can result. If the voltage is less than +10.8 VDC, the camera may operate erratically. Applying power with the wrong polarity can result in severe damage to the camera. 1. Always make sure that the voltage of the power to the camera is within the specified range. 2. Always make sure that the polarity of the applied voltage is correct. NOTICE An incorrect plug can damage the 4-pin connector. The plug on the cable that you attach to the camera’s 4-pin connector must have 4 female pins. Use of a plug with a different number of pins, can damage the pins in the camera’s 4-pin connector. NOTICE Making or breaking Camera Link connections incorrectly can severely damage the camera. If you are supplying power to the camera via the 4-pin M5 connector, switch off the power to the connector before you connect or disconnect the Camera Link cables. Basler ace Camera Link 33 Physical Interface 5.6 AW00098504000 LED Indicator The LED indicator on the back of the camera signals whether power is present and also provides some basic error indications for the camera. For more information, see Section 10.10 on page 208. 34 Basler ace Camera Link AW00098504000 Physical Interface 5.7 General Purpose I/O (GPIO) 5.7.1 Introduction The camera has one GPIO line that is accessed via pins 2 and 4 in the 4-pin M5 connector on the back of the camera. The GPIO line can be set to operate as an input to the camera or to operate as a camera output. The GPIO line is designated as line 1. The next sections describe the differences in the GPIO electrical functionality when the line is set to operate as an input and when it is set to operate as an output. NOTICE The camera’s GPIO line can be set to operate as an input or as an output. Applying incorrect electrical signals to the camera’s GPIO line can severely damage the camera. 1. Before you connect any external circuitry to the GPIO line, we strongly recommend that you set the GPIO line to operate as an input or as an output (according to your needs). 2. Once the line is properly set, make sure that you only apply electrical signals to the line that are appropriate for the line’s current setting. For more information about setting the GPIO line operation, see Section 6.1 on page 49. For more information about the 4-pin connector, see Section 5.2.1 on page 26. 5.7.2 Operation as an Input This section describes the electrical operation of the GPIO line when the line has been set to operate as an input. 5.7.2.1 Voltage Requirements : Different voltage levels apply, depending on whether the standard power and I/O cable or a PLC power and I/O cable is used (see below). Basler ace Camera Link 35 Physical Interface AW00098504000 Voltage Levels When the Standard Power and I/O Cable is Used The following voltage requirements apply to the camera’s GPIO line when the line is set to act as an input and a standard power and I/O cable is used: Voltage Significance +0 to +20 VDC Recommended signal voltage. +0 to +1.4 VDC The voltage indicates a logical 0. > +1.4 to +2.2 VDC > +2.2 VDC Region where the transition threshold occurs; the logical state is not defined in this region. The voltage indicates a logical 1. Table 4: Voltage Requirements with the GPIO Set as an Input and Using the Standard Power and I/O Cable Voltage Levels When a PLC Power and I/O Cable is Used The following requirements apply to the camera’s GPIO line when the line is set to act as an input and a PLC power and I/O cable is used. The PLC power and I/O cable will adjust the voltages to the levels required by the camera’s GPIO line (see Table 4). Voltage Significance +0 to +24 VDC Recommended signal voltage. +0 to +8.4 VDC The voltage indicates a logical 0. > +8.4 to +10.4 VDC > +10.4 VDC Region where the transition threshold occurs; the logical state is not defined in this region. The voltage indicates a logical 1. Table 5: Voltage Requirements with the GPIO Set as an Input and Using a PLC Power and I/O Cable 36 Basler ace Camera Link AW00098504000 5.7.2.2 Physical Interface Electrical Characteristics As shown in Figure 10, when the GPIO line is set to operate as an input, the line is opto-isolated. See the previous section for input voltages and their significances. The current draw for each input line is between 5 mA and 15 mA. 4-Pin Receptacle Camera GPIO_In 1 2 3 4 D BAS 16XV2T1 GPIO_Gnd 3.3 V Q BF545C 100 nF Gnd 180 1k GPIO_In_Ctrl (to FPGA) 49.9 Gnd U TLP281 GPIO_Gnd Fig. 10: Schematic with GPIO Set as an Input Basler ace Camera Link 37 Physical Interface AW00098504000 Figure 11 shows an example of a typical circuit you can use to input a signal into the camera. Your Gnd 4-Pin Receptacle Camera GPIO_In Input Voltage +0 to +20 VDC (Standard Pwr. and I/O Cable) 1 2 3 4 D BAS 16XV2T1 GPIO_Gnd Your Gnd 3.3 V Q BF545C 100 nF Gnd 180 1k GPIO_In_Ctrl (to FPGA) 49.9 Gnd U TLP281 GPIO_Gnd Fig. 11: Typical Input Circuit For more information about GPIO pin assignments and pin numbering, see Section 5.2 on page 26. For more information about setting the GPIO line operation, see Section 6.1 on page 49. 38 Basler ace Camera Link AW00098504000 5.7.2.3 Physical Interface Response Time The response times for the GPIO line on the camera when the line is set to operate as an input are as shown in Figure 12. Not to Scale Voltage Applied to the Camera’s Input Line 2.2 V (10.4 V with PLC cable) 1.4 V (8.4 V with PLC cable) Time TDF TDR Level of Camera’s Internal Input Circuit Fig. 12: GPIO Line Input Response Times Time Delay Rise (TDR) = 1.3 µs to 1.6 µs Time Delay Fall (TDF) = 40 µs to 60 µs Basler ace Camera Link 39 Physical Interface 5.7.3 AW00098504000 Selecting the Input as the Source Signal for a Camera Function When the GPIO line is set to operate as an input, you can select the input to act as the source signal for the following camera functions: the acquisition start trigger the frame start trigger Note that when the input has been selected as the source signal for a camera function, you must apply an electrical signal to the input that is appropriately timed for the function. For more information about using the input line as the source signal for a camera function, see Section 6.1.3 on page 50. 40 Basler ace Camera Link AW00098504000 5.7.4 Physical Interface Operation as an Output This section describes the electrical operation of the GPIO line when the line has been set to operate as an output. 5.7.4.1 Voltage Requirements The following voltage requirements apply to the camera’s GPIO line when it is set to operate as an output: Voltage Significance < +3.3 VDC The output may operate erratically. +3.3 to +24 VDC Recommended operating voltage. Table 6: Voltage Requirements with the GPIO Set as an Output 5.7.4.2 Electrical Characteristics As shown in Figure 13, when the GPIO line is set to operate as an output, the line is opto-isolated. See the previous section for the recommended operating voltages. The maximum current allowed through the output circuit is 50 mA. If the GPIO line is not set to invert: A low output signal from the camera results in a non-conducting Q1 transistor in the output circuit. A high output signal from the camera results in a conducting Q1 transistor in the output circuit. If the GPIO line is set to invert: A low output signal from the camera results in a conducting Q1 transistor in the output circuit. A high output signal from the camera results in a non-conducting Q1 transistor in the output circuit. When the GPIO is set to operate as an output, you should use a standard power and I/O cable, not a PLC power and I/O cable (see Section 5.4 on page 30). Basler ace Camera Link 41 Physical Interface AW00098504000 Camera 4-Pin Receptacle GPIO_Out_Ctrl 120 (from FPGA) 4.7k U TLP281 1 2 3 GPIO_Out 4 Q1 BC846W Gnd 390 GPIO_Gnd Gnd I/O_Gnd Fig. 13: Schematic with GPIO Set as an Output Figure 14 shows a typical circuit you can use to monitor the output line with a voltage signal. Your Gnd Camera +3.3 to +24 VDC 4-Pin Receptacle GPIO_Out_Ctrl 120 (from FPGA) 4.7k Gnd U TLP281 1k 1 2 3 4 GPIO_Out Q1 BC846W Voltage Output Signal to You 390 GPIO_Gnd Gnd Your Gnd I/O_Gnd Fig. 14: Typical Voltage Output Circuit 42 Basler ace Camera Link AW00098504000 Physical Interface Figure 15 shows a typical circuit you can use to monitor the output line with an LED or an optocoupler. In this example, the voltage for the external circuit is +24 VDC. Current in the circuit is limited by an external resistor. Your Gnd +24 VDC LED Output to You Camera 4-Pin Receptacle GPIO_Out_Ctrl 120 (from FPGA) 4.7k Gnd U TLP281 2.2k 1 GPIO_Out 2 3 4 Q1 BC846W 390 Your Gnd GPIO_Gnd Gnd I/O_Gnd Fig. 15: Typical LED Output Signal at +24 VDC for the External Circuit (Example) For more information about GPIO pin assignments and pin numbering, see Section 5.2 on page 26. For more information about setting the GPIO line operation, see Section 6.1 on page 49. Basler ace Camera Link 43 Physical Interface 5.7.4.3 AW00098504000 Response Time The information in this section assumes that the output circuit on your camera is designed as in the typical voltage output circuit shown in Section 5.7.4.2. The response times for the output lines on your camera will typically fall into the ranges specified below. The exact response time for your specific application will depend on the external resistor and the applied voltage you use. The response times for the GPIO line on the camera when the line is set to operate as an output are as shown in Figure 16. Level on Out_1_Ctrl Not to Scale TDR 90% Voltage Present on the Camera’s Output Line TDF RT FT 90% Time Fig. 16: GPIO Line Output Response Times Time Delay Rise (TDR) = 40 µs Rise Time (RT) = 20 µs to 70 µs Time Delay Fall (TDF) = 0.6 µs Fall Time (FT) = 0.7 µs to 1.4 µs 44 Basler ace Camera Link AW00098504000 5.7.4.4 Physical Interface Selecting a Source Signal for the Output Line When the GPIO line is configured to act as an output line, you must select a source signal for the line to make the line useful. The camera has several standard output signals available and any one of them can be selected to act as the source signal for the output line. For more information about selecting a source signal for the output line, see Section 6.2.3 on page 55. Basler ace Camera Link 45 Physical Interface AW00098504000 5.8 I/O in the Camera Link Interface 5.8.1 Inputs The camera is also equipped with three input lines built into the Camera Link interface. These lines are designated as CC1, CC2, and CC3 as specified in the Camera Link standard. Typically, input signals are applied to these lines by the frame grabber board attached to the camera. The frame grabber board can typically be configured to supply different types of signals to these inputs as required by the camera user. On the camera side, you can select these inputs to act as the source signal for the following camera functions: the acquisition start trigger the frame start trigger For more information about using CC1, CC2, and CC3 on the specific type of frame grabber installed in your system, refer to the documentation for you frame grabber board. You can also obtain some general information about how these lines are implemented in the Camera Link interface from the Basler document named Ace Camera Link Information for Frame Grabber Designers (AW000990xx000). You can obtain the document from the Downloads section of the Basler website: www.baslerweb.com For more information about using CC1, CC2, and CC3 as the source signal for a camera function, see Section 6.1 on page 49. 5.8.2 Outputs As specified in the Camera Link standard, a "CL Spare" data bit is included in the Camera Link interface. On ace Camera Link cameras, the CL Spare data bit can be used as a camera output line. You can select any one of the camera’s standard output signals to act as the source signal for the for the CL Spare line. The camera has four standard output signals available: Acquisition Trigger Wait Frame Trigger Wait Exposure Active Frame Cycle You can also designate the line as "user settable". If an output line is designated as user settable, you can use the camera’s API to set the state of the line as desired. 46 Basler ace Camera Link AW00098504000 Physical Interface The CL Spare data bit is not available when the camera is set for the 1X8-1Y or the 1X10⁻¹Y tap geometry. The CL Spare data bit is not directly accessible by the camera user. The data bit must be accessed via the frame grabber attached to the camera. Not all frame grabbers provide users with direct access to this bit. Consult your frame grabber supplier for more information. For more information about using the CL Spare bit on your specific type of frame grabber installed in your system, refer to the documentation for you frame grabber board. You can also obtain some general information about how this bit is implemented in the Camera Link interface from the Basler document named Ace Camera Link Information for Frame Grabber Designers (AW000990xx000). You can obtain the document from the Downloads section of the Basler website: www.baslerweb.com For more information about selecting a camera output signal to act as the source signal for the CL Spare bit, see Section 6.2 on page 54. Basler ace Camera Link 47 Physical Interface 48 AW00098504000 Basler ace Camera Link AW00098504000 I/O Control 6 I/O Control This section describes how to set the camera’s input and output lines. It also provides information about monitoring the state of the input and output lines. 6.1 Input Lines 6.1.1 Available Input Lines The camera is equipped with one GPIO line designated as line 1. The GPIO line can be accessed through the four pin connector on the back of the camera as described in the "Physical Interface" chapter. The GPIO line can be set to operate as either as an input line or an output line. This section describes using the GPIO when it is set to operate as an input line. The camera is also equipped with three input lines built into the Camera Link interface. These lines are designated as CC1, CC2, and CC3 as specified in the Camera Link standard. Typically, input signals are applied to these lines by the frame grabber board attached to the camera. The frame grabber board can typically be configured to supply different types of signals to these inputs as required by the camera user. For more information about using CC1, CC2, and CC3 on the specific type of frame grabber installed in your system, refer to the documentation for your frame grabber board. You can also get some general information about how these lines are implemented in the Camera Link interface from the Basler document called Ace Camera Link Information for Frame Grabber Designers (AW000990xx000). You can obtain the document from the Downloads section of the Basler website: www.baslerweb.com 6.1.2 Setting the GPIO Line to Operate as an Input The Line Mode parameter is used to set the camera’s GPIO line to operate as an input. NOTICE Applying incorrect electrical signals to the camera’s GPIO line can severely damage the camera. 1. Before you connect any external circuitry to the GPIO line, we strongly recommend that you set the GPIO line mode so that the line will operate as an input. 2. Once the line mode is set, make sure that you only apply electrical signals to the line that are appropriate for the line’s current mode. For more information about the electrical characteristics of the GPIO line, see Section 5.7 on page 35. Basler ace Camera Link 49 I/O Control AW00098504000 Setting the Line Mode Using Basler Pylon You can set the Line Mode parameter value from within your application software by using the pylon API. The following code snippet illustrates using the API to set the line mode: // Configure the GPIO line as an input Camera.LineSelector.SetValue( LineSelector_Line1 ); Camera.LineMode.SetValue( LineMode_Input ); You can also use the Basler pylon Viewer application to easily set the parameters. For more information about the pylon API and the pylon Viewer, see Section 3.1 on page 19. Setting the Line Mode Using Direct Register Access To configure the GPIO line as an input via direct register access: Set the value of the Line Mode Line 1 register to Input. For more information about direct register access, see Section 3.2 on page 21. 6.1.3 Selecting an Input Line as the Source Signal for a Camera Function You can set the GPIO line (assuming it is set as an input), CC1, CC2, or CC3 to act as the source signal for one of the following camera functions: Acquisition Start Trigger - If an input line is selected as the source signal for the acquisition start trigger, whenever a proper electrical signal is applied to the line, the camera will recognize the signal as an acquisition start trigger signal. Frame Start Trigger - If an input line is selected as the source signal for the frame start trigger, whenever a proper electrical signal is applied to the line, the camera will recognize the signal as an frame start trigger signal. For detailed information about selecting an input line to act as the source signal for the acquisition start trigger and for details about how the acquisition start trigger operates, see Section 7.2.5 on page 75. For detailed information about selecting an input line to act as the source signal for the frame start trigger and for details about how the frame start trigger operates, see Section 7.3.3 on page 86. 50 Basler ace Camera Link AW00098504000 6.1.4 I/O Control Input Line Debouncer When the GPIO line is set to operate as an input, it is equipped with a debouncer feature on the line. CC1, CC2, and CC3 are also equipped with debouncers. The debouncer feature aids in discriminating between valid and invalid input signals and only lets valid signals pass to the camera. The debouncer value specifies the minimum time that an input signal must remain high or remain low in order to be considered a valid input signal. We recommend setting the debouncer value so that it is slightly greater than the longest expected duration of an invalid signal. Setting the debouncer to a value that is too short will result in accepting invalid signals. Setting the debouncer to a value that is too long will result in rejecting valid signals. Note that the debouncer creates a delay between the arrival of a valid signal at the camera and its transfer to the camera’s internal circuitry. The duration of the delay will be determined by the debouncer value. Figure 17 illustrates how the debouncer filters out invalid input signals, i.e. signals that are shorter than the debouncer value. The diagram also illustrates how the debouncer delays a valid signal. Unfiltered arriving signals Debouncer debouncer value Transferred valid signal delay TIMING CHARTS ARE NOT DRAWN TO SCALE Fig. 17: Filtering of Input Signals by the Debouncer Basler ace Camera Link 51 I/O Control AW00098504000 Setting the Debouncer Using Basler Pylon The debouncer value is determined by the value of the Line Debouncer Time Abs parameter. The parameter is set in microseconds and can be set in a range from 0 to approximately 1 s. To set the debouncer: Use the Line Selector to select CC1, CC2, CC3, or Line1 (Line1 designates the GPIO line). Set the value of the Line Debouncer Time Abs parameter. You can set the Line Selector and the value of the Line Debouncer Abs parameter from within your application software by using the Basler pylon API. The following code snippet illustrates using the API to set the selector and the parameter value: // Select the GPIO line Camera.LineSelector.SetValue( LineSelector_Line1 ); // Set the parameter value to 100 microseconds Camera.LineDebouncerTimeAbs.SetValue( 100 ); // Select the CC1 line Camera.LineSelector.SetValue( LineSelector_CC1 ); // Set the parameter value to 150 microseconds Camera.LineDebouncerTimeAbs.SetValue( 150 ); You can also use the Basler pylon Viewer application to easily set the parameters. For more information about the pylon API and the pylon Viewer, see Section 3.1 on page 19. Setting the Debouncer Using Direct Register Access To set the value of the input line debouncers via direct register access: For the GPIO line, set the value of the Input Debouncer Time Line 1 register as desired (the value represents milliseconds). For the CC1 line, set the value of the Input Debouncer Time CC1 register. For the CC2 line, set the value of the Input Debouncer Time CC2 register. For the CC3 line, set the value of the Input Debouncer Time CC3 register. For more information about direct register access, see Section 3.2 on page 21. 52 Basler ace Camera Link AW00098504000 6.1.5 I/O Control Setting an Input Line for Invert You can set CC1, CC2, CC3, and the GPIO line to invert or not to invert the incoming electrical signal. Setting an Input Line for Invert Using Basler Pylon To set the invert function on an input line: Use the Line Selector to select CC1, CC2, CC3, or Line1 (Line1 designates the GPIO line). Set the value of the Line Inverter parameter to true to enable inversion on the selected line or to false to disable inversion. You can set the Line Selector and the Line Inverter parameter value from within your application software by using the pylon API. The following code snippet illustrates using the API to set the selector and the parameter value: // Select the GPIO line Camera.LineSelector.SetValue( LineSelector_Line1 ); // Enable the inverter on the selected line Camera.LineInverter.SetValue( true ); // Select the CC1 line Camera.LineSelector.SetValue( LineSelector_CC1 ); // Disable the inverter on the selected line Camera.LineInverter.SetValue( false ); You can also use the Basler pylon Viewer application to easily set the parameters. For more information about the pylon API and the pylon Viewer, see Section 3.1 on page 19. Setting an Input Line for Invert Using Direct Register Access To set the invert function on an input line via direct register access: For the GPIO line, set the value of the Line Inverter Line 1 register to 0 (false) or 1 (true) as desired. For the CC1 line, set the value of the Line Inverter CC1 register. For the CC2 line, set the value of the Line Inverter CC2 register. For the CC3 line, set the value of the Line Inverter CC2 register. For more information about direct register access, see Section 3.2 on page 21. Basler ace Camera Link 53 I/O Control AW00098504000 6.2 Output Lines 6.2.1 Available Output Lines The camera is equipped with one GPIO line designated as line 1. The GPIO line can be accessed through the four pin connector on the back of the camera as described in the "Physical Interface" chapter. The GPIO line can be set to operate as either as an input line or an output line. This section describes using the GPIO when it is set to operate as an output line. The camera is also equipped with a CL Spare data bit built into the Camera Link interface as specified in the Camera Link standard. On ace Camera Link cameras, the CL Spare data bit can be used as a camera output line. The CL Spare data bit is not available when the camera is set for the 1X8-1Y or the 1X10⁻¹Y tap geometry. The CL Spare data bit is not directly accessible by the camera user. The data bit must be accessed via the frame grabber attached to the camera. Not all frame grabbers provide users with direct access to this bit. Consult your frame grabber supplier for more information. You can get some general information about how this bit is implemented from the Basler document called Ace Camera Link Information for Frame Grabber Designers (AW000990xx000). You can obtain the document from the Downloads section of the Basler website: www.baslerweb.com 6.2.2 Setting the GPIO Line to Operate as an Output The Line Mode parameter is used to set the camera’s GPIO line to operate as an output. NOTICE Applying incorrect electrical signals to the camera’s GPIO line can severely damage the camera. 1. Before you connect any external circuitry to the GPIO line, we strongly recommend that you set the GPIO line mode so that the line will operate as an output. 2. Once the line mode is set, make sure that you only apply electrical signals to the line that are appropriate for the line’s current mode. For more information about the electrical characteristics of the GPIO line, see Section 5.7 on page 35. 54 Basler ace Camera Link AW00098504000 I/O Control Setting the Line Mode Using Basler Pylon You can set the Line Mode parameter value from within your application software by using the pylon API. The following code snippet illustrates using the API to set the line mode: // Configure the GPIO line as an output Camera.LineSelector.SetValue( LineSelector_Line1 ); Camera.LineMode.SetValue( LineMode_Output ); You can also use the Basler pylon Viewer application to easily set the parameters. For more information about the pylon API and the pylon Viewer, see Section 3.1 on page 19. Setting the Line Mode Using Direct Register Access To configure the GPIO line as an output via direct register access: Set the value of the Line Mode Line 1 register to Output. For more information about direct register access, see Section 3.2 on page 21. 6.2.3 Selecting the Source Signal for an Output Line You can select any one of the camera’s standard output signals to act as the source signal for the GPIO line (assuming it is set as an output) or for the CL Spare line. The camera has four standard output signals available: Acquisition Trigger Wait Frame Trigger Wait Exposure Active Frame Cycle You can also designate an output line as "user settable". If an output line is designated as user settable, you can use the camera’s API to set the state of the line as desired. For more information about the acquisition trigger and frame trigger wait signals, see Section 7.1 on page 65. For more information about the exposure active signal, see Section 7.6.1 on page 99. For more information about the frame cycle signal, see Section 7.6.4 on page 112. For more information about setting the state of a user settable output line, see Section 6.2.4 on page 57. For more information about the electrical characteristics of the GPIO line when it is set as an output, see Section 5.7.4 on page 41. Basler ace Camera Link 55 I/O Control AW00098504000 Selecting the Source Signal Using Basler Pylon To select a camera output signal as the source signal for the GPIO line (assuming it is set as an output) or for the CL Spare line, or to designate a line as user settable: Use the Line Selector to select the line. Set the value of the Line Source Parameter to one of the available output signals or to user settable. This will set the source signal for the output line. You can set the Line Selector and the Line Source parameter value from within your application software by using the Basler pylon API. The following code snippet illustrates using the API to set the selector and the parameter value: // Select the GPIO line Camera.LineSelector.SetValue( LineSelector_Line1 ); // Set the source signal for the selected line Camera.LineSource.SetValue( LineSource_ExposureActive ); // Select the CL Spare line Camera.LineSelector.SetValue( LineSelector_ClSpare ); // Set the source signal for the selected line Camera.LineSource.SetValue( LineSource_UserOutput ); You can also use the Basler pylon Viewer application to easily set the parameters. For more information about the pylon API and the pylon Viewer, see Section 3.1 on page 19. Selecting the Source Signal Using Direct Register Access To select a camera output signal as the source signal for the GPIO line (assuming that it is set as an output) or to designate the line as user settable via direct register access: Set the value of the Line Source Line 1 register to Acquisition Trigger Wait, Frame Trigger Wait, Exposure Active, Frame Cycle, or User as desired. To select a camera output signal as the source signal for the CL Spare line or to designate the line as user settable via direct register access: Set the value of the Line Source Line CL Spare register to Acquisition Trigger Wait, Frame Trigger Wait, Exposure Active, Frame Cycle, or User as desired. For more information about direct register access, see Section 3.2 on page 21. 56 Basler ace Camera Link AW00098504000 6.2.4 I/O Control Setting the State of a User Settable Output Line As mentioned in the previous section, the GPIO line (assuming it is set as an output) or the CL Spare line can each be designated as "user settable". If you have designated a line as user settable, you can use camera parameters to set the state of the line. Setting the State Using Basler Pylon To set the state of a user settable output line: Use the User Output Selector to select the GPIO line or the CL Spare line. Set the value of the User Output Value parameter to true (1) or false (0). This will set the state of the output line. You can set the Output Selector and the User Output Value parameter from within your application software by using the Basler pylon API. The following code snippet illustrates using the API to designate a line as user settable and to set the state of the line: // Set the GPIO line to be user settable Camera.LineSelector.SetValue( LineSelector_Line1 ); Camera.LineSource.SetValue( LineSource_UserOutput ); // Select the user settable line and set the state Camera.UserOutputSelector.SetValue( UserOutputSelector_UserOutputLine1 ); Camera.UserOutputValue.SetValue( true ); bool currentUserOutput1State = Camera.UserOutputValue.GetValue( ); // Set the CL Spare line to be user settable Camera.LineSelector.SetValue( LineSelector_ClSpare ); Camera.LineSource.SetValue( LineSource_UserOutput ); // Select the user settable line and set the state Camera.UserOutputSelector.SetValue( UserOutputSelector_UserOutputClSpare ); Camera.UserOutputValue.SetValue( false ); bool currentUserOutput1State = Camera.UserOutputValue.GetValue( ); You can also use the Basler pylon Viewer application to easily set the parameters. If you have the invert function enabled on the output line and the line is designated as user settable, the user setting sets the state of the line before the inverter. For more information about the pylon API and the pylon Viewer, see Section 3.1 on page 19. Basler ace Camera Link 57 I/O Control AW00098504000 Setting the State Using Direct Register Access To set the state of a user settable output line via direct register access: For the GPIO line, set the value of the User Output Line 1 register to 1 (true) or 0 (false) as desired. For the CL Spare line, set the value of the User Output CL Spare register to 1 (true) or 0 (false) as desired. For more information about direct register access, see Section 3.2 on page 21. 58 Basler ace Camera Link AW00098504000 6.2.5 I/O Control Setting an Output Line for Invert You can set the output lines to not invert or to invert. For the GPIO Line If the GPIO line is not set to invert: A low output signal from the camera results in a non-conducting Q1 transistor in the output circuit (see Figure 18). A high output signal from the camera results in a conducting Q1 transistor in the output circuit. If the GPIO line is set to invert: A low output signal from the camera results in a conducting Q1 transistor in the output circuit. A high output signal from the camera results in a non-conducting Q1 transistor in the output circuit. For the CL Spare Line If the CL Spare line is not set to invert: When the source camera signal assigned to the line is high, the CL Spare line will transmit a 1. And when the source signal is low, the CL Spare line will transmit a 0. If the CL Spare line is set to invert: When the source camera signal assigned to the line is high, the CL Spare line will transmit a 0. And when the source signal is low, the CL Spare line will transmit a 1. Camera 4-Pin Receptacle GPIO_Out_Ctrl 120 (from FPGA) U TLP281 1 GPIO_Out 2 3 4.7k Gnd 4 Q1 BC846W 390 GPIO_Gnd Gnd I/O_Gnd Fig. 18: GPIO Line Schematic (GPIO Line Set as an Output) Basler ace Camera Link 59 I/O Control AW00098504000 Setting an Output Line for Invert Using Pylon To set the invert function on an output line: Use the Line Selector to select the GPIO line or the CL Spare line. Set the value of the Line Inverter parameter to true to enable inversion on the selected line or to false to disable inversion. You can set the Line Selector and the Line Inverter parameter value from within your application software by using the pylon API. The following code snippet illustrates using the API to set the selector and the parameter value: // Select the GPIO line Camera.LineSelector.SetValue( LineSelector_Line1 ); // Enable the inverter on the selected line Camera.LineInverter.SetValue( true ); // Select the CL Spare line Camera.LineSelector.SetValue( LineSelector_ClSpare ); // Disable the inverter on the selected line Camera.LineInverter.SetValue( false ); You can also use the Basler pylon Viewer application to easily set the parameters. For more information about the pylon API and the pylon Viewer, see Section 3.1 on page 19. Setting an Output Line for Invert Using Direct Register Access To set the invert function on an output line via direct register access: For the GPIO line, set the value of the Line Inverter Line 1 register to 0 (false) or 1 (true) as desired. For the CL Spare line, set the value of the Line Inverter CL Spare register to 0 (false) or 1 (true) as desired. For more information about direct register access, see Section 3.2 on page 21. 60 Basler ace Camera Link AW00098504000 I/O Control 6.3 Checking the State of the I/O Lines 6.3.1 Checking the State of a Single Line Checking the State Using Basler Pylon You can determine the current state of each I/O line using Basler Pylon: Use the Line Selector parameter to select a line. Read the value of the Line Status parameter to determine the current state of the line. A value of true means the line’s state is currently high and a value of false means the line’s state is currently low. You can set the Line Selector and read the Line Status parameter value from within your application software by using the Basler pylon API. The following code snippet illustrates using the API to set the selector and read the parameter value: // Select the GPIO line and read the state Camera.LineSelector.SetValue( LineSelector_Line1 ); bool Line1State = Camera.LineStatus.GetValue( ); // Select the CLSpare line and read the state Camera.LineSelector.SetValue( LineSelector_ClSpare ); bool ClSpareState = Camera.LineStatus.GetValue( ); // Select the CC1 line and read the state Camera.LineSelector.SetValue( LineSelector_CC1 ); bool CC1 = Camera.LineStatus.GetValue( ); You can also use the Basler pylon Viewer application to easily set the parameters. For more information about the pylon API and the pylon Viewer, see Section 3.1 on page 19. Checking the State Using Direct Register Access To check the current state of an I/O line via direct register access: For the GPIO line, read the value of the Line Status Line 1 register. The value will indicate 1 (true) or 0 (false). For the CL Spare line, read the value of the Line Status CL Spare register. For the CC1 line, read the value of the Line Status CC1 register. For the CC2 line, read the value of the Line Status CC2 register. For the CC3 line, read the value of the Line Status CC3 register. For more information about direct register access, see Section 3.2 on page 21. Basler ace Camera Link 61 I/O Control 6.3.2 AW00098504000 Checking the State of All Lines Checking the State Using Basler Pylon You can determine the current state of all input and output lines by reading the value of the Line Status All parameter. You can read the Line Status All parameter value from within your application software by using the pylon API. The following code snippet illustrates using the API to read the parameter value: int64_t lineState = Camera.LineStatusAll.GetValue( ); The Line Status All parameter is a 32 bit value. As shown in Figure 19, certain bits in the value are associated with each I/O line, and each of these bits will indicate the state of the assocaited line. If a bit is 0, it indicates that the state of the associated line is currently low. If a bit is 1, it indicates that the state of the associated line is currently high. Indicates CC3 state Indicates CC2 state Indicates CL Spare state Indicates CC1 state Indicates line 1 (GPIO) state Fig. 19: Line Status All Parameter Bits You can also use the Basler pylon Viewer application to easily read the parameter. For more information about the pylon API and the pylon Viewer, see Section 3.1 on page 19. Checking the State Using Direct Register Access To check the current state of all I/O lines via direct register access, read the value of the Line Status All register. The register holds a 32 bit value that indicates the state of of each I/O line. The mapping of the bits in the value to I/O lines is similar to the mapping described above for access via Basler pylon. For more information about direct register access, see Section 3.2 on page 21. 62 Basler ace Camera Link AW00098504000 6.4 I/O Control Checking the Line Logic Checking the Line Logic Using Basler Pylon You can determine the type of line logic for each I/O line using Basler Pylon: Use the Line Selector parameter to select a line. Read the value of the Line Logic parameter to determine the type of line logic used by the line. The parameter will indicate whether the logic is positive or negative. You can set the Line Selector and read the Line Logic parameter value from within your application software by using the Basler pylon API. The following code snippet illustrates using the API to set the selector and read the parameter value: // Select the GPIO line and read the line logic type Camera.LineSelector.SetValue( LineSelector_Line1 ); LineLogicEnums lineLogicLine1 = Camera.LineLogic.GetValue( ); // Select the CLSpare line and read line logic type Camera.LineSelector.SetValue( LineSelector_ClSpare ); LineLogicEnums lineLogicClSpare = Camera.LineLogic.GetValue( ); // Select the CC1 line and read the line logic type Camera.LineSelector.SetValue( LineSelector_CC1 ); LineLogicEnums lineLogicCC1 = Camera.LineLogic.GetValue( ); You can also use the Basler pylon Viewer application to easily set the parameters. For more information about the pylon API and the pylon Viewer, see Section 3.1 on page 19. Checking the Line Logic Using Direct Register Access To check the Line Logic of an I/O line via direct register access: For the GPIO line, read the value of the Line Logic Line 1 register. The value will indicate 1 (positive) or 0 (negative). For the CL Spare line, read the value of the Line Logic CL Spare register. For the CC1 line, read the value of the Line Logic CC1 register. For the CC2 line, read the value of the Line Logic CC2 register. For the CC3 line, read the value of the Line Logic CC3 register. For more information about direct register access, see Section 3.2 on page 21. Basler ace Camera Link 63 I/O Control 64 AW00098504000 Basler ace Camera Link AW00098504000 Image Acquisition Control 7 Image Acquisition Control This chapter provides detailed information about controlling image acquisition. You will find information about triggering image acquisition, about setting the exposure time for acquired images, about controlling the camera’s image acquisition rate, and about how the camera’s maximum allowed image acquisition rate can vary depending on the current camera settings. 7.1 Overview This section presents an overview of the elements involved with controlling the acquisition of images. Reading this section will give you an idea about how these elements fit together and will make it easier to understand the detailed information in the sections that follow. Three major elements are involved in controlling the acquisition of images: The acquisition start trigger The frame start trigger Exposure time control When reading the explanations in the overview and in this entire chapter, keep in mind that the term "frame" is typically used to mean a single acquired image. When reading the material in this chapter, it is helpful to refer to Figure 20 on page 67 and to the use case diagrams in Section 7.9 on page 121. These diagrams present the material related to the acquisition start trigger and the frame start trigger in a graphical format. Acquisition Start Trigger The acquisition start trigger is essentially an enabler for the frame start trigger. The acquisition start trigger has two modes of operation: off and on. If the Trigger Mode parameter for the acquisition start trigger is set to off, the camera will generate all required acquisition start trigger signals internally, and you do not need to apply acquisition start trigger signals to the camera. If the Trigger Mode parameter for the acquisition start trigger is set to on, the initial acquisition status of the camera will be "waiting for acquisition start trigger" (see Figure 20 on page 67). When the camera is in this acquisition status, it cannot react to frame start trigger signals. When an acquisition start trigger signal is applied to the camera, the camera will exit the "waiting for acquisition start trigger" acquisition status and enter a "waiting for frame start trigger" acquisition status. The camera can then react to frame start trigger signals. The camera will continue to react to frame start trigger signals until the number of frame start trigger signals it has received is equal to an integer parameter setting called the Acquisition Frame Count. At that point, the camera will return to the "waiting for Basler ace Camera Link 65 Image Acquisition Control AW00098504000 acquisition start trigger" acquisition status and will remain in that status until a new acquisition start trigger signal is applied. As an example, assume that the Acquisition Frame Count parameter is set to three and that the camera is in a "waiting for acquisition start trigger" acquisition status. When an acquisition start trigger signal is applied to the camera, it will exit the "waiting for acquisition start trigger" acquisition status and enter the "waiting for frame start trigger" acquisition status. Once the camera has received three frame start trigger signals, it will return to the "waiting for acquisition start trigger" acquisition status. At that point, you must apply a new acquisition start trigger signal to the camera to make it exit "waiting for acquisition start trigger". Frame Start Trigger Assuming that an acquisition start trigger signal has just been applied to the camera, the camera will exit from the "waiting for acquisition start trigger" acquisition status and enter a "waiting for frame start trigger" acquisition status. Applying a frame start trigger signal to the camera at this point will exit the camera from the "waiting for frame start trigger" acquisition status and will begin the process of exposing and reading out a frame (see Figure 20 on page 67). As soon as the camera is ready to accept another frame start trigger signal, it will return to the "waiting for frame start trigger" acquisition status. A new frame start trigger signal can then be applied to the camera to begin another frame exposure. The frame start trigger has two modes: off and on. If the Trigger Mode parameter for the frame start trigger is set to off, the camera will generate all required frame start trigger signals internally, and you do not need to apply frame start trigger signals to the camera. The rate at which the camera will generate the signals and acquire frames will be determined by the way that you set several frame rate related parameters. If the Trigger Mode parameter for the frame start trigger is set to on, you must trigger frame start by applying frame start trigger signals to the camera. Each time a trigger signal is applied, the camera will begin a frame exposure. When frame start is being triggered in this manner, it is important that you do not attempt to trigger frames at a rate that is greater than the maximum allowed. (There is a detailed explanation about the maximum allowed frame rate at the end of this chapter.) Frame start trigger signals that are applied to the camera when it is not in a "waiting for frame start trigger" acquisition status will be ignored. 66 Basler ace Camera Link AW00098504000 Image Acquisition Control = camera is waiting for an acquisition start trigger signal = camera is waiting for a frame start trigger signal = frame exposure and readout = frame transmission = a frame start trigger signal that will be ignored because the camera is not in a "waiting for frame start trigger" status Acquisition Frame Count parameter setting = 3 Acquisition Start Trigger Signal Frame Start Trigger Signal Time Fig. 20: Acquisition Start and Frame Start Triggering Applying Trigger Signals The paragraphs above mention "applying a trigger signal". There are two ways to apply an acquisition start or a frame start trigger signal to the camera: via software or via hardware. To apply trigger signals via software, you must first select the acquisition start or the frame start trigger and then indicate that software will be used as the source for the selected trigger signal. At that point, the Basler pylon API or direct camera register access can be used to apply a software trigger signal to the camera for the selected trigger. To apply trigger signals via hardware, you must first select the acquisition start or the frame start trigger. You then configure the camera’s GPIO as an input and select the input to be used as the source for the selected trigger. At that point, each time the proper electrical signal is applied to the selected input, an occurrence of the selected trigger signal will be recognized by the camera. Basler ace Camera Link 67 Image Acquisition Control AW00098504000 The Trigger Selector (This Only Applies When You Are Using Basler pylon) If you are using the Basler pylon API to parameterize the camera, the concept of the "trigger selector" is very important to understand when working with the acquisition start and frame start triggers. Many of the parameter settings and the commands that apply to the triggers have names that are not specific to a particular type of trigger, for example, the acquisition start trigger has a mode setting and The frame start trigger has a mode setting. But in Basler pylon there is a single parameter, the Trigger Mode parameter, that is used to set the mode for both of these triggers. Also, the Trigger Software command mentioned earlier can be executed for either the acquisition start trigger or the frame start trigger. So if you want to set the Trigger Mode or execute a Trigger Software command for the acquisition start trigger rather than the frame start trigger, how do you do it? The answer is, by using the Trigger Selector parameter. Whenever you want to work with a specific type of trigger, your first step is to set the Trigger Selector parameter to the trigger you want to work with (either the acquisition start trigger or the frame start trigger). At that point, the changes you make to the Trigger Mode, Trigger Source, etc., will be applied to the selected trigger only. Exposure Time Control As mentioned earlier, when a frame start trigger signal is applied to the camera, the camera will begin to acquire a frame. A critical aspect of frame acquisition is how long the pixels in the camera’s sensor will be exposed to light during the frame acquisition. If the camera is set for software frame start triggering, the camera’s Exposure Time parameter will determine the exposure time for each frame. If the camera is set for hardware frame start triggering, there are two modes of operation: "timed" and "trigger width". With the "timed" mode, the Exposure Time parameter will determine the exposure time for each frame. With the "trigger width" mode, the way that you manipulate the rise and fall of the hardware signal will determine the exposure time. The "trigger width" mode is especially useful if you want to change the exposure time from frame to frame. 68 Basler ace Camera Link AW00098504000 7.2 Image Acquisition Control The Acquisition Start Trigger (When reading this section, it is helpful to refer to Figure 20 on page 67.) The acquisition start trigger is used in conjunction with the frame start trigger to control the acquisition of frames. In essence, the acquisition start trigger is used as an enabler for the frame start trigger. Acquisition start trigger signals can be generated within the camera or may be applied externally as software or hardware acquisition start trigger signals. When the acquisition start trigger is enabled, the camera’s initial acquisition status is "waiting for acquisition start trigger". When the camera is in this acquisition status, it will ignore any frame start trigger signals it receives. If an acquisition start trigger signal is applied to the camera, it will exit the "waiting for acquisition start trigger" acquisition status and enter the "waiting for frame start trigger" acquisition status. In this acquisition status, the camera can react to frame start trigger signals and will begin to expose a frame each time a proper frame start trigger signal is applied. A primary feature of the acquisition start trigger is that after an acquisition start trigger signal has been applied to the camera and the camera has entered the "waiting for frame start trigger" acquisition status, the camera will return to the "waiting for acquisition start trigger" acquisition status once a specified number of frame start triggers has been received. Before more frames can be acquired, a new acquisition start trigger signal must be applied to the camera to exit it from "waiting for acquisition start trigger" status. Note that this feature only applies when the Trigger Mode parameter for the acquisition start trigger is set to on. This feature is explained in greater detail in the following sections. 7.2.1 Acquisition Start Trigger Mode The main parameter associated with the acquisition start trigger is the Trigger Mode parameter. The Trigger Mode parameter for the acquisition start trigger has two available settings: off and on. 7.2.1.1 Acquisition Start Trigger Mode = Off When the Trigger Mode parameter for the acquisition start trigger is set to off, the camera will generate all required acquisition start trigger signals internally, and you do not need to apply acquisition start trigger signals to the camera. 7.2.1.2 Acquisition Start Trigger Mode = On When the Trigger Mode parameter for the acquisition start trigger is set to on, the camera will initially be in a "waiting for acquisition start trigger" acquisition status and cannot react to frame start trigger signals. You must apply an acquisition start trigger signal to the camera to exit the camera from the "waiting for acquisition start trigger" acquisition status and enter the "waiting for frame start trigger" acquisition status. The camera can then react to frame start trigger signals and will continue to do so until the number of frame start trigger signals it has received is equal to the current Acquisition Basler ace Camera Link 69 Image Acquisition Control AW00098504000 Frame Count parameter setting. The camera will then return to the "waiting for acquisition start trigger" acquisition status. In order to acquire more frames, you must apply a new acquisition start trigger signal to the camera to exit it from the "waiting for acquisition start trigger" acquisition status. When the Trigger Mode parameter for the acquisition start trigger is set to on, you must select a source signal to act as the acquisition start trigger. The Trigger Source parameter specifies the source signal. The available selections for the Trigger Source parameter are: Software - When the source signal is set to software, you apply an acquisition start trigger signal to the camera by executing a Trigger Software command for the acquisition start trigger on the host PC. Line 1 - When the source signal is set to line 1, you apply an acquisition start trigger signal to the camera by injecting an externally generated electrical signal (commonly referred to as a hardware trigger signal) into the GPIO line on the camera. This assumes that the GPIO line on the camera has been properly set to operate as an input line. CC1 - When the source signal is set to CC1, you apply an acquisition start trigger signal to the camera by injecting an externally generated electrical signal into CC1 in the Camera Link interface. CC2 - When the source signal is set to CC2, you apply an acquisition start trigger signal to the camera by injecting an externally generated electrical signal into CC2 in the Camera Link interface. CC3 - When the source signal is set to CC3, you apply an acquisition start trigger signal to the camera by injecting an externally generated electrical signal into CC3 in the Camera Link interface. If the Trigger Source parameter for the acquisition start trigger is set to line 1, CC1, CC2, or CC3, you must also set the Trigger Activation parameter. The available settings for the Trigger Activation parameter are: Rising Edge - specifies that a rising edge of the hardware trigger signal will act as the acquisition start trigger. Falling Edge - specifies that a falling edge of the hardware trigger signal will act as the acquisition start trigger. Typically, a frame grabber is used to supply the electrical frame start trigger signal to CC1, CC2, or CC3. For more detailed information about the GPIO line on the camera, see Section 5.7 on page 35. For more detailed information about the CC1, CC2, and CC3 inputs in the Camera Link interface, refer to the document called Ace Camera Link Information for Frame Grabber Designers (AW000990xx000). You can obtain the document from the Downloads section of the Basler website: www.baslerweb.com 70 Basler ace Camera Link AW00098504000 7.2.2 Image Acquisition Control Acquisition Frame Count When the Trigger Mode parameter for the acquisition start trigger is set to on, you must set the value of the camera’s Acquisition Frame Count parameter. The value of the Acquisition Frame Count can range from 1 to 255. With acquisition start triggering on, the camera will initially be in a "waiting for acquisition start trigger" acquisition status. When in this acquisition status, the camera cannot react to frame start trigger signals. If an acquisition start trigger signal is applied to the camera, the camera will exit the "waiting for acquisition start trigger" acquisition status and will enter the "waiting for frame start trigger" acquisition status. It can then react to frame start trigger signals. When the camera has received a number of frame start trigger signals equal to the current Acquisition Frame Count parameter setting, it will return to the "waiting for acquisition start trigger" acquisition status. At that point, you must apply a new acquisition start trigger signal to exit the camera from the "waiting for acquisition start trigger" acquisition status. 7.2.3 Setting The Acquisition Start Trigger Mode and Related Parameters Setting the Parameters Using Basler pylon You can set theTrigger Mode and Trigger Source parameter values for the acquisition start trigger and the Acquisition Frame Count parameter value from within your application software by using the pylon API. The following code snippet illustrates using the API to set the acquisition start Trigger Mode to on, the Trigger Source to software, and the Acquisition Frame Count to 5: // Select the acquisition start trigger Camera.TriggerSelector.SetValue( TriggerSelector_AcquisitionStart ); // Set the mode for the selected trigger Camera.TriggerMode.SetValue( TriggerMode_On ); // Set the source for the selected trigger Camera.TriggerSource.SetValue ( TriggerSource_Software ); // Set the acquisition frame count Camera.AcquisitionFrameCount.SetValue( 5 ); The following code snippet illustrates using the API to set the Trigger Mode to on, the Trigger Source to line 1, the Trigger Activation to rising edge, and the Acquisition Frame Count to 5: // Select the acquisition start trigger Camera.TriggerSelector.SetValue( TriggerSelector_AcquisitionStart ); // Set the mode for the selected trigger Camera.TriggerMode.SetValue( TriggerMode_On ); // Configure the GPIO line as an input Basler ace Camera Link 71 Image Acquisition Control AW00098504000 Camera.LineSelector.SetValue( LineSelector_Line1 ); Camera.LineMode.SetValue( LineMode_Input ); // Set the source for the selected trigger to line 1 Camera.TriggerSource.SetValue ( TriggerSource_Line1 ); // Set the activation mode for the selected trigger to rising edge Camera.TriggerActivation.SetValue( TriggerActivation_RisingEdge ); // Set the acquisition frame count Camera.AcquisitionFrameCount.SetValue( 5 ); You can also use the Basler pylon Viewer application to easily set the parameters. For more information about the pylon API and the pylon Viewer, see Section 3.1 on page 19. For more detailed information about the camera’s GPIO line, see Section 5.7 on page 35. Setting the Parameters Using Direct Register Access To set the parameters related to the acquisition start trigger via direct register access: Set the value of the Trigger Mode Acquisition Start register to On. Set the value of the Trigger Source Acquisition Start register to Software, Line 1, CC1, CC2, or CC3. If the trigger source is set to line 1, set the GPIO line to operate as an input by setting the value of the LineModeLine1 register to Input. If the trigger source is set to line 1, CC1, CC2, or CC3, set the value of the Trigger Activation Acquisition Start register to Rising Edge or Falling Edge. Set the value of the Acquisition Frame Count register as desired. For more information about direct register access, see Section 3.2 on page 21. For more detailed information about the camera’s GPIO line, see Section 5.7 on page 35. 72 Basler ace Camera Link AW00098504000 7.2.4 7.2.4.1 Image Acquisition Control Using a Software Acquisition Start Trigger Signal Introduction If the camera’s Trigger Mode parameter for the acquisition start trigger is set to on and the Trigger Source parameter is set to software, you must apply a software acquisition start trigger signal to the camera before you can begin frame acquisition. The camera will initially be in a "waiting for acquisition start trigger" acquisition status. It cannot react to frame trigger signals when in this acquisition status. When a software acquisition start trigger signal is received by the camera, it will exit the "waiting for acquisition start trigger" acquisition status and will enter the "waiting for frame start trigger" acquisition status. It can then react to frame start trigger signals. When the number of frame start trigger signals received by the camera is equal to the current Acquisition Frame Count parameter setting, the camera will return to the "waiting for acquisition start trigger" acquisition status. When a new software acquisition start trigger signal is applied to the camera, it will again exit from the "waiting for acquisition start trigger" acquisition status and enter the "waiting for frame start trigger" acquisition status. Section 7.2.4.2 includes more detailed information about applying a software acquisition start trigger to the camera using Basler pylon or via direct register access. 7.2.4.2 Setting the Parameters Related to Software Acquisition Start Triggering and Applying a Software Trigger Signal Setting the Parameters and Applying the Signal Using Basler pylon You can set all of the parameters needed to perform software acquisition start triggering from within your application software by using the pylon API. The following code snippet illustrates using the API to set the parameter values and execute the commands related to software acquisition start triggering: // Select the acquisition start trigger Camera.TriggerSelector.SetValue( TriggerSelector_AcquisitionStart ); // Set the mode for the selected trigger Camera.TriggerMode.SetValue( TriggerMode_On ); // Set the source for the selected trigger Camera.TriggerSource.SetValue ( TriggerSource_Software ); // Set the acquisition frame count Camera.AcquisitionFrameCount.SetValue( 5 ); // Execute a trigger software command to apply a software acquisition start trigger // signal to the camera Camera.TriggerSoftware.Execute( ); // Note: as long as the Trigger Selector is set to Acquisition Start, executing // a Trigger Software command will apply an acquisition start software trigger // signal to the camera Basler ace Camera Link 73 Image Acquisition Control AW00098504000 You can also use the Basler pylon Viewer application to easily set the parameters. For more information about the pylon API and the pylon Viewer, see Section 3.1 on page 19. Setting the Parameters and Applying the Signal Using Direct Register Access To set the parameters needed to perform software acquisition start triggering via direct register access: Set the value of the Trigger Mode Acquisition Start register to On. Set the value of the Trigger Source Acquisition Start register to Software. Set the value of the Acquisition Frame Count register as desired. Set the value of the Trigger Software Acquisition Start register to 1. Setting the value of this register to 1 applies a software acquisition start trigger signal to the camera. The register resets to 0 when execution is complete. For more information about direct register access, see Section 3.2 on page 21. 74 Basler ace Camera Link AW00098504000 7.2.5 7.2.5.1 Image Acquisition Control Using a Hardware Acquisition Start Trigger Signal Introduction If the Trigger Mode parameter for the acquisition start trigger is set to on and the Trigger Source parameter is set to line 1, CC1, CC2, or CC3, an externally generated electrical signal injected into the selected source will be will act as the acquisition start trigger signal for the camera. This type of trigger signal is generally referred to as a hardware trigger signal or as an external acquisition start trigger signal (ExASTrig). If the Trigger Source is set to line 1, the GPIO line must be properly set to operate as an input in order to accept the trigger signal. A rising edge or a falling edge of the ExASTrig signal can be used to trigger acquisition start. The Trigger Activation parameter is used to select rising edge or falling edge triggering. When the Trigger Mode parameter is set to on, the camera will initially be in a "waiting for acquisition start trigger" acquisition status. It cannot react to frame start trigger signals when in this acquisition status. When the appropriate ExASTrig signal is applied to the selected source (e.g, a rising edge of the signal for rising edge triggering), the camera will exit the "waiting for acquisition start trigger" acquisition status and will enter the "waiting for frame start trigger" acquisition status. It can then react to frame start trigger signals. When the number of frame start trigger signals received by the camera is equal to the current Acquisition Frame Count parameter setting, the camera will return to the "waiting for acquisition start trigger" acquisition status. When a new ExASTrig signal is applied to the selected source, the camera will again exit from the "waiting for acquisition start trigger" acquisition status and enter the "waiting for frame start trigger" acquisition status. For more information about setting the camera for hardware acquisition start triggering and selecting the source to receive the ExASTrig signal, see Section 7.2.5.3 on page 76. For more information about the electrical requirements for the GPIO line when it is set to operate as an input, see Section 5.7.2 on page 35. For more information about CC1, CC2, and CC3, see Section 6.1 on page 49. 7.2.5.2 Acquisition Start Trigger Delay The acquisition start trigger delay feature lets you specify a delay (in microseconds) that will be applied between the receipt of each hardware acquisition start trigger signal by the camera and when the trigger signal will become effective. The acquisition start trigger delay may be specified in the range from 0 to 10000000 µs (equivalent to 10 s). When the delay is set to 0 µs, no delay will be applied. If you are parameterizing the camera with Basler pylon, the Trigger Delay Abs parameter will determine the length of the delay. If you are parameterizing the camera via direct register access, the Trigger Delay Raw Acquisition Start register will determine the length of the delay. Basler ace Camera Link 75 Image Acquisition Control AW00098504000 The acquisition start trigger delay will not operate if the Acquisition Start Trigger Mode parameter is set to off or if you are using a software acquisition start trigger. 7.2.5.3 Setting the Parameters Related to Hardware Acquisition Start Triggering and Applying a Hardware Trigger Signal Setting the Parameters Using Basler pylon and Applying a Signal You can set all of the parameters needed to perform hardware acquisition start triggering from within your application software by using the pylon API. The following code snippet illustrates using the API to set the parameter values required to enable rising edge hardware acquisition start triggering with line 1 as the trigger source: // Select the acquisition start trigger Camera.TriggerSelector.SetValue( TriggerSelector_AcquisitionStart ); // Set the mode for the selected trigger Camera.TriggerMode.SetValue( TriggerMode_On ); // Configure the GPIO line as an input Camera.LineSelector.SetValue( LineSelector_Line1 ); Camera.LineMode.SetValue( LineMode_Input ); // Set the source for the selected trigger to line 1 Camera.TriggerSource.SetValue ( TriggerSource_Line1 ); // Set the activation mode for the selected trigger to rising edge Camera.TriggerActivation.SetValue( TriggerActivation_RisingEdge ); // Set the acquisition frame count Camera.AcquisitionFrameCount.SetValue( 5 ); // Apply a rising edge of the externally generated electrical signal // (ExASTrig signal) to line 1 on the camera You can also use the Basler pylon Viewer application to easily set the parameters. For more information about the pylon API and the pylon Viewer, see Section 3.1 on page 19. For more detailed information about the camera’s GPIO line, see Section 5.7 on page 35. 76 Basler ace Camera Link AW00098504000 Image Acquisition Control Setting the Parameters Using Direct Register Access and Applying a Signal To set the parameters needed to perform hardware acquisition start triggering via direct register access: Set the value of the Trigger Mode Acquisition Start register to On. Set the value of the Trigger Source Acquisition Start register to Line 1, CC1, CC2, or CC3. If the trigger source is set to line 1, set the GPIO line to operate as an input by setting the value of the LineModeLine1 register to Input. Set the value of the Trigger Activation Acquisition Start register to Rising Edge or Falling Edge. Set the value of the Acquisition Frame Count register as desired. Apply the appropriate externally generated electrical signal (ExASTrig signal) to the selected trigger source. For more information about direct register access, see Section 3.2 on page 21. For more detailed information about the camera’s GPIO line, see Section 5.7 on page 35. Basler ace Camera Link 77 Image Acquisition Control 7.3 AW00098504000 The Frame Start Trigger The frame start trigger is used to begin frame acquisition. Assuming that the camera is in a "waiting for frame start trigger" acquisition status, it will begin a frame acquisition each time it receives a frame start trigger signal. (For a quick overview of acquisition start triggering and frame start triggering, see Section 7.1 on page 65.) When reading this section, it is helpful to refer to Figure 20 on page 67 and the use case diagrams that appear in Section 7.9 on page 121. 7.3.1 Frame Start Trigger Mode The main parameter associated with the frame start trigger is the Trigger Mode parameter. The Trigger Mode parameter for the frame start trigger has two available settings: off and on. 7.3.1.1 Frame Start Trigger Mode = Off When the Trigger Mode parameter for the frame start trigger is set to off, the camera will generate all required frame start trigger signals internally, and you do not need to apply frame start trigger signals to the camera. If you are using Basler pylon to parameterize the camera, the rate at which the frame start trigger signals will be generated is determined by the camera’s Acquisition Frame Rate Abs parameter: If the parameter is not enabled, the camera will generate frame start trigger signals at the maximum rate allowed given the current camera settings. If the parameter is enabled and is set to a value less than the maximum allowed frame rate, the camera will generate frame start trigger signals at the rate specified by the parameter setting. If the parameter is enabled and is set to a value greater than the maximum allowed frame rate, the camera will generate frame start trigger signals at the maximum allowed frame rate. If you are using direct register access to parameterize the camera, the rate at which the frame start trigger signals will be generated is determined by the camera’s Acquisition Frame Period Raw parameter (Frame Rate = 1/ Frame Period): If the parameter is not enabled, the camera will generate frame start trigger signals at the maximum rate allowed given the current camera settings. If the parameter is enabled and is set to a value that would result in a frame rate less than the maximum allowed, the camera will generate frame start trigger signals at the rate that results from the parameter setting. If the parameter is enabled and is set to a value that would result in a frame rate greater than the maximum allowed given the current camera settings, the camera will generate frame start trigger signals at the maximum allowed frame rate. 78 Basler ace Camera Link AW00098504000 Image Acquisition Control Exposure Time Control with the Frame Start Trigger Off When the Trigger Mode parameter for the frame start trigger is set to off, the exposure time for each frame acquisition is determined by: the value of the camera’s Exposure Time Abs parameter if you are parameterizing the camera using Basler pylon. the value in the camera’s Exposure Time Raw register if you are parameterizing the camera using direct register access. For more information about setting the Exposure Time Abs parameter or the Exposure Time Raw register, see Section 7.4 on page 94. 7.3.1.2 Frame Start Trigger Mode = On When the Trigger Mode parameter for the frame start trigger is set to on, you must apply a frame start trigger signal to the camera each time that you want to begin a frame acquisition. The Trigger Source parameter specifies the source signal that will act as the frame start trigger. The available selections for the Trigger Source parameter are: Software - When the source signal is set to software, you apply a frame start trigger signal to the camera by executing a Trigger Software command for the frame start trigger on the host PC. Line 1 - When the source signal is set to line 1, you apply a frame start trigger signal to the camera by injecting an externally generated electrical signal (commonly referred to as a hardware trigger signal) into the GPIO line on the camera. This assumes that the GPIO line on the camera has been properly set to operate as an input line. CC1 - When the source signal is set to CC1, you apply a frame start trigger signal to the camera by injecting an externally generated electrical signal into CC1 in the Camera Link interface. CC2 - When the source signal is set to CC2, you apply a frame start trigger signal to the camera by injecting an externally generated electrical signal into CC2 in the Camera Link interface. CC3 - When the source signal is set to CC3, you apply a frame start trigger signal to the camera by injecting an externally generated electrical signal into CC3 in the Camera Link interface. If the Trigger Source parameter is set to line 1, line 2, CC1, CC2, or CC3, you must also set the Trigger Activation parameter. The available settings for the Trigger Activation parameter are: Rising Edge - specifies that a rising edge of the hardware trigger signal will act as the frame start trigger. Falling Edge - specifies that a falling edge of the hardware trigger signal will act as the frame start trigger. Basler ace Camera Link 79 Image Acquisition Control AW00098504000 Typically, a frame grabber is used to supply an electrical frame start signal to CC1, CC2, or CC3. For more detailed information about the camera’s GPIO line, see Section 5.7 on page 35. For more information about using a software trigger to control frame acquisition start, see Section 7.3.2 on page 83. For more information about using a hardware trigger to control frame acquisition start, see Section 7.3.3 on page 86. Exposure Time Control with the Frame Start Trigger On When the Trigger Mode parameter for the frame start trigger is set to on and the Trigger Source parameter is set to software, the exposure time for each frame acquisition is determined by: the value of the camera’s Exposure Time Abs parameter if you are parameterizing the camera using Basler pylon. the value in the camera’s Exposure Time Raw register if you are parameterizing the camera using direct register access. When the Trigger Mode parameter is set to on and the Trigger Source parameter is set to line 1, CC1, CC2, or CC3, the exposure time for each frame acquisition can be controlled using one of the values mentioned in the two bullet points above or it can be controlled by manipulating the hardware trigger signal. For more information about controlling exposure time when using a software trigger, see Section 7.3.2 on page 83. For more information about controlling exposure time when using a hardware trigger, see Section 7.3.3 on page 86. 80 Basler ace Camera Link AW00098504000 7.3.1.3 Image Acquisition Control Setting the Frame Start Trigger Mode and Related Parameters Setting the Parameters Using Basler pylon You can set the Trigger Mode and related parameter values from within your application software by using the pylon API. If your settings make it necessary, you can also set the Trigger Source parameter. The following code snippet illustrates using the API to set the Trigger Mode parameter for the frame start trigger to on and the Trigger Source parameter to CC1: // Select the frame start trigger Camera.TriggerSelector.SetValue( TriggerSelector_FrameStart ); // Set the mode for the selected trigger Camera.TriggerMode.SetValue( TriggerMode_On ); // Set the source for the selected trigger Camera.TriggerSource.SetValue ( TriggerSource_CC1 ); The following code snippet illustrates using the API to set the Trigger Mode parameter for the frame start trigger to on and the Trigger Source parameter to line 1: // Select the frame start trigger Camera.TriggerSelector.SetValue( TriggerSelector_FrameStart ); // Set the mode for the selected trigger Camera.TriggerMode.SetValue( TriggerMode_On ); // Configure the GPIO line as an input Camera.LineSelector.SetValue( LineSelector_Line1 ); Camera.LineMode.SetValue( LineMode_Input ); // Set the source for the selected trigger to line 1 Camera.TriggerSource.SetValue ( TriggerSource_Line1 ); The following code snippet illustrates using the API to set the Trigger Mode parameter for the frame start trigger to off and the Acquisition Frame Rate Abs parameter to 60: // Select the frame start trigger Camera.TriggerSelector.SetValue( TriggerSelector_FrameStart ); // Set the mode for the selected trigger Camera.TriggerMode.SetValue( TriggerMode_Off ); // Set the exposure time Camera.ExposureTimeAbs.SetValue( 3000 ); // Enable the acquisition frame rate parameter and set the frame rate. (Enabling // the acquisition frame rate parameter allows the camera to control the frame // rate internally. Camera.AcquisitionFrameRateEnable.SetValue( true ); Camera.AcquisitionFrameRateAbs.SetValue( 60.0 ); You can also use the Basler pylon Viewer application to easily set the parameters. For more information about the pylon API and the pylon Viewer, see Section 3.1 on page 19. For more detailed information about the camera’s GPIO line, see Section 5.7 on page 35. Basler ace Camera Link 81 Image Acquisition Control AW00098504000 Setting the Parameters Using Direct Register Access To set the trigger mode for the frame start trigger to on and to select a trigger source via direct register access: Set the value of the Trigger Mode Frame Start register to On. Set the value of the Trigger Source Frame Start register to Software, Line 1, CC1, CC2, or CC3. If the trigger source is set to Line 1, set the GPIO line to operate as an input by setting the value of the Line Mode Line 1 register to Input. If the trigger source is set to line 1, CC1, CC2, or CC3, set the value of the Trigger Activation Frame Start register to Rising Edge or Falling Edge. To set the trigger mode for the frame start trigger to off, set the exposure time, and set the frame acquisition rate via direct register access: Set the value of the Trigger Mode Frame Start register to Off. Set the value of the Exposure Time Raw register as desired. A value in a raw register is simply an integer value with no units. To determine what the actual setting will be, you must multiply the value in the raw register by the camera’s time base. The time base on ace cameras is 1 µs. For example, if you set the Exposure Time Raw register to 1000, the exposure time would be 1000 µs (1000 x 1 µs = 1000 µs). Set the value of the Acquisition Frame Period Enable register to 1 (true). (This will enable the camera’s ability to internally control the frame period.) Set the value of the Acquisition Frame Period Raw register as desired. (Frame Rate = 1 /Frame Period.) For more information about direct register access, see Section 3.2 on page 21. For more detailed information about the camera’s GPIO line, see Section 5.7 on page 35. 82 Basler ace Camera Link AW00098504000 7.3.2 7.3.2.1 Image Acquisition Control Using a Software Frame Start Trigger Signal Introduction If the Trigger Mode parameter for the frame start trigger is set to on and the Trigger Source parameter is set to software, you must apply a software frame start trigger signal to the camera to begin each frame acquisition. Assuming that the camera is in a "waiting for frame start trigger" acquisition status, frame exposure will start when the software frame start trigger signal is received by the camera. Figure 21 illustrates frame acquisition with a software frame start trigger signal. When the camera receives a software trigger signal and begins exposure, it will exit the "waiting for frame start trigger" acquisition status because at that point, it cannot react to a new frame start trigger signal. As soon as the camera is capable of reacting to a new frame start trigger signal, it will automatically return to the "waiting for frame start trigger" acquisition status. When you are using a software trigger signal to start each frame acquisition, the camera’s Exposure Mode parameter must be set to timed. The exposure time for each acquired frame will be determined by the value of the camera’s Exposure Time Abs parameter if you are parameterizing the camera with Basler pylon or by the Exposure Time Raw parameter if you are parameterizing the camera via direct register access. Software Frame Start Trigger Signal Received Software Frame Start Trigger Signal Received Frame Acquisition Exposure Exposure (duration determined by the exposure time parameter) Fig. 21: Frame Acquisition with a Software Frame Start Trigger When you are using a software trigger signal to start each frame acquisition, the frame rate will be determined by how often you apply a software trigger signal to the camera, and you should not attempt to trigger frame acquisition at a rate that exceeds the maximum allowed with the current camera settings. (There is a detailed explanation about the maximum allowed frame rate at the end of this chapter.) Software frame start trigger signals that are applied to the camera when it is not ready to receive them will be ignored. Section 7.3.2.2 includes more detailed information about applying a software frame start trigger signal to the camera using Basler pylon or via direct register access. For more information about determining the maximum allowed frame rate with the current camera settings, see Section 7.8 on page 117. Basler ace Camera Link 83 Image Acquisition Control 7.3.2.2 AW00098504000 Setting the Parameters Related to Software Frame Start Triggering and Applying a Software Trigger Signal Setting the Parameters and Applying the Signal Using Basler pylon You can set all of the parameters needed to perform software frame start triggering from within your application software by using the Basler pylon API. The following code snippet illustrates using the API to set the parameter values and execute the commands related to software frame start triggering. In this example, the acquisition start trigger mode will be set to off: // Select the acquisition start trigger Camera.TriggerSelector.SetValue( TriggerSelector_AcquisitionStart ); // Set the mode for the selected trigger Camera.TriggerMode.SetValue( TriggerMode_Off ); // Disable the acquisition frame rate parameter (this will disable the camera’s // internal frame rate control and allow you to control the frame rate with // software frame start trigger signals) Camera.AcquisitionFrameRateEnable.SetValue( false ); // Select the frame start trigger Camera.TriggerSelector.SetValue( TriggerSelector_FrameStart ); // Set the mode for the selected trigger Camera.TriggerMode.SetValue( TriggerMode_On ); // Set the source for the selected trigger Camera.TriggerSource.SetValue ( TriggerSource_Software ); // Set for the timed exposure mode Camera.ExposureMode.SetValue( ExposureMode_Timed ); // Set the exposure time Camera.ExposureTimeAbs.SetValue( 3000 ); while ( ! finished ) { // Execute a trigger software command to apply a frame start // trigger signal to the camera Camera.TriggerSoftware.Execute( ); // Retrieve acquired frame here } // Note: as long as the Trigger Selector is set to FrameStart, executing // a Trigger Software command will apply a software frame start trigger // signal to the camera The following code snippet illustrates using the API to check the acquisition status: // Set the acquisition status selector Camera.AcquisitionStatusSelector.SetValue ( AcquisitionStatusSelector_FrameTriggerWait ); // Read the acquisition status bool IsWaitingForFrameTrigger = Camera.AcquisitionStatus.GetValue(); 84 Basler ace Camera Link AW00098504000 Image Acquisition Control You can also use the Basler pylon Viewer application to easily set the parameters. For more information about the pylon API and the pylon Viewer, see Section 3.1 on page 19. Setting the Parameters and Applying the Signal Using Direct Register Access To set the parameters needed to perform software frame start triggering via direct register access (with the acquisition start trigger mode set to off): Set the value of the Trigger Mode Acquisition Start register to Off. Set the value of the Acquisition Frame Period Enable register to 0 (false). (This will disable the camera’s ability to internally control the frame period and allow you to control the frame rate with a software trigger signals.) Set the value of the Trigger Mode Frame Start register to On. Set the value of the Trigger Source Frame Start register to Software. Set the value of the Exposure Mode register to Timed. Set the value of the Exposure Time Raw parameter as desired. A value in a raw register is simply an integer value with no units. To determine what the actual setting will be, you must multiply the value in the raw register by the camera’s time base. The time base on ace cameras is 1 µs. For example, if you set the Exposure Time Raw register to 1000, the exposure time would be 1000 µs (1000 x 1 µs = 1000 µs). Set the value of the Trigger Software Frame Start register to 1. Setting the value of this register to 1 applies a software frame start trigger to the camera. The register resets to 0 when execution is complete. To determine the acquisition status of the camera via direct register access: Read the value of the Status Frame Trigger Wait register. A value of 0 indicates that the camera is not ready to receive a frame start trigger. A value of 1 indicates that the camera is ready to receive a frame start trigger. For more information about direct register access, see Section 3.2 on page 21. Basler ace Camera Link 85 Image Acquisition Control 7.3.3 7.3.3.1 AW00098504000 Using a Hardware Frame Start Trigger Signal Introduction If the Trigger Mode parameter for the frame start trigger is set to on and the Trigger Source parameter is set to line 1, CC1, CC2, or CC3, an externally generated electrical signal injected into the selected source will act as the frame start trigger signal for the camera. This type of trigger signal is generally referred to as a hardware trigger signal or as an external frame start trigger signal (ExFSTrig signal). If the Trigger Source is set to line 1, the GPIO line must be properly set to operate as an input in order to accept the trigger signal. A rising edge or a falling edge of the ExFSTrig signal can be used to trigger frame acquisition. The Trigger Activation parameter is used to select rising edge or falling edge triggering. Assuming that the camera is in a "waiting for frame start trigger" acquisition status, frame acquisition will start when the hardware frame start trigger signal is received by the camera. When the camera receives a hardware trigger signal and begins exposure, it will exit the "waiting for frame start trigger" acquisition status because at that point, it cannot react to a new frame start trigger signal. As soon as the camera is capable of reacting to a new frame start trigger signal, it will automatically return to the "waiting for frame start trigger" acquisition status. When the camera is operating under control of an ExFSTrig signal, the period of the ExFSTrig signal will determine the rate at which the camera will acquire frames: 1 ------------------------------------------------------------------------- = Frame Rate ExFSTrig period in seconds For example, if you are operating a camera with an ExFSTrig signal period of 20 ms (0.020 s): 1 --------------- = 50 fps 0.020 So in this case, the frame rate is 50 fps. If you have selected CC1, CC2, or CC3 as the trigger source, your frame grabber will typically apply the electrical signal to the selected input via the Camera Link cable. For more information about applying an ExFSTrig signal to CC1, CC2, or CC3, see the documentation for your frame grabber. If you have selected line 1 as the trigger source, some other kind of external electrical device will be used to apply the electrical signal to the selected input. 86 Basler ace Camera Link AW00098504000 Image Acquisition Control If you are triggering frame acquisition with an ExFSTrig signal and you attempt to acquire frames at too high a rate, some of the frame trigger signals that you apply will be received by the camera when it is not in a "waiting for frame start trigger" acquisition status. The camera will ignore any frame start trigger signals that it receives when it is not "waiting for frame start trigger". (This situation is commonly referred to as "overtriggering" the camera. To avoid overtriggering, you should not attempt to acquire frames at a rate that exceeds the maximum allowed with the current camera settings. For more information about determining the maximum allowed frame rate with the current camera settings, see Section 7.8 on page 117. For more information about setting the camera for hardware triggering and selecting the source to receive the ExFSTrig signal, see Section 7.3.3.4 on page 91. For more information about the electrical requirements for the GPIO line when it is set to operate as an input, see Section 5.7.2 on page 35. For more information about CC1, CC2, and CC3, see Section 6.1 on page 49. 7.3.3.2 Exposure Modes If you are triggering the start of frame acquisition with an externally generated frame start trigger (ExFSTrig) signal, two exposure modes are available: timed and trigger width. Timed Exposure Mode When timed mode is selected, the exposure time for each frame acquisition is determined by: the value of the camera’s Exposure Time Abs parameter if you are parameterizing the camera with Basler pylon. the value of the Exposure Time Raw register if you are parameterizing the camera via direct register access. Basler ace Camera Link 87 Image Acquisition Control AW00098504000 If the camera is set for rising edge triggering, the exposure time starts when the ExFSTrig signal rises. If the camera is set for falling edge triggering, the exposure time starts when the ExFSTrig signal falls. Figure 22 illustrates timed exposure with the camera set for rising edge triggering. ExFSTrig Signal Period ExFSTrig Signal Exposure (duration determined by the exposure time parameter) Fig. 22: Timed Exposure with Rising Edge Triggering Note that if you attempt to trigger a new exposure start while the previous exposure is still in progress, the trigger signal will be ignored, and an over trigger error will be generated. This situation is illustrated in Figure 23 for rising edge triggering. This rise in the trigger signal will be ignored, and an over trigger error will be generated ExFSTrig Signal Exposure (duration determined by the exposure time parameter) Fig. 23: Overtriggering with Timed Exposure For more information about setting the exposure time, see Section 7.3.3.4 on page 91. For more information about the over trigger error, see Section 10.10 on page 208. 88 Basler ace Camera Link AW00098504000 Image Acquisition Control Trigger Width Exposure Mode When trigger width exposure mode is selected, the length of the exposure for each frame acquisition will be directly controlled by the ExFSTrig signal. If the camera is set for rising edge triggering, the exposure time begins when the ExFSTrig signal rises and continues until the ExFSTrig signal falls. If the camera is set for falling edge triggering, the exposure time begins when the ExFSTrig signal falls and continues until the ExFSTrig signal rises. Figure 24 illustrates trigger width exposure with the camera set for rising edge triggering. Trigger width exposure is especially useful if you intend to vary the length of the exposure time for each captured frame. ExFSTrig Signal Period Exposure ExFSTrig Signal Fig. 24: Trigger Width Exposure with Rising Edge Triggering When you operate the camera in trigger width exposure mode, you must also set the camera’s Exposure Overlap Time Max Abs parameter. This parameter setting will be used by the camera to operate the Frame Trigger Wait signal. You should set the Exposure Overlap Time Max Abs parameter value to represent the shortest exposure time you intend to use. For example, assume that you will be using trigger width exposure mode and that you intend to use the ExFSTrig signal to vary the exposure time in a range from 3000 µs to 5500 µs. In this case you would set the camera’s Exposure Overlap Time Max Abs parameter to 3000 µs. For more information about the Frame Trigger Wait signal and the Exposure Overlap Time Max Abs parameter, see Section 7.6.2.2 on page 104. Basler ace Camera Link 89 Image Acquisition Control 7.3.3.3 AW00098504000 Frame Start Trigger Delay The frame start trigger delay feature lets you specify a delay (in microseconds) that will be applied between the receipt of each hardware frame start trigger signal and when the trigger signal will become effective. The frame start trigger delay may be specified in the range from 0 to 10000000 µs (equivalent to 10 s). When the delay is set to 0 µs, no delay will be applied. If you are parameterizing the camera with Basler pylon, the Trigger Delay Abs parameter will determine the length of the delay. If you are parameterizing the camera via direct register access, the Trigger Delay Raw Frame Start register will determine the length of the delay. The frame start trigger delay will not operate if the Frame Start Trigger Mode is set to off or if you are using a software frame start trigger. 90 Basler ace Camera Link AW00098504000 7.3.3.4 Image Acquisition Control Setting the Parameters Related to Hardware Frame Start Triggering and Applying a Hardware Trigger Signal Setting the Parameters Using Basler pylon and Applying the Signal You can set all of the parameters needed to perform hardware frame start triggering from within your application software by using the pylon API. The following code snippet illustrates using the API to set the parameter values and execute the commands related to hardware frame start triggering with the camera set for the timed exposure mode with rising edge triggering and CC1 as the trigger source. In this example, the trigger mode for the acquisition start trigger will be set to off: // Select the acquisition start trigger Camera.TriggerSelector.SetValue( TriggerSelector_AcquisitionStart ); // Set the mode for the selected trigger Camera.TriggerMode.SetValue( TriggerMode_Off ); // Disable the acquisition frame rate parameter (this will disable the camera’s // internal frame rate control and allow you to control the frame rate with // external frame start trigger signals) Camera.AcquisitionFrameRateEnable.SetValue( false ); // Select the frame start trigger Camera.TriggerSelector.SetValue( TriggerSelector_FrameStart ); // Set the mode for the selected trigger Camera.TriggerMode.SetValue( TriggerMode_On ); // Set the source for the selected trigger Camera.TriggerSource.SetValue ( TriggerSource_CC1 ); // Set the trigger activation mode to rising edge Camera.TriggerActivation.SetValue( TriggerActivation_RisingEdge ); // Set for the timed exposure mode Camera.ExposureMode.SetValue( ExposureMode_Timed ); // Set the exposure time Camera.ExposureTimeAbs.SetValue( 3000 ); // Frame acquisition will start each time the externally generated // frame start trigger signal (ExFSTrig signal)goes high The following code snippet illustrates using the API to set the parameter values and execute the commands related to hardware frame start triggering with the camera set for the trigger width exposure mode with rising edge triggering, with line 1 as the trigger source, and with a trigger delay. In this example, the trigger mode for the acquisition start trigger will be set to off: // Select the acquisition start trigger Camera.TriggerSelector.SetValue( TriggerSelector_AcquisitionStart ); // Set the mode for the selected trigger Camera.TriggerMode.SetValue( TriggerMode_Off ); // Disable the acquisition frame rate parameter (this will disable the camera’s Basler ace Camera Link 91 Image Acquisition Control AW00098504000 // internal frame rate control and allow you to control the frame rate with // external frame start signals) Camera.AcquisitionFrameRateEnable.SetValue( false ); // Select the frame start trigger Camera.TriggerSelector.SetValue( TriggerSelector_FrameStart ); // Set the mode for the selected trigger Camera.TriggerMode.SetValue( TriggerMode_On ); // Configure the GPIO line as an input Camera.LineSelector.SetValue( LineSelector_Line1 ); Camera.LineMode.SetValue( LineMode_Input ); // Set the source for the selected trigger to line 1 Camera.TriggerSource.SetValue ( TriggerSource_Line1 ); // Set the trigger activation mode to rising edge Camera.TriggerActivation.SetValue( TriggerActivation_RisingEdge ); // Set for the trigger width exposure mode Camera.ExposureMode.SetValue( ExposureMode_TriggerWidth ); // Set the trigger delay for one millisecond (1000us == 1ms == 0.001s) double TriggerDelay_us = 1000.0; Camera.TriggerDelayAbs.SetValue( TriggerDelay_us ); // Frame acquisition will start each time the externally generated // frame start trigger signal (ExFSTrig signal)goes high You can also use the Basler pylon Viewer application to easily set the parameters. For more information about the pylon API and the pylon Viewer, see Section 3.1 on page 19. For more detailed information about the camera’s GPIO line, see Section 5.7 on page 35. Setting the Parameters Using Direct Register Access and Applying the Signal To set the parameters needed to perform hardware frame start triggering via direct register access (with the trigger mode for the acquisition start trigger set to off): Set the value of the Trigger Mode Acquisition Start register to Off. Set the value of the Acquisition Frame Period Enable register to 0 (false). (This will disable the camera’s ability to control the frame period internally and allow you to control the frame rate with an external signal.) Set the value of the Trigger Mode Frame Start register to On. Set the value of the Trigger Source Frame Start register to receive the external trigger signal on Line 1, CC1, CC2, or CC3. If the trigger source is set to line 1, set the GPIO line to operate as an input by setting the value of the Line Mode Line 1 register to Input. Set the value of the Trigger Activation Frame Start register to Rising Edge or Falling Edge as desired. Set the value of the Exposure Mode register to Timed or to Trigger Width. If the mode is set to timed, set the value of the Exposure Time Raw register as desired. 92 Basler ace Camera Link AW00098504000 Image Acquisition Control A value in a raw register is simply an integer value with no units. To determine what the actual setting will be, you must multiply the value in the raw register by the camera’s time base. The time base on ace cameras is 1 µs. For example, if you set the Exposure Time Raw register to 1000, the exposure time would be 1000 µs (1000 x 1 µs = 1000 µs). Apply the appropriate externally generated electrical signal (ExFSTrig signal) to the selected trigger source. For more information about direct register access, see Section 3.2 on page 21. For more detailed information about the camera’s GPIO line, see Section 5.7 on page 35. Basler ace Camera Link 93 Image Acquisition Control 7.4 AW00098504000 Setting the Exposure Time This section (Section 7.4) describes how the exposure time can be adjusted "manually", i.e., by setting the value of the exposure time parameter. The camera also has an Exposure Auto function that can automatically adjust the exposure time. Manual adjustment of the exposure time parameter will only work correctly if the Exposure Auto function is disabled. For more information about auto functions in general, see Section 10.9 on page 189. For more information about the Exposure Auto function in particular, see Section 10.9.5 on page 202. If you are operating the camera in any one of the following ways, you must use the camera’s Exposure Time parameter to set the exposure time: the frame start trigger mode is set to off the frame start trigger mode is set to on and the trigger source is set to software the frame start trigger mode is set to on, the trigger source is set to line 1, CC1, CC2, or CC3, and the exposure mode is set to timed The minimum allowed exposure time for all camera models is 24 µs. The maximum allowed exposure time for all camera models is 2500000 µs. Setting the Exposure Time Using Basler pylon If you are parameterizing the camera with Basler pylon, the exposure time is determined by the setting of the Exposure Time Abs parameter. The Exposure Time Abs parameter sets the exposure time in µs. The exposure time should be set in increments of 1 µs. You can use the pylon API to set the Exposure Time Abs parameter value from within your application software. The following code snippet illustrates using the API to set the parameter value: // Set the exposure time to 1000 µs Camera.ExposureTimeAbs.SetValue( 1000 ); You can also use the Basler pylon Viewer application to easily set the parameter. For more information about the pylon API and the pylon Viewer, see Section 3.1 on page 19. Setting the Exposure Time Using Direct Register Access If you are parameterizing the camera via direct register access, the Exposure Time Raw register sets the exposure time. 94 Basler ace Camera Link AW00098504000 Image Acquisition Control To set the exposure time via direct register access: Set the value of the Exposure Time Raw register. A value in a raw register is simply an integer value with no units. To determine what the actual exposure time will be, you must multiply the value in the raw register by the camera’s time base. The time base on ace cameras is 1 µs. For example, if you set the Exposure Time Raw register to 1000, the exposure time would be 1000 µs (1000 x 1 µs = 1000 µs). For more information about direct register access, see Section 3.2 on page 21. Basler ace Camera Link 95 Image Acquisition Control 7.5 AW00098504000 Overlapping Exposure with Sensor Readout The frame acquisition process on the camera includes two distinct parts. The first part is the exposure of the pixels in the imaging sensor. Once exposure is complete, the second part of the process – readout of the pixel values from the sensor – takes place. In regard to this frame acquisition process, there are two common ways for the camera to operate: with “non-overlapped” exposure and with “overlapped” exposure. In the non-overlapped mode of operation, each time a frame is acquired the camera completes the entire exposure/readout process before acquisition of the next frame is started. The exposure for a new frame does not overlap the sensor readout for the previous frame. This situation is illustrated in Figure 25 with the camera set for the trigger width exposure mode. ExFSTrig Signal Frame Acquisition N+1 Frame Acquisition N Exposure Exposure Readout Frame Acquisition N+2 Readout Exposure Readout Time Fig. 25: Non-overlapped Exposure and Readout In the overlapped mode of operation, the exposure of a new frame begins while the camera is still reading out the sensor data for the previously acquire frame. This situation is illustrated in Figure 26 with the camera set for the trigger width exposure mode. ExFSTrig Signal Frame Acquisition N Exposure Readout Frame Acquisition N+1 Exposure Readout Frame Acquisition N+2 Exposure Readout Frame Acquisition N+3 Exposure Readout Time Fig. 26: Overlapped Exposure and Readout 96 Basler ace Camera Link AW00098504000 Image Acquisition Control Determining whether your camera is operating with overlapped or non-overlapped exposure and readout is not a matter of issuing a command or switching a setting on or off. Rather the way that you operate the camera will determine whether the exposures and readouts are overlapped or not. If we define the “frame period” as the time from the start of exposure for one frame acquisition to the start of exposure for the next frame acquisition, then: Exposure will not overlap when: Frame Period > Exposure Time + Readout Time Exposure will overlap when: Frame Period Exposure Time + Readout Time For more information about determining the frame readout time, see Section 7.7 on page 115. Guideline for Overlapped Operation with Trigger Width Exposure If the camera is set for the trigger width exposure mode and you are operating the camera in a way that readout and exposure will be overlapped, there is an important guideline you must keep in mind: You must not end the exposure time of the current frame acquisition until readout of the previously acquired frame is complete. If this guideline is violated, the camera will drop the frame for which the exposure was just ended and will declare an over trigger error. This situation is illustrated in Figure 27 with the camera set for the trigger width exposure mode with rising edge triggering. ExFSTrig Signal Frame Acquisition N Exposure Readout Frame Acquisition N+1 Exposure Readout This exposure was ended too early. The frame will be dropped and an over trigger error declared. Exp Frame Acquisition N+3 Exposure Readout Time Fig. 27: Overtriggering Caused by an Early End of Exposure Basler ace Camera Link 97 Image Acquisition Control AW00098504000 You can avoid violating this guideline by using the camera’s Frame Trigger Wait signal to determine when exposure can safely begin and by properly setting the camera’s Exposure Overlap Time Max Abs parameter. For more information about the Frame Trigger Wait signal and the Exposure Overlap Time Max Abs parameter, see Section 7.6.2.2 on page 104. For more information about trigger width exposure, see Section 7.3.3.2 on page 87. For more information about the over trigger error, see Section 10.10 on page 208. 98 Basler ace Camera Link AW00098504000 Image Acquisition Control 7.6 Acquisition Monitoring Tools 7.6.1 Acquisition Status Indicator If a camera receives a software acquisition start trigger signal when it is not in a "waiting for acquisition start trigger" acquisition status, it will simply ignore the trigger signal and will generate an overtrigger error. If a camera receives a software frame start trigger signal when it is not in a "waiting for frame start trigger" acquisition status, it will simply ignore the trigger signal and will generate an overtrigger error. The camera’s acquisition status indicator gives you the ability to check whether the camera is in a "waiting for acquisition start trigger" acquisition status or in a "waiting for frame start trigger" acquisition status. If you check the acquisition status before you apply each software acquisition start trigger signal or each software frame start trigger signal, you can avoid applying trigger signals to the camera that will be ignored. The acquisition status indicator is designed for use when you are using host control of image acquisition, i.e., when you are using software acquisition start and frame start trigger signals. For more information about the overtrigger error, see Section 10.10.2 on page 209. Checking the Acquisition Status Using Basler Pylon To determine the acquisition status of the camera via the Basler pylon API: Use the Acquisition Status Selector to select the Acquisition Trigger Wait status or the Frame Trigger Wait status. Read the value of the Acquisition Status parameter. If the value is set to "false", the camera is not waiting for the trigger signal. If the value is set to "true", the camera is waiting for the trigger signal. You can check the acquisition status from within your application software by using the Basler pylon API. The following code snippet illustrates using the API to check the acquisition status: // Check the acquisition start trigger acquisition status // Set the acquisition status selector Camera.AcquisitionStatusSelector.SetValue ( AcquisitionStatusSelector_AcquisitionTriggerWait ); // Read the acquisition status bool IsWaitingForAcquisitionTrigger = Camera.AcquisitionStatus.GetValue(); // Check the frame start trigger acquisition status // Set the acquisition status selector Camera.AcquisitionStatusSelector.SetValue ( AcquisitionStatusSelector_FrameTriggerWait ); // Read the acquisition status Basler ace Camera Link 99 Image Acquisition Control AW00098504000 bool IsWaitingForFrameTrigger = Camera.AcquisitionStatus.GetValue(); You can also use the Basler pylon Viewer application to easily set the parameters. For more information about the pylon API and the pylon Viewer, see Section 3.1 on page 19. Checking the Acquisition Status Using Direct Register Access To determine the acquisition start trigger status via the direct register access: Read the value of the Status Acquisition Trigger Wait register. If the value is set to 0, the camera is not waiting for the trigger signal. If the value is set to 1, the camera is waiting for the trigger signal. To determine the frame start trigger status via the direct register access: Read the value of the Status Frame Trigger Wait register. If the value is set to 0, the camera is not waiting for the trigger signal. If the value is set to 1, the camera is waiting for the trigger signal. For more information about direct register access, see Section 3.2 on page 21. 100 Basler ace Camera Link AW00098504000 7.6.2 Image Acquisition Control Trigger Wait Signals If a camera receives a hardware acquisition start trigger signal when it is not in a "waiting for acquisition start trigger" acquisition status, it will simply ignore the trigger signal and will generate an overtrigger error. If a camera receives a hardware frame start trigger signal when it is not in a "waiting for frame start trigger" acquisition status, it will simply ignore the trigger signal and will generate anovertrigger error. The camera’s acquisition trigger wait signal gives you the ability to check whether the camera is in a "waiting for acquisition start trigger" acquisition status. If you check the acquisition trigger wait signal before you apply each hardware acquisition start trigger signal, you can avoid applying acquisition start trigger signals to the camera that will be ignored. The camera’s frame trigger wait signal gives you the ability to check whether the camera is in a "waiting for frame start trigger" acquisition status. If you check the frame trigger wait signal before you apply each hardware frame start trigger signal, you can avoid applying frame start trigger signals to the camera that will be ignored. These signals are designed to be used when you are triggering acquisition start or frame start via a hardware trigger signal. For more information about the overtrigger error, see Section 10.10.2 on page 209. 7.6.2.1 Acquisition Trigger Wait Signal As you are acquiring frames, the camera automatically monitors the acquisition start trigger status and supplies a signal that indicates the current status. The Acquisition Trigger Wait signal will go high whenever the camera enters a "waiting for acquisition start trigger" status. The signal will go low when an external acquisition start trigger (ExASTrig) signal is applied to the camera and the camera exits the "waiting for acquisition start trigger status". The signal will go high again when the camera again enters a "waiting for acquisition trigger" status and it is safe to apply the next acquisition start trigger signal. If you base your use of the ExASTrig signal on the state of the acquisition trigger wait signal, you can avoid "acquisition start overtriggering", i.e., applying an acquisition start trigger signal to the camera when it is not in a "waiting for acquisition start trigger" acquisition status. If you do apply an acquisition start trigger signal to the camera when it is not ready to receive the signal, it will be ignored and an overtrigger error will be reported. Figure 28 illustrates the Acquisition Trigger Wait signal with the Acquisition Frame Count parameter set to 3 and with exposure and readout overlapped. The figure assumes that the trigger mode for the frame start trigger is set to off, so the camera is internally generating frame start trigger signals. Basler ace Camera Link 101 Image Acquisition Control AW00098504000 Acq. Trigger Wait Signal ExASTrig Signal Frame Acquisition Exp. Readout Frame Acquisition Exp. Readout Frame Acquisition Exp. Readout Frame Acquisition Exp. Readout Frame Acquisition Exp. Readout Frame Acquisition Exp. Readout Time = Camera is in a "waiting for acquisition start trigger" status Fig. 28: Acquisition Trigger Wait Signal The acquisition trigger wait signal will only be available when hardware acquisition start triggering is enabled. For more information about the overtrigger error, see Section 10.10.2 on page 209. 102 Basler ace Camera Link AW00098504000 Image Acquisition Control Selecting the Acquisition Trigger Wait Signal as the Source Signal for an Output Line Using Basler Pylon You can select the acquisition trigger wait signal as the source signal for the camera’s GPIO line (assuming it is set as an output) or the CL Spare output line. Selecting a source signal for the output line is a three step process: Configure the GPIO line as an output (if you want to use the GPIO line). Use the Line Selector to the desired line. Set the value of the Line Source Parameter to the acquisition trigger wait signal. You can set the Line Selector and the Line Source parameter value from within your application software by using the Basler pylon API. The following code snippet illustrates using the API to set the selector and the parameter value: // Configure the GPIO line as an output Camera.LineSelector.SetValue( LineSelector_Line1 ); Camera.LineMode.SetValue( LineMode_Output ); //Select the GPIO line Camera.LineSelector.SetValue( LineSelector_Line1 ); //Set the source for the selected line Camera.LineSource.SetValue( LineSource_AcquisitionTriggerWait ); //Select the CL Spare line Camera.LineSelector.SetValue( LineSelector_ClSpare ); //Set the source for the selected line Camera.LineSource.SetValue( LineSource_AcquisitionTriggerWait ); You can also use the Basler pylon Viewer application to easily set the parameters. For more information about the pylon API and the pylon Viewer, see Section 3.1 on page 19. Selecting the Acquisition Trigger Wait Signal as the Source Signal for an Output Line Using Direct Register Access You can select the acquisition trigger wait signal as the source signal for the camera’s GPIO line (assuming it is set as an output) or the CL Spare output line. To select the acquisition trigger wait signal as the source signal for the GPIO line via direct register access: Set the GPIO line to operate as an output by setting the value of the Line Mode Line 1 register to Output. Set the value of the Line Source Line 1 register to Acquisition Trigger Wait. To select the acquisition trigger wait signal as the source signal for the CL Spare line via direct register access: Set the value of the Line Source CL Spare register to Acquisition Trigger Wait. For more information about direct register access, see Section 3.2 on page 21. For more detailed information about the camera’s GPIO line, see Section 5.7 on page 35. Basler ace Camera Link 103 Image Acquisition Control 7.6.2.2 AW00098504000 Frame Trigger Wait Signal Overview As you are acquiring frames, the camera automatically monitors the frame start trigger status and supplies a signal that indicates the current status. The Frame Trigger Wait signal will go high whenever the camera enters a "waiting for frame start trigger" status. The signal will go low when an external frame start trigger (ExFSTrig) signal is applied to the camera and the camera exits the "waiting for frame start trigger status". The signal will go high again when the camera again enters a "waiting for frame trigger" status and it is safe to apply the next frame start trigger signal. If you base your use of the ExFSTrig signal on the state of the frame trigger wait signal, you can avoid "frame start overtriggering", i.e., applying a frame start trigger signal to the camera when it is not in a "waiting for frame start trigger" acquisition status. If you do apply a frame start trigger signal to the camera when it is not ready to receive the signal, it will be ignored and a frame start over trigger error will be declared. Figure 29 illustrates the Frame Trigger Wait signal. The camera is set for the trigger width exposure mode with rising edge triggering and with exposure and readout overlapped. Frame Trigger Wait Signal ExFSTrig Signal Frame Acquisition N Exposure Readout Frame Acquisition N+1 Exposure Readout Frame Acquisition N+2 Exposure Readout Time = Camera is in a "waiting for frame start trigger" status Fig. 29: Frame Trigger Wait Signal The frame trigger wait signal will only be available when hardware frame start triggering is enabled. For more information about the over trigger error, see Section 10.10 on page 208. 104 Basler ace Camera Link AW00098504000 Image Acquisition Control Frame Trigger Wait Signal Details When the camera is set for the timed exposure mode, the rise of the Frame Trigger Wait signal is based on the current exposure time parameter setting and on when readout of the current frame will end. This functionality is illustrated in Figure 30. If you are operating the camera in the timed exposure mode, you can avoid overtriggering by always making sure that the Frame Trigger Wait signal is high before you trigger the start of frame capture. Frame Trig Wait Signal ExFSTrig Signal Frame Acquisition N Exposure The rise of the Frame Trigger Wait signal is based on the end of frame readout and on the current exposure time parameter setting Readout Exp. Time Setting Frame Acquisition N+1 Exposure Readout Exp. Time Setting Frame Acquisition N+2 Exposure Readout Time = Camera is in a "waiting for frame start trigger" status Fig. 30: Frame Trigger Wait Signal with the Timed Exposure Mode Basler ace Camera Link 105 Image Acquisition Control AW00098504000 When the camera is set for the trigger width exposure mode, the rise of the Frame Trigger Wait signal is based on the Exposure Overlap Time Max parameter setting and on when readout of the current frame will end. This functionality is illustrated in Figure 31. Frame Trig Wait Signal ExFSTrig Signal Frame Acquisition N Exposure The rise of the Frame Trigger Wait signal is based on the end of frame readout and on the current Exposure Overlap Time Max parameter setting Readout Exp. Overlap Time Max Abs Setting Frame Acquisition N+1 Exposure Readout Exp. Overlap Time Max Abs Setting Frame Acquisition N+2 Exposure Readout Time = Camera is in a "waiting for frame start trigger" status Fig. 31: Frame Trigger Wait Signal with the Trigger Width Exposure Mode If you are operating the camera in the trigger width exposure mode, you can avoid overtriggering the camera by always doing the following: Setting the camera’s Exposure Overlap Time Max parameter so that it represents the smallest exposure time you intend to use. Making sure that your exposure time is always equal to or greater than the setting for the Exposure Overlap Time Max Abs parameter. Monitoring the camera’s Frame Trigger Wait signal and only using the ExFSTrig signal to start exposure when the Frame Trigger Wait signal is high. You should set the Exposure Overlap Time Max parameter value to represent the shortest exposure time you intend to use. For example, assume that you will be using trigger width exposure mode and that you intend to use the ExFSTrig signal to vary the exposure time in a range from 3000 µs to 5500 µs. In this case you would set the camera’s Exposure Overlap Time Max parameter to 3000 µs. 106 Basler ace Camera Link AW00098504000 Image Acquisition Control Setting the Exposure Overlap Time Max Using Basler Pylon You can use the Basler pylon API to set the Exposure Overlap Time Max Abs parameter value from within your application software by using the the Basler pylon API. The following code snippet illustrates using the API to set the parameter value: // Set the Exposure Overlap Time Max to 3000 µs Camera.ExposureOverlapTimeMaxAbs.SetValue( 3000 ); You can also use the Basler pylon Viewer application to easily set the parameters. Setting the Exposure Overlap Time Max Using Direct Register Access If you are parameterizing the camera via direct register access, the Exposure Overlap Time Max Raw register sets the exposure overlap time max. To set the exposure overlap time max via direct register access: Set the value of the Exposure Overlap Time Max Raw register. A value in a raw register is simply an integer value with no units. To determine what the actual exposure time will be, you must multiply the value in the raw register by the camera’s time base. The time base on ace cameras is 1 µs. For example, if you set the Exposure Overlap Time Max Raw register to 3000, the exposure overlap time max would be 3000 µs (3000 x 1 µs = 3000 µs). Selecting the Frame Trigger Wait Signal as the Source Signal for an Output Line Using Basler Pylon You can select the frame trigger wait signal as the source signal for the camera’s GPIO line (assuming it is set as an output) or the CL Spare output line. Selecting a source signal for the output line is a three step process: Configure the GPIO line as an output (if you want to use the GPIO line). Use the Line Selector to select the desired line. Set the value of the Line Source Parameter to the frame trigger wait signal. You can set the Line Selector and the Line Source parameter value from within your application software by using the Basler pylon API. The following code snippet illustrates using the API to set the selector and the parameter value: // Configure the GPIO line as an output Camera.LineSelector.SetValue( LineSelector_Line1 ); Camera.LineMode.SetValue( LineMode_Output ); //Select the GPIO line Camera.LineSelector.SetValue( LineSelector_Line1 ); Basler ace Camera Link 107 Image Acquisition Control AW00098504000 //Set the source for the selected line Camera.LineSource.SetValue( LineSource_FrameTriggerWait ); //Select the CL Spare line Camera.LineSelector.SetValue( LineSelector_ClSpare ); //Set the source for the selected line Camera.LineSource.SetValue( LineSource_FrameTriggerWait ); You can also use the Basler pylon Viewer application to easily set the parameters. For more information about the pylon API and the pylon Viewer, see Section 3.1 on page 19. Selecting the Frame Trigger Wait Signal as the Source Signal for an Output Line Using Direct Register Access You can select the frame trigger wait signal as the source signal for the camera’s GPIO line (assuming it is set as an output) or the CL Spare output line. To select the frame trigger wait signal as the source signal for the GPIO line via direct register access: Set the GPIO line to operate as an output by setting the value of the Line Mode Line 1 register to Output. Set the value of the Line Source Line 1 register to Frame Trigger Wait. To select the frame trigger wait signal as the source signal for the CL Spare line via direct register access: Set the value of the Line Source CL Spare register to Frame Trigger Wait. For more information about direct register access, see Section 3.2 on page 21. For more detailed information about the camera’s GPIO line, see Section 5.7 on page 35. 108 Basler ace Camera Link AW00098504000 7.6.3 Image Acquisition Control Exposure Active Signal The camera can provide an "exposure active" (ExpAc) output signal. The signal goes high when the exposure time for each frame acquisition begins and goes low when the exposure time ends as shown in Figure 32. (In this example,the camera is operating in the timed exposure mode.) This signal can be used as a flash trigger and is also useful when you are operating a system where either the camera or the object being imaged is movable. For example, assume that the camera is mounted on an arm mechanism and that the mechanism can move the camera to view different portions of a product assembly. Typically, you do not want the camera to move during exposure. In this case, you can monitor the ExpAc signal to know when exposure is taking place and thus know when to avoid moving the camera. Exposure Active Signal ExFSTrig Signal Frame Acquisition N Exposure Readout Frame Acquisition N+1 Exposure Readout Frame Acquisition N+2 Exposure Readout Time = Camera is in a "waiting for frame start trigger" status Fig. 32: Exposure Active Signal Basler ace Camera Link 109 Image Acquisition Control AW00098504000 Selecting the Exposure Active Signal as the Source Signal for an Output Line Using Basler Pylon You can select the exposure active signal as the source signal for the GPIO line (assuming it is set as an output) or the CL Spare output line. Selecting a source signal for the output line is a three step process: Configure the GPIO line as an output (if you want to use the GPIO line). Use the Line Selector to select the desired line. Set the value of the Line Source Parameter to the exposure active output signal. You can set the Line Selector and the Line Source parameter value from within your application software by using the Basler pylon API. The following code snippet illustrates using the API to set the selector and the parameter value: // Configure the GPIO line as an output Camera.LineSelector.SetValue( LineSelector_Line1 ); Camera.LineMode.SetValue( LineMode_Output ); //Select the GPIO line Camera.LineSelector.SetValue( LineSelector_Line1 ); //Set the source signal for the selected line Camera.LineSource.SetValue( LineSource_ExposureActive ); //Select the CL Spare line Camera.LineSelector.SetValue( LineSelector_ClSpare ); //Set the source signal for the selected line Camera.LineSource.SetValue( LineSource_ExposureActive ); You can also use the Basler pylon Viewer application to easily set the parameters. For more information about the pylon API and the pylon Viewer, see Section 3.1 on page 19. For more detailed information about the camera’s GPIO line, see Section 5.7 on page 35. Selecting the Exposure Active Signal as the Source Signal for an Output Line Using Direct Register Access You can select the exposure active signal as the source signal for the camera’s GPIO line (assuming it is set as an output) or the CL Spare output line. To select the exposure active signal as the source signal for the GPIO line via direct register access: Set the GPIO line to operate as an output by setting the value of the Line Mode Line 1 register to Output. Set the value of the Line Source Line 1 register to Exposure Active. To select the exposure active signal as the source signal for the CL Spare line via direct register access: 110 Set the value of the Line Source CL Spare register to Exposure Active. Basler ace Camera Link AW00098504000 Image Acquisition Control For more information about direct register access, see Section 3.2 on page 21. For more detailed information about the camera’s GPIO line, see Section 5.7 on page 35. Basler ace Camera Link 111 Image Acquisition Control 7.6.4 AW00098504000 Frame Cycle Signal The camera can provide a "Frame Cycle" (FrmCyc) output signal. The signal goes high when the camera enters a waiting for frame trigger condition and goes low when the exposure time for the next triggered image ends as shown in Figure 33. (In this example, the camera is operating in the timed exposure mode.) The intention of this signal is to let you monitor these two important points in the acquisition process with a single output signal. Frame Cycle Signal ExFSTrig Signal Frame Acquisition N Exposure Readout Frame Acquisition N+1 Exposure Readout Frame Acquisition N+2 Exposure Readout Time = Camera is in a "waiting for frame start trigger" status Fig. 33: Frame Cycle Signal 112 Basler ace Camera Link AW00098504000 Image Acquisition Control Selecting the Frame Cycle Signal as the Source Signal for an Output Line Using Basler Pylon You can select the frame cycle signal as the source signal for the camera’s GPIO line (assuming it is set as an output) or the CL Spare output line. Selecting a source signal for the output line is a three step process: Configure the GPIO line as an output (if you want to use the GPIO line). Use the Line Selector to select the desired line. Set the value of the Line Source Parameter to the frame cycle output signal. You can set the Line Selector and the Line Source parameter value from within your application software by using the Basler pylon API. The following code snippet illustrates using the API to set the selector and the parameter value: // Configure the GPIO line as an output Camera.LineSelector.SetValue( LineSelector_Line1 ); Camera.LineMode.SetValue( LineMode_Output ); //Select the GPIO line Camera.LineSelector.SetValue( LineSelector_Line1 ); //Set the source signal for the selected line Camera.LineSource.SetValue( LineSource_FrameCycle ); //Select the CL Spare line Camera.LineSelector.SetValue( LineSelector_ClSpare ); //Set the source signal for the selected line Camera.LineSource.SetValue( LineSource_FrameCycle ); You can also use the Basler pylon Viewer application to easily set the parameters. For more information about the pylon API and the pylon Viewer, see Section 3.1 on page 19. For more detailed information about the camera’s GPIO line, see Section 5.7 on page 35. Selecting the Frame Cycle Signal as the Source Signal for an Output Line Using Direct Register Access You can select the frame cycle signal as the source signal for the camera’s GPIO line (assuming it is set as an output) or the CL Spare output line. To select the frame cycle signal as the source signal for the GPIO line via direct register access: Set the GPIO line to operate as an output by setting the value of the Line Mode Line 1 register to Output. Set the value of the Line Source Line 1 register to Frame Cycle. To select the frame cycle signal as the source signal for the CL Spare line via direct register access: Set the value of the Line Source CL Spare register to Frame Cycle. Basler ace Camera Link 113 Image Acquisition Control AW00098504000 For more information about direct register access, see Section 3.2 on page 21. For more detailed information about the camera’s GPIO line, see Section 5.7 on page 35. 114 Basler ace Camera Link AW00098504000 7.7 Image Acquisition Control Acquisition Timing Chart Figure 34 shows a timing chart for frame acquisition and transmission. The chart assumes that exposure is triggered by an externally generated frame start trigger (ExFSTrig) signal with rising edge activation and that the camera is set for the timed exposure mode. As Figure 34 shows, there is a slight delay between the rise of the ExFSTrig signal and the start of exposure. After the exposure time for a frame acquisition is complete, the camera begins reading out the acquired image data from the imaging sensor. After a short delay, the camera will begin transmitting image data from the camera to the host PC. The exposure start delay is the amount of time between the point where the trigger signal transitions and the point where exposure actually begins. Note that, if the debouncer feature is used, the debouncer setting for the input line must be added to the exposure start delay shown in Figure 34 to determine the total start delay. The frame readout time is the amount of time it takes to read out the data for an acquired frame from the imaging sensor. This time period will vary depending on several camera settings such as the image AOI, the Camera Link tap geometry, the Camera Link pixel clock speed, and others. As explained below, you can read the value of the Readout Time parameter to determine the sensor readout time given the current camera settings. The frame transmission time is the amount of time it takes to transmit an acquired frame from the buffer in the camera to the host PC via the network. The frame transmission time will always be equal to the frame readout time. The transmission start delay is the amount of time between the point where the camera begins reading out the acquired frame data from the sensor to the point where it begins transmitting the data for the acquired frame from the buffer to the host PC. FTWait Signal ExFSTrig Signal Exposure Start Delay ( 39 µs) Exposure Exposure Frame N Frame Readout Frame Transmission Exposure Start Delay ( 39 µs) Exposure Frame N+1 Frame N Readout Exposure Frame N+2 Frame N+1 Readout Transmission Start Delay (65 to 200 µs) Transmission Start Delay (65 to 200 µs) Frame N Transmission to Host PC Frame N+1 Transmission to Host PC Timing charts are not drawn to scale Fig. 34: Exposure Start Controlled with an ExFSTrig Signal Basler ace Camera Link 115 Image Acquisition Control AW00098504000 Determining the Frame Readout Time Using Basler Pylon You can determine the frame readout time by reading the value of the Readout Time Abs parameter. The parameter indicates what the readout time will be in microseconds given the camera’s current settings. You can read the Readout Time Abs parameter value from within your application software by using the Basler pylon API. The following code snippet illustrates using the API to get the parameter value: double ReadoutTime = Camera.ReadoutTimeAbs.GetValue( ); You can also use the Basler pylon Viewer application to easily get the parameter value. For more information about the pylon API and the pylon Viewer, see Section 3.1 on page 19. Determining the Frame Readout Time Using Direct Register Access To determine the frame readout time via direct register access: Read the value of the Readout Time Raw register. A value in a raw register is simply an integer value with no units. To determine what the actual exposure time will be, you must multiply the value in the raw register by the camera’s time base. The time base on ace cameras is 1 µs. For example, if you read the Readout Time Raw register value as 18000, the frame readout time would be 18000 µs (18000 x 1 µs = 18000 µs). Note that the frame transmission time is always equal to the frame readout time. 116 Basler ace Camera Link AW00098504000 7.8 Image Acquisition Control Maximum Allowed Frame Acquisition Rate The maximum allowed frame acquisition rate for your camera is not static. It can vary depending on how certain camera features are set. In general, the following factors can affect the maximum allowed frame rate: The Camera Link pixel clock speed and the Camera Link tap geometry settings. When the pixel clock speed is set to a high value, it will take less time to transfer captured images from the camera to the frame grabber in your host PC. When the camera is set for a tap geometry that uses more taps (e.g., the 1X2-1Y geometry uses two taps and the 1X3-1Y geometry uses three taps), it can typically transfer data out of the camera faster. So if the camera is set for a high pixel clock speed and a high number of taps, it typically will have a much higher maximum allowed frame rate than when it is set for a low pixel clock speed and a low number of taps. The sensor bit depth setting. The sensor can capture pixel data at 12 bit or at 10 bit depth. When the sensor is set for 12 bit depth, it operates slower than at 10 bit depth. If you have the sensor set for 10 bit depth, you can acquire images at a significantly higher maximum allowed rate. The amount of time it takes to read the data for an acquired image (known as a frame) out of the imaging sensor. This time varies depending on the height of the frame. The frame height is determined by the camera’s AOI settings. If you use shorter AOIs (i.e., AOIs that include fewer lines), it takes less time to read an acquired frame out of the sensor and you can acquire more frames per second. Decreasing the width of the AOI can also yield a significant increase in the maximum allowed frame rate, but this is only true when the width is lowered in increments of 50% of the sensor width (e.g., from 2048 to 1024 or from 1024 to 512). Whether binning is enabled. Enabling either horizontal or vertical binning may yield a significant increase in the maximum allowed frame rate, but this will only be true if the camera is not already reading out image data at a rate that is near to the current data carrying capacity of the Camera Link interface. The exposure time for acquired frames. If you use very long exposure times, you can acquire fewer frames per second. There are several ways that you can determine the maximum allowed acquisition frame rate with your current camera settings: You can go to the Support section of the Basler website and use the online frame rate calculator: www.baslerweb.com You can use Basler pylon to read the value of the camera’s Resulting Frame Rate Abs parameter (see below). You can use direct register access to read the value of the Resulting Frame Period register (see below). For more information about the image AOI settings, see Section 10.3 on page 160. Basler ace Camera Link 117 Image Acquisition Control AW00098504000 For more information about selectable pixel clock speeds, see Section 10.1 on page 157. For more information about the sensor bit depth, see Section 10.1 on page 157. For more information about Camera Link tap geometries, see Section 9.3 on page 146. Using Basler pylon to Check the Maximum Allowed Frame Rate You can use the Basler pylon API to read the current value of the Resulting Frame Rate Abs parameter from within your application software using the Basler pylon API. The following code snippet illustrates using the API to get the parameter value: // Get the resulting frame rate double resultingFps = Camera.ResultingFrameRateAbs.GetValue(); The Resulting Frame Rate Abs parameter takes all camera settings that can influence the frame rate into account and indicates the maximum allowed frame rate given the current settings. You can also use the Basler pylon Viewer application to easily read the parameter. For more information about the pylon API and the pylon Viewer, see Section 3.1 on page 19. Using Direct Register Access to Check the Maximum Allowed Rate When using direct register access, you work with the "resulting frame period" rather than the frame acquisition rate. Once the resulting frame period is known, the maximum allowed frame acquisition rate can be determined by: 1 Max Frame Acquisition Rate = ---------------------------------------------------------------------------------------------Resulting Frame Period in Seconds To determine the resulting frame period: Check the value of the Resulting Frame Period Raw register. The Resulting Frame Period Raw register takes all of camera settings that can influence the frame period into account and indicates the minimum allowed frame period given the current settings. A value in a raw register is simply an integer value with no units. To determine what the actual frame period will be, you must multiply the value in the raw register by the camera’s time base. The time base on ace cameras is 1 µs. For example, if you read the Resulting Frame Period Raw register and find that its value is 10000, the resulting frame period would be 10000 µs (10000 x 1 µs = 10000 µs). For more information about direct register access, see Section 3.2 on page 21. 118 Basler ace Camera Link AW00098504000 7.8.1 Image Acquisition Control Increasing the Maximum Allowed Frame Rate You may find that you would like to acquire frames at a rate higher than the maximum allowed with the camera’s current settings. In this case, you must adjust one or more of the factors that can influence the maximum allowed rate and then check to see if the maximum allowed rate has increased: If you have the Camera Link pixel clock speed on your camera set to a low value, consider setting it to a higher value. Be aware, however, that some frame grabbers cannot handle higher pixel clock speeds. Before you increase the setting for the camera’s pixel clock, make sure that your frame grabber is compatible with the higher setting. If you are using a Camera Link configuration with a low number of taps, consider using a configuration with a higher number. If you have the sensor bit depth set to 12 bits, consider changing the value to 10 bits. This will typically yield a significant increase in the maximum allowed frame rate. Decreasing the height of the AOI can have a significant impact on the maximum allowed frame rate. If possible in your application, decrease the height of the AOI. Decreasing the width of the AOI can also yield a significant increase in the maximum allowed frame rate, but this is only true when the width is lowered in increments of 50% of the sensor width (e.g., from 2048 to 1024 or from 1024 to 512). If possible in your application, enable either horizontal or vertical binning (or both). This may yield a significant increase in the maximum allowed frame rate, but this will only be true if the camera is not already reading out image data at a rate that is near to the current data carrying capacity of the Camera Link interface. Decreasing the sensor bit depth, decreasing the AOI height, decreasing the AOI width, and enabling binning can each result in an increase in the maximum allowed frame rate because they decrease the time that it takes to read out pixel data from the imaging sensor. But in order to actually see an increase in the maximum allowed frame rate, you must have the pixel clock speed and the number of taps set high enough so that the Camera Link interface can transfer the larger amount of image data that will be generated when the camera is operated at a higher frame rate. If you decrease the bit depth, decrease the AOI Height, decrease the AOI Width, or enable binning and you have the pixel clock speed and the number of taps set to low values, you will see no increase in the maximum allowed frame rate. If you are using normal exposure times and you are using the camera at it’s maximum resolution, your exposure time will not normally restrict the frame rate. However, if you are using long exposure times or a small area of interest, it is possible that your exposure time is limiting the maximum allowed frame rate. If you are using a long exposure time or a small AOI, try using a shorter exposure time and see if the maximum allowed frame rate increases. (You may need to compensate for a shorter exposure time by using a brighter light source or increasing the opening of your lens aperture.) Basler ace Camera Link 119 Image Acquisition Control AW00098504000 An important thing to keep in mind is a common mistake new camera users frequently make when they are working with exposure time. They will often use a very long exposure time without realizing that this can severely limit the camera’s maximum allowed frame rate. As an example, assume that your camera is set to use a 1/2 second exposure time. In this case, because each frame acquisition will take at least 1/2 second to be completed, the camera will only be able to acquire a maximum of two frames per second. Even if the camera’s nominal maximum frame rate is, for example, 100 frames per second, it will only be able to acquire two frames per second because the exposure time is set much higher than normal. For more information about the sensor bit depth feature, see Section 10.1 on page 157. For more information about the image AOI settings, see Section 10.3 on page 160. For more information about selectable pixel clock speeds, see Section 10.1 on page 157. For information about Camera Link tap geometries, see Section 9.3 on page 146. For more information about the exposure time, see Section 7.4 on page 94. 120 Basler ace Camera Link AW00098504000 7.9 Image Acquisition Control Use Case Descriptions and Diagrams The following pages contain a series of use case descriptions and diagrams. The descriptions and diagrams are designed to illustrate how acquisition start triggering and frame start triggering work in some common situations and with some common combinations of parameter settings. These use cases do not represent every possible combination of the parameters associated with acquisition start and frame start triggering. They are simply intended to aid you in developing an initial understanding of how these two triggers interact. In each use case diagram, the black box in the upper left corner indicates how the parameters are set. The use case diagrams are representational. They are not drawn to scale and are not designed to accurately describe precise camera timings. Use Case 1 - Acquisition and Frame Start Triggers Both Off (Free Run) Use case one is illustrated on page 122. In this use case, the Trigger Mode parameter for the acquisition start trigger and the Trigger Mode parameter for the frame start trigger are both set to off. The camera will generate all required acquisition start and frame start trigger signals internally. When the camera is set this way, it will constantly acquire images without the need for any type of triggering by the user. This use case is commonly referred to as "free run". The rate at which the camera will acquire images will normally be determined by the camera’s Acquisition Frame Rate Abs parameter when the camera is parameterized via Basler pylon or by the Acquisition Frame Period Raw register when the camera is parameterized via direct register access. If the Acquisition Frame Rate Abs parameter or the Acquisition Frame Period Raw register (respectively) is disabled, the camera will acquire frames at the maximum allowed frame rate. In the real world, cameras are used in free run for many applications. One example is for aerial photography. A camera set for free run is used to capture a continuous series of images as an aircraft overflies an area. The images can then be used for a variety of purposes including vegetation coverage estimates, archaeological site identification, etc. For more information about the Acquisition Frame Rate Abs parameter and the Acquisition Frame Period Raw register, see Section 7.3.1.1 on page 78 and Section 7.3.1.3 on page 81. Basler ace Camera Link 121 Image Acquisition Control AW00098504000 Use Case: "Free Run" (Acquisition Start Trigger Off and Frame Start Trigger Off) The acquisition start trigger is off. The camera will generate acquisition start trigger signals internally with no action by the user. The frame start trigger is off. The camera will generate frame start trigger signals internally with no action by the user. Settings: Trigger Mode for the acquisition start trigger = Off Trigger Mode for the frame start trigger = Off = a trigger signal generated by the camera internally = camera is waiting for an acquisition start trigger = camera is waiting for a frame start trigger = frame exposure and readout = frame transmission Acquisition Start Trigger Signal Frame Start Trigger Signal Time Fig. 35: Use Case 1 - Acquisition Start Trigger Off and Frame Start Trigger Off 122 Basler ace Camera Link AW00098504000 Image Acquisition Control Use Case 2 - Acquisition Start Trigger Off - Frame Start Trigger On Use case two is illustrated on page 124. In this use case, the Trigger Mode parameter for the acquisition start trigger is set to off and the Trigger Mode parameter for the frame start trigger is set to on. Because the acquisition start trigger is set to off, the user does not need to apply acquisition start trigger signals to the camera. The camera will generate all required acquisition start trigger signals internally. Because the frame start trigger is set to on, the user must apply a frame start trigger signal to the camera in order to begin each frame exposure. In this case, we have set the frame start trigger signal source to line 1 and the activation to rising edge. So, the rising edge of an externally generated electrical signal applied to line 1 will serve as the frame start trigger signal. (Note that the GPIO line is designated as line 1 and in this case it has been set to act as in input line.) This type of camera setup is used frequently in industrial applications. One example might be a wood products inspection system used to inspect the surface of pieces of plywood on a conveyor belt as they pass by a camera. In this situation, a sensing device is usually used to determine when a piece of plywood on the conveyor is properly positioned in front of the camera. When the plywood is in the correct position, the sensing device transmits an electrical signal to line 1 on the camera. When the electrical signal is received on line 1, it serves as a frame start trigger signal and initiates a frame acquisition. The frame acquired by the camera is transmitted to an image processing system that will inspect the image and determine if there are any defects in the plywood’s surface. Basler ace Camera Link 123 Image Acquisition Control AW00098504000 Use Case: Acquisition Start Trigger Off and Frame Start Trigger On The acquisition start trigger is off. The camera will generate acquisition start trigger signals internally with no action by the user. The frame start trigger is on, and the frame start trigger source is set to line 1. The user must apply a frame start trigger signal to line 1 to start each frame exposure. Settings: Trigger Mode for the acquisition start trigger = Off Trigger Mode for the frame start trigger = On Trigger Source for the frame start trigger = Line 1 Trigger Activation for the frame start trigger = Rising Edge = a trigger signal generated by the camera internally = a trigger signal applied by the user = camera is waiting for an acquisition start trigger signal = camera is waiting for a frame start trigger signal = frame exposure and readout = frame transmission Acquisition Start Trigger Signal Frame Start Trigger Signal (applied to line 1) Time Fig. 36: Use Case 2 - Acquisition Start Trigger Off and Frame Start Trigger On 124 Basler ace Camera Link AW00098504000 Image Acquisition Control Use Case 3 - Acquisition Start Trigger On - Frame Start Trigger Off Use case three is illustrated on page 126. In this use case, the Trigger Mode parameter for the acquisition start trigger is set to on and the Trigger Mode parameter for the frame start trigger is set to off. Because the acquisition start trigger mode is set to on, the user must apply an acquisition start trigger signal to the camera. In this case, we have set the acquisition start trigger signal source to line 1 and the activation to rising edge, so an externally generated electrical signal applied to line 1 will serve as the acquisition start trigger signal. The Acquisition Frame Count parameter has been set to 3. (Note that the GPIO line is designated as line 1 and in this case it has been set to act as in input line.) When a rising edge of the electrical signal is applied to line 1, the camera will exit the "waiting for acquisition start trigger" acquisition status and enter a "waiting for frame start trigger" acquisition status. Once the camera has acquired 3 frames, it will re-enter the "waiting for acquisition start trigger" acquisition status. Before any more frames can be acquired, a new rising edge must be applied to line 1 to make the camera exit the "waiting for acquisition start trigger" acquisition status. Because the frame start trigger is set to off, the user does not need to apply frame start trigger signals to the camera. The camera will generate all required frame start trigger signals internally. The rate at which the frame start trigger signals will be generated is normally determined by the camera’s Acquisition Frame Rate Abs parameter when the camera is parameterized via Basler pylon or by the Acquisition Frame Period Raw register the camera is parameterized via direct register access. If the Acquisition Frame Rate Abs parameter or the Acquisition Frame Period Raw register (respectively) is disabled, the camera will acquire frames at the maximum allowed frame rate. This type of camera setup is used frequently in "intelligent traffic systems". With these systems, a typical goal is to acquire several images of a car as it passes through a toll booth. A sensing device is usually placed at the start of the toll booth area. When a car enters the area, the sensing device applies an electrical signal to line 1 on the camera. When the electrical signal is received on line 1, it serves as an acquisition start trigger signal and the camera exits from the "waiting for acquisition start trigger" acquisition status and enters a "waiting for frame trigger" acquisition status. In our example, the next 3 frame start trigger signals internally generated by the camera would result in frame acquisitions. At that point, the number of frames acquired would be equal to the setting for the Acquisition Frame Count parameter. The camera would return to the "waiting for acquisition start trigger" acquisition status and would no longer react to frame start trigger signals. It would remain in this condition until the next car enters the booth area and activates the sensing device. This sort of setup is very useful for traffic system applications because multiple frames can be acquired with only a single acquisition start trigger signal pulse and because frames will not be acquired when there are no cars passing through the booth (this avoids the need to store images of an empty toll both area.) For more information about the Acquisition Frame Rate Abs parameter and the Acquisition Frame Period Raw register, see Section 7.3.1.1 on page 78 and Section 7.3.1.3 on page 81. Basler ace Camera Link 125 Image Acquisition Control AW00098504000 Use Case: Acquisition Start Trigger On and Frame Start Trigger Off The acquisition start trigger is on, and the acquisition start trigger source is set to line 1. The user must apply an acquisition start trigger signal to line 1 to make the camera exit the "waiting for acquisition start trigger" acquisition status. Because the acquisition frame count is set to 3, the camera will reenter the "waiting for acquisition start trigger" acquisition status after 3 frames have been acquired. The frame start trigger is off. The camera will generate frame start trigger signals internally with no action by the user. Settings: Trigger Mode for the acquisition start trigger = On Trigger Source for the acquisition start trigger = Line 1 Trigger Activation for the acquisition start trigger = Rising Edge Acquisition Frame Count = 3 Trigger Mode for the frame start trigger = Off = a trigger signal generated by the camera internally = a trigger signal applied by the user = camera is waiting for an acquisition start trigger signal = camera is waiting for a frame start trigger signal = frame exposure and readout = frame transmission Acquisition Start Trigger Signal (applied to line 1) Frame Start Trigger Signal Time Fig. 37: Use Case 3 - Acquisition Start Trigger On and Frame Start Trigger Off 126 Basler ace Camera Link AW00098504000 Image Acquisition Control Use Case 4 - Acquisition Start and Frame Start Triggers On Use case four is illustrated on page 128. In this use case, the Trigger Mode parameter for the acquisition start trigger is set to on and the Trigger Mode parameter for the frame start trigger is set to on. Because the acquisition start trigger mode is set to on, the user must apply an acquisition start trigger signal to the camera. In this case, we have set the acquisition start trigger signal source to software, so the execution of an acquisition trigger software command will serve as the acquisition start trigger signal. The Acquisition Frame Count parameter is set to 3. When an acquisition trigger software command is executed, the camera will exit the "waiting for acquisition start trigger" acquisition status and enter a "waiting for frame start trigger" acquisition status. Once the camera has acquired 3 frames, it will re-enter the "waiting for acquisition start trigger" acquisition status. Before any more frames can be acquired, a new acquisition trigger software command must be executed to make the camera exit the "waiting for acquisition start trigger" acquisition status. Because the frame start trigger is set to on, the user must apply a frame start trigger signal to the camera in order to begin each frame acquisition. In this case, we have set the frame start trigger signal source to line 1 and the activation to rising edge, so the rising edge of an externally generated electrical signal applied to line 1 will serve as the frame start trigger signal. Keep in mind that the camera will only react to a frame start trigger signal when it is in a "waiting for frame start trigger" acquisition status. (Note that the GPIO line is designated as line 1 and in this case it has been set to act as in input line.) A possible use for this type of setup is a conveyor system that moves objects past an inspection camera. Assume that the system operators want to acquire images of 3 specific areas on each object, that the conveyor speed varies, and that they do not want to acquire images when there is no object in front of the camera. A sensing device on the conveyor could be used in conjunction with a PC to determine when an object is starting to pass the camera. When an object is starting to pass, the PC will execute an acquisition start trigger software command, causing the camera to exit the "waiting for acquisition start trigger" acquisition status and enter a "waiting for frame start trigger" acquisition status. An electrical device attached to the conveyor could be used to generate frame start trigger signals and to apply them to line 1 on the camera. Assuming that this electrical device was based on a position encoder, it could account for the speed changes in the conveyor and ensure that frame trigger signals are generated and applied when specific areas of the object are in front of the camera. Once 3 frame start trigger signals have been received by the camera, the number of frames acquired would be equal to the setting for the Acquisition Frame Count parameter, and the camera would return to the "waiting for acquisition start trigger" acquisition status. Any frame start trigger signals generated at that point would be ignored. This sort of setup is useful because it will only acquire frames when there is an object in front of the camera and it will ensure that the desired areas on the object are imaged. (Transmitting images of the "space" between the objects would be a waste of bandwidth and processing them would be a waste of processor resources.) Basler ace Camera Link 127 Image Acquisition Control AW00098504000 Use Case: Acquisition Start Trigger On and Frame Start Trigger On The acquisition start trigger is on, and the acquisition start trigger source is set to software. The user must execute an acquisition start trigger software command to make the camera exit the "waiting for acquisition start trigger" acquisition status. Because the acquisition frame count is set to 3, the camera will re-enter the "waiting for acquisition start trigger" acquisition status after 3 frame trigger signals have been applied. The frame start trigger is on, and the frame start trigger source is set to line 1. The user must apply a frame start trigger signal to line 1 to start each frame exposure. Settings: Trigger Mode for the acquisition start trigger = On Trigger Source for the acquisition start trigger = Software Acquisition Frame Count = 3 Trigger Mode for the frame start trigger = On Trigger Source for the frame start trigger = Line 1 Trigger Activation for the frame start trigger = Rising Edge = a trigger signal applied by the user = camera is waiting for an acquisition start trigger signal = camera is waiting for a frame start trigger signal = frame exposure and readout = frame transmission = a frame start trigger signal that will be ignored because the camera is not in a "waiting for frame start trigger" status Acquisition Start Trigger Software Command Executed Frame Start Trigger Signal (applied to line 1) Time Fig. 38: Use Case 4 - Acquisition Start Trigger On and Frame Start Trigger On 128 Basler ace Camera Link AW00098504000 Color Creation and Enhancement 8 Color Creation and Enhancement This chapter provides information about how color images are created on color camera models and about the features available for adjusting the appearance of the colors. 8.1 Color Creation The sensor used in the cameras is equipped with an additive color separation filter known as a Bayer filter. The pixel data output formats available on color cameras are related to the Bayer pattern, so you need a basic knowledge of the Bayer filter to understand the pixel formats. With the Bayer filter, each individual pixel is covered by a part of the filter that allows light of only one color to strike the pixel. The pattern of the Bayer filter used on the camera is as shown in Figure 39 (the alignment of the Bayer filter with repect to the sensor is shown as an example only; the figure shows the "GB" filter alignment). As the figure illustrates, within each square of four pixels, one pixel sees only red light, one sees only blue light, and two pixels see only green light. (This combination mimics the human eye’s sensitivity to color.) Sensor G B G B G B G B G B G B R G R G R G R G R G R G G B G B G B G B G B G B R G R G R G R G R G R G G B G B G B G B G B G B R G R G R G R G R G R G G B G B G B G B G B G B R G R G R G R G R G R G G B G B G B G B G B G B R G R G R G R G R G R G G B G B G B G B G B G B R G R G R G R G R G R G Pixels Fig. 39: Bayer Filter Pattern Basler ace Camera Link 129 Color Creation and Enhancement 8.1.1 AW00098504000 Bayer Color Filter Alignment On all color camera models, the alignment of the filter to the pixels in the acquired images is Bayer GB. Bayer GB alignment means that pixel one and pixel two of the first line in each image transmitted will be green and blue respectively. And for the second line transmitted, pixel one and pixel two will be red and green respectively. Since the pattern of the Bayer filter is fixed, you can use this information to determine the color of all of the other pixels in the image. The Pixel Color Filter parameter indicates the current alignment of the camera’s Bayer filter to the pixels in the images captured by a color camera. You can tell how the current AOI is aligned to the Bayer filter by reading the value of the Pixel Color Filter parameter. The image area of interest (AOI) parameters can only be changed in certain defined increments. The increments are designed so that the alignment of the Bayer filter to the pixels in the transmitted images will stay the same regardless of the size of the image AOI. When either the reverse X feature or the reverse Y feature or both are used, the alignment of the color filter to the image remains Bayer GB. The camera includes a mechanism that keeps the filter alignment constant when these features are used. For more information about the camera’s AOI feature, see Section 10.3 on page 160. For more information about the reverse X and reverse Y features, see Section 10.7 on page 179. 8.1.2 Pixel Data Formats Available on Color Cameras Bayer Formats Cameras equipped with a Bayer pattern color filter can output pixel data in the Bayer GB 8, the Bayer GB 10, or the Bayer GB 12 pixel data format. When a color camera is set for one of these three pixel data output formats, the pixel data is not processed or interpolated in any way. So, for each pixel covered with a red lens, you get 8, 10, or 12 bits of red data. For each pixel covered with a green lens, you get 8, 10, or 12 bits of green data. And for each pixel covered with a blue lens, you get 8, 10, or 12 bits of blue data. (This type of pixel data is sometimes referred to as "raw" output.) 130 Basler ace Camera Link AW00098504000 8.2 Color Creation and Enhancement Integrated IR Cut Filter (All Color Models) All color camera models are equipped with an IR-cut filter as standard equipment. The filter is mounted in a filter holder located in the lens mount. Monochrome cameras include a filter holder in the lens mount, but the holder is not populated with an IR-cut filter. NOTICE On all cameras, the lens thread length is limited. All cameras (mono and color) are equipped with a plastic filter holder located in the lens mount. The location of the filter holder limits the length of the threads on any lens you use with the camera. If a lens with a very long thread length is used, the filter holder or the lens mount will be damaged or destroyed and the camera will no longer operate. For more information about the location of the IR cut filter, see Section 1.4.2 on page 8. Basler ace Camera Link 131 Color Creation and Enhancement 8.3 Color Enhancement Features 8.3.1 White Balance AW00098504000 This section (Section 8.3) describes how a color camera’s white balance can be adjusted "manually", i.e., by setting the value of the Balance Ratio Abs parameters for red, green, and blue. The camera also has a White Balance Auto function that can automatically adjust the white balance. Manual adjustment of the Balance Ratio Abs parameters for red, green, and blue will only work correctly if the Balance White Auto function is disabled. For more information about auto functions in general, see Section 10.9 on page 189. For more information about the Balance White Auto function, see Section 10.9.7 on page 206. White balance capability has been implemented on color models of the camera. White balancing can be used to adjust the color balance of the images transmitted from the camera. With the white balancing scheme used on these cameras, the red intensity, green intensity, and blue intensity can each be adjusted. For each color, a Balance Ratio parameter is used to set the intensity of the color. If the Balance Ratio parameter for a color is set to a value of 1, the intensity of the color will be unaffected by the white balance mechanism. If the ratio is set to a value lower than 1, the intensity of the color will be reduced. If the ratio is set to a value greater than 1, the intensity of the color will be increased. The increase or decrease in intensity is proportional. For example, if the balance ratio for a color is set to 1.2, the intensity of that color will be increased by 20%. The balance ratio value can range from 0.00 to 15.984. But you should be aware that if you set the balance ratio for a color to a value lower than 1, this will not only decrease the intensity of that color relative to the other two colors, but will also decrease the maximum intensity that the color can achieve. For this reason, we don’t normally recommend setting a balance ratio less than 1 unless you want to correct for the strong predominance of one color. Setting the White Balance Using Basler pylon Setting the Balance Ratio parameter for a color using Basler pylon is a two step process: Set the Balance Ratio Selector to red, green, or blue. Set the Balance Ratio Abs parameter to the desired value for the selected color. You can use the pylon API to set the Balance Ratio Selector and the Balance Ratio Abs parameter value from within your application software. The following code snippet illustrates using the API to set the selector and the parameter value: // Set the red balance ratio 132 Basler ace Camera Link AW00098504000 Color Creation and Enhancement Camera.BalanceRatioSelector.SetValue( BalanceRatioSelector_Red ); Camera.BalanceRatioAbs.SetValue( 1.20 ); // Set the green balance ratio Camera.BalanceRatioSelector.SetValue( BalanceRatioSelector_Green ); Camera.BalanceRatioAbs.SetValue( 1.20 ); You can also use the Basler pylon Viewer application to easily set the parameters. For more information about the pylon API and the pylon Viewer, see Section 3.1 on page 19. Setting the White Balance Using Direct Register Access To set the balance ratio parameters via direct register access: Set the value of White Balance Red register to adjust the red ratio. Set the value of the White Balance Green register to adjust the green ratio. Set the value of the White Balance Blue register to adjust the blue ratio. For more information about direct register access, see Section 3.2 on page 21. 8.3.2 Gamma Correction The gamma correction feature lets you modify the brightness of the pixel values output by the camera’s sensor to account for a non-linearity in the human perception of brightness. There are two modes of gamma correction available on the camera: sRGB and User. sRGB Gamma When the camera is set for sRGB gamma correction, it automatically sets the gamma correction to adjust the pixel values so that they are suitable for display on an sRGB monitor. If you will be displaying the images on an sRGB monitor, using this type of gamma correction is appropriate. User Gamma With User type gamma correction, you can set the gamma correction value as desired. To accomplish the correction, a gamma correction value () is applied to the brightness value (Y) of each pixel according to the following formula: Y uncorrected Y corrected = --------------------------- Y max Y max Basler ace Camera Link 133 Color Creation and Enhancement AW00098504000 The formula uses uncorrected and corrected pixel brightnesses that are normalized by the maximum pixel brightness. The maximum pixel brightness equals 255 for 8 bit output, 1023 for 10 bit output, and 4095 for 12 bit output. The gamma correction value can be set in a range from 0 to 3.99998. When the gamma correction value is set to 1, the output pixel brightness will not be corrected. A gamma correction value between 0 and 1 will result in increased overall brightness, and a gamma correction value greater than 1 will result in decreased overall brightness. In all cases, black (output pixel brightness equals 0) and white (output pixel brightness equals 255 at 8 bit output, 1023 at 10 bit output, and 4095 at 12 bit output) will not be corrected. Enabling and Setting Gamma Correction Using Basler Pylon You can enable or disable the gamma correction feature by setting the value of the Gamma Enable parameter. You can use the Gamma Selector to select either sRGB or user gamma correction. If you select user gamma correction, you can use the Gamma parameter to set the gamma correction value. You can set the Gamma Enable parameter, use the Gamma Selector, and set Gamma parameter values from within your application software by using the Basler pylon API. The following code snippet illustrates using the API to set the parameter values for sRGB type correction: // Enable the Gamma feature Camera.GammaEnable.SetValue( true ); // Set the gamma type to sRGB Camera.GammaSelector.SetValue ( GammaSelector_sRGB ); The following code snippet illustrates using the API to set the parameter values for user type correction: // Enable the Gamma feature Camera.GammaEnable.SetValue( true ); // Set the gamma type to User Camera.GammaSelector.SetValue ( GammaSelector_User ); // Set the Gamma value to 1.2 Camera.Gamma.SetValue( 1.2 ); You can also use the Basler pylon Viewer application to easily set the parameters. For more information about the pylon API and the pylon Viewer, see Section 3.1 on page 19. 134 Basler ace Camera Link AW00098504000 Color Creation and Enhancement Enabling and Setting Gamma Correction Using Direct Register Access To enable gamma correction and to set the gamma value via direct register access: Set the value of the Gamma Enable register to Enabled. Set the value of the Gamma Selector register to SRGB or User. If the Gamma Selector is set to User, eet the value in the Gamma register to the desired gamma value. For more information about direct register access, see Section 3.2 on page 21. Basler ace Camera Link 135 Color Creation and Enhancement 8.3.3 AW00098504000 Matrix Color Transformation The main objective of matrix color transformation is to make corrections to the color information that will account for the type of lighting used during image acquisition and to compensate for any imperfections in the sensor’s color generation process. With the matrix color transformation, a first matrix transforrmation step ensures that the pixel values form the sensor are available in RGB color space, i.e. as R, G, or B component for each pixel. A second transformation step takes account of the specific pre-selected light source. The vector consisting of the R, G, or B component for each pixel in the image is multiplied by a matrix containing a set of correction values. The first camera parameter associated with matrix color transformation is the Color Transformation Selector parameter. This parameter is used to select the type of transformation that will be performed. For ace Camera Link cameras, RGB to RGB is the only setting available. This setting simply means that the camera will not transform the red, green, and blue pixel values from the sensor into a different color space (such as YUV). The second parameter associated with matrix color transformation is the Light Source Selector parameter. The following settings are available for this parameter: Off - No alterations will be made to the pixel values. Daylight - This setting will automatically populate the matrix with a pre-selected set of values that will make appropriate corrections for images captured with daylight lighting that has a color temperature of about 5000K. Tungsten - This setting will automatically populate the matrix with a pre-selected set of values that will make appropriate corrections for images captured with tungsten lighting that has a color temperature of about 2500K to 3000K. Daylight 6500K - This setting will automatically populate the matrix with a pre-selected set of values that will make appropriate corrections for images captured with daylight lighting that has a color temperature of about 6500K. Custom - The user can set the values in the matrix as desired. In almost all cases, selecting one of the settings that populate the matrix with pre-selected values will give you excellent results with regard to correcting the colors for the light source you are using. The custom setting should only be used by someone who is thoroughly familiar with matrix color transformations. Instructions for using the custom setting appear in the next section. The third parameter associated with matrix color transformation is the Color Transformation Matrix Factor parameter. This parameter determines how strong an effect the matrix correction function will have on the colors output by the camera. The parameter setting is a floating point value that can range from 0 to 1. When the parameter value is set to 0, matrix correction will have no effect. When the value is set to 1, matrix correction will have its maxumum effect. Setting Matrix Color Transformation Using Basler Pylon You can set the Color Transformation Selector and Light Source Selector parameters from within your application software by using the Basler pylon API. The following code snippet illustrates using the API to set the parameter values: // Select the color transformation type 136 Basler ace Camera Link AW00098504000 Color Creation and Enhancement Camera.ColorTransformationSelector.SetValue ( ColorTransformationSelector_RGBtoRGB ); // Set the light source selector so that no correction will be done Camera.LightSourceSelector.SetValue ( LightSourceSelector_Off ); // Set the light source selector for daylight (at about 5000K) Camera.LightSourceSelector.SetValue ( LightSourceSelector_Daylight ); // Set the light source selector for tungsten lighting Camera.LightSourceSelector.SetValue ( LightSourceSelector_Tungsten ); // Set the light source selector for daylight (at about 6500K) Camera.LightSourceSelector.SetValue ( LightSourceSelector_Daylight6500K ); // Set the matrix correction factor Camera.ColorTransformationMatrixFactor.SetValue( 0.50 ); You can also use the Basler pylon Viewer application to easily set the parameters. For more information about the pylon API and the pylon Viewer, see Section 3.1 on page 19. Setting Matrix Color Transformation Using Direct Register Access To set matrix color transformation via direct register access: Set the value of the Light Source Selector register to Off, Daylight, Tungsten, Daylight 6500K, or Custom as desired. Set the value of the Color Matrix Factor register as desired. For more information about direct register access, see Section 3.2 on page 21. Basler ace Camera Link 137 Color Creation and Enhancement 8.3.3.1 AW00098504000 "Custom" Light Source Setting The "Custom" setting for the Light Source Selector parameter is intended for use by someone who is thoroughly familiar with matrix color transformations. It is nearly impossible to enter correct values in the conversion matrix by trial and error. The RGB to RGB color matrix conversion for each pixel is performed by multiplying a 1 x 3 matrix containing R, G, and B color values with a 3 x 3 matrix containing correction values. Each column in the 3 x 3 matrix can be populated with values of your choice. In other words: Gain00 Gain01 Gain02 Gain10 Gain11 Gain12 Gain20 Gain21 Gain22 R G B = R G B Where Gain00, Gain01, etc. are settable values. Keep in mind that ace Camera Link cameras use sensors with a Bayer pattern filter and that they do not interpolate the pixel values. This means that when the camera is a doing matrix correction for a particular pixel, only one actual color value will be available for that pixel. To fill in the other two color values in the 1 x 3 matrix, the camera uses values from neighboring pixels. After making the correction calculations, the camera only transmits the result for the actual pixel color and discards the other two calculated values. For example, if the camera is correcting the value for a red pixel, it will populate the 1 x 3 matrix with the actual value for the red pixel. It will then populate the green and blue positions in the matrix with values from a neighboring green and a neighboring blue pixel. After making the matrix correction calculations, the camera will discard the green and blue values from the result and only transmit the red value. Each GainXY position can each be populated with a floating point value ranging from -8.0 to +7.96875 by using the Color Transformation Value Selector to select one of the GainXX positions in the matrix and using the Color transformation Value parameter to enter a value for that position. As an alternative the Gain XY values can each be entered as an integer value on a scale ranging from -256 to +255. This integer range maps linearly to the floating point range with -256 being equivalent to -8.0, 32 being equivalent to 1.0, and +255 being equivalent to +7.96875. The integer values can be entered using the Color transformation Value Raw parameter. A reference article that explains the basics of color matrix transformation for video data can be found at: http://www.its.bldrdoc.gov/pub/ntia-rpt/04-406/index.php 138 Basler ace Camera Link AW00098504000 Color Creation and Enhancement Setting Custom Matrix Values Using Basler Pylon You can set the Color Transformation Value Selector, Color Transformation Value, and Color Transformation Value Raw parameters from within your application software by using the Basler pylon API. The following code snippet illustrates using the API to set the values in the matrix. Note that the values in this example are just randomly selected numbers and do not represent values that you should actually use. // Set the light source selector for custom Camera.LightSourceSelector.SetValue ( LightSourceSelector_Custom ); // Select a position in the matrix Camera.ColorTransformationValueSelector.SetValue ( ColorTransformationValueSelector_Gain01 ); // Set the value for the selected position as a floating point value Camera.ColorTransformationValue.SetValue( 2.11 ); // Select a position in the matrix Camera.ColorTransformationValueSelector.SetValue ( ColorTransformationValueSelector_Gain12 ); // Set the value for the selected position as an integer value Camera.ColorTransformationValueRaw.SetValue( 135 ); You can also use the Basler pylon Viewer application to easily set the parameters. For more information about the pylon API and the pylon Viewer, see Section 3.1 on page 19. Setting Custom Matrix Values Using Direct Register Access To set Gain XY values in the matrix via direct register access: Set the value of the Light Source Selector register to Custom. Set the value of the following registers as desired: Color Matrix RGB 2 RGB 00 Color Matrix RGB 2 RGB 01 Color Matrix RGB 2 RGB 02 Color Matrix RGB 2 RGB 10 Color Matrix RGB 2 RGB 11 Color Matrix RGB 2 RGB 12 Color Matrix RGB 2 RGB 20 Color Matrix RGB 2 RGB 21 Color Matrix RGB 2 RGB 22 For more information about direct register access, see Section 3.2 on page 21. Basler ace Camera Link 139 Color Creation and Enhancement 140 AW00098504000 Basler ace Camera Link AW00098504000 Sensor Bit Depth, Pixel Formats, Tap Geometries, and Clock Speeds 9 Sensor Bit Depth, Pixel Formats, Tap Geometries, and Clock Speeds This chapter provides information about the sensor bit depths, pixel formats, Camera Link tap geometries and pixel clock speeds available on the camera. If you plan to design your own frame grabber, or if you would like complete details regarding the way that pixel data is handled by the camera, refer to the Basler document named Ace Camera Link Information for Frame Grabber Designers (AW000990xx000). You can obtain the document from the Downloads section of the Basler website: www.baslerweb.com Basler ace Camera Link 141 Sensor Bit Depth, Pixel Formats, Tap Geometries, and Clock Speeds 9.1 AW00098504000 Sensor Bit Depth As mentioned in the "Functional Description" section of this manual, the camera’s imaging sensor can be set to acquire image data at either 10 bit or 12 bit depth. When the sensor is operating at 10 bit depth, it operates significantly faster than at 12 bit depth. So when the sensor is set for 10 bit acquisition, the camera can be operated at a higher maximum frame rate. Keep in mind that the data depth of the pixel values actually reported out of the camera will depend on the camera’s current pixel format setting. For more information about pixel formats, see Section 9.2 on page 143. Setting the Sensor Bit Depth Using Basler pylon You can use the pylon API to set the sensor bit depth from within your application software. The following code snippet illustrates using the API to set the exposure mode: // Set the sensor bit depth to 10 Camera.SensorBitDepth.SetValue( SensorBitDepth_BitDepth10 ); // Set the sensor bit depth to 12 Camera.SensorBitDepth.SetValue( SensorBitDepth_BitDepth12 ); You can also use the Basler pylon Viewer application to easily set the parameters. For more information about the pylon API and the pylon Viewer, see Section 3.1 on page 19. Setting the Sensor Bit Depth Using Direct Register Access To set the sensor bit depth via direct register access: Set the value of the Sensor Bit Depth register to 10 Bit Depth or 12 Bit Depth. For more information about direct register access, see Section 3.2 on page 21. 142 Basler ace Camera Link AW00098504000 9.2 Sensor Bit Depth, Pixel Formats, Tap Geometries, and Clock Speeds Pixel Formats Pixel Formats for Monochrome Cameras The choice of a pixel format determines the bit depth of the data transmitted from the camera for each pixel in the acquired frames. The pixel formats available on the mono cameras depend on the current setting of the Camera Link Geometry parameter as shown in Table 7. Camera Link Geometry Setting Available Pixel Formats Mono 8 Mono 10 Mono 12 1X2-1Y 1X3-1Y 1X4-1Y 1X6-1Y 1X8-1Y 1X10⁻¹Y Table 7: Mono Pixel Formats Available for Each Geometry ( = format available) Pixel Formats for Color Cameras The choice of a pixel format determines the bit depth of the data transmitted from the camera for each pixel in the acquired frames. The pixel formats available on the color cameras depend on the current setting of the Camera Link Geometry parameter as shown in Table 7. Camera Link Geometry Setting Available Pixel Formats Bayer GB 8 Bayer GB 10 Bayer GB 12 1X2-1Y 1X3-1Y 1X4-1Y 1X6-1Y 1X8-1Y 1X10⁻¹Y Table 8: Pixel Formats Available for Each Geometry ( = format available) Basler ace Camera Link 143 Sensor Bit Depth, Pixel Formats, Tap Geometries, and Clock Speeds AW00098504000 The pixels output from the color camera are not interpolated in any way; they are output as "raw" data. This means that for each pixel, there is only one color value (i.e., for each red pixel there is only a red value, for each green pixel there is only a green value, and for each blue pixel there is only a blue value). Color cameras do not output interpolated RGB values for each pixel, even when they are set for a multiple tap Camera Link geometry such as 1X3-1Y or 1X6-1Y. Pixel Format Interaction with the Sensor Bit Depth Setting The camera’s sensor can capture image data at 12 bit depth or at 10 bit depth (depending on the Sensor Bit Depth setting). There is an interaction between the Sensor Bit Depth setting and the Pixel Format setting as described in Table 9. Sensor Bit Depth Setting Pixel Format Setting Mono 8 or Bayer GB 8 Mono 10 or Bayer GB 10 Mono 12 or Bayer GB 12 12 bits 8 most significant bits of data from the sensor are transmitted 10 most significant bits of data from the sensor are transmitted All 12 bits of data from the sensor are transmitted 10 bits 8 most significant bits of data from the sensor are transmitted All 10 bits of data from the sensor are transmitted All 10 bits of data from the sensor are transmitted and 2 zero-packed least significant bits are added Table 9: Interaction Between the Sensor Bit Depth and the Pixel Format For more information about the sensor bit depth, see Section 9.1 on page 142. 144 Basler ace Camera Link AW00098504000 Sensor Bit Depth, Pixel Formats, Tap Geometries, and Clock Speeds Setting the Pixel Format Using Basler Pylon You can use the pylon API to set the Pixel Format parameter value from within your application. The following code snippet illustrates using the API to set the parameter value: Mono cameras // Set pixel format to Mono 8 Camera.PixelFormat.SetValue( PixelFormat_Mono8 ); // Set pixel format to Mono 10 Camera.PixelFormat.SetValue( PixelFormat_Mono10 ); // Set pixel format to Mono 12 Camera.PixelFormat.SetValue( PixelFormat_Mono12 ); Color Cameras: // Set pixel format to Bayer GB 8 Camera.PixelFormat.SetValue( PixelFormat_BayerGB8 ); // Set pixel format to Bayer GB 10 Camera.PixelFormat.SetValue( PixelFormat_BayerGB10 ); // Set pixel format to Bayer GB 12 Camera.PixelFormat.SetValue( PixelFormat_BayerGB12 ); You can also use the Basler pylon Viewer application to easily set the parameter. For more information about the pylon API and the pylon Viewer, see Section 3.1 on page 19. Setting the Pixel Format Using Direct Register Access To set the sensor pixel format via direct register access: On mono cameras, set the value of the Pixel Format register to Mono 8, Mono 10, or Mono 12 as desired. On color cameras, set the value of the Pixel Format register to Bayer GB 8, Bayer GB 10, or Bayer GB 12 as desired. For more information about direct register access, see Section 3.2 on page 21. Basler ace Camera Link 145 Sensor Bit Depth, Pixel Formats, Tap Geometries, and Clock Speeds AW00098504000 9.3 Camera Link Tap Geometry 9.3.1 Overview The Camera Link tap geometry determines how the data that is read out of the imaging sensor will be transmitted from the camera to the frame grabber in your host PC via the Camera Link interface. The selection of a camera link tap geometry also determines whether your camera will be operating in the base, medium, or full Camera Link configuration and which Camera Link connectors on the camera will be used to transmit pixel data. Table 10 indicates how the Camera Link interface will operate with each available tap geometry setting. The X2, X3, X4, X6, X8, or X10 in the tap geometry names indicates the number of Camera Link taps that will be used for a given configuration (i.e., X2 means 2 taps, X3 means 3 taps, etc.). As a general rule of thumb, a camera will have a higher maximum allowed frame rate when it is operating with a tap geometry that uses Camera Link taps. Tap Geometry Setting Camera Link Configuration Camera Link Connectors Used to Transmit Data 1X2-1Y Base Base Only 1X3-1Y Base Base Only 1X4-1Y Medium Base and Medium/Full 1X6-1Y Medium Base and Medium/Full 1X8-1Y Full Base and Medium/Full 1X10⁻¹Y Full Base and Medium/Full Table 10: Camera Link Operation at Various Tap Geometry Settings 26-pin SDR Connector (Medium/Full Camera Link Connection) 26-pin SDR Connector (Base Camera Link Connection) Fig. 40: Camera Link Connections 146 Basler ace Camera Link AW00098504000 Sensor Bit Depth, Pixel Formats, Tap Geometries, and Clock Speeds The tap geometries available by model are as shown in Table 11. Tap Geometry Setting Camera Model acA2000-340km/kmNIR/kc acA2040-180km/kmNIR/kc 1X2-1Y 1X3-1Y 1X4-1Y 1X6-1Y 1X8-1Y 1X10⁻¹Y Table 11: Available Tap Geometries by Model ( = geometry available) For more information about the camera’s maximum allowed frame rate, see Section 7.8 on page 117. This section describes the basics of Camera Link tap geometry. For more complete tap geometry details, refer to the Basler document named Ace Camera Link Information for Frame Grabber Designers (AW000990xx000) You can obtain the document from the Downloads section of the Basler website: www.baslerweb.com Basler ace Camera Link 147 Sensor Bit Depth, Pixel Formats, Tap Geometries, and Clock Speeds 9.3.2 AW00098504000 1X2-1Y Tap Geometry Description The characteristics of the 1X2-1Y tap geometry are: On each cycle of the Camera Link pixel clock, the data for two pixels are transmitted via the Camera Link interface. This is commonly referred to as a "two tap" Camera Link configuration. The camera will begin transmitting data from line one. It will transmit the data for the first two pixels in line one on the first Camera Link pixel clock cycle, the next two pixels in line one on the second pixel clock cycle, the next two pixels in line one on the third clock cycle, and so on until the line is complete. When line one is complete, transmission of line two will begin and will proceed in a similar fashion. Data transmission will continue line-by-line until all of the data for the image have been transmitted. When the camera is set for the 1X2-1y tap geometry, it uses the base Camera Link configuration. The 1X2-1Y transmission scheme is shown graphically in Figure 41. Step X = 2 Tap 1 Tap 2 Step Y = 1 Pixel Data Pixel Data Pixel Data Pixel Data Pixel Data Pixel Data Pixel Data Pixel Data Pixel Data Pixel Data Pixel Data Pixel Data Pixel Data Pixel Data Pixel Data Pixel Data Pixel Data Pixel Data Pixel Data Pixel Data Pixel Data Pixel Data Pixel Data Pixel Data Pixel Data Pixel Data Pixel Data Pixel Data Pixel Data Pixel Data Pixel Data Pixel Data Pixel Data Pixel Data Pixel Data Pixel Data Pixel Data Pixel Data Pixel Data Pixel Data Pixel Data Pixel Data Pixel Data Pixel Data Pixel Data Pixel Data Pixel Data Pixel Data Pixel Data Pixel Data Pixel Data Pixel Data Pixel Data Pixel Data Pixel Data Pixel Data Pixel Data Pixel Data Pixel Data Pixel Data Pixel Data Pixel Data Pixel Data Pixel Data Pixel Data Pixel Data Pixel Data Pixel Data Pixel Data Pixel Data Pixel Data Pixel Data Fig. 41: 1X2-1Y Tap Geometry 148 Basler ace Camera Link AW00098504000 9.3.3 Sensor Bit Depth, Pixel Formats, Tap Geometries, and Clock Speeds 1X3-1Y Tap Geometry Description The characteristics of the 1X3-1Y tap geometry are: On each cycle of the Camera Link pixel clock, the data for three pixels are transmitted via the Camera Link interface. This is commonly referred to as a "three tap" Camera Link configuration. The camera will begin transmitting data from line one. It will transmit the data for the first three pixels in line one on the first Camera Link pixel clock cycle, the next three pixels in line one on the second pixel clock cycle, the next three pixels in line one on the third clock cycle, and so on until the line is complete. When line one is complete, transmission of line two will begin and will proceed in a similar fashion. Data transmission will continue line-by-line until all of the data for the image have been transmitted. When the camera is set for the 1X3-1y tap geometry, it uses the base Camera Link configuration. The 1X3-1Y transmission scheme is shown graphically in Figure 41. Step X = 3 Tap 1 Tap 2 Tap 3 Step Y = 1 Pixel Data Pixel Data Pixel Data Pixel Data Pixel Data Pixel Data Pixel Data Pixel Data Pixel Data Pixel Data Pixel Data Pixel Data Pixel Data Pixel Data Pixel Data Pixel Data Pixel Data Pixel Data Pixel Data Pixel Data Pixel Data Pixel Data Pixel Data Pixel Data Pixel Data Pixel Data Pixel Data Pixel Data Pixel Data Pixel Data Pixel Data Pixel Data Pixel Data Pixel Data Pixel Data Pixel Data Pixel Data Pixel Data Pixel Data Pixel Data Pixel Data Pixel Data Pixel Data Pixel Data Pixel Data Pixel Data Pixel Data Pixel Data Pixel Data Pixel Data Pixel Data Pixel Data Pixel Data Pixel Data Pixel Data Pixel Data Pixel Data Pixel Data Pixel Data Pixel Data Pixel Data Pixel Data Pixel Data Pixel Data Pixel Data Pixel Data Pixel Data Pixel Data Pixel Data Pixel Data Pixel Data Pixel Data Fig. 42: 1X3-1Y Tap Geometry Basler ace Camera Link 149 Sensor Bit Depth, Pixel Formats, Tap Geometries, and Clock Speeds 9.3.4 AW00098504000 1X4-1Y Tap Geometry Description The characteristics of the 1X4-1Y tap geometry are: On each cycle of the Camera Link pixel clock, the data for four pixels are transmitted via the Camera Link interface. This is commonly referred to as a "four tap" Camera Link configuration. The camera will begin transmitting data from line one. It will transmit the data for the first four pixels in line one on the first Camera Link pixel clock cycle, the next four pixels in line one on the second pixel clock cycle, the next four pixels in line one on the third clock cycle, and so on until the line is complete. When line one is complete, transmission of line two will begin and will proceed in a similar fashion. Data transmission will continue line-by-line until all of the data for the image have been transmitted. When the camera is set for the 1X4-1y tap geometry, it uses the medium Camera Link configuration. The 1X4-1Y transmission scheme is shown graphically in Figure 41. Step X = 4 Tap 1 Tap 2 Tap 3 Tap 4 Step Y = 1 Pixel Data Pixel Data Pixel Data Pixel Data Pixel Data Pixel Data Pixel Data Pixel Data Pixel Data Pixel Data Pixel Data Pixel Data Pixel Data Pixel Data Pixel Data Pixel Data Pixel Data Pixel Data Pixel Data Pixel Data Pixel Data Pixel Data Pixel Data Pixel Data Pixel Data Pixel Data Pixel Data Pixel Data Pixel Data Pixel Data Pixel Data Pixel Data Pixel Data Pixel Data Pixel Data Pixel Data Pixel Data Pixel Data Pixel Data Pixel Data Pixel Data Pixel Data Pixel Data Pixel Data Pixel Data Pixel Data Pixel Data Pixel Data Pixel Data Pixel Data Pixel Data Pixel Data Pixel Data Pixel Data Pixel Data Pixel Data Pixel Data Pixel Data Pixel Data Pixel Data Pixel Data Pixel Data Pixel Data Pixel Data Pixel Data Pixel Data Pixel Data Pixel Data Pixel Data Pixel Data Pixel Data Pixel Data Fig. 43: 1X4-1Y Tap Geometry 150 Basler ace Camera Link AW00098504000 9.3.5 Sensor Bit Depth, Pixel Formats, Tap Geometries, and Clock Speeds 1X6-1Y Tap Geometry Description The characteristics of the 1X6-1Y tap geometry are: On each cycle of the Camera Link pixel clock, the data for six pixels are transmitted via the Camera Link interface. This is commonly referred to as a "six tap" Camera Link configuration. The camera will begin transmitting data from line one. It will transmit the data for the first six pixels in line one on the first Camera Link pixel clock cycle, the next six pixels in line one on the second pixel clock cycle, the next six pixels in line one on the third clock cycle, and so on until the line is complete. When line one is complete, transmission of line two will begin and will proceed in a similar fashion. Data transmission will continue line-by-line until all of the data for the image have been transmitted. When the camera is set for the 1X6-1y tap geometry, it uses the medium Camera Link configuration. The 1X6-1Y transmission scheme is shown graphically in Figure 41. Step X = 6 Tap 1 Tap 2 Tap 3 Tap 4 Tap 5 Tap 6 Step Y = 1 Pixel Data Pixel Data Pixel Data Pixel Data Pixel Data Pixel Data Pixel Data Pixel Data Pixel Data Pixel Data Pixel Data Pixel Data Pixel Data Pixel Data Pixel Data Pixel Data Pixel Data Pixel Data Pixel Data Pixel Data Pixel Data Pixel Data Pixel Data Pixel Data Pixel Data Pixel Data Pixel Data Pixel Data Pixel Data Pixel Data Pixel Data Pixel Data Pixel Data Pixel Data Pixel Data Pixel Data Pixel Data Pixel Data Pixel Data Pixel Data Pixel Data Pixel Data Pixel Data Pixel Data Pixel Data Pixel Data Pixel Data Pixel Data Pixel Data Pixel Data Pixel Data Pixel Data Pixel Data Pixel Data Pixel Data Pixel Data Pixel Data Pixel Data Pixel Data Pixel Data Pixel Data Pixel Data Pixel Data Pixel Data Pixel Data Pixel Data Pixel Data Pixel Data Pixel Data Pixel Data Pixel Data Pixel Data Fig. 44: 1X6-1Y Tap Geometry Basler ace Camera Link 151 Sensor Bit Depth, Pixel Formats, Tap Geometries, and Clock Speeds 9.3.6 AW00098504000 1X8-1Y Tap Geometry Description The characteristics of the 1X8-1Y tap geometry are: On each cycle of the Camera Link pixel clock, the data for eight pixels are transmitted via the Camera Link interface. This is commonly referred to as an "eight tap" Camera Link configuration. The camera will begin transmitting data from line one. It will transmit the data for the first eight pixels in line one on the first Camera Link pixel clock cycle, the next eight pixels in line one on the second pixel clock cycle, the next eight pixels in line one on the third clock cycle, and so on until the line is complete. When line one is complete, transmission of line two will begin and will proceed in a similar fashion. Data transmission will continue line-by-line until all of the data for the image have been transmitted. When the camera is set for the 1X8-1y tap geometry, it uses the full Camera Link configuration. The 1X8-1Y transmission scheme is shown graphically in Figure 41. Step X = 8 Tap 1 Tap 2 Tap 3 Tap 4 Tap 5 Tap 6 Tap 7 Tap 8 Step Y = 1 Pixel Data Pixel Data Pixel Data Pixel Data Pixel Data Pixel Data Pixel Data Pixel Data Pixel Data Pixel Data Pixel Data Pixel Data Pixel Data Pixel Data Pixel Data Pixel Data Pixel Data Pixel Data Pixel Data Pixel Data Pixel Data Pixel Data Pixel Data Pixel Data Pixel Data Pixel Data Pixel Data Pixel Data Pixel Data Pixel Data Pixel Data Pixel Data Pixel Data Pixel Data Pixel Data Pixel Data Pixel Data Pixel Data Pixel Data Pixel Data Pixel Data Pixel Data Pixel Data Pixel Data Pixel Data Pixel Data Pixel Data Pixel Data Pixel Data Pixel Data Pixel Data Pixel Data Pixel Data Pixel Data Pixel Data Pixel Data Pixel Data Pixel Data Pixel Data Pixel Data Pixel Data Pixel Data Pixel Data Pixel Data Pixel Data Pixel Data Pixel Data Pixel Data Pixel Data Pixel Data Pixel Data Pixel Data Pixel Data Pixel Data Pixel Data Pixel Data Pixel Data Pixel Data Pixel Data Pixel Data Pixel Data Pixel Data Pixel Data Pixel Data Pixel Data Pixel Data Pixel Data Pixel Data Pixel Data Pixel Data Pixel Data Pixel Data Pixel Data Pixel Data Pixel Data Pixel Data Fig. 45: 1X8-1Y Tap Geometry 152 Basler ace Camera Link AW00098504000 9.3.7 Sensor Bit Depth, Pixel Formats, Tap Geometries, and Clock Speeds 1X10⁻¹Y Tap Geometry Description The characteristics of the 1X10⁻¹Y tap geometry are: On each cycle of the Camera Link pixel clock, the data for ten pixels are transmitted via the Camera Link interface. This is commonly referred to as an "ten tap" Camera Link configuration. The camera will begin transmitting data from line one. It will transmit the data for the first ten pixels in line one on the first Camera Link pixel clock cycle, the next ten pixels in line one on the second pixel clock cycle, the next ten pixels in line one on the third clock cycle, and so on until the line is complete. When line one is complete, transmission of line two will begin and will proceed in a similar fashion. Data transmission will continue line-by-line until all of the data for the image have been transmitted. When the camera is set for the 1X10⁻¹y tap geometry, it uses the full Camera Link configuration. The 1X10⁻¹Y transmission scheme is shown graphically in Figure 41. Step X = 10 Tap 1 Tap 2 Tap 3 Tap 4 Tap 5 Tap 6 Tap 7 Tap 8 Tap 9 Tap 10 Step Y = 1 Pixel Data Pixel Data Pixel Data Pixel Pixel Data Data Pixel Data Pixel Data Pixel Data Pixel Data Pixel Data Pixel Data Pixel Data Pixel Data Pixel Data Pixel Pixel Data Data Pixel Pixel Data Data Pixel Data Pixel Data Pixel Data Pixel Data Pixel Data Pixel Pixel Data Data Pixel Data Pixel Data Pixel Data Pixel Data Pixel Data Pixel Data Pixel Data Pixel Data Pixel Data Pixel Pixel Data Data Pixel Pixel Data Data Pixel Data Pixel Data Pixel Data Pixel Data Pixel Data Pixel Pixel Data Data Pixel Data Pixel Data Pixel Data Pixel Data Pixel Data Pixel Data Pixel Data Pixel Data Pixel Data Pixel Pixel Data Data Pixel Pixel Data Data Pixel Data Pixel Data Pixel Data Pixel Data Pixel Data Pixel Pixel Data Data Pixel Data Pixel Data Pixel Data Pixel Data Pixel Data Pixel Data Pixel Data Pixel Data Pixel Data Pixel Pixel Data Data Pixel Pixel Data Data Pixel Data Pixel Data Pixel Data Pixel Data Pixel Data Pixel Pixel Data Data Pixel Data Pixel Data Pixel Data Pixel Data Pixel Data Pixel Data Pixel Data Pixel Data Pixel Data Pixel Pixel Data Data Pixel Pixel Data Data Pixel Data Pixel Data Pixel Data Pixel Data Pixel Data Pixel Pixel Data Data Pixel Data Pixel Data Pixel Data Pixel Data Pixel Data Pixel Data Pixel Data Pixel Data Pixel Data Pixel Pixel Data Data Pixel Pixel Data Data Pixel Data Pixel Data Fig. 46: 1X10⁻¹Y Tap Geometry Basler ace Camera Link 153 Sensor Bit Depth, Pixel Formats, Tap Geometries, and Clock Speeds 9.3.8 AW00098504000 Setting the Tap Geometry Setting the Tap Geometry Using Basler pylon You can use the pylon API to set the Camera Link tap geometry from within your application software. The following code snippet illustrates using the API to set the tap geometry: // Set the tap geometry to 1X2-1Y Camera.ClTapGeometry.SetValue( ClTapGeometry_Geometry1X2_1Y ); // Set the tap geometry to 1X3-1Y Camera.ClTapGeometry.SetValue( ClTapGeometry_Geometry1X3_1Y ); You can also use the Basler pylon Viewer application to easily set the parameters. For more information about the pylon API and the pylon Viewer, see Section 3.1 on page 19. Setting the Tap Geometry Using Direct Register Access To set the Camera Link tap geometry via direct register access: Set the value of the CL Tap Geometry register for 1X2-1Y, 1X3-1Y, 1X4-1Y, 1X6-1Y, 1X8-1Y or 1X10⁻¹Y as desired. For more information about direct register access, see Section 3.2 on page 21. 154 Basler ace Camera Link AW00098504000 9.4 Sensor Bit Depth, Pixel Formats, Tap Geometries, and Clock Speeds Camera Link Pixel Clock Speed The camera features selectable Camera Link pixel clock speeds. The pixel clock speed determines the rate at which pixel data will be transmitted from the camera to the frame grabber in your PC via the Camera Link interface. The four available pixel clock speeds are: 32.5 MHz, 48 MHz, 65 MHz, and 82 MHz. The default clock speed is 82 MHz. Setting the camera for a higher pixel clock speed will increase the rate at which image data is transferred from the camera to the frame grabber. Some frame grabbers, however, cannot operate at the higher clock speeds. So it is important that you determine the maximum clock speed that your frame grabber can handle and that you set the camera’s speed no higher than the frame grabber’s maximum. Keep in mind that if you set the camera for one of the lower pixel clock speeds, it may limit the camera’s maximum allowed frame acquisition rate. If you change the clock speed while the camera is in the process of acquiring images: Triggering and image acquisition will stop. Any acquired image that is already in the process of being transferred will be delivered. The camera’s clock speed will be changed internally. Once the change is complete, triggering and image acquisition will resume. The Camera Link clock speed setting will be stored in the camera’s configuration sets. This means, for example, that if you have a different clock speed setting stored in user set 1 and user set 2 and you change the active set from user set 1 to user set 2, the clock speed will change. For more information about the maximum allowed frame acquisition rate, see Section 7.8 on page 117. For more information about configuration sets, see Section 10.14 on page 217. Setting the Camera Link Pixel Clock Using Basler pylon You can use the pylon API to set the Camera Link pixel clock speed from within your application software. The following code snippet illustrates using the API to set the clock speed: // Set the Camera Link pixel clock speed 32.5 Camera.ClPixelClock.SetValue( ClPixelClock_PixelClock32_5 ); // Set the Camera Link pixel clock speed to 48 Camera.ClPixelClock.SetValue( ClPixelClock_PixelClock48 ); You can use the pylon API to set the pixel clock speed to 32.5, 48, 65, or 82 MHz. These are the only valid values for the pixel clock speed. If you attempt to use the API to set the clock speed to a value other than these, the camera will automatically move the setting to the nearest lower valid speed. Basler ace Camera Link 155 Sensor Bit Depth, Pixel Formats, Tap Geometries, and Clock Speeds AW00098504000 You can also use the Basler pylon Viewer application to easily set the parameters. For more information about the pylon API and the pylon Viewer, see Section 3.1 on page 19. Setting the Camera Link Pixel Clock Using Direct Register Access To set the Camera Link pixel clock speed via direct register access: Set the value of the CL Pixel Clock register to 32.5 MHz, 48 MHz, 65 MHz, or 82 MHz. For more information about direct register access, see Section 3.2 on page 21. 156 Basler ace Camera Link AW00098504000 Features 10 Features This chapter provides detailed information about the standard features available on each camera. It also includes an explanation of their operation and the parameters associated with each feature. 10.1 Gain This section (Section 10.1) describes the basic theory of gain and how gain can be adjusted "manually", i.e., by setting the value of the gain raw parameter. The camera also has a Gain Auto function that can automatically adjust the gain. Manual adjustment of the gain parameters will only work correctly if the Gain Auto function is disabled. For more information about auto functions in general, see Section 10.9 on page 189. For more information about the Gain Auto function in particular, see Section 10.9.4 on page 199. The camera’s gain setting is adjustable. As shown in Figure 47, increasing the gain increases the slope of the response curve for the camera. This results in a higher gray value output from the camera for a given amount of output from the imaging sensor. Decreasing the gain decreases the slope of the response curve and results in a lower gray value for a given amount of sensor output. Gray Values 4095 1023 255 (12-bit) (10-bit) (8-bit) 12 dB 6 dB Increasing the gain is useful when at your brightest exposure, a gray value lower than 0 255 (in modes that output 8 bits per pixel), 0 25 50 1023 (in modes that output 10 bits per pixel), or 4095 (in modes that output 12 bits per Sensor Output Signal (%) pixels) is reached. For example, if you found that at your brightest exposure the gray Fig. 47: Gain in dB values output by the camera were no higher than 127 (in an 8 bit mode), you could increase the gain to 6 dB (an amplification factor of 2) and thus reach gray values of 254. Basler ace Camera Link 0 dB 100 157 Features AW00098504000 The camera’s gain is determined by the value of the Gain Raw parameter. Raw gain is adjusted on an integer scale. The minimum setting is 33 and the maximum setting is 511. If you know the current setting for the Gain Raw parameter, you can calculate the camera’s gain in dB using the following formula: Gain in dB = 20 log10 (Gain Raw Setting / 32) For example, if the current Gain Raw setting is 128, then: Gain in dB = 20 log10 (128 / 32) Gain in dB = 12.0 Setting the Gain Using Basler pylon To set the Gain Raw parameter value: Set the Gain Selector to All. Set the Gain Raw parameter to your desired value. You can use the pylon API to set the Gain Selector and the Gain Raw parameter values from within your application software. The following code snippet illustrates using the API to set the selector and the parameter value: // Set the gain Camera.GainSelector.SetValue( GainSelector_All ); Camera.GainRaw.SetValue( 128 ); You can also use the Basler pylon Viewer application to easily set the parameters. For more information about the pylon API and the pylon Viewer, see Section 3.1 on page 19. Setting the Gain Using Direct Register Access To set the gain via direct register access: Set the value of the Gain All register. For more information about direct register access, see Section 3.2 on page 21. 158 Basler ace Camera Link AW00098504000 10.2 Features Black Level Adjusting the camera’s black level will result in an offset to the pixel values output by the camera. Increasing the black level setting will result in a positive offset in the digital values output for the pixels. Decreasing the black level setting will result in a negative offset in the digital values output for the pixels. The black level can be set on an integer scale ranging from 0 to 255. If the camera is set for a pixel format that yields an 8 bit pixel depth, an increase of 16 in the black level parameter setting will result in a positive offset of 1 in the digital values output for the pixels. And a decrease of 16 in the setting will result in a negative offset of 1 in the digital values output for the pixels. If the camera is set for a pixel format that yields a 10 bit pixel depth, an increase of 4 in the black level parameter setting will result in a positive offset of 1 in the digital values output for the pixels. A decrease of 4 in the setting will result in a negative offset of 1 in the digital values output for the pixels. If the camera is set for a pixel format that yields a 12 bit pixel depth, an increase of 1 in the black level parameter setting will result in a positive offset of 1 in the digital values output for the pixels. A decrease of 1 in the setting will result in a negative offset of 1 in the digital values output for the pixels. Setting the Black Level Using Basler pylon To set the black level: Set the Black Level Selector to All. Set the Black Level Raw parameter to your desired value. You can use the pylon API to set the Black Level Selector and the Black Level Raw parameter values from within your application software. The following code snippet illustrates using the API to set the selector and the parameter value: // Set the black level Camera.BlackLevelSelector.SetValue ( BlackLevelSelector_All ); You can also use the Basler pylon Viewer application to easily set the parameters. For more information about the pylon API and the pylon Viewer, see Section 3.1 on page 19. Setting the Black Level Using Direct Register Access To the black level via direct register access: Set the value of the Black Level All register. For more information about direct register access, see Section 3.2 on page 21. Basler ace Camera Link 159 Features AW00098504000 10.3 Image Area of Interest (AOI) The image area of interest (Image AOI or AOI for short) feature lets you specify a portion of the sensor array and after each image is acquired, only the pixel information from the specified portion of the array will be read out of the sensor and transmitted from the camera. The area of interest is referenced to the top left corner of the sensor array. The top left corner is designated as column 0 and row 0 as shown in Figure 48. The location and size of the area of interest is defined by declaring an offset X, a width, an offset Y, and a height. For example, suppose that you specify the offset X as 10, the width as 16, the offset Y as 6, and the height as 10. The area of the array that is bounded by these settings is shown in Figure 48. The camera will only transmit pixel data from within the area defined by your settings. Information from the pixels outside of the area of interest is discarded. Column 0 1 2 3 4 5 6 7 8 9 10 11 12 13 14 15 16 17 18 19 20 21 22 23 24 25 26 27 28 29 30 Row 0 Offset Y Height 1 2 3 4 5 6 7 8 9 10 11 12 13 14 15 16 17 18 19 The camera will only transmit the pixel data from this area Offset X Width Fig. 48: Area of Interest One of the main advantages of the AOI feature is that decreasing the size of the AOI can increase the camera’s maximum allowed acquisition frame rate. The AOI feature also includes Center X and a Center Y capabilities. When Center X is enabled, the camera will automatically center the AOI along the sensor’s X axis (and will disable the Offset X 160 Basler ace Camera Link AW00098504000 Features setting). When Center Y is enabled, the camera will automatically center the AOI along the sensor’s Y axis (and will disable the Offset Y setting). For more information about how changing the AOI size affects the maximum allowed frame rate, see Section 7.8 on page 117. 10.3.1 Setting the Image AOI By default, the AOI is set to use the full resolution of the camera’s sensor. You can change the size and the position of the AOI by changing the value of the camera’s Offset X, Offset Y, Width, and Height parameters. You can also enable automatic centering using the Center X and Center Y parameters. When you are setting the camera’s area of interest, you must follow these guidelines: On all camera models: The sum of the Offset X setting plus the Width setting must not exceed the width of the camera’s sensor. For example, on the acA2000-340km, the sum of the Offset X setting plus the Width setting must not exceed 2048. The sum of the Offset Y setting plus the Height setting must not exceed the height of the camera’s sensor. For example, on the acA2000-340km, the sum of the Offset Y setting plus the Height setting must not exceed 1088. On monochrome camera models: The Offset Y and Height parameters can each be set in increments of 1. The Offset X and Width parameters can be set in increments of: 2 on a camera set for the 1X2-1Y Camera Link tap geometry 3 on a camera set for the 1X3-1Y Camera Link tap geometry 4 on a camera set for the 1X4-1Y Camera Link tap geometry 6 on a camera set for the 1X6-1Y Camera Link tap geometry 8 on a camera set for the 1X6-1Y Camera Link tap geometry 10 on a camera set for the 1X10⁻¹Y Camera Link tap geometry On color camera models: The Offset Y and Height parameters can each be set in increments of 2. The Offset X and Width parameters can be set in increments of: 2 on a camera set for the 1X2-1Y Camera Link tap geometry 6 on a camera set for the 1X3-1Y Camera Link tap geometry 4 on a camera set for the 1X4-1Y Camera Link tap geometry 6 on a camera set for the 1X6-1Y Camera Link tap geometry 8 on a camera set for the 1X6-1Y Camera Link tap geometry 10 on a camera set for the 1X10⁻¹Y Camera Link tap geometry For more information about Camera Link tap geometries, see Section 9.3 on page 146. Basler ace Camera Link 161 Features AW00098504000 Your frame grabber may place additional restrictions on how the AOI size must be set. Check the documentation included with your frame grabber to determine its AOI requirements. Normally the X Offset, Y Offset, Width, and Height parameter settings refer to the physical columns and lines in the sensor. But if binning is enabled, these parameters are set in terms of "virtual" columns and lines. For more information about binning, see Section 10.8 on page 184. Setting the Image AOI Using Basler pylon You can set the Offset X, Offset Y, Width, and Height parameter values from within your application software by using the Basler pylon API. The following code snippets illustrate using the API to get the maximum allowed settings and the increments for the Width and Height parameters. They also illustrate setting the Offset X, Offset Y, Width, and Height parameter values and enabling automatic AOI centering. int64_t widthMax = Camera.Width.GetMax( ); int64_t widthInc = Camera.Width.GetInc(); Camera.Width.SetValue( 200 ); Camera.OffsetX.SetValue( 100 ); int64_t heightMax = Camera.Height.GetMax( ); int64_t heightInc = Camera.Height.GetInc(); Camera.Height.SetValue( 200 ); Camera.OffsetY.SetValue( 100 ); // Enable automatic X and Y centering Camera.CenterX.SetValue( true ); Camera.CenterY.SetValue( true ); You can also use the Basler pylon Viewer application to easily set the parameters. For more information about the pylon API and the pylon Viewer, see Section 3.1 on page 19. 162 Basler ace Camera Link AW00098504000 Features Setting the Image AOI Using Direct Register Access To set the AOI Offset X, Offset Y, Width, and Height parameters via direct register access: Set the value of the Offset X register. Set the value of the Offset Y register. Set the value of the Width register. Set the value of the Height register. To enable Center X and Center Y via direct register access: Set the value of the Center X register. Set the value of the Center Y register. For more information about direct register access, see Section 3.2 on page 21. Basler ace Camera Link 163 Features 10.4 AW00098504000 Stacked Zone Imaging The stacked zone imaging feature lets you define up to eight zones on the sensor array. When an image is acquired, only the pixel information from the areas within the defined zones will be read out of the sensor. The lines read out of the zones will then be stacked together and will be transmitted from the camera as a single image. The Stacked Zone Imaging Enable parameter is used to enable or disable stacked zone imaging. When the parameter is set to true, stacked zone imaging is enabled. The Offset X and Width parameters are used to begin the process of setting up stacked zone imaging. Since all of the zones must be the same width and all of the zones must be vertically aligned, these two parameters define the left and right borders for all of the zones as shown in Figure 49 on page 165. In the figure, Offset X is set to 10 and the Width is set to 16. The next step in the setup process is to define each individual zone. Up to 8 zones can be set up, with zone index numbers ranging from 1 through 8. Each zone can be enabled or disabled individually by first using the Stacked Zone Imaging Index parameter to select a zone number and then using the Stacked Zone Imaging Zone Enable parameter to enable the selected zone. Once a zone has been enabled, you must use the Stacked Zone Imaging Zone Offset Y parameter to set the offset (in pixels) between the top of the sensor and the top of the zone. And you can use the Stacked Zone Imaging Zone Height parameter to set the height of the zone. In Figure 49, for example, three zones have been enabled - zone 1, zone 2, and zone 3. The Offset X is set to 10 and the Width is set to 16. These settings apply to all zones. For zone 1: The Stacked Zone Imaging Zone Offset Y parameter is set to 6. The Stacked Zone Imaging Zone Height parameter is set to 6. For zone 2: The Stacked Zone Imaging Zone Offset Y parameter is set to 20. The Stacked Zone Imaging Zone Height parameter is set to 10. For zone 3: The Stacked Zone Imaging Zone Offset Y parameter is set to 38. The Stacked Zone Imaging Zone Height parameter is set to 8. With these settings, the camera would output an image that is 16 pixels wide and 24 lines (the total height of the three zones) high. 164 Basler ace Camera Link AW00098504000 Features 0 1 2 3 4 5 6 7 8 9 10 11 12 13 14 15 16 17 18 19 20 21 22 23 24 25 26 27 28 29 30 0 1 2 Zone 1 Offset Y 3 4 5 6 7 8 9 Zone 1 Height Zone 0 10 11 12 13 Zone 2 Offset Y 14 15 16 17 18 19 20 21 22 Zone 2 Height 23 24 25 26 Zone 1 27 28 29 30 31 32 Zone 3 33 Offset Y 34 35 36 37 38 39 40 Zone 3 41 Height 42 Zone 2 43 44 45 46 47 48 Offset X Width Fig. 49: Stacked Zone Imaging Basler ace Camera Link 165 Features AW00098504000 There are several things to keep in mind when setting up zoned imaging: You are not required to enable the zones in sequence. For example, you can enable zones 2, 4, and 6 and not enable zones 1, 3, and 5. You do not need to order the zones from top to bottom on the sensor. For example, you could place zone 1 near the bottom of the sensor, zone 3 near the top, and zone 2 in the middle. But note that the camera always reads out and transmits the zones starting from the top of the sensor and going to the bottom, regardless of how the zone numbers are ordered. So the lines in the transmitted images will always be ordered from top to bottom in relation to the sensor. The zones can be set so that they overlap. When this happens, the camera will internally transform the overlapped zones into a single large zone that will be read out and transmitted as if it were simply a single large zone. (The lines included in the overlapping area will only be read out and transmitted once.) When stacked zone imaging is enabled, the camera’s Offset Y parameter becomes read only, and this parameter indicates the Y offset for the zone nearest to the top of the sensor. When stacked zone imaging is enabled, the Height parameter becomes read only, and this parameter indicates the total height of the image that will be transmitted from the camera (i.e., the sum of the heights of all zones). 166 Basler ace Camera Link AW00098504000 10.4.1 Features Setting Stacked Zone Imaging Guidelines When you are setting the stacked zones, you must follow these guidelines: On all camera models: The sum of the Offset X setting plus the Width setting must not exceed the width of the camera’s sensor. For example, on the acA2000-340km, the sum of the Offset X setting plus the Width setting must not exceed 2048. For any given zone, The sum of the Stacked Zone Imaging Zone Offset Y setting plus the Stacked Zone Imaging Zone Height setting must not exceed the height of the camera’s sensor. For example, on the acA2000-340km, the sum of the Stacked Zone Imaging Zone Offset Y setting plus the Stacked Zone Imaging Zone Height setting must not exceed 1088. On monochrome camera models: The Stacked Zone Imaging Zone Offset Y and Stacked Zone Imaging Zone Height parameters for any given zone can each be set in increments of 1. The Offset X and Width parameters can be set in increments of: 2 on a camera set for the 1X2-1Y Camera Link tap geometry 3 on a camera set for the 1X3-1Y Camera Link tap geometry 4 on a camera set for the 1X4-1Y Camera Link tap geometry 6 on a camera set for the 1X6-1Y Camera Link tap geometry 8 on a camera set for the 1X6-1Y Camera Link tap geometry 10 on a camera set for the 1X10⁻¹Y Camera Link tap geometry On color camera models: The Stacked Zone Imaging Zone Offset Y and Stacked Zone Imaging Zone Height parameters for any given zone can each be set in increments of 2. The Offset X and Width parameters can be set in increments of: 2 on a camera set for the 1X2-1Y Camera Link tap geometry 6 on a camera set for the 1X3-1Y Camera Link tap geometry 4 on a camera set for the 1X4-1Y Camera Link tap geometry 6 on a camera set for the 1X6-1Y Camera Link tap geometry 8 on a camera set for the 1X6-1Y Camera Link tap geometry 10 on a camera set for the 1X10⁻¹Y Camera Link tap geometry Basler ace Camera Link 167 Features AW00098504000 Setting Stacked Zone ImagingUsing Basler pylon You can set the parameter values associated with stacked zone imaging from within your application software by using the Basler pylon API. The following code snippets illustrate using the API to set up two zones. // Enable stacked zone imaging Camera.StackedZoneImagingEnable.SetValue( true ); // Set the width and offset X for the zones Camera.Width.SetValue( 200 ); Camera.OffsetX.SetValue( 100 ); // Set zone 1 // Select the zone Camera.StackedZoneImagingIndex.SetValue( 1 ); // Enable the selected zone Camera.StackedZoneImagingZoneEnable.SetValue( true ); // Set the offset Y for the selected zone Camera.StackedZoneImagingZoneOffsetY.SetValue( 100 ); // Set the height for the selected zone Camera.StackedZoneImagingZoneHeight.SetValue( 100 ); // Set zone 2 // Select the zone Camera.StackedZoneImagingIndex.SetValue( 2 ); // Enable the selected zone Camera.StackedZoneImagingZoneEnable.SetValue( true ); // Set the offset Y for the selected zone Camera.StackedZoneImagingZoneOffsetY.SetValue( 250 ); // Set the height for the selected zone Camera.StackedZoneImagingZoneHeight.SetValue( 200 ); You can also use the Basler pylon Viewer application to easily set the parameters. For more information about the pylon API and the pylon Viewer, see Section 3.1 on page 19. 168 Basler ace Camera Link AW00098504000 Features Setting Stacked Zone Imaging Using Direct Register Access To enable stacked zone imaging via direct register access: Set the value of the Stacked Zone Imaging Enable register to 1 (true). To set the Offset X and Width, parameters for the zones: Set the value of the Offset X register. Set the value of the Width register. To set up zone 1: Enable zone 1 by setting the value of the Stacked Zone Imaging Zone 1 Enable register to 1 (true). Set the Y offset for zone 1 by setting the value of the Stacked Zone Imaging Zone 1 Offset Y register. Set the height for zone 1 by setting the value of the Stacked Zone Imaging Zone 1 Height register. Zones 2 through 8 are set up in similar fashion. For more information about direct register access, see Section 3.2 on page 21. Basler ace Camera Link 169 Features 10.5 AW00098504000 Sequencer Overview During operation, the camera is controlled by a set of configuration parameters that reside in the camera’s volatile memory. This set of parameters is known as the "active set". When you use the pylon API or direct register access to make a change to a camera parameter such as the Gain, you are making a change to the active set. And since the active set controls camera operation, you will see a change in camera operation when you change a parameter in the active set. For more information about the active set, see the "Configuration Sets" section. From the point of view of the sequencer feature, the parameters in the active set can be divided into two types: "non-sequence" and "sequence" parameters (as shown in Figure 50 on page 170). The non-sequence parameters are those that cannot be changed using the sequencer feature and the sequence parameters are those that can be changed using the sequencer feature. With the sequencer feature, you can define up to four different "sequence sets". Each sequence set includes a set of values for all of the sequence parameters. As you are acquiring images, you can replace the values for the sequence parameters in the active set with the values from any one of the sequence sets at will. So, for example, you could define four sequence sets, with each one being appropriate for a different type of lighting conditions. As you are operating your system and the lighting conditions change, you could replace the values for the sequence parameters in the active set with the values from any one of the sequence sets at will. One of the main advantages of the sequence sets is that because they reside in the camera’s FPGA, you can replace the values in the active set with values from one of the sequence sets almost instantaneously. Active Set pylon API / Register Access Non-sequence Parameters Sequence Parameters Load / Store Sequence Enable Sequence Set 0 Sequence Set 1 Sequence Set 2 Sequence Set 3 Control A Control B Set ID Fig. 50: Sequence Feature Block Diagram 170 Basler ace Camera Link AW00098504000 Features The four sequence sets are stored in the camera’s memory and are available for use by the sequencer feature. Any of the sequence sets only actively controls the operation of the camera after it was transferred into the active set. The four sequence sets are designated as Sequence Set 0, Sequence Set 1, Sequence Set 2, and Sequence Set 3. The parameters included in each sequence set are: Exposure Time Enable Acquisition Frame Rate Acquisition Frame Rate Width Height X Offset Y Offset Binning Pixel Format Test Image Gain Black Level Digital Shift LUT Enable Light Source Selector Color Transformation Value Color Transformation Matrix Factor Stacked Zone Enable Zone Enable Zone Top Zone Height Sequencer Feature Operation The software module that operates the sequencer feature has two controls designated as Control A and Control B. Each control can be set to a zero or to a one. As shown below, the combination of the states of the two controls selects a "set ID", which acts as a pointer to one of the four sequence sets. Control B Control A Selects 0 0 Set ID 0 (Sequence Set 0) 0 1 Set ID 1 (Sequence Set 1) 1 0 Set ID 2 (Sequence Set 2) 1 1 Set ID 3 (Sequence Set 3) Table 12: Controls A and B The Sequence Enable parameter is used to enable the sequencer feature. Assuming that the camera is in the process of continuously capturing images, the sequencer feature operates as follows: When the sequencer feature becomes enabled and a frame start trigger was received, the camera checks the state of Control A and Control B and determines which sequence set is currently pointed to. The camera immediately replaces the sequence parameter values in the active set with the values from that sequence set. When the next image is acquired, the modified active set will be used to control the image Basler ace Camera Link 171 Features AW00098504000 acquisition. After each image is acquired, the camera checks the state of Control A and Control B: If there has been no change in the state, the camera will take no action regarding the active set. If the state has changed, the camera will determine which sequence parameter set is now being pointed to and will immediately replace the sequence parameter values in the active set with the values from that sequence set. When the sequencer feature becomes disabled, the parameter values in the active set will return to what they were before the sequencer feature was enabled. When the sequencer feature is enabled, the values of the sequence parameters in the active set cannot be accurately read using the pylon API or direct register access. We recommend that you do not attempt to read or change any of the sequence parameters when the sequencer feature is enabled. Setting the State of Control A and Control B Before using the sequencer feature, the user must assign a source signal to Control A and a source signal to Control B. The user then sets the state of Control A and Control B by manipulating the source signals. The source input signals available for Control A or Control B are: Line 1 - When the source signal for a control is set to line 1, you set the state of the control by applying the appropriate electrical signal to the GPIO line on the camera. (This assumes that the GPIO line on the camera has been properly set to operate as an input line.) CC1 - When the source signal for a control is set to CC1, you set the state of the control by applying the appropriate electrical signal to CC1 in the Camera Link interface. CC2 - When the source signal for a control is set to CC2, you set the state of the control by applying the appropriate electrical signal to CC2 in the Camera Link interface. CC3 - When the source signal for a control is set to CC3, you set the state of the control by applying the appropriate electrical signal to CC3 in the Camera Link interface. You can also set Control A or Control B to "Disabled". When a control is set to disabled, its value will always be zero. To assign a source signal to control: Use the Sequence Control Selector parameter to select either Control A or Control B. Use the Sequence Control Source parameter to set the source signal for the selected control to Line 1, CC1, CC2, CC3, or to Disabled. The disabled setting is useful if you only want to use one source signal to select between two of the available sequence parameter sets. For example, you could set Control A to use CC1 as its source 172 Basler ace Camera Link AW00098504000 Features signal and set Control B as disabled. In this case, you could point to sequence parameter set 0 or sequence parameter set 1 by simply using CC1 to set the state of Control A. Populating the Sequence Parameter Sets Before you begin using the sequencer feature, you must populate the sequence sets with values that will be useful for your particular situation. You should use the following procedure to populate the sequence sets: Make sure that the sequencer feature is disabled. Set up your first acquisition scenario (i.e., lighting, object positioning, etc.). Adjust the camera parameters to get the best image quality with this scenario (you are adjusting the parameters in the active set). Use the Sequence Set Selector to select sequence set 0, 1, 2, or 3. Execute the Sequence Set Store command to copy the sequence parameter values currently in the active set into the selected sequence set. (Any existing parameter values in the sequence set will be overwritten.) Repeat the above steps for the other sequence sets. There is also a command called Sequence Set Load that can be useful when working with the sequence parameter sets. If you use the Sequence Set Selector parameter to select a sequence set and then you execute the Sequence Set Load command, the sequence parameter values in the active set will be replaced by the values stored in the selected sequence set. This ability can be useful in two situations. First, if you simply want to see how the parameters currently stored in one of the sequence parameter sets will affect camera operation, you can load the parameters from that sequence parameter set into the active parameter set and see what happens. Second, if you want to prepare a new sequence parameter set and you know that an existing set is already close to what you will need, you can load the existing sequence set into the active set, make some small changes to the active set, and then save the active set to one of the other sequence parameter sets. Replacing the sequence parameter values in the active set via the Sequence Set Load command is much slower than by involving the Controls A and B. We therefore recommend to only use the Controls A and B for acquiring images continuously. Because the sequence parameter sets reside in volatile memory, they are not retained if camera power is switched off. Basler ace Camera Link 173 Features AW00098504000 Setting the Sequencer Using Basler pylon You can use the pylon API to set the parameters associated with the sequencer feature from within your application software. The following code snippet illustrates using the API to populate sequence set 0 and sequence set 1 by storing the sequence parameter values from the active set in the sequence sets: // Disable the sequencer feature Camera.SequenceEnable.SetValue( false ); // Set up the first acquisition scenario (lighting, object position, etc.) and // adjust the camera parameters for the best image quality. // Select sequence parameter set 0 Camera.SequenceSetSelector.SetValue( 0 ); // Store the sequenceable parameters from the active set in the selected sequence // set Camera.SequenceSetStore.Execute( ); // Set up the second acquisition scenario (lighting, object position, etc.) and // adjust the camera parameters for the best image quality. // Select sequence parameter set 1 Camera.SequenceSetSelector.SetValue( 1 ); // Store the sequenceable parameters from the active set in the selected sequence // set Camera.SequenceSetStore.Execute( ); The following code snippet illustrates using the API to set the source signal for Control A and Control B to CC1 and CC2 respectively: // Select Control A Camera.SequenceControlSelector.SetValue( SequenceControlSelector_ControlA ); // Set the signal source for the selected input Camera.SequenceControlSource.SetValue( SequenceControlSource_CC1 ); // Select Control B Camera.SequenceControlSelector.SetValue( SequenceControlSelector_ControlB ); // Set the signal source for the selected input Camera.SequenceControlSource.SetValue( SequenceControlSource_CC2 ); The following code snippet illustrates using the API to load the sequence parameter values from sequence set 0 into the active set: // Select sequence parameter set 0 Camera.SequenceSetSelector.SetValue( 0 ); 174 Basler ace Camera Link AW00098504000 Features // Load the sequenceable parameters from the sequence set into the active set Camera.SequenceSetLoad.Execute( ); The following code snippet illustrates using the API to enable the sequencer feature: // Enable the sequencer feature Camera.SequenceEnable.SetValue( true ); You can also use the Basler pylon Viewer application to easily set the parameters. For more information about the pylon API and the pylon Viewer, see Section 3.1 on page 19. Setting the Sequencer Feature Using Direct Register Access To populate the sequencer parameter sets via direct register access: Disable the sequencer feature by setting the value of the Sequence Enable register to 0 (false). Set up the first acquisition scenario (lighting, object position, etc.) and adjust camera parameters for best image quality. Select sequence parameter set 0 by setting the value of the Sequence Step Selector register to 0. Store the sequenceable parameters from the active set in the selected sequence parameter set by setting the value of the Sequence Step Store register to 1. Follow a similar process to populate sequence parameters set 1, 2, or 3. To select the source signal for Control A: Set the value of the Sequence Control Source 0 to Line 1, CC1, CC2, CC3, or Disabled as desired. To select the source signal for Control B: Set the value of the Sequence Control Source 1 to Line 1, CC1, CC2, CC3, or Disabled as desired. To load the sequence parameter values from sequence set 0 into the active set via direct register access: Select sequence parameter set 0 by setting the value of the Sequence Step Selector register to 0. Load the sequence parameters from the selected sequence parameter set into the active set by setting the value of the Sequence Step Load register to 1. Follow a similar process to load the sequence parameters from set 1, 2, or 3. To enable the sequencer feature: Set the value of the Sequence Enable register to 1 (true). For more information about direct register access, see Section 3.2 on page 21. Basler ace Camera Link 175 Features 10.6 AW00098504000 Binning The binning feature is only available on the monochrome cameras. Binning increases the camera’s response to light by summing the charges from adjacent pixels into one pixel. Two types of binning are available: vertical binning and horizontal binning. With vertical binning, adjacent pixels from 2 lines, 3 lines, or a maximum of 4 lines in the imaging sensor array are summed and are reported out of the camera as a single pixel. Figure 51 illustrates vertical binning. Vertical Binning by 2 Vertical Binning by 3 Vertical Binning by 4 Fig. 51: Vertical Binning With horizontal binning, adjacent pixels from 2 columns, 3 columns, or a maximum of 4 columns are summed and are reported out of the camera as a single pixel. Figure 52 illustrates horizontal binning. Horizontal Binning by 2 Horizontal Binning by 3 Horizontal Binning by 4 Fig. 52: Horizontal Binning 176 Basler ace Camera Link AW00098504000 Features You can combine vertical and horizontal binning. This, however, may cause objects to appear distorted in the image. For more information on possible image distortion due to combined vertical and horizontal binning, see the next section. Setting Binning Using Basler pylon You can enable vertical binning by setting the Binning Vertical parameter. Setting the parameter’s value to 2, 3, or 4 enables vertical binning by 2, vertical binning by 3, or vertical binning by 4 respectively. Setting the parameter’s value to 1 disables vertical binning. You can enable horizontal binning by setting the Binning Horizontal parameter. Setting the parameter’s value to 2, 3, or 4 enables horizontal binning by 2, horizontal binning by 3, or horizontal binning by 4 respectively. Setting the parameter’s value to 1 disables horizontal binning. You can use the pylon API to set the Binning Vertical or the Binning Horizontal parameter value from within your application software. The following code snippet illustrates using the API to set the parameter values: // Enable vertical binning by 2 Camera.BinningVertical.SetValue( 2 ); // Enable horizontal binning by 4 Camera.BinningHorizontal.SetValue( 4 ); // Disable vertical and horizontal binning Camera.BinningVertical.SetValue( 1 ); Camera.BinningHorizontal.SetValue( 1 ); You can also use the Basler pylon Viewer application to easily set the parameters. For more information about the pylon API and the pylon Viewer, see Section 3.1 on page 19. Setting Binning Using Direct Register Access To enable vertical binning via direct register access: Set the value of the Binning Vertical register. Setting the register’s value to 2, 3, or 4 enables vertical binning by 2, vertical binning by 3, or vertical binning by 4 respectively. Setting the register’s value to 1 disables vertical binning. To enable horizontal binning via direct register access: Set the value of the Binning Horizontal register. Setting the register’s value to 2, 3, or 4 enables horizontal binning by 2, horizontal binning by 3, or horizontal binning by 4 respectively. Setting the register’s value to 1 disables horizontal binning. For more information about direct register access, see Section 3.2 on page 21. Basler ace Camera Link 177 Features 10.6.1 AW00098504000 Considerations When Using Binning Increased Response to Light Using binning can greatly increase the camera’s response to light. When binning is enabled, acquired images may look overexposed. If this is the case, you can reduce the lens aperture, reduce the intensity of your illumination, reduce the camera’s exposure time setting, or reduce the camera’s gain setting. Reduced Resolution Using binning effectively reduces the resolution of the camera’s imaging sensor. For example, the sensor in the acA2000-340km camera normally has a maximum resolution of 2048 (H) x 1088 (V) pixels. If you set this camera to use horizontal binning by 3 and vertical binning by 3, the effective maximum resolution of the sensor is reduced to 682 (H) by 362 (V). (Note that the dimensions of the sensor are not evenly divisible by 3, so we rounded down to the nearest whole number.) Possible Image Distortion Objects will only appear undistorted in the image if the numbers of binned lines and columns are equal. With all other combinations, the imaged objects will appear distorted. If, for example, vertical binning by 2 is combined with horizontal binning by 4 the widths of the imaged objects will appear shrunken by a factor of 2 compared to the heights. If you want to preserve the aspect ratios of imaged objects when using binning, you must use vertical and horizontal binning where equal numbers of lines and columns are binned, e.g. vertical binning by 3 combined with horizontal binning by 3. Binning’s Effect on AOI Settings When you have the camera set to use binning, keep in mind that the settings for your area of interest (AOI) will refer to the binned lines and columns in the sensor and not to the physical lines in the sensor as they normally would. Another way to think of this is by using the concept of a "virtual sensor." For example, assume that you are using an acA2000-340km camera set for 3 by 3 binning as described above. In this case, you would act as if you were actually working with a 682 column by 362 line sensor when setting your AOI parameters. The maximum AOI width would be 682 and the maximum AOI height would be 362. When you set the Width for the AOI, you will be setting this value in terms of virtual sensor columns. And when you set the Height for the AOI, you will be setting this value in terms of virtual sensor lines. For more information about the imaging area of interest (AOI) feature, see Section 10.3 on page 160. 178 Basler ace Camera Link AW00098504000 10.7 Features Mirror Imaging The camera’s reverse X and reverse Y functions let you flip the captured images horizontally and/ or vertically before they are transmitted from the camera. Note that the reverse X and reverse Y functions may both be enabled at the same time if so desired. 10.7.1 Reverse X The reverse X feature is a horizontal mirror image feature. When the reverse X feature is enabled, the pixel values for each line in a captured image will be swapped end-for-end about the line’s center. This means that for each line, the value of the first pixel in the line will be swapped with the value of the last pixel, the value of the second pixel in the line will be swapped with the value of the nextto-last pixel, and so on. Figure 53 shows a normal image on the left and an image captured with reverse X enabled on the right. Normal Image Reverse X Mirror Image Fig. 53: Reverse X Mirror Imaging Basler ace Camera Link 179 Features AW00098504000 The Effect of Reverse X on the Auto Function AOIs If you are using the camera’s auto functions, you should be aware of the effect that using the reverse X feature will have on the auto function AOIs. When reverse X is used, the position of the auto function AOIs relative to the sensor remains the same. As a consequence, each auto function AOI will include a different portion of the captured image depending on whether or not the reverse X feature is enabled. Figure 54 shows the effect of that reverse X mirroring will have on the auto function AOIs. Normal Image Auto AOI 1 Auto AOI 2 Reverse X Mirror Image Auto AOI 1 Auto AOI 2 Fig. 54: Using Reverse X Mirror Imaging with Auto Functions Enabled For more information about auto functions and auto function AOIs, see Section 10.9 on page 189. 180 Basler ace Camera Link AW00098504000 10.7.2 Features Reverse Y The reverse Y feature is a vertical mirror image feature. When the reverse Y feature is enabled, the lines in a captured image will be swapped top-to-bottom. This means that the top line in the image will be swapped with the bottom line, the next-to-top line will be swapped with the next-to-bottom line, and so on. Figure 53 shows a normal image on the left and an image captured with reverse Y enabled on the right. Normal Image Reverse Y Mirror Image Fig. 55: Reverse Y Mirror Imaging Basler ace Camera Link 181 Features AW00098504000 The Effect of Reverse Y on the Auto Function AOIs If you are using the camera’s auto functions, you should be aware of the effect that using the reverse Y feature will have on the auto function AOIs. When reverse Y is used, the position of the auto function AOIs relative to the sensor remains the same. As a consequence, each auto function AOI will include a different portion of the captured image depending on whether or not the reverse Y feature is enabled. Figure 56 shows the effect of that reverse Y mirroring will have on the auto function AOIs. Normal Image Auto AOI 1 Auto AOI 2 Reverse Y Mirror Image Auto AOI 1 Auto AOI 2 Fig. 56: Using Reverse Y Mirror Imaging with Auto Functions Enabled For more information about auto functions and auto function AOIs, see Section 10.9 on page 189. 182 Basler ace Camera Link AW00098504000 10.7.3 Features Enabling Reverse X and Reverse Y Enabling Reverse X and Y Using Basler Pylon You can enable the reverse X and reverse Y features by setting the Reverse X and the Reverse Y parameter values. You can use the pylon API to set the parameter values from within your application software. The following code snippet illustrates using the API to set the parameter values: // Enable reverse X Camera.ReverseX.SetValue(true); // Enable reverse Y Camera.ReverseY.SetValue(true); You can also use the Basler pylon Viewer application to easily set the parameter. For more information about the pylon API and the pylon Viewer, see Section 3.1 on page 19. Enabling Reverse X and Y Using Direct Register Access To enable reverse X via direct register access: Set the value of the Reverse X register to 1 (enabled). To enable reverse Y via direct register access: Set the value of the Reverse Y register to 1 (enabled). For more information about direct register access, see Section 3.2 on page 21. Basler ace Camera Link 183 Features 10.8 AW00098504000 Luminance Lookup Table The type of electronics used on the camera allows the camera’s sensor to acquire pixel values at a 12 bit depth. Normally, when a camera is set for a 12 bit pixel data format, the camera transmits the actual 12 bit pixel values reported by the sensor. The luminance lookup table feature lets you create a custom 12 bit to 12 bit lookup table that maps the actual 12 bit values output from the sensor to substitute 12 bit values of your choice. When the lookup table is enabled, the camera will replace the actual pixel values output from the sensor with the substitute values from the table. The lookup table has 4096 indexed locations with a 12 bit value stored at each index. The values stored in the table are used like this: When the sensor reports that a pixel has an actual 12 bit value of 0, the substitute 12 bit value stored at index 0 will replace the actual pixel value. The numbers stored at indices 1 through 7 are not used. When the sensor reports that a pixel has an actual 12 bit value of 8, the substitute 12 bit value stored at index 8 will replace the actual pixel value. The numbers stored at indices 9 through 15 are not used. When the sensor reports that a pixel has an actual 12 bit value of 16, the substitute 12 bit value stored at index 16 will replace the actual pixel value. The numbers stored at indices 17 through 23 are not used. When the sensor reports that a pixel has an actual 12 bit value of 24, the substitute 12 bit value stored at index 24 will replace the actual pixel value. And so on. As you can see, the table does not include a defined 12 bit substitute value for every actual pixel value that the sensor can report. If the sensor reports an actual pixel value that is between two values that have a defined substitute, the camera performs a straight line interpolation to determine the substitute value that it should use. For example, assume that the sensor reports an actual pixel value of 12. In this case, the camera would perform a straight line interpolation between the substitute values at index 8 and index 16 in the table. The result of the interpolation would be used by the camera as the substitute. Another thing to keep in mind about the table is that index 4088 is the last index that will have a defined substitute value associated with it (the values at indices 4089 through 4095 are not used.) If the sensor reports an actual value greater than 4088, the camera will not be able to perform an interpolation. In cases where the sensor reports an actual value greater than 4088, the camera simply uses the 12 bit substitute value from index 4088 in the table. 184 Basler ace Camera Link AW00098504000 Features If the imaging sensor bit depth is set to 10 bits, the sensor will only capture pixel data at 10 bit depth. In this case, the pixel values output from the sensor wil be converted to 12 bit depth by padding the 10 bit values with two zeros as least significant bits. These converted 12 bit values will then be used as input to the lookup table. There is only one lookup table. When the lookup table is enabled on color cameras, the single table is used for red, green, and blue pixel values. The values for the luminance lookup table are not saved in the user sets and are lost when the camera is reset or switched off. If you are using the lookup table feature, you must reenter the lookup table values after each camera startup or reset. The advantage of the luminance lookup table feature is that it lets a user customize the response curve of the camera. The graphs below represent the contents of two typical lookup tables. The first graph is for a lookup table where the substitute values are designed so that the output of the camera increases linearly as the actual sensor output increases. The second graph is for a lookup table where the substitute values are designed so that the camera output increases quickly as the actual sensor output moves from 0 through 2048 and increases gradually as the actual sensor output moves from 2049 through 4096. 4095 3072 Substitute 12 Bit Value 2048 1024 0 0 1024 2048 3072 4095 Actual 12 Bit Sensor Value Fig. 57: Lookup Table with Values Mapped in a Linear Fashion Basler ace Camera Link 185 Features AW00098504000 4095 3072 Substitute 12 Bit Value 2048 1024 0 0 1024 2048 3072 4095 Actual 12 Bit Sensor Value Fig. 58: Lookup Table with Values Mapped for Higher Camera Output at Low Sensor Readings Using the Luminance Lookup Table to Get 10 Bit or 8 Bit Output As mentioned above, when the camera is set for a 12 bit pixel data format, the lookup table can be used to perform a 12 bit to 12 bit substitution. The lookup table can also be used in 12 bit to 10 bit or 12 bit to 8 bit fashion. To use the table in 12 bit to 10 bit fashion, you enter 12 bit substitution values into the table and enable the table as you normally would. But instead of setting the camera for a 12 bit pixel data format, you set the camera for a 10 bit format (such as Mono 10). In this situation, the camera will first use the values in the table to do a 12 bit to 12 bit substitution. It will then truncate the least significant 2 bits of the substitute value and will transmit the remaining 10 most significant bits. To use the table in 12 bit to 8 bit fashion, you enter 12 bit substitution values into the table and enable the table as you normally would. But instead of setting the camera for a 12 bit pixel data format, you set the camera for an 8 bit format (such as Mono 8). In this situation, the camera will first use the values in the table to do a 12 bit to 12 bit substitution. It will then truncate the least significant 4 bits of the substitute value and will transmit the remaining 8 most significant bits. 186 Basler ace Camera Link AW00098504000 10.8.1 Features Entering LUT Values and Enabling the LUT Entering Values and Enabling the LUT Using Basler pylon You can enter values into the luminance lookup table (LUT) and enable the use of the lookup table by doing the following: Use the LUT Selector to select a lookup table. (Currently there is only one lookup table available, i.e., the "luminance" lookup table described above.) Use the LUT Index parameter to select an index number. Use the LUT Value parameter to enter the substitute value that will be stored at the index number that you selected in step 2. Repeat steps 2 and 3 to enter other substitute values into the table as desired. Use the LUT Enable parameter to enable the table. You can use the pylon API to set the LUT Selector, the LUT Index parameter, and the LUT Value parameter from within your application software. The following code snippet illustrates using the API to set the selector and the parameter values: // Select the lookup table Camera.LUTSelector.SetValue( LUTSelector_Luminance ); // Write a lookup table to the device. // The following lookup table causes an inversion of the sensor values // ( bright -> dark, dark -> bright ) for ( int i = 0; i < 4096; i += 8 ) { Camera.LUTIndex.SetValue( i ); Camera.LUTValue.SetValue( 4095 - i ); } // Enable the lookup table Camera.LUTEnable.SetValue( true ); You can also use the Basler pylon Viewer application to easily set the parameters. For more information about the pylon API and the pylon Viewer, see Section 3.1 on page 19. Basler ace Camera Link 187 Features AW00098504000 Entering Values and Enabling the LUT Using Direct Register Access When setting up the luminance lookup table via direct register access, two registers are involved: the LUT register and the LUT Enable register. The LUT register is simply an array register that holds the 4096 12 bit values described earlier in this section. As a first step to using the lookup table feature. You must populate this register with 12 bit values. Once the LUT register has been populated, you can enable the use of the lookup table by setting the value of the LUT Enable register to 1 (enabled). For more information about direct register access, see Section 3.2 on page 21. 188 Basler ace Camera Link AW00098504000 10.9 Features Auto Functions Auto functions control image properties and are the "automatic" counterparts of certain features, such as the gain feature or the white balance feature, which normally require "manually" setting the related parameter values. Auto functions are particularly useful when an image property must be adjusted quickly to achieve a specific target value and when a specific target value must be kept constant in a series of images. An Auto Function Area of Interest (Auto Function AOI) lets you designate a specific part of the image as the base for adjusting an image property. Each auto function uses the pixel data from an Auto Function AOI for automatically adjusting a parameter value and, accordingly, for controlling the related image property. Some auto functions always share an Auto Function AOI. An auto function automatically adjusts a parameter value until the related image property reaches a target value, and the parameter value cannot be manually set. For some auto functions, the target value is fixed. For other auto functions, the target value can be set, as can the limits between which the related parameter value will be automatically adjusted. For example, the gain auto function lets you set an average gray value for the image as a target value and also set a lower and an upper limit for the gain parameter value. Generally, the different auto functions can operate at the same time. For more information, see the following sections describing the individual auto functions. A target value for an image property can only be reached if it is in accord with all pertinent camera settings and with the general circumstances used for capturing images. Otherwise, the target value will only be approached. For example, with a short exposure time, insufficient illumination, and a low setting for the upper limit of the gain parameter value, the Gain Auto function may not be able to achieve the current target average gray value setting for the image. You can use an auto function when binning is enabled (monochrome cameras only). An auto function uses the binned pixel data and controls the image property of the binned image. For more information about binning, see Section 10.6 on page 176. Basler ace Camera Link 189 Features 10.9.1 AW00098504000 Auto Function Operating Modes The following auto function modes of operation are available: All auto functions provide the "once" mode of operation. When the "once" mode of operation is selected, the parameter values are automatically adjusted until the related image property reaches the target value. After the automatic parameter value adjustment is complete, the auto function will automatically be set to "off" and the new parameter value will be applied to the following images. The parameter value can be changed by using the "once" mode of operation again, by using the "continuous" mode of operation, or by manual adjustment. If an auto function is set to the "once" operation mode and if the circumstances will not allow reaching a target value for an image property, the auto function will try to reach the target value for a maximum of 30 images and will then be set to "off". Some auto functions also provide a "continuous" mode of operation where the parameter value is adjusted repeatedly while images are acquired. Depending on the current frame rate, the automatic adjustments will usually be carried out for every or every other image. The repeated automatic adjustment will proceed until the "once" mode of operation is used or until the auto function is set to "off", in which case the parameter value resulting from the latest automatic adjustment will operate, unless the parameter is manually adjusted. When an auto function is set to "off", the parameter value resulting from the latest automatic adjustment will operate, unless the parameter is manually adjusted. You can enable auto functions and change their settings while the camera is capturing images ("on the fly"). If you have set an auto function to "once" or "continuous" operation mode while the camera was continuously capturing images, the auto function will become effective with a short delay and the first few images may not be affected by the auto function. 190 Basler ace Camera Link AW00098504000 10.9.2 Features Auto Function AOIs Each auto function uses the pixel data from an Auto Function AOI for automatically adjusting a parameter value, and accordingly, for controlling the related image property. Some auto functions always share an Auto Function AOI and some auto functions can use their own individual Auto Function AOIs. Within these limitations, auto functions can be assigned to Auto Function AOIs as desired. Each Auto Function AOI has its own specific set of parameter settings, and the parameter settings for the Auto Function AOIs are not tied to the settings for the AOI that is used to define the size of captured images (Image AOI). For each Auto Function AOI, you can specify a portion of the sensor array and only the pixel data from the specified portion will be used for auto function control. Note that an Auto Function AOI can be positioned anywhere on the sensor array. An Auto Function AOI is referenced to the top left corner of the sensor array. The top left corner of the sensor array is designated as column 0 and row 0 as shown in Figure 59. The location and size of an Auto Function AOI is defined by declaring an X offset (coordinate), a width, a Y offset (coordinate), and a height. For example, suppose that you specify the X offset as 14, the width as 5, the Y offset as 7, and the height as 6. The area of the array that is bounded by these settings is shown in Figure 59. Only the pixel data from the area of overlap between the Auto Function AOI defined by your settings and the Image AOI will be used by the related auto function. Column 0 1 2 3 4 5 6 7 8 9 10 11 12 13 14 15 16 17 18 19 20 21 22 23 24 25 26 27 28 29 30 Row 0 1 2 3 Y Offset 4 5 6 7 8 Height Auto Function Area of Interest 9 10 11 12 13 14 Image Area of Interest 15 16 17 18 19 X Offset Width Fig. 59: Auto Function Area of Interest and Image Area of Interest Basler ace Camera Link 191 Features 10.9.2.1 AW00098504000 Assignment of an Auto Function to an Auto Function AOI By default, the Gain Auto and the Exposure Auto auto functions are assigned to Auto Function AOI 1 and the Balance White Auto auto function is assigned to Auto Function AOI 2. The assignments can, however, be set as desired. For example, the Balance White Auto auto function can be assigned to Auto Function AOI 1 or all auto functions can be assigned to the same Auto Function AOI. We strongly recommend that you do not assign an auto function to more than one Auto Function AOI even though this can be done. One limitation must be kept in mind: For the purpose of making assignments, the Gain Auto and the Exposure Auto auto functions are always considered as a single "Intensity" auto function and therefore the Auto Function AOI assignment is always identical for both auto functions. For example, if you assign the "Intensity" auto function to Auto Function AOI 2 the Gain Auto and the Exposure Auto auto functions are both assigned to Auto Function AOI 2. This does not imply, however, that the Gain Auto and the Exposure Auto auto functions must always be used at the same time. Assigning an Auto Function to an Auto Function AOI Using Basler pylon You can assign auto functions to Auto Function AOIs from within your application software by using the pylon API. As an example, the following code snippet illustrates using the API to assign the Gain Auto and Exposure Auto auto function - considered as a single "Intensity" auto function - and the Exposure Auto auto function to Auto Function AOI 1. The snippet also illustrates disabling the unused Auto Function AOI 2 to avoid assigning any auto function to more than one Auto Function AOI. // Select Auto Function AOI 1 // Assign auto functions to the selected Auto Function AOI Camera.AutoFunctionAOISelector.SetValue( AutoFunctionAOISelector_AOI1 ); Camera.AutoFunctionAOIUsageIntensity.SetValue( true ); Camera.AutoFunctionAOIUsageWhiteBalance.SetValue( true ); // Select the unused Auto Function AOI 2 // Disable the unused Auto Function AOI Camera.AutoFunctionAOISelector.SetValue( AutoFunctionAOISelector_AOI2 ); Camera.AutoFunctionAOIUsageIntensity.SetValue( false ); Camera.AutoFunctionAOIUsageWhiteBalance.SetValue( false ); 192 Basler ace Camera Link AW00098504000 Features You can also use the Basler pylon Viewer application to easily set the parameters. For more information about the pylon API and the pylon Viewer, see Section 3.1 on page 19. Assigning an Auto Function to an Auto Function AOI Using Direct Register Access To assign an auto function to Auto Function AOI 1 via direct register access: Set the value of the Auto AOI 1 Usage register. To assign an auto function to Auto Function AOI 2 via direct register access: Set the value of the Auto AOI 2 Usage register. For more information about direct register access, see Section 3.2 on page 21. Basler ace Camera Link 193 Features 10.9.2.2 AW00098504000 Relative Positioning of an Auto Function AOI The size and position of an Auto Function AOI can be, but need not be, identical to the size and position of the Image AOI. Note that the overlap between an Auto Function AOI and the Image AOI determines whether and to what extent the auto function will control the related image property. Only the pixel data from the areas of overlap of an Auto Function AOI and the Image AOI will be used by the auto function to control the image property of the entire image. Different degrees of overlap are illustrated in Figure 60. The hatched areas in the figure indicate areas of overlap. If the Auto Function AOI is completely included in the Image AOI (see (a) in Figure 60), all pixel data from the Auto Function AOI will be used to control the image property. If the Image AOI is completely included in the Auto Function AOI (see (b) in Figure 60), only the pixel data from the Image AOI will be used to control the image property. If the Image AOI only partially overlaps the Auto Function AOI (see (c) in Figure 60), only the pixel data from the area of partial overlap will be used to control the image property. If the Auto Function AOI does not overlap the Image AOI (see (d) in Figure 60), the Auto Function will not control the image property. For details, see the sections below, describing the individual auto functions. We strongly recommend completely including the Auto Function AOI within the Image AOI, or, depending on your needs, setting identical positions and sizes for the Auto Function AOIs and the Image AOI. You can use auto functions when also using the reverse X and reverse Y mirroring features. For information about the behavior of Auto Function AOIs when also using the reverse X or reverse Y mirroring feature, see the "Mirror Image" section. 194 Basler ace Camera Link AW00098504000 Features Auto Function AOI Image AOI (a) Auto Function AOI Image AOI (b) Auto Function AOI Image AOI (c) Auto Function AOI Image AOI (d) Fig. 60: Various Degrees of Overlap Between the Auto Function AOI and the Image AOI Basler ace Camera Link 195 Features 10.9.2.3 AW00098504000 Setting an Auto Function AOI Position and Size Setting an Auto Function AOI position and size is a two-step process: You must first select the Auto Function AOI related to the auto function that you want to use and then set the position and the size of the Auto Function AOI. By default, an Auto Function AOI is set to the full resolution of the camera’s sensor. You can change the position and the size of an Auto Function AOI by changing the value of the Auto Function AOI’s X Offset, Y Offset, Width, and Height parameters. The value of the X Offset parameter determines the starting column for the Auto Function AOI. The value of the Y Offset parameter determines the starting line for the Auto Function AOI. The value of the Width parameter determines the width of the Auto Function AOI. The value of the Height parameter determines the height of the Auto Function AOI. When you are setting an Auto Function AOI, you must follow these guidelines: The sum of the X Offset setting plus the Width setting must not exceed the width of the camera’s sensor. For example, on the acA2000-340km, the sum of the X Offset setting plus the Width setting must not exceed 2048. The sum of the Y Offset setting plus the Height setting must not exceed the height of the camera’s sensor. For example, on the acA2000-340km, the sum of the X Offset setting plus the Width setting must not exceed 1088. Normally, the X Offset, Y Offset, Width, and Height parameter settings for an Auto Function AOI refer to the physical columns and lines in the sensor. But if binning is enabled (monochrome cameras only), these parameters are set in terms of "virtual" columns and lines, i.e., the settings for an Auto Function AOI will refer to the binned lines and columns in the sensor and not to the physical lines in the sensor as they normally would. For more information about the concept of a "virtual" sensor, see Section 10.8 on page 184. 196 Basler ace Camera Link AW00098504000 Features Setting an Auto Function AOI Position and Size Using Basler pylon You can select an Auto Function AOI and set the X Offset, Y Offset, Width, and Height parameter values for the Auto Function AOI from within your application software by using the pylon API. The following code snippet illustrates using the API to select Auto Function AOI one and to get the maximum allowed settings for the Width and Height parameters. The snippet also illustrates setting the X Offset, Y Offset, Width, and Height parameter values. // Select auto function AOI 1 // Set position and size of the selected auto function AOI Camera.AutoFunctionAOISelector.SetValue( AutoFunctionAOISelector_AOI1 ); Camera.AutoFunctionAOIOffsetX.SetValue( 0 ); Camera.AutoFunctionAOIOffsetY.SetValue( 0 ); Camera.AutoFunctionAOIWidth.SetValue( Camera.AutoFunctionAOIWidth.GetMax() ); Camera.AutoFunctionAOIHeight.SetValue( Camera.AutoFunctionAOIHeight.GetMax() ); You can also use the Basler pylon Viewer application to easily set the parameters. For more information about the pylon API and the pylon Viewer, see Section 3.1 on page 19. Setting an Auto Function AOI Position and Size Using Direct Register Access To set the X Offset, Y Offset, Width, and Height for Auto Function 1 via direct register access: Set the value of the Auto AOI 1 Left register to set the X offset. Set the value of the Auto AOI 1 Top register to set the Y offset. Set the value of the Auto AOI 1 Width register to set the width. Set the value of the Auto AOI 1 Height register to set the height. To set the X Offset, Y Offset, Width, and Height for Auto Function 2 via direct register access: Set the value of the Auto AOI 2 Left register to set the X offset. Set the value of the Auto AOI 2 Top register to set the Y offset. Set the value of the Auto AOI 2 Width register to set the width. Set the value of the Auto AOI 2 Height register to set the height. For more information about direct register access, see Section 3.2 on page 21. Basler ace Camera Link 197 Features 10.9.3 AW00098504000 Using an Auto Function To use an auto function, carry out the following steps: 1. Select an Auto Function AOI. 2. Assign the auto function you want to use to the selected Auto Function AOI. 3. Unassign the auto function you want to use from the other Auto Function AOI. 4. Set the position and size of the Auto Function AOI. 5. If necessary, set the lower and upper limits for the auto functions’s parameter value. 6. If necessary, set the target value. 7. If necessary, set the auto function profile to define priorities between auto functions. 8. Enable the auto function by setting it to "once" or "continuous". For more information about the individual settings, see the next sections that describe the individual auto functions. 198 Basler ace Camera Link AW00098504000 10.9.4 Features Gain Auto Gain Auto is the "automatic" counterpart to manually setting the Gain Raw parameter. When the gain auto function is operational, the camera will automatically adjust the Gain Raw parameter value within set limits until a target average gray value for the pixel data from the related Auto Function AOI is reached. The gain auto function can be operated in the "once" and continuous" modes of operation. If the related Auto Function AOI does not overlap the Image AOI (see the "Auto Function AOI" section) the pixel data from the Auto Function AOI will not be used to control the gain. Instead, the current manual setting for the Gain Raw parameter value will control the gain. The gain auto function and the exposure auto function can be used at the same time. In this case, however, you must also set the auto function profile feature. For more information about the "manual" gain settings, see Section 10.1 on page 157. For more information about the auto function profile Section 10.9.6 on page 205. The limits within which the camera will adjust the Gain Raw parameter are defined by the Auto Gain Raw Upper Limit and the Auto Gain Raw Lower Limit parameters. The minimum and maximum allowed settings for the Auto Gain Raw Upper Limit and Auto Gain Raw Lower Limit parameters depend on the current pixel data format, on the current settings for binning, and on whether or not the parameter limits for manually setting the gain feature are disabled. The Auto Target Value parameter defines the target average gray value that the gain auto function will attempt to achieve when it is automatically adjusting the Gain Raw value. The target average gray value can range from 0 (black) to 255 (white) when the camera is set for an 8 bit pixel format, from 0 (black) to 1023 (white) when the camera is set for a 10 bit pixel format, or from 0 (black) to 4095 (white) when the camera is set for a 12 bit pixel format. Basler ace Camera Link 199 Features AW00098504000 Setting the Gain Auto Function Using Basler pylon Setting the gain auto functionality using Basler pylon is a several step process: Select the Auto Function AOI to which the Gain Auto function is assigned. Set the value of the Offset X, Offset Y, Width, and Height parameters for the AOI. Set the Gain Selector to All. Set the value of the Auto Gain Raw Lower Limit and Auto Gain Raw Upper Limit parameters. Set the value of the Auto Target Value parameter. Set the value of the Gain Auto parameter for the "once" or the "continuous" mode of operation. You can set the gain auto functionality from within your application software by using the pylon API. The following code snippets illustrate using the API to set the exposure auto functionality: // Select Auto Function AOI to which the Gain Auto function is assigned // For this example, assume that the Gain Auto function is assigned // to Auto AOI 1 Camera.AutoFunctionAOISelector.SetValue( AutoFunctionAOISelector_AOI1 ); // Set the position and size of selected auto function AOI. In this example, we set // auto function AOI to cover the entire sensor. Camera.AutoFunctionAOIOffsetX.SetValue( 0 ); Camera.AutoFunctionAOIOffsetY.SetValue( 0 ); Camera.AutoFunctionAOIWidth.SetValue( Camera.AutoFunctionAOIWidth.GetMax() ); Camera.AutoFunctionAOIHeight.SetValue( Camera.AutoFunctionAOIHeight.GetMax() ); // Select gain all and set the upper and lower gain limits for the gain // auto function. Camera.GainSelector.SetValue( GainSelector_All ); Camera.AutoGainRawLowerLimit.SetValue( Camera.GainRaw.GetMin() ); Camera.AutoGainRawUpperLimit.SetValue( Camera.GainRaw.GetMax() ); // Set target gray value for the gain auto function. Camera.AutoTargetValue.SetValue( 16 ); // Set the mode of operation for gain auto function. Camera.GainAuto.SetValue( GainAuto_Once ); You can also use the Basler pylon Viewer application to easily set the parameters. For more information about the pylon API and the pylon Viewer, see Section 3.1 on page 19. 200 Basler ace Camera Link AW00098504000 Features Setting the Gain Auto Function Using Direct Register Access Setting the gain auto functionality via direct register access is a several step process: Set the position and size of Auto Function AOI 1 by setting the value of the Auto AOI 1 Left register, the value of the Auto AOI 1 Top register, the value of the Auto AOI 1 Width register, and the value of the Auto AOI 1 Height register. (Note: This step assumes that the Gain Auto function is assigned to Auto Function AOI 1. If the Gain Auto function is assigned to Auto Function AOI 2, you would set the Auto Function AOI 2 registers.) Set the value of the Auto Gain Lower Limit register and the Auto Gain Upper Limit register. Set the value of the Auto Target Value register. Enable the gain auto function by selecting the value of the Gain Auto register to the Once or the Continuous mode of operation as desired. For more information about direct register access, see Section 3.2 on page 21. Basler ace Camera Link 201 Features 10.9.5 AW00098504000 Exposure Auto The exposure auto function will not work if the camera’s exposure mode is set to trigger width. For more information about the trigger width exposure mode, see Section 7.3.3.2 on page 87. Exposure Auto is the "automatic" counterpart to manually setting the Exposure Time Abs parameter. The exposure auto function automatically adjusts the Exposure Time Abs parameter. within set limits until a target average gray value for the pixel data from the related Auto Function AOI is reached. The exposure auto function can be operated in the "once" and continuous" modes of operation. If the related Auto Function AOI does not overlap the Image AOI (see the "Auto Function AOI" section), the pixel data from the Auto Function AOI will not be used to control the exposure time. Instead, the current manual setting for the Exposure Time Abs parameter will control the exposure time. The exposure auto function and the gain auto function can be used at the same time. In this case, the auto function profile feature also takes effect. By default, the auto function profile feature minimizes gain. When trigger width exposure mode is selected, the exposure auto function is not available. For more information about the "manual" exposure time setting, see Section 7.4 on page 94. For more information about the trigger width exposure mode, see Section 7.3.3.2 on page 87. For more information about the auto function profile Section 10.9.6 on page 205. The limits within which the camera will adjust the Auto Exposure Time Abs parameter are defined by the Auto Exposure Time Abs Upper Limit and the Auto Exposure Time Abs Lower Limit parameters. The current minimum and the maximum allowed settings for the Auto Exposure Time Abs Upper Limit parameter and the Auto Exposure Time Abs Lower Limit parameters depend on the minimum allowed and maximum possible exposure time for your camera model. The Auto Target Value parameter defines the target average gray value that the exposure auto function will attempt to achieve when it is automatically adjusting the Exposure Time Abs value. The target average gray value can range from 0 (black) to 255 (white) when the camera is set for an 8 bit pixel format, from 0 to 1023 when the camera is set for a 10 bit pixel format, and from 0 to 4095 when the camera is set for a 12 bit pixel format. If the Exposure Time Abs Upper Limit Parameter is set to a sufficiently high value, the camera’s maximum allowed frame rate may be decreased. 202 Basler ace Camera Link AW00098504000 Features Setting the Exposure Auto Function Using Basler pylon Setting the exposure auto functionality using Basler pylon is a several step process: Select the Auto Function AOI to which the Exposure Auto function is assigned. Set the value of the Offset X, Offset Y, Width, and Height parameters for the AOI. Set the value of the Auto Exposure Time Abs Lower Limit and Auto Exposure Time Abs Upper Limit parameters. Set the value of the Auto Target Value parameter. Set the value of the Exposure Auto parameter for the "once" or the "continuous" mode of operation. You can set the exposure auto functionality from within your application software by using the pylon API. The following code snippets illustrate using the API to set the exposure auto functionality: // Select Auto Function AOI to which the Exposure Auto function is assigned // For this example, assume that the Exposure Auto function is // assigned to Auto AOI 1 Camera.AutoFunctionAOISelector.SetValue( AutoFunctionAOISelector_AOI1 ); // Set the position and size of selected auto function AOI. In this example, we set // auto function AOI to cover the entire sensor. Camera.AutoFunctionAOIOffsetX.SetValue( 0 ); Camera.AutoFunctionAOIOffsetY.SetValue( 0 ); Camera.AutoFunctionAOIWidth.SetValue( Camera.AutoFunctionAOIWidth.GetMax() ); Camera.AutoFunctionAOIHeight.SetValue( Camera.AutoFunctionAOIHeight.GetMax() ); // Set the exposure time limits for the exposure auto function Camera.AutoExposureTimeAbsLowerLimit.SetValue( 1000 ); Camera.AutoExposureTimeAbsUpperLimit.SetValue( 1.0E6 ); // Set target gray value for the exposure auto function // (If gain auto is enabled, this target is also used for gain auto control) Camera.AutoTargetValue.SetValue( 32 ); // Set the mode of operation for the exposure auto function Camera.ExposureAuto.SetValue( ExposureAuto_Continuous ); You can also use the Basler pylon Viewer application to easily set the parameters. For more information about the pylon API and the pylon Viewer, see Section 3.1 on page 19. Basler ace Camera Link 203 Features AW00098504000 Setting the Exposure Auto Function Using Direct Register Access Setting the exposure auto functionality via direct register access is a several step process: Set the position and size of Auto Function AOI 1 by setting the value of the Auto AOI 1 Left register, the value of the Auto AOI 1 Top register, the value of the Auto AOI 1 Width register, and the value of the Auto AOI 1 Height register. (Note: This step assumes that the Exposure Auto function has been assigned to Auto Function AOI 1. If the Exposure Auto function is assigned to Auto Function AOI 2, you would set the Auto Function AOI 2 registers.) Set the value of the Auto Exposure Lower Limit register and the Auto Exposure Upper Limit register. Set the value of the Auto Target Value register. Enable the gain auto function by selecting the value of the Exposure Auto register to the Once or the Continuous mode of operation as desired. For more information about direct register access, see Section 3.2 on page 21. 204 Basler ace Camera Link AW00098504000 10.9.6 Features Auto Function Profile If you want to use the gain auto function and the exposure auto function at the same time, the auto function profile feature also takes effect. The auto function profile specifies whether the gain or the exposure time will be kept as low as possible when the camera is making automatic adjustments to achieve a target average gray value for the pixel data from the Auto Function AOI that was related to the gain auto and the exposure auto function. By default, the auto function profile feature minimizes gain. If you want to use the gain auto and the exposure auto functions at the same time, you should set both functions for the continuous mode of operation. Setting the Auto Function Profile Using Basler pylon Setting the camera with Basler pylon to use the gain auto function and the exposure auto function at the same time is a several step process: Set the value of the Auto Function Profile parameter to specify whether gain or exposure time will be minimized during automatic adjustments. Set the value of the Gain Auto parameter to the "continuous" mode of operation. Set the value of the Exposure Auto parameter to the "continuous" mode of operation. You can set the auto function profile from within your application software by using the pylon API. The following code snippet illustrates using the API to set the auto function profile. As an example, Gain Auto is set to be minimized during adjustments: // Use GainAuto and ExposureAuto simultaneously Camera.AutoFunctionProfile.SetValue( AutoFunctionProfile_GainMinimum ); Camera.GainAuto.SetValue( GainAuto_Continuous ); Camera.ExposureAuto.SetValue( ExposureAuto_Continuous ); You can also use the Basler pylon Viewer application to easily set the parameters. For more information about the pylon API and the pylon Viewer, see Section 3.1 on page 19. Setting the Auto Function Profile Using Direct Register Access Setting the camera to use the gain auto function and the exposure auto function at the same time via direct register access is a several step process: Set the value of the Auto Function Profile register to specify whether gain or exposure time will be minimized during automatic adjustments. Set the value of the Gain Auto register for the Continuous" mode of operation. Set the value of the Exposure Auto register for the Continuous mode of operation. For more information about direct register access, see Section 3.2 on page 21. Basler ace Camera Link 205 Features 10.9.7 AW00098504000 Balance White Auto Balance White Auto is the "automatic" counterpart to manually setting the white balance. The balance white auto function is only available on color models. Automatic white balancing is a two-step process. First, the Balance Ratio Abs parameter values for red, green, and blue are each set to 1.0. Next, the Balance Ratio Abs parameter values are automatically adjusted such that the average values for the "red", "green", and "blue" pixels are all the same. During this process, the color that needs the smallest amount of gain will be adjusted to a value of 1.0. The balance white auto function uses the Auto Function AOI that was related to the Balance White Auto function and can only be operated in the "once" mode of operation. If the related Auto Function AOI does not overlap the Image AOI (see the "Auto Function AOI" section) the pixel data from the Auto Function AOI will not be used to control the white balance of the image. However, as soon as the Balance White Auto function is set to "once" operation mode, the Balance Ratio parameter values for red, green, and blue are each set to 1.5. These settings will then control the white balance of the image. For more information about the "manual" white balance settings, see Section 8.3.1 on page 132. Setting the Balance White Auto Function Using Basler pylon Setting the balance white auto functionality using Basler pylon is a several step process: Select the Auto Function AOI to which the Balance White Auto is assigned. Set the value of the Offset X, Offset Y, Width, and Height parameters for the AOI. Set the value of the Exposure Auto parameter for the "once" or the "continuous" mode of operation. You can set the white balance auto functionality from within your application software by using the pylon API. The following code snippets illustrate using the API to set the balance auto functionality: // Select Auto Function AOI to which the Balance White Auto function is assigned // For this example, assume that the Balance White Auto function is // assigned to Auto AOI 2 Camera.AutoFunctionAOISelector.SetValue( AutoFunctionAOISelector_AOI2 ); // Set the position and size of selected auto function AOI. In this example, we set // auto function AOI to cover the entire sensor. Camera.AutoFunctionAOIOffsetX.SetValue( 0 ); Camera.AutoFunctionAOIOffsetY.SetValue( 0 ); Camera.AutoFunctionAOIWidth.SetValue( Camera.AutoFunctionAOIWidth.GetMax() ); Camera.AutoFunctionAOIHeight.SetValue( Camera.AutoFunctionAOIHeight.GetMax() ); // Set mode of operation for balance white auto function Camera.BalanceWhiteAuto.SetValue( BalanceWhiteAuto_Once ); You can also use the Basler pylon Viewer application to easily set the parameters. 206 Basler ace Camera Link AW00098504000 Features For more information about the pylon API and the pylon Viewer, see Section 3.1 on page 19. Setting the Balance White Auto Function Using Direct Register Access Setting the balance white auto functionality via direct register access is a several step process: Set the position and size of Auto Function AOI 2 by setting the value of the Auto AOI 2 Left register, the value of the Auto AOI 2 Top register, the value of the Auto AOI 2 Width register, and the value of the Auto AOI 2 Height register. (Note: This step assumes that the Balance White Auto function has been assigned to Auto Function AOI 2. If the Exposure Auto function is assigned to Auto Function AOI 1, you would set the Auto Function AOI 1 registers.) Enable the balance white auto function in the once mode of operation by selecting the value of the Balance White Auto register to Once. For more information about direct register access, see Section 3.2 on page 21. Basler ace Camera Link 207 Features AW00098504000 10.10 Error Detection 10.10.1 LED Indicator The LED indicator on the back of the camera includes both a small red LED and a small green LED. The LED indicator signals the camera’s current condition as shown in Table 13. LED State Status Indication Red and Greeen Both Off No power to the camera. Continuous Green / Red Off The camera has booted up successfully and is OK. Flashing Green / Red Off The camera is set to expect an external trigger signal on an input, but no trigger signal is present. Green and Red Both Flasing An error condition has been detected that may be correctable with user intervention. (See the next section for more information). Flashing Red / Green Off Internal error. Contact Basler technical support. Table 13: LED Indications During the camera bootup process, both the red and the green LEDs will be lit. 208 Basler ace Camera Link AW00098504000 Features 10.10.2 Error Codes The camera can detect several user correctable errors. If one of these errors is present, the camera will set an error code and will flash both the red and green LEDs in the LED indicator. The following table indicates the available error codes: Code Condition Meaning 0 No Error The camera has not detected any errors since the last time that the error memory was cleared. 1 Overtrigger An overtrigger has occurred. The user has applied an acquisition start trigger to the camera when the camera was not in a waiting for acquisition start condition. Or, the user has applied a frame start trigger to the camera when the camera was not in a waiting for frame start condition. 2 User set load An error occurred when attempting to load a user set. Typically, this means that the user set contains an invalid value. Try loading a different user set . 3 Invalid Parameter A parameter is set out of range or in an otherwise invalid manner. (Typically, this error only occurs when the user is setting parameters via direct register access.) Table 14: Error Codes When the camera detects a user correctable error, it sets the appropriate error code in an error memory. If two or three different detectable errors have occurred, the camera will store the code for each type of error that it has detected (it will store one occurrence of the each code no matter how many times it has detected the corresponding error). You can use the following procedure to check the error codes: Read the value of the Last Error parameter. The Last Error parameter will indicate the last error code stored in the memory. Execute the Clear Last Error Command to clear the last error code from the memory. Continue reading and clearing the last error until the parameter indicates a No Error code. Reading and Clearing the Error Codes Using Basler Pylon You can use the pylon API to read the value of the Last Error parameter and to execute a Clear Last Error command from within your application software. The following code snippets illustrate using the API to read the parameter value and execute the command: // Read the value of the last error code in the memory LastErrorEnums lasterror = Camera.LastError.GetValue(); // Clear the value of the last error code in the memory Camera.ClearLastError.Execute( ); Basler ace Camera Link 209 Features AW00098504000 You can also use the Basler pylon Viewer application to easily set the parameter and execute the command. For more information about the pylon API and the pylon Viewer, see Section 3.1 on page 19. Reading and Clearing the Error Codes Using Direct Register Access To get the value of the last error code in the memory via direct register access: Read the value of the Last User Error register. To clear the value of the last error code in the memory via direct register access: Set the value of the Clear Last User Error register to 1. For more information about direct register access, see Section 3.2 on page 21 210 Basler ace Camera Link AW00098504000 Features 10.11 Test Images All cameras include the ability to generate test images. Test images are used to check the camera’s basic functionality and its ability to transmit an image to the host PC. Test images can be used for service purposes and for failure diagnostics. For test images, the image is generated internally by the camera’s logic and does not use the optics, the imaging sensor, or the ADCs. Five test images are available. The Effect of Camera Settings on Test Images When any of the test image is active, the camera’s analog features such as gain, black level, and exposure time have no effect on the images transmitted by the camera. For test images 1, 2, and 3, the camera’s digital features, such as the luminance lookup table, will also have no effect on the transmitted images. But for test images 4 and 5, the cameras digital features will affect the images transmitted by the camera. This makes test images 4 and 5 as good way to check the effect of using a digital feature such as the luminance lookup table. Enabling a Test Image Using Basler pylon With Basler pylon, the Test Image Selector is used to set the camera to output a test image. You can set the value of the Test Image Selector to enable one of the test images or to "test image off". You can use the pylon API to set the Test Image Selector from within your application software. The following code snippets illustrate using the API to set the selector: // Set for no test image Camera.TestImageSelector.SetValue( TestImageSelector_Off ); // Set for test image 1 Camera.TestImageSelector.SetValue( TestImageSelector_Testimage1 ); You can also use the Basler pylon Viewer application to easily set the parameters. For more information about the pylon API and the pylon Viewer, see Section 3.1 on page 19. Enabling a Test Image Using Direct Register Access To enable a test image via direct register access: Set the value of the Test image Selector Register to Test Image 1, 2, 3, 4, or 5 as desired. To disable test images: Set the value of the Test image Selector Register to Off. For more information about direct register access, see Section 3.2 on page 21. Basler ace Camera Link 211 Features AW00098504000 10.11.1 Test Image Descriptions Test Image 1 - Fixed Diagonal Gray Gradient (8 bit) The 8 bit fixed diagonal gray gradient test image is best suited for use when the camera is set for monochrome 8 bit output. The test image consists of fixed diagonal gray gradients ranging from 0 to 255. If the camera is set for 8 bit output and is operating at full resolution, test image one will look similar to Figure 61. The mathematical expression for this test image: Gray Value = [column number + row number] MOD 256 Fig. 61: Test Image One Test Image 2 - Moving Diagonal Gray Gradient (8 bit) The 8 bit moving diagonal gray gradient test image is similar to test image 1, but it is not stationary. The image moves by one pixel from right to left whenever a new image acquisition is initiated. The test pattern uses a counter that increments by one for each new image acquisition. The mathematical expression for this test image is: Gray Value = [column number + row number + counter] MOD 256 212 Basler ace Camera Link AW00098504000 Features Test Image 3 - Moving Diagonal Gray Gradient (12 bit) The 12 bit moving diagonal gray gradient test image is similar to test image 2, but it is a 12 bit pattern. The image moves by one pixel from right to left whenever a new image acquisition is initiated. The test pattern uses a counter that increments by one for each new image acquisition. The mathematical expression for this test image is: Gray Value = [column number + row number + counter] MOD 4096 Test Image 4 - Moving Diagonal Gray Gradient Feature Test (8 bit) The basic appearance of test image 4 is similar to test image 2 (the 8 bit moving diagonal gray gradient image). The difference between test image 4 and test image 2 is this: if a camera feature that involves digital processing is enabled, test image 4 will show the effects of the feature while test image 2 will not. This makes test image 4 useful for checking the effects of digital features such as the luminance lookup table. Test Image 5 - Moving Diagonal Gray Gradient Feature Test (12 bit) The basic appearance of test image 5 is similar to test image 3 (the 12 bit moving diagonal gray gradient image). The difference between test image 5 and test image 3 is this: if a camera feature that involves digital processing is enabled, test image 5 will show the effects of the feature while test image 3 will not. This makes test image 5 useful for checking the effects of digital features such as the luminance lookup table. Basler ace Camera Link 213 Features AW00098504000 10.12 Device Information Parameters Each camera includes a set of "device information" parameters. These parameters provide some basic information about the camera. The device information parameters include: Device Vendor Name (read only) - contains the name of the camera’s vendor. This string will always indicate Basler as the vendor. Device Model Name (read only) - contains the model name of the camera, for example, acA2000-140km. Device Manufacturer Info (read only) - can contain some information about the camera manufacturer. This string usually indicates "none". Device Version (read only) - contains the device version number for the camera. This is usually the material number of the device. Device Firmware Version (read only) - contains the version of the firmware the camera. Device ID (read only) - typically contains the serial number of the camera. Device User ID (read / write) - is used to assign a user defined name to a device. This name will be displayed in the Basler pylon Viewer. The name will also be visible in the "friendly name" field of the device information objects returned by pylon’s device enumeration procedure. Device Scan Type (read only) - contains the scan type of the camera, for example, line scan or area scan. The aviator will always indicate area scan. Sensor Width (read only) - contains the physical width of the sensor in pixels. Sensor Height (read only) - contains the physical height of the sensor. Max Width (read only) - Indicates the camera’s maximum area of interest (AOI) width setting. Max Height (read only) - Indicates the camera’s maximum area of interest (AOI) height setting. For more information about the pylon API and the pylon Viewer, see Section 3.1 on page 19. Working with Device Information Parameters Using Basler pylon You can use the pylon API to read the values for all of the device information parameters or set the value of the Device User ID parameter from within your application software. The following code snippets illustrate using the API to read the parameters or write the Device User ID: // Read the Vendor Name parameter Pylon::String_t vendorName = Camera.DeviceVendorName.GetValue(); // Read the Model Name parameter Pylon::String_t modelName = Camera.DeviceModelName.GetValue(); // Read the Manufacturer Info parameter Pylon::String_t manufacturerInfo = Camera.DeviceManufacturerInfo.GetValue(); // Read the Device Version parameter Pylon::String_t deviceVersion = Camera.DeviceVersion.GetValue(); 214 Basler ace Camera Link AW00098504000 Features // Read the Firmware Version parameter Pylon::String_t firmwareVersion = Camera.DeviceFirmwareVersion.GetValue(); // Read the Device ID parameter Pylon::String_t deviceID = Camera.DeviceFirmwareVersion.GetValue(); // Write and read the Device User ID Camera.DeviceUserID = "custom name"; Pylon::String_t deviceUserID = Camera.DeviceUserID.GetValue(); // Read the Sensor Width parameter int64_t sensorWidth = Camera.SensorWidth.GetValue(); // Read the Sensor Height parameter int64_t sensorHeight = Camera.SensorHeight.GetValue(); // Read the Max Width parameter int64_t maxWidth = Camera.WidthMax.GetValue(); // Read the Max Height parameter int64_t maxHeight = Camera.HeightMax.GetValue(); You can also use the Basler pylon Viewer application to easily read the parameters and to read or write the Device User ID. For more information about the pylon API and the pylon Viewer, see Section 3.2 on page 21. Working with Device Information Parameters Using Direct Register Access When working with the camera via direct register access, you can do the following: Read the value in the Device Vendor Name register. Read the value in the Device Model Name register. Read the value in the Device Manufacturer Info register. Read the value in the Device Version register. Read the value of the Device Firmware Version register. Read the value in the Device ID register. Read the value in or set the value of the Device User ID register. Read the value in the Device Scan Type register. Read the value in the Sensor Width register. Read the value in the Sensor Height register. Read the value in the Width Max register. Read the value in the Height Max register. For more information about via direct register access, see Section 3.2 on page 21. Basler ace Camera Link 215 Features AW00098504000 10.13 User Defined Values The camera can store five "user defined values". These five values are 32 bit signed integer values that you can set and read as desired. They simply serve as convenient storage locations for the camera user and have no impact on the operation of the camera. The five values are designated as Value 1, Value 2, Value 3, Value 4, and Value 5. Setting User Defined Values Using Basler Pylon Setting a user defined value using Basler pylon is a two step process: Set the User Defined Value Selector to Value 1, Value 2, Value 3, Value 4, or Value 5. Set the User Defined Value parameter to the desired value for the selected value. You can use the pylon API to set the User Defined Value Selector and the User Defined Value parameter value from within your application software. The following code snippet illustrates using the API to set the selector and the parameter value: // Set user defined value 1 Camera.UserDefinedValueSelector.SetValue( UserDefinedValueSelector_Value1 ); Camera.UserDefinedValue.SetValue( 1000 ); // Set user defined value 2 Camera.UserDefinedValueSelector.SetValue( UserDefinedValueSelector_Value2 ); Camera.UserDefinedValue.SetValue( 2000 ); // Get the value of user defined value 1 Camera.UserDefinedValueSelector.SetValue( UserDefinedValueSelector_Value1 ); int64_t UserValue1 = Camera.UserDefinedValue.GetValue(); You can also use the Basler pylon Viewer application to easily set the parameters. For more information about the pylon API and the pylon Viewer, see Section 3.1 on page 19. Setting User Defined Values Using Direct Register Access To set the user defined values via direct register access: Set the value of the User Defined Value 1 register, the User Defined Value 2 register, the User Defined Value 3 register, the User Defined Value 4 register or the User Defined Value 5 register as desired. For more information about direct register access, see Section 3.2 on page 21. 216 Basler ace Camera Link AW00098504000 Features 10.14 Configuration Sets A configuration set is a group of values that contains all of the parameter settings needed to control the camera. There are three basic types of configuration sets: the active set, the default set, and user sets. Non-volatile Memory (Flash) User Set 1 User Set 2 The Active Set The active set contains the camera’s current parameter settings and thus determines the camera’s performance, that is, what your image currently looks like. When you change parameter settings using the pylon API or direct register access, you are making changes to the active set. The active set is located in the camera’s volatile memory and the settings are lost if the camera is reset or if power is switched off. The Default Set When a camera is manufactured, numerous tests are performed on the camera and four factory optimized setups are determined. The four factory optimized setups are: Volatile Memory (RAM) Active Set User Set 3 Default Set Standard Factory Setup High Gain Factory Setup Auto Functions Factory Setup Color Factory Setup Fig. 62: Configuration Sets The Standard Factory Setup - is optimized for average conditions and will provide good camera performance in many common applications. In the standard factory setup, the gain is set to a low value, and all auto functions are set to off. The High Gain Factory Setup - is similar to the standard factory setup, but the gain is set to + 6 dB. The Auto Functions Factory Setup - is similar to the standard factory setup, but the Gain Auto and the Exposure Auto auto functions are both enabled and are set to the continuous mode of operation. During automatic parameter adjustment, gain will be kept to a minimum. The Color Factory Setup - is optimized to yield the best color fidelity with daylight lighting. The factory setups are saved in permanent files in the camera’s non-volatile memory. They are not lost when the camera is reset or switched off and they cannot be changed. You can select one of the four factory setups to be the camera’s "default set". Instructions for selecting which factory setup will be used as the default set appear later in the Configuration Sets section. Note that your selection of which factory setup will serve as the default set will not be lost when the camera is reset or switched off. When the camera is running, the default set can be loaded into the active set. The default set can also be designated as the "startup" set, i.e., the set that will be loaded into the active set whenever the camera is powered on or reset. Instructions for loading the default set into the active set and for designating which set will be the startup set appear later in the Configuration Sets section. Basler ace Camera Link 217 Features AW00098504000 User Sets As mentioned above, the active configuration set is stored in the camera’s volatile memory and the settings are lost if the camera is reset or if power is switched off. The camera can save most of the settings from the current active set to a reserved area in the camera’s non-volatile memory. A configuration set that has been saved in the non-volatile memory is not lost when the camera is reset or switched off. There are three reserved areas in the camera’s non-volatile memory available for saving configuration sets. A configuration set saved in a reserved area is commonly referred to as a "user set". The three available user sets are called User Set 1, User Set 2, and User Set 3. When the camera is running, a saved user set can be loaded into the active set. A saved user set can also be designated as the "startup" set, i.e., the set that will be loaded into the active set whenever the camera is powered on or reset. Instructions for loading a saved user set into the active set and for designating which set will be the startup set appear later in the Configuration Sets section. The values for the luminance lookup table are not saved in the user sets and are lost when the camera is reset or switched off. If you are using the lookup table feature, you must reenter the lookup table values after each camera startup or reset. Designating a Startup Set You can designate the default set or one of the user sets as the "startup" set. The designated startup set will automatically be loaded into the active set whenever the camera starts up at power on or after a reset. Instructions for designating the startup set appear below. 218 Basler ace Camera Link AW00098504000 Features 10.14.1 Selecting a Factory Setup as the Default Set When the camera is delivered, the Auto Functions Factory Setup will be selected as the default set. You can, however, select any one of the three factory setups to serve as the default set. Selecting which factory setup will serve as the default set is only allowed when the camera is idle, i.e. when it is not acquiring images continuously or does not have a single image acquisition pending. Selecting the standard factory setup as the default set and then loading the default set into the active set is a good course of action if you have grossly misadjusted the settings in the camera and you are not sure how to recover. The standard factory setup is optimized for use in typical situations and will provide good camera performance in most cases. Selecting a Factory Setup Using pylon To select which factory setup will serve as the default set using Basler pylon: Set the Default Set Selector to the Standard Factory Setup, High Gain Factory Setup or Auto Functions Factory Setup. You can set the Default Set Selector from within your application software by using the pylon API. The following code snippet illustrates using the API to set the selector: If you want to select the Standard Factory Setup: Camera.DefaultSetSelector.SetValue(DefaultSetSelector_Standard); If you want to select the High Gain Factory Setup: Camera.DefaultSetSelector.SetValue(DefaultSetSelector_HighGain); If you want to select the Auto Functions Factory Setup: Camera.DefaultSetSelector.SetValue(DefaultSetSelector_AutoFunctions); If you want to select the Color Factory Setup: Camera.DefaultSetSelector.SetValue(DefaultSetSelector_Color); Selecting a Factory Setup Using Direct Register Access To select which factory setup will serve as the default set via direct register access: Set the Default Set Selector register to the Standard Factory Setup, High Gain Factory Setup, Auto Functions Factory Setup, or Color setup. Basler ace Camera Link 219 Features AW00098504000 10.14.2 Saving User Sets You can save the current parameter set being used by the camera (i.e., the "active" set in the camera’s volatile memory) to user set 1, user set 2, or user set 3. The user sets are stored in the camera’s non-volatile memory and will be retained when the camera power is switched off or the camera is reset. When you save the active set to a user set, any parameter data already in that user set will be overwritten. Saving User Sets Using Basler Pylon Using Basler pylon to save the current active set to a user set in the camera’s non-volatile memory is a several step process: Make changes to the camera’s settings until the camera is operating in a manner that you would like to save. Set the User Set Selector to User Set 1, User Set 2, or User Set 3 as desired. Execute a User Set Save command to save the active set to the selected user set. Saving an active set to a user set in the camera’s non-volatile memory will overwrite any parameters that were previously saved in that user set. You can use the pylon API to set the User Set Selector and to execute the User Set Save command from within your application software. The following code snippet illustrates using the API to set the selector and execute the command: Camera.UserSetSelector.SetValue( UserSetSelector_UserSet1 ); Camera.UserSetSave.Execute( ); You can also use the Basler pylon Viewer application to easily set the parameters. For more information about the pylon API and the pylon Viewer, see Section 3.1 on page 19. Saving User Sets Using Direct Register Access To save the current active set to a user set in the camera’s non-volatile memory via direct register access: Make changes to the camera’s settings until the camera is operating in a manner that you would like to save. Set the value of the User Set Selector register to User Set 1, 2, or 3 as desired. Set the value of the User Set Save register to 1. For more information about direct register access, see Section 3.2 on page 21. 220 Basler ace Camera Link AW00098504000 Features 10.14.3 Loading a Saved User Set or the Default Set into the Active Set If you have saved a configuration set into one of the user sets in the camera’s non-volatile memory, you can load the saved user set into the camera’s active set. When you do this, the parameters stored in the user set overwrite the parameters in the active set. Since the settings in the active set control the current operation of the camera, the settings from the loaded user set will now be controlling the camera. You can also load the default set into the camera’s active set. Loading a user set or the default set into the active set is only allowed when the camera is idle, i.e. when it is not acquiring an image. Assuming that you have selected the standard factory setup as the default set, loading the default set into the active set is a good course of action if you have grossly misadjusted the settings in the camera and you are not sure how to recover. The standard factory setup is optimized for use in typical situations and will provide good camera performance in most cases. Loading a Set Using Basler Pylon Loading a saved user set or the default set from the camera’s non-volatile memory into the active set using Basler pylon is a two step process: Set the User Set Selector to User Set 1, User Set 2, User Set 3, or Default as desired. Execute a User Set Load command to load the selected set into the active set. You can use the pylon API to set the User Set Selector and to execute the User Set Load command from within your application software. The following code snippet illustrates using the API to set the selector and execute the command: // Load user set 2 into the active set Camera.UserSetSelector.SetValue( UserSetSelector_UserSet2 ); Camera.UserSetLoad.Execute( ); // Load the default set into the active set Camera.UserSetSelector.SetValue( UserSetSelector_Default ); Camera.UserSetLoad.Execute( ); For more information about the pylon API and the pylon Viewer, see Section 3.1 on page 19. Basler ace Camera Link 221 Features AW00098504000 Loading a Set Using Direct Register Access To load a saved user set or the default set from the camera’s non-volatile memory into the active set via direct register access: Set the value of the User Set Selector register to User Set 1, 2, or 3, or to the Default set as desired. Set the value of the User Set Load register to 1. For more information about direct register access, see Section 3.2 on page 21. 222 Basler ace Camera Link AW00098504000 Features 10.14.4 Selecting a "Startup" Set You can select the default set or one of the user sets stored in the camera’s non-volatile memory to be the "startup" set. The configuration set that you select as the startup set will be loaded into the active set whenever the camera starts up at power on or after a reset. Selecting the Startup Set Using Basler Pylon With Basler pylon, the User Set Default Selector parameter is used to select User Set 1, User Set 2, User Set 3, or the Default Set as the startup set. You can use the pylon API to set the User Set Default Selector parameter from within your application software. The following code snippet illustrates using the API to set the selector: // Designate user set 1 as the startup set Camera.UserSetDefaultSelector.SetValue( UserSetDefaultSelector_UserSet1 ); // Designate the default set as the startup set Camera.UserSetDefaultSelector.SetValue( UserSetDefaultSelector_Default ); For more information about the pylon API and the pylon Viewer, see Section 3.1 on page 19. Selecting the Startup Set Using Direct Register Access When using direct register access, the User Set Default Selector register is used to select the startup set: Set the value of the User Set Default Selector register for User Set 1, User Set 2, User Set 3, or Default as desired. For more information about direct register access, see Section 3.2 on page 21. Basler ace Camera Link 223 Features 224 AW00098504000 Basler ace Camera Link AW00098504000 Technical Support 11 Technical Support This chapter outlines the resources available to you if you need help working with your camera. 11.1 Technical Support Resources If you need advice about your camera or if you need assistance troubleshooting a problem with your camera, you can contact the Basler technical support team for your area. Basler technical support contact information is located in the front pages of this manual. You will also find helpful information such as frequently asked questions, downloads, and application notes in the Downloads and the Support sections of our website: www.baslerweb.com If you do decide to contact Basler technical support, please take a look at the form that appears on the last two pages of this section before you call. Filling out this form will help make sure that you have all of the information the Basler technical support team needs to help you with your problem. 11.2 Obtaining an RMA Number Whenever you want to return material to Basler, you must request a Return Material Authorization (RMA) number before sending it back. The RMA number must be stated in your delivery documents when you ship your material to us! Please be aware that if you return material without an RMA number, we reserve the right to reject the material. You can find detailed information about how to obtain an RMA number in the Support section of our website: www.baslerweb.com Basler ace Camera Link 225 Technical Support AW00098504000 11.3 Before Contacting Basler Technical Support To help you as quickly and efficiently as possible when you have a problem with a Basler camera, it is important that you collect several pieces of information before you contact Basler technical support. Copy the form that appears on the next two pages, fill it out, and fax the pages to your local dealer or to your nearest Basler support center. Or, you can send an e-mail listing the requested pieces of information and with the requested files attached. Basler technical support contact information is shown in the title section of this manual. 226 Basler ace Camera Link AW00098504000 1. The camera’s product ID: 2. The camera’s serial number: 3. Your operating system: 4. Frame grabber that you use with the camera: 5. Describe the problem in as much detail as possible: Technical Support (If you need more space, use an extra sheet of paper.) 6. If known, what’s the cause of the problem? 7. When did/does the problem occur? At startup. While running. After a certain action (e.g., a change of parameters): 8. How often did/does the problem occur? Once. Every time. Regularly when: Occasionally when: Basler ace Camera Link 227 Technical Support 9. How severe is the problem? AW00098504000 Camera can still be used. Camera can be used after I take this action: Camera can no longer be used. 10. Did your application ever run without problems? 11. Parameter set Yes No It is very important for Basler technical Support to get a copy of the exact camera parameters that you were using when the problem occurred. To make note of the parameters, use Basler’s pylon Viewer tool. If you cannot access the camera, please try to state the following parameter settings: Pixel Data Format: Image Size (AOI): Exposure Time Control Mode Exposure Time: Gain: Black Level: Frame Rate: 12. Live image/test image If you are having an image problem, try to generate and save live images that show the problem. Also generate and save test images. Please save the images in BMP format, zip them, and send them to Basler technical support. 228 Basler ace Camera Link AW00098504000 Revision History Revision History Doc. ID Number Date Changes AW00098501000 16 Feb 2011 Preliminary release of this document. Applies to prototype cameras only. AW00098502000 1 Apr 2011 Second preliminary release. Added information for the acA2000-340km/kc, acA2040-70km/kc, and acA2040-180km/kc models. Added information for the new stacked zone imaging, sequencer, and error detection features. Applies to prototype cameras only. AW00098503000 6 Jun 2011 Third preliminary release. Applies to prototype cameras only. Updated all specifications and feature descriptions. AW00098504000 7 Feb 2013 Fourth release: Information relating to acA NIR cameras describes the cameras in their prototype stage. Indicated Basler AG as bearer of the copyright on the back of the front page. Updated e-mail addresses for Basler technical support. Removed the following cameras from the manual: acA2000-140km/kc, acA2040-70km/kc. Included the following cameras into the manual: acA2000-340kmNIR, acA2040-180kmNIR. Corrected the focal length distance in Section 1.4.1 on page 7. Added LZ4 licensing information in Section 1.5.1 on page 9. Modified the statement of camera power in Table 2 on page 27 and replaced it in Table 3 on page 28. Added the full config. entries in Table 5.2.2 on page 27. Removed abolute max. voltages from Table 4 on page 36, Table 5 on page 36, and Section 5.7.2.2 on page 37 (inputs) and from Table 6 on page 41 and Section 5.7.4.2 on page 41 (output). Replaced absolute max. input voltage in Figure 11 on page 38 by the recommended voltage range for standard power and I/O cable. Basler ace Camera Link 229 Revision History 230 AW00098504000 Basler ace Camera Link AW00095804000 Index Index Numerics 1X10⁻¹Y tap geometry ..........................153 1X2-1Y tap geometry ............................148 1X3-1Y tap geometry ............................149 1X4-1Y tap geometry ............................150 1X6-1Y tap geometry ............................151 1X8-1Y tap geometry ............................152 binary protocol library ..............................21 binning ...................................................176 bit depth ........................................ 2, 3, 142 black level ..............................................159 C A acquisition frame count parameter ....71, 73 acquisition start trigger details ................................................69 introduction ........................................65 acquisition start trigger delay ...................75 acquisition start trigger mode parameter .69 acquisition status indicator ......................99 acquisition status parameter ...........99, 100 acquisition trigger wait signal ................101 active configuration set ..........................217 active set see active configuration set AOI, see area of interest .......................160 API, pylon ................................................20 area of interest auto functions AOI ...................189, 191 image AOI .......................................160 auto functions area of interest ................................191 assignment to an auto function AOI 192 introduction ......................................189 modes of operation .........................190 using with binning ............................189 auto functions AOI explained .........................................189 relating to an auto function ..............192 setting ..............................................196 auto functions factory setup ..................217 auto functions profile .............................205 B balance white auto ................................206 Basler binary protocol library ...................21 Bayer filter .............................................129 Basler ace Camera Link cables power and I/O (PLC) ...................30, 31 power and I/O (standard) ..................30 camera driver ..........................................19 camera link pixel clock speed, setting ...155 camera power ....................................32, 33 CC1, CC2, and CC3 ..........................46, 49 CL spare ............................................46, 54 cleaning the camera and sensor .............14 clock speed, camera link pixel clock .....155 code snippets, proper use .......................14 color factory setup .................................217 color filter ...............................................129 color transformation mode parameter ...136 configuration set loaded at startup ........223 configuration sets ..........................217–223 conformity ..............................................2, 3 connector types .......................................29 connectors ...............................................25 D debouncer and exposure start delay .................115 explained ...........................................51 default configuration set ........................217 device ID parameter ..............................214 device manufacturer info parameter ......214 device model name parameter ..............214 device scan type parameter ..................214 device user ID parameter ......................214 device vendor name parameter .............214 device version parameter ......................214 dimensions ............................................2, 3 driver, camera .........................................19 dust ..........................................................12 231 Index AW00095804000 E G electromagnetic interference ...................10 electrostatic discharge ............................10 EMI ..........................................................10 environmental requirements ...................11 error detection ....................................... 208 ESD .........................................................10 exposure active signal ..........................109 exposure auto ....................................... 202 exposure modes timed .................................................87 trigger width ......................................89 exposure overlap time max abs parameter ........................................89, 106 exposure start delay .............................. 115 exposure time controlling with an external trigger signal ................................................86 setting ...............................................94 gain auto ............................................... 199 gamma correction ................................. 133 F factory setup ......................................... 217 auto functions factory setup ............217 color factory setup ..........................217 high gain factory setup ....................217 standard factory setup ....................217 firmware version parameter .................. 214 frame cycle signal ................................. 112 frame rate and AOI size ................................... 117 controlling with an external trigger signal ................................................86 increasing the max allowed ............119 maximum allowed ........................... 117 frame readout time ................................ 115 frame start trigger details ...............................................78 introduction .......................................66 frame start trigger delay ..........................90 frame start trigger mode parameter ........78 frame transmission time ........................ 115 frame trigger wait signal ........................ 104 free run .................................................. 121 functional description ..............................23 H hardware trigger acquisition start .................................75 frame start ......................................... 86 heat dissipation .......................................11 high gain factory setup .......................... 217 horizontal binning .................................. 176 humidity ................................................... 11 I image area of interest ........................... 160 increasing the max allowed frame rate . 119 input line electrical characteristics .................... 37 invert ................................................. 53 propagation delay ............................. 39 using as a source signal ...................50 voltage requirements ........................ 36 integrate enabled signal ................109, 112 invert input line ........................................... 53 output line ......................................... 59 IP30 ........................................................... 7 IR-cut filter .....................................6, 8, 131 L LED indicator ..................................34, 208 lens adapter ..........................................2, 3 lens thread length ..................................... 8 line inverter parameter ......................53, 60 line source parameter ................................. .................................56, 103, 107, 110, 113 line status parameter ........................61, 63 LUT (luminance lookup table) ............... 184 M max height parameter ........................... 214 max lens thread length ..............................8 max width parameter ............................ 214 232 Basler ace Camera Link AW00095804000 maximum allowed frame rate ................117 mirror imaging .......................................179 models .......................................................1 modes of operation (of auto functions) ..190 Index reverse Y ...............................................181 RMA number .........................................225 S O optical size, sensor ................................2, 3 output line electrical characteristics ....................41 invert .................................................59 response time ....................................44 selecting a source signal ...................55 voltage requirements .........................41 overlapped exposure ...............................96 overtrigger error ...............................99, 101 overtriggering ..........................................87 P parameter sets explained .........................................217 saving ..............................................220 parameters setting via register access .................21 parameters loaded at startup ................223 pin assignments ......................................26 pin numbering ..........................................26 pixel clock speed ...................................155 pixel size ................................................2, 3 PLC power and I/O cable ..................30, 31 voltage requirements .........................35 PoCL .......................................................32 power over Camera Link .........................32 power requirements, camera .............32, 33 precautions ..............................................12 protection class .........................................7 pylon API .................................................20 pylon driver package ...............................19 pylon Viewer ............................................20 R readout time abs parameter ..................116 registers ...................................................21 return material authorization ..................225 reverse X ...............................................179 Basler ace Camera Link saving parameter sets ...................217, 220 sensor optical size ......................................2, 3 pixel size .........................................2, 3 size in pixels ....................................2, 3 type .................................................2, 3 sensor bit depth .....................................142 sensor height parameter .......................214 sensor width parameter .........................214 sequencer ..............................................170 serial number ...........................................14 sets of parameters, saving ....................220 setting parameters via register access ............................21 size, camera ..........................................2, 3 software development kit .........................20 software trigger acquisition start .................................73 frame start .........................................83 spectral response color cameras ......................................6 mono cameras ....................................4 sRGB gamma ........................................133 stacked zone imaging ............................164 standard factory setup ...........................217 standard power and I/O cable .................30 voltage requirements .........................36 startup parameter set ....................218, 223 support ..................................................226 T tap geometries .......................................146 target value ............................................189 technical support ...................................225 temperature, housing ..............................11 test images ............................................211 timed exposure mode ..............................87 transition threshold ..................................36 transmission start delay .........................115 trigger delay acquisition start .................................75 frame start .........................................90 trigger wait signals .................................101 233 Index AW00095804000 trigger width exposure mode ...................89 troubleshooting with the LED indicator .208 U use case diagrams ................................ 121 user configuration set ............................218 user defined values ...............................216 user output selector ................................57 user output value parameter ...................57 V ventilation ................................................11 vertical binning ...................................... 176 viewer ......................................................20 W weight ....................................................2, 3 white balance ........................................132 white balance auto see balance white auto Z zone imaging ......................................... 164 234 Basler ace Camera Link