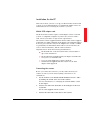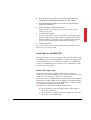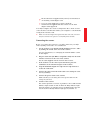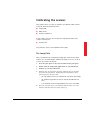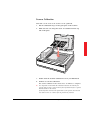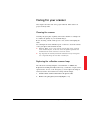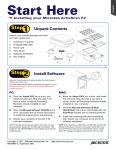
1
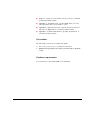
Horizon Ultra Scanner
Owner’s Guide
abc
The complete picture.
Trademarks
Agfa and Horizon Ultra are trademarks of Agfa-Gevaert N.V.
Apple and Macintosh are registered trademarks of
Apple computer, Inc.
PC and PS/2 are registered trademarks of the International Business
Machines Corporation.
Sun is a registered trademark of Sun Microsystems Inc.
Other product or company names are trademarks or registered
trademarks of their respective holders.
Copyright © 1995 Agfa-Gevaert N.V.
All rights reserved
All software and hardware described in this document are subject to
change without any notice.
2
Contents
EMI Interference
v
Preface
vii
Welcome
About this guide
Conventions
Hardware requirements
Environmental requirements
Important safety instructions
vii
vii
viii
viii
ix
ix
1 Preparing the scanner
11
Unpacking the scanner
13
Unlocking the scanner
14
Locking the scanner
16
Taking a closer look
17
Placing reflectives
18
Placing transparencies
19
Using the universal glass plate
19
Using the optional transparency holder frames and transparency holders
Testing the scanner
22
2 Installing the scanner
About SCSI devices
Changing the SCSI ID number
Installation for the Apple Macintosh
Choosing a SCSI ID number
Connecting the scanner
Testing the connection
Installation for the PC
Which SCSI adapter card
Connecting the scanner
Installation for the IBM PS/2
Which SCSI adapter card
Connecting the scanner
24
24
24
25
25
26
28
29
29
29
30
30
31
3
20
3 Calibrating the scanner
34
The Lamp Calib
White Point
Scanner Calibration
Scan Information
34
35
36
37
4 Caring for your scanner
39
Cleaning the scanner
Replacing the reflection scanner lamp
Replacing the transparency lamp
Replacing the fuse
39
39
42
43
Appendix A—Troubleshooting
44
Appendix B—Optional accessories
46
Appendix C—Technical Information
50
Contents
4
EMI Interference
Federal Communications commission
This equipment generates, uses, and can radiate radio frequency
energy and if not installed and used in accordance with the
instructions manual, may cause interference to radio communications.
It has been tested and found to comply with the limitations for a Class
A computer device pursuant to Subpart J of Part 15 of FCC rules,
which are designed to provide reasonable protection against such
interference when operated in a commercial environment. Operation
of this equipment in a residential area is likely to cause interference in
which case the user at his own expense will be required to take
whatever measures may be required to correct the interference.
Shielded cables are required for this device to comply with FCC Rules.
Use only shielded cables when connecting this device to others.
Canadian department of communications
This digital apparatus does not exceed the Class A limits for radio
noise emissions from digital apparatus set out in the Radio
Interference Regulations of the Canadian Department of
Communications.
Shielded cables are required for this device to comply with the Radio
Interference Regulations of the Canadian Department of
Communications. Use only shielded cables when connecting this
device to others.
5
Preface
6
Preface
Welcome
Congratulations on your purchase of Agfa™ ’s Horizon Ultra™
scanner, and welcome in our world of high-quality pre-press
peripherals and systems.
The Horizon Ultra scanner is a high-performance color digitizer for
scanning reflective originals or transparencies.
It will help you to increase the productivity of your scanning process.
Its image quality makes it suitable to be used for pre-press graphical
applications. It is based on flat-bed, CCD (Charge Coupled Device)
scanning technology. The Horizon Ultra scanner is characterized by a
large input size range and a high scanning speed. Due to its 15,000
CCD pixels, an impressive output size range can be achieved. This
high-precision instrument features exceptional sharpness and color
fidelity.
The originals can be colored, gray-scale or line-art. The corresponding
bit depths can be either 10 or 8 bit for color and gray-scale originals,
or 1 bit for line-art originals. The scanned data are transferred to the
workstation through SCSI. The workstation can be either a Apple®
Macintosh® , PC® , PS/2® , or Sun® (through third parties).
We wish you success with your scanner. Have fun!
About this guide
This guide to the Horizon Ultra scanner contains three chapters and
three appendices:
■
Chapter 1, ‘Preparing the scanner’, shows you how to prepare your
scanner for installation.
■
Chapter 2, ‘Installing the scanner’, shows you how to set up your
Horizon Ultra scanner for the Apple Macintosh, PC, and IBM PS/2
computers.
■
Chapter 3, ‘Calibration tools for the Macintosh or PC’, shows you
how to calibrate your Horizon Ultra scanner.
Welcome
7
■
Chapter 4, ‘Caring for your scanner’, shows you how to maintain
your Horizon Ultra scanner.
■
Appendix A, ‘Troubleshooting’, can be helpful when you come
across problems that you are unable to solve.
■
Appendix B, ‘Optional accessories’, lists the accessories that you
can buy as a supplement to your Horizon Ultra scanner.
■
Appendix C, ‘Technical Information’, provides specifications of
your Horizon Ultra scanner.
Conventions
The following conventions are used in this guide:
❖
Note: a note of this type gives you additional information.
1. Numbered steps describe the actions you must take to perform
a task.
Hardware requirements
You need at least a PowerMac 9500 or a Pentium PC.
Preface
8
Environmental requirements
■
Place the scanner on a horizontal, flat surface.
■
Make sure that no vibrations or shocks occur.
■
Make sure that no dust is present.
■
To ensure proper ventilation, allow a minimum of 25 cm
(10 inches) free space around each side of the scanner.
■
To obtain a perfect image quality, operate the scanner preferably
when the environmental temperature is between 15°C and 30°C.
Avoid exposure to direct sunlight and heating devices.
■
To obtain a perfect image quality, operate the scanner preferably
when the environmental humidity is between 10% and 75%.
Avoid environments where humidity fluctuations might occur.
■
Avoid any risk of water splashes.
■
Check whether the voltage of the power cable corresponds to the
voltage in your area. If not, contact your dealer or Agfa service
representative. Avoid environments where voltage fluctuations
might occur.
■
Never use extension cables.
Important safety instructions
For your own safety and that of your equipment, always take the
following precautions.
■
Check frequently whether there is no overheating of the power
plug and whether the power plug is pushed all the way into the
socket.
■
Switch the machine off at the end of your working day or during
power failure.
■
Disconnect the power plug when you want to clean the scanner
housing or glass plate and when the scanner needs service.
■
Do not open the scanner housing as it contains high voltage areas
and sensitive components. Any curative maintenance, should
preferably be carried out by your dealer or Agfa service
representative. However, in case of an emergency, you can replace
the lamps or fuse yourself. These procedures are described further
in this owner’s guide.
Important safety instructions
9
Chapter 1
Preparing the scanner
Chapter 1 — Preparing the scanner
10
Preparing the scanner
This chapter assists you in preparing your Horizon Ultra™ scanner for
installation. You will find instructions for:
■
Unpacking the scanner
■
Unlocking the scanner
■
Locking the scanner
■
Taking a closer look
■
Placing reflectives
■
Placing transparencies
■
Testing the scanner
Chapter 1 — Preparing the scanner
11
Horizon Ultra
Scanner
Transparency-holder
frame
or
115 V
power cable
230 V
power cable
Calibration target
Apple® Macintosh® scanner
software
PC® scanner software
SCSI 50 to
50 pins cable
Owner’s and User’s
Guides
Warranty and Registration card
Figure 1-1
The contents of the packing box of the
Horizon Ultra scanner
Lock/Unlock card
Chapter 1 — Preparing the scanner
12
Unpacking the scanner
The first thing to do is to make sure you have everything listed here.
The packing box contains:
■
The Horizon Ultra scanner.
■
The Owner’s and User’s Guides, Apple Macintosh scanner software
and PC scanner software, all contained in one packing box.
■
Calibration tools for the transparency lamp, the focus, the Color
Registration and the White Point of the Horizon Ultra scanner.
■
The Scanner Info tool.
■
The White Point target: a white paper target labeled with
densitometric RGB values.
■
The Color Registration and Focus target: a 24x34 cm target.
■
A 115 V power cable or a 230 V power cable.
■
A SCSI 50 to 50 pins cable (can be used as extension cable for the
Apple Macintosh or as direct connection for the PC).
■
An external terminator.
■
A warranty and registration card.
■
A Lock/Unlock card.
■
A universal glass plate (24 x 34 cm)
1. Open the packing box and take out all the items.
The unpacking of the scanner should preferably be done by two
persons, to avoid shocks and to keep the scanner horizontal.
2. Check each item against Figure 1-1 to make sure that you have
everything.
If something is missing, contact your dealer or Agfa service
representative.
Chapter 1 — Preparing the scanner
13
3. Remove the plastic wrapping and the packing materials from
the scanner.
4. Fill out the Warranty and Registration form. You will find the
product serial number on the back panel of the scanner.
❖
Note: Do not forget to mail the Warranty and Registration form. Only
then you can claim your guarantee and get the following registration
benefits: new product information, new application software.
Unlocking the scanner
The scanner’s optical box contains all optical components and rides
back and forth during the scan. A shipping restraint holds it in place
at the right side of the scanner during shipment. You have to remove
this restraint before powering up the scanner.
1. Remove the panel at the right side of the scanner by loosening
the four screws, as shown in Figure 1-2.
2. Locate the shipping restraint (a screw).
3. Loosen the screw (left), as shown in Figure 1-3, and place it in
the holder next to it (Figure 1-4).
The holder allows you to save the screw so that you can replace it
if you have to move the scanner over long distances.
4. Try to move the optical box to the left. Do not touch the
electronic board, use the lower U-profile instead. If the optical
box is still blocked, unblock it by pushing down the handle that
holds it in place.
5. Bring the panel back in place.
Chapter 1 — Preparing the scanner
14
A4
A5
optical box
shipping restraint
Figure 1-2
Removing the panel
A4
A5
Figure 1-3
Removing the shipping restraint
A4
A5
Figure 1-4
Replacing the shipping restraint
Chapter 1 — Unlocking
Preparing the scanner
15
Locking the scanner
If you need to transport the scanner over long distances, you should
first replace the shipping restraint. This will protect the scanner’s
optical box from possible damage.
1. Remove the panel at the right side of the scanner.
2. Move the optical box manually to the right, until it is in proper
position to be locked.
Hold it at its lower U-profile.
3. Remove the screw from its right hole, then gently turn the
screw into the slot and fasten it.
4. Bring the panel back in place.
Chapter 1 — Preparing the scanner
16
Taking a closer look
Now that you have the scanner out of the box, take a closer look so
that you become familiar with its parts. Figure 1-5 and Figure 1-6
illustrate the locations of the different parts of your Horizon Ultra
scanner.
Transparency
lamp carriage
Transparency Unit
A4
A5
Power switch
Figure 1-5
The top and left side of the scanner
Operating panel
Glass plate
SCSI ID switch
Power input
SCSI interface connector
Figure 1-6
The rear of the scanner
Serial port for diagnostics service
Chapter 1 — Preparing the scanner
17
Placing reflectives
You can place a reflective originals directly on the scanner’s glass
plate with its image side down.
■
Place the original on the glass plate, with its top side against
the middle of the left ruler.
A4
A5
Figure 1-7
Placing a reflective original
For faster scanning, slide the original into one of the corners. This
special Horizon Ultra feature allows the scanner to take advantage
of its special pixel reading mecanism by skipping the empty parts
of the scan bed. Optical performance of a CCD scanner is always
best near the middle of the glass plate. However, for the relatively
low resolutions at which reflective originals are scanned, sliding
originals to the side will not decrease quality.
■
Close the document cover of the scanner.
Chapter 1 — Preparing the scanner
18
Placing transparencies
Using the universal glass plate
You can clip your originals underneath the universal glass plate and
place them on the glass plate of the scanner. Center the originals on
the glass plate, with their top side towards the calibration slot. This
position guarantees the best quality. Make sure that the calibration
slot in the frame is at the left side (standing in front of the scanner)
and that it is clean.
calibration slot
A4
Figure 1-8
Placing a transparent original
A5
If you place more than one slide on the glass plate (for batch
scanning), position them as close to the center line as possible to
optimize quality.
Chapter 1 — Preparing the scanner
19
Using the optional transparency holder frames and
transparency holders
The holders keep the originals perfectly flat between two anti-Newton
glasses, thus guaranteeing optimum sharpness.
To insert transparencies in the transparency holders and the holders in
their frames, follow this procedure:
1. Place the transparency holder frame, with the protection foil
down, in the upper left corner of the scanner’s glass plate.
2. Press the two plastic buttons on the top of the required
transparency holder to unlock the upper and lower part of the
holder (see Figure 1-9).
Figure 1-9
Unlocking the transparency holder
3. Place the transparency (without frame) between the upper part
and bottom plate (see Figure 1-10).
To avoid wrong reading, make sure that the emulsion side of the
transparency faces upwards when the transparency holder is
placed in its frame.
a
Figure 1-10
Placing the transparency in the holder
Chapter 1 — Preparing the scanner
20
4. Press the upper part and the bottom plate of the transparency
holder together until you hear a click.
5. Place the transparency holder in the transparency-holder frame.
Make sure that the pins of the holder are inserted completely in
the holes of the frame (see Figure 1-11). The transparency holder
should be in full contact with the protection foil of the
transparency-holder frame.
6. Place the frame in the top left corner of the glass plate.
Make sure that the slot in the frame (for lamp calibration) is at the
left side. Always cover unused neighbouring holes of the frame
with the round hole covers. This eliminates the visibility of stray
light and reflections.
A4
A5
AGFA
Figure 1-11
Placing the frame
with transparency holders
on the scanner
Chapter 1 — Preparing the scanner
21
7. Leave the document cover open, so that the carriage can move
over the frame.
❖
Note: To remove the transparency holder from the holder frame after
scanning, make sure that the transparency lamp carriage is in its home
position (completely left), and that nobody attempts to start a new scan.
Testing the scanner
You are now ready to perform a power-on test to check if the scanner
is operating correctly.
1. Check whether you have unlocked the scanner.
2. Connect the power cable to the scanner.
Make sure that you are using the correct power cable for the
voltage in your area. Double-check whether the voltage indicated
on the back panel of the scanner corresponds with the voltage in
your area. If not, call your dealer or Agfa service representative.
3. Switch on the scanner.
The scanner performs a self-test after which the Busy indicator
light switches off and the Ready indicator light (green) switches
on. This takes about a minute or more.
If a malfunction is detected during the self-test, that is, if the
Error indicator switches on, refer to Appendix A,
‘Troubleshooting’.
Chapter 1 — Preparing the scanner
22
Chapter 2
Installing the scanner
Chapter 2 — Installing the scanner
23
Installing the scanner
This chapter shows you how to set up your Horizon Ultra scanner with
your Apple Macintosh, PC, or PS/2® computer. You’ll find instructions
for:
■
Changing and setting the SCSI ID number
■
Using the correct SCSI adapter card
■
Connecting the scanner to your computer
■
Testing the connection
About SCSI devices
The Horizon Ultra scanner is a Small Computer System Interface
(SCSI) device. It communicates with your computer by using the SCSI2 standard. The SCSI communication standard allows you to have up
to seven peripheral devices connected to your computer.
Before connecting the SCSI devices you should always make sure that
your computer and all SCSI devices are switched off. If either the
computer or any of the devices remains on, you could damage the
computer or the device.
A unique SCSI ID number is assigned to each device in the SCSI chain
enabling your computer to identify the device it wants to
communicate with and the priority of each device.
❖
Warning: If two SCSI devices have the same ID number, your system will
not work properly and you may damage your SCSI devices.
Changing the SCSI ID number
Before connecting the scanner to your computer, you must be aware
of the SCSI ID numbers already assigned. Your Horizon Ultra scanner
is preset to ID 2 and only needs to be changed if there is already
another device in your chain set to the same number.
1. Make sure your scanner is switched off and is disconnected
from your computer.
2. Decide on an unassigned SCSI ID number.
Chapter 2 — Installing the scanner
24
On an Apple Macintosh, you can use the SCSI ID checker software
utility delivered with the scanner (see next page).
3. Use a screwdriver to set the desired SCSI ID on the switch at the
rear of the scanner.
4
5 6
1 2
3
7
Figure 2-1
Changing the SCSI ID number
Installation for the Apple Macintosh
This section shows you how to set up your Horizon Ultra scanner with
your Apple Macintosh computer. You must first choose and set a SCSI
ID number, then connect the scanner to your Apple Macintosh, and
finally test the connection.
Choosing a SCSI ID number
Before you connect your Horizon Ultra scanner to your Macintosh,
you have to find out which SCSI ID numbers are already assigned and
which numbers are free. To do this, you can use the Apple Macintosh
utility ‘SCSI ID Checker’. You will find this utility on the Apple
Macintosh scanner software diskette.
1. Copy the SCSI ID Checker to your Apple Macintosh computer.
2. Open the SCSI ID Checker.
A dialog box appears with a list of the SCSI ID numbers that are
free in your Apple Macintosh computer.
Chapter 2 — Installing the scanner
25
Figure 2-2
SCSI Table
Your Macintosh always occupies ID 7 and its internal hard disk
usually ID 0 or ID 1. CD-ROM usually occupies ID 3. If your
Macintosh is equipped with 2 SCSI-busses (internal and external),
the button Next Bus allows you to switch busses.
3. Write down any SCSI ID number that is free.
Your Horizon Ultra scanner is preset to ID 2. If this number is free
you do not need to alter the SCSI ID switch on the rear of the
scanner.
4. Click OK to quit the SCSI ID Checker.
5. Set the scanner to the SCSI ID number that you have written
down.
For more information, see ‘Changing the SCSI ID number’ earlier
in this chapter.
Connecting the scanner
Before you connect the scanner to your Apple Macintosh, make sure
that your scanner as well as your Macintosh and everything
connected to it are switched off.
We assume that you already have several SCSI devices. If your
Horizon Ultra scanner would happen to be your first and only SCSI
peripheral, you have to buy a System 25-pin to 50-pin SCSI cable to
be able to connect the scanner to your Apple Macintosh.
Chapter 2 — Installing the scanner
26
If your Horizon Ultra scanner is the only SCSI device to be connected
to your Apple Macintosh:
1. Connect the smaller 25-pin end of the System 25-pin to 50-pin
cable to the SCSI port on your Apple Macintosh.
2. Connect the 50-pin connector to the scanner.
3. Place the terminator on the scanner’s remaining 50-pin
connector.
4. Snap the diamond shaped wire clips into the clip brackets to
secure the connection.
If your Horizon Ultra scanner will be connected to your Apple
Macintosh together with other SCSI devices:
1. Connect one end of the SCSI cable (supplied with the scanner)
to the adjacent SCSI device.
If you install the scanner at the end of your SCSI chain, remove
the terminator from the last device in the SCSI chain. Connect the
cable to the SCSI port that has become available on this device.
If you install the scanner between two other devices, disconnect a
SCSI cable from one of these two devices, and connect the free
end to the scanner. Connect the SCSI cable between the scanner
and the remaining open port.
2. If the scanner is the last device in the SCSI chain place the
terminator (supplied with the scanner) on the unconnected SCSI
port of the scanner.
Remember your Horizon Ultra scanner has no built-in terminator.
3. Snap the diamond shaped wire clips into the clip brackets to
secure the connection.
❖
Warning: Make sure there are no more than two terminators in your SCSI
chain. Some SCSI devices have built-in terminators and must therefore be
placed at the end of your SCSI chain. Please check the documentation of
each of your SCSI devices if you are not sure whether the device has a
built-in terminator.
Apple Computer, Inc. recommends using its proprietary black
terminator for the Apple Macintosh IIfx.
Chapter 2 — Installing the scanner
27
Testing the connection
You are now ready to perform a test to check if the scanner is
correctly connected to your Apple Macintosh.
1. Connect the power cable to the scanner.
Make sure that you are using the correct power cable for the
voltage in your area.
2. Check if the SCSI cable is properly connected.
3. Switch the scanner on.
The scanner performs a self-test: it produces some sounds and the
indicator lights switch on and off. Then the Busy indicator light
(yellow) switches on, until the self-test is finished. After the selftest the scanner’s Ready indicator light (green) switches on.
4. Switch on any other SCSI devices you may have attached, and
wait for them to start up.
5. Switch on your Apple Macintosh.
As it starts up, your Macintosh performs a series of tests to verify
the correct system configuration.
6. Open the SCSI ID checker to verify whether the Macintosh sees
the scanner at its proper SCSI address.
In case of problems, refer to Appendix A, ‘Troubleshooting’.
7. Close the SCSI ID checker by clicking the OK button.
You are now ready to install and configure Agfa’s scanning software.
Please refer to the User’s Guide.
Chapter 2 — Installing the scanner
28
Installation for the PC
This section shows you how to set up your Horizon Ultra scanner with
your PC. You can find information on which SCSI adapter card to use
and instructions for connecting the scanner to your PC.
Which SCSI adapter card
The Horizon Ultra scanner requires a SCSI adapter card to work with
your PC or compatible computer. If your PC does not have such a
card, contact your dealer or Agfa service representative.
The scanner software supplied with the Horizon Ultra scanner supports
in principle any ASPI-compatible SCSI adapter card. Technical support
however, gives assistance only for the Adaptec line of cards, of which
we particularly recommend the AHA 1540 or 1542 for ISA PC’s, the
1742 or 2742 for EISA PC’s, and the 2942 for PCI PC's.
Important: Please check the following documentation:
■
The Read Me file on the PC scanner driver software disk for
up-to-date information.
■
The documentation supplied with your adapter card. This will
tell you how to install the card.
■
If you are using third party software, check the
documentation supplied with that software for the SCSI
adapter cards supported.
Connecting the scanner
Before you connect the scanner to your PC, make sure that your
scanner as well as your PC and everything connected to it are
switched off.
1. Set the scanner to an unused SCSI ID number between 1 and 6
by turning the switch at the rear of the scanner.
For more information, see ‘Changing the SCSI ID number’ earlier
in this chapter.
2. Connect one end of the SCSI cable to the SCSI port at the rear
of your PC.
Use the cable supplied with the scanner.
3. Connect the other side of the cable to the scanner.
Chapter 2 — Installing the scanner
29
4. If the scanner is the last device in the SCSI chain, place the
terminator on the unconnected SCSI port of the scanner.
5. Snap the diamond shaped wire clips into the clip brackets to
secure the connection.
6. Connect the power cable to the scanner.
Make sure that you are using the correct power cable for the
voltage in your area.
7. Switch on the scanner.
The scanner performs a self-test: it produces some sounds and the
indicator lights switch on and off. Then the Busy indicator light
(yellow) switches on, until the self-test is finished. After the selftest the scanner’s Ready indicator light (green) switches on.
8. Switch on your PC.
You are now ready to install and configure Agfa’s scanning software.
Please refer to the User’s Guide.
Installation for the IBM PS/2
This section shows you how to set up your Horizon Ultra scanner with
your IBM PS/2. You can find information on which SCSI adapter card
to use and instructions for connecting the scanner to your IBM PS/2.
If you have an IBM PS/2 model 30, please refer to ‘Installation for the
PC’ earlier on in this chapter.
Which SCSI adapter card
The Horizon Ultra scanner requires a SCSI interface card that is
certified to work with your IBM PS/2. If your PS/2 does not have such
a card, contact your dealer or Agfa service representative.
The scanner software supplied with the Horizon Ultra scanner supports
in principle any ASPI-compatible SCSI adapter card. Technical support
however, gives assistance only for the Adaptec line of cards, of which
we particularly recommend the AHA 1640.
Important: Please check the following documentation:
■
The Read Me file on the PC scanner driver software disk for
up-to-date information.
■
The documentation supplied with your adapter card. This will
tell you how to install the card.
Chapter 2 — Installing the scanner
30
■
The documentation supplied with your PS/2 for information
on installing a SCSI adapter card.
If you are using third party software, check the
documentation supplied with that software for the SCSI
adapter cards supported.
Your PS/2 computer also needs a configuration file to make it aware
of the interface card. This file enables your computer to automatically
configure the interface card.
■
❖
Make sure that the Adapter Description File that came with your SCSI
interface card has been copied to your PS/2 Reference diskette.
Connecting the scanner
Before you connect the scanner to your PS/2, make sure your PS/2
and everything connected to it is switched off.
1. Set the scanner to an unused SCSI ID number between 1 and 6
by turning the switch at the rear of the scanner.
For more information, see ‘Changing the SCSI ID number’ earlier
in this chapter.
2. Plug the SCSI cable (an IBM or compatible cable) into the SCSI
interface connector at the rear of the scanner.
Use the cable supplied with the Horizon Ultra scanner.
3. If the scanner is at the end of your SCSI chain, place the
terminator on the unconnected part of the scanner.
4. Snap the diamond shaped wire clips into the clip brackets to
secure the connection.
5. Connect the other end of the SCSI cable to the SCSI port at the
rear of your PS/2.
6. Connect the power cable to the scanner.
Make sure that you are using the correct power cable for the
voltage in your area.
7. Switch on the scanner.
The scanner performs a self-test: it produces some sounds and the
indicator lights switch on and off. Then the Busy indicator light
(yellow) switches on, until the self-test is finished. After the selftest the scanner’s Ready indicator light (green) switches on.
Chapter 2 — Installing the scanner
31
8. Switch on your PS/2.
Your PS/2 performs a series of checks to verify the correct system
configuration each time you switch it on. For further information
on configuring your PS/2 system see your PS/2 documentation,
adapter card documentation and the Read Me file on the PC
scanner software disk.
You are now ready to install and configure Agfa’s scanning software.
Please refer to the User’s Guide.
Chapter 2 — Installing the scanner
32
Chapter 3
Calibrating the scanner
Chapter 3 — Calibrating the scanner
33
Calibrating the scanner
This chapter shows you how to calibrate your Horizon Ultra scanner
using the following calibration tools:
■
Lamp Calib,
■
White Point,
■
Scanner Calibration.
It also teaches you how you can get basic information about your
scanner with the tool:
■
Scanner Info.
You find these tools in the Calibration Tool folder.
The Lamp Calib
This tool calibrates the transparency lamp unit of the Horizon Ultra
scanner. It is recommended to calibrate the lamp every two weeks, if
you use the scanner intensively.
1. Clear the glass plate of any objects and clean the glass plate.
2. Double click the Lamp Calib application on your Macintosh.
3. Click Do to start the calibration.
❖
❖
Warning: Only for emergencies the lamp calibration may be cancelled.
You cancel the calibration by holding down the Command key while
pressing period (.). Be aware that:
-
the top and bottom motors will NOT be sent home afterwards,
-
the calibration parameters may be in half old and half new
state,
-
you should do another lamp calibration as soon as possible.
Note: The reflection lamp is not calibrated with this utility. It is automatically calibrated when the scanner powers up.
Chapter 3 — Calibrating the scanner
34
White Point
This tool calibrates the White Point of the scanner in reflective mode.
You should use this tool when the color balance or density reading of
the White Point of your scanner is not correct.
1. Note the Gray, Red, Green and Blue densities labeled on the
White Point target.
With a color densitometer you can also measure the individual
densities and use these values.
2. Place the White Point target on the top-center position of the
glass plate and close the cover of the scanner.
3. Double click the White Point tool.
4. Click Do to start the application.
A dialog box appears.
5. Enter the earlier noted RGB and Gray density values multiplied
by 10000.
E.g. Dred = 0.051 so the value to be entered is 510. The scanner
starts the calibration.
Chapter 3 — Calibrating the scanner
35
Scanner Calibration
With this tool the focus of the scanner can be optimized.
1. Put the calibration target on the glass plate of the scanner.
2. Make sure the text “Keep me clean” is readable from the top
side of the plate.
A4
A5
3. Double click the Scanner Calibration tool on your Macintosh.
4. Click Do to start the calibration.
The scanner calibration takes about 10 to 15 minutes to complete.
❖
It is important to check that the calibration continues beyond the first
prescan. The prescan is used to check if the registration target is squarely
located (relative to the rulers).
If the target does not meet the requirements of the prescan, the tool will
exit with an error very shortly after the prescan has finished.
Chapter 3 — Calibrating the scanner
36
Scan Information
This tool gives you some information about your scanner.
■
Double click the Scan Information tool.
The following information about your scanner appears.
■
The serial number: Gives you the serial number of your scanner.
■
The memory size: Gives you the available memory size of your
scanner.
■
Pixelwise scanning supported Yes or No: Indicates whether your
scanner supports pixelwise scanning or not.
■
Scan count: Gives you the number of scans already made since
the production of the scanner. Note that each scan movement will
be taken for one scan. Scanning colors means that the scanner
makes 3 scan movements, one movement for each color. If a
prescan is required for a color scan the scanner will count 6 scans.
■
Reflection lamp burn time: Gives you the time the reflection lamp
has been burning already. The service technician can reset the
counter when replacing the lamp.
■
Transparent lamp burn time: Gives you the time the transparent
lamp has been burning already. The service technician can reset
the counter when replacing the lamp.
Chapter 3 — Calibrating the scanner
37
Chapter 4
Caring for your scanner
Chapter 4 — Caring for your scanner
38
Caring for your scanner
This chapter describes how to keep your Horizon Ultra scanner in
perfect working order.
Cleaning the scanner
Cleaning the glass plate regularly will ensure that dirt or smudges do
not reduce the quality of your scanned images.
Before cleaning, switch off the power to the scanner and unplug the
cable.
Use a damp cloth and a mild detergent or alcohol to clean the surface
of the glass plate and document board.
❖
Warning: When you use sprays directly onto the glass plate, avoid the
seams around the glass, as this may cause the liquid to penetrate and
contaminate the mirrors and lenses inside the scanner.
❖
Tip: Especially the cleaning around the calibration zone for transparencies is important. Keep this area dust- and dirt-free.
Replacing the reflection scanner lamp
The reflection scanning lamp has a rated lifetime of 1000 hours.
Replacement should preferably be done by your dealer or Agfa service
representative. In case of an emergency, you can replace the lamp as
follows (read also the instructions coming with the lamp):
1. Switch off the scanner and remove the power cable.
2. Remove the glass plate (8 screws) (Figure 3-1).
Chapter 4 — Caring for your scanner
39
A4
A5
Figure 3-1
Removing the glass plate
3. Move the optical box to the opening under the glass plate. Use
the U-beam at the right bottom side to move it, while keeping
it down.
4. Unhook the top of the plastic plates at the front and the rear of
the optical box (Figure 3-2).
Make sure not to unhook the plastic plates completely.
Figure 3-2
Unhooking the plastic plates
5. Remove the top Infrared filter, by turning loose its six screws
(Figure 3-3). Do not touch the glass.
Chapter 4 — Caring for your scanner
40
Figure 3-3
Removing the top Infrared filter
6. Disconnect the lamp cables.
❖
Warning: The lamp may still be hot.
7. Push the lamp cables through the small holes.
8. Remove the old lamp.
9. Bring the new lamp in place, with the little mark at one end of
the lamp towards the back side of the scanner, facing upwards.
❖
Warning: Do not touch the glass with your bare hands. This would
dramatically shorten the new lamp’s lifetime.
10. Re-assemble everything in reverse order.
❖
Warning: Make sure that you remove all dust from inside the scanner
before you place the glass plate back. Clean the Infrared filter with an
appropriate optical cleaning tissue before installing it.
❖
Note: If you want to do the replacement yourself with a minimum of
wasted time, you can order a spare lamp before your scanner lamp needs
replacing. It strongly recommended to have a service engineer recalibrate
the scanner after lamp replacement.
Chapter 4 — Caring for your scanner
41
Replacing the transparency lamp
The transparency lamp has a rated lifetime of 300 hours. Replacement
should preferably be done by your dealer or Agfa service
representative. In case of an emergency, you can replace the lamp as
follows (read also the instructions coming with the lamp):
1. Switch off the scanner and remove the power cable.
2. Turn loose the screws that fasten the lamp hood (Figure 3-4).
3. Remove the lamp hood.
4. Remove the small plate that holds the lamp in place
(Figure 3-5).
❖
Warning: If you have operated the scanner just before replacing the lamp,
this plate is very hot. Be careful not to burn yourself.
5. Remove the lamp by holding the wires on both sides of the
lamp (Figure 3-6).
Figure 3-4
Turning loose the lamp hoods screws
Figure 3-5
Removing the small plate
Figure 3-6
Removing the lamp
Chapter 4 — Caring for your scanner
42
6. Disconnect the wires. Cut the cable binders.
7. Connect the new lamp.
8. Bring the new lamp in place by holding the wires.
❖
Warning: Do not touch the glass with your bare hands. This would
dramatically shorten the new lamp’s lifetime.
9. Re-assemble everything in reverse order.
❖
Note: If you want to do the replacement yourself with a minimum of
wasted time, you can order a spare lamp before your transparency lamp
needs replacing.
Replacing the fuse
Replacement of the fuse should preferably be done by your dealer or
Agfa service representative. In case of an emergency, you can replace
the fuse as follows:
1. Disconnect the main power cable.
2. Locate the fuse(s) in the bottom left corner at the rear of the
scanner.
3. Replace the defective fuse(s).
For a 230 V scanner, you need 2 x 5 AMP slow blow fuses. For a
115 V scanner, you need a 10 AMP medium blow fuse.
❖
Warning: Do not open the scanner housing. There are extremely sensitive
components inside the scanner.
Chapter 4 — Caring for your scanner
43
Appendix A Troubleshooting
The Horizon Ultra scanner is designed for efficient, trouble-free
operation. This appendix describes what to do in the unlikely event
that problems would occur.
The scanner does not start up.
The scanner is not receiving any power.
■
Check whether the voltage of the power cable corresponds
with the voltage in your area. If it does, verify the power
connection to the scanner.
■
Check whether the power cable fuses are failing. If the fuses
are failing, replace them following the procedure that is
described earlier in this guide.
■
If, after you changed the fuse, the scanner still receives no
power, contact your dealer or Agfa service representative.
The scanner makes a banging noise and nothing moves under the glass
plate.
■
The scanner was not properly unlocked. Immediately switch
the scanner off and unlock properly, or call your service
representative.
The Error indicator light (red) on the scanner’s operating panel
switches on during the power-up sequence.
A malfunction has been detected by the scanner.
■
Check that you have removed the shipping constraint.
Check the reflection and transparency lamp in the scanner.
If one of the lamps flickers, dims, or switches off, please
contact your dealer or Agfa service representative.
The reflection or transparency lamp has failed.
■
The reflection or transparency lamp has to be changed,
following the procedure that is described earlier in this guide.
Preferably contact your dealer or Agfa service representative.
The reflection or transparency lamp has turned black.
■
■
The reflection or transparency lamp has to be changed,
following the procedure that is described earlier in this guide.
Preferably contact your dealer or Agfa service representative.
Appendix A — Troubleshooting
44
The workstation does not start up.
Your workstation cannot find its hard disk due to a conflict with
the SCSI ID numbers of the devices you have attached.
■
Disconnect all SCSI devices (except the start-up disk) and
connect them one by one, beginning with the scanner, to
identify the device that causes the problem (switch all devices
off before breaking or making connections).
The scanner software cannot find the scanner
After opening the Scan dialog box, a message appears telling that
no scanner is connected, although the scanner is connected.
■
Check the Installation procedure, to see if you followed the
instructions. Pay special attention to the setting of the SCSI ID
number.
■
Maybe you did not wait long enough for all SCSI devices to
start up, before you switched your workstation on. Therefore,
try restarting your workstation. If this doesn’t help,
■
Disconnect all SCSI devices and connect them one by one,
beginning with the scanner, to identify the device that causes
the problem.
The scanner reports errors during scanning (Apple Macintosh)
■
If this happens without error indications during the start-up
(see previous topics), contact your dealer or Agfa service
representative.
When starting up, the scanner makes a beeping noise and all the lights
are blinking.
■
This indicates a SCSI cabling problem. Be sure to immediately
shut down all machines in the chain and then solve the
problem. (Missing terminator? Bad cable? Internally
terminated component in chain?)
Appendix A — Troubleshooting
45
Appendix B Optional accessories
This appendix provides information on some accessories that you can
buy as a supplement to your Horizon Ultra scanner. You will find
information on:
■
Transparency holders
■
Transparency-holder frames
■
The Memory Pack
Transparency holders
Several types of transparency holders are available:
■
■
Small types:
■
A 24 mm x 36 mm transparency holder (for 35 mm
transparencies).
■
A 6 cm x 6 cm transparency holder (2.25 x 2.25").
Large type:
■
A 10 cm x 12,5 cm transparency holder (4 x 5").
Appendix B — Optional accessories
46
Transparency-holder frames
Several types of transparency-holder frames are available:
■
A frame for two small holders and one large holder
■
A frame with one large hole and two small holes, plus 3 round
hole covers.
■
A frame for 6 small holders
Appendix B — Optional accessories
47
■
A frame for 9 holders for mounted slides
■
A frame for film strips
Appendix B — Optional accessories
48
■
A batch scanning pack containing:
■
A frame for film strips
■
A frame for 6 small holders and 6 holders for 35 mm slides (=
3 packages)
■
A frame for 9 holders for mounted slides and 9 holders for
mounted slides (5 cm)
■
A universal glass plate (24 x 34 cm)
■
Two 6 x 6 cm holders (= 1 pack)
Memory Pack
The Memory Pack contains 24 Mb RAM, and a custom-made memory
management IC. This pack allows further productivity improvements,
especially when big color scans are concerned. (More than 8 Mb per
colour plane)
Installation instructions come with the kit. It should be installed by an
Agfa authorized service engineer.
Appendix B — Optional accessories
49
Appendix C Technical Information
This appendix provides some technical information about your Horizon
Ultra scanner.
Scanner type:
Flat-bed A3 size color CCD scanner
CCD:
15000 elements, hybrid type
Output resolution:
20 - 2540 ppi for line art and gray
20 - 2000 ppi for color mode
A/D Conversion:
12 bit
Output pixel depth:
1 bit output for line-art (black and white)
8 or 10 bit output for gray
3 x 8 bit or 3 x 10 bit output for color
Density range:
3.2 D
Max. density detected:
3.4 D
Scanning speed:
0.8- 40 ms
Original sizes:
Maximum reflection
A3 size (297 x 420 mm)
Minimum transmission
35 mm transparency (24 x 36 mm)
Maximum transmission
240 x 340 mm transparency
Memory:
8 Mb RAM (expandable to 32 Mb)
Reflection scanner lamp: Halogen (rod type) of 400 W/80 V,
1000 hr lifetime, user replaceable
Transparency lamp:
Halogen 400 W rod-like type,
300 hr lifetime, user replaceable
Warm up time:
150 seconds or less
Power supply:
Either 115 V rating: 90-140 V, 47 - 65 Hz
(preset for US scanners),
or 230 V rating: 180 - 264 V, 47 - 65 Hz
(preset for European scanners)
Power consumption:
in stand-by mode: 125 W
Appendix C — Technical Information
50
when scanning: 650 W maximum
Dimensions:
815 x 560 x 395 mm (32.1" x 22" x 15.5")
Acoustic noise:
max. 55 dB
Weight:
64 kg (141 lbs)
Options:
Transparency holders
Transparency-holder frames
Memory pack
Batch scanning pack
Interface:
SCSI-2 interface
Maximum throughput 4MB/sec
Environment:
Operating temperature:
15°C to 30°C (50°F to 104°F)
Relative humidity:
10% to 75%
Technical specifications are subject to change without notice.
Appendix C — Technical Information
51