1
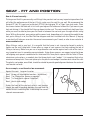
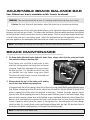
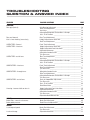
Arrow Karts
Owner’s Manual
KART SETUP GUIDE
Arrow Karts Pty Ltd
57-59 Nantilla Road, North Clayton VIC 3168 Australia
Tel (03) 8558 4000 Fax (03) 9545 3743
(Int’l: Tel +61 3 8558 4000 Fax +61 3 9545 3743)
www.arrowkarts.com
[email protected]
Arrow Karts are designed strictly for racing purposes only,
and not for any type of commercial and/or rental use.
‘Advanced’
‘Beginners’
Contents
2
Use and Safety Guide
3
Cornering Diagrams
5
Rear Track
7
Front Track
8
Tyre Pressures
8
Rear Wheel Hubs
9
Crash & Sidepod Bar Adjustment
10
Front End Alignment
15
Height Adjustable Front Stub Axles
16
Seat Stays
16
Adjustable/Removable Torsion Bars & Clamps
19
Axle Bearing Adjustment
20 Height Adjustment of Rear Axle
21 Axles & Wheels
23 Seat – Fit and Position
24 Weighting the Kart
24 Wet Weather
25 Brake Adjustment
26 Adjustable Brake Balance Bar (on karts with front brakes)
26 Brake Maintenance
28 ‘Blue Printing’ your Arrow Racing Kart
30 Fitting Tyres
31 Owner Registration Card
33 Gear Ratio Chart
34 Maintenance Schedule
36 Troubleshooting Question & Answer Index
Please Take Note...
Before making any adjustments be sure to test your Arrow in its recommended standard setup. It is
essential to make only one adjustment at a time to get a true indication of what effect each change has.
Contents
1
General Use and Safety Guide
Please read carefully
Congratulations on choosing an Arrow Kart.
Since 1973, we have been 100% committed to the Kart Industry. It’s our life, our passion and our
livelihood, so you can count on us being there when you need us.
In producing your kart, we have used only the best and highest quality materials and components, and
all possible care has been taken. However you must be aware that this is a high performance racing /
competition vehicle designed for use only on closed racing circuits. As such it is subject to very high
levels of stress and strain, therefore it requires constant inspection, maintenance and replacement of
components. FAILURE to carry out the above may result in severe injury, perhaps even death.
It is your responsibility as the Owner/Operator/Driver to carry out this regular inspection and a
maintenance schedule is offered to you for your guidance. Please be aware that in providing these
guidelines we make no indication that these items are the only maintenance or inspection required,
merely that they are important elements in the maintenance of your kart/s.
To carry out these inspections, a basic level of mechanical knowledge is required. If you are unsure or
do not possess the basic level of mechanical knowledge required, then you must have this work carried
out by a suitably qualified person. Contact your local Kart Distributor/Dealer for further information.
As this is a racing vehicle it is possible a collision may occur. If a collision occurs which results in
damage to any of the following assemblies or any of their components, then the damaged component/s
must be replaced and not repaired.
• Steering Assembly including Stub Axles, King Pins, King Pin bearings and Tie Rods
• Brake Assembly including pedal and cables
• Side Pods including Side Pod Bars
All items should be constantly inspected for possibilities such as cracks from fatigue or crash contact,
bending, seizing up, lubrication, normal wear and tear. Ensure all fasteners are tight and securely
fastened. Items showing damage or wear must be replaced.
2
Use & Safety Guide
Modification
Please note that under no circumstances does our Company authorise or recommend modifications
of any type whatsoever to Go Karts or components we produce. This includes any alternative methods
of assembly of any components. Any such alteration or modification performed is totally and solely
the responsibility of the person/persons carrying out the same.
Arrow Karts are designed strictly for racing purposes only, and not for any type of commercial and/
or rental use.
Protective Clothing
For your protection and safety when driving a Kart you must always wear the following:
•
•
•
•
•
•
Approved Safety Helmet
Driving Suit
Driving Gloves
Driving Boots
Ear Plugs
Also a neck brace is highly recommended
NEVER wear loose fitting clothes or scarves. If you have long hair, it must be contained in a hair net
to prevent being entangled in any moving parts.
Warranty/Guarantee
As this is a racing/competition vehicle no Warranty or Guarantee, either written or implied, exists.
NEVER drive your Kart on any public highway, freeway, street or road. Doing this is illegal and
extremely dangerous. If you decide to resell or pass on your Arrow Kart, it is your responsibility
to pass on all the Safety maintenance information to the next owner/operator. In the event of an
accident, failure to pass on this information may mean you are held legally responsible.
Finally, we wish you many hours of fun, excitement and enjoyable racing. These guidelines are to help
you make it as safe as possible.
Use & Safety Guide
3
CORNERING diagrams
Many of the problems and kart behaviours mentioned in this Guide refer to the kart ‘understeering’ or
‘oversteering’, and also to the different parts of a corner where the behaviour occurs. The diagrams
below graphically explain these terms and behaviours.
Exit
(out of turns)
Entry
(into turns)
Apex
Desired racing line
Desired racing line
Kart continues
on instead of
turning
UNDERSTEER is when the front of the kart slides
more than the rear, making the kart ‘push’
straight ahead instead of turning.
4
Turn-in
point
Rear of kart
slides out
OVERSTEER is when the rear of the kart slides
more than the front, requiring more steering
input to avoid the kart spinning out.
CORNERING DIAGRAMS
Rear Track
Problem: “There’s no traction/the kart is oversteering coming from the apex out of a corner”
Solution: Reduce the rear track width by 3mm on both sides at a time.
Problem: “The back slides/the kart oversteers going into the turns”
Solution: Increase the rear track width by 3mm on both sides at a time, being careful not to
exceed the maximum regulation width overall of 1400mm.
Problem: “There is understeer all the way through the turn”
Solution: Increase the rear track width by 3mm on both sides at a time, being careful not to
exceed the maximum regulation width overall of 1400mm.
Problem: “There is bounce in the rear”
Solution: Increase the rear track width by 3mm on both sides at a time, being careful not to
exceed the maximum regulation width overall of 1400mm.
Problem: “The track is very bumpy giving the kart a lot of bounce”
Solution: Increase the rear track width by 3mm on both sides at a time, being careful not to
exceed the maximum regulation width overall of 1400mm.
Problem: “The kart has a tendency to lift up on two wheels through the corners”
Solution: Increase the rear track width by 3mm on both sides at a time, being careful not to
exceed the maximum regulation width overall of 1400mm.
Note: 3mm is the easiest jump to make as most wheel hub spacers
(shown at right) have a minimum of 3mm.
Why?
Narrowing the rear track will make the rear bite into the track and sometimes provide more rear grip.
However, avoid continually narrowing the rear track to obtain more grip as you will find that only so
much grip can be obtained and you will then be upsetting the balance of the kart making it much more
unstable and difficult to drive. The same applies when increasing rear track.
REAR TRACK
5
Rear Track (continued)
Rear Track (overall width to outside of rear wheels)
Important: Rear track is one of the most important single variables on a kart chassis. Different
driving styles and different tracks will require different settings. The standard setting is the best
starting point and we suggest you vary the rear track by no more than 5mm each side per change.
It is a weird karting phenomenon, but nevertheless a fact that in certain conditions a wider rear track
will provide more grip and, in contrast, different conditions may see a narrower rear track provide
more grip. We believe rear track is more an aid in balancing the kart and suggest you be prepared to
experiment to search for your own best setting.
Note: There is a pattern that shows taller drivers require wider rear track, and shorter drivers narrower.
Rear track measurement – Overall width to outside edge of rear wheels...
‘Open’ type tyres (e.g. Dunlop DDS)
1395-1400mm
‘High grip’ SL type tyres (e.g. MG Yellow)
1390-1395mm
‘SL’ tyres (e.g. MG Red)
1375-1385mm
Low grip ‘SL’ tyres (e.g. Bridgestone YDS, Dunlop SL1)
1290-1320mm
Midget/Rookie (e.g. Dunlop SL1)
1100-1115mm
Note: The above settings are to give you a suggested starting point
6rear track
Front Track
Problem: “Understeer on turn-in to the apex of the corner”
Solution: Widen the front track by a 5mm wheel spacer at a time.
Problem: “Oversteer or very sensitive front steering causing the rear to slide.”
Solution: Narrow the front track width by a 5mm wheel spacer at a time.
Front Wheel Spacer Adjustment
Wheel Further Out (more spacers inside wheel)
For setting the front track width, a good
starting point is...
‘Open’ type tyres – One 20mm spacer
and one 5mm spacer on the inside of
each front wheel.
‘High grip’ SL type tyres – One 20mm
spacer on the inside of each front wheel.
‘SL’ tyres – One 10mm spacer and one
5mm spacer on the inside of each front
wheel.
Stub Axle
Spacers
Wheel
Wheel Further In (less spacers inside wheel)
Stub Axle
front track
Spacers
Wheel
Junior kart on ‘SL’ tyres – One 10mm
spacer on the inside of each front wheel.
Midget/Rookie – One 10mm spacer and
one 5mm spacer on the inside of each
front wheel.
Note: When tightening the front
wheels, you should tighten the
nut just enough so that there is
no lateral movement of the wheel
or wheel spacers on the stub axle
shaft, though the wheel spacers
should still be able to spin using
your fingers.
7
Tyre Pressures
It is imperative that your tyres do not overheat during a race, as they will lose grip and you will lose
speed!
We recommend that you ‘Hot Pressure’ your tyres at the end of each session (i.e check the tyre
pressure immediately at the end of a session) then adjust all of the tyres to the working hot pressure.
Below is an approximate cold & hot pressure guide. For specifics, contact your local dealer.
‘Open’ tyres – Cold 9-10 PSI – Hot 13 PSI
‘SL’ type tyres – Cold 12-14 PSI – Hot 15-16 PSI
‘Low Grip SL’ tyres – Cold 22-24 PSI – Hot 26-27 PSI
Note: Due to the many specifications and compounds of kart tyres on the market today, we
suggest you seek information from your kart dealer or the particular tyre distributor.
Rear Wheel Hubs
Problem: “Understeer from the apex and out of the corner and/or the rear of the kart feels
stuck to the track, making it slow off corners”
Solution: Replace the rear wheel hubs with shorter units.
Problem: “There’s no traction and/or the rear of the kart is sliding out under heavy braking
and/or oversteering coming from the apex out of a corner”
Solution: Replace the rear wheel hubs with longer units.
Why?
By increasing or decreasing the distance between the outside of the rear axle outer
bearings and the inside face of the rear wheel hub you are in fact increasing or
decreasing the amount of “working” axle. In other words, the length of axle between
the kart’s main chassis rails and the wheel assembly that is left clear to flex unhindered.
In the same way as altering the rear track width, reducing the amount of “working”
axle will make the rear bite into the track and sometimes provide more rear grip.
Instead of narrowing or widening the rear track, the ability of changing to longer
or shorter hubs is a major advantage in trying to obtain the ultimate kart balance.
Different length wheel hubs are available and these can be utilised to further finetune your kart’s handling to your individual liking.
8tyre pressures - rear wheel hubs
Rear Wheel Hubs (continued)
Note: If your Arrow is fitted with a 40mm axle the wheel hubs incorporate a unique design
with a wheel-locating insert. Fit the insert if you have your wheel hubs over the end of
the axle and remove the insert if you want to slide your wheel hubs further inwards for a
narrower rear track. Important: To remove the insert slide your wheel hub onto the axle
and tap the hub against the end of the axle until the insert falls out. When the insert is
fitted ensure it is fitted fully into the hub before fitting your wheel. If the insert is sitting
against the end of the axle and protruding from the wheel hub this will stop your wheel
from fitting correctly and will cause the wheel to come loose.
CRASH & sidepod Bar Adjustment
Problem: “Understeer from the apex and out of the corner and/or the rear of the kart feels
stuck to the track, making it slow off corners”
Solution: Loosen, but do not remove the bolt
at the front mounting point of both side-pod
supporting bars to the chassis.
Problem: “Lacking all round grip/bite into the track”
Solution: Tighten side-pod mounting bolts.
Side Pod Bars:
Have these tightened for most conditions. Loosening
these will reduce grip and can also assist in reducing
understeer.
Rear Crash Bar:
The rear crash bar must always be kept securely
tightened, unless using Arrow’s Rear Crash Bar
Loosening System. This unique system allows the
rear crash bar to be run ‘loose’ in order to reduce grip,
while maintaining safe attachment and complying with
racing rules.
Rear Wheel hubs - crash & sidepod bar adjustment
9
CRASH & SIDEPOD BARS (cont)
Front Crash Bar:
The bolts securing the front bar are best left firmly
tightened but do not over tighten. Loosening the front
bar will reduce the front steering/grip.
Note: If your kart has a front crash bar that also
has two vertical bolts holding it to the
front pedal bar, then be sure that these
remain firmly fastened at all times.
Front END Alignment
It is important to remember that all karts need to have a wheel alignment done prior to each new day
on the track.
The first stage to doing a front wheel alignment is making sure you’ve set the height of your kart’s
steering wheel to where you find it will be most comfortable. On Arrow karts, the upper plastic bush
on the steering shaft is height adjustable by the two holes at the top of the chassis steering shaft
support uprights and the two holes on the steering shaft bush. It can also be adjusted by rotating the
plastic bush upside-down.
Once you’ve done that, make sure the steering spade at the bottom of the steering shaft (where the
two steering tie rods are bolted on) is completely vertical. Now you are ready to do a front wheel
alignment, using either a ‘Sniper’ laser aligner or alignment bars.
1. Toe In/out
Toe in/out refers to the front wheels pointing in
towards each other (toe in) or outwards away from
each other (toe out) when viewed from above. Refer
to your kart setup specifications for the suggested
starting settings.
NOte: Excessive toe in or out may significantly
affect your kart’s top speed, as the
tyres will ‘drag’, acting like brakes.
10
Toe In
Toe Out
Crash & sidepod bar adjustment - FRONT END ALIGNMENT
Front End Alignment (cont)
2. Adjustable Ackerman
Problem: “The kart lacks steering into and through the middle of a corner”
(i.e. I need to turn the wheel excessively to steer through the corner)
Solution: Increase the amount of Ackerman by moving the tie rods to the inner mounting
holes on the stub axles. See Note below!
Problem: “The back slides/the kart oversteers from
the middle to the exit of turns (especially fast turns)”
Solution: Reduce the Ackerman setting by
moving the tie rods to the outer mounting holes
on the stub axles. See Note below!
Problem: “There is too much steering or bite on
turn-in”
Solution: Reduce the Ackerman setting by
moving the tie rods to the outer mounting holes
on the stub axles. See Note below!
In
Out
Forward
Back
NOTE: You must check and reset the frond end alignment after any adjustment to the Ackerman.
Why?
Adjustable Ackerman on the Stub Axles’ Steering Arms and Steering Column
Arrow karts are supplied with stub axle steering arms that offer up to six settings as to where the tie
rods can be bolted. Moving the tie rods inwards or outwards alters the amount of Ackerman being run
on the kart, while mounting the tie rods to the forward holes, if available, will speed up the steering
action (ie. more steering lock for less steering wheel movement, making the steering more sensitive).
Firstly, let’s explain how Ackerman works. If you take a piece of string 30cm long, and fix one end to a
table, at the free end make a mark at the tip then a second mark 5cm further in, 25cm from where the
string is fixed. The first mark you made represents the outside front tyre of your kart, the second mark
being the inside front tyre and the fixed end on the string being the fulcrum of the arc the kart is going
through in a corner. Keeping it tight, when you move the string straight off you’ll notice that the inside
front tyre is going through a smaller diameter arc than the outside tyre. All things being equal, the inside
front tyre needs to be turned more into the corner than the outside front, the principle used to achieve
Front End Alignment
11
Front End Alignment (cont)
this in a car or, in our case, kart is called Ackerman. The outside holes give almost parallel steering
meaning front wheels turn at almost the same rate one to the other. In using the inner hole offered on
each stub axle, the kart will have more Ackerman or, in other words, the more the inner stub axle will turn
in ratio to the outer stub, (or, if you like, the more the toe-out increases as the steering wheel is turned.)
On the track increasing Ackerman has the effect of increasing ‘turn-in’ of your kart. It forces the inside
front tyres to work more as well as increasing the mechanical chassis jack effect, or in other words
will increase the amount of lift off the track you’ll get with the inside back tyre through a corner while
at the same time increasing the mechanical grip of the outside back tyre. This is all good stuff but like
all good things in life too much can be bad!
On a track which offers a lot of fast sweeping corners with a fast corner leading onto the longest
straight, running a lot of Ackerman can reduce your top end speed. It’s like setting the kart with
toe-out where the front tyres become dragging front brakes. On a track with lots of ‘stop, turn, go’
180° type corners, lots of Ackerman will really help. The kart will change direction quickly without
overworking the outside front tyre while the engine will be helped on acceleration out of the corner
with the added chassis jacking offering a greater differential
effect (see ‘Height Adjustable Front Stub Axles’).
All Arrow karts offer adjustable Ackerman on the steering
column where the tie rods are bolted to the steering column
‘spade’. When supplied from the factory, the tie rods will be
bolted on at the bottom two holes of the spade. Bolting both
links into the upper holes will lighten the steering N.B. It will
very slightly make the steering less responsive and will need a
little more lock to achieve the same amount of steer.
3. Adjustable Camber and Caster
Central Caster
Maximum
Caster
Minimum
Caster
Negative Camber
12
Positive Camber
Front of Kart
CAMBER
CASTER
Front End alignment
Front End Alignment (cont)
Problem: “The back slides/the kart oversteers going into the turns”
Solution: If camber/caster adjusters are fitted on the kart, reduce the caster setting.
Problem: “There is too much steering or front end bite on turn-in”
Solution: If there are camber/caster adjusters in the kart, reduce the caster.
Problem: “There is understeer all the way through the turn”
Solution: If there are camber/caster adjusters in the kart, increase the caster.
Why?
Arrow karts are all supplied with camber/caster adjusting concentric king-pin locating washers as standard.
They come from the factory with the camber/caster set in the neutral position. By increasing caster you
increase front ‘turn-in’ grip, increasing steering response. Running full
caster in the wet is a must. In the dry, when looking for better steering
response and turn-in into corners, increasing caster is okay. But note,
too much caster will make for a very nervous kart on entry to corners
followed by power on understeer from the apex of the corner and out.
Front
Minimum Caster
Front
Neutral Caster
On many Arrow kart models there are three possible caster settings while
retaining the kart’s standard camber setting (see images at left):
• Minimum Caster – Both indicator lines facing to the back of the kart;
• Maximum Caster – Both indicator lines facing to the front of the kart;
• Central or Neutral Caster – Top indicator line pointing to the back
with the bottom indicator line pointing to the front of the kart.
Most new Arrow kart models feature caster adjustment on both the
top and bottom, allowing even greater adjustment range. Refer to the
following table for settings:
Neutral
Top
Front
Bottom
Double Minimum
Top
Front
Maximum Caster
Front End alignment
Back
■
■
■
Double Maximum
Bottom
Top
■
■
Bottom
Neutral
Top
Bottom
■
■
■
13
Front End Alignment (cont)
Note: Some Arrow kart models have only two caster settings:
Backward = Minimum & Forward = Maximum (see below)
Front
Front
Minimum Caster
Maximum Caster
Negative/Positive Camber
Negative camber is when the top of the tyre leans towards the centre of the kart. Using negative
camber will reduce the amount of steering response the kart has, and will give more rear grip.
Positive camber is when the top of the tyre leans away from the centre of the kart. Using positive
camber will help to give the kart more direct steering feel, and will also help to give the kart more
mechanical ‘jacking’ of the inside rear wheel.
By rotating the indicator lines towards the centre of the kart you will introduce increased positive
camber on the attached relevant front wheel, conversely by moving them away from the centre of the
kart you will increase negative camber (see below).
Negative
Front
Positive
Front
Negative
Minimum Caster
Positive
Negative
Front
Negative
Neutral Caster
Maximum Caster
Using Sniper alignment bars, the camber setting we recommend should be:
‘SL’ tyres: 0-2mm positive per side (meaning both front tyres should the same top to bottom, or
leaning out slightly at the top).
‘Open’ CIK Homologated tyres: 0-6mm negative per side (meaning both front tyres should be straight
up and down or up to a maximum of 6mm narrower at their tops than their bottoms).
14
Front End alignment
Height Adjustable
Front Stub Axles
Problem: “The front understeers on entry to 180° turns”
Solution: Raise the front ride height i.e. lower
the front stub axles in the chassis by one spacer
at a time
Problem: “The front understeers from the middle
to the exit of fast turns”
Solution: Lower the front ride height i.e. raise the
front stub axles in the chassis by one spacer at
a time.
Why?
Height adjustable front stub axles are an aid to achieving that ‘perfect’ kart set-up. What is being
achieved when the front stub axles are lowered or raised is raising and moving back or lowering and
moving forward the kart’s “centre of gravity” (c.o.g.).
When you lower the stubs in the frame you raise the kart’s front ride height. This raises the karts
c.o.g. as well as moving it further back. The effect on the kart will be to make it a little slower with
its immediate reaction on initial steering wheel input but from then on in the front will have more
grip into a corner’s apex. The effect of having moved the c.o.g. back will be to create more rear end
grip throughout the whole corner as well as making the rear of the kart sit flatter, especially from the
corner’s apex.
Be careful not to go too far when raising the front ride height. You might start feeling that your engine
is ‘going off’, losing mid-range pull out of the turns however the kart itself feels great. Wrong! What
is actually happening is that by going too high with the front ride height, the c.o.g. has been moved
too far back and is now making the kart sit too flat through the corner. By doing so, the kart is not
allowing any ‘chassis jacking’ or ‘differential effect’ i.e. not allowing the inside (unloaded) back wheel
to lift off the track through the corner’s apex, pulling the engine down as it tries to drive both the back
tyres which are mounted on a fixed axle yet are each trying to go through the corner at a different arc
to one other.
Note: By raising the stub axle in the chassis you lower the kart’s front ride height achieving
the reverse of the above.
At least one spacer must always remain above and below the stub axle.
height adjustable front stub axles
15
Seat Stays
Problem: “There’s no traction/the kart is
oversteering coming from the apex out of a corner”
Solution: Mount seat stays on either side of the
seat. In certain applications 2 sets of seat stays
can be fitted.
Problem: “The kart is unsettled over bumps”
Solution: Remove the seat stays.
Problem: “The kart is slow coming off corners, and is pushing from the rear”
Solution: Remove the seat stays.
Note: Additional seat stays are available which fix to the axle bearing flanges and the top
section of the seat. Running four seat stays will significantly obtain a lot more rear grip.
Adjustable/Removable
Torsion Bars and Clamps
Problem: “There’s no traction/the kart is oversteering coming from the apex out of a corner &
also on the entry into a corner”
Solution:
1. Running the rear torsion bar ‘full stiff’ (i.e.
with the blade of the torsion bar set vertically
to the track’s surface) will maximize rear
mechanical grip as well as reducing rear
chassis roll.
2. When karts are fitted with a removable side
torsion bar or are equipped with tensioning
bolts on the fourth rail, tighten the tensioning
bolts completely.
16seat stays - Adjustable/Removable torsion bars & clamps
Adjustable/Removable
Torsion Bars and Clamps (cont)
Problem: “There is understeer all the way through the turn”
Solution:
1. Turning the rear torsion blade bar towards
the horizontal position will reduce rear
mechanical grip while increasing rear chassis
roll. If the rear torsion bar is already ‘full soft’,
remove the bar completely.
2. In the case that they are fitted, remove the
tensioning bolts from the side torsion bar/
fourth rail. If the tensioning bolts are already
removed from the side torsion bar then
remove the torsion bar altogether from the
kart.
Note: We recommend that you do not use the rear or side torsion bars at all, unless all other
options have been attempted. The exception is the 125 Shifter Kart, in which case the
rear bar should almost always be kept in and ‘flat’.
Problem: “The kart oversteers, is too direct in the steering when entering corners”
Solution: Remove front clamp or torsion bar.
Problem: “The kart lacks initial steering and feels
vague in the front”
Solution: Tighten front clamp and/or insert front
torsion bar.
Note: As a general rule, fitting and/or tightening torsion bars or clamps will increase
mechanical grip, while removing and/or loosening them will reduce mechanical grip.
Adjustable/Removable torsion bars & clamps
17
Adjustable/Removable
Torsion Bars and Clamps (cont)
Why?
1. Removable Front Torsion Bars & Clamps
Removable front torsion bars and clamps affect the mechanical grip of the front tyres. Removing
the front torsion bar in your kart will decrease front-end mechanical grip.
2. Adjustable/Removable Side Torsion Bar (chassis fourth rail)
The tension bolts on the fourth rail on some karts are designed to allow adjustment to the stiffness
of the centre section of these chassis rails. Under normal track conditions this bolt should be left
in and done up tight. As a track offers more grip or as rubber goes down on the driving line, then
the bolt should be loosened until the point you can turn it freely with your fingers. If the track has
good grip with a lot of rubber on the driving line or if the track is very bumpy then the bolt and its
spacer should be removed from the kart altogether.
Some Arrow karts also provide the ability to remove the fourth rail/side torsion bar completely.
Having the side bar fitted in your Kart will normally provide more grip. Conversely, removing this
torsion bar will reduce grip.
3. Adjustable/Removable Rear Torsion Bar
The adjustable/removable rear torsion bar is a good tool in helping to create more grip in the back
of your kart. Some Arrow karts are supplied with this chassis-tuning feature. This allows you to
fine tune the chassis by increasing or decreasing rear end grip. Running the bar “full stiff” (i.e. with
the blade of the torsion bar set vertically to the track’s surface,) will maximize rear mechanical grip
as well as reducing rear chassis roll. Turning the bar towards the horizontal position will reduce
rear mechanical grip while increasing rear chassis roll. Removing the rear torsion bar completely
is the ‘free-est’ setting.
4. Centre Rail Torsion Clamp
In low to standard grip levels, removing the clamp will allow the kart to release better off the turn
and keep engine momentum up, but the kart will slide more. Fitting the clamp will provide more all
round grip to the kart, but exit speed off tighter turns will be lower.
In high grip conditions the chassis will already be flexing a lot more, therefore we recommend
fitting the clamp as it will provide more steering, better balance and the engine speed off the tighter
turns will be higher.
18
Adjustable/Removable torsion bars & clamps
Axle Bearing Adjustment
1.
Axle Bearing Adjustment
Problem: “The kart sits ‘flat’ on the exit of turns”
Solution: On Arrow karts using a 3 bearing rear
axle design, under certain conditions where
grip level is high, less grip may be achieved by
loosening the centre bearing. Remove the bolts
from the alloy bearing flange and loosely fit
cable ties through these holes.
NOTE: The results of this will change dependent
on the tyre you are running.
2.Height Adjustment of the Rear Axle
Problem: “The kart is two wheeling excessively through corners”
(i.e. both inside wheels are 10cm off the track surface)
Solution: Raise axle in chassis.
Problem: “The back slides/the kart oversteers
going into the turns”
Solution: Make sure the back axle is located full
down in the chassis (i.e. the kart with maximum
rear ride height)
Why?
With the Arrow karts that allow height adjustment of the rear axle, by raising the height of the rear
axle in the chassis you are lowering the rear ride height. In effect, this changes the ‘centre of gravity’
(c.o.g.) of your kart, which is lowered and moved back compared to when the axle is in its normal full
down position in the chassis.
Note: As a general rule the axle should always be left fully down in the chassis (if 2 positions are
available) or in the middle (if 3 positions are available) as the kart’s normal setting. Only
when track conditions start making the kart two-wheel excessively through corners, or
other options have been exhausted, should the axle be raised in the chassis.
axle bearing adjustment
19
Height Adjustment
of the rear axle
X1-Shifter, X1-CIK, X1E-CIK, X1-28C, AX9 125, AX9 CIK & AX9 B-MAX:
These karts feature Arrow’s unique cam adjusting ride-height adjustment system. Its user friendly
design makes it easy to set the ride-height for all conditions – here’s how...
1. Loosen engine clamp bolts, but do not remove the chain.
2. Loosen the seat stay bolts both at the top and the bottom.
3. Loosen all four bearing flange bolts on all three flanges.
Now you’re ready to adjust the ride-height. The Arrow range of karts comes standard in the central
ride-height position. This means that both of the cam-adjuster’s lines will be facing forward.
4. Take the Ride-height spanner.
5. To achieve ‘HIGH’ ride-height simply rotate the cam-adjusters so that both lines are facing
upward. To achieve ‘LOW’ ride-height, continue the rotation until the lines are facing downward.
‘HIGH’ Ride Height
‘CENTRAL’ Ride Height
‘LOW’ Ride Height
Note: When the cam adjuster line is pointing fully down it will hit a stopper. This will indicate
that it has reached its lowest ride-height point. The same will occur when the adjuster is
turned fully toward the front, this indicates that the axle is in the ‘true’ central position.
6. Tighten all axle flange bolts, leaving the centre bearing to last.
7. Tighten all of your seat stay bolts, beginning with the lower one’s.
8. Adjust your chain tension & then tighten the engine clamp bolts.
Note: The cam-adjuster bolt should remain tight enough not to move, yet loose enough so that
with the ride-height spanner you can still rotate the adjuster. This bolt has no effect on
retaining the bearing flange in the hanger.
20height adjustment of rear axle
axles & Wheels
AXLES
There are many different types of axles available for your
Arrow kart. Each of these will cause a different sensation
and will affect the way the kart handles on entry, in the
middle and on the exit of a turn. Your job, depending on
the track conditions, will be to decipher which axle suits
both your driving and the track conditions.
Below are some examples of what they will do. Keep in
mind that starting in the middle or ‘medium’ is often the
best place.
Diameter
Wall Thickness
50mm
HARD – Best suited to cold, low grip situations.
MEDIUM – Workable in most racing conditions.
SOFT – Provides less grip than the above two, although can be beneficial if the kart is slow exiting
corners due to excessive grip.
EXTREME SOFT – This is an axle which is ‘way off the scale’. Be careful not to drive your grub screws
through it when installing! This axle is best suited to high grip tyres, though some independent testing
should be carried out to see how it works for you.
NOTE: Always check the grub screws after each session
40mm
HARD – Best suited to cold, low grip situations.
MEDIUM – Workable in most racing conditions.
SOFT – Provides less grip than the above two, although can be beneficial if the kart is slow exiting
corners due to excessive grip.
EXTRA SOFT (2mm) – This axle has a 2mm wall thickness and, although it is next in the line of axles, it
can have varied effects depending on track condition due to its wall thickness. It can be a very good
axle in high grip SL racing situations.
EXTREME SOFT – This is not as ‘extreme’ as the 50mm version. It has limited uses, though high grip
situations are where it will work best. Some independent testing should be carried out to see how it
works for you.
AXLES & WHEELS
21
axles & wheels (cont)
30mm
SOLID – Mainly used in Hire Kart applications, this axle will make the kart extremely stiff, possibly
generating a lot more grip and is generally not very user friendly.
THICKWALL – Mainly used in cold, slippery conditions, it offers more rear grip than the thinwall version.
THINWALL – This is the standard 30mm axle. It suits most racing conditions and generally makes
setup of the rest of the kart quite easy.
EXTREME SOFT – This is a good axle for relieving the rear of the kart of grip. It allows the kart to release
off of corners better. Also, in some cases, it can create more grip in SL harder tyre classes.
25mm
SOLID – This axle is rarely used (unless it is mandatory in Cadet racing under some associations),
through advances in technology, the 30mm thinwall axle has basically taken over its place.
MAGNESIUM VS ALLOY WHEELS
Alloy wheels are stiffer than magnesium wheels and because of this they tend to generate more
mechanical grip. For instance, if you had four alloy wheels fitted and the back of the kart had too much
grip and was starting to overpower the front, then fitting magnesium wheels on the rear only would
be a viable option to reduce rear end grip.
SOFT TYRES AND/OR HOT WEATHER: Generally use magnesium wheels.
HARD TYRES AND/OR COLD WEATHER: Generally use alloy wheels.
22
AXLES & WHEELS
Seat – Fit and Position
How to fit a seat correctly...
Picking a seat that fits you correctly and fitting it into your kart are two very important operations that
will affect the performance of the kart. Firstly, make sure the seat fits you well. We recommend the
Kartech RT (for ‘SL’ type tyres) or Kartech RT Stiff (for high grip ‘SL’ or ‘Open’ type tyre) seats. Place
the chosen seat on the floor and sit in it with your legs out flat and arms held out as if you were in your
kart and driving it. You should fit all the way down into the seat. The seat should firmly hold your hips,
while you must be able to place your flat hand in between the seat and your rib cage without using
force. With an Arrow kart, once you’ve got the correct seat, depending on its size and the model Arrow
kart you’re fitting it in to, the Seat Position diagram and chart included with this Manual (if buying
a new kart) will help you ascertain the correct measurements you’ll need, or refer to our website at
www.arrowkarts.com.
When fitting a seat in your kart, it is essential that the frame is not stressed or forced in order to
tighten up the seat fixing bolts. Arrow offers a range of seat spacers that help making the job of
fitting a seat easy. Make sure you use a large diameter seat washer against each side of the seat; a
very important must in spreading cornering loads. Using Arrow spacers, we suggest using the Arrow
self aligning seat spacers combined with a mixture of the 7mm plastic spacer with the 7mm & 12mm
aluminium seat washers, as needed, plus the Arrow plastic seat “wedge”. It is important that only a
maximum of one plastic 7mm seat spacer plus the plastic seat wedge is used on each side of the seat.
The plastic seat wedge, once fitted, should be rotated to provide good alignment between the seat and
seat bracket surfaces.
As an example, on an Arrow kart we recommend:
Against the seat: Large o.d. washer
Next: Arrow self aligning seat washers ( aluminium ).
Next: 7 or 12mm alum. spacer as required*,
Next: 1 x 7mm plastic spacer if required*,
Next: plastic seat wedge.
Under the front of the seat only plastic seat spacers
should be used as packing between the seat and the
welded chassis mounting tabs in obtaining the correct
relevant measurements.
seat - fit and position
23
Weighting the Kart
Lead ballast should be securely fastened to the sides,
rear or underneath of the seat. The best place for the
majority of your lead ballast is underneath the seat at
the front (Crotch area). Do not add ballast to any other
part of the kart chassis. A driver with a light body weight
may achieve better handling by fastening ballast as high
as possible on the seat. Adding a significant amount
of ballast can have a marked affect on the handling of
the kart. It may be necessary to test different mounting
positions for the ballast.
NOTE: Try not to mount lead on the rear of the seat as it gives the effect of moving the seat back
Wet Weather
Wet Tyres (hard compound SL):
• Front Track: Move front wheels out as far as possible.
• Rear Track: Leave as per your dry setting or move hubs inwards 10mm each side.
Narrowing the rear track too much will result in front understeer.
• Caster Adjustment: If time permits, adjusting to maximum caster (indicator lines to front of kart)
will reduce understeer.
• Tyre Pressure: Extreme wet conditions:
Moderate wet conditions:
Drying conditions:
30–35psi
20–25psi
15–20psi
2.00–2.35kg/cm2
1.35–1.70kg/cm2
1.00–1.35kg/cm2
Wet Tyres (soft compound):
• Front Track: Move front wheels out as far as possible.
• Rear Track: Leave as per your dry setting or move hubs inwards 10mm each side. Narrowing the
rear track too much will result in front understeer.
• Caster Adjustment: If time permits, adjusting to maximum caster (indicator lines to front of kart)
will reduce understeer.
• Tyre Pressure: Front:
Rear:
24
12psi
14psi
0.80 kg/cm2
0.95 kg/cm2
Weighting the kart - WET WEATHER
Brake Adjustment
1. Pad Wear Adjustment
Problem: “The engine has no top end speed”
Solution: Verify the brakes are not dragging. If needed,
increase the gap between the rear brake pads and the
disc by removing shims between the caliper piston and
the brake pad.
Problem: “Excessive pad clearance between each pad and
the disc” (Pad adjustment is necessary when the clearance
between each pad and the disc exceeds 3mm)
Solution: Reduce the gap between the rear brake pads and the disc by fitting a shim
between the caliper piston and brake pad. You must do this on both sides to ensure pad
clearance to the disc is equal. Remove the pad safety pins and fit a shim between the caliper
piston and the brake pad. Refit the safety pins. You can fit additional shims as the pads wear
more, however, ensure you do not fit too many shims as this could cause the pad return
springs to spring bind and this will seriously affect your brake performance. Should you
encounter difficulty fitting the shims then remove the four pad return bolt/springs, fit the
shim and refit the return bolt/springs.
Note: The minimum clearance between each pad and the disc should be 1.5mm.
2. Pedal Pressure Adjustment
Problem: “Brake pedal pressure does not suit my driving style”
Solution: On the pedal there are three positions available for
the brake actuating linkage. The higher up the brake pedal you
mount the actuation linkage, the more pedal pressure that will
be required. The lower the linkage is mounted on the brake
pedal, the more sensitive the brakes become with less pedal
pressure being required. On the master cylinder there are two
positions available for mounting the brake actuation linkage. The higher the linkage is
mounted, the more sensitive the brakes will be, while requiring less pedal pressure.
BRAKE ADJUSTMENT
25
Adjustable Brake Balance Bar
(as fitted on kart models with front brakes)
Problem: “Too much front end bite on turn-in” (steering wheel tries to rip from your hands)
Solution: On karts fitted with front brakes, adjust the brake bias to increase rear braking.
The brake balance bar on karts with front brakes allows you to regulate the percentage of braking done
between the front and rear wheels. The balance bar distributes the brake pedal movement transmitted
to the front brake’s and the rear brake’s master cylinder pumps. The first way of adjusting the brake bias
is to do it when the kart is on the kart stand. Adjust the brake balance bar into a position where, with
pressure applied on the brake pedal, both front and rear wheels can just be turned by hand.
Note: We recommend turning the knob right in and then back out six whole turns.
Brake Maintenance
1. On Arrow karts fitted with nylon hydraulic brake lines, always check that the spring nut brake
line protection fitting is done up tight.
These Spring nuts are fitted at both ends of each
brake line to help protect the tubing from accidental
crimping. To do their job properly they must always
be done up tight. It is therefore essential that they
are checked each day before using your Arrow.
They have left hand threads so must be turned anticlockwise to be tightened.
2. Always check the feel of the brake pedal making
sure it feels hard without any sponginess.
If the pedal does feel a little spongy, bleed the system only using racing Dot-4 grade hydraulic brake
fluid. Before attempting to bleed the brake, retract the dust boot on master cylinder to check if the
piston is against the circlip (adjust the pushrod if necessary). To bleed the brake, depress master
cylinder lever. Whilst keeping pressure on the lever, open the bleed screw in the brake caliper. Keep
pressure on the master cylinder lever until the bleed screw is tightened. Release the lever. Repeat this
process while maintaining the reservoir fluid level, until the new fluid has been flushed through the
system. Repeat for other side of the caliper. If, having done this, the brake pedal still feels spongy,
check for leaks. As a safety check, make sure the pad retaining bolts are tight. We do check them at
the factory but double-checking never hurt anyone. Not checking might!
NOTE: Do not use Silicon brake fluid!
26
ADJUSTABLE BRAKE BALANCE BAR - BRAKE MAINTENANCE
Brake Maintenance (cont)
Note: After a period of 3 months it is recommended you replace the brake fluid by re-bleeding.
Whilst bleeding the brake, ensure the fluid level does not drop. Ensure pad adjustment
is kept within tolerance given. Lack of adjustment will result in calliper piston and bore
wear becoming excessive, and leakage occurring.
3. Ensure the master cylinder lever always has free play. If the brake rod is adjusted in such a way
that no free play exists and the master cylinder lever has pressure on it (preventing the master
cylinder from returning) adjust either your pedal stop or brake rod length.
4. Your brake system should be overhauled every 6 months. The system should be stripped, washed
in water or methylated spirits, new seals fitted and re-bled. Your kart dealer can overhaul your
brake if you are unable. “Don’t wait for a failure – preventative maintenance is much wiser.”
5. Arrow karts are supplied with brake pads developed over many years of extensive testing. Don’t
use substitutes as they could affect your brake disc and result in poor braking performance. The
correct part numbers are BDHL7, BDHL7X or BDHL5.
6. When your kart is new or whenever you fit new brake pads ensure you follow this ‘bedding-in’
procedure. Correct bedding-in improves pad life and braking performance.
Drive kart slowly for 2-3 laps dragging the brake until they are extremely hot and are about to
fade. Now continue driving slowly, without touching the brakes, allowing them to cool.
After this you can drive at race pace.
BRAKE MAINTENANCE
27
‘Blue Printing’
Your Arrow Racing Kart
Arrow karts are highly sensitive machines. As you will soon find out, even the slightest of adjustments
can make the biggest of differences to the way the kart handles. These adjustments will have a very
large impact on the final results of your race weekend.
It is because of these factors that we have taken it upon ourselves to search for anything that could
contribute to making our karts and you both faster and more user friendly, we are hopeful that because
of this attention to detail that you ultimately get the results that you deserve.
Reducing unnecessary strain on components
Affixing Front Crash Bar
1. Tighten ‘lower’ bolts through
chassis on both sides.
2. Tighten bolts in upright of front
crash bar.
1
3
3. Tighten ‘upper’ bolts to tabs on
chassis on both sides.
2
Affixing Steering Upright & Column
1. Tighten the steering upright’s
bottom two bolts.
2. Tighten the steering bush bolt.
3. Tighten nyloc nut at the bottom
of the steering column (from
underneath).
28
2
1
3
1
‘Blueprinting’ your arrow racing kart
‘Blue Printing’
Your Arrow Racing Kart (cont)
Affixing Side Pod Bars
Always tighten the rear bolt first as
the front hole is slotted.
1
2
Proper fitment & Alignment of Rear Axle Flanges & Axle
1. Firmly tighten both the far left & far right bearing flanges into their respective bearing hangers.
2. Slide axle through L/H flange, right up to the face of R/H bearing. Now wiggle axle front to back
& left too right, for proper alignment, it should move in each direction equally, relative to the
bearing. Now remove axle & repeat from the opposite side. You should now be able to slide the
axle freely between the two bearings.
3. Loosely put the third bearing into position and do the bolts up only finger tight. Now slightly
knock the top of the flange towards the left hand side of the kart.
4. Tighten the TOP two
bolts of the flange
first, followed by the
bottom bolt/s. Now
back each bolt off
slightly so as you can
spin them with the
spanner, but leave
them tight enough so
that they DO NOT MOVE left to right. Lightly tap the top of the bearing flange back towards the
right hand side of the kart. Whilst you are doing this you must continuously try to push the axle
through the flanges. Soon the axle will move freely, but if you hit the flange too hard it may bind
up again, in which case you will have to knock it back to the left again.
5. Now that the axle moves freely between all three flanges you can tighten the third bearing firmly.
6. Be sure when inserting axle that both ends protrude from the bearing by exactly the same amount.
‘Blueprinting’ your arrow racing kart
29
Fitting Tyres
Fitting tyres will depend upon the class the kart is being assembled for. When inflating the tyre to seat
the bead, do not over inflate. There is a very real risk of serious injury if the manufacturer’s advice
printed on the sidewall of all tyres is not followed. To aid the seating of the bead a light coating of soap
applied before inflation and using external steel tyre rings around the tyre will help. Ensure all tyres
are wiped after this process and check for any damage or defects before placing the tyre on the kart.
Note: Using the Kartech Adjustable External
Steel Tyre Ring is important as a safety
issue as well as for performance. It
reduces the amount of pressure
required to seat the tyre’s bead onto
the rim. Apart from the obvious
safety advantage, this stops the
tyre from being stretched out of
circumference or shape.
30
FITTING TYRES
Owner Registration Card
✂
Important:
This card must be filled out by the Kart Dealer selling the kart and forwarded
to Arrow Karts Pty Ltd.
It is essential this registration card is on file should any queries
require future attention by Arrow Karts.
Kart Dealer Name
_______________________________________________________________________________________
Owners Name
_______________________________________________________________________________________
Address
_______________________________________________________________________________________
Owner’s Phone Number Business ( _________ ) ___________________________________________________________
A/Hours ( _________ ) ___________________________________________________________
Age of owner
7–15
16–20
21–25
26–30
31–35
36+
Number of years karting
_______________________________________________________________________________________
Date Kart Purchased _________________________________ Chassis Number ___________________________________
Class in which the kart will be raced _________________________________________________________________________
Has the purchaser owned an Arrow Kart previously _____________________________________________________
(If so, which model/s)
What other brand of kart has the owner previously owned ____________________________________________
Please remove this card and return to: Arrow Karts
57-59 Nantilla Road
North Clayton VIC 3168 Australia
OWNer Registration Card
31
gear ratio chart
9
10
11
12
13
14
64
7.11
6.40
5.81
5.33
4.92
4.57
65
7.22
6.50
5.90
5.41
5.00
4.64
66
7.33
6.60
6.00
5.55
5.07
4.71
67
7.44
6.70
6.09
5.58
5.15
4.78
68
7.55
6.80
6.18
5.66
5.23
4.85
69
7.66
6.90
6.27
5.75
5.30
4.92
70
7.77
7.00
6.36
5.83
5.38
5.00
71
7.88
7.10
6.45
5.91
5.46
5.07
72
8.00
7.20
6.54
6.00
5.54
5.14
73
8.11
7.30
6.63
6.08
5.62
5.21
74
8.22
7.40
6.73
6.16
5.69
5.28
75
8.33
7.50
6.82
6.25
5.77
5.35
76
8.44
7.60
6.91
6.33
5.85
5.42
77
8.55
7.70
7.00
6.42
5.92
5.50
78
8.66
7.80
7.09
6.50
6.00
5.57
79
8.77
7.90
7.18
6.58
6.08
5.64
80
8.88
8.00
7.27
6.66
6.15
5.71
81
9.00
8.10
7.36
6.75
6.23
5.78
82
9.11
8.20
7.45
6.83
6.31
5.85
83
9.22
8.30
7.54
6.92
6.38
5.92
84
9.33
8.40
7.64
7.00
6.46
6.00
85
9.44
8.50
7.73
7.08
6.54
6.07
86
9.55
8.60
7.82
7.17
6.62
6.14
87
9.66
8.70
7.91
7.25
6.69
6.21
88
9.77
8.80
8.00
7.33
6.77
6.28
89
9.88
8.90
8.09
7.42
6.85
6.35
90
10.00
9.00
8.18
7.5
6.92
6.42
91
10.11
9.10
8.28
7.58
7.00
6.50
92
10.22
9.20
8.36
7.66
7.07
6.57
93
10.33
9.30
8.50
7.55
7.15
6.64
Gear Ratio Chart
33
suggested maintenance schedule
Item Every Race Meeting After
After After 1 Meet 3 Meets 5 Meets 1 Season
or
or
or
or
Running Every
As In
Run
100km 300km 500km Req’d 1,000km Remarks
Axle Inspection
•
•
Axle Bearing:
Inspection
Retighten
Replacement
•
•
•
•
•
Bearing Grub Screws:
Inspection
Retighten
•
•
•
•
Bolts & Nuts:
Retighten
•
•
Brakes:
Retighten
(spring nut brake
line protection)
•
Refer to brake
maintenance section
on page 19
Inspection (disc)
•
•
Inspection
(pad clearance)
Inspection
(fluid leaks)
Inspection
(brake fluid level)
Inspection
(brake response)
Retighten
Replacement
(brake pads)
•
•
•
•
•
Replacement
(brake fluid)
Brake Disc Hub
Cables:
Inspection
(brake cable)
Inspection
(throttle cable)
Replacement
Torque: 5Nm
(0.5m.kg, 3.6ft.lb)
•
Runout Limit
1mm (0.04”)
Clearance to disc
2.0mm maximum
•
•
•
•
•
Refer to Brake section.
Max. pad wear before
replacement 4mm
•
•
•
•
•
•
•
Lubricate threads
•
Chain:
Inspection
Lubricate
Replacement
•
•
Chain Guard:
Inspection
Replacement
•
•
•
•
•
•
Item Every Race Meeting After
After After 1 Meet 3 Meets 5 Meets 1 Season
or
or
or
or
Running Every
As In
Run
100km 300km 500km Req’d 1,000km Remarks
Chassis, including all welds:
Inspection
•
•
Cleaning
•
•
Drive Sprockets:
Inspection
Replacement
•
•
Engine:
Engine Mount Clamps:
Retighten
Inspection
(red nylon inserts)
•
Refer to Owners Manual Maintenance Schedule
•
•
•
Fuel line/Fuel tank:
Inspection (tank)
•
•
Inspection (hose)
Cleaning (tank)
Replacement (hose)
•
•
•
•
Sprocket Hub:
•
•
•
•
Steering System:
Inspection 1
(movement)
Inspection 2
(damage)
Retighten
King Pins
Wheels/Tyres:
Air pressure
Inspection (wheels,
inc. bearings)
Inspection
(rear wheel hubs)
Retighten (wheels)
Replace (wheels)
Replace (tyres)
Replace after 5
race meetings
Check inside tank that
fuel pickup has not
come adrift from the
outlet fitting
•
•
Lubricate threads
•
•
•
•
•
•
Inspection
(tie rod ends)
Rear Bumper:
Inspection
Retighten
Immediately following
any crash/contact
Must be tight, but do
not overtighten.
Replace if movement
of stub on king pin
is evident
Replace if worn
•
•
•
•
•
Immediately following
any crash/contact
•
•
•
•
•
•
•
•
Lubricate threads
•
•
Troubleshooting
question & answer index
PROBLEM
HANDLING:
Rear grip (lack of)
POSSIBLE SOLUTION/S
PAGE
Axle Bearing Adjustment ___________________________________________________ 19
Rear Track Adjustment ______________________________________________________ 5
Seat Stays ______________________________________________________________________ 16
Adjustable/Removable Torsion Bars & Clamps _ _____________________ 16
Seat - Fit & Position _ ________________________________________________________ 23
Rear end ‘bounce’
Rear Track Adjustment ______________________________________________________ 5
Kart is ‘two wheeling’ excessively
Height Adjustment of Rear Axle __________________________________________ 20
Rear Track Adjustment ______________________________________________________ 5
OVERSTEER – General
Front Track Adjustment _____________________________________________________ 7
OVERSTEER – into turns
Height Adjustment of Rear Axle __________________________________________ 20
Height Adjustable Front Stub Axles _ ____________________________________ 15
Adjustable Ackerman ________________________________________________________ 11
Adjustable Camber/Caster _ ________________________________________________ 12
Tyre Pressures _________________________________________________________________ 8
OVERSTEER – out of turns
Rear Track Adjustment ______________________________________________________ 5
Seat Stays ______________________________________________________________________ 16
Adjustable/Removable Torsion Bars & Clamps _ _____________________ 16
Seat - Fit & Position _ ________________________________________________________ 23
UNDERSTEER – into turns
Front Track Adjustment _____________________________________________________ 7
Rear Track Adjustment ______________________________________________________ 5
Tyre Pressures _________________________________________________________________ 8
UNDERSTEER – through turns
Adjustable Camber/Caster _ ________________________________________________ 12
Rear Track Adjustment ______________________________________________________ 5
Adjustable/Removable Torsion Bars & Clamps _ _____________________ 16
Tyre Pressures _________________________________________________________________ 8
UNDERSTEER – out of turns
Crash & Sidepod Bar Adjustment ________________________________________ 9
Tyre Pressures _________________________________________________________________ 8
Seat - Fit & Position _ ________________________________________________________ 23
Rear Wheel Hubs _____________________________________________________________ 8
Steering – too much bite on turn-in
Height Adjustable Front Stub Axles _ ____________________________________ 15
Adjustable Ackerman ________________________________________________________ 11
Adjustable Camber/Caster _ ________________________________________________ 12
Tyre Pressures _________________________________________________________________ 8
Adjustable Brake Balance Bar _____________________________________________ 26
BRAKES:
Brake Pads – excessive clearance
Brake pedal pressure
ENGINE:
Lacks top end speed
Lacks mid range
Brake Pad Adjustment _______________________________________________________ 25
Pedal Pressure Adjustment ________________________________________________ 25
Brake Pad Adjustment _______________________________________________________ 25
Tyre Pressures _________________________________________________________________ 8
Adjustable Ackerman ________________________________________________________ 11
36troubleshooting index
This guide is intended as a general handling and setup guide
for all karts, as well as being an Owner’s Manual for the
Arrow range of karts. For more information on Arrow karts,
visit the web site at www.arrowkarts.com
Your Arrow Karts dealer is:
www.arrowkarts.com