1
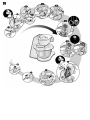
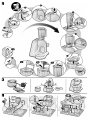
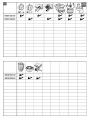
MUM52.. AU MUM56.. AU en Operating instructions en Contents For your safety . . . . . . . . . . . . . . . . . . . . . . 2 Overview . . . . . . . . . . . . . . . . . . . . . . . . . . 3 Operating the appliance . . . . . . . . . . . . . . . 4 Cleaning and servicing . . . . . . . . . . . . . . . . 7 Storage . . . . . . . . . . . . . . . . . . . . . . . . . . . 7 Troubleshooting . . . . . . . . . . . . . . . . . . . . . 8 Application examples . . . . . . . . . . . . . . . . . 8 Disposal . . . . . . . . . . . . . . . . . . . . . . . . . . . 9 Warranty conditions . . . . . . . . . . . . . . . . . . 9 Optional accessories . . . . . . . . . . . . . . . . . 10 `çåÖê~íìä~íáçåë=çå=íÜÉ=éìêÅÜ~ëÉ=çÑ=óçìê= åÉï=_lp`e=~ééäá~åÅÉK få=ÇçáåÖ=ëçI=óçì=Ü~îÉ=çéíÉÇ=Ñçê=~=ãçÇÉêåI= ÜáÖÜJèì~äáíó=ÇçãÉëíáÅ=~ééäá~åÅÉK vçì=Å~å=ÑáåÇ=ÑìêíÜÉê=áåÑçêã~íáçå=~Äçìí=çìê= éêçÇìÅíë=çå=çìê=ïÉÄ=é~ÖÉK This appliance is designed for processing normal household quantities in the home or similar quantities in non-industrial applications. Non-industrial applications include e.g. use in employee kitchens in shops, offices, agricultural and other commercial businesses, as well as use by guests in boarding houses, small hotels and similar dwellings. Use the appliance for processing normal quantities of food for domestic use. Do not exceed the stipulated maximum quantities. Please read the operating instructions carefully and keep them in a safe place. If the instructions for correct use of the appliance are not observed, the manufacturer’s liability for any resulting damage will be excluded. If passing on the appliance to a third party, always include the operating instructions. The operating instructions describe several models, see also overview of models (Fig. ). The appliance is maintenance-free. For your safety General safety instructions oáëâ=çÑ=ÉäÉÅíêáÅ=ëÜçÅâ> Connect and operate the appliance only in accordance with the specifications on the rating plate. Only use indoors. Do not use the appliance if the power cord and/or appliance are damaged. Keep children away from the appliance. 2 Do not allow persons (also children) with restricted physical sensory perception or mental abilities or with lack of experience and knowledge to operate the appliance unless they are supervised or have been instructed in the use of the appliance by somebody who is responsible for their safety. Always pull out the mains plug after using the appliance, before cleaning the appliance, before leaving the room or if a fault occurs. Do not leave the running appliance unattended. Do not place the power cord over sharp edges or hot surfaces. To prevent injury, a damaged power cord must be replaced by the manufacturer or his customer service or a similarly qualified person. Only our customer service may repair the appliance. Safety instructions for this appliance Keep hands clear of rotating parts. For reasons of safety the appliance may only be operated when unused drives have been covered with drive guards (6, 9). Do not adjust the swivel arm while the appliance is switched on. Wait until the drive has come to a standstill. Do not immerse the base unit in water or clean under running water. Use the appliance with original accessories only. When using the accessories, follow the enclosed operating instructions. Use only one tool or accessory at any one time. Use only the rotary switch to switch the appliance on or off. Important information Do not change tool/accessory until the drive is at a standstill – when the appliance is switched off, the drive continues running briefly. Safety systems Start lock-out See “Operating positions” table. The appliance can be switched on in pos. 1 and 3 only: – when the bowl (11) has been inserted and turned until it locks into place and – the blender drive cover has been attached (9). Restart lock-out If the power is interrupted, the appliance remains switched on but the motor does not start running again when the power is restored. To switch the appliance on again, turn the rotary switch to 0/off, then switch on. Robert Bosch Hausgeräte GmbH en Overload protection If the motor switches itself off while the appliance is being used, the overload protection feature has been activated. A possible cause may be that too much food was processed at one time. If a safety system is activated, see “Troubleshooting”. Explanation of the symbols on the appliance or accessory Follow the instructions in the instructions for use. Caution! Rotating blades. Caution! Rotating tools! Do not put fingers in the feed tube. Overview Please fold out the illustrated pages. Fig. Base unit 1 Release button 2 Swivel arm “Easy Armlift” function to support the upward movement of the arm (see “Work positions”). 3 Rotary switch When the appliance has been switched off (position 0/off), the appliance runs automatically to the optimum position for changing the tools. MUM52..: 0/off = Stop M = Pulse switch at maximum speed, grip switch for required blending duration. Settings 1–4, Operating speed: 1 = low speed – slow, 4 = high speed – fast. MUM54../MUM56..: 0/off = Stop M = Pulse switch at maximum speed, grip switch for required blending duration. Settings 1–7, Operating speed: 1 = low speed – slow, 7 = high speed – fast. Robert Bosch Hausgeräte GmbH 4 On/Off display (MUM54../56..) Is lit while the appliance is operating (rotary switch on M or 1–7). Flashes if the appliance has been operated incorrectly, the electronic fuse has tripped or the appliance is defective – see section entitled “Troubleshooting”. 5 Drive for – continuous-feed shredder and – citrus press (special accessory *). When not in use, attach the drive cover. 6 Drive cover To remove the drive cover, press on the rear area and remove cover. 7 Drive for tools (stirrer, whisk, kneading hook) and mincer (special accessory *) 8 Drive for blender (special accessory *) When not in use, attach the blender drive cover. 9 Blender drive cover 10 Cord store MUM52../MUM54..: Stow the cord in the cord store. MUM56..: Automatic cord winder Bowl with accessories 11 Stainless steel stirring bowl 12 Lid Tools 13 Stirrer 14 Whisk 15 Kneading hook with dough deflector 16 Accessories bag For storage of the tools and cutting discs. Continuous-feed shredder 17 Pusher 18 Cover with filling shaft 19 Cutting discs 19a Reversible slicing disc – thick/thin 19b Reversible shredding disc – coarse/fine 19c Grating disc – medium-fine 20 Drive shaft 21 Housing with outlet opening Blender * 22 Blender jug 23 Lid 24 Funnel * If an accessory is not included in the product package, it can be purchased via the trade or customer service. 3 en Fig. Operating positions ^ííÉåíáçå> _ÉÑçêÉ=çéÉê~íáåÖ=íÜÉ=~ééäá~åÅÉI=~íí~ÅÜ=íÜÉ=íççäL ~ÅÅÉëëçêó=íç=íÜÉ=ÅçêêÉÅí=ÇêáîÉ=~åÇ=áå=íÜÉ=ÅçêêÉÅí= éçëáíáçå=~åÇ=éä~ÅÉ=áå=íÜÉ=çéÉê~íáåÖ=éçëáíáçå= ~ÅÅçêÇáåÖ=íç=íÜáë=í~ÄäÉK qÜÉ=ëïáîÉä=~êã=ãìëí=ÄÉ=ÉåÖ~ÖÉÇ=áå=ÉîÉêó= çéÉê~íáåÖ=éçëáíáçåK Note The swivel arm features an “Easy Armlift” function which supports the upwards movement of the swivel arm. Selecting the operating position: Press the Release button and move the swivel arm. Support movement with your hand. Move the swivel arm until it engages in the required position. Position 1 2 3 Drive MUM52.. MUM54.. MUM56.. 1–4 1–7 1–4 1–7 1–2 1–3 – – 2–4 3–7 2–4 3–7 8 3–4 5–7 7 3–4 5–7 7 7 * 5 4 * Insert/remove whisk, stirrer or kneading hook. Add large quantities of ingredients. 4 Operating the appliance oáëâ=çÑ=áåàìêó> aç=åçí=áåëÉêí=ã~áåë=éäìÖ=ìåíáä=~ää=éêÉé~ê~íáçåë= Ñçê=ïçêâáåÖ=ïáíÜ=íÜÉ=~ééäá~åÅÉ=~êÉ=ÅçãéäÉíÉK ^ííÉåíáçå> aç=åçí=çéÉê~íÉ=íÜÉ=~ééäá~åÅÉ=ïáíÜçìí=~å= ~ÅÅÉëëçêóLíççä=áå=íÜÉ=çéÉê~íáåÖ=éçëáíáçåK aç=åçí=çéÉê~íÉ=íÜÉ=~ééäá~åÅÉ=ÉãéíóK= aç=åçí=ÉñéçëÉ=~ééäá~åÅÉ=çê=~ÅÅÉëëçêáÉë=íç=ÜÉ~í= ëçìêÅÉëK=m~êíë=~êÉ=åçí=ãáÅêçï~îÉJë~ÑÉK Before operating the appliance and accessories for the first time, clean thoroughly; see “Cleaning and servicing”. Important information In these instructions for use the recommended reference values for the operating speed refer to appliances with a 7-setting rotary switch. For appliances with a 4-setting rotary switch you can find the values in brackets after the values for a 7-setting rotary switch. These instructions for use contain a sticker with reference values for the operating speed of the appliance when using the tools or accessories. We recommend attaching this sticker to the appliance (Fig. ). Preparation Place the base unit on a smooth, clean surface. Pull out the power cord (Fig. ). MUM52../MUM54.. Cord store: Pull out cable to the required length. MUM56.. Automatic cord winder: Pull out the cord in one go to the required length (max. 100 cm) and slowly release; the cord is locked. Reducing the cord length: Pull gently on the cord and allow it to roll up to the required length. Then gently pull the cord again and slowly release; the cable is locked. Robert Bosch Hausgeräte GmbH t~êåáåÖ> aç=åçí=íïáëí=íÜÉ=ÅçêÇ=ïÜÉå=áåëÉêíáåÖ=áíK= fÑ=íÜÉ=~ééäá~åÅÉ=ÑÉ~íìêÉë=~å=~ìíçã~íáÅ=ÅçêÇ= ïáåÇÉêI=Çç=åçí=áåëÉêí=íÜÉ=ÅçêÇ=ã~åì~ääóK= fÑ íÜÉ ÅçêÇ=à~ãëI=éìää=çìí=íÜÉ=ÅçêÇ=~ää=íÜÉ=ï~ó= ~åÇ íÜÉå=~ääçï=áí=íç=ïáåÇ=ìéK Insert the mains plug. Bowl and tools oáëâ=çÑ=áåàìêó=Ñêçã=êçí~íáåÖ=íççäë tÜáäÉ=íÜÉ=~ééäá~åÅÉ=áë=çéÉê~íáåÖI=âÉÉé=ÑáåÖÉêë= ÅäÉ~ê=çÑ=íÜÉ=ãáñáåÖ=ÄçïäK=^íí~ÅÜ=íÜÉ=ÅçîÉê=ENOF= ÄÉÑçêÉ=çéÉê~íáåÖ=íÜÉ=~ééäá~åÅÉ> aç=åçí=ÅÜ~åÖÉ=íççäë=ìåíáä=íÜÉ=ÇêáîÉ=Ü~ë=ÅçãÉ= íç=~=ëí~åÇëíáää=Ó=ïÜÉå=íÜÉ=~ééäá~åÅÉ=áë= ëïáíÅÜÉÇ=çÑÑI=íÜÉ=ÇêáîÉ=ÅçåíáåìÉë=êìååáåÖ= ÄêáÉÑäó=~åÇ=ëíçéë=áå=íÜÉ=íççä=ÅÜ~åÖÉ=éçëáíáçåK= aç=åçí=ãçîÉ=íÜÉ=ëïáîÉä=~êã=ìåíáä=íÜÉ=íççä=Ü~ë= ÅçãÉ=íç=~=ëí~åÇëíáääK cçê=êÉ~ëçåë=çÑ=ë~ÑÉíó=íÜÉ=~ééäá~åÅÉ=ã~ó=çåäó= ÄÉ=çéÉê~íÉÇ=ïÜÉå=ìåìëÉÇ=ÇêáîÉë=Ü~îÉ=ÄÉÉå= ÅçîÉêÉÇ=ïáíÜ=ÇêáîÉ=Öì~êÇë=ESI=VFK ^ííÉåíáçå> rëÉ=Äçïä=ïáíÜ=íÜáë=~ééäá~åÅÉ=çåäóK Stirrer (13) for stirring dough, e.g. cake mixture Whisk (14) for whisking egg whites, cream and light dough, e.g. sponge mixture Kneading hook (15) for kneading heavy dough and mixing-in ingredients that ought not be cut (e.g. raisins and chocolate chips) Working with the bowl and the tools Fig. Press the Release button and move the swivel arm to position 2. Insert the bowl: – Tilt the bowl forwards and then set it down, – turn anti-clockwise until it locks into place. Depending on the processing task, insert the stirrer, whisk or kneading hook until it locks into position. Note: If using the kneading hook, rotate the dough deflector until the kneading hook can lock into position (Fig. –4b). Put the ingredients to be processed into the bowl. Robert Bosch Hausgeräte GmbH Press the Release button and move en the swivel arm to position 1. Attach the cover. Set the rotary switch to the desired setting. Our recommendation: – Stirrer: first stir in at setting 1 (1), then select setting 7 (4) – Whisk: setting 7 (4), mix in at setting 1 (1) – Kneading hook: first stir in at setting 1 (1), knead at setting 3 (2) Adding more ingredients Switch off the appliance with the rotary switch. Add more ingredients through the feed tube in the cover. çê Remove lid. Press the Release button and move the swivel arm to position 2. Add ingredients. After using the appliance Switch off the appliance with the rotary switch. Pull out the mains plug. Remove lid. Press the Release button and move the swivel arm to position 2. Take the tool out of the drive. Remove the bowl. Clean all parts, see “Cleaning and servicing”. Continuous-feed shredder oáëâ=çÑ=áåàìêó aç=åçí=Öêáé=íÜÉ=ëÜ~êé=Ää~ÇÉë=çê=ÉÇÖÉë= çÑ íÜÉ ÅìííáåÖ=ÇáëÅëK=q~âÉ=ÜçäÇ=çÑ=ÅìííáåÖ= ÇáëÅë Äó=íÜÉ=ÉÇÖÉ=çåäóK _ÉÑçêÉ=~íí~ÅÜáåÖLêÉãçîáåÖ=íÜÉ=ÅçåíáåìçìëJ ÑÉÉÇ=ëÜêÉÇÇÉêI=ï~áí=ìåíáä=íÜÉ=ÇêáîÉ=Ü~ë=ÅçãÉ= íç ~=ëí~åÇëíáää=~åÇ=éìää=çìí=íÜÉ=ã~áåë=éäìÖK aç=åçí=êÉ~ÅÜ=áåíç=íÜÉ=ÑÉÉÇ=íìÄÉK t~êåáåÖ> qÜÉ=ÅçåíáåìçìëJÑÉÉÇ=ëÜêÉÇÇÉê=ãìëí= ÄÉ ÅçãéäÉíÉäó=~ëëÉãÄäÉÇ=ÄÉÑçêÉ=ìëÉK= kÉîÉê ~ëëÉãÄäÉ=íÜÉ=ÅçåíáåìçìëJÑÉÉÇ= ëÜêÉÇÇÉê çå=íÜÉ=Ä~ëÉ=ìåáíK léÉê~íÉ=íÜÉ=ÅçåíáåìçìëJÑÉÉÇ=ëÜêÉÇÇÉê= áå íÜÉ áåÇáÅ~íÉÇ=çéÉê~íáåÖ=éçëáíáçå=çåäóK 5 en Predetermined breaking point Fig. The built-in predetermined breaking point protects the drive of the appliance. If an overload occurs, the drive shaft of the continuous-feed shredder breaks. However, the drive shaft can easily be replaced. A new drive shaft with driver is available from customer service. Reversible slicing disc – thick/thin for slicing fruit and vegetables. Process at setting 5 (3). Designation on the reversible slicing disc: “1” for the thick slicing side “3” for the thin slicing side t~êåáåÖ> qÜÉ=êÉîÉêëáÄäÉ=ëäáÅáåÖ=ÇáëÅ=áë=åçí=ëìáí~ÄäÉ=Ñçê= ëäáÅáåÖ=Ü~êÇ=ÅÜÉÉëÉI=ÄêÉ~ÇI=êçääë=çê=ÅÜçÅçä~íÉK= päáÅÉ=ÄçáäÉÇI=ï~ñó=éçí~íçÉë=çåäó=ïÜÉå=íÜÉó=~êÉ= ÅçäÇK Reversible shredding disc – coarse/fine for shredding vegetables, fruit cheese, except for hard cheese (e.g. Parmesan). Processing at setting 3 (2) or 4 (3). Designation on the reversible shredding disc: “2” for the coarse shredding side “4” for the fine shredding side t~êåáåÖ> qÜÉ=êÉîÉêëáÄäÉ=ëÜêÉÇÇáåÖ=ÇáëÅ=áë=åçí=ëìáí~ÄäÉ= Ñçê ëÜêÉÇÇáåÖ=åìíëK=pÜêÉÇ=ëçÑí=ÅÜÉÉëÉ=ïáíÜ=íÜÉ= Åç~êëÉ=ëáÇÉ=çåäó=~í=ëÉííáåÖ=T=EQFK Grating disc – medium-fine for grating raw potatoes, hard cheese (e.g. Parmesan), cooled chocolate and nuts. Process at setting 7 (4). t~êåáåÖ> qÜÉ=Öê~íáåÖ=ÇáëÅ=áë=åçí=ëìáí~ÄäÉ=Ñçê=Öê~íáåÖ=ëçÑí= ÅÜÉÉëÉ=~åÇ=ÅÜÉÉëÉ=ëäáÅÉëK Working with the continuous-feed shredder Fig. Press the Release button and move the swivel arm to position 2. Insert the bowl: – Tilt the bowl forwards and then set it down. – Turn anti-clockwise until it locks into place. Press the Release button and move the swivel arm to position 3. Remove drive cover from the drive of the continuous-feed shredder. 6 Hold drive shaft with the predetermined breaking point face down with one hand underneath. Attach required slicing or shredding disc. In the case of reversible discs, ensure that the required side is face up. Grip drive shaft at the upper end and insert into the housing. Attach the cover (note mark) and turn all the way in a clockwise direction. Place continuous-feed shredder on the drive and turn all the way in a clockwise direction. Turn rotary switch to recommended setting. Put food to be processed in the feed tube and push down with the pusher. t~êåáåÖ> mêÉîÉåí=íÜÉ=Åìí=áåÖêÉÇáÉåíë=Ñêçã=ÄìáäÇáåÖ=ìé= áå íÜÉ=çìíäÉí=çéÉåáåÖK Tip: To ensure evenly cut ingredients, process slender ingredients in bunches. Note: If the food to be processed sticks in the continuous-feed shredder, switch food processor off, pull out mains plug, wait until the drive comes to a standstill, remove cover from the continuous-feed shredder and empty feed tube. After using the appliance Switch off the appliance with the rotary switch. Rotate the continuous-feed shredder in an anti-clockwise direction and remove. Rotate the lid in an anti-clockwise direction and remove. Remove drive shaft together with disc. To do this, press finger from below against the drive shaft (Fig. ). Clean parts. Blender oáëâ=çÑ=áåàìêó=Ñêçã=ëÜ~êé=Ää~ÇÉëL êçí~íáåÖ=ÇêáîÉ> kÉîÉê=éä~ÅÉ=ÑáåÖÉêë=áå=íÜÉ=~íí~ÅÜÉÇ=ÄäÉåÇÉê>= aç=åçí=êÉãçîÉL~íí~ÅÜ=íÜÉ=ÄäÉåÇÉê=ìåíáä=íÜÉ= ÇêáîÉ=áë=~í=~=ëí~åÇëíáää>=léÉê~íÉ=íÜÉ=~ëëÉãÄäÉÇ= ÄäÉåÇÉê=çåäó=~åÇ=ïáíÜ=íÜÉ=äáÇ=~íí~ÅÜÉÇK oáëâ=çÑ=ëÅ~äÇáåÖ> fÑ=éêçÅÉëëáåÖ=Üçí=äáèìáÇëI=ëíÉ~ã=ÉëÅ~éÉë= íÜêçìÖÜ=íÜÉ=ÑìååÉä=áå=íÜÉ=äáÇK=^ÇÇ=~=ã~ñK=MKR= äáíêÉë=çÑ=Üçí=çê=ÑêçíÜáåÖ=äáèìáÇK Robert Bosch Hausgeräte GmbH en t~êåáåÖ> _äÉåÇÉê=ã~ó=ÄÉ=Ç~ã~ÖÉÇK=aç=åçí=éêçÅÉëë= ÇÉÉéJÑêçòÉå=áåÖêÉÇáÉåíë=EÉñÅÉéí=áÅÉ=ÅìÄÉëFK= aç åçí=çéÉê~íÉ=ïÜÉå=ÉãéíóK Working with the blender Fig. Press the release button and move the swivel arm to position 4. Remove the blender drive cover. Attach blender jug (mark on the handle on mark on the base unit) and turn all the way in an anti-clockwise direction. Add ingredients. Maximum capacity – liquid = 1.25 litres; maximum capacity frothing or hot liquids max. 0.5 litres; optimal processing capacity – solids = 50–100 g; Attach the cover and turn anti-clockwise all the way into the blender handle. The lug must be engaged. Set the rotary switch to the desired setting. Adding more ingredients Switch off the appliance with the rotary switch. Remove the cover and add ingredients or remove the funnel and gradually add solid ingredients through the feed tube or pour liquid through the funnel. After using the appliance Switch off the appliance with the rotary switch. Rotate the blender in a clockwise direction and remove. Tip: It is recommended to clean the blender immediately after use. Cleaning and servicing ^ííÉåíáçå> aç=klq=ìëÉ=~Äê~ëáîÉ=ÅäÉ~åáåÖ=~ÖÉåíëK= pìêÑ~ÅÉë ã~ó=ÄÉ=Ç~ã~ÖÉÇK= Cleaning the base unit oáëâ=çÑ=ÉäÉÅíêáÅ=ëÜçÅâ> kÉîÉê=áããÉêëÉ=íÜÉ=Ä~ëÉ=ìåáí=áå=ï~íÉê=çê=éä~ÅÉ= ìåÇÉê=êìååáåÖ=ï~íÉêK aç=åçí=ìëÉ=~=ëíÉ~ã=ÅäÉ~åÉêK Robert Bosch Hausgeräte GmbH Pull out the mains plug. Wipe the base unit and drive cover with a damp cloth. If required, use a little detergent. Then dry the base unit. Cleaning the bowl and tools The bowl and tools are dishwasher-safe. Do not wedge plastic parts in the dishwasher, as they could be permanently deformed during the washing process! Cleaning the continuous-feed shredder All parts of the continuous-feed shredder are dishwasher-proof. Tip: To remove the red film after processing e.g. carrots, pour a little cooking oil on a cloth and rub the film off the continuous-feed shredder (not the cutting discs). Then rinse the continuous-feed shredder. Cleaning the blender oáëâ=çÑ=áåàìêó=Ñêçã=ëÜ~êé=Ää~ÇÉë> aç=åçí=íçìÅÜ=ÄäÉåÇÉê=Ää~ÇÉë=ïáíÜ=Ä~êÉ=Ü~åÇëK The blender jug, lid and funnel are dishwashersafe. Tip: After processing liquids, it is often sufficient to clean the blender without removing it from the appliance. Pour a little water and washingup liquid into the attached blender. Switch on the blender for several seconds (setting M). Pour out the water and rinse out the blender with clear water. Important information If required, clean accessories bag. Follow care instructions in the bag. Storage oáëâ=çÑ=áåàìêó> tÜÉå=íÜÉ=~ééäá~åÅÉ=áë=åçí=áå=ìëÉI=éìää=çìí=íÜÉ= ã~áåë=éäìÖK Fig. Store tools and cutting discs in the accessories bag. Keep accessories bag in the bowl. To store in the original packaging, see Fig. . 7 en Troubleshooting oáëâ=çÑ=áåàìêó> _ÉÑçêÉ=Éäáãáå~íáåÖ=~=Ñ~ìäíI=éìää=çìí=íÜÉ=ã~áåë= éäìÖK Important information for MUM54../MUM56.. The On/Off display flashes if the appliance has been operated incorrectly or the fuse has tripped or the appliance is defective. The swivel arm must be engaged in every operating position. Initially try to eliminate the problem which has occurred with the help of the following information. Fault Appliance does not start. Remedial action Check the power supply. Check the mains plug. Check swivel arm. Correct position? Engaged? Screw on blender or bowl as far as possible. Attach the blender cover and screw on as far as possible. Attach drive cover to unused drives. The safety lock is active. Switch appliance to 0/off and then back to the required setting. Fault Appliance switches off during use. The overload protection feature has been activated. Too much food was processed at one time. Remedial action Switch off the appliance. Reduce processing quantity. Do not exceed permitted maximum quantities (see “Application examples”). Fault While the drive was running, the release button was inadvertently pressed. The swivel arm moves up. The drive switches off, but does not stop in the tool change position. Remedial action Set rotary switch to 0/off. Move swivel arm to position 1. Switch on appliance (setting 1). Switch off appliance again. Tool stops in tool change position. 8 Fault Blender does not start working or stops during use, the drive is “humming”. Blade is blocked. Remedial action Switch off the appliance and pull out the mains plug. Detach the blender and remove the obstruction. Re-attach the blender. Switch on the appliance. Important information If the fault cannot be eliminated, please contact customer service. Application examples Whipped cream 100–600 g Whip cream with the whisk for 1½ to 4 minutes at setting 7 (4) depending on the quantity and properties of the cream. Egg white 1 to 8 egg whites Beat egg white with the whisk for 4 to 6 minutes at setting 7 (4). Sponge mixture _~ëáÅ=êÉÅáéÉ 2 eggs 2–3 tbs. hot water 100 g sugar 1 packet of vanilla sugar 70 g flour 70 g cornflour Baking powder if required Beat the ingredients (except flour and cornflour) with the whisk for approx. 4–6 minutes at setting 7 (4) until frothy. Rotate switch to setting 1 (1) and spoon in the sifted flour and cornflour within approx. ½ to 1 minute. Maximum quantity: 2 x basic recipe Cake mixture _~ëáÅ=êÉÅáéÉ 3–4 eggs 200–250 g sugar 1 pinch of salt 1 packet of vanilla sugar or peel from ½ lemon 200–250 g butter or margarine (room temperature) 500 g flour Robert Bosch Hausgeräte GmbH en 1 packet of baking powder 125 ml milk Mix all ingredients with the stirrer for approx. ½ minute at setting 1 (1), then for approx. 3–4 minutes at setting 7 (4). Maximum quantity: 1.5 x basic recipe Short pastry _~ëáÅ=êÉÅáéÉ 125 g butter (room temperature) 100–125 g sugar 1 egg 1 pinch of salt A little lemon peel or vanilla sugar 250 g flour Baking powder if required Using the stirrer, process all ingredients for approx. ½ minute at setting 1 (1), then for approx. 2–3 minutes at setting 6 (3). From 500 g flour: Knead the ingredients with the kneading hook for approx. ½ minute at setting 1 (1), then for approx. 3–4 minutes at setting 3 (2). Maximum quantity: 2 x basic recipe Yeast dough _~ëáÅ=êÉÅáéÉ 500 g flour 1 egg 80 g fat (room temperature) 80 g sugar 200–250 ml lukewarm milk 25 g fresh yeast or 1 packet of dried yeast Peel of ½ lemon 1 pinch of salt Mix all ingredients with the kneading hook for approx. ½ minute at setting 1, then for approx. 3–6 minutes at setting 3 (2). Maximum quantity: 1.5 x basic recipe Pasta dough _~ëáÅ=êÉÅáéÉ 300 g flour 3 eggs 1–2 tbs. (10–20 g) cold water as required Process all ingredients for approx. 3–5 minutes at setting 3 (2) until a dough forms. Maximum quantity: 1.5 x basic recipe Robert Bosch Hausgeräte GmbH Mayonnaise 2 eggs 2 tsp. mustard ¼ l oil 2 tbs. lemon juice or vinegar 1 pinch of salt 1 pinch of sugar Ingredients must be at the same temperature. Process the ingredients (except the oil) in the blender for several seconds at setting 3 (2) or 4 (3). Switch the blender to setting 7 (4) and slowly pour the oil through the funnel and mix until the mayonnaise emulsifies. Eat the mayonnaise immediately, do NOT store. Honey bread spread 30 g butter (from refrigerator, 7 °C) 190 g honey (from refrigerator, 7 °C) Cut butter into small pieces and put into the blender. Add honey and blend for 15 seconds at setting 7 (4). Disposal This appliance has been identified in accordance with the European directive 2002/96/EG on Waste Electrical and Electronic Equipment – WEEE. The Directive paves the way for effective EU-wide withdrawal and utilization of waste appliances. Please ask your dealer or inquire at your local authority about current means of disposal. Warranty conditions The guarantee conditions for this appliance are as defined by our representative in the country in which it is sold. Details regarding these conditions can be obtained from the dealer from whom the appliance was purchased. The bill of sale or receipt must be produced when making any claim under the terms of this guarantee. 9 en Optional accessories MUZ5ZP1 Citrus press For squeezing oranges, lemons and grapefruits. MUZ5FW1 Mincer For cutting fresh meat for steak tartare or meat loaf. MUZ45LS1 For the mincer MUZ5FW1. Perforated disc set fine Fine disc for pasties and spreads, coarse disc for (3 mm), coarse (6 mm) sausages and bacon. MUZ45SV1 Viennese whirl attachment For the mincer MUZ5FW1. With metal template for 4 different pastry moulds. MUZ45RS1 Grater attachment For the mincer MUZ5FW1. For grating nuts, almonds, chocolate and dried bread rolls. MUZ45FV1 Juicer attachment For the mincer MUZ5FW1. For pressing soft fruit, except raspberries, tomatoes and rose hips, to a pulp. At the same time e.g. currants are automatically stemmed and pitted. MUZ45PS1 Chipper disc For the continuous-feed shredder MUZ5DS1. For slicing raw potatoes for chips. MUZ45AG1 For the continuous-feed shredder MUZ5DS1. Asiatic vegetables disc Slices fruit and vegetables into fine strips for Asian vegetable dishes. MUZ45RS1 Grating disc coarse 10 For the continuous-feed shredder MUZ5DS1. For grating raw potatoes, e.g. for potato pancakes or dumplings. Robert Bosch Hausgeräte GmbH en MUZ45KP1 Potato fritter disc For the continuous-feed shredder MUZ5DS1. For grating raw potatoes for rostis and potato fritters, for cutting fruit and vegetables into thick slices. MUZ5ER2 Stainless steel stirring bowl Up to 750 g of flour plus ingredients can be processed in the bowl. MUZ5MX1 For blending drinks, for pureeing fruit and vegetables, for preparing mayonnaise, for cutting fruit, nuts, for crushing ice cubes. Plastic blender attachment MUZ5MM1 Multi-blender For chopping herbs, vegetables, apples and meat, for shredding carrots, radishes and cheese, for grating nuts and cooled chocolate. If an accessory is not included in the product package, it can be purchased via the trade or customer service.. Subject to alterations. Robert Bosch Hausgeräte GmbH 11 Robert Bosch Hausgeräte GmbH Carl-Wery-Straße 34, 81739 München, Germany 9000657581/04.2011 en