1
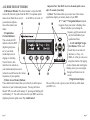
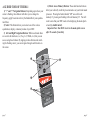
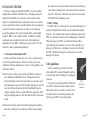
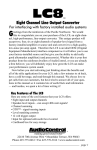
WILL THE DDC WORK WITH MY AUDIOCONTROL DIGITAL PROCESSOR? DDCtm tm Digital Dash Control Owner’s Enjoyment Manual Greetings from the rainforest! Congratulations on your purchase of the AudioControl Digital Dash Control or DDC as it is known by its closest friends. The DDC will allow you to now extend the unique operations of your AudioControl digital processor to other parts of your vehicle while giving you direct access to the various memory locations. Imagine having settings that will optimize Rock and Roll, another one brings out the vocals of your favorite Pop star, while another can maximize the overall SPL of your vehicle to impress your buds (or buddettes). With the DDC in place, all this is now possible. Change the settings of your AudioControl digital processor by just tapping a few buttons. Now, while you are salivating just thinking about the benefits of the DDC, take a few minutes to sit back, grab a beverage and read through this manual. Although the DDC is one of the easier products to install, we encourage you to take a few minutes to read this manual nonetheless. It will answer any questions you may have. For any specific operation questions about the AudioControl digital processor you are connecting to your DDC, please refer to the owner’s manual for that individual processor. The DDC was designed to work with all AudioControl digital processors, both new and old, that are equipped with a Digital Dash Control RJ-11 connector (looks like a phone connector). You can connect your DDC to the following AudioControl Digital processors and it will work immediately: DQT: Serial number DQ20022 or higher DQX: Serial number QX20019 or higher If your AudioControl Digital processor was manufactured prior to these serial numbers “don’t worry” because your friends at AudioControl have got you covered. Even though these older AudioControl Digital processors were manufactured before we even thought of the DDC, we can program your unit so it will work! Just contact us at the AudioControl factory to make arrangements to get your trunk processor (i.e. DQT or DQX) programmed. It will require your AudioControl Digital Processor to visit our factory for programming. However, unlike a nameless software company in the Pacific Northwest, you won’t have to buy any new hardware. ® making good sound bettertm 22410 70th Ave. West • Mountlake Terrace, WA 98043 Phone 425-775-8461 • Fax 425-778-3166 • www.audiocontrol.com ® page 1 page 2 FEATURES AND HIGHLIGHTS Remote mountable control Once connected, the DDC (Digital Dash Control) allows you to operate all of the features of your AudioControl digital processor from crossover points to equalization settings. Control Cable Your DDC is attached to a 20’ control cable that is hard wired inside the DDC and has an RJ-11 connection on the other end. Despite the fact the RJ-11 connector looks like the same connector as the one on your phone, we highly recommend you don’t try and make any calls. Direct Memory Access The DDC has four dual action buttons that allow direct access to the memory settings of your DDC. Please note that your DDC needs to be displaying the main “by AudioControl” splash screen to use the direct memory access. If you don’t see the splash screen, you will need to wait 30 seconds for it to return. Selectable Display Backlighting Since lighting is an important feature of the DDC, we have built in several different lighting schemes to allow you to change the backlighting colors to match your vehicle…or your mood. Available colors are blue, red, and green. Dual Color Button Lighting You also have the ability to change the lighting color of the memory access and navigation buttons. Your choices are red or green. With this control, combined with selectable display backlighting, you have the ability to make your DDC look very cool . . . or very gaudy if you choose. page 3 DR-1 Wireless Remote If the 20’ cable that comes attached to your DDC is not long enough, we have also included a very compact wireless remote, the DR-1. With it you have the ability to operate your DDC from up to 20’ away. Keep in mind that window tint, glass reflection, and the battery levels in your DR-1 will affect your range. Bulletproof Warranty: This is one of the nicest features of all. Every AudioControl product is selflessly designed and manufactured by the inhabitants of our rainforest factory. We take every effort to ensure that you will have many years of enjoyment out of your DDC. To ensure the performance of this new Digital product, we highly recommend that you allow your authorized AudioControl dealer to perform the installation. Not only do they have all the right knowledge and tools, but also in the unlikely chance your DDC should stop working, we will back it with a limited five years parts and labor warranty. Should you choose to install it yourself we will still give you one-year parts and labor warranty. To activate your warranty, you need to FILL OUT AND SEND IN YOUR WARRANTY CARD! We also recommend that you save your invoice or sales slip as proof of installation and ownership. Not only is it necessary for warranty purposes, but should your DDC “disappear” one day while your car is parked at your local latté stand, you will find insurance companies very unforgiving without proof of purchase. page 4 A GUIDED TOUR OF THE DDC 1) IR Remote Window: This tinted window is where the DDC receives IR (infrared) signals from the DR-1. For optimum performance do not block this or cover it . . . or the DR-1 won’t work. If you need more explana tion on this contact your dealer. 2) Equalization Overload Indicator: This convenient LED indicates when the DSP (digital signal processor) in your trunkmounted processor is clipping or distorting. You will want to turn down the level controls on your trunk-mounted processor or reduce the overall boost on the various frequencies of your equalizer. 3) Direct Access Memory Buttons: These dual function buttons allow you to directly recall the preset memories on your trunk mount processor. Pressing the button labeled “1/5” once will recall memory #1; pressing and holding will recall memory #5. You will want to note that your DDC needs to be displaying the main splash screen “by AudioControl”. page 5 Important Note: Your DDC reverts to the main splash screen after 30 seconds of inactivity. 4) Select: This button allows you to select one of the various equalization, display, or memory modes of your DDC. 5) “+” and “-” Navigation Buttons: Depend ing upon where your cursor is flashing, these buttons will allow you to change the frequency, apply boost/cut and vary the bandwidth of your equalization filters. 6) Left and Right Navigation Buttons: Within each mode there are several sub functions (i.e. Freq., Lvl, Width, etc.) that you can access using these buttons. By tapping on these buttons and watching the flashing cursor, you can navigate through each function on the screen. 7) Digital Status Display This cool blue (or red or green) screen will tell you which mode your DDC is in. page 6 A GUIDED TOUR OF THE DR-1 1) “+” and “-” Navigation Buttons: Depending upon where your cursor is flashing, these buttons will allow you to change the frequency, apply boost/cut and vary the bandwidth of your equalization filters. 2) Select: This button allows you to select one of the various equalization, display, or memory modes of your DDC. 3) Left and Right Navigation Buttons: Within each mode there are several sub functions (i.e., Freq., Lvl, Width, etc.) that you can access using these buttons. By tapping on these buttons and watching the flashing cursor, you can navigate through each function on the screen. 4) Direct Access Memory Buttons: These dual function buttons allow you to directly recall the preset memories on your trunk mount processor. Pressing the button labeled “1/5” once will recall memory #1; pressing and holding will recall memory #5. You will want to note that your DDC needs to be displaying the main splash screen (by AudioControl). Important Note: Your DDC reverts to the main splash screen after 30 seconds of inactivity. page 7 page 8 INSTALLING THE DDC Given how compact and flexible the DDC is, it can be installed and operated in a number of different ways. Although you may be tempted to let the DDC sit on your seat, center console or dash board, it is recommended that you physically mount it to a location in your vehicle that is easily accessible. Imagine what can happen to your unit if it bounces around your car when you are braking or accelerating suddenly. It is not recommended that you personally mount the DDC, as that could be painful. In addition we highly recommend your are parked in your vehicle when making any adjustments on your DDC. Operating a moving vehicle is not the best time to make equalization adjustments. A. Placement & Mounting the DDC: In-dash, under-dash, on-dash, in-a-visor, or on-a-console are just a few of the possible locations. Whatever location, you or your installation technician should choose, there are a few guidelines you will want to follow. Decide in advance where you are locating the DDC in relation to your AudioControl Digital Processor. Although the cable is relatively flexible, you will want some slack on each end to assist in the placement so you don’t find yourself yanking your cord. By now you will have discovered that the Digital Dash Control is compact enough to fit into a standard DIN size opening by either using the supplied pocket or with some kind of really cool custom mount. else, make sure you are not about to drill a hole in an airbag or a wire loom as nothing ruins your day more than an expensive repair bill. Drill a few small pilot holes and secure the pocket of the DDC with self-tapping screws. B. DDC Cabling The DDC cable is a critical part of a successful installation as it connects the Digital Dash Control to your AudioControl digital processor. The cable provides the power and data to operate your DDC so connecting it properly and not damaging it is important. When inspecting your DDC, you will notice that the cable is wired internally, which allows it to stay as thin as possible so it takes up very little room. Attempting to remove the cable from the DDC is highly discouraged as you may cause irreversible damage in the process. Cable guidelines: • Prior to mounting your DDC, thread the cable and the RJ-11 adapter through the dash kit or any brackets, before running it to your Digital processor. • If you wish to extend your DDC cable do not use an RJ-11 female-to-female extension device. Many of these devices actually reverse the wires internally which are fine with your phones but will cause your DDC to not work properly. RJ-11 DDC Cable Connector Position the unit in the pocket and mark the appropriate mounting holes with a felt-tip pin or scratch awl. Before doing anything page 9 page 10 DDC Menu Screens One of the major benefits of using Digital technology is the ability to use less knobs and buttons and get more control. To that extent the DDC will allow you to control all of the functions of the AudioControl digital processor it is connected to. Please refer to the specific owner’s manual of each digital product for more details. MODE: Display Brightness and Colors When connecting the DDC to your AudioControl digital processor you will find that you have one additional menu screen that is only accessible through your DDC. Display: (Colors ^) Bright Dim Auto In this mode, you have the ability to change the brightness levels, backlighting color and the button illumination on the display of your DDC. Using the left and right navigation buttons you can set the screen illumination to the maximum brightness (Bright), the minimal level (Dim) or let the DDC adjust itself to the ambient light level (Auto). Once you have selected a brightness level you are comfortable with, tap the “Select” button and your last brightness setting will be retained. page 11 LCD: Red Buttons: Green You will also want to scroll the cursor to the box labeled “Color” and tap the “Up” arrow key to enter the menu which will allow you to change the display colors and the button illuminations. Enjoy the ride. TROUBLESHOOTING No Power: If the colored display on your DDC will not turn on, check to make sure that the control cable is connected properly to your Digital processor and that it has not been damaged or cut. If you have extended the cable in any manner (adapter or splicing) check your connections before you blame your DDC. Buttons Not Reacting: Your AudioControl digital product contains numerous filter circuits controled by a special DSP (Digital Signal Processor). When you make changes to the graphic equalizer, parametric equalizer, crossover, or memories in your AudioControl digital processor it may take a second or so for the processor to …well process the information. Hence, if you are a DDC power user and jump from button to button like a Nintendo game, you will notice that pausing between button pushes is part of the normal operation of your DDC. Reset Button: On the back of your DDC is a cleverly concealed button that resets the functions of your DDC And now a word from the legal department... page 12 THE WARRANTY People are scared of warranties. Lots of fine print. Months of waiting around. Well, fear no more, this warranty is designed to make you rave about us to your friends. It’s a warranty that looks out for you and helps you resist the temptation to have your friend, “...who’s good with electronics”, try to repair your AudioControl product. So go ahead, read this warranty, and then take a few days to enjoy your DDC before sending in the warranty card and comments. “Conditional” doesn’t mean anything ominous. The Federal Trade Commission tells all manufacturers to use the term to indicate that certain conditions have to be met before they’ll honor the warranty. If you meet all of these conditions, we will warrant all materials and workmanship on your DDC for one year from the date you bought it (five years if it is installed by an authorized United States AudioControl dealer). We will fix or replace it, at our option, during that time. Here are the conditional conditions: 1. You have to fill out the warranty card and send it to us within 15 days after purchasing your DDC. 2. You must keep your sales receipt for proof of purchase showing when and from whom the unit was bought. We’re not the only ones who require this, so it’s a good habit to get into with any major purchase. 3. Your DDC must have originally been purchased from an authorized AudioControl dealer. You do not have to be the original owner, but you do need a copy of the original sales slip. 4. You cannot let anybody who isn’t (A) the AudioControl factory; (B) somebody authorized in writing by AudioControl to service your page 13 DDC. If anyone other than (A) or (B) messes with your DDC, that voids your warranty. 5. The warranty is also void if the serial number is altered or removed, or if your DDC has been used improperly. Now that sounds like a big loophole, but here is all we mean by it. Unwarranted abuse is (A) physical damage (don’t use the DDC to pound nails); (B) improper connections (120 volts into the power jack can fry the poor thing); (C) sadistic things. This is the best mobile product we know how to build, but if you mount it to the front bumper of your car, something will go wrong. 6. If an authorized United States AudioControl dealer installs your DDC, the warranty is five years; otherwise the warranty is one year. Assuming you conform to 1 through 6, and it really isn’t all that hard to do, we get the option of fixing your old unit or replacing it with a new one. LEGALESE SECTION This is the only warranty given by AudioControl. This warranty gives you specific legal rights that vary from state to state. Promises of how well the DDC will perform are not implied by this warranty. Other than what we have covered in this warranty, we have no obligation, express or implied. Also, we will not be obligated for direct or indirect consequential damage to your system caused by hooking up the DDC. Failure to send in a properly completed warranty card negates any service claims. page 14 DDC SPECIFICATIONS All specifications are measured with the at 14.4 VDC (standard automotive voltage). As technology advances, AudioControl reserves the right to continuously change our specifications like our weather. Display backlighting colors ............................... blue, red, or green Button colors ................................................................ red or green Cable type… .................................................................. 4 conductor Size ............................................................... 6.43” x 1.82”h x.82”d Weight ....................................................................................... 1lb. ® ©2004, AudioControl, a division of Electronic Engineering and Manufacturing, Inc. All rights reserved. AudioControl, Making Good Stereo Sound Better, DDC, DQX, DQT, DQS and DXS, are all trademarks of Electronic Engineering and Manufacturing, Inc. This manual was conceived, designed, and written on a cold, blustery, and rain-drenched days at our home in the Pacific Northwest Rainforest outside of Seattle, Washington. The latte’s were hot and the wheat beers were cold and cloudy like our weather. page 15 th 22410 70 Avenue West Mountlake Terrace, WA 98043 USA Phone 425-775-8461 Fax: 425-778-3166 www.audiocontrol.com P/N 9130760 page 16