1
EA
SE
EL
R
TP
C
Impero Education Pro Installation Guide
© 2014 Impero Solutions Ltd.
www.imperosoftware.com
Impero Education Pro Installation Guide
Quick Start Guide
EA
SE
table of contents
Minimum System Requirements
How to verify if you have the correct .NET Framework installed
Installing .NET 3.5 SP1 Framework
Download Impero Software
Server Installation
Installing Windows Clients
Installing Apple Mac Clients
Starting the Impero Console
EL
Advanced Settings
C
TP
R
Reactivating Your Server
Terminal Services & Virtual Desktop Environments
Troubleshooting Server Install
Troubleshooting Window Clients
Troubleshooting Apple Mac Clients
Using Apple Xserve
DNS Record
3
3
3
4
5
6
10
14
15
15
16
16
17
19
20
21
21
Impero Education Pro Installation Guide
1
Quick Start Guide
This guide will take you through the process of installing and registering the Impero server and deploying the Impero clients. We
have also included some advanced troubleshooting topics to answer your common questions.
1.1
Minimum System Requirements
EA
SE
Impero Server:
Microsoft Windows XP SP3, Vista, Windows 7, Windows Server 2003/2008/2012
Microsoft .NET Framework 3.5 SP1
32 Bit and 64 Bit operating systems
Windows Installer 3.5
2.0+ Dual Core processor
4 GB RAM
100 MB HDD for Installation
10GB HDD for Logs (Space requirement depends on your retention policy)
TCP/IP connection
Internet Connection required for registering Impero Server
N ote : Actual requirem ents will vary based on y our sy stem configuration, num ber of clients, and the applications and features y ou choose to install.
Impero Client:
EL
Windows
R
Microsoft Windows XP SP3, Vista, Windows 7, Windows Server 2003/2008, Citrix, NComputing, Virtualization
Microsoft .NET Framework 3.5 SP1
32 Bit and 64 Bit operating systems
Windows Installer 3.5
Intel Pentium processor @ 1.6 Ghz
1 GB RAM
TCP/IP connection
At least 100mb HDD space
Apple Mac
TP
Intel Mac
Apple Mac 10.5 and above operating systems
32 Bit and 64 Bit operating systems
TCP/IP connection
At least 100mb HDD space
N ote : Actual requirem ents will vary based on y our sy stem configuration, num ber of clients, and the applications and features y ou choose to install.
1.2
How to verify if you have the correct .NET Framework installed
C
The Impero Server and the Impero Client both use the .NET 3.5 Service Pack 1 Framework.
N ote : .N E T 3.5 S P1 is is not included as part of .N E T 4.
Please use the following checks to verify whether you have the correct version of .NET framework installed.
Microsoft Server 2008
Start > Administrative Tools > Server Manager > Features
Under features installed you are looking for .NET 3.0 or .NET 3.5.1. If you do not see either of these features then you will need to
click on 'Add Feature' and select .NET.
© 2014 Impero
Solutions
Ltd.
© 2014
Impero
Solutions
Ltd.
3
Impero Education Pro Installation Guide
Please refer to Microsoft's Server documentation for official procedures as those above are intended for demonstration purposes only.
Microsoft Server 2003
Control Panel > Add/Remove Programs
Under installed programs verify you have .NET 3.5.1 SP1 installed. If you do not have the correct .NET Framework installed then
please click the button at the top of the page or visit the Microsoft website.
EA
SE
Please refer to Microsoft's Server documentation for official procedures as those above are intended for demonstration purposes only.
Microsoft Server 2000 SP4
Control Panel > Add/Remove Programs
Under installed programs verify you have .NET 3.5.1 SP1 installed. If you do not have the correct .NET Framework installed then
please click the button at the top of the page or visit the Microsoft website.
Please refer to Microsoft's Server documentation for official procedures as those above are intended for demonstration purposes only.
Microsoft Windows XP
Control Panel > Add/Remove Programs
Under installed programs verify you have .NET 3.5.1 SP1 installed. If you do not have the correct .NET Framework installed then
please click the button at the top of the page or visit the Microsoft website.
Please refer to Microsoft's Server documentation for official procedures as those above are intended for demonstration purposes only.
EL
Microsoft Windows 7 / Vista
Control Panel > Programs > Programs and Features > Turn Windows features on or off
In the list of features, check for Microsoft .NET Framework 3.5.1, which should have a filled in checkbox marked next to it.
N ote : W indows 7 standard installation has a partial install of M icrosoft .N E T 3.5.1 fram ework that will work with Im pero software. R em inder: M icrosoft
.N E T 4 does not included the correct .N E T fram ework needed to run Im pero software.
Please refer to Microsoft's Server documentation for official procedures as those above are intended for demonstration purposes only.
Installing .NET 3.5 SP1 Framework
R
1.3
C
TP
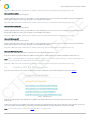
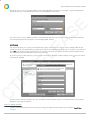
If you do not have the correct version of .NET Framework installed, this can be downloaded from the Impero website.
Image 1 - .NET Download
Click on the relevant link to be redirected to the Microsoft website where you can download the correct version of .NET
Framework.
Follow the instructions on the Microsoft website, ensuring you download the correct version relevant to the operating system you
are running. Once the download has completed, locate downloaded the file and double click to launch the installer.
N ote : if y ou are running W indows 7/V ista, please verify that .N E T 3.5 is already running.
© 2014 Impero
Solutions
Ltd.
© 2014
Impero
Solutions
Ltd.
4
Impero Education Pro Installation Guide
1.4
Download Impero Software
You will require an activation code to register and download Impero software. If you do not already have an activation code you
may request one from our website.
EA
SE
To download Impero software, please visit the download section of our website. You will need to enter your email address and the
activation code. Once you click on the 'Download' button you will be directed to new page which tells you the latest available
version of software, and below that a list of your available downloads (Image 2). Please download the "Full Installation" of the
software.
EL
N ote : If the 'L atest V ersion Available' does not m atch the 'F ull Installation' version, there m ay be an upgrade available to y ou. Please contact y our account
m anager, or Im pero S upport, if this is the case.
R
Image 2 - Software Download
C
TP
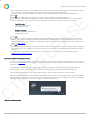
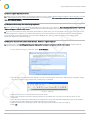
You will then be prompted as to whether you wish to open the download file, or save it to your machine (Image 2.1). Click on the
'Save File' option which will download the zip file to the default location on your PC.
© 2014 Impero
Solutions
Ltd.
© 2014
Impero
Solutions
Ltd.
Image 2.1 - Impero Download
5
Impero Education Pro Installation Guide
1.5
Server Installation
EL
EA
SE
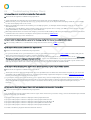
Once your download has completed, locate the downloaded file and extract it. Open the extracted folder, and run the file called
ImperoSetup.exe located in the ImperoSetup folder. This will open the 'Impero Setup' window (Image 3):
Image 3 - Impero Setup
This window will tell you that Impero requires the install of two applications - Impero Server and Impero Client.
R
You will first need to install the Impero Server, which you can do by clicking the 'Install' button within the '1. Impero Server' panel
at the top of the window. This will launch the ImperoServerSetup.msi installer which you can also find in the 'Installations'
directory within your downloaded folder.
After clicking the 'Install' button, please proceed through the following steps:
TP
1. You may be prompted with a security warning asking if you wish to run this file. Click on 'Run'.
2. On the welcome screen, click on 'Next'.
3. Read through the End-User License Agreement. If you accept the terms, select the checkbox to mark your acceptance and click
on 'Next'.
4. You are then prompted to select an install location for the Impero Server. If you are happy with the default location, click on
'Next' and skip to step 7.
5. If you wish to change the install location, click on 'Browse' to navigate to an alternate location.
6. Once you have selected your alternate location, click on 'Next'.
7. Click 'Install'.
8. Once the installation has completed, click on the 'Finish' button to close the Impero Server Setup wizard window.
9. Impero Server is now installed. In order to continue setting up Impero, you then need to register your Impero Server.
C
N ote : O nce the install is finished, please wait 1 m inute before launching Im pero S erver
Registering the Impero Server
1. Double click on the new Impero Server icon on your desktop (Image 3.1).
© 2014 Impero
Solutions
Ltd.
© 2014
Impero
Solutions
Ltd.
6
Impero Education Pro Installation Guide
Image 3.1 - Impero Server Icon
EL
EA
SE
2. You will then see an 'Introduction' window explaining the registration process. Please read this window, and then click on 'Next'.
3. Please enter the details that you are prompted for, and click on 'Next' (Image 3.2)
Image 3.2 - Impero Server Registration
R
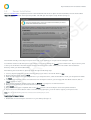
4. On the following screen, enter your Activation Code (which you earlier used to download the Impero software package) and a
desired password. This password will be used to access our online support forum, as well as become your default Impero Console
access password; although this can be changed once your server is registered. Once these details are entered, please click
'Register' (Image 3.3).
C
TP
N ote : T he password field at this stage is restricted to a m axim um of six characters in length.
© 2014 Impero
Solutions
Ltd.
© 2014
Impero
Solutions
Ltd.
7
EA
SE
Impero Education Pro Installation Guide
Image 3.3 - Impero Server Activation
Image 3.4 - Impero Activation Advanced Settings
C
TP
R
EL
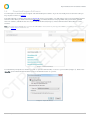
5. If the registration is successful, please skip ahead to Step 16. If the Impero Server failed to register, please continue to Step 6.
6. If your Impero Server failed to register, click on 'Advanced Settings' (Image 3.4)
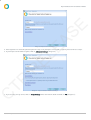
7. If you are using a Proxy Server, click on 'Proxy Settings'. Enter the relevant details and click on 'OK' (Image 3.5):
© 2014 Impero
Solutions
Ltd.
© 2014
Impero
Solutions
Ltd.
8
EA
SE
Impero Education Pro Installation Guide
Image 3.5 - Impero Server Advanced Proxy Settings
EL
8. Click on the 'Register' button
9. If the registration is successful, please skip ahead to Step 16. If the Impero Server still failed to register, please continue to Step
10.
TP
R
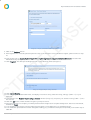
10. Tick the box next to 'Cannot Register Impero? Try registering Impero using your default web browser', located under
Advanced Settings (Image 3.3).
11. Click 'Register'. This will open the 'Register Impero using a Browser' wizard (Image 3.6).
Image 3.6 - Register Impero using a Browser
C
12. Click 'Go To Website'.
13. This will open your default web browser, and display an activation string. Select the string, and copy (CTRL + C) to your
clipboard.
14. Switch back to the 'Register Impero using a Browser' window (Image 3.6), and paste your activation string (CTRL + V) into
the text area.
15. Click the 'OK' button, which should now register your Impero Server.
16. Once the registration is complete you will be presented with a 'Registration Complete' dialogue box. Take note of the details,
and click on 'Finish'.
17. You should now also receive an email confirming these details, to the address that you specified in Step 3.
18. You will be then presented with another dialogue box telling you your default console password, which you entered in Step 4.
Click 'OK'.
© 2014 Impero
Solutions
Ltd.
© 2014
Impero
Solutions
Ltd.
9
Impero Education Pro Installation Guide
EA
SE
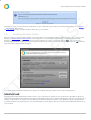
Image 3.7 - Impero Access Details
19. The first screen you see is the License Tab where you can see details of your license. For further details, please see our Impero
Server Guide (PDF format).
20. You are now ready to install the Impero Client across your network.
1.6
Installing Windows Clients
TP
R
EL
Once your Impero Server has been installed, you are then able to start installing the Impero Client. In order to do so, return to the
file that you downloaded and extracted. If it not already open, re-run the ImperoSetup.exe file from within the ImperoSetup
directory. You may be prompted with a security warning asking if you wish to run this file; click on 'Run'. You may also get a
warning dialogue explaining that you may be required to reboot your machine to complete the installation; click on 'OK'. This will
open the 'Impero Setup' window (Image 4)
Image 4 - Impero Setup Wizard
C
You will be presented with the following two options for installing the Impero Client in the '2. Impero Client' panel.
Option 1: Install Locally
This will run the ImperoClientSetup.msi file on the PC you are currently on, which you can also find in the 'Installations' directory
within your downloaded folder. Once the installer has finished the 'Impero Client' window will disappear and return you back to the
'Impero Setup' window. An 'Impero Console' desktop icon will be created and a system tray notification pop-up message will tell
you when the client is active (Image 4.1). You can then begin to use the Impero Console, or continue to install further clients across
your network.
© 2014 Impero
Solutions
Ltd.
© 2014
Impero
Solutions
Ltd.
10
Impero Education Pro Installation Guide
EA
SE
Image 4.1 - Client Installed
Option 2: Install Remotely
This will open the 'Impero - Remote Deploy MSI' wizard (Image 4.2) which gives you three options with which you can deploy the
Impero Client to your network. First you must select the desired computers to install the Impero Client to. You can do this a
number of different ways; Found Computers, Manual Add and Add Domain.
Step 1 - Selecting Computers
Found Computers
You will be presented with a list of computers that have been found on your network by your computer on the left-hand
side. You simply need to tick the computers that you would like to install the Impero Client on, and those that you have
ticked will appear in the right-hand panel.
C
TP
R
EL
N ote : T his will only show com puters that have been discovered by y our Com puter Browser service. T his will only show PC's that have been
switched on for at least 12 m inutes and are also on the sam e V L AN . If it has not found the desired com puters, see the 'M anual Add' and 'Add
D om ain' options.
Image 4.2 - Remote Install Client, Found Computers
Manual Add
Enter a com puter nam e or IP Address
This option allows you to either enter the computer name or the IP Address of the computer you would like to install
Impero client on (Image 4.3).
Enter an IP Address R ange
© 2014 Impero
Solutions
Ltd.
© 2014
Impero
Solutions
Ltd.
11
Impero Education Pro Installation Guide
EA
SE
This allows you to enter a starting IP Address and an ending IP Address (Image 4.3). The 'Impero - Remote Deployment'
wizard will then try to install the Impero Client to every IP Address in that range.
Image 4.3 - Manual Add
Any entries that you have added using either of these methods will then load a list of the Computer Names/IP Addresses
into the right-hand panel of the 'Impero - Remote Deploy MSI' window.
Add Domain
EL
This option will allow you to load your Active Directory (AD) structure into the 'Impero - Remote Deploy MSI' wizard
(Image 4.4). Enter your Active Directory details and a valid set of credentials with which you can connect to your AD, and
click 'OK'. This will then load your AD structure into the 'Found Computers' panel on the left-hand side, underneath the
list of computers that have been discovered on your network.
icon to the left of
C
TP
R
If you do not see your AD structure, you may need to minimise the 'Network' node by clicking on the
the 'Network' heading.
Image 4.4 - Add Domain
You then need to tick the computers that you would like to install the Impero Client on, and those that you have ticked
will appear in the right-hand panel.
Step 2 - Installing the Client
Once you have selected the remote computer(s) using your preferred method from Step 1, click the 'Install Now'
button.
© 2014 Impero
Solutions
Ltd.
© 2014
Impero
Solutions
Ltd.
12
Impero Education Pro Installation Guide
Local Account:
Username: Administrator
Password: password
Domain Account:
Username: Domain\Administrator
Password: password
EA
SE
On the dialogue box 'Impero - Choose MSI', select 'Browse' to locate the ImperoClientSetup.msi. This file must be local
to this machine as the MSI deployment tool does not support the use of shared directories.
Leave the 'Enter Parameters' dialogue box blank as Impero Client already has the parameter silently built-in.
Click 'OK'.
Click 'OK' on the dialogue box warning you that Impero requires Microsoft .NET 2 Framework.
In the 'Impero - Enter Password' dialogue box, enter a username and password that will allow you connection to the
remote computer(s). You may choose to use a local admin user account or a domain admin user account.
EL
Click 'OK'.
In the 'Impero - Enter Server IP' dialogue box, enter the IP Address of your Impero Server. If you do not know the IP
Address, you can leave this blank as the Impero Client will do a UDP Broadcast to find the Impero Server. If you use
multiple VLANs across your network, you will need to enter the IP Address of your Impero Server at this stage, or see
creating a DNS record.
Click 'OK'.
The Remote Deploy Wizard will now install the Impero Client on the computers you have selected. It will only deploy to
ten computers at a time, reducing the amount of traffic on your network. As one client deployment finishes, another
will start.
You will either see 'Installation Successful' or an error message. If you receive an error message please refer to
troubleshooting Windows clients.
Manual Installation of the Impero Client
In order to manually install the Impero Client on a computer, locate and run the ImperoClientSetup.msi file on the local
PC. You may download this file or navigate to your Impero Server to retrieve this file. The default location of this file will
be located at:
R
64 bit machines - 'C:\Program Files (x86)\Impero Solutions Ltd\Impero Server\Updates\ImperoClientSetup.msi'
32 bit machines - 'C:\Program Files\Impero Solutions Ltd\Impero Server\Updates\ImperoClientSetup.msi'
Copy the ImperoClientSetup.msi file to the machine that you wish to install the client on, and run the file.
C
TP
Once it has finished the 'Impero Client' window will disappear and an 'Impero Console' desktop icon will be created. Once
the Impero Client Service has started a system tray notification will pop-up a message telling you that it has connected to
the Impero Server (Image 4.5). You can now begin to use the Impero Console.
Image 4.5 - Client Installed
FAQ's for Advanced Users
© 2014 Impero
Solutions
Ltd.
© 2014
Impero
Solutions
Ltd.
13
Impero Education Pro Installation Guide
Q. Can I include the Im pero Client in a default im age that can be pushed out to the rest of the netw ork ?
A. Yes, Impero can be installed on a master image that then can be pushed out to the rest of the network. Impero will not
require any additional configuration settings once it has been installed on the image.
Q. W hat if w e use m ultiple VLAN 's on our netw ork ?
A. Impero supports multiple VLAN's. You just need to create a DNS Record or, when you remote deploy the Impero Client
be sure to enter the IP Address of the Impero Server when prompted to do so.
EA
SE
Q. Can I use G roup Policy Object (G PO) to deploy the Im pero Client?
A. You may deploy the clients using Group Policy. Please refer to the Microsoft website for additional information.
Q. W e have Thin Clients on our netw ork , w ill Im pero w ork ?
A. Yes, Impero supports many different types of Thin Client, i.e. Terminal Server, NComputing, VMware, Citrix.
1.7
Installing Apple Mac Clients
The Impero Apple Mac Client provides the same capabilities of the Windows Client and gives you the ability to manage the Mac
machine from any Microsoft Windows operating system. The Impero Mac Client works on Apple operating systems 10.5 and
above.
TP
R
EL
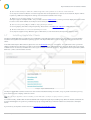
To download the Impero Mac software, please visit our the download section of our website. You will need to enter your email
address and Activation Code. Once you click on the 'Download' button you will be directed to new page which tells you the latest
available version of software, and below that a list of your available downloads (Image 5). Please click on the 'Impero Client (MAC
OSX 10.5+)' link to download the software.
Image 5 - Impero Client Download
C
The Impero Apple Mac machines need to have the software installed manually onto them, or by any other means that you may
have used in the past to deploy software to them.
N ote : O nce the Im pero Apple M ac software is installed, y ou then will be able to use Im pero to deploy software to y our M acs.
To install manually, double click the downloaded file and navigate through the proceeding steps. Once the install has finished the
program will disappear. A system tray notification pop-up message will tell you when the client has connected to the Impero
Server.
If you have any issues please see the section on 'Troubleshooting Apple Mac Clients'.
© 2014 Impero
Solutions
Ltd.
© 2014
Impero
Solutions
Ltd.
14
Impero Education Pro Installation Guide
1.8
Starting the Impero Console
To begin using Impero, locate the 'Impero Console' shortcut icon (Image 6) on a Windows desktop and double click.
Alternatively, in the system tray locate the Impero icon (Image 6.1), right-click and then select 'Open Impero
Console'.
EA
SE
Image 6 Desktop Icon
Image 6.1 - System Tray Icon
You may be presented with the password entry box* (Image 6.2), or the Impero
console will open (Image 6.3). This depends on how Impero has been configured.
*N ote : If y ou are not sure of y our password please ask y our network adm inistrator.
For further information on how to use the Impero Console, please see our Impero
Console Guide (PDF format).
C
TP
R
EL
Image 6.2 - Password Box
2
Image 6.3 - Impero Console
Advanced Settings
We have also included some advanced troubleshooting topics to help answer common questions when installing Impero Software.
© 2014 Impero
Solutions
Ltd.
© 2014
Impero
Solutions
Ltd.
15
Impero Education Pro Installation Guide
2.1
Reactivating Your Server
EA
SE
If you receive the error message 'Your Impero Server needs registering or your trial period has expired' (Image 7), please follow
the steps below.
Image 7 - Impero Cannot Run
1. Open your Impero Server to verify if this is correct. If so you will need to reactivate your license first.
2. If you need to re-register your Impero Server, you will need to log in to our website.
3. You will need your Activation Code and your account password. This would have been emailed to you when you first registered
your Impero Server.
4. Once you have logged in you will need to go to the top of the page and click the 'my account' link (Image 7.1).
Image 7.1 - My Account
TP
R
EL
5. Click on the 'Options' link across the top of the page.
6. Click the 'Reactivate Licence' button (Image 7.2).
Image 7.2 - Reactivate License
7. Once you have done this, you will be able to re-register your Impero Server.
2.2
Terminal Services & Virtual Desktop Environments
C
While you can install the Impero Server to a virtual server, it is important to bear in mind that the Impero Server should never be
installed to a Terminal Services Server, and ideally not onto a Virtual desktop delivery server.
Virtual Desktops
Install the Impero Client onto the golden/template image, as you would a normal application. This applies for Citrix XenDesktop
and other VDI technologies such as NComputing and VMWare.
Terminal Services
To install the Impero Client, log onto the terminal server console as a member of the Domain Admins group and install Impero as
you would any other software. Do not forget to put the Terminal Server into Install Mode. This methodology also applies for older
versions of Citrix.
© 2014 Impero
Solutions
Ltd.
© 2014
Impero
Solutions
Ltd.
16
Impero Education Pro Installation Guide
W indows T erm inal S erver 2003: http://technet.m icrosoft.com /en-us/library /cc781026(v=W S .10).aspx
W indows T erm inal S erver 2008: http://technet.m icrosoft.com /en-us/library /cc742815(v=W S .10).aspx
VMware View Desktop visualization
EA
SE
Base tem plate and a cloned desk top pool
Install the ImperoClientSetup.msi to the base image. If you want the name of the Thin Client to report back to the Impero
Console, you will need to install VMware Tools.
S tatic Virtual M achine
Install the ImperoClientSetup.msi to each static virtual machine in use.
Citrix Xen Desktop
Base tem plate and a cloned desk top pool
Install the ImperoClientSetup.msi to the base image. If you want the name of the Thin Client to report back to the Impero
Console you will need to install Citrix Tools.
S tatic Virtual M achine
Install the ImperoClientSetup.msi to each static virtual machine in use.
Citrix Xen App
F or Published D esk tops
Deploy the Impero Client to the XenApp server using the Citrix recommended install practices.
EL
F or Application Publishing
This is currently an unsupported configuration for Impero. It has not been tested and is therefore not currently
supported.
NComputing
Install the ImperoClientSetup.msi on the NComputing host computer.
2.3
R
N ote : Please refer to vendor's docum entation for official procedures, as those above are intended for dem onstration purposes only .
Troubleshooting Server Install
Q: I cannot install the Impero Server, I get an error message saying I do not have administrative rights.
TP
A: This is usually a .NET error. You will need to verify that the correct version of .NET is installed.
Q: My Impero Server just hangs during installation (Image 8).
C
A: You will need to verify that the correct version of .NET is installed, or alternatively you could disable your Anti-Virus system and
try re-installing your Impero Server.
Image 8 - Service will not start
© 2014 Impero
Solutions
Ltd.
© 2014
Impero
Solutions
Ltd.
17
Impero Education Pro Installation Guide
Q: I cannot register my Impero Server
Q: The Impero Server says that it is already registered.
EA
SE
A: Check your proxy setting details on the register window. You may need to add the following websites access through your web
filter; www.imperov3.co.uk, www.imperosoftware.com or see the question; This server does not have access to the internet.
How can I register Impero?
A: If this is the first time you are registering the Impero Server then remove the tick from 'Can't Register Impero? Try registering
Impero using your default web browser' located under the Advanced Settings section and click the Register button.
A: If you do not have internet access then click the back button and shorten your contact details. The amount of information that
is being encrypted is to large for your web browser. Once you have shortened your contact details, click next and then register.
You should then see the encrypted key. You then need to highlight this, and copy and paste back into the Impero Server
registration window as shown in Image xx.
Q: This server does not have access to the internet. How can I register Impero?
A: You will need to tick 'Can't Register Impero? Try registering Impero using your default web browser' located under the
Advanced Settings section and click the Register button.
R
EL
1. A new window (Image 8.1) will open. Click 'Go To Website'.
Image 8.1 - Register Impero using a browser
Image 8.2 - URL Code
C
TP
2. This will open your default browser and fail as you do not have internet access, but it will generate a long URL (Image
8.2) that you need to copy and paste into a document, i.e. Notepad.
3. Open the document on a PC that does have internet access.
4. Then copy and paste the content of the document into the address bar of your browser and press enter on your
keyboard.
5. This will contact the Impero Licensing Server and generate a long code that will be displayed in the browser window.
6. Select all of the code in the browser window and paste into a document.
7. Open the document on the Impero Server, and copy and paste the code into Step 2 of Image xx.
8. Click 'OK'.
© 2014 Impero
Solutions
Ltd.
© 2014
Impero
Solutions
Ltd.
18
Impero Education Pro Installation Guide
2.4
Troubleshooting Window Clients
Q: I am getting errors when trying to deploy the Client remotely
A: Please work through the troubleshooting steps below:
EA
SE
Verify all firewalls are off during the remote deployment; both Anti-Virus and Windows Firewall.
Make sure that you can open the C$ share (e.g. \\computername\C$) as the Impero Remote Deploy needs this to be available
for the remote deployment tool to work.
Make sure the MSI is located on the machine you are deploying from, as the Impero Remote Deploy tool does not work from
shared directories.
Try deploying to the IP Address of the machine rather than the computer name to verify your DNS is correct. If Impero installs
using the IP Address of the machine then you have a DNS issue.
Manually install the client on the PC. This will give you a better understanding of what may be happening on the PC. If the client
installs but does not connect to the Impero Server, please see creating a DNS record.
Check Event Viewer logs on the workstation.
Q: I can't install the Impero Server; I get an error message saying that I do not have administrative rights.
A: This is usually a .NET error. You will need to verify that the correct version of .NET is installed.
Q: The Impero Client cannot connect to the Impero Server.
A: Please work through the troubleshooting steps below:
EL
Do you have VLAN's across your network? If so, and you use a DNS Server then you can create a DNS record that will give the
clients the correct information in order to connect the Impero Server.
The first time you install Impero Client it creates a local text file called ServerIP.txt if it can find the Impero Server ('C:\Program
Files\Impero Solutions Ltd\ImperoClient\ServerIP.txt'). This stores the IP Address of your Impero Server. If this file is missing
you can create this text file manually and enter the IP Address of your Impero Server in it. You may need to open 'services.msc'
and stop the 'Impero Client SVC' service and then restart it once you have created the ServerIP.txt file.
R
Q: The Impero Client is saying 'Your Impero Server needs registering or your trial period has expired'.
A: Please work through the troubleshooting steps below:
TP
The Impero Server has become unregistered. The most probable cause would be that the hardware footprint of your server has
changed by either adding new hardware or something dynamically assigned has changed. You need to reactivate your account
before you are able to re-register your server again.
If your Impero Server opens without asking you to register then you have multiple Impero Servers installed. On the PC that is
showing the error message open the following file 'C:\Program Files\Impero Solutions Ltd\Impero Client\ServerIP.txt', this will
tell you the IP Address of second Impero Server. You need to remove this as you should only have one Impero Server per
network.
Q: I can see the client in the Impero Console but I am unable to remote control the machine.
A: Please work through the troubleshooting steps below:
C
Turn off Windows Firewall on both clients and test again. If this works then you need to verify you have allowed all Impero Firewall
exceptions through your firewalls:
C:\Program Files\Impero Solutions Ltd\Impero Client\imperoclient.exe
C:\Program Files\Impero Solutions Ltd\Impero Client\ImperoClientSVC.exe
C:\Program Files\Impero Solutions Ltd\Impero Client\ImperoControlLibrary.dll
C:\Program Files\Impero Solutions Ltd\Impero Client\NRControlViewer.dll
C:\Program Files\Impero Solutions Ltd\Impero Client\ImperoUtilities.exe
You need to be able to ping both directions between the PCs.
© 2014 Impero
Solutions
Ltd.
© 2014
Impero
Solutions
Ltd.
19
Impero Education Pro Installation Guide
Impero uses the following ports:
EA
SE
TCP/UDP Ports 30015 - Reserved for Impero Server
TCP/UDP Ports 30016 - Reserved for Impero Server
TCP/UDP Ports 30017 - Reserved for Impero Server
TCP/UDP Ports 30018 - Reserved for Impero Server
TCP/UDP Ports 30019 - Reserved for Impero Server
TCP/UDP Ports 30020 - Reserved Proxy or Thumbnail view
TCP/UDP Ports 30021 - 30521
N ote: T his exam ple is based on seeing 500 thum bnail clients at once. T he port num bers from 30021 to 30521 is based on how m any thum bnails y ou can
see at once and m ay be adjusted to fit y our needs.
2.5
Troubleshooting Apple Mac Clients
Q: The Mac icon is appearing, however, the client is not connecting to the Impero Server.
A: If, after you install the Mac client, the Impero icon appears in the task tray but appears grey, this then means that it cannot find
the Impero Server. The most likely cause of this is that the Impero Client cannot find the Impero Server via UDP Broadcast. This is
often seen on networks where VLAN's are utilised. See the section below for 'How do I use a Fixed IP Address?'
Q: How do I display the Impero error logs?
A: Run the following command on a terminal session within the Mac client:
EL
tail -1000 /var/log/system.log | grep impero
In the error log output look for the following entry every 30 seconds:
09:48 DT-S-WS10-023com.imperosoftware.imperoclientsrv[54]: CServerConnection::DoBroadCast
09:49 DT-S-WS10-023com.imperosoftware.imperoclientsrv[54]: CServerConnection::DoBroadCast
09:49 DT-S-WS10-023com.imperosoftware.imperoclientsrv[54]: CServerConnection::DoBroadCast
R
This means that the client cannot find the Impero Server via UDP Broadcast. This is often seen on networks where VLAN's are
utilised. See the section below for 'How do I use a Fixed IP Address?'
Q: How do I use a 'Fixed IP Address'?
TP
A: To force the Impero Client running on Mac OSX to automatically find the Impero Server, instead of doing a UDP Broadcast then
run the following two commands in a terminal session:
sudo defaults write /Library/Preferences/com.impero-solutions-ltd.ImperoClientSrv host 192.168.1.1
sudo defaults write /Library/Preferences/com.impero-solutions-ltd.ImperoClientSrv port 30015
Replace the 192.168.1.1 for your Impero Server IP Address.
Q: Internet blocking & logging is not working on the Mac
C
A: The proxy is set through your XServe and you need to tell it about Impero. See section 'Using Apple XServe'.
© 2014 Impero
Solutions
Ltd.
© 2014
Impero
Solutions
Ltd.
20
Impero Education Pro Installation Guide
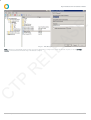
2.6
Using Apple Xserve
How to set the Impero Proxy with your Xserve
Impero needs to be setup to work with the Apple Xserve or it will not block or log any internet traffic. You will need to replace your
existing proxy (Image 9) with the Impero proxy settings and then tell the Impero proxy what IP Address and Port to use for your
existing proxy.
EL
EA
SE
N ote : Im pero currently does not work with proxy .pac files within X serve.
Image 9 - Xserve Workgroup Manager
Step 1
R
Set Proxy Autoconfig Url to: http://localhost:30020/impero_proxy.pac
N ote : O ther proxy options should be disabled.
Step 2
TP
On the Mac OSX clients, open terminal and enter the following command without quotes. It must be one continuous line
of code. Please press enter after you have entered each line of code. Change 10.0.0.1 to your proxies IP Address and also
change 8080 to the correct port that your proxy is using.
“sudo defaults write /Library/Preferences/com.impero-solutions-ltd.ImperoClientSrv persistent_proxy true”
“sudo defaults write /Library/Preferences/com.impero-solutions-ltd.ImperoClientSrv proxy_host 10.0.0.1”
“sudo defaults write /Library/Preferences/com.impero-solutions-ltd.ImperoClientSrv proxy_port 8080”
Verify that Internet blocking and logging are now working correctly on your Apple Mac clients.
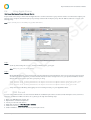
DNS Record
C
2.7
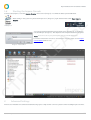
You can create a DNS record to ensure that both Windows and Mac Impero Clients are able to find the Impero Server, even if it is
located in on different VLAN. In order to do so, please go through the following steps:
1.
2.
3.
4.
5.
6.
Open your DNS Manager (Image 10).
Expand the 'Forward Lookup Zones'.
Locate your domain and select it.
Right click and choose 'New Host (A or AAAA)'.
Under 'Host' enter 'impero_server'.
Under 'IP Address', enter the IP Address of your Impero Server.
© 2014 Impero
Solutions
Ltd.
© 2014
Impero
Solutions
Ltd.
21
EA
SE
Impero Education Pro Installation Guide
Image 10 - DNS Manager
C
TP
R
EL
N ote : If this does not im m ediately resolve any issues y ou m ay be experiencing, y ou m ay need to restart the affected com puter, or run an 'ipconfig /
flus hdns ' com m and in the Com m and Prom pt of the affected com puter.
© 2014 Impero
Solutions
Ltd.
© 2014
Impero
Solutions
Ltd.
22